
Chapter 4. Before and after: boundary aspects
- What boundaries mean
- Using PostSharp to bound methods
- Writing an ASP.NET HttpModule to help detect mobile users
- The differences (and similarities) of method interception and method bounding
- Writing a caching aspect with PostSharp
In chapter 3, I covered one of the most common types of method aspects you can write: method interception. These aspects contain code that runs instead of the code that it intercepts.
Another type of aspect you might use is a boundary aspect, which contains code that runs around the code that it’s bounding. (Most commonly, these aspects are methods, but other types of boundaries exist, including page requests, ASP.NET MVC controller actions, and entire programs.)
I’ll be using PostSharp to demonstrate a boundary aspect at the method level. I’ll also use something that might be familiar already—an ASP.NET HttpModule—to demonstrate a boundary aspect at the page level.
The point of this chapter isn’t to teach you everything about PostSharp and ASP.NET’s HttpModule but to show you what’s meant by the term boundary and how boundary aspects work in general. At the end of this chapter, you’ll know how to write boundary aspects, you’ll have a couple of practical aspects for caching, and mobile browser detection.
4.1. Boundary aspects
A boundary in the most general sense is an arbitrary line of division between two entities. A boundary between states (a border), for example, is a somewhat arbitrary distinction between two geographical areas. You can travel between the states, but first you must cross the border. When you’re finished visiting, you can go back to the other state, but you must once again cross a border.
You’ll find lots of boundaries when writing code, too. You might start in a Main method and make a call to another method. Although we don’t often think about it, there is a border crossing when a program enters that method body. It’s more like a boundary between two U.S. states: as we drive, we see a sign that says “Welcome to Ohio,” but it’s not like someone’s manning a gate to check your passport. When that method’s code is finished running, the flow of the program returns to the Main method. Again, it’s a boundary that we don’t often think about.
With AOP, we get the ability to put code at those boundaries which represent a place and/or a condition where it might be useful to put reusable code. Let’s look at how to put code at the boundaries of a method with PostSharp.
4.1.1. PostSharp method bounding
Start a new project in Visual Studio. A Console Application project will be good for this example. I’m calling my project BaseballStatsPostSharp.
If you’ve been following all of the examples in the book to this point, you probably know what’s coming next: NuGet. Install PostSharp with the NuGet UI or the package manager Console. Here’s a quick refresher:
PM> Install-Package PostSharp
Successfully installed 'PostSharp 2.1.7.10'.
Successfully added 'PostSharp 2.1.7.10' to BaseballStatsPostSharp.
I’ll start by creating a service that will get Major League Baseball statistics. This service won’t interface with real statistics services (like www.baseball-reference.com); it’ll just return hard-coded data for demonstration. I’ll also create an instance of it in Main and call the service’s GetPlayerBattingAverage method, as shown in the next listing.
Listing 4.1. Calling a GetBattingAverage method on a service class

Compile and run, and you should see Console output like that in figure 4.1.
Figure 4.1. Console reporting results

Simple stuff, but take a second to think about all of the boundaries that exist in this example. Because this is a Console application, you can imagine that there’s a boundary immediately after the program starts and before the program ends. Another boundary would be between Main and GetBattingAverage. A boundary exists when Main calls GetBattingAverage, and a boundary exists when GetBattingAverage returns a value to Main.
Let’s create a PostSharp aspect class that will let us put code into those boundaries. Create a class that inherits the OnMethodBoundaryAspect base class (don’t forget to mark it as serializable):
[Serializable]
public class MyBoundaryAspect : OnMethodBoundaryAspect
{

}
Now you’ve got a method boundary aspect. Next, indicate what method should be bounded. With PostSharp, you can do this by using the aspect class as an attribute. Let’s put it on the GetBattingAverage method, as in the following listing.
Listing 4.2. Using an attribute to indicate which method to bound
public class BaseballStats
{
    [MyBoundaryAspect]
    public decimal GetBattingAverage(string playerName)
    {
        if (playerName == "Joey Votto")
            return 0.309M;
        if (playerName == "Brandon Phillips")
            return 0.300M;
        return 0.000M;
    }
}
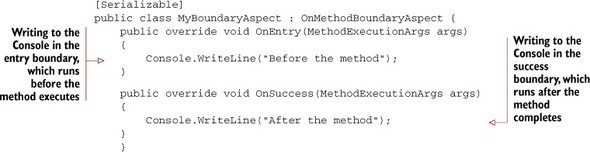
Now all of the calls to GetBattingAverage are bounded with MyBoundaryAspect. Of course, MyBoundaryAspect contains no useful code ... yet. Let’s add some behavior by overriding the OnEntry and OnSuccess methods:
[Serializable]
public class MyBoundaryAspect : OnMethodBoundaryAspect {
    public override void OnEntry(MethodExecutionArgs args)
    {
    }

    public override void OnSuccess(MethodExecutionArgs args)
    {
    }
    }
If you run the program now, the code in OnEntry will run before the code in GetBattingAverage, and the code in OnSuccess will run after the code in GetBatting-Average. This result still isn’t interesting, so let’s add some code to those methods:
Compile and run the application; figure 4.2 shows the new output that you’ll see.
Figure 4.2. Console out with method boundary aspect

The method is called, the before boundary code runs, the method runs, and the after boundary code runs. After the program execution returns to Main, the Console displays the batting average returned from the method.
This should look somewhat familiar because we used an OnMethodBoundaryAspect in the first chapter’s “Hello, World” example, and this example isn’t much different. Later in this chapter, we’ll look at a more practical use of a PostSharp method boundary aspect when we write an aspect to help with caching.
Before we get to that, I’ll discuss some of the differences between the method boundary aspect covered here and the method interception aspects you saw in the previous chapter.
4.1.2. Method boundaries versus method interception
Now that you’ve seen both method interception and method boundary aspects, you might be wondering about any differences between the two. Differences exist, but they’re subtle, and single-minded developers could probably use one without ever using the other if they were so inclined. The differences I’ll discuss in this section are
- Shared state between aspect methods
- Clarity/intent of code
Figure 4.3 shows a side-by-side comparison of the basic structure of a PostSharp’s MethodInterceptionAspect and its equivalent OnMethodBoundary aspect.
Figure 4.3. Side-by-side comparison of a method boundary and a method interception

Conceptually, you can convert a boundary aspect into an intercept aspect (and vice versa) by copying the code from the areas in the boxes on the left to the areas in the boxes on the right.
But if it’s that simple, what’s the point of having two different types of method aspects? Well, the answer is that it’s usually not that simple.
Shared State Between Aspect Methods
Let’s look at shared state first. The interception aspect has only one method (OnInvoke), so sharing state isn’t a concern—any variables that you use in the beginning of the method you can continue to use in the rest of the method. With a boundary method, it’s not as simple. A variable that you declare in OnEntry won’t be available in OnSuccess because they’re separate methods.
But with PostSharp, you’ll have some workarounds for sharing state between the boundary methods. First, you could use a field of the class itself, as in this listing.
Listing 4.3. Using a class member for shared state

This approach does have a major drawback, though. In PostSharp, by default, each bounded method in the class uses the same instance of the aspect class. This aspect is called a statically scoped aspect, which means that even if you create multiple instances of a class, a method that’s bounded by PostSharp will have only one aspect instance that corresponds to that class. If your aspect implements the IInstanceScopedAspect interface, then it becomes an instance-scoped aspect. The default behavior adds less overhead in the code after it’s been weaved together but introduces a bit of complexity that may not be completely obvious.
To demonstrate this issue, I’ll create another simple Console application that creates two objects of the same type and calls the same method on both of those objects, as shown in the next listing. The method will have an aspect applied to it.
Listing 4.4. A Console application showing the pitfalls of using an aspect field in PostSharp

MyMethod doesn’t do anything, but there’s an attribute (OnMethodBoundaryAspect) on it. PostSharp will create only one instance of SharedStateDemoAspect regardless of how many instances of SharedStateDemo you create.
Now let’s put a field into the SharedStateDemoAspect class. Set it to be a new Guid in the aspect’s constructor.
GUID is short for globally unique identifier. GUIDs are 128-bit values that are used for unique identification and are often represented in an 8-4-4-4-12 format of hexadecimal digits. Guid.NewGuid() generates a Guid that’s unique (not in a mathematical sense, but in a practical and statistical sense) and is therefore good for demonstrating that the same instance is being used.
The pronunciation of GUID is one of some light-hearted controversy: GUID as in squid and GUID as in GOO-id are the two major camps.
Then, in the OnSuccess boundary, write out that Guid to Console:
[Serializable]
public class SharedStateDemoAspect : OnMethodBoundaryAspect {
    Guid _sharedState;

    public SharedStateDemoAspect() {
        _sharedState = Guid.NewGuid();
    }

    public override void OnSuccess(MethodExecutionArgs args) {
        Console.WriteLine("_sharedState is '{0}'", _sharedState);
    }
}
Notice that I’ve added an explicit constructor to this aspect. When the aspect is first constructed, it will create a Guid and store it in an aspect field called _sharedState.
All the aspect does is print the value of the Guid when the method is finished. If PostSharp created two SharedStateDemoAspect objects to go along with the two SharedStateDemo objects, then we’d expect to see two different Guids printed to Console. But that’s not what happens, as figure 4.4 shows.
Figure 4.4. Output of the shared state demo

This output shows that the constructor was run only once and that all of the MyMethod’s are sharing the same SharedStateDemoAspect object. Now, if you created another method (for example, MyMethod2), then PostSharp would create another instance for that method.
To summarize: an aspect field isn’t necessarily a safe way to communicate between methods of the aspect because it’s not thread-safe. Other methods could be making changes to those fields. For this reason, PostSharp provides an API to help share state called args.MethodExecutionTag. It’s a property of the args object that’s passed in to each boundary method. This object is unique to each specific time the method is called.
Let’s move the Guid.NewGuid out of a constructor and into OnEntry. And instead of writing out the field to Console in OnSuccess, I’ll write out args.Method-ExecutionTag. The end result looks like the following.
Listing 4.5. Using MethodExecutionTag to share state

Run the code with those changes made and, as figure 4.5 shows, you’ll see unique Guids printed to Console.
Figure 4.5. Output using MethodExecutionTag for shared state

PostSharp gives us this workaround, but it’s not entirely ideal. MethodExecutionTag is of the type object, which is fine for storing and printing something as simple as a Guid, but if you need more complex shared state, you now have to take the extra step of casting the value of args.MethodExecutionTag before you use it. If you have a shared state that consists of multiple objects, you may have to go so far as to create a custom class to store them in the MethodExecutionTag property.
Keep in mind that none of these problems exist for a method interception aspect, because OnInvoke is the only method, and you can use all of the shared state within that method. The data transaction aspect from the previous chapter is an example of an aspect that uses a lot of shared state—the number of retries, the TransactionScope object, and the succeeded flag would all potentially have to be shared.
If you’re writing an aspect that uses a complex shared state, or a lot of shared state, you might be better off using a method interception aspect instead of a method boundary aspect. If that’s the case, why even bother with a method boundary aspect in the first place?
Clarity/intent of code
A method interception aspect certainly has the advantage when it comes to shared state. But what if the shared state is minimal or a shared state isn’t necessary? What if you need to run some code at only a single boundary? In these cases, a method boundary aspect might have the upper hand.
Let’s write an aspect that runs whenever a method finishes execution (regardless of whether it has succeeded). To do this in a PostSharp method boundary aspect, override the OnExit method (as in the next listing). The OnExit method is different from OnSuccess, which runs only if the bounded method completes without throwing an exception. OnExit runs every time the method finishes executing: exception or not.
Listing 4.6. A boundary aspect that overrides only OnExit
[Serializable]
public class MyBoundaryAspect : OnMethodBoundaryAspect {
    public override void OnExit(MethodExecutionArgs args) {
        Console.WriteLine("{0} execution complete",
            args.Method.Name);
    }
}
Even though it’s an aspect that doesn’t do much, compare it to the following to listing, which you’d write if you were using a method interception aspect instead.
Listing 4.7. An equivalent interception aspect

Still a trivial example, but it required seven additional lines of code. In this contrived example, it’s not much more difficult to read the interception code, but imagine that this aspect was doing something other than writing to Console. It might not be clear at first glance that everything this interception aspect does takes place entirely within the finally block. In fact, unlike the boundary aspect, in which OnExit can be quickly scanned and parsed by yourself and your team members, a developer must examine the body of OnInvoke more closely to see what’s occurring. Because the method is being intercepted, any number of things could be happening.
The method boundary aspect hides the details of try/catch/finally and Proceed(). You don’t need to write that code, and you don’t need to read that code.
Ultimately, although you may be tempted to always use method interception, don’t dismiss method bounding if it’s available in the AOP tool you decide to use. It can lead to improved clarity and brevity of code.
Other key differences between method boundary aspects and method interception aspects are performance and memory considerations. These considerations will vary based on the tool you’re using.
In PostSharp, when you use a MethodInterceptionAspect, all the arguments are copied from the stack to the heap every time (via boxing). When you use an OnMethodBoundaryAspect, PostSharp detects arguments that aren’t used and will write optimized code that won’t box them up. If you’re writing an aspect that doesn’t use the method arguments, using an OnMethodBoundaryAspect will use less memory, which can be important if you’re using the aspect in many places. (Note that this optimization feature isn’t included in the free version of PostSharp.)
Method boundaries aren’t the only types of boundaries that are useful when you’re using AOP. In the next section, we’ll look at ASP.NET HttpModules, which are useful for putting boundaries around web pages.
4.1.3. ASP.NET HttpModule bounding
With standard ASP.NET Web Forms, each file in the project represents a web page to which browsers can make requests. Each page has a layout file (for example, Default.aspx) that contains a combination of HTML (for example, <p>Paragraph</p>), ASP.NET controls (for example, <asp:Button ID="myButton" runat="server" />), and possibly code (for example, C# or VB.NET). These files almost always have a corresponding code behind file (for example, Default.aspx.cs for C#) that contains a class where you can put code to handle the requests made to that page.
If you want to follow along, create a new ASP.NET web application in Visual Studio. I’ll call my project AspNetHttpModuleDemo. Add a new Web Form file (without Master Page) called Demo.aspx to the project. You can leave Demo.aspx.cs alone, but go ahead and modify the Demo.aspx HTML to add text that’s something like:

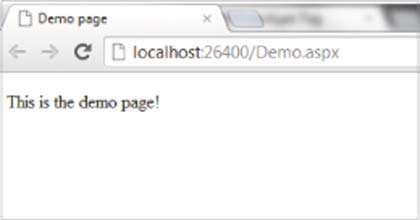
Compile your web application and run it on the web server of your choice. (I’m using Visual Studio’s built-in ASP.NET Development Server, also known as Cassini, but IIS and IIS Express should also work fine.) You should see something like figure 4.6 in your browser.
Figure 4.6. Demo.aspx in a browser

Each request to an ASP.NET page such as Demo.aspx has a complex life cycle, which won’t be covered in detail in this book. But one part of the life cycle worth noting is the use of an HttpModule, which allows you to put code at the boundaries of all ASP.NET pages. To create an HttpModule, create a class that implements the IHttpModule interface (which is in the System.Web namespace):

Each module must be configured to run in the ASP.NET Web.config file. Depending on the web server you’re using (IIS6, IIS7+, Cassini, IIS Express, and so on), the Web.config may vary. I like to cover all my bases, so I put the configuration in both <system.web /> and <system.webServer /> sections, as shown here.
Listing 4.8. Configuring MyHttpModule in Web.config
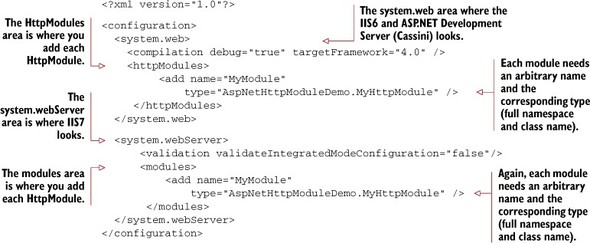
I want to stress that I’m writing the Web.config in this way to make it easier for all readers to follow along. In your environment, you might use only IIS6/Cassini or only IIS7 and therefore you might not need to duplicate configuration. Additionally, configuring HttpModules can be considerably more complex, depending on the nature of your site, your modules, and whether you have subfolder areas that have their own web.config files— none of which are covered in this book.
ASP.NET uses multiple worker processes to handle incoming requests. For each worker process, an instance of HttpApplication is created. Each HttpApplication will create a new instance of each HttpModule and run the Init command on those modules. Our Init code isn’t doing anything yet, so in the following listing, I’ve set up some boundaries using event handlers.
Listing 4.9. Event handlers in MyHttpModule

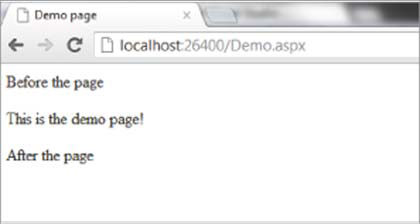
Although the syntax is significantly different, this feels a lot like the method boundary aspect you saw earlier in the chapter. But we still don’t have anything meaningful taking place. After you create this class, modify the Web.config file and request the web page in a browser; it should look the same (figure 4.7) as it did when the project was created (figure 4.6).
Figure 4.7. Demo.aspx page as viewed in a browser
Let’s put some code in those empty methods and see what happens. In the following listing I’ll add plain text to the response at the beginning and at the end.
Listing 4.10. Writing text to the response at the beginning and end of a page

Now when you view a page in your browser (after you recompile), you’ll see something like figure 4.8.
Figure 4.8. Demo.aspx with HttpModule viewed in a browser
Because you have the HttpApplication object available in the boundary methods, you have a lot of flexibility and potential in what you can accomplish. When you examine the properties and events of HttpApplication, you’ll see that you can do a lot more than just write text to the response. In the next section, we’ll look at a more practical example of using an HttpModule to help enhance the experience of a mobile user.
4.2. Real-world example: detecting mobile users
It doesn’t seem like too long ago that a mobile web page often meant a stripped-down or severely limited version of the full desktop web page. Tiny screens and slow speeds made this approach a necessity. In recent years, smartphones and improved cellular networks have pushed that delineation much further back.
With the increase in smartphone marketshare came an increase in mobile users, which means that it’s important to be able to provide a good experience to both traditional desktop browsers and mobile browsers.
These days, on many mobile devices, use of the standard desktop layout rendering can be adequate for normal use, due to larger screens, better resolutions, and faster connections. But users of mobile devices such as phones and tablets are still different than users of desktop or laptop computers in many ways.
An operation that can be quite easy with a mouse or keyboard can be much more difficult with touch and touch keyboards. Operations that can be done with hotkey combinations or a series of clicks and drags become challenging on a mobile device. Unless a stylus is available (currently uncommon among smartphone users), the precision of screen touches isn’t as accurate as a mouse cursor. Clicking a small link or button can be a source of frustration. Typing can also be more arduous. Even though display resolution keeps improving, the smaller size of phone screens still means that you can’t show as much readable information on a single mobile screen as you can a desktop screen. For these reasons, many website developers still like to have a native mobile application, alternative mobile site, or at least a mobile theme to improve the mobile user’s experience, as they (hopefully) maintain the same level of functionality.
Cellular networks continue to improve, but it’s not yet a certainty that a mobile user will have a good, fast connection at all times. A user on a road trip with a spotty connection might be more concerned about getting information quickly than about getting the full rich experience of a high-bandwidth site.
For these reasons, it’s still important to be able to recognize mobile users and present them with alternatives or options to best enhance their experience. In this section, we’ll look at using AOP to detect mobile users and giving them the option of installing a native application.
4.2.1. Offer a link to an application
Offering a link to your mobile application (or apps) on your home page can be a good way to let your users know that a native application is available for them to use on their device. But keep in mind that not every user always uses the front door. They could be going directly to a page of content via a link that a friend sent, or they could be clicking on a result from a search engine. You could put a link to your mobile application on every page. But now you’re taking up screen space for something that only part of your users will be interested in (maybe they don’t have a smartphone, aren’t using the smartphone, or aren’t interested in installing an application).
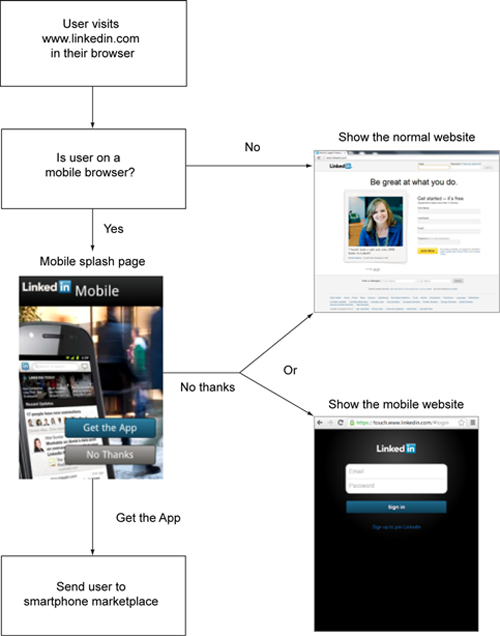
I think a nice way to deal with this is to show the mobile user an interstitial or splash screen—a web page that is displayed in between the source of the link and the page being linked to. Interstitials have been used for ads, warning messages, and so on. Two examples of interstitials are shown in figure 4.9. For our purposes, we’d like to show incoming users an interstitial to let them know that there’s a native application available that they can use instead.
Figure 4.9. Examples of a mobile interstitial when visiting LinkedIn or the Verge

Let’s create our own interstitial using an ASP.NET HttpModule. My example won’t look nearly as nice, but it will have the same functionality. I’m going to create an HttpModule that will detect if the user is a mobile user, as shown in figure 4.10. If so, I’m going to redirect them to the interstitial page to give them the option of downloading the native application (via App Store or Google Play) or continuing on to browse the site as normal with the mobile web browser.
Figure 4.10. Routing a mobile user to their preferred experience
And finally, I don’t want to annoy a mobile user by showing this interstitial for every request, so I’ll use a cookie to make sure that it’s being shown only every so often.
Create an HttpModule
Start by creating an ASP.NET project in Visual Studio. I’m going to use a plain ASP.NET application, not an MVC project. Name it what you want: I’m calling mine MobileBrowserAspNet. The default application template creates a Default.aspx and an About.aspx page, which are sufficient for this example. Because we’re using an HttpModule, any additional pages that you’ll add automatically pick up the same functionality (which is one of the key benefits of this approach: it’s modular and reusable). Create a class that implements IHttpModule. A bare-bones example would look like this:
public class MobileInterstitialModule : IHttpModule {
    public void Init(HttpApplication context)
    {
    }

    public void Dispose()
    {
    }
}
We won’t need to put anything in the Dispose method for this example because we won’t be using any resources that require disposal (for example, a FileStream or SqlConnection—some resource that’s not already handled by .NET’s garbage collector).
ASP.NET HttpModules run on every HTTP request to the site. The HttpApplication context parameter passed to Init provides some events that will be invoked for certain boundaries. For the interstitial, we’ll be interested in subscribing to the Begin-Request boundary event, as in this listing.
Listing 4.11. Subscribing to the BeginRequest boundary event
public void Init(HttpApplication context) {
    context.BeginRequest += context_BeginRequest;
}

void context_BeginRequest(object sender, EventArgs e) {

}
The code in context_BeginRequest will be run before the page executes, so this is where we check to see whether the user is a mobile user.
Check for mobile user
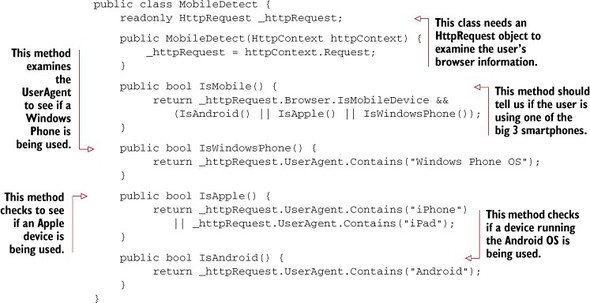
Let’s start by creating a MobileDetect class. Let’s assume that you have native applications available for the big 3 smartphone platforms: Android, iOS (Apple), and Windows Phone. You can approach browser detection in several ways, but I’ll keep it simple for now and look to see if the UserAgent contains certain keywords. The following listing isn’t a particularly sophisticated method but is fine for our purposes.
Listing 4.12. A class to detect mobile users
Now that we have that class available, let’s use it to check the incoming request.
Redirect to a Mobile Splash Screen
In the next listing, I use MobileDetect within the context_BeginRequest event handler. If MobileDetect says that the incoming request is from a smartphone, it will redirect the user to the splash screen page (which I’ve called MobileInterstitial.aspx).
Listing 4.13. Detecting a mobile browser
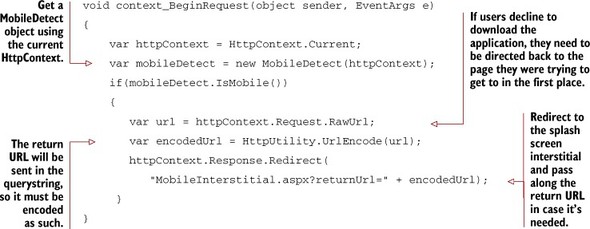
At this point, users are redirected to the interstitial page. But we also need to communicate the page that the user is trying to get to, in case they tap the No Thanks option, so that’s why the original URL is being sent to the MobileInterstitial page as the returnUrl querystring value.
Create a MobileInterstitial.aspx page. The design of my example in figure 4.11 isn’t beautiful, but it’s functional: some text and two buttons.
Figure 4.11. Display an interstitial to the mobile user

MobileInterstitial.aspx will have some HTML markup: just two buttons, as shown in this listing. Make sure that the buttons are in a form.
Listing 4.14. Basic splash screen with two buttons

To make the buttons do something, I need to write code in the code-behind page (MobileInterstitial.aspx). The btnDownload_Click and btnNoThanks_Click methods are wired to the click events in Page_Load (see listing 4.15).
The "no thanks" click event will redirect the browser to the originally requested page. Recall that this information was passed to this page via querystring (return-Url), so we can use Request.QueryString to get that information and send users on their way.
The "get the app" click event will need to redirect the user to the appropriate mobile download portal (the iPhone App Store, for instance). We can get more use out of the MobileDetect class to determine where to send the user. Each phone will be able to interpret the URL and send the user to the correct place. For instance, if users are on an Android, they’ll be directed to your application in Google Play.
Listing 4.15. Handling the button clicks in code-behind

And there you have it. Now every page on your site requested by smartphone users will first present them with a splash screen asking if they want to download the mobile application instead.
But we’re not done. Note that I said every page will get a splash screen. That’s a problem, because the splash screen itself is also a page. Sounds like an infinite loop. Also, when the user clicks "no thanks" and is redirected back, then the HttpModule runs again, which we don’t want it to do. Let’s add some checks to the HttpModule to avoid these situations.
Adding checks
First, check to see if the interstitial itself is being requested. If this is the case, then we can stop execution and return; otherwise, we’ll be in an infinite redirect loop. Next, if your users choose not to download the native application, then we need to check for that condition so that we don’t send them right back to the interstitial again and again. I’ll write two methods to check for each of these conditions, respectively, in context_BeginRequest. The following listing shows the OnMobileInterstitial and ComingFromMobileInterstitial methods.
Listing 4.16. Adding checks to avoid redirect loops

Now the user won’t be stuck in loops. But I think we can do better. Suppose a user doesn’t want to use the native application and wants to view your site in a normal mobile browser. As it stands now, every time such users want to view a page, they’ll be shown the splash screen first, which could get annoying.
4.2.2. Don’t be a pest
Instead of showing the splash screen for every request, it’d be much better to show the splash screen only once. If users say no thanks, we won’t bother them again. One way to do this is to set a cookie when a user clicks "no thanks." Open up MobileInterstitial.aspx.cs again and set a cookie in the "Nothanks" click event:

I set the cookie to expire after two minutes so that users can see the splash screen up to once every two minutes (if you are following along, you have to wait only two minutes to see this in action). In reality, you might want to set a much longer expiration period (one month, six months, one year) or set it to never expire. To give users more flexibility, you could add a checkbox to the splash screen saying Don’t Ask Me Again that determines whether to set an expiration on the cookie.
Now that you’ve set a cookie, you need to check for that cookie back in the HttpModule. In this listing, I’ve added a cookie check to context_BeginRequest.
Listing 4.17. Checking for a cookie

Depending on the web server you’re using, HttpModules could literally affect every page that’s requested, including CSS files, image files, text files, and PDF files. You don’t want an interstitial that runs on CSS files.
With IIS7, you can configure the module in the Web.config file with preCondition="managedHandler", which means that the HttpModule will be executed only on files that run managed code (for example, it will provide boundaries for ASPX files but not for CSS files).
If you’re using IIS6, it might or might not be configured to allow static files such as CSS files to be processed by ASP.NET. If you can’t change the configuration as you wish, then you can add some code to check on this. For example, see if httpContext.Request.Url.AbsolutePath contains a .aspx extension.
HttpModules can be an excellent way to use AOP to address cross-cutting concerns in your web application. They have powerful and flexible capabilities that are baked right into the ASP.NET framework but are too often overlooked and forgotten.
Now that you’ve seen a real-world example of a boundary aspect for pages, let’s shift back to PostSharp for a real-world use of method boundaries. This time, we’ll look at method boundaries to help with caching.
4.3. Real-world example: caching
When you’re designing and writing code, try to avoid or optimize any process that runs slowly. If a single web page is making a ton of database calls, for instance, often those calls can be consolidated or eliminated to improve performance.
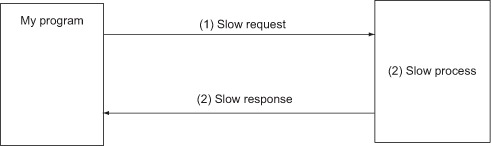
But sometimes the speed of a process can’t be improved. Some processes are more complex and take a lot of time to run. Sometimes you’re dependent on external processes (a database, a web service, etc.) over which you have little or no control, as figure 4.12 shows.
Figure 4.12. You might be victim of slow request transit, slow processes, slow response transit, or all of the above
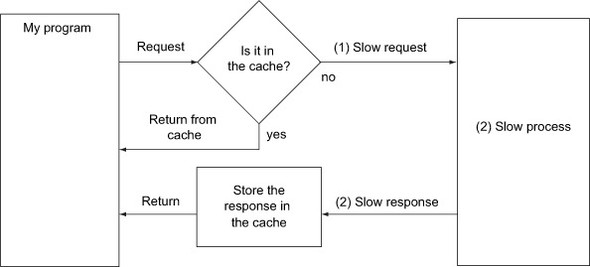
But there’s good news: if you’re in a situation in which you’re waiting on information from a slow process, and that information doesn’t change often, you might be able to use caching to reduce waiting time. Caching is particularly beneficial to multiuser systems, in which the (unlucky) first user makes a request that’s dependent on a slow process. The cache will then take the results of that slow process and store them locally, where it can be retrieved quickly (see figure 4.13). When another request is made, the cache will check to see whether the information has already been retrieved. If so, then it will get only that information and bypass the slow process.
Figure 4.13. How a cache helps with a slow process or slow transit
Caching can be a cross-cutting concern. For every method in which you want to use caching, follow these steps:
- Check to see whether the value is already in the cache
- If it is, return the value
- If it’s not, run the process as normal
- Get the results of the process and put it in the cache so it can be used next time
These steps could lead to a lot of boilerplate code in use in many different parts of the code base, which is a sign that AOP might be a good idea. Let’s look at an example of caching (ASP.NET’s Cache object) and write an aspect to help use it more effectively.
4.3.1. ASP.NET Cache
Many caching tools are available for many different types of programs (Microsoft’s Caching Application Block, NCache from Alachisoft, Windows Azure AppFabric for cloud caching). But I want to focus on how AOP can help with caching, not the caching technology itself. Therefore, I’m going to use a cache that’s most readily available to .NET developers: the ASP.NET Cache.
The cache is like a dictionary object that’s available to you to use in ASP.NET code. In ASP.NET Web Forms, Cache is inherited from the Page base class. In ASP.NET MVC, it’s available through HttpContext, which is inherited from the Controller base class. Failing all else, you can get it via HttpContext.Current.Cache.
The Cache object has a simple API, as you’ll see in the following snippet. You can use it as a dictionary to add and retrieve values from it. If you try to retrieve a value that hasn’t been saved, it will return null.

Cache has other helpful methods such as Add and Insert, which give you the ability to specify whether a cache value will expire. You can also use the Remove method to immediately remove a value from Cache. I’m not going to spend much time on this API, because it’s well documented and it’s not the main focus of this AOP example.
A cache value is often set to expire after a certain period of time. For instance, if you store a value using "MyCacheKey" and set it to expire after two hours, then two hours later, if you try to retrieve that value using "MyCacheKey", you’ll get a null result.
ASP.NET Cache has several available expiration settings:
- Absolute expiration— The value will expire at a given DateTime.
- Sliding expiration— The value will expire at a given amount of time after it was last used.
- Never— The value will always remain unless the application ends or the cache decides that it needs the memory to store something else.
By default, values you add to the ASP.NET cache never expire.
In the next section, we’ll put the ASP.NET Cache to work for a single page of an ASP.NET application, in which caching might come in handy.
4.3.2. An application that could benefit from caching
In the car marketplace, consumers and dealers look to several third-party sources to provide independent information on the market value of used cars (Kelley Blue Book, for instance). In this section, you’re not going to write an entire real-world application—you’ll write only a small part of one. You’ll write a web page to retrieve car values from a hypothetical third-party web service.
To get started, create a new ASP.NET web application project in Visual Studio. Add PostSharp by using NuGet. What we’re going to build is something that looks like figure 4.14.
Figure 4.14. A page with a form to look up a car’s market value

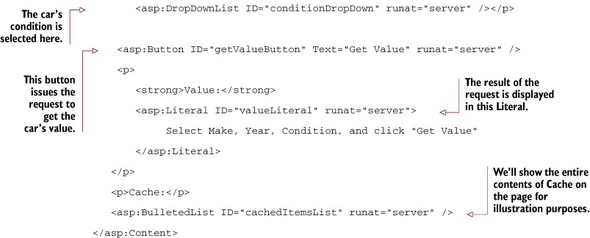
First, create a “Web Form using Master Page” called CarValue.aspx, as listing 4.18 shows. Add HTML and ASP.NET controls to the page to let users specify information about a car. We need three DropDownLists, a submit Button, a Literal to display the value, and a BulletedList to display the contents of the cache (for demonstration purposes only).
Listing 4.18. CarValue.aspx HTML and ASP.NET controls

In the code-behind class, we need to do several things to make this form work. We need to add items to each of the drop-down boxes to give the user a choice of inputs. These values may normally be retrieved from a database or other data source, but I’ll hard-code them, as shown in this listing.
Listing 4.19. Add items to each drop-down list

We also need to add an event handler to the button’s click event. This event will kick off a request to the third-party service, but for now I’ll leave it empty, as the following listing shows.
Listing 4.20. An event to handle a button click

Finally, we need to write code that will display the entire contents of the Cache object (see the next listing). This code is for illustration purposes so that you can see exactly what is put in the Cache. Because I want the Cache to be displayed at the last possible moment before the page is rendered so that any items added by the click event will still show up, I’ll put that code in the OnPreRender method of the page.
Listing 4.21. Show the entire contents of Cache

At this point, if you compile and load CarValue.aspx in a browser, you should see a page like figure 4.15 that’s ready to use.
Figure 4.15. The CarValue.aspx page in a browser

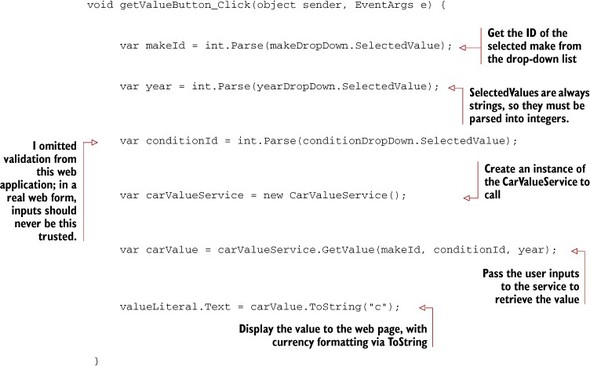
If you click Get Value, the page will refresh in the browser, but it’ll look the same because the click event isn’t doing anything yet. I’m going to create a CarValue-Service class that can be called from the button click event handler. This class won’t call a real web service but will simulate that a web service can be somewhat slow. I’m going to add a Thread.Sleep line to make the code pause:
public class CarValueService {
    readonly Random _rand;

    public CarValueService() {
        _rand = new Random();
    }

    public decimal GetValue(int makeId, int conditionId, int year)
    {
        Thread.Sleep(5000);
        return _rand.Next(10000, 20000);
    }
}
This car service will pause for five seconds and return a value that’s somewhere between $10,000 and $20,000. Now I just need the code (in the next listing) back in the button handler to use this service.
Listing 4.22. Clicking the Get Value button
Now the application should display a (random) dollar amount on the page when you run it, as figure 4.16 shows.
Figure 4.16. The CarValue.aspx showing a dollar amount after clicking Get Value

Those extra five seconds of wait time (could be more or less, depending on the internet connection speed) may not seem like a lot, but if your company is doing thousands of these requests every hour, that time can add up—not to mention that our application is overly simplfied. In a more comprehensive piece of software
- Values would be much more integrated throughout the rest of the software.
- Reports and searches containing hundreds of cars could be generated.
- We might need to cache the results of many web services, not only one value service.
Because this third-party data is unlikely to change often, caching the data for a few hours (or even more) means that our cached data won’t be out of date.
This seems like a great place not only to use caching, but also to use AOP to avoid all of the repetition and boilerplate that caching brings with it. Let’s start by writing an aspect to cache the results of GetValue.
4.3.3. Caching a result
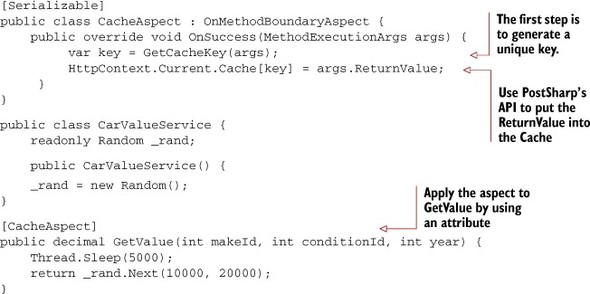
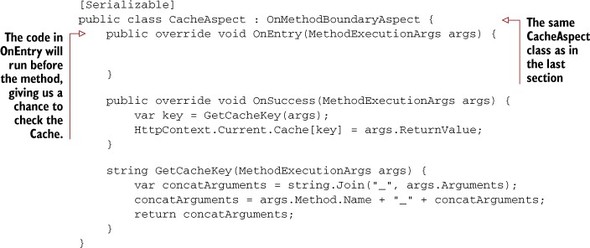
Getting the result of a method and putting it in the ASP.NET Cache is mostly straightforward. Create a class that uses PostSharp’s OnMethodBoundaryAspect as a base class. Because we’re interested in the results (the return value) of a method, OnSuccess seems to be the most logical place to put our code, as shown here.
Listing 4.23. Storing the results of the method in a cache
One important thing is omitted from the previous example: the GetCacheKey method. This method is responsible for generating a unique key that will be used to retrieve the data that’s stored in the cache. It must be a key that’s based on the arguments that are passed in to the bounded method. Therefore, if the user selects a Ford (ID: 2), 2010, in Average (ID: 1) condition, the results will be stored in the cache separate from the results if the user selects a Honda (ID: 0), 2012, in Mint (ID: 2) condition.
A naïve approach (you’ll learn why it’s naïve later) would be to combine all of those arguments into one string. To do that, write a GetCacheKey method, as shown next.
Listing 4.24. Naïve GetCacheKey implementation

Compile and load the CarValue.aspx again. Make a few requests for different cars, and you should see some values start to appear in the cache (see figure 4.17). Although we aren’t retrieving any values out of the cache yet, you can see the values starting to build up in the cache.
Figure 4.17. After three different requests, the cache contains three values

In figure 4.18, you can see how GetCacheKey constructs the strings.
Figure 4.18. How the Cache key is constructed

If we can construct this key the same way every time the same arguments are sent to the GetValue method, then we’ll be able to retrieve the value using the same constructed key.
4.3.4. Retrieving from the cache
Stored values in a cache aren’t useful unless we retrieve the values when they’re available. If GetValue is called with arguments for which we’ve already cached a value, then we can save a trip to the (slow) web service and retrieve the value out of cache instead of running the code inside of GetValue. If it turns out that the value hasn’t been cached, only then do we need to run the (slow) GetValue method. To do this, let’s add to CacheAspect by overriding the OnEntry method, as shown in the listing 4.25.
Think back to the metaphor of the boundary between two states. Instead of making the costly trip from Columbus, Ohio, to Philadelphia, Pennsylvania, to get a delicious cheesesteak, what this caching aspect is doing is putting the cheesesteak at the Ohio-Pennsylvania border.
Listing 4.25. Add an OnEntry override to the CacheAspect class
In the OnEntry method, we check to see whether there’s already a cached result (see listing 4.26). If there isn’t, then there’s nothing left to do: the slow method must be run. Someone has to go to get that cheesesteak.
If there’s a value in the cache, then we need to set the return value of the bounded method and return immediately (without running the bounded method). Therefore, if there’s a cheesesteak at the border, there’s no reason to continue on to Philadelphia: the hard work has already been done.
Listing 4.26. Checking the cache in OnEntry

There are two pieces of PostSharp API that warrant further explanation. The first is args.ReturnValue. This property gets and sets the return value of the method being bounded (CarValueService’s GetValue method). We want GetValue to return the value that’s in the cache, and setting args.ReturnValue will accomplish that.
Second is args.FlowBehavior. If you set only args.ReturnValue, that isn’t enough—because this is a boundary aspect, it’s implicit that the bounded method will run. But because we have a cached value, we don’t want it to run. Setting args.FlowBehavior to FlowBehavior.Return will instruct PostSharp to make GetValue return immediately without running any of its code.
One more problem remains. In this simplified example, we can get only values of cars by model, year, and condition. In reality, the variables are much more comprehensive: color, number of doors, engine type, and so on can all be a factor in determining value. Adding more parameters to GetValue would quickly get out of control. It’d make sense to instead refactor GetValue to take a single parameter that encapsulates all the options, as shown next.
Listing 4.27. Refactored CarValueService to encapsulate options

If you make this change, though, you’ll run into a problem with caching that goes back to the naïve GetCacheKey that I wrote:

The cache key is being constructed by using ToString on each of the arguments. This approach works fine if all the arguments are types like int, string, long, and so on. But what happens if you call ToString on an argument of type CarValueArgs? You get a string "CachingPostSharp.CarValueArgs" (that is, the name of the type and its namespace). This string won’t work well with caching, because GetCacheKey will always return the same string, regardless of the values of the CarValueArgs properties. We have to write a better GetCacheKey.
4.3.5. A more robust cache key
We want a cache key that will be unique for the values of the CarValueArgs parameter. This task may sound daunting, because it needs to be generic enough to use in an aspect.
One way is to perform shallow serialization on the argument(s) and use that serialization to generate the cache key. Shallow serialization means that only the values available through public properties will be serialized. All objects in .NET are available for shallow serialization without doing anything extra to them. For my CarValueArgs parameter, this is fine, because it’s only public properties.
Next, we must determine how the serialization will be performed. XML is an option. We could use binary serialization and calculate a hash value. But let’s keep it simple and straightforward and use JSON (JavaScript Object Notation) serialization.
The caching aspect, ASP.NET Cache, and the CarValueService have nothing to do with JavaScript, so why are we using JSON?
- It’s easy to read. When we see the contents of the cache on the screen, it’ll be clear what’s happening and what’s being cached.
- It’s compact. No offense to XML fans, but we don’t need all the extra XML headers and namespace information to generate a caching key.
- It’s easy to generate. We’ll use the JavaScriptSerializer, which is in System.Web.Extensions.
It’s okay to use some other kind of serialization, or to write your own, as long as it achieves the goal of generating a unique key that you can use to identify cached data.
Let’s write a better GetCacheKey such as the one in the following listing. This one will serialize the arguments to a JSON string (and prepend the method name to provide additional uniqueness).
Listing 4.28. A more robust GetCacheKey using serialization

Now recompile and try getting some car values. You should see different-looking cache keys, as in figure 4.19.
Figure 4.19. Serialized object used for cache keys
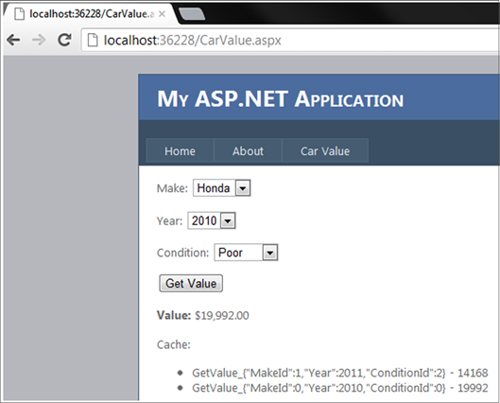
Not only are we able to use a more flexible CarValueArgs parameter and have it still work with caching now, but we get a nice side effect whereby we have a more readable cache key on the demonstration page. I selected Honda (MakeId of 0), 2010 model year, and Poor condition (ConditionId of 0). The cached value is 19992 ($19,992).
4.4. Summary
In this chapter, I covered a common type of aspect: boundary aspects. Boundaries are like the borders between states. A boundary aspect gives you the opportunity to put behavior at the boundaries in your code. Two common examples of boundary aspects are before and after web pages and before and after method calls. Like method interception, boundary aspects give you another way to encapsulate cross-cutting concerns into their own classes.
PostSharp gives you the ability to write method interception aspects, and ASP.NET gives you the ability to write web page boundary aspects (via HttpModules). Both of their APIs give you contextual information (for example, information about the HTTP request or information about the method), as well as the ability to control the flow of the program (for example, redirects to another page or immediate returns from the method).
As I said, I believe it is beneficial to work through the two real-world aspects presented in this chapter. I recommend that you experiment with the HttpModule, the PostSharp OnMethodBoundaryAspect, and both of their APIs.
In the next chapter, we’ll revisit both PostSharp and interception. But instead of methods, we’ll look at intercepting properties and fields, known collectively as locations.