
Chapter 1. Introducing AOP
- A brief history of AOP
- What problems AOP was created to solve
- Writing a very simple aspect using PostSharp
In this first chapter, I’ll start in an obvious place—introducing you to aspect-oriented programming (AOP), where it came from, and what problems it’ll help you solve.
We’ll look at several tools as you progress through this book, but I will focus on PostSharp and Castle DynamicProxy. These aren’t the only tools available to .NET developers, but they’re popular ones that have stood the test of time. The concepts and code you use in this book should still be applicable if you use a different tool (see appendix A for notes on the ecosystem of AOP tools in .NET).
We’ll use PostSharp in this chapter, but before you start typing out real code, we’ll look at features central to the software concept of AOP itself. I’ll talk about cross-cutting concerns, what a nonfunctional requirement is (and contrast it with a functional requirement), and what nonfunctional requirements have to do with AOP.
Finally, I’ll walk you through a basic “Hello, World!” example using AOP in .NET. I’ll break apart that example, identifying the individual puzzle pieces and explaining how they fit together into something called an aspect.
1.1. What is AOP?
AOP is a relatively young concept in computer science. Like many advancements in modern computing—including the mouse, IPV6, the graphical user interface (GUI), and Ethernet—AOP was created at Xerox PARC (now known as PARC, a Xerox company).
Gregor Kiczales lead a team of researchers who first described AOP in 1997. He and his team were concerned about the use of repetition and boilerplate that were often necessary and costly in large object-oriented code bases. Common examples of such boilerplate can be seen with logging, caching, and transacting.
In the resulting research paper, “Aspect-Oriented Programming,” Kiczales and his team describe problems that object-oriented programming (OOP) techniques were unable to capture and solve in a clear way. What they observed was that these cross-cutting concerns ended up scattered throughout the code. This tangled code becomes increasingly difficult to develop and modify. They analyzed all of the technical reasons why this tangling pattern occurs and why it’s difficult to avoid, even with the proper use of design patterns.
The paper describes a solution that is complementary to OOP—that is, “aspects” that encapsulate the cross-cutting concerns and allow them to be reused. It suggests several implementations of this solution, which ultimately led to the creation of AspectJ, the leading AOP tool still in use today (for Java).
One of my goals with this book is to avoid some of the complex language and academic terminology associated with AOP. If you’re interested in diving deeper into the complex research, the “Aspect-Oriented Programming” white paper (http://mng.bz/xWIb) is definitely worth a read.
I don’t want to give you the idea that using AOP is more complicated than it really is. Instead, I want to focus on solving problems in your .NET projects with AOP. Next, we’ll go through the main features of AOP that were outlined in the original paper, but I’ll try to avoid a dense academic approach.
1.1.1. Features
Like many developer tools and software concepts, AOP has unique terms and wording to describe its features, the individual pieces that are put together to make the complete picture.
This is usually the part of AOP that makes people’s eyes glaze over and suddenly remember that hilarious YouTube cat video they’ve been meaning to watch (again). But hang in there, and I’ll do my best to make these terms approachable. I’m not going to cover every detail of the exact terminology; I want to keep things simple and practical for now.
AOP’s purpose: Cross-cutting concerns
One of the main drivers leading to the invention of AOP was the presence of cross-cutting concerns in OOP. Cross-cutting concerns are pieces of functionality that are used across multiple parts of a system. They cut across, as opposed to standing alone.
This term is perhaps the softest in AOP terminology because it’s more of an architectural concept than a technical one. Cross-cutting concerns and nonfunctional requirements have a lot of overlap: a nonfunctional requirement will often cut across many parts of your application.
Logging is a common example. Logging could be used in the user interface (UI) layer, the business logic, the persistence layer, and so on. Even within an individual layer, logging could be used across many classes and services, crossing all the normal boundaries.
Functional requirements are the value-adding requirements of your project—the business logic, the UI, the persistence (database).
Nonfunctional requirements are secondary, yet essential elements of a project. Examples include logging, security, performance, and data transactions.
Cross-cutting concerns exist regardless of whether you use AOP. Consider a method that does X. If you want to perform logging (C), then the method has to perform X and C. If you need logging for methods Y and Z, you’d have to put C into each of those methods, too. C is the cross-cutting concern.
Although cross-cutting concern is a conceptual term that’s defined by a sentence or two, the advice is the concrete code that does the work.
An aspect’s job: The advice
The advice is the code that performs the cross-cutting concern. For a cross-cutting concern such as logging, the code could be a call to the log4net library or NLog. It could be a simple one-line statement—such as Log.Write ("information")—or a bunch of logic to examine and log arguments, timestamps, performance metrics, and so on.
Advice is the “what” of AOP. Now you need the “where.”
An aspect’s map: A pointcut
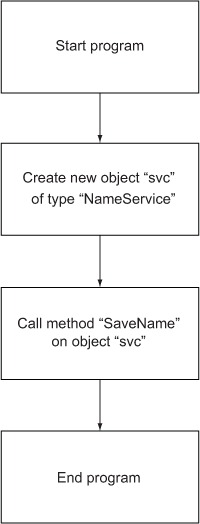
Pointcuts are the where. Before defining a pointcut, I need to define a join point. A join point is a place that can be defined between logical steps of the execution of your program. Imagine your program as a low-level flowchart, as shown in figure 1.1.
Figure 1.1. A low-level flowchart of a program that uses a single service
Any gap in that flowchart could be described as a join point, as in figure 1.2.
Figure 1.2. The same low-level flowchart with possible join points identified

Now that you know what a join point is, I can define a pointcut. A pointcut is a set of join points (or an expression that describes a set of join points). An example of a join point is “before I call svc.SaveName()”; an example of a pointcut is “before I call any method.” Pointcuts can be simple, such as “before every method in a class,” or complex, such as “before every method in a class in the namespace MyServices except for private methods and method DeleteName.”
Consider the snippet of pseudocode in this listing.
Listing 1.1. A simple program that calls service methods in sequence

Let’s create a simple flowchart (figure 1.3) of the previous code, identifying only the exit join points in that short snippet.
Figure 1.3. Flowchart representation—imagine exit join points after each step

Suppose I want to insert advice (some piece of code) only on the exit join points of NameService objects. My pointcut could be expressed in English as “exiting a method of NameService.”
How to express that pointcut in code (if it can be expressed at all) is dependent on the AOP tool you’re using. In reality, just because I can define a join point in English doesn’t mean I can reach it with a tool. Some join points are far too low level and not generally practical.
Once you’ve identified the what (advice) and the where (join points/pointcuts), you can define an aspect. The aspect works through a process known as weaving.
How AOP works: Weaving
When cross-cutting concerns are coded without AOP, the code often goes inside a method, intermixed with the core logic of the method. This approach is known as tangling, because the core logic code and the cross-cutting concern code are tangled together (like spaghetti).
When the cross-cutting concern code is used in multiple methods and multiple classes (using copy and paste, for instance), this approach is called scattering, because the code gets scattered throughout your application.
In figure 1.4, the core business logic code is shown in green, and the logging code is shown in red. (In the printed book, the lighter gray in the figures represents green; the darker color represents red.) This figure represents a code base that is not using any aspects: the cross-cutting concern code is in the same classes as the core business logic.
Figure 1.4. Tangling and scattering. In the printed volume, X represents red code and Y, the green code.

When you refactor to use AOP, you move all the red code (advice) into a new class, and all that should remain in the original class is the green code that performs the business logic. Then you tell the AOP tool to apply the aspect (red class) to the business class (green class) by specifying a pointcut. The AOP tool performs this combinational step with a process called weaving, as shown in figure 1.5.
Figure 1.5. Splitting up the classes and recombining them with weaving
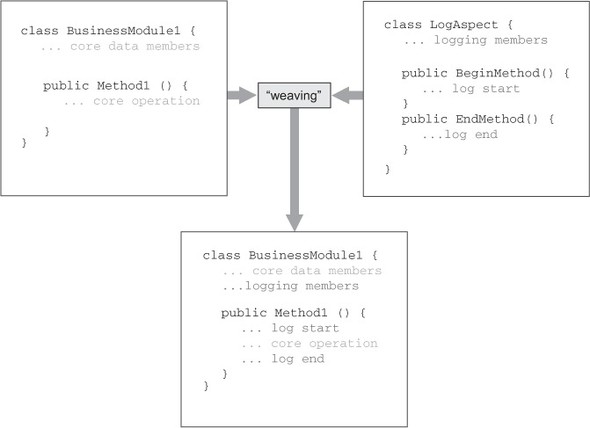
In the previous figure, the combined code looks like the original code, mixing green and red into one class. (This appearance is close to the truth, but in reality there may be additional work that the AOP tool inserts to do its job.) You won’t see any of the combined code in your source code files. The code you do see—the classes you work with, write, and maintain—has a nice organized separation.
The way that AOP tools perform weaving differs from tool to tool. I’ll talk more about this concept in chapter 7, and you can learn more details about specific AOP tools in appendix A.
1.1.2. Benefits
The main benefit to using AOP is clean code that’s easier to read, less prone to bugs, and easier to maintain.
Making code easier to read is important because it allows new team members to get comfortable and up to speed quickly. Additionally, your future self will thank you. Have you ever looked at a piece of code you wrote a month ago and been baffled by it? AOP allows you to move tangled code into its own classes and leave behind more declarative, clearer code.
AOP helps you make your code less expensive to maintain. Certainly, making your code more readable will make maintenance easier, but that’s only part of the story. If a piece of boilerplate code that handles threading (for instance) is used and reused in your application, then any fixes or changes to that code must be made everywhere. Refactoring that code into its own encapsulated aspect makes it quicker to change all the code in one place.
Clean up spaghetti code
You may have heard the myth that if you put a frog in a pot of boiling water, it’ll jump right out, but if you put the frog in a pan of cold water and slowly turn up the heat, it won’t notice that it’s being cooked until it’s too late. Even though this is only a myth, its allegorical point rings true for many things. If you’re asked to add a lot of cross-cutting concerns to an already large code base, you might balk at adding the code only one method at a time. Just like a frog thrown into a pot of boiling water, you’ll jump out immediately and look for cooler water to swim in.
But when you start a new project or add features to a small project, the heat of adding cross-cutting concerns to a few places might not be so sudden.
When I add a first cross-cutting concern to my young project, it takes only a few lines and repeats only a couple of times. No big deal. I’ll just copy and paste it when I need it, and I’ll clean it up later.
The temptation to “just get it working” is strong. I’ll literally copy and paste that code to another part of my application and make (usually minor) changes so that the pasted code works. Call it copy-and-paste programming or copy-and-paste inheritance.
This scattered or tangled code has even been classified as an antipattern. This particular antipattern has been called shotgun surgery. Code other than the main business logic gets mixed in via copy/paste over and over with other code, much like a burst from a shotgun shell spreads out all over a target. Avoiding this pattern is the point of the Single Responsibility Principle: a class should have only one reason to change. Although surgery with a shotgun may accomplish one task (like removing an appendix), it will cause many other problems. Surgery should be done with a more precise tool, such as a laser or a scalpel.
An antipattern is a pattern that’s been identified in software engineering, such as any pattern you might find in the Gang of Four Design Patterns book (the full title is Design Patterns: Elements of Reusable Object-Oriented Software, but because of its four authors, it’s often called the “Gang of Four book”). Unlike those good patterns, an antipattern is a pattern that often leads to bugs, expensive maintenance, and headaches.
This copy-and-paste strategy may help you get something done fast, but in the long term you end up with messy, expensive spaghetti code. Hence the well-known rule of thumb: Don’t Repeat Yourself (DRY).
All these things can add up to a boiled frog. I don’t want you to get boiled. Instead of a tedious spiral into spaghetti code, let’s move beyond copy and paste and use good design patterns.
Reduce repetition
When you move beyond simple copy and paste, you start using techniques such as dependency injection and/or the decorator pattern to handle cross-cutting concerns. This is good. You’re writing loosely coupled code and making things easier to test. But when it comes to cross-cutting concerns, when you’re using dependency injection (DI), you may still end up with tangling/scattering. If you take it to the next level and use the decorator pattern, you may still end up with a lot of pseudocode.
Imagine that you’ve refactored a cross-cutting concern such as transaction management (begin/commit/rollback) to a separate service. It might look like the pseudocode in the following.
Listing 1.2. Example of refactoring using DI instead of AOP

In this example, the InvoiceService isn’t dependent on a specific transaction management service implementation. It will use whatever service is passed to it via the interface: the exact implementation is a detail left to another service. (This is a form of dependency inversion called DI). This approach is better than hard-coding transaction code into every method. But I would argue that although the transaction management code is loosely coupled, it’s still tangled up with the InvoiceService code: you still have to put _transaction.Start() and _transaction.Commit() among the rest of your code. This approach also makes unit testing a little more tedious: the more dependencies, the more stubs/fakes you need to use.
If you’re familiar with DI, you may also be familiar with the use of the decorator pattern. Suppose the InvoiceService class has an interface, such as IInvoiceService. We could then define a decorator to handle all the transactions. It would implement the same interface, and it would take the real InvoiceService as a dependency through its constructor, as shown next.
Listing 1.3. Use of the decorator pattern in pseudocode

This decorator (and all the dependencies) are configured with an Inversion of Control (IoC) tool (for example, StructureMap) to be used instead of an InvoiceService instance directly. Now we’re following the open/closed principle by extending InvoiceService to add transaction management without modifying the InvoiceService class. This is a great starting point, and sometimes this approach might be sufficient for a small project to handle cross-cutting concerns.
But consider the weakness of this approach, particularly as your project grows. Cross-cutting concerns are things such as logging and transaction management that are potentially used in many different classes. With this decorator, we’ve cleaned up only one class: InvoiceService. If there’s another class, such as SalesRepService, we need to write another decorator for it. And if there’s a third class, such as PaymentService? You guessed it: another decorator class. If you have 100 service classes that all need transaction management, you need 100 decorators. Talk about repetition!
At some point between decorator 3 and decorator 100 (only you can decide how much repetition is too much), it becomes practical to ditch decorators for cross-cutting concerns and move to using a single aspect. An aspect will look similar to a decorator, but with an AOP tool it becomes more general purpose. Let’s write an aspect class and use an attribute to indicate where the aspect should be used, as in the next example (which is still pseudocode).
Listing 1.4. Using AOP instead of DI for cross-cutting concerns
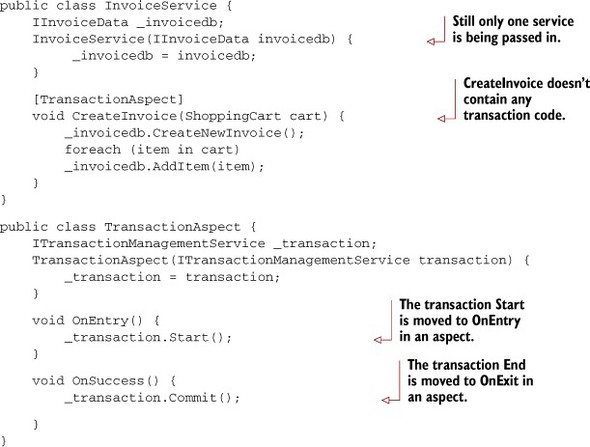
Note that AOP has at no point completely replaced DI (nor should it). InvoiceService is still using DI to get the IInvoiceData instance, which is critical to performing the business logic and isn’t a cross-cutting concern. But ITransactionManagementService is no longer a dependency of InvoiceService: it’s been moved to an aspect. You don’t have any more tangling because CreateInvoice no longer has any transaction code.
Encapsulation
Instead of 100 decorators, you have only one aspect. With that one aspect, you’ve encapsulated the cross-cutting concern into one class.
Let’s continue with the example and build out the project some more. Next is a pseudocode class that doesn’t follow the Single Responsibility Principle (SRP) due to a cross-cutting concern.
Listing 1.5. Pseudocode example of an extremely simple AddressBookService
public class AddressBookService {
    public string GetPhoneNumber(string name) {
        if(name is null) throw new ArgumentException("name");
        var entry = PhoneNumberDatabase.GetEntryByName(name);
        return entry.PhoneNumber;
    }
}
This class looks easy enough to read and maintain, but it’s doing two things: it’s getting the phone number based on the name passed in, and it’s checking to make sure that the name argument isn’t invalid. Even though checking the argument for validity is related to the service method, it’s still secondary functionality that could be separated and reused.
The following is what the pseudocode might look like with that concern separated using AOP.
Listing 1.6. Pseudocode example with argument checking split out using AOP
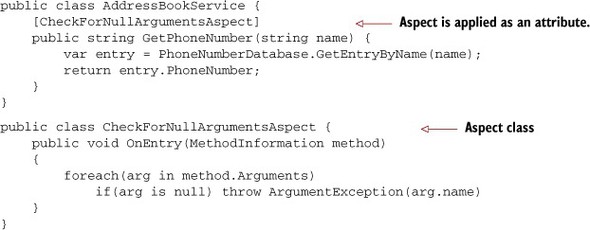
One new addition to this example is a MethodInformation parameter for OnEntry, which supplies some information about the method so that the arguments can be checked for nulls.
I can’t overstate how trivial this example is, but with the code separated (as in the next example), the CheckForNullArgumentsAspect code can be reused on other methods for which you want to ensure that the arguments are valid.
Listing 1.7. Encapsulated and reusable code
public class AddressBookService {
    [CheckForNullArgumentAspect]
    public string GetPhoneNumber(string name) { ... }
}

public class InvoiceService {
    [CheckForNullArgumentAspect]
    public Invoice GetInvoiceByName(string name) { ... }
    [CheckForNullArgumentAspect]
    public void CreateInvoice(ShoppingCart cart) { ... }
}

public class PaymentSevice {
    [CheckForNullArgumentAspect]
    public Payment FindPaymentByInvoice(string invoiceId) { ... }
}
Let’s look at the previous listing with maintenance in mind. If we want to change something with Invoices, we need to change only InvoiceService. If we want to change something with the null checking, we need to change only CheckForNullArgumentAspect. Each of the classes involved has only one reason to change. We’re now less likely to cause a bug or a regression when making a change.
If any of this seems familiar to you, it’s perhaps because you’ve already been using similar techniques in .NET that aren’t labelled as aspects.
1.1.3. AOP in your daily life
“Are you telling me I could’ve had another acronym on my resume all this time?” As a .NET developer, you might do several common things every day that are part of AOP, such as:
- ASP.NET Forms Authentication
- An implementation of ASP.NET’s IHttpModule
- ASP.NET MVC Authentication
- ASP.NET MVC implementations of IActionFilter
ASP.NET has an IHttpModule that you can implement and set up in web.config. When you do this, each module will run for every page request to your web application. Inside an IHttpModule implementation, you can define event handlers that run at the beginning or at the end of requests (BeginRequest and EndRequest, respectively). When you do this, you’re creating a boundary aspect: code that’s running at the boundaries of a page request.
If you’ve used out-of-the-box forms authentication, then you’ve already been implementing such an approach. ASP.NET Forms Authentication uses the Forms-AuthenticationModule behind the scenes, which is itself an implementation of IHttpModule (see figure 1.6). Instead of putting code on every page to check authentication, you (wisely) use this module to encapsulate the authentication. If the authentication changes, you change only the configuration, not every single page. If you create a new page, you don’t have to worry about forgetting to add authentication code to it.
Figure 1.6. The HttpModule lifecycle in relation to the request->ASP.NET page->response

The same is true for ASP.NET MVC applications. You have the ability to create Attribute classes that implement IActionFilter. These attributes can be applied to actions, and they run code before and after the action executes (OnActionExecuting and OnActionExecuted, respectively). If you use the default AccountController that comes standard with a new ASP.NET MVC project, you’ve probably seen the [Authorize] attribute in action. AuthorizeAttribute is a built-in implementation of an IActionFilter (figure 1.7) that handles forms authentication for you so you don’t have to put authentication code in all of your controller action methods.
Figure 1.7. The ASP.NET MVC ActionFilter lifecycle

ASP.NET developers aren’t the only ones who may have seen and used AOP without realizing it. These are examples of AOP used within the .NET framework—they don’t have anything explicitly called an aspect. If you’ve seen these examples before, you already have an idea of how AOP can help you.
Now that you’re familiar with the benefits and features of AOP, let’s write some real code. Warm up Visual Studio. You’re about to write your first aspect.
1.2. Hello, World
We’ll get to more useful examples in later chapters; for now, let’s get your first aspect out of the way to give you a taste of what’s in store. As we write this aspect, I’ll point out some of the AOP features (advice, pointcut, and so on) along the way. Don’t worry if you don’t fully understand what’s going on yet. Follow along just to get your feet wet.
I’ll be using Visual Studio and PostSharp. Both Visual Studio 2010 and Visual Studio 2012 should work fine. Visual Studio Express (which is a free download) should work, too. I’m also using NuGet, which is a great package manager tool for .NET that integrates with Visual Studio. If NuGet is not part of your arsenal, you should definitely download it from NuGet.org and install it. It will make your life as a .NET developer much easier. Appendix B outlines the basics of NuGet, but you can read more about it at NuGet.org.
Start by selecting File->New Project->Console Application. Call it whatever you want, but I’m calling mine HelloWorld. You should be looking at an empty console project such as the following:
class Program {
    static void Main(string[] args) {
    }
}
Next, install PostSharp with NuGet. NuGet can work from a PowerShell command line within Visual Studio called the Package Manager Console. To install PostSharp via the Package Manager Console, use the Install-Package command (it should look like the following example):
PM> Install-Package postsharp
Successfully installed 'PostSharp 2.1.6.17'.
Successfully added 'PostSharp 2.1.6.17' to HelloWorld.
Alternatively, you can do it via the Visual Studio UI by first right-clicking References in Solution Explorer, as shown in figure 1.8.
Figure 1.8. Starting NuGet with the UI

Select Online, search for PostSharp, and click Install (see figure 1.9).
Figure 1.9. Search for PostSharp and install with NuGet UI

You may get a PostSharp message that asks you about licensing. Accept the free trial and continue, but rest assured that even when that trial expires, you’ll still be able to use all the PostSharp examples in this book with the free PostSharp Express Edition (unless otherwise noted). Additionally, the Express Edition is free for commercial use, so you can use it at your job, too. (You still need a license, but it’s a free license.) Now that PostSharp is installed, you can close out of the NuGet dialog. In Solution Explorer under References, you should see a new PostSharp reference added to your project.
Now you’re ready to start writing your first aspect. Create a class with one simple method that writes only to Console. Mine looks like the following:
public class MyClass {
    public void MyMethod() {
        Console.WriteLine("Hello, world!");
    }
}
Instantiate a MyClass object inside the Main method, and call the method. The following code shows how the Program class should look now:
class Program {
    static void Main(string[] args) {
        var myObject = new MyClass();
        myObject.MyMethod();
    }
}
Execute that program now (F5 or Ctrl+F5 in Visual Studio), and your output should look like figure 1.10.
Figure 1.10. Console output of “Hello, world!”
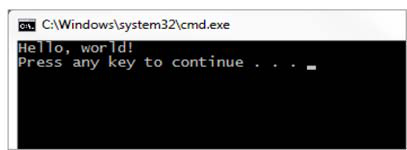
We’re not pushing the limits of innovation just yet, but hang in there. Before we create an aspect, let’s specify what cross-cutting concern this aspect will be taking care of. Let’s keep it simple and define our requirement as “log something before and after the Hello, world! message is written.” We could cram an extra couple of Console.WriteLine statements into MyMethod, but instead, let’s steer away from modifying MyClass and write something that can be reused with other classes.
Create a new class that inherits from OnMethodBoundaryAspect, which is a base class in the PostSharp.Aspects namespace, something like the following:
[Serializable]
public class MyAspect : OnMethodBoundaryAspect {
}
PostSharp requires aspect classes to be Serializable (because PostSharp instantiates aspects at compile time, so they can be persisted between compile time and run time. This will be covered in more detail in chapter 7).
Congratulations! You’ve just written an aspect, even though it doesn’t do anything yet. Like the name of the base class implies, this aspect allows you to insert code on the boundaries of methods.
Remember join points? Every method has boundary join points: before the method starts, when the method ends, when the method throws an exception, and when the method ends without exception (in PostSharp, these are OnEntry, OnExit, OnException, and OnSuccess, respectively).
Let’s make an aspect that inserts code before and after a method is called. Start by overriding the OnEntry method. Inside that method, write something to Console, such as the following:
[Serializable]
public class MyAspect : OnMethodBoundaryAspect {
    public override void OnEntry(MethodExecutionArgs args) {
        Console.WriteLine("Before the method");
    }
}
Notice the MethodExecutionArgs parameter. It’s there to give information and context about the method being bounded. We won’t use it in this simple example, but argument objects like that are almost always used in a real aspect.
Think back to the advice feature of an aspect. In this case, the advice is just one line of code: Console.WriteLine("Before the method");. Create another override, but this time override OnExit, as the following code shows:
[Serializable]
public class MyAspect : OnMethodBoundaryAspect {
    public override void OnEntry(MethodExecutionArgs args) {
        Console.WriteLine("Before the method");
    }
    public override void OnExit(MethodExecutionArgs args) {
        Console.WriteLine("After the method");
    }
}
Once again, the advice is just another Console.WriteLine statement.
Now you’ve written an aspect that will write to Console before and after a method. But which method? We’ve only partially specified the where or the pointcut. We know that the join points are before and after a method. But which method(s)?
The most basic way to tell PostSharp which method (or methods) to apply this aspect to is to use the aspect as an attribute on the method. For instance, to put it on the boundaries of the “Hello, world” method from earlier, use MyAspect as an attribute, as in the following example.
public class MyClass {
    [MyAspect]
    public void MyMethod() {
        Console.WriteLine("Hello, world!");
    }
}
Now, run the application again (F5 or Ctrl+F5). Right after the program is compiled, PostSharp will take over and perform the weaving. PostSharp is a post compiler AOP tool, so it will modify your program after it has been compiled but before it has been executed.
In reality, you aren’t required to put attributes on every piece of code when using PostSharp. In chapter 8, I cover the ability of PostSharp to multicast attributes. In the meantime, I’ll continue to use individual attributes just to keep things simple.
When your program is executed, you should see output like that in figure 1.11.
Figure 1.11. Output with MyAspect applied
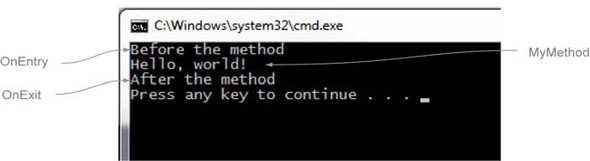
That’s it! You’ve now written an aspect and told PostSharp where to use it, and PostSharp has performed the weaving.
This example may not seem that impressive, but notice that you were able to put code around the MyMethod method without making any changes to MyMethod itself. Yeah, you did have to add that [MyAspect] attribute, but you’ll see in later chapters more efficient and/or centralized ways of applying PostSharp aspects by multicasting attributes. Also, using attributes isn’t the only way to use AOP: tools such as Castle DynamicProxy use an IoC tool, and I’ll examine that tool in later chapters as well. You’re well on your way to mastering AOP in .NET.
1.3. Summary
AOP isn’t as complicated as it might sound. It might take some getting used to, because you may have to adjust the way you think about cross-cutting concerns. But there will be plenty more examples in this book to help you get started.
AOP is an inspiring, powerful tool that’s fun to use. I’m in awe of the implementations of the various tools such as PostSharp and Castle DynamicProxy, both written by people far smarter than I. These are tools that I like and that I’ll use in this book, but if you aren’t totally comfortable with them, you can check out some of the other AOP tools for .NET (see appendix A).
Whatever tool you decide to use, AOP will help you do your job more effectively. You’ll spend less time copying and pasting the same boilerplate code or fixing the same bug in that boilerplate 100 times. In abstract terms, this helps you adhere to the single responsibility principle and use the open/closed principle effectively, without repetition. In real-world terms, it will allow you to spend more time adding value and less time doing mindless, tedious work. It will get you to happy hour faster; whether happy hour is a literal happy hour at your local pub, or your son’s baseball game, AOP is going to help you get there in a better frame of mind—and on time.