
Chapter 5. Get this instead: intercepting locations
This chapter covers
- What is a location?
- Using PostSharp to intercept locations
- Writing lazy-loading aspects
- How noisy INotifyPropertyChanged makes your code
- Using AOP to make INotifyPropertyChanged clean and easy
In chapter 3, I wrote about method interception. In this chapter, we’ll look at a different kind of interception: the interception of locations. I’ll start by reviewing what a location is (field or property), then I’ll show you a couple of examples of real-world aspects that you can use on locations. So far, the focus has been mainly on methods. But locations are an important part of your code and can be susceptible to the same types of repetitive boilerplate as methods.
Location interception is a less common feature of AOP frameworks, so most of the examples in this chapter use PostSharp, a framework that supports locations. Additionally, you’ll look at a specialized AOP tool in this chapter (as opposed to a general AOP framework such as PostSharp) called NotifyPropertyWeaver that provides location-interception capabilities, but only for one narrow feature.
5.1. Location interception
You might not have heard the term location in reference to C#. A field is a location and a property is a location. The following code snippet contains two locations, one field and one property:

Fields and properties are common in OOP. They give data and structure to a class, as well as the ability to share information among the methods of a class.
The next section is a quick refresher on how fields and properties in C# work. If you feel comfortable in your knowledge of fields and properties, you can skim the next section. Remember that properties are just syntactic sugar for getter/setter methods.
5.1.1. Fields and properties in .NET
Fields are members of a class. They can be declared public, private, protected, internal, and so on to restrict the access level (private by default).
Generally, public fields are frowned upon if encapsulation is important, so fields are most often set to private and used only outside the class via accessor methods (such as in the following listing). If I have a private _balance field, then—as the listing shows—only by calling Deposit or Withdrawal can the value of the field be changed by other objects.
Listing 5.1. Encapsulation of a private field with methods
public class BankAccount {
    decimal _balance;

    public void SetBalance(decimal amount) {
        _balance = amount;
    }

    public decimal GetBalance(decimal amount) {
        return _balance;
    }
}
In C#, you can use the properties syntax (get and set), which reduces the amount of code necessary to implement this common pattern. The following C# getter and setter code shows a private field (_balance) and a property that encapsulates access via Balance:
public class BankAccount {
    decimal _balance;
    public decimal Balance {

        get { return _balance; }
        set { _balance = value; }
    }
}
Using both get and set is optional: if a setter isn’t necessary, you can leave it out (and vice versa). But behind the scenes, the .NET compiler still creates methods. If you use a decompiler tool such as ILSpy to examine MyClass’s CIL, as in the next listing, you’ll see that it creates a decimal get_Balance() method and a void set_Balance(decimal).
Listing 5.2. The compiled program viewed through the ILSpy tool

Properties are called syntactic sugar because they make your life easier as a developer, even though they’re implemented with methods and fields. In a way, this is similar to what AOP tools do for you: they make it easy to read/write code because they fill in all of the messy details later.
Autoproperties were introduced in C# 2. This new tool gives you the ability to create a property without having to create the backing field explicitly. You can now rewrite the previous code in a much more concise way:
public class MyClass {
    public string MyProperty {get; set;}
}
When using autoproperties, you must use both get and set, but you can put different access levels on them. For example, get could be public and set could be private.
This isn’t brand-new or surprising information to a .NET developer, as properties and fields are part of your day-to-day work. But the most used features are often the ones you take for granted, so it’s good to review some of those details before diving into new AOP code that involves interception of locations.
5.1.2. PostSharp location interception
In chapter 3, we talked about using AOP tools such as PostSharp to intercept methods, which might lead you to hypothesize that (because properties are methods underneath) you could use method interception aspects on properties. And you’d be correct. You can use PostSharp or Castle DynamicProxy to create method interception aspects on properties. The next listing shows an example that uses PostSharp to do so in a Console project.
Listing 5.3. Using a method interception aspect on a property

But we should discuss a couple of issues with this approach. First, it’s awkward. With this approach, you’d possibly have to write two aspects: one for getting and one for setting. Second, you can use this approach only with properties. Fields don’t generate methods; they’re like normal variables, except that they’re scoped to the entire class instead of to only one method.
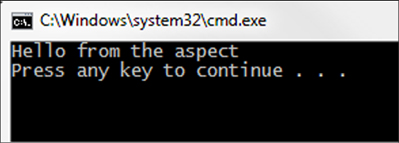
Figure 5.1. The Console output of method interception on a property
Fortunately, PostSharp gives us a more convenient way to write a single class that can handle both getting and setting, as well enable us to write aspects for both fields and properties: the LocationInterceptionAspect. The following listing shows similar example code as the last couple of examples, except this time it’s written with a LocationInterceptionAspect.
Listing 5.4. Using a PostSharp location interception aspect

In similar fashion to other PostSharp aspects, two overrides are available: OnGetValue and OnSetValue. Those methods run in place of the get or set operation, respectively. Therefore, as with method interception, you need to proceed if you want the operations to be called. Use args.ProceedGetValue() or args.ProceedSetValue(), respectively.
In addition to these simple proceed commands, the PostSharp API gives you ability to examine and change the underlying value of the field/property. If you want to modify or examine the value, you can do so with PostSharp. I’ll demonstrate this usage with a real-world example of a lazy-loading aspect.
5.2. Real-world example: lazy loading
The purpose of lazy loading is to defer execution of a costly operation for as long as possible. For instance, if you have a service that takes a long time to initialize, you might want to wait to initialize until the service is used, particularly if there’s a possibility that the service won’t be used.
The opposite of lazy loading is eager loading, in which an operation or series of operations is performed every time before the results are needed, in case they might be needed.
NHibernate is one example of a database tool used in a persistence layer. When you retrieve an entity from the database with lazy loading, NHibernate would pull that entity but not the related entities. With eager loading, NHibernate could pull that entity, related entities, entities related to the related entities, and so on. In that case, it’s a trade-off between performance and convenience.
I mention NHibernate only because it’s a popular, mature tool with built-in configuration options to control lazy/eager loading with which you might be familiar. If you’re working with resources or services for which lazy loading isn’t already available, the next section will be helpful, as we’ll look at a variety of approaches in .NET to implement it.
5.2.1. Lazy loading approaches in .NET
One approach to lazy loading involves using a property with a backing field. When you first use get, it creates a new instance. Subsequent uses of get will return the backing property as normal.
Suppose I have a class named SlowConstructor, which I’ve so named because instantiating an object of that type takes a long period of time (making it beneficial to be lazy when loading, and preventing the constructor penalty payment until it’s absolutely necessary). This listing shows how lazy loading might look.
Listing 5.5. Lazy loading with a property and a backing field

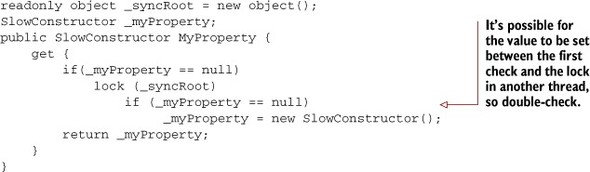
Not bad. You may have noticed that it’s not thread-safe, so if that’s a concern, put in a lock statement. This is an appropriate place to use double-checked locking, as shown in the next listing, because it’s possible for a race condition to occur between the first check and the lock.
Listing 5.6. Thread-safe lazy loading with double-checked locking
With that code in place, being lazy pays off. You can access the property in a normal way, and if it’s never used, then that slow constructor never runs. Instead of using new, you could also use a factory or an IoC tool to instantiate an object. The surrounding code (the locks, the checking, and the backing field) would all remain the same.
Starting with .NET 4.0, the .NET framework provides System.Lazy<T>, which is a convenience class to accomplish the same thing as the previous listing with less code. The following listing is an example of that same lazy-loaded property with a Lazy field instead.
Listing 5.7. Using System.Lazy<T>
Lazy<SlowConstructor> MyProperty = new Lazy<SlowConstructor>(
    () => new SlowConstructor()
);
The factory code is passed in as a lambda (nonymous function) that tells Lazy to use this code to instantiate the object the first time that Lazy is accessed. System.Lazy<T> is also thread-safe (by default), so it’s encapsulating all the locking.
However, unlike the previous example, this field is of the type Lazy<Slow-Constructor>, instead of being a property of the type SlowConstructor. To use the SlowConstructor object you need one additional step:
SlowConstructor c = MyProperty.Value;
Now you have two options when you want lazy loading. In the first example, you have a bunch of boilerplate code and backing fields. In the second example, with System .Lazy<T>, all of the boilerplate goes away, but now you have to go through a Value property to get at the lazy-loaded object. Let’s use AOP to create an aspect that combines the best of both approaches.
5.2.2. Implementing lazy loading with AOP
In this example, we’ll work toward a property that can be accessed directly (that is, without a Value property) and that has none of the boilerplate from the first example in the previous section. The following code represents what we want:

The body of the get contains the factory for lazy loading. It won’t be called until a get is performed, and the results of that operation will be used on subsequent gets.
Start by creating a Console project (I’m calling mine LazyLoading) and installing PostSharp via NuGet. I’ll create a class called SlowConstructor that simulates a class or a service that’s expensive to instantiate. Then, I’ll make a property of that type in the Main class and use that property’s get a couple of times to access the object and call its method. (I’ll call it twice, just to demonstrate the lazy loading, as shown in this listing.)
Listing 5.8. Basic Console application with no lazy loading
public class SlowConstructor {
    public SlowConstructor() {
        Console.WriteLine("Doing something slow");
        Thread.Sleep(5000);
    }

    public void DoSomething() {
        Console.WriteLine("Hello, it's {0}", DateTime.Now);
    }
}

class Program {
    static SlowConstructor MyProperty {
        get { return new SlowConstructor();}
    }

    static void Main(string[] args) {
        MyProperty.DoSomething();
        MyProperty.DoSomething();
    }
}
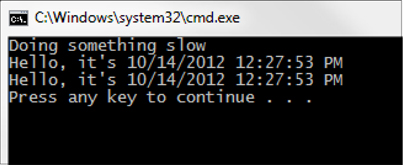
The SlowConstructor object simulates a costly constructor operation. MyProperty contains only the code to instantiate the object. This would be a poor way to write a program, because the property gets reinstantiated every time it’s used. But we’re planning to make that get into a blueprint of how to lazily load the property. When you run the program, you’d see output shown in figure 5.2.
Figure 5.2. Output with no lazy-loading

Instead of adding all of the backing fields, double-checked locking, or switching to use System.Lazy<T>, I’m going to put an attribute on it that inherits from PostSharp’s LocationInterceptionAspect:
class Program {
    [LazyLoadGetter]
    static SlowConstructor MyProperty {
        get { return new SlowConstructor();}
    }

    static void Main(string[] args) {
        MyProperty.DoSomething();
        MyProperty.DoSomething();
    }
}

[Serializable]
public class LazyLoadGetter : LocationInterceptionAspect
{

}
Nothing much changed in the previous code from the prior listing, except the addition of an (empty) aspect class, and the use of the attribute on MyProperty to indicate that you want that property to be lazy loading.
Next, in LazyLoadGetter, you want to intercept any gets to the property, so override OnGetValue:
[Serializable]
public class LazyLoadGetter : LocationInterceptionAspect {
    public override void OnGetValue(LocationInterceptionArgs args)
    {
    }
}
The backing field and double-check locking live in this aspect. Move the code from listing 5.6 (the code that uses double-checked locking to make the lazy-loading thread safe) into the aspect’s OnGetValue method.
Listing 5.9. A lazy-loading aspect

This code looks similar to the original double-check locking code from the previous section. But the PostSharp API is being used in a few different places (specifically, the ProceedGetValue method and the args.Value property).
The first time that get is called, OnGetValue executes. The backing field will be null at first, so lock and double-check, as before. Now tell PostSharp to proceed to run the code inside of the get, which means that SlowConstructor will be executed. Once that’s done, PostSharp’s args.Value will be populated with the result of the get. Put that value into the backing field for use next time.
After all that, and on every subsequent call, all that PostSharp is doing is setting args.Value to be the value of the backing field. args.ProceedGetValue() is only called the first time. Run the code again and, as figure 5.3 shows, you’ll see that lazy loading has kicked in.
Figure 5.3. Output with lazy-loading

With this aspect, you now have syntax that’s similar to System.Lazy<T> (the body of the get acts as the factory instead of having to pass in a Func to Lazy’s constructor) and still have the ability to access the property directly.
As you know, for fields, you don’t have a get, so using lazy loading will take on a bit of a different form.
5.2.3. What about lazy-loading fields?
A field is a class-level variable, which means you won’t find a way to explicitly specify how a field should get lazy loaded. Let’s make some assumptions to implicitly specify how the field should be loaded. First, let’s write code similar to the last section, but use a field instead of a property:
class Program {
    static SlowConstructor MyField;

    static void Main(string[] args) {
        MyField.DoSomething();
        MyField.DoSomething();
    }
}
The simplest thing you can do is use Reflection’s Activator to create an instance of the field’s type. Let’s create an aspect that does that. Start by creating a class that inherits LocationInterceptionAspect, and use it as an attribute on the field:
class Program {
    [LazyLoadActivator]
    static SlowConstructor MyField;

    static void Main(string[] args) {
        MyField.DoSomething();
        MyField.DoSomething();
    }
}

[Serializable]
public class LazyLoadActivator : LocationInterceptionAspect
{

}
Reflection is a group of tools in the System.Reflection namespace that allows you to write code that reads and generates code as the program is running. The Activator class is able to create new instances of an object on the fly, which is useful when you want to instantiate a new object, but you won’t know what type of object to instantiate until runtime. Using it in this aspect lets you reuse the aspect on a field of any type. With this flexibility comes a performance cost, so make sure that you use Reflection only when necessary.
The code in LazyLoadActivator will look similar to LazyLoadGetter, except that instead of args.ProceedGetValue(), you’ll use Activator to invoke the parameterless constructor of SlowConstructor as shown in the next example.
Listing 5.10. Lazy loading using Activator

PostSharp’s args.Location. LocationType is able to tell us the Type of the location that’s being intercepted (for both properties and fields). Once you have that information, use System.Activator to create a new instance of that type. Store the result in the backing field, as before.
This approach may be appropriate for some narrow situations, but a more realistic way would be to use a factory, service locator, or IoC container in place of Activator. For instance, if you use StructureMap (a popular .NET IoC tool), then you could replace Activator with ObjectFactory.GetInstance. This approach allows you to use lazy loading with more complex dependencies (that is, classes that don’t have a parameterless constructor).
Suppose that SlowConstructor has only one constructor and that constructor has an IMyService parameter. Now you have a set of classes that looks something like the following code.
Listing 5.11. SlowConstructor with a dependency on IMyService

You could still use Activator to create an object, but then you’d have to use Activator to create the dependent object as well. In a real-world application, this chain of dependencies could be much longer and more complex, so typically you’d leave this task to a tool such as StructureMap. The following listing shows how I’d initialize StructureMap in the Console’s Main method. Other IoC tools will be similar.
Listing 5.12. Initializing

Now that the dependencies are configured, add a field to the Program class, apply a new aspect to it, and use the MyField, as in the previous Activator example (listing 5.10). This listing shows the code to do that.
Listing 5.13. Lazy loading with StructureMap

I’m using StructureMap’s ObjectFactory.Initialize method to specify the dependencies. If StructureMap is asked for an implementation of IMyService, it will return a new MyService object. If it’s asked for an implementation of SlowConstructor, it will use SlowConstructor. More important, when creating an instance of Slow-Constructor, it’ll recognize that SlowConstructor’s constructor has a single parameter (IMyService) and will automatically use the configured dependency and pass a new instance of MyService to it.
Once again, the lazy-loading code will look similar to previous iterations, but this time it’ll use ObjectFactory.GetInstance (that is, it’ll ask StructureMap to provide the object) instead of using Activator as shown here.
Listing 5.14. Using StructureMap in place of Activator

Run the Console application, and you’ll see that figure 5.4 outputs similar results as before (figure 5.3).
Figure 5.4. Lazy loading with dependencies via StructureMap
The main difference is that it’s a much more real scenario: classes have dependencies on interfaces, the configuration of which is defined through a DI tool.
Judicious use of lazy loading can improve the performance of your code by performing expensive operations only when they’re necessary. AOP makes it painless to use lazy loading by intercepting the accessing of fields and properties and moving boilerplate code out of the property and into its own aspect class. Another place where fields and properties can get bogged down with boilerplate is in a responsive GUI.
5.3. Real-world example: INotifyPropertyChanged
If you’re a web developer, as I am, then you don’t write many desktop or rich client applications. But if you aren’t a web developer, you might be writing rich UI applications with UI frameworks such as WPF, Silverlight, Windows 8, or even standard Windows Forms (WinForms).
If you’ve spent your days working with such frameworks, then you’ve probably used the INotifyPropertyChanged interface a few times. Implementations of this interface raise an event that signals to the UI that one of the properties has been changed and to update the UI accordingly. This interface is helpful and can save a lot of code; it also requires a lot of repetitive boilerplate code to get it working, so it is a great place to use AOP.
Let’s first review how INotifyPropertyChanged works (in a desktop WPF app) without the help of any AOP.
5.3.1. Using INotifyPropertyChanged in a desktop application
In this section, I’ll walk you through a refresher on how INotifyPropertyChanged works in WPF.
Create a WPF project in Visual Studio. I’m going make MainWindow a window with two text boxes: one for first name and one for last name. There will be a label on the window that shows the combination of first name with last name. Use a simple set of StackPanels to lay this out, something like figure 5.5.
Figure 5.5. MainWindow layout with text boxes and labels

You can drag and drop your way to that, or if you’re more comfortable with XAML, you might put together something like this listing.
Listing 5.15. XAML to create textbox, button, and textblocks

You want the “Full Name” field to be populated with the combination of first and last name as the user is typing. A common approach to doing this in WPF is to create a view model to encapsulate the data (first name and last name) and derived data (full name).
Create a NameViewModel class with three properties, as in the following listing. FirstName and LastName will be standard autoproperties. Create another property called FullName, which will be a derived property that appends LastName to FirstName with a space between them.
Listing 5.16. A view model class representing the data
public class NameViewModel {
    public string FirstName { get; set; }
    public string LastName { get; set; }
    public string FullName {
        get {
            return string.Format("{0} {1}", FirstName, LastName);
        }
    }
}
There are just a couple more steps to get this to work. First, bind the DataContext of the WPF window to a new instance of this type. Do this in the MainWindow.xaml.cs code-behind class by assigning an instance of the object to the WPF Window’s DataContext property.
Listing 5.17. Binding a NameViewModel object to MainWindow’s DataContext

Next, you need to bind the individual text boxes and label to the properties of the ViewModel by specifying the binding in the Text and Content properties of the TextBoxes and Labels, respectively, as in the next listing.
Listing 5.18. Binding controls to ViewModel properties

We’re getting closer. Next, tell the two TextBox bindings that they should trigger an update whenever they change (that is, when the user types something in). Modify the FirstName and LastName text boxes, specify UpdateSourceTrigger in the bindings, and set it to PropertyChanged:
<TextBox Width="200"
    Text="{Binding Path=FirstName,
        UpdateSourceTrigger=PropertyChanged}"/>
and
<TextBox Width="200"
    Text="{Binding Path=LastName,
        UpdateSourceTrigger=PropertyChanged}"/>
TextBoxes, by default, will update the source data when losing focus. What we’re doing here is telling them to update the source data as the user is typing. To make that work, you need to do one last thing: make the NameViewModel class implement INotifyPropertyChanged. The only thing that you need to implement this interface is an event of type PropertyChangedEventHandler. With the binding that you’ve added to the TextBoxes, WPF will look for this event to be fired, which means that you have to code the setters of each property to trigger that event with the name of the property that has been changed. This listing shows how to do it.
Listing 5.19. Implementing INotifyPropertyChanged on NameViewModel


Nothing terribly new going on here, if you’re used to WPF: whenever a set is used on these properties, the PropertyChanged event is triggered. Because this object is bound to the WPF window, WPF is listening for that PropertyChanged event. For instance, if you type a single letter in the FirstName text box, that causes the FirstName property to be set. During the set, the PropertyChanged event is fired twice: first to announce that the FirstName property has changed and then to announce that the FullName property has changed.
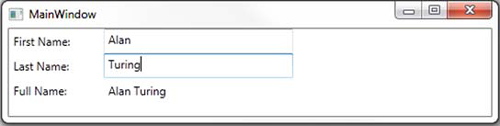
Compile and run this application, then type in a first name such as Alan and a last name such as Turing. As you type, you’ll see the full name appear (shown in figure 5.6).
Figure 5.6. Type in first and last name, and watch the full name populate
Although this demonstration isn’t terribly complex, in a real-world WPF window, there could be many more fields and complex relationships between those fields. If you’re familiar with the MVVM (Model-View-ViewModel) pattern (as many WPF developers are), you know that this type of binding is important in making that pattern easy to implement.
Also notice that even with a trivial demonstration application, the NameViewModel went from a small class with autoproperties to a class that’s more than five times the size, with backing fields and logic in every set. You get a nice clean separation between the View and the ViewModel, but now you face pitfalls and issues with using INotifyPropertyChanged.
5.3.2. Problems and constraints with INotifyPropertyChanged
Even though using INotifyPropertyChanged brings some benefits, it has drawbacks that leave you with potentially a lot of boilerplate, brittle code, and code that may be difficult to refactor.
You’ve certainly noticed the boilerplate already: the basic NameViewModel class went from having two small autoproperties to having explicit backing fields and sets with logic in them. As you can see, there is a lot of repetition, which you can reduce through the use of AOP.
Second, notice that to trigger the PropertyChanged event, you need a PropertyChangedEventArgs object, which needs a string to identify the property that has changed. So each time you call OnPropertyChanged, you need to pass in a string corresponding to the name of the property. If you make a typo or any other kind of mistake, it will fail to trigger the event correctly.
Finally, using INotifyPropertyChanged can be difficult to refactor. Because it uses strings, if you change the name of the property, you need to remember to change the strings as well. (Refactoring tools such as ReSharper can do this for you if you use them to rename the property.) Also note that because you have a derived property (FullName), you need to remember to include that property when you’re sending notification about what properties have been changed.
Even though a property name such as FirstName and a string such as "FirstName" look the same to a human reading the code, to a compiler they’re different symbols. If you change one symbol, the compiler won’t be smart enough to realize that the other symbol is related, and you’ll end up with errors when you run the code.
Refactoring tools such as JetBrains ReSharper, Telerik JustCode, and many others will attempt to find related symbols using intelligent analysis and deduction. When you use ReSharper to rename the FirstName field, for example, it might also ask if you want to change the value of the "FirstName" string.
You can mitigate these issues in a number of ways, without using AOP. You can write unit tests or defensive programming that will verify that all the correct notifications are being sent. That could potentially be a lot of code, though some use of Reflection could make things easier. (For example, you could use Reflection to loop over the properties, get the property names, and make sure they match when the event is triggered.)
If you’re using .NET 4.5, check out a new tool to help you deal with INotifyPropertyChanged called CallerMemberName. CallerMemberName is an attribute that you can use to set a parameter to be the name of the property that called it. I could use CallerMemberName to reduce my dependency on strings in the NameViewModel class. This listing shows how it would look.
Listing 5.20. Using CallerMemberName attribute


This is an improvement: renaming FirstName and LastName properties becomes less of an issue, because you’re allowing the .NET framework to fill in the blanks. Typos and misspellings are also not an issue, because CallerMemberName will use only the names of the properties. But you still have to notify that FullName is changed, because it’s a derived property. You still have a lot of boilerplate, including explicit backing fields and a lot of code in all the sets.
You can tackle both of these issues with AOP. In the next section, I’ll introduce a new AOP tool that was created specificially to help with INotifyPropertyChanged.
5.3.3. Reducing boilerplate with AOP
I’ve shown a lot of code examples using general-purpose AOP frameworks such as PostSharp and Castle DynamicProxy. But I want to introduce a more specific, single-minded AOP tool that was created just for working with INotifyPropertyChanged: NotifyPropertyWeaver. After walking through NotifyPropertyWeaver, we’ll also look at how we might write something similar with PostSharp.
To install NotifyPropertyWeaver, in Visual Studio go to Tools -> Extension Manager (see figure 5.7). Click Online Gallery and search for NotifyPropertyWeaver. Click Download to install it. You may need to restart Visual Studio after that.
Figure 5.7. Installing NotifyPropertyWeaver

Once you’ve installed it, you can configure/disable it in Visual Studio by clicking Project -> NotifyPropertyWeaver. But the default behavior is good enough for this demonstration. Now you can remove all the boilerplate, strings, and backing fields from NameViewModel. All you need are the bare essentials of the properties, the derived property, and the one PropertyChanged event, as in listing 5.21. NotifyPropertyWeaver will fill in the rest in a postcompile step, like PostSharp.
Listing 5.21. Boilerplate-free use of INotifyPropertyChanged

NotifyPropertyWeaver fills in all the gaps, and it’s even smart enough to detect the derived property and fill in the notification gaps for it.
NotifyPropertyWeaver isn’t the only AOP tool that provides this level of narrow bolt on/plug-and-play functionality. PostSharp also offers similar functionality in the form of PostSharp Ultimate.
PostSharp Ultimate is a growing open source collection of ready-to-use aspects. At the time of writing, it includes ready-made aspects for:
- Threading
- Diagnostics (logging)
- The definitive INotifyPropertyChanged aspect
These toolkits are free, but they require the full commercial edition of PostSharp.
The advantage to these toolkits (and any of the other similar ready-made AOP tools such as NotifyPropertyWeaver or Fody) is that you get all the benefits of AOP to solve a specific problem without having to write a production-ready aspect from scratch.
I definitely recommend that you use a tool like NotifyPropertyWeaver or PostSharp Ultimate, because they offer a set of well-tested functionality, intelligent static analysis, and configurability. But writing a basic INotifyPropertyChanged aspect is a good way to explore location interception in PostSharp as we wrap up this chapter.
In this example, you aren’t going to build in any intelligence or analysis for derived properties, but you still need to allow for that possibility. Therefore, let’s make it an option on the aspect to specify which derived properties use a particular location. As with NotifyPropertyWeaver, you want to remove all the boilerplate and end up with a minimal view model. Shoot for something like the following listing.
Listing 5.22. NameViewModel with a custom PostSharp aspect

Add PostSharp to the project via NuGet, as before. Create a new class called NotifyPropertyChangedAspect that inherits from LocationInterceptionAspect. It should have a constructor that can accept any number of strings as parameters, as in this listing.
Listing 5.23. Constructor that accepts derived property names
[Serializable]
public class NotifyPropertyChangedAspect : LocationInterceptionAspect {
    readonly string[] _derivedProperties;

    public NotifyPropertyChangedAspect(params string[] derived) {
        _derivedProperties = derived;
    }
}
If you think back to implementing INotifyPropertyChanged, all the hard work was done in the setters, so override the OnSetValue method. The code in OnSetValue will be run when the property’s setter is used, and it will be run instead of the setter:

Think back to the WPF example with FirstName and LastName. When you type a letter into the FirstName textbox (like “A”), the WPF binding means that the FirstName property is set to “A.” Before that value gets assigned, the old value of FirstName is still null. If you type another letter (like “l”), FirstName gets set to “Al,” and the old value is “A.”
Inside OnSetValue, you need to do three things: compare the old value and the new value (using an if statement). If they’re different, then you need to allow the set action to go through (using the args.ProceedSetValue method of the PostSharp API). And finally, you need to notify that the property has been changed (including any of the derived properties that were specified by the constructor). Create a RaisePropertyChanged method that you can reuse to perform the last step, and loop through any derived properties that were specified and call RaisePropertyChanged for those, too. (In the following listing notice that RaisePropertyChanged is called, but you haven’t written the details of it yet.)
Listing 5.24. Perform all the steps of property notification in OnSetValue

Let’s go over all of the PostSharp API usage here, because I haven’t shown some pieces yet. args.GetCurrentValue() gets the current value of the location, but it doesn’t put that value into args.Value. I store this value in the appropriately named oldValue variable. args.Value returns the incoming location value. args.ProceedSetValue() then instructs PostSharp to allow the set operation to happen.
If the values don’t match (that is, the property has changed), then you want to raise the property changed event. Look at the arguments being passed in. args.Instance returns the object that the property is in (for example, an instance of the NameViewModel class), which should be a class that implements INotifyPropertyChanged. args.LocationName returns the name of the property (or field) being intercepted. For instance, it could be FirstName or LastName.
After that property changed notification is sent out, you then loop through any derived properties that were specified (like FullName) and call the same Raise-PropertyChanged method for those.
Let’s finish this aspect and write the RaisePropertyChanged method now. In this method, you would expect to find the PropertyChanged event on the instance object that was passed in and raise that event using the location name that was passed in. However, only a plain object is being passed in, so you have to resort to Reflection to do that.
Listing 5.25. RaisePropertyChanged method
private void RaisePropertyChanged(object instance, string propertyName)
{
    var type = instance.GetType();
    var propertyChanged = type.GetField("PropertyChanged",
        BindingFlags.Instance | BindingFlags.NonPublic);
    var handler = propertyChanged.GetValue(instance)
        as PropertyChangedEventHandler;
    handler(instance, new PropertyChangedEventArgs(propertyName));
}
None of the PostSharp API is used in this method—only the System.Reflection API. Reflection retrieves the Type of the instance. From that Type, Reflection can find the PropertyChanged event field. Use that field to invoke the event.
I’m using Reflection because that’s the only way to raise the event from outside the class. It’s not a good idea to do this because Reflection is a slow process and writing the aspect this way means that Reflection will be performed every time a property changes. Additionally, if this aspect is somehow used on a class that doesn’t have a PropertyChanged event, then it will fail (You’ll see ways to avoid that problem in chapter 8; specifically, the CompileTimeValidate feature of PostSharp).
5.4. Summary
This chapter covered a new type of interception: interception of properties and fields (locations). As with methods, location interception aspects act as middlemen between the getters/setters and the code doing the getting/setting.
Because properties offer a succinct way of writing getter/setter methods in C#, tools that can intercept methods can intercept properties (Castle DynamicProxy, for instance). But PostSharp has special aspects created for locations, with an API that’s geared toward properties and fields. As with method interception, you get the ability to proceed to the get/set operation, as well as the ability to get information about the location (for example, field name or property name), its instance object, and so on.
I also introduced a new tool in this chapter, albeit a tool with a narrow focus. Notify-PropertyWeaver is an AOP tool that does only one thing, unlike PostSharp or Castle DynamicProxy, which are general-purpose frameworks. The advantage to such a tool is that you don’t have to write an aspect from scratch; the disadvantage is that such tools are good for only a single purpose.
Showing tools like NotifyPropertyWeaver to developers who’ve been implementing INotifyPropertyChanged the hard way is often an exciting moment: for developers because the tool lifts a weight from their shoulders, and for me because it demonstrates the power of AOP to save time and simplify code in an immediate way.
In these last three chapters, we’ve been going full steam ahead and writing many different types of aspects. You now know how to write aspects for method boundaries, for intercepting methods, and for intercepting locations. But learning AOP isn’t only about quantity—it’s about quality, too. In the next chapter, you’ll look at how unit testing and aspects fit together.