
Chapter 3. Call this instead: intercepting methods
- What method interception means
- Using Castle DynamicProxy to intercept methods
- Writing a data transaction aspect
- Using PostSharp to intercept methods
- Writing a threading aspect
In chapter one, I talked about join points and pointcuts. I left the definition of these terms fairly broad, defining a join point as any point in between your code and describing a pointcut as a collection of join points. I kept these definitions loose because aspects can theoretically be applied to any location in your code that you can describe. You could put an aspect inside of an if statement or use it to modify a for loop. But you don’t need to do that 99% of the time in practical application.
Good frameworks (like PostSharp and Castle DynamicProxy) make it easy to write aspects using predefined join points and give you limited ability to describe pointcuts. However, you’ll retain enough flexibility to tackle the vast majority of AOP use cases.
Low-level tools are available that let you modify or create code all the way down to the instruction level (IL). These tools include Mono.Cecil, the PostSharp SDK, .NET Reflection, and Reflection.Emit. But these tools aren’t the focus of this book. I’m focusing on writing aspects, not on the entire realm of metaprogramming. We’ll revisit some of the low-level tools in chapter 7 and appendix A.
In the next few chapters, I cover common types of aspects that these third-party frameworks provide. In this chapter, we’ll look at method interception aspects. These are aspects that run code in place of another method, whenever that method is called. Even though I’ll be using only two tools in this chapter, method interception is perhaps the most common feature of all AOP frameworks. PostSharp and Castle DynamicProxy make it easy to jump right in and start coding. Once you have a good feel for method interceptors with these frameworks, you should be able to tread water with any framework that includes method interception.
The point of this chapter isn’t to teach you everything about these two frameworks but to give you a push in the right direction with one of the most common features in all AOP frameworks. At the end, you’ll know how to write simple method interception aspects, and you’ll have a couple of practical aspects for data transactions and threading to build upon.
3.1. Method interception
A method interception aspect is one that runs a piece of code in place of the method being intercepted. The aspect is executed instead of the method. It’s like having a middleman or a gatekeeper between normal execution and a method.
To illustrate this concept, let’s look at a simple program that calls a single method. The method returns control to the program when it’s done. (Sometimes a method returns a value to the program, but not in this example.) Figure 3.1 shows a normal program flow of a hypothethical Twitter service method used to send a tweet.
Figure 3.1. Normal flow: calling a method and returning control

Intercepting that method to call some other code may sound like a bad idea, like adding a middleman to a transaction: why not just deal directly? But just like middlemen in real life, method interception does serve an important purpose. Figure 3.2 shows a diagram of the same program as before with an added method interceptor.
Figure 3.2. Intercepted flow: the method interceptor is a middleman

What could we put in that interceptor? We could log that a tweet is about to be sent. We could validate the string being sent. We could modify the string being sent to the method. We could log that the tweet was sent. If the tweet failed (for example, if Send throws an exception or returns false), we could log that it failed. If it fails, we could try resending the tweet. We could add a variety of behavior without changing one line of code in the Send method itself.
Note that you aren’t completely replacing the method. In most cases, the aspect allows execution to continue to the intercepted method. What you’re doing is having some other piece of code run before the method executes (and/or after the method returns).
Now that I’ve defined and illustrated method interception, let’s create a method interception aspect in real code. By the end of this section, you’ll be able to write a method interception aspect using the PostSharp framework.
3.1.1. PostSharp method interception
Let’s try to move the diagrams from the previous section into a real implementation in code. This exercise will help you learn how to write method interception code and give you an introduction to the PostSharp way of writing a method interception aspect. I’ll create the basic program in a console application, then add a method interceptor to it.
Start a new project in Visual Studio: select Console Application. I’m calling my project TweetPostSharp. You can add PostSharp easily to your project with NuGet. You can install it with the NuGet UI by searching for PostSharp or install it with NuGet’s package manager console.
PM> Install-Package PostSharp
Successfully installed 'PostSharp 2.1.7.10'.
Successfully added 'PostSharp 2.1.7.10' to TweetPostSharp.
I’ll start by creating the Twitter service class. This class won’t interface with Twitter; it’ll just write to Console for demonstration. I’ll also create an instance of it in Main and call its Send method.
Listing 3.1. Calling Send method on TwitterClient service class
public class TwitterClient {
     public void Send(string msg) {
        Console.WriteLine("Sending: {0}", msg);
    }
}

class Program {
    static void Main(string[] args) {
        var svc = new TwitterClient();
        svc.Send("hi");
     }
}
Compile and run, and you should see the modest console output shown in figure 3.3.
Figure 3.3. Console output simulating a tweet

So far, so good. We’ve written code to match the diagram. Now it’s time to use PostSharp to create the interceptor aspect. Use the following code to create a class that inherits the MethodInterceptionAspect base class:
Make sure to use the [Serializable] attribute on aspect classes when using PostSharp. The PostSharp framework needs to instantiate and serialize aspect objects so that they can be deserialized and used after compiling.
[Serializable]
public class MyInterceptorAspect : MethodInterceptionAspect
{

}
Now that you have an interceptor, you need to indicate what method it should intercept. With PostSharp, you do this by using the aspect class as an attribute (listing 3.2).
Listing 3.2. Indicating which method to intercept with an attribute

And there you have it: now you’re intercepting any calls to Send with MyInterceptorAspect, as figure 3.4 illustrates.
Figure 3.4. Diagram with a real PostSharp method interception aspect

But it’s not even close to being useful, because there’s nothing in MyInterceptorAspect yet.
We’ll get to some examples of real behavior that you might want to use in an aspect later in this chapter. For now, let’s write to Console to demonstrate the basics. To start adding some intercepting behavior with PostSharp, override the base class’s OnInvoke method:
[Serializable]
public class MyInterceptorAspect : MethodInterceptionAspect {
    public override void OnInvoke(MethodInterceptionArgs args) {

    }
}
If you were to run the program at this point, the interceptor would run the code in OnInvoke, but because OnInvoke doesn’t do anything, the real Send method that was intercepted won’t ever be called. To proceed to the intercepted method, use the args parameter’s Invoke method:

Run the program again and the Send method will be called, writing to console. The program is still not too interesting, because it’s not adding any additional behavior yet: it’s only a passthrough to the method. Now let’s add code to the interceptor:

Run the application. Figure 3.5 shows the new output that you’ll see.
Figure 3.5. Console output with interceptor

It’s not yet an interesting use of interception, but it’s a start. You’ll see how to use a PostSharp interception aspect to make threading easier a couple of sections from now. But first, let’s look at another way to write interceptors: using Castle DynamicProxy.
3.1.2. Castle DynamicProxy method interception
We’re going to write the same program and interceptor as in the previous section. This time, you’ll use a different tool that has a similar API: Castle DynamicProxy. These tools provide similar capabilities as far as method interception, but they differ in many key ways. We’ll explore the details of how AOP tools are implemented (PostSharp and DynamicProxy in particular) in chapter 7. For now, because we’re only scratching the surface, let’s say that PostSharp does its work right after compilation and DynamicProxy does its work during runtime.
You can use the same project if you want, but I’ll create a new console project called TweetDynamicProxy. Castle DynamicProxy is part of the Castle.Core library. I’ll install it with NuGet, using the package manager console:
PM> Install-Package Castle.Core
Successfully installed 'Castle.Core 3.1.0'.
Successfully added 'Castle.Core 3.1.0' to TweetDynamicProxy.
I’ll use the same Main and TwitterClient code I used in an earlier section.
Listing 3.3. Calling the Send method on the TwitterClient service class
public class TwitterClient {
    public void Send(string msg) {
        Console.WriteLine("Sending: {0}", msg);
    }
}

class Program {
    static void Main(string[] args) {
        var svc = new TwitterClient();
        svc.Send("hi");
    }
}
Run it, and you’ll see the same output, as shown in figure 3.6.
Figure 3.6. Console output simulating a tweet again

To create an interceptor with Castle DynamicProxy, create a class that implements the IInterceptor interface (the interface has one method: Intercept):
public class MyInterceptorAspect : IInterceptor {
    public void Intercept(IInvocation invocation) {

    }
}
Now we need to tell DynamicProxy what code to intercept. With PostSharp, you can pick a single method, but with Castle DynamicProxy, you apply an interceptor to an entire object. (DynamicProxy can target individual methods like PostSharp, using IInterceptorSelector, but it still must create a proxy for an entire class.) Using Castle DynamicProxy, this is a two-step process:
1. Create a ProxyGenerator.
2. Use the ProxyGenerator to apply the interceptor.
Create a ProxyGenerator with normal instantiation. Use that proxy generator to apply the interceptor and pass it an instance of the TwitterClient object. I’ll use the CreateClassProxy method of the ProxyGenerator’s API because it’s the fastest way to demonstrate DynamicProxy, but we’ll explore other options later. Make these changes in the Main method:

There’s one more critical step in making this work. The Send method must be made into a virtual method. If you don’t do this, then the interception code won’t be executed:
public class TwitterClient {
    public virtual void Send(string msg) {
        Console.WriteLine("Sending: {0}", msg);
    }
}
The type of object that CreateClassProxy returns isn’t TwitterClient, but it’s a type that’s generated dynamically with TwitterClient as its base class. Therefore, each method that you want to intercept must be virtual in order to add additional functionality.
If you’ve used NHibernate, then you’re familiar with its similar requirements. This isn’t merely coincidence: NHibernate uses Castle DynamicProxy.
If you find this design annoying or cumbersome, don’t panic. I only had to do this because I am intercepting a concrete class (TwitterClient). If I had used an interface as well (ITwitterClient, for instance), then I could use a ProxyGenerator method such as CreateInterfaceProxyWithTarget instead, and the members wouldn’t have to be virtual. In fact, I’ll do this in later examples that use Castle DynamicProxy along with an IoC tool such as StructureMap.
Now you’re intercepting the method call, but the MyInterceptorAspect isn’t doing anything—not even calling the intercepted method. Let’s at least get this interceptor to act as a passthrough first, and then we can add behavior to it.
To tell the interceptor to proceed to the intercepted method, use the invocation parameter’s Proceed method:

Now it’s at least working as a passthrough. Let’s add behavior to the interceptor (see the next listing). Again, you’re only writing to Console for now. (We’ll look at more realistic examples later in this chapter.)
Listing 3.4. Adding code to the interceptor

And as figure 3.7 shows, we’ll see the same console output that we saw with the PostSharp example (figure 3.5).
Figure 3.7. Console output with a tweet and interceptors

As before, this isn’t a particularly interesting example, but you’re on your way to understanding the basics of method interception. PostSharp and Castle DynamicProxy differ in many significant ways, but as far as the basics of method interception, they have similar APIs and capabilities.
Let’s leave the Twitter example by the wayside for now and dig into a much more practical example. In the previous section, you learned the basics of writing method interception aspects in two of the most popular AOP frameworks for .NET. Let’s put your new expertise to work. In the next section, we’ll use more of the Castle DynamicProxy API to write an aspect that can help make data transactions easier.
3.2. Real-world example: data transactions
Transaction management can be an important part of working with databases. If several database operations are related, you often want them all to succeed or you want them all to fail. Any other combination might cause your data to enter an invalid or inconsistent state.
One way this goal can be achieved is with transactions. The basic components of a transaction are:
- Begin— Mark where a transaction starts.
- Perform related operations— For example, database operations (usually two or more).
- Commit— When operations are completed, commit indicates that the transaction is over.
- Rollback— If something goes wrong in the operations, roll back instead of committing, and return to the beginning state.
- Retry (optional)— Not strictly related to transactions, but after a rollback, a retry can often be attempted.
Transactions can be useful, but they’re definitely a cross-cutting concern that can add a lot of boilerplate and noise to your code. Therefore, an aspect can come in handy. Next, we’re going to create a transaction aspect using an interceptor aspect with Castle DynamicProxy.
3.2.1. Ensuring data integrity with begin and commit
To start, let’s focus on the basic structure of a transacton: begin and commit. For this section, I’ll assume that our transaction will always behave, so I won’t add any rollback code yet.
As in the previous examples, I’m going to create a console project and add Castle DynamicProxy using NuGet. I’ll call this example DataTransactionsCastle.
Before we can demonstrate a transaction, we have to create some code worth transacting with. Let’s start by creating a service class. This call will have one method that creates an invoice. This method will take an invoice as a parameter and perform several database operations. The actual database operations aren’t important for this example, so to demonstrate the possibilities I’m going to create three methods that behave in three different ways:
- A Save method that always succeeds, to demonstrate the happy path.
- A Save method that succeeds after a retry, to demonstrate how retries work.
- A Save method that always fails, to demonstrate running out of retry attempts.
The following listing shows the code for the three methods. For a failure, you can throw whatever exception you want, but I’ll use DataException, which is in the System.Data namespace.
Listing 3.5. Three different transaction scenarios
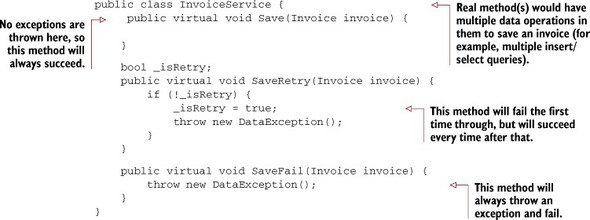
Note that I’ve made all three methods virtual, in anticipation of using Castle DynamicProxy.
In a Main method, I can create an invoice, pass it to the Save method, and then write a success message to console, as shown here.
Listing 3.6. A Main method to try out the Save scenarios
static void Main(string[] args) {
    var invoiceService = new InvoiceService();
    var invoice = new Invoice
    {
        InvoiceId = Guid.NewGuid(),
        InvoiceDate = DateTime.Now,
        Items = new List<string> {"Item1", "Item2", "Item3"}
    };
    invoiceService.Save(invoice);
    //invoiceService.SaveRetry(invoice);
    //invoiceService.SaveFail(invoice);
    Console.WriteLine("Save successful");
}
The console output would show the save successful message, as shown in figure 3.8.
Figure 3.8. Console reporting that the save was successful.

If I switch Save with SaveRetry (see figure 3.9) or SaveFail (see figure 3.10), I get an exception from each.
Figure 3.9. SaveRetry fails on the first attempt.

Figure 3.10. SaveFail will always fail.

I’ve split these three possibilities out into their own methods for demonstration; in reality, all three conditions would exist in an individual service method. The first example is what we’re all rooting for, but we need to plan for the other scenarios, too.
We could add transaction code directly to the service class, but think back to the Single Responsibility Principle. A class should have only one reason to change. If we add transaction code, then we’re making this class do two things. Instead, let’s create a separate interceptor to do all the work in a reusable way.
Let’s first create an empty interceptor and wire it up to the invoice service instance. I’ll call it TransactionWithRetries because over time I’ll add retry capabilities to it. For now, let’s use the interceptor to create a transaction, as in the following listing.
Listing 3.7. Basic transaction interceptor, used with proxy generator

The first thing I’m doing in the previous code is use a TransactionScope, as in chapter 2.
TransactionScope is part of System.Transactions, which comes with the .NET framework. If TransactionScope is disposed of (such as via a using block ending or by calling Dispose explicitly) without calling the Complete method on it, then TransactionScope will consider the operation a failure and will roll back.
TransactionScope is a helpful API to manage ambient transactions (ambient meaning that databases that support TransactionScope will automatically manage the transaction themselves). This API is supported by a variety of popular databases, including Microsoft SQL.
If you’re using a database or some transaction-based system that doesn’t support TransactionScope, you can still use an interceptor, but you’ll have to change the code to use the appropriate supported transaction API (for instance, using the Begin-Transaction API to get your database provider’s IDbTransaction implementation).
If the intercepted method proceeds without exception (and we’re all rooting for it to do so), then it will call Complete() on the TransactionScope and we’re done.
To start using this aspect, again make use of a ProxyGenerator in Main, as the following listing shows.
Listing 3.8. Using ProxyGenerator to apply the TransactionWithRetries aspect

Now all of the Save methods will be placed inside of transactions. We start a new transaction (begin) by instantiating a new TransactionScope object. We end (commit) the transaction by calling its Complete method. Now the ideal scenario (represented by Save) is covered. What if something goes wrong?
3.2.2. When transactions go bad: rollback
Of course, if transactions always succeeded, there would be no need for transactions. The whole point of them is to identify a series of commands that can be rolled back if something goes wrong. So in this section, I’ll talk about how to add a rollback to our transaction aspect.
Because we’re using .NET’s TransactionScope, there is no explicit rollback command. The closest equivalent is its Dispose() method. If TransactionScope is disposed before its Complete() method is called, TransactionScope will then perform a rollback. Otherwise, it won’t. So, as the next listing shows, we must add a Dispose call to our transaction interceptor aspect.
Listing 3.9. Using Dispose to rollback

In C#, we can write this a little more concisely with the using syntax (which works only with objects that implement .NET’s IDisposable interface):

If the intercepted method completes without throwing an exception, then trans.Complete() will be called and the transaction will be committed. If an exception occurs in the intercepted method, then the TransactionScope object will be disposed of before trans.Complete() gets a chance to be called (thanks to the using syntax and the .NET garbage collector), triggering a rollback.
This aspect continues to cover the ideal scenario (Save), and it now also covers the worst-case scenario (SaveFail). All we have left to do is cover the last scenario: SaveRetry.
3.2.3. When all else fails, retry
Let’s review the three possibilities: success, retry success, and failure. The interceptor we’ve written so far covers the possibility of success, certainly. It also covers the possibility of failure, because it won’t allow any of the operations to finish unless they all succeed (by using a rollback). But it doesn’t cover the possibility of retry success.
This listing shows how we can add a loop to retry.
Listing 3.10. Adding a loop to retry
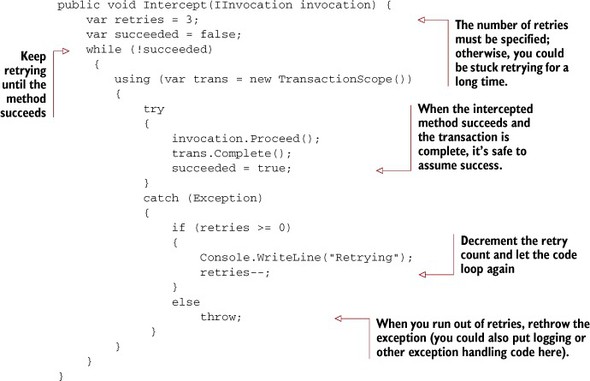
At this point, we’ve added a loop and a retry condition. I’ve hardcoded this aspect to retry up to three times. We need only one to get the SaveRetry service to succeed this time, as figure 3.11 shows.
Figure 3.11. Success after one retry

But I think we can do better than hardcoding. Let’s move the number of retries to a constructor parameter so that it can be more easily configured, as shown next.
Listing 3.11. Transaction with maximum retries specified in constructor

To use that interceptor with the proxy generator, add the number of retries as an argument to the constructor:
var invoiceService = proxyGenerator
    .CreateClassProxy<InvoiceService>(
        new TransactionWithRetries(3));
We can make one more little improvement to this interceptor aspect. Instead of writing only “Retrying” to the console when there’s a retry, it would be much more helpful to see “Retrying” and the name of the method. For instance, “Retrying SaveRetry,” as figure 3.12 shows.
Figure 3.12. Console reporting that there was one retry before successful save

How do we get the method name? You may have already noticed (via intellisense) that Proceed() isn’t the only thing you can do with the invocation parameter to the Intercept method. This parameter also has other interesting contextual information.
For instance, invocation.Method returns a MethodInfo object (from the System .Reflection namespace), representing the method that is being intercepted. Among other things, the MethodInfo class has a Name property, which can give us the method’s name. Change the Console.WriteLine statement to the following:
Console.WriteLine("Retrying {0}", invocation.Method.Name);
Now you’ll get the “Retrying SaveRetry” message written to console. Experiment with the other properties available to you on that IInvocation invocation parameter: there’s a lot of contextual information that you can read and modify with it. You’ve created a very useful interceptor aspect, and you’ve barely scratched the surface of the DynamicProxy API.
Let’s shift back to PostSharp now and look at a real-world example of a PostSharp interceptor aspect.
3.3. Real-world example: threading
When you load a program into memory and start to execute it, it’s known as a process. The CPU reads each instruction of the process, one at a time. Sometimes you want more than one thing to be processed. While you’re waiting for a slow web service, you may want to keep the user informed of progress via the UI. To do this, you might use threads, which are like miniprocesses.
Web developers don’t see as many opportunities to use the threading capabilities of .NET as do desktop or mobile developers. But even for veteran desktop developers, threading can be a painful experience: it’s hard to write, hard to debug, hard to read, and hard to test. Yet threading often can’t be avoided when writing code to create a responsive desktop experience.
I’m not going to tell you that using aspects will make threading easier to debug and test. You’ll probably need another book for that. But we can take a step in the right direction by making threaded code a little easier to write (and to read).
Let’s start with a quick refresher on the basics of threading in a .NET application.
3.3.1. The basics of .NET threading
You can do threading with .NET in a few different ways. As multicore programming becomes more important and more common, the number of ways to write a multithreaded program increases. Microsoft and other third-party tools provide a number of threading options that are all worth exploring further.
I’m going to focus on the old-fashioned Thread class for the example in this section. If you prefer another way of writing threaded code, there’s good news: AOP makes it easy to make that change in a modular, encapsulated way instead of in multiple places cross-cutting your code.
Now let’s get started writing some threaded code.
Suppose you have a method called DoWork that takes a long time to run, and therefore you want to run it in a worker thread, freeing up the UI to update the users on the status of the work or allow them to start other operations. To run DoWork in another thread, simply create a Thread object and start it:
var thread = new Thread(DoWork);
thread.Start();
This code may look simple, but the Thread class has a lot of other capabilities: checking to see whether a thread is still alive, setting it to be a background thread, thread priority, and so on. And often you’ll need other parts of the System.Threading API, such as ManualResetEvent, ThreadPool, Mutex, and perhaps the lock keyword. Even with other APIs and newer tools, I can’t overstate how complex threads can be to use: threads are not something that you should undertake lightly.
For this section, I’m going to focus on a common and relatively simple use case for threads: a graphic UI that triggers worker threads (which may themselves need to update the UI) in order to demonstrate a valuable way to use method interception.
3.3.2. UI threads and worker threads
I’m going to start by creating a simple desktop application that uses threading without any AOP. I’ll create a new Windows Forms Application project in Visual Studio. You should get a Form1 class created by default. I’ll add one button and one ListBox to make it look something like figure 3.13.
Figure 3.13. A desktop application

I want this form to update the list of tweets via a web service when I click the update button. The following is a service class to get (simulated) tweets:

Double-click the Update button in the Visual Studio form editor to automatically generate a click event handler. Put a bit of code in that method to update the ListBox of tweets, as shown here.
Listing 3.12. Full Form1 class with button click event handler

That works, but if you run it, you’ll find that while the GetTweet method is running, nothing else on the UI works. You can’t move the window, you can’t press the button again, and you can’t scroll or click on items in the list, as figure 3.14 illustrates.
Figure 3.14. Because GetTweet runs on the UI thread, the other UI controls are unable to accept input while it’s running.

I don’t want the UI to lock up while it’s hitting the web service (maybe I’ll want to show a loading animation or allow the user to perform other operations while the list of tweets is loading). In order to do this, I have to create a worker thread to run while the UI thread remains available to handle other operations (clicks, scrolling, etc.). I’ll move the tweet update code into its own method and start a thread to run it:
private void btnUpdate_Click(object sender, EventArgs e) {
    var thread = new Thread(GetNewTweet);
    thread.Start();
}

void GetNewTweet() {
    var tweet = _twitter.GetTweet();
    listTweets.Items.Add(tweet);
}
That looks good. Run it (not in debug mode), and you’ll see that the UI remains responsive after you click Update. You can even click Update again to trigger another thread (and so on).
Try it again in debug mode, and you’ll get an InvalidOperationException when your code tries to add an item to the list. What gives? In a Windows Forms application, the UI controls aren’t thread-safe. Much like a database transaction, if you’re manipulating a UI control from multiple threads, you could put it into an inconsistent state. Therefore, manipulating Control objects from a thread other than the UI thread is a bad idea. (You’ll always get an exception in debug mode, and you may get all kinds of bad behavior or exceptions when not in debug mode.)
So how do we check whether we’re running on the UI thread? And if we’re not, how do we run the code on the UI thread? Use the InvokeRequired and Invoke members of Form1, inherited from the Form base class, as shown next.
Listing 3.13. Checking whether Invoke is necessary
void GetNewTweet()
{
    var tweet = _twitter.GetTweet();
    if (InvokeRequired)
        this.Invoke(new Action(() => listTweets.Items.Add(tweet)));
    else
        listTweets.Items.Add(tweet);
}
InvokeRequired is the way to ask whether the current thread is on the UI thread. If it is true, then the current thread is not on the UI thread. If that’s the case, then you must use Invoke to execute code that will be working with Windows Forms controls.
This pattern isn’t limited to Windows Forms. The specific way to check the current thread and use the UI thread may vary depending on the type of application you’re using. Windows Presentation Foundation (WPF) uses Dispatcher.CheckAccess and Dispatcher.Invoke. Other UI technologies such as Mono for Android, Windows Phone, and Silverlight may also vary.
There’s some repetition now, so it might be best to refactor into yet another method, GetNewTweet:

Now run the program again (in debug mode), and it won’t cause an Invalid-OperationException. Great, except that now the code has gotten quite long and messy, even for a ridiculously simple example (imagine a more complex form with multiple threaded operations). Don’t say I didn’t warn you: threading is messy.
But I also promised to show you a way to make threading easier to read and write. Let’s imagine a much shorter, clearer, declarative way to write the Form1 code. It would be nice if our code looked more like the following.
Listing 3.14. Wouldn’t it be nice if threading were more like this?

There are three main changes in the previous listing. First, in the click event handler (btnUpdate_Click), we’re no longer creating a Thread object: we’re only calling the method directly. Much clearer to read without any noise about starting a new thread.
Second, the GetNewTweet() method has an attribute that declares that it will be run on a worker thread. Notice that the code inside the method doesn’t have any Invoke-Required or Invoke noise. It’s easier to read, and we know exactly what it’s doing.
Finally, the UpdateTweetListBox() method remains the same, except that it has an attribute declaring that it will be running on the UI thread.
This hypothetical code is shorter, more declarative, and contains no threading details. Putting code on a worker thread becomes as easy as using an attribute. Not only is it declarative, but if we want to change the threading details (to use the .NET 4 Task class, for instance), that needs to be done in only one place.
But this isn’t a hypothetical situation: we can do this type of declarative threading with AOP by writing two small interceptor aspects.
3.3.3. Declarative threading with AOP
We need two interceptor aspects to achieve declarative threading: one aspect to intercept a method call and put it on a worker thread, and another aspect to intercept a method call and make sure that it runs on the UI thread.
Start by adding PostSharp to your project with NuGet via the NuGet UI or command line (Install-Package PostSharp).
Create a WorkerThread aspect class that uses MethodInterceptionAspect as a base class and overrides OnInvoke:
[Serializable]
public class WorkerThread : MethodInterceptionAspect
{
    public override void OnInvoke(MethodInterceptionArgs args)
    {

    }
}
The goal is to move the intercepted method on to a new thread. To do this, I’m going to proceed to the intercepted method by using args.Proceed(), but I’m going to do it on a new thread:

This aspect gets us most of the way there, but if the worker thread needs to update the UI, we’ll run into problems again if we don’t check InvokeRequired. That’s why we’ll create a companion UIThread interceptor aspect. Create a UIThread aspect that also uses MethodInterceptionAspect:
[Serializable]
public class UIThread : MethodInterceptionAspect
{
    public override void OnInvoke(MethodInterceptionArgs args)
    {

    }
}
The goal of this aspect is to check whether an Invoke is required and to use Invoke if it is. But wait a minute: how can I use the InvokeRequired property and the Invoke method in this class, which is separate from Form1? Fortunately, PostSharp provides a way. We can get to the instance object of the method that we’re intercepting by using the args parameter: args.Instance. It returns object, so we have to cast it to type Form before using InvokeRequired and Invoke (as shown next).
Listing 3.15. UIThread interceptor aspect

The args parameter (of type MethodInterceptionArgs) contains a lot of other information about the intercepted method: its context, arguments being passed in, and so on. Like the Castle DynamicProxy IInvocation API, I encourage you to explore all the available properties and methods.
Using these two aspects, we can now realize the “wouldn’t it be nice” example (repeated here).
Listing 3.16. Declarative threading is now a reality

Not only have we reduced the readability issues and made threads easier (almost fun!) to use, but we’ve also decoupled threading details from the class and encapsulated them into their own classes. So we could switch to using the Task class by changing only the WorkerThread aspect class, as this listing shows.
Listing 3.17. Changing from Thread to Task
[Serializable]
public class WorkerThread : MethodInterceptionAspect {
    public override void OnInvoke(MethodInterceptionArgs args) {
        var task = new Task(args.Proceed);
        task.Start();
    }
}
But ultimately, the point isn’t to demonstrate the threading tools themselves (as I’ve alluded to, threading can be complicated, and there are a multitude of ways to deal with it). Instead, I want to demonstrate that the threading code can often get tangled and scattered throughout the rest of your UI code as a cross-cutting concern and that using an aspect can separate that cross-cutting concern into its own class.
3.4. Summary
This chapter covered one of the most common types of aspects: method interception aspects. Method interception aspects are like middlemen between code that’s calling a method and the method itself. They give you the opportunity to add or modify method behavior without modifying the method and thus the ability to encapsulate cross-cutting concerns into their own classes, not only for improved organization but also for improved reuse.
PostSharp, Castle DynamicProxy, and other similar tools make it easy to write method interception aspects. Their APIs allow you to proceed to the intercepted method when you want to. Their APIs are also able to give you contextual information about the method being intercepted, including information about the method (for example, the method’s name), the class that the method is in, and much more.
I encourage you to work through the two real-world aspects presented in this chapter on your own. Experiment with the tools and their APIs. We’ll look at other PostSharp features throughout the rest of book. In the next chapter I’ll discuss a different kind of aspect: boundary aspects.