Chapter 8: Cloud Migration Schema and Limitations
We start Part 2 with Cloud Migration. Cloud Migration is a special tool that helps you to migrate your data from any on-premises Business Central environment (still supported in version 14) or Dynamics GP to the SaaS environment. It is free of charge and already included in your cloud environment even if you do not need it. You do not need to search for any distributives; the only thing you need to install additionally is a self-hosted integration runtime – part of the Cloud Migration tool. You will get a link to download it while you run the setup process.
The main official purpose of the Cloud Migration tool is to help you migrate from your on-premises environment to the cloud, but later we will look at a non-official usage – data consolidation. For some reasons (which we will find out about later), it is not officially recommended, but it works with some exceptions.
You do not need developer skills to use it. Not a single line of code is required; it is pure administration. From the Business Central 2022 release wave 1, delegated admins can perform the migration. If you are a Partner, you do not need a separate license for this action anymore.
Cloud Migration made a long journey from quite a raw instrument (when it was called Intelligent Edge) to a real business tool that will help you to take your ERP system to the next level. I have been working with the tool since it first appeared, firstly, just to get to know the new technology. Then, me and my team got a chance to use it in a real project. We took the risk and it was worth it.
In this chapter, we are going to cover the following main topics:
- Cloud Migration and how to use it
- Migration schema and the main nodes
- Migration limitations
By the end of this chapter, you will know what Cloud Migration is, along with its parts, migration stages, and limitations.
Technical requirements
To create a migration, you must have the following:
- A Dynamics 365 Business Central SaaS tenant (also works on a demo tenant)
- A SUPER user in the Business Central SaaS or a delegated admin with granted consent
- A Microsoft 365 tenant admin account
The currently supported products for migration to SaaS are the following:
- All versions of Dynamics 365 Business Central on-premises.
- Dynamics GP 2015 and newer.
- Dynamics NAV customers are also able to migrate, but they have to upgrade their systems to Dynamics 365 Business Central first. To find out how to do it, you can read the docs page here: https://docs.microsoft.com/en-us/dynamics365/business-central/dev-itpro/upgrade/upgrading-to-business-central.
- On-premises SQL Server database:
- SQL Server 2016 and newer
- Compatibility level 130 (the compatibility level defines how SQL Server uses certain features)
- SQL Server authorization
Cloud Migration and how to use it
The Cloud Migration tool lives in your cloud environment. You can find it by searching for the Cloud Migration Management page. Before the setup, it should look empty.

Figure 8.1 – Cloud Migration Management
We can have a look at the backend and open the Installed Extensions page.

Figure 8.2 – Cloud Migration extensions
You can see three to four extensions here, related to Cloud Migration:
- Business Central Intelligent Cloud: The main app.
- Business Central Cloud Migration - Previous Release: This app lets you migrate old Business Central on-premises versions to the cloud.
- Business Central Cloud Migration - Previous Release (Localization Code): Not mandatory. You can not use it in every localization. It contains localization specialties for the migration process.
- Business Central Cloud Migration API: A new feature, introduced in the Business Central 2022 release wave 2. This lets you automate the migration process.
If you migrate from Dynamics GP, you need the following extensions:
- Dynamics GP Intelligent Cloud: This app is used to migrate data from Dynamics GP.
Figure 8.3 – Dynamics GP Intelligent Cloud
- Dynamics GP History SmartLists: This extension is used to load several predefined SmartLists that will show Microsoft Dynamics SL historical transactions data.
If some of these apps (not just GP) are not installed in your environment, you can find them in the Extensions Marketplace.

Figure 8.4 – Microsoft Dynamics SL History SmartLists
When running Cloud Migration for the first time, you can do so from the Assisted Setup page.

Figure 8.5 – Assisted Setup
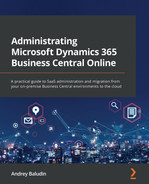
This option is just used to run the setup process or to show with a Completed mark that setup has been done. The other way is to search for cloud migration in the Tell me what you want to do search box.
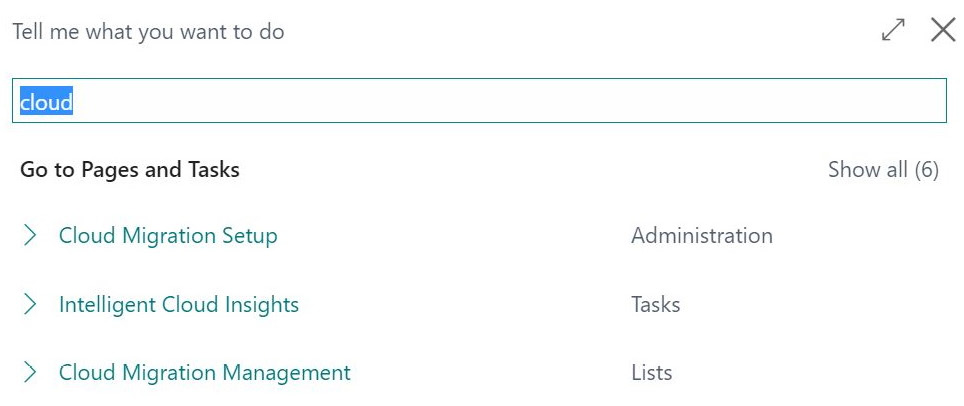
Figure 8.6 – Searching for Cloud Migration
As you see, it has three related pages:
- Cloud Migration Setup: Runs the same page as we have in the Assisted Setup
- Cloud Migration Management: Runs the page to handle the migration process
- Delegated admin consent for cloud migration: A special page where the Business Central license owner can grant consent to the delegated admin to run Cloud Migration
In this chapter, we will get to know the parts of Cloud Migration that will be commonly used. The usage and details will be described in the next chapters.
Migration schema and the main nodes
The Cloud Migration tool consists of the following nodes:
- On-premises SQL Server database or Azure SQL Database
- Self-hosted integration runtime or Azure runtime
- Azure Data Factory pipelines
- Azure Integration Runtime for Data Factory
- Business Central SaaS
The common migration schema looks like this:

Figure 8.7 – Cloud Migration schema
If you migrate from an on-premises SQL Server database, you must install the self-hosted integration runtime and register it with a special authentication key, which you get during the setup, to let Azure Data Factory connect to the database.
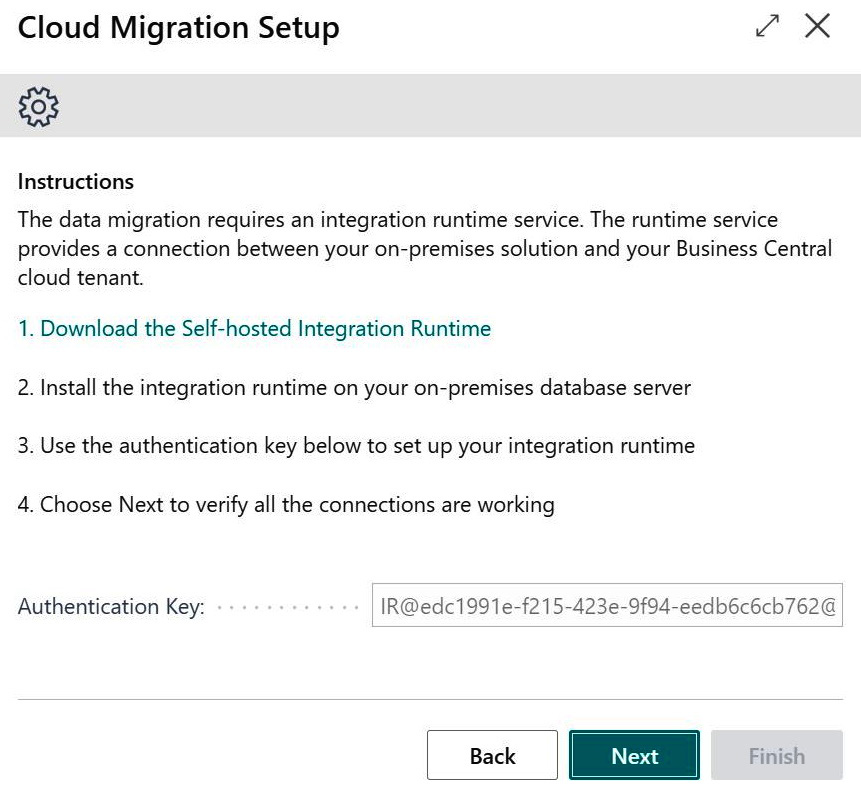
Figure 8.8 – Self-hosted integration runtime authentication key
For Azure SQL Database, the integration runtime is created automatically. Azure Data Factory only uses your SQL Server permissions with the user account that you use for the migration.
Migration limitation
Previously, the main limitation in Cloud Migration was the database size – 80 GB. Now, you can migrate larger-sized databases; but can does not mean should.
If you exceed the storage limit, the migration process will not stop; you will have to buy additional capacity with a storage add-on.
Microsoft recommends migrating no more than 30 GB per migration. But how do you achieve this if your database is large?
- First of all, you can migrate your companies one by one. Select one company on the initial setup and you will be able to change the companies list to migrate later after the first company migrates.
- Secondly, delete or archive unneeded data. Sounds easy, but this is a very tough process. Please refer to Chapter 6, for the details.
- You can add the ReplicateData = False property to your custom tables if you do not want to replicate them.

Figure 8.9 – ReplicateData table property
If you want to migrate a large database and cannot shrink it, you may ask a support team to assist you in this process.
You will probably be wondering about custom tables and field migration. Data is migrated if it exists in both environments – on-premises and SaaS. If you have custom tables and fields in an on-premises environment and want to migrate them to the cloud, you must deploy the same changes to the SaaS first. If your on-premises Business Central is an April 2019 release, you must redevelop your C/AL customizations to AL if you already developed them before the data migration.

Figure 8.10 – Cloud Migration schema
Some releases ago, the Cloud Migration tool allowed regularly scheduled runs. This meant that you were able to have a regularly updating copy of your on-premises database in the cloud without any lines of code. Now, this functionality had been cut out because if migration runs while the environment is upgrading, this could cause serious issues. For managed and automated migration runs, APIs could be used.
Note
Migration isn't limited between regions from on-premises to SaaS, for example, RU on-premises to UK SaaS. Data will migrate but only for equal schema elements.
You could even collect data from different databases into one SaaS environment, for example, to consolidate data for some analysis. Remember that per-database tables will be overwritten each time and some links could be corrupted.
Note
Per-database table data applies to all companies in the database. Per-company table data applies only to the current company.
Additional Information
Microsoft gives extra details about Cloud Migration in Microsoft Docs: https://docs.microsoft.com/en-us/dynamics365/business-central/dev-itpro/administration/migrate-data.
For Microsoft Partners, the product team is available on Yammer. You will be surprised by how responsive they are there: https://aka.ms/bccloudmigrationyammer.
Summary
Now you know what Cloud migration is and what nodes it consists of. It is no longer a black box for you. You've seen that Cloud Migration is a very good tool but has some limitations that you need to be aware of. In the next chapter, you will learn, in detail, how to set up the migration process.