
Chapter 10: Migration Process
In the previous chapter, we completed the cloud migration setup. This action does not mean that your data is already in the cloud even if you see your on-premise company on the list. Here, we will demystify the migration process and how your data moves from on-premise to the cloud and upgrade the process because the table schema might be different in a newer environment. Also, you will learn how to automate migration runs.
In this chapter, we are going to cover the following main topics:
- Data migration
- Data upgrade
- Typical fails and how to resolve them
- Automating data migration
By the end of this chapter, you will understand how to set up cloud migration so that you can move your data from an on-premise environment to the cloud.
Data migration
The full migration process is divided into two stages:
- Data migration
- Data upgrade
You can run data migration several times, for example, by synchronizing your companies from on-premise to SaaS one by one, by cleaning your data in the destination point, and by only upgrading your data at the end as a final step, when you are sure that everything has been correctly migrated.
Microsoft describes the migration process with the following schema:
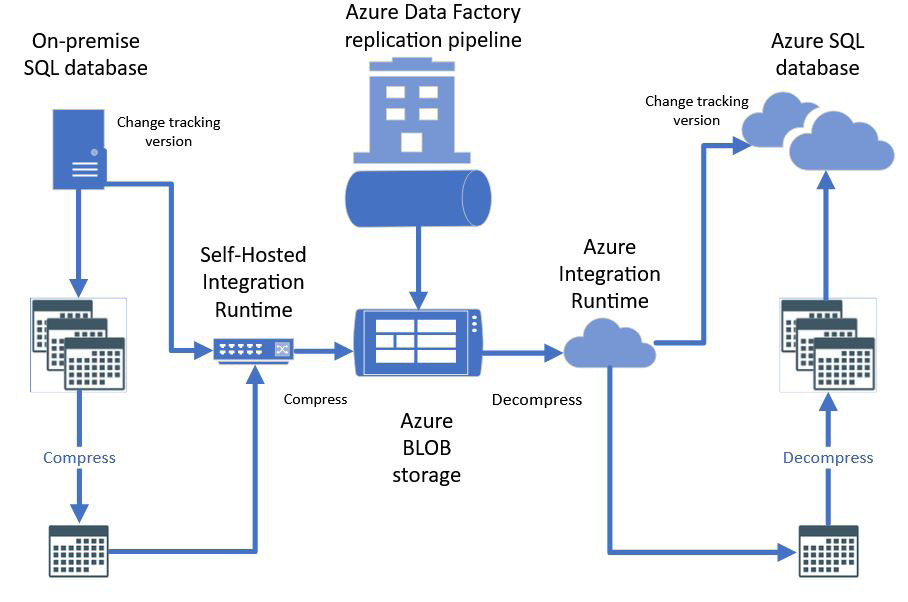
Figure 10.1 – The data migration process
You might have a question about the per database tables synchronization. Take a look at Figure 10.2. It is from Microsoft Business Central Launch Event 2022 wave 1. What if we sync the Company 1 tables with the per database tables and then sync the Company 2 tables with the per database tables again? If we overwrite the per database tables each time, data could have been already changed in such tables and links could have become broken. The answer is that all tables that synchronize in one moment per database table do not have double replication, so your data will migrate correctly:

Figure 10.2 – Table replication
To start the migration process, open the Cloud Migration Management page in the Business Central SaaS. Here, you can either Run Migration Now or Create Diagnostic Run to do more data verification before the normal migration run, to decrease the risk of a failed migration.
Important Note
Before you start the data migration, open the Admin Portal, and if you have a pending target environment update, postpone it. Similarly, if you need to upgrade your cloud environment, disable the cloud migration from the Cloud Migration Management page.
You can view the Cloud Migration Management page here:

Figure 10.3 – The Cloud Migration management page
In addition, this page contains other useful actions. Let's look at the most important ones:

Figure 10.4 – Cloud migration actions
Here is a list of the useful actions:
- Run Data Upgrade Now: This starts the data upgrade.
- Refresh Status: You can use this action to refresh the state of your running migration operations.
- Reset Cloud Data: This resets the migration-enabled data in the cloud tenant.
- Get Runtime Service Key: If you forgot to copy the Integration Runtime authorization key, you can find it here.
- Reset Runtime Service Key: This resets the Integration Runtime authorization key.
- Disable Cloud Migration: Use this action to disable the cloud migration process; for example, before an environment upgrade.
- Select Companies to Migrate: Here, you can change your companies to migrate choice.
- Manage Custom Tables: Use this action to manage the custom table's mappings:

Figure 10.5 – Migration table mappings
Do you remember the ReplicateData property for the custom tables? By default, it is True. So, all your custom tables will try to migrate. You can exclude them from the replication process by setting this property to False. I say try to migrate because you must have the same tables in the SaaS environment. You can map them with the Manage Custom Tables functionality if they have different names (for example, if you use Business Central 14 and moved your C/AL code to AL before migration).
To start the migration process, select Run Migration Now. Answer Yes, and wait until you see a confirmation message:

Figure 10.6 – A migration confirmation message
You will see that the migration is in progress:

Figure 10.7 – Cloud migration in progress
The migration time depends on the size of your database. It could be anywhere from several minutes for a Cronus Demo database to several hours for a real database. Click on Refresh Status to update the status information.
After the migration, the status will change to Data Repair Pending:

Figure 10.8 – Cloud migration data repair
And, a bit later, it will change to Upgrade Pending:

Figure 10.9 – Cloud migration upgrade pending
You can check the migration details in the Migration Information fact box:

Figure 10.10 – Migration Information
The numbers are informative; click on them to see the details:
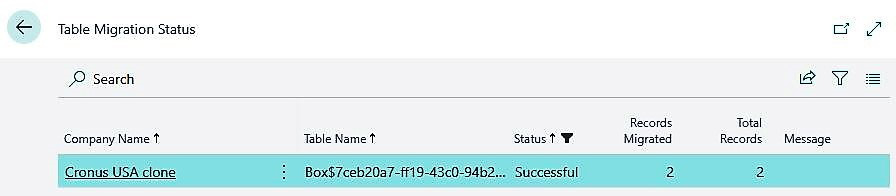
Figure 10.11 – Table Migration Status
Note
Failed tables and tables with warnings will also be listed here.
Before the data upgrades, you can verify or clean up the migrated data. It is highly recommended that you create a copy of the production environment as a sandbox and run the data upgrade there first.
You can migrate data several times to add deltas or extra companies and then run the data upgrade at the end.
Data upgrade
We can illustrate the data upgrade process with the following schema:

Figure 10.12 – The data upgrade schema
We have table X with 15 fields in the on-premises Business Central instance. It should be an old version from 14 to 19. We migrate data to the new Business Central SaaS v.20 where table X already has 19 fields because new functionality was added. We migrate 15 fields from the on-premises instance. After that, we upgrade data to fill the last 16–19 fields in the new environment.
Important Note
Before you start the data upgrade, open the Admin Portal, and if you have a pending target environment update, postpone it. Similarly, if you need to upgrade your cloud environment, disable the cloud migration from the Cloud Migration Management page.
After you migrate your data, open the Admin Portal and create a copy of your target migration environment. Test the data upgrade in this copy first. This is not a mandatory step, but it is highly recommended. You can restore this copy at any point if something went wrong.
To start the data upgrade process, click on the Run Data Upgrade Now action on the Cloud Migration management page. You must confirm that you have migrated all the companies and are ready to finish this process:

Figure 10.13 – Data upgrade confirmation
After the confirmation, your migration status will turn into Upgrade in Progress:

Figure 10.14 – Data upgrade status
And after that, the status will change to Complete.
If you try to click Run Migration again after the data upgrade, you will get an error. You must delete the migrated company (you can do this from the Companies list) and start the migration again:

Figure 10.15 – Data migration error
After the migration, all users in the migrated company (except the admin) will be assigned to the Intelligent Cloud user group. This means that the database for them becomes read-only. This is made on purpose, to prevent any unexpected data modifications before you complete the migration. After you upgrade the data, you must open the Users card and assign normal permission sets to allow them to work as usual.
The last step will be to ask users to stop working in the on-premise environment and provide them with a new connection URL.
Typical failures and how to resolve them
For now, there are not so many problems with cloud migration. I have Microsoft statistics about the most popular issues. They are listed as follows:
- A failed connection from the Self-Hosted Integration runtime to an on-premise database.
Solution: Test your Integration Runtime connection using the diagnostics tool. It will likely be network issues.
- Self-Hosted Integration runtime setup errors.
Solution: As in the first point, test your connection. You likely set the wrong authorization key. Check it one more time or generate a new one.
- Wrong connection string.
Solution: Check all the parameters one more time. It is likely that you mistyped somewhere.
Solution: Check the database compatibility level. Change it, if needed.
- The on-premise database has been replaced after setup.
Solution: Set up the cloud migration process again.
I also met some strange and unexpected errors during the migration, which were caused by major environment updates. If you are a Partner, you can always ask the development team about such cases in Yammer at https://aka.ms/bccloudmigrationyammer.
Automating data migration
As part of the cloud migration setup, Microsoft provides APIs to run data migration and data upgrades. They can be useful if you are planning a bulk migration or migrations for several customers. If you need more details, you can find them in the official Microsoft documentation at https://docs.microsoft.com/en-us/dynamics365/business-central/dev-itpro/administration/cloudmigrationapi/cloud-migration-api-overview.
However, here, we will skip their boring description and have more practice.
To make your life easier, Microsoft created a PowerShell script with a set of functions for cloud migration. It contains all that you need – the setup, migration, and data upgrade. You can download it from https://aka.ms/BCCloudMigrationAPI.
The link contains two files:
- CloudMigrationStatusText.psm1: This contains state-of-art graphic design functions.
- CloudMigrationScripts.ps1: This contains the main cloud migration functions:
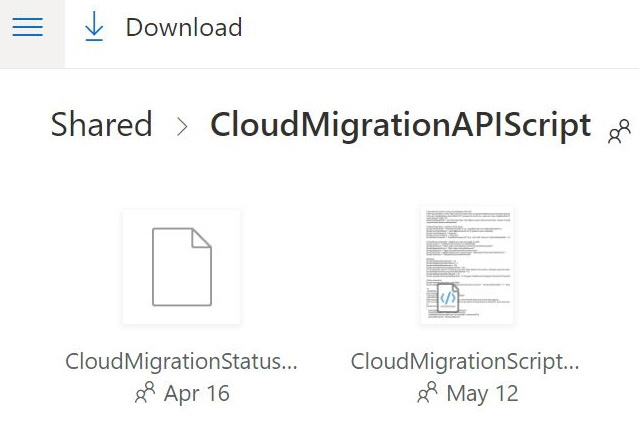
Figure 10.16 – The cloud migration API script
To start using the script, please download both files into one folder to the machine where you have installed or are planning to install the Integration Runtime, run Windows PowerShell ISE as an administrator, and open CloudMigrationScripts.ps1.
You must fill the following parameters with your values:
- AADTenantID: This is your Business Central SaaS tenant ID.
- CurrentUserName: This is your admin username.
- CurrentPassword: This is your admin user password.
- EnvironmentName: This is the name of the cloud environment where you plan to migrate your on-premise companies.
- MainCompanyID: This is the ID of the cloud company from which you want to run the cloud migration setup.
- ClientID: This is the client ID of the app registration, which you use for OAuth 2.0 authorization:

Figure 10.17 – The script parameters
Before the first run, I needed two extra things to make this script work:
- Add and execute the Import-Module "MSAL.PS" line. Microsoft writes about this step in the third line of the script; only in the first run.
- Check that your app registration in the Azure Portal, under the Manifest tab, has allowPublicClient = true. Otherwise, change it and save your app registration:
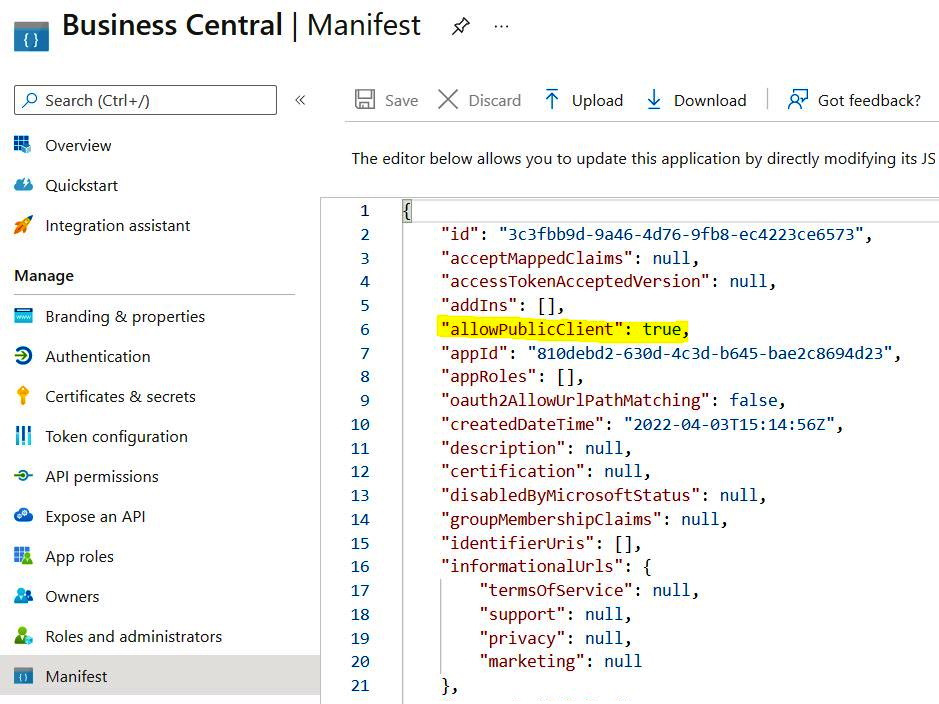
Figure 10.18 – The app registration manifest
After that, run your script with the F5 key to load the variables. The script contains many functions, but we will start with the common Run-CloudMigrationE2E function and a –SqlConnectionString parameter. You can revisit how to construct a connection string in the previous chapter. Here is my example:
Run-CloudMigrationE2E -SqlConnectionString "server=CloudMigrationBCDEMO;Initial Catalog ='Demo Database BC (18-0)';user id =integration;password =YOURPASSWORD;"
Next, you must sign in so that the script will run. If you have already done the cloud migration setup, it will skip this step.
As a result, you will see the whole migration process step by step (remember when I told you about state-of-the-art graphic design?):

Figure 10.19 – Running the cloud migration script
After the script execution, open your SaaS environment and ensure the company has been migrated. Please investigate the script, and you can create your own scenarios based on the functions it has.
Summary
Now you know what data upgrade is and why you need it. You know the typical issues and are ready to fight them. Finally, you know how to automate your cloud migration with a pre-prepared PowerShell script. You are ready to migrate from on-premise Dynamics 365 Business Central to the cloud. In the final chapter, I will tell you about my experience with cloud migration.