
12 Free Form Photo Collages
Photoshop Elements 5.0 heralded a major change in the way that photographers created free form layouts and multi-page books. Versions 6.0 and 7.0 continue the revolution with the refining of both these features, now called Photo Book and Photo Collage, and a complete revamp of the Photo Bin, now called the Project Bin, so that rather than just being a place to view open images it becomes a multi-purpose ‘go to’ area for your project actions. I believe that these features provide photographers with new and powerful ways to use their images to generate create projects in ways that even Photoshop users can only dream of. So to get started let’s look at some of the technology that underpins this new way of working.
Adobe has created a new layer type, Frame layers, a new file format, the Photo Project or PSE, a new design system that uses special matched frames and backgrounds sets called Themes, created an updated version of the Photo Bin, called the Project Bin, a set of Photo Projects that makes use of all this new technology and, finally, a new Task Mode based layout workflow.
Sound confusing? Well some of the features are new and some are continuations of technology from version 5.0, but once you begin to play with Photo Collages, the process seems so logical and familiar that it isn’t long before you will start to feel at home with the new workflow. So to get you started this chapter will look at the basic techniques that are involved in the layout workflow.
Before you start – edit then layout
The production of Photo Collages, or any of the other Photo Projects, in Photoshop Elements is essentially a presentation exercise for photos that have already been enhanced. For this reason it is a good idea to complete any preliminary editing work such as color and tonal correction, spotting and retouching changes and the application of sharpening before including the picture in a new Photo Collage.
This is especially true when working with the special framed picture elements of a Photo Collage as these visual components are stored in a special Frame layer which has to be simplified before it can be edited. The act of simplification, which is also called rasterization, converts the Frame layer to a standard image layer and in the process removes the layer’s ability to scale, rotate and distort repeatedly without image quality loss.

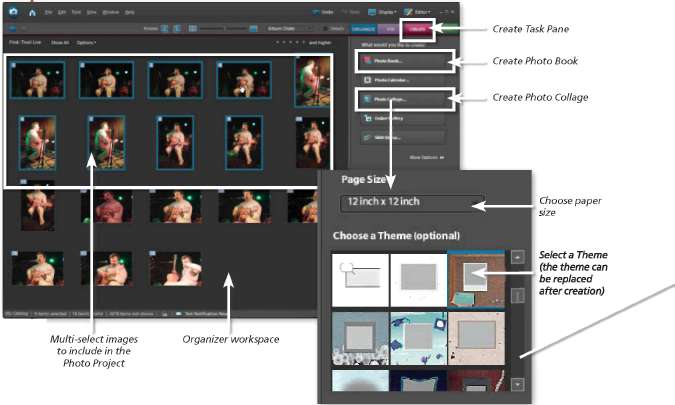
Great layouts quickly >> The Photo Book feature fast tracks the production of multi-image, multi-page projects in Photoshop Elements. The Photo Collage option on the other hand is used for creating single page montages of multiple pictures. To use either simply select the images to include in the Organizer space and pick either the Photo Book, or Photo Collage, entry from the new Create Task pane. The Editor workspace then opens and the selected images are displayed in the Project Bin. Next style the layout with the theme and/or layout options in the Create Task Pane and then click the OK button to produce the layout in Full Edit space.
12.01 Basic steps for layout creation
Suitable for Elements – 7.0, 6.0, 5.0 | Difficulty level – Basic | Resources – Web image 1201-1, 1201-2, 1201-3 Related techniques – 12.02, 12.03, 12.04
Using the Photo Collage feature, one of the Photo Project options in Elements, is a simple multi-step process with the creation options centered around the new Create Task pane.
Step 1 >> The process of creating a Photo Collage will generally start in the Organizer workspace. Here you can multi-select the photos that will be used in the layout. To choose a series of images click on the first thumbnail and then hold down the Shift key and click the last picture in the series.

Step 2 >> To pick non-sequential photos, select the first and then hold down the Control key whilst clicking on other thumbnails to be included in the selection. With the images highlighted the next step is to choose the Photo Collage option from the Create Task pane.
Step 3 >> Using an Elements’ Album (collection) as a starting point you can alter the order or sequence that the photos appear in the multi-page document. After rearranging the position of photos in the Album, multi-select those to be included in the layout.

Step 4 >> Alternatively a blank document can be created by selecting the Photo option in Create Task pane in either the Editor or Organizer spaces. Photos that are already open can then be dragged into the blank document from the Project Bin area of the Editor. Non-opened pictures can be added by clicking onto the Click Here to Add Photo section of the newly created frames. Album images can also be displayed in the Project Bin by choosing the Album entry from the Bin’s menu.
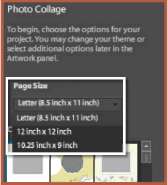
Step 5 >> Next choose the Photo Collage option from the Create Task Pane. The selected images are transferred to the Project Bin and the Projects panel is displayed in the Create Task Pane. You can select the size of the photo collage document from those contained in the dropdown list at the top of the panel.
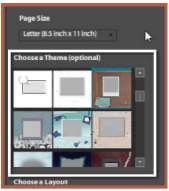
Step 6 >> The next step is to choose the Theme for the collage. The Theme options provide the chance to refine the way that the layout looks. Here you can choose matched background and frame treatments. The Layout settings control the number and general position of the pictures on the document pages. The last section provides the Additional Options of auto filling the pages created with selected photos, adding caption details and altering the total number of pages created.

Step 7 >> Extra pages and images can be added or removed after the Photo Collage has been created from inside the Full Edit workspace. The frames, backgrounds and themes can also be changed by applying an alternative design from those listed in the Content panel situated in the Artwork section of the Create pane.>

Step 8 >> Once the Photo Collage characteristics are set then clicking the Done button at the bottom of the pane will instruct Elements to create the free form multi-page document. This process can take a little while as the program creates the pages and then sources, sizes and inserts the pictures into the new Photo Collage.
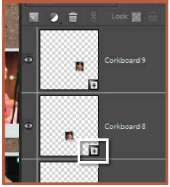
Step 9 >> Each photo is stored on a separate Frame layer which is indicated by a small plus icon in the bottom right of the layer’s thumbnail. The Layers palette can be displayed (along with other editing tools) when selecting the Edit option in the Task Pane area of the Editor workspace.

Step 10 >> Frame layers are unlike other image layers in that they contain both the photo as well as its surrounding frame. These picture parts are stored separately and remain editable even though they appear as a single layer. When the creation process is finished you can flip between pages (if you have created a multi-page document) by clicking on the next (or previous) page in the Project Bin or pressing the Forward and Back buttons in the Organizer space.
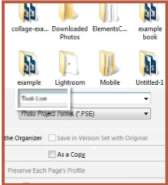
Step 11 >> Unlike the album pages in earlier versions of Elements, Photo Collage and the other Photo Project, and their contents, remain editable after they have been saved and reopened. To enable this new ability Adobe created a completely new file format for the multi-page editable documents. Called the Photo Project Format it has an extension of .PSE as opposed to the .PSD that is associated with standard Photoshop and Photoshop Elements documents.

Step 12 >> When saving a newly created Photo Collage the file format in the Save dialog automatically changes to . PSE. By default the Include in the Organizer option is also selected ensuring that the new document is cataloged and displayed in the Organizer space. A small Multi-page icon is displayed at the top right of the thumbnail of each Photo Collage document displayed in the Organizer.
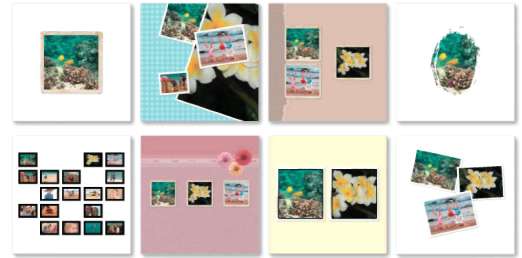
Quick change layouts using Themes >> The Photo Collage and Photo Book features in Elements can be used to quickly create a series of photo album pages using photos selected in the Organizer workspace. A variety of layout designs are shipped with the program with other variations promised as downloads in the future. Changing a design (a specific background and frame) is as simple as Applying a new Theme from the Artwork > Content section of the Create pane.
12.02 The new super Project Bin
Suitable for Elements – 7.0, 6.0, 5.0 | Difficulty level – Basic | Resources – Web image 1201-1, 1201-2, 1201-3 Related techniques – 12.02, 12.03, 12.04
Starting life as a humble place to store photos open in the Editor workspace the Photo Bin, now called the Project Bin, was upgraded for version 6 of Photoshop Elements. Sure, the bin still displays those images that are open in the workspace but this is only part of the story.
The Project Bin contains two drop down menus on the upper edge of the bin. The menu on the left provides a choice of which images are displayed in the bin. The options include:
Show Open Files – This option displays all images currently open in the editor workspace in a group in the project bin.
Show Files From Organizer – Use this choice to display any images currently selected in the Organizer workspace.
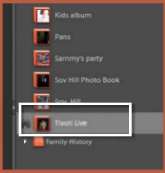
Show Albums – Though not a specific entry itself, the next group of options in the menu are headings for all the Albums that have been saved in the Organizer workspace. The number of entries listed here will be determined by the number of Albums you have created in the Organizer. Selecting an entry here will display all the images contained in the Album in the Project Bin.
Providing better control over the images that are displayed in the Project Bin helps users when they are constructing Photo Book pages or individual Photo Collages. It is no longer necessary to bounce back and forwards between Editor and Organizer workspaces, locating suitable photos to include in your compositions. Just group all the images into an Album and then proceed to the Editor workspace. Display the images in the Project Bin by choosing the Album entry from the dropdown list. Next select the Create Option from the Bin Actions menu and choose the Photo Book or Photo Collage option from the Create Task Pane.
By selecting the Auto Fill with Project Bin Photos option at the bottom of the Photo Book or Photo Collage pane, the pictures will be inserted into new frames and pages. Alternatively a blank multi-page document can be created by deselecting this option and then the pictures can be dragged to the blank frames from the Project Bin.

Auto-Fill >> The Auto-Fill with Project Bin Photos option inserts the images from the bin into the frames and onto the pages created in the multi-page document. Elements will create as many pages as is needed to place all of the images displayed in the bin.
Project Bin actions
On the right of the ‘show’ drop-down menu there is a second menu containing special actions that can be performed directly from the Project Bin.
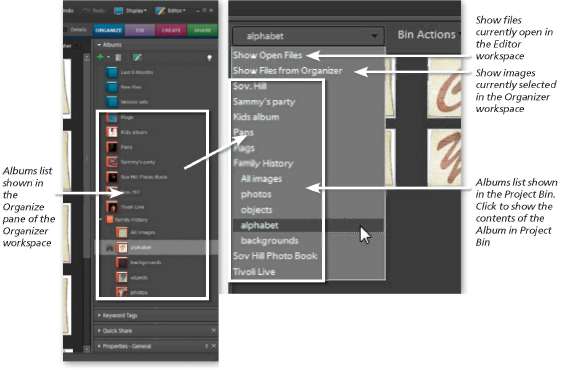
Displaying Album contents in the Editor workspace >> One of the real bonuses in the upgrade of the Project Bin from Elements 6 is the ability to display Albums inside the Editor workspace. The drop-down menu on the left of the Project Menu lists all saved Albums. Selecting an entry will display the Album’s photos in the Bin ready for inclusion in photo projects.
There are four possible Project Bin actions:
Create – Selecting this entry switches the Task Pane on the right of the editor workspace to the Create option providing easy access to the Photo Projects.
Share – The Share option displays the Share Task Pane on the right of the Editor workspace.
Print Bin Files – Select this entry to automatically add the images currently displayed in the Bin to the Print Photos dialog. This is a fast way to print all open files.
Save Bin as an Album – Use this option to save all files displayed in the Bin as a new Album. This provides a great way to group images that you have been working on in the Editor workspace so that you can return to them later.
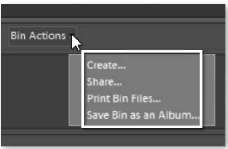
Bin Actions >> The Bin Actions menu is located beside the ‘show’ menu at the top edge of the Project Bin. The menu contains four different actions that can be performed from the bin.
12.03 Editing existing Photo Collages
Suitable for Elements – 7.0, 6.0, 5.0 | Difficulty level – Basic | Related techniques – 12.01, 12.03, 12.04
As we have seen, the Photo Collage feature can create a multi-page document complete with photos in frames on a background. In producing this design Elements will make decisions about the size and position of the frames and the pictures within them. On many occasions you will probably want to use the pages the feature produces with no alterations, but there will be times when you will want to tweak the results. At these times use the following techniques to edit the automatically produced designs.

Basic adjustments >> To move the picture and frame combination to a new position on the canvas just click and drag the combination.
The size and orientation of the Frame/Picture can be altered by clicking on the picture and frame first, to select it, and then using the corner, edge and rotate handles to scale or pivot.
Click on the Commit button (green tick) at the bottom of the selected picture to apply the changes. To disregard the changes click the Cancel button (red circle with diagonal line through it) instead.
Frame and picture combination changes summary
Other adjustment options are available via the right-click menu when the Move tool is selected. Selections in this menu allow you to:
Rotate 90° Right or Left – Pivot the frame and picture by a set amount.
Position Photo in Frame – Switch to Picture Select mode to allow scaling, rotating and moving the photo within the frame.
Fit Frame to Photo – Automatically adjust the frame size to accommodate the dimensions and format of the place photo. Use this option if you don’t want to crop the photo with the edges of the frame.
Replace Photo – Displays a file dialog where you can select a new photo for the frame.
Clear Photo – Removes the photo but keeps the frame.
Clear Frame – Removes the frame but keeps the photo.
Bring to Front/Bring Forward – Moves the frame and photo up the layer stack.
Send to Back/Send Backward – Moves the frame and photo down the layer stack.
Edit Text – Switches text layers to the edit mode.
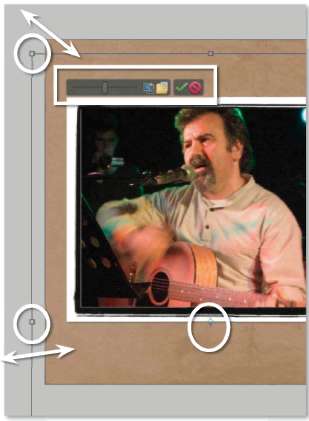
Altering the picture only >> As well as being able to alter the characteristics of the frame by selecting the photo you can perform similar changes to the picture itself. Double-clicking with the Move tool or choosing the Position Photo in Frame option from the right-click menu selects the photo and displays a marquee around the picture. A small control panel is also displayed at the top of the marquee.
To move the position of the photo in the frame simply click and drag on the image, releasing the mouse button when the picture is correctly placed. You can alter the size of the photo within the frame by moving the Scale slider (in the control panel) or by dragging one of the handles of the marquee.
Moving a corner handle will scale the photo proportionately, whereas dragging a side handle will squish or stretch the image. The picture can be rotated in 90 increments (to the left) by clicking the Rotate button in the control panel. Alternatively, you can rotate the image to any angle using the rotate handle (middle of the bottom edge of the marquee) or by click-dragging the cursor outside the boundaries of the marquee.
The photo can be replaced with a new picture by clicking the Replace button in the control panel and then selecting the new picture from the file dialog that is displayed.
Altering the Picture Only summary
Extra image adjustment options are available from the right-click menu. The actions available are:
Free Transform – The default mode where dragging the corner of the marquee scales proportionately and dragging the edges squashes or stretches the picture. The following keys alter the action of dragging a handle when in this mode:
Shift + corner handle – Scales proportionately (this option is set by default when first scaling so it may not be necessary to hold down Shift unless you moved an edge handle),
Ctrl + any handle – Distorts the picture,
Ctrl + Shift + middle edge handle – Skews the picture, and
Ctrl + Alt + Shift + corner handle – Applies perspective.
Scale – Resizes in the same manner as the Free Transform mode.
Free Rotate Layer – Rotates the image when click-dragging outside of the marquee.
Skew – Skews the photo when dragging an edge handle.
Distort – Distorts the picture when moving any handle.
Perspective – Applies a perspective effect when dragging a corner handle.
12.04 Adding, removing and replacing photos
Suitable for Elements – 7.0, 6.0, 5.0 | Difficulty level – Basic | Related techniques – 12.01, 12.03, 12.04
Photo Collages do not become static documents once they are created. In the previous section we saw how it is possible to adjust the size, position and orientation of both the photo and frames that were added during the initial creation process, but the feature’s flexibility doesn’t end there. You can also add new photos, replace existing pictures with alternative choices and even remove images that you no longer want to keep. Here’s how.

Adding new photos >> All editing of Photo Projects occurs in the Full Editor workspace. So to add new photos to an existing layout you need to add a new blank frame to the composition. Do this by clicking on the selected frame in the Content section of the Artwork area of the Create pane and pressing the Apply button. A new frame will be created on the current page of the document.
To add a photo to the frame, click-drag one from the Project Bin to the frame or click the text in the empty frame and select a photo from the file browser that opens. Using this approach you can add a photo without it first having to be open in the Project Bin.
When moving the photo make sure that the frame is highlighted with a blue rectangle before releasing the mouse button to insert the picture.

Getting new photos to fit >> The last part of the process is to fine-tune the picture by adjusting size, orientation and position within the frame. Use the techniques in the previous section to make these alterations.
A good starting place is to select the Fit Frame to Photo option from the right-click menu. After the image and frame are the same size you can then scale, rotate and move the combination.

Replace existing photos >> It is just as easy to replace existing photos with different images whilst still retaining the frame. Select the frame first and then click-drag a picture from the Project Bin to the frame.
This action swaps the two pictures but you will need to have the replacement image already open in the Full Editor workspace beforehand. If this isn’t the case, then an alternative is to select the Replace Photo entry from the right-click menu and choose a new picture via the file dialog that is displayed.
Switching photos >> You can also switch photos between frames on a page by dragging the content of one frame over another. You will see a special Cursor icon when the image is in position and the content will be switched.

Removing photos >> Pictures inserted into frames can be removed whilst still retaining the frame by selecting the Clear Photo option from the right-click menu. The frame will then revert to a blank state providing the opportunity to add a new image to the composition.
If you want to remove both the frame and the photo it contains then select the frame first and click the Delete key. A warning window will display asking you if you want to delete selected layers. Answer yes to remove the frame and picture from the composition.
12.05 Adding, moving and deleting pages
Suitable for Elements – 7.0, 6.0, 5.0 | Difficulty level – Basic | Related techniques – 12.01, 12.02, 12.03
If you selected the Auto Fill option when first creating your Photo Collage then Elements will have generated enough pages to insert the photos that were initially included. If you want to add images, some text or graphics later on then you will need to add some extra pages. The new Photo Project file format (.PSE) was developed especially to handle multi-page documents and to ensure that tasks such as adding, deleting and moving pages was as easy as possible.
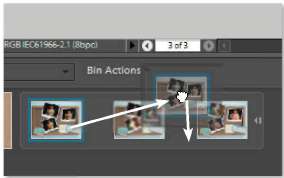
All page management activities are centered around the PSE document in the Project Bin. The document can be displayed collapsed, where all the pages are grouped together on top of each other, or expanded, where each of the thumbnails representing a single page can be viewed separately .

Adding Pages >> All new pages in a PSE document are added after the current selected page. So start by expanding the multi-page document in the Project Bin and then selecting the thumbnail of the page before the position where the new page is to be created.
So to add a new page you choose either the Add Blank Page or Add Page Using Current Layout option from the Edit menu.
The new page is then added to the document and a new thumbnail is displayed in the Project Bin to the right of the selected page.
These Add Page options are also available from the right-click menu when you select a page in the Project Bin.
Adding pages options:
In Elements you have two options for creating new pages:
Add Blank Page – Use this option to add a white page with no frames, backgrounds or themes present. Once the page is created then text, graphics, shapes, frames, backgrounds and special effects can be added from the Artwork and Effects palette.
Add Page Using Current Layout – This feature duplicates the layout settings of the selected page when creating the new one. Use this option to add new pages to a group of pages that already contain a background and frames as it will help to keep the look of the whole document consistent.
Moving pages >> The position of pages (from left to right) in the expanded view of a multi-page document in the Project Bin indicates the page’s location in the production. The first page in the document is the one position furthest to the left, the second page is the next one along to the right and so on. Changing the position of the page thumbnail in the Project Bin preview alters the page’s actual position in the document. Moving pages is a simple task – just click on the page to move and drag it to a new location in the document, release the mouse button and the page is relocated.

Deleting pages >> Pages, and the frames and photos they contain, can be deleted from a multi-page document by selecting the page thumbnail in the Project Bin and then choosing Edit > Delete Current Page. Alternatively, the Delete Current Page entry can also be selected from the right-click menu.

Viewing pages >> Navigate between the different pages of your PSE document by selecting the thumbnail of the page that you want to display from the Project Bin. Alternatively you can move from one page to the next using the Forward and Backward buttons located at the bottom of the document window.

PSE documents in the Project Bin >> Multi-page Photo Project (.PSE) documents are displayed in the Project Bin with a shaded background. The document can be expanded or collapsed via the sideways arrow button on the right of the last thumbnail on the right.

12.06 Using the Content and Effects panes
Suitable for Elements – 7.0, 6.0, 5.0 | Difficulty level – Basic | Related techniques – 12.01, 12.02, 12.03, 12.04
Photoshop Elements contains a variety of tools and options for customizing a Photo Book or Photo Collage project. Most changes are made via options in the Effects, Content, Favorite and Layers palettes. These palettes or panes as they are sometimes called can be accessed via the Edit or Create (Artwork section) Task panes.
It is worth noting though that different options are available for Photo Books and Photo Collage features. Because Photo Books are designed for the creation of documents that contain between 20 and 80 pages it is important to keep the files as streamlined as possible. For this reason it is not possible to access the Edit Task pane options. This means that there is no access to the Layers Palette and that the options in the Effects palette are limited. Photo Collage documents are designed for fewer pages and so can access the full range of features.
Content Palette or Pane
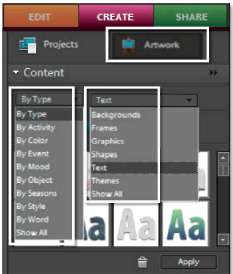
So once a multi-page document is created the various components housed in the Content palette can be used to add to or alter the look and feel of your design. The palette was completely revamped in version 6 and contains a drop-down menu on the left for the way that the content is sorted (by type, activity, color, event, etc.) and the right for filtering the content so that only specific types are displayed (backgrounds, frames, graphics, etc.).
The content types include backgrounds, frames, graphics, shapes, text and themes. The themes area houses prebuilt and fully styled layout designs combining matched frame sets and backgrounds. Many of the frame and theme options featured in these sections are also available in the Photo Projects panes displayed when first producing the Photo Book or Photo Collage. The Text section contains a variety of one-click text effects that can be added quickly and easily to type. The Favorites group holds user selected favorites chosen from the other areas. To add a theme, frame, background or any other entry from the palette select the entry and then click the Add to Favorites button. To apply a theme or add artwork to a document select the Palette entry and click the Apply button. Extra palette options and preferences are available via the More button at the top of the palette.
Effects Palette
The Effects palette (previously called Special Effects) includes filters, layer styles, and photo effects options. In versions 6.0 and 7.0 these options have been given their own palette located under the Edit tab, rather than being grouped together in a single Artwork and Effects palette as was the case in Photoshop Elements 5. To apply an effect to a document select the item in the layout to change and then choose the Palette entry and click the Apply button. The effect can also be dragged and dropped over the frame or graphic to apply the change.

Multiple designs in seconds >> You can change both frames and backgrounds of an existing layout with just two clicks – one to select the new theme (combination of frame and background) and two to apply it to the design. All the designs here were created in this way. If you drag the design from the palette and drop it on the document, then you can make the change with only one click. Cool!
Create > Artwork > Content section >> The Content section of the Artwork area of the Create task pane contains backgrounds, picture frames, graphics, text, themes and shapes that can be added to your layouts. Backgrounds, graphics and shapes all create their own layers when added. Frames, on the other hand, are applied to existing layers. To add a piece of artwork click on the thumbnail in the palette and then press the Apply button. To add a picture to a frame drag the image from another open document to the frame.
All artwork except Backgrounds can be scaled and rotated via the corner, middle edge and rotate handles. Click the image layer to activate the handles.
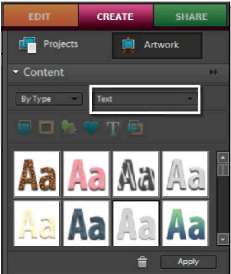
Create > Artwork > Content > Text section >> The Text section of the Content panel contains a variety of text effects that you can apply to the type in your Elements documents. The effects include bevels, drop shadows, glows and gradients, and only work with text layers. To add text to your composition click the thumbnail of the effect that you want to apply in the pane before finally clicking the Apply button.
With Photo Collage compositions the attributes of the text effects (size of drop shadow, color of stroke, etc.) can be adjusted via the Layer > Layer Style > Style Settings. Text effects can be removed by selecting the Layer > Layer Style > Clear Layer Style entry. These options are not available for Photo Book productions.

Create > Artwork > Effects section >> The Effects section of the Artwork pane groups together filters, layer styles and photo effects. Note that not all of these options are available for use with Photo Books.
The Filters group contains many of the options that are listed under the Filter menu. To apply a filter select the layer to change, then the thumbnail in the palette and click Apply. Layers styles add effects such as drop shadows, outer glows and strokes to selected layers. These can be applied to text, image and shape layers and the characteristics of the styles can be customized via the Layer > Layer Style > Style Settings dialog. Photo effects alter your photos via a series of automatic editing steps. Options include convert to black and white, create a photo frame and add soft focus. Some Photo effects are applied to standard image layers, others only work with background layers. After selecting the effect to apply, a pop-up dialog will indicate if you are working with the wrong layer type. To correct, simply convert image layers to background, or vice versa, and apply the effect again.
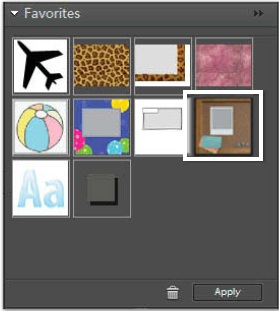
Create > Artwork > Favorites section >> The Favorites section of the Artwork pane lists all the artwork, effects, themes and styles that you have nominated as favorites.
This area is a great place to store the Artwork entries that you use time and time again. For instance when you find a layer style or filter that you particularly like, rather than have to search for it each time you want to use it, simply click the Add Favorites star at the bottom of the palette to store the style in the Favorites area.
Remove items from the Favorites by right-clicking on the thumbnail of the Favorites entry and selecting Remove from Favorites entry in the pop-up menu.

Create > Artwork > Content > Themes section >> The Themes section lists a variety of pre-designed backgrounds and matched frame sets that can be applied to your Elements’ document. A document page can only have one theme at a time so trying to apply a second theme will replace the existing background and frames. A multi-page document can have many differently themed pages though. Themes are a great place to start when you want to provide a consistent look and feel to your album or scrapbook pages. Commencing your project with themes doesn’t mean that you can’t add other frames, graphics, shapes or text later. Just choose and apply the selected frame style from the Artwork pane as you would normally.
You can also change the theme’s background by picking and applying a new background. Different frame styles can be substituted by dragging the new style over the existing frame and letting go when the layer border turns blue.

Adjusting Style Settings in Photo Collages >> The attributes of the Text Effects or Layer Styles in Photo Collage designs can be adjusted using the Style Settings dialog which is displayed by double-clicking the ‘fx’ icon in the layer or by selecting Layer > Layer Style > Style Setting.
12.07 Align, arrange and distribute your frames
Suitable for Elements – 7.0, 6.0, 5.0 | Difficulty level – Basic | Related techniques – 12.01, 12.02, 12.03, 12.04
The Auto Fill option within the Photo Collage feature is a great way to get your photos into a layout quickly and easily . I n the previous sections we have looked at how to adjust the pictures and the picture and frame combinations; now let’s look at how to change the way that each of the picture elements relate to each other.
Photoshop Elements contains three specialist controls designed for this purpose. They are located on the options bar of the Move tool and are divided into Arrange, Align and Distribute headings. When clicked each shortcut button displays a variety of composition options in a dropdown menu.
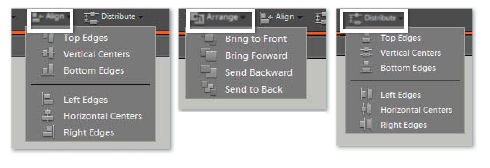
Composition changes >> The options grouped under the Align, Arrange and Distribute shortcut buttons provide quick ways to alter the composition of your framed photos.

Align >> The Align option is one of three arrangement features designed to work with the contents of layers. After multi-selecting several layers in the Layers palette, the picture content of these layers can be composed according to the options in the Align menu.
Top and Bottom Edges align the picture via the top or bottom extremities of layer content. The Vertical Centers option arranges the picture parts around a horizontal line or axis. Left and Right Edges move the picture content to either side aligning the edges of the detail. The Horizontal Centers feature arranges all the content of the selected layers around a vertical axis.
In the example, the three pictures are aligned using the top edge of the frame. Do this by selecting the layers first and then choosing Align > Top Edges.
Arrange >> The Arrange option is one of three new layer organization features contained on the Move tool’s options bar. Unlike the Align and Distribute features, Arrange moves a selected layer (or group of layers) up or down the layer stack rather than moving the contents of these layers around the canvas area.
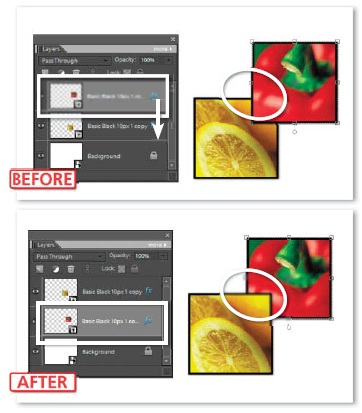
To use the feature select a layer, or layers, in the Layers palette and then choose one of the options in the drop-down Arrange menu in the Move tool options bar. In the example document the red pepper picture (top layer) was selected and then the Send Backward option chosen. This moved the layer one position down in the order of the stack changing the picture so that the red pepper now sits behind the lemon. The Arrange options include – Bring Forward and Send Backward which moves the layer up or down one position and Send to Back which pushes the layer to the bottom and Bring to Front which places the layer on the very top of the stack.

Distribute >> The Distribute option also arranges the content of layers within the canvas space. After multi-selecting several layers in the Layers palette, the picture content of these layers can be arranged according to the options in the Distribute drop-down menu. This feature can be used very successfully to evenly space picture parts within the canvas area.
The Distribute > Horizontal and Vertical Centers options arrange the picture parts so that the axes of the objects are evenly spaced. The Top and Bottom Edges base the spacings on the upper or bottom most part of the object. The Left or Right Edges option distributes the objects using the side boundaries as the reference point for the spacing. In this example an even space was placed between the three photos by first selecting all three layers and then choosing the Distribute > Horizontal Centers option.
12.08 Printing your Photo Collages and Photo Books
Suitable for Elements – 7.0, 6.0, 5.0 | Difficulty level – Basic | Related techniques – 12.01, 12.02, 12.03, 12.04
As part of the technology behind the new Photo Collage feature the folk at Adobe created a new file format called the Photo Project Format. The files saved in this format differ from traditional Photoshop Elements files in that they can include multiple pages. The format has a file extension of .PSE. If a layout document consists of only one page then you can choose to save the file in either the Photoshop Elements format (.PSD) or the Photo Projects format, but once you have multiple pages in the layout then you can only save the document in the PSE file type.
This new file type also brings with it different possibilities when it comes to output. You can now choose to print any single page from the document, all pages from the layout, a contact sheet, picture package, or label set of the pages or even order a Kodak Photo Book of the complete project all from inside Photoshop Elements.
All printing options, except the on-line photo book ordering, are handled by either the Print (for single prints) or Print Photos (for multiple prints) dialogs. Print is accessed from inside the Full Edit space by selecting File > Print. The Print Photos dialog is displayed by either selecting File > Print Multiple Photos from the Full Edit space, Print Bin Files from the Bin Actions menu or File > Print from the Organizer (the Photo Project thumbnail must be selected first).
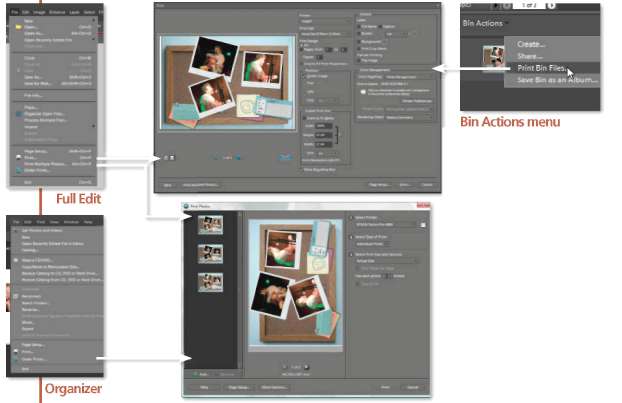
Printing PSE documents >> Multi-page PSE, or Photo Project documents that are open in the Full Edit workspace, can be printed either a page at a time via the File > Print option or as a group of prints with the File > Print Multiple Photos. Also the new Print Bin Files option located in the Bin Actions menu can be used to output the files displayed as thumbnails in the bin space.
The Photo Project can also be printed directly from the Organizer space without the need to open the document by electing the project’s thumbnail and then choosing the File Print option.
Print Preview
There is no need to display the individual page you want to print before moving to the Print Preview screen as a pair of Navigation buttons now appear below the preview thumbnail in the window. Use these to flip through the pages in your document to select the page to output. If you decide that you want to print more than one page then click onto the Print Multiple Photos button at the top of the dialog to display the Print Photos screen.
Print Photos
Once inside the Print Photos dialog you will notice that the pages of your Photo Project are listed as individual prints on the left side of the screen. Here you can choose to remove any pages that you don’t want to print by clicking on the thumbnail and then choosing the Remove button at the bottom of the screen. It is important to know that this action only removes the page from the print list and doesn’t make any changes to the Photo Project document itself. As well as the Individual Print Type setting, the Print Photos dialog also provides the ability to output the pages as a contact sheet, picture package or label set. See Chapter 13 for more details on these options.
Order a Kodak Photo Book or Kodak Prints
You can also opt for getting your multi-page Photo Book produced as a Kodak Photo Book or a series of Kodak Prints. This option might not be available in some locations. Simply select the completed creation project thumbnail in the Organizer space and then choose the Order Prints option from the Print On-line shortcut button. This will take you to the Kodak Print store where you can select the size and finish of the prints and where to send them. Add in your payment details and then the files are uploaded and the completed prints are delivered back in the post.
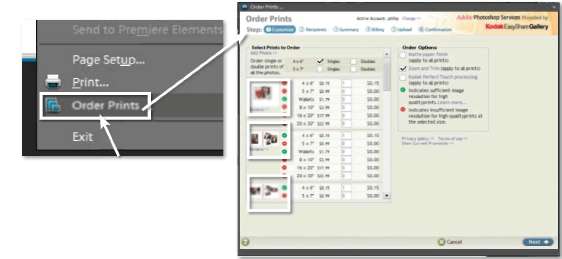
Ordering Prints of Photo Book pages >> Finished multi-page Photo Collage documents can be produced as individual prints via the File > Order Prints option.
To produce a Kodak Photo Book select the Order button in the new floating options bar that appears alongside the preview of the photo book pages when open in the Full Edit workspace. This action will take you to the login screen for the online book production service. In most countries this service is provided by Kodak Easy Share gallery. If you have an account then you can proceed to the book ordering process otherwise you will need to undertake the free registration process before moving to the next screen. The process involves several steps including selecting the cover finish, adding in delivery and payment details and finally confirming the order. A few days later a professionally printed and bound book will arrive at your door.
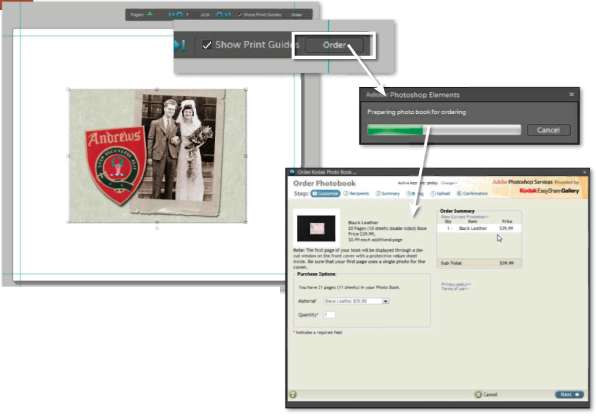
Ordering Photo Books and Prints >> Finished multi-page Photo Collage documents can be produced as bound books with the Order Kodak Photo Books option.