
Appendices
Blend modes

The way that layers interact with other layers in the stack is determined by the Blending mode of the upper layer.
By default the layer’s mode is set to Normal, which causes the picture content on the upper layer to obscure the picture parts beneath, but Photoshop Elements has many other ways (modes) to control how these pixels interact.
Called Blend modes, the different options provide a variety of ways to control the mixing, blending and general interaction of the layer content.

In the following Blend mode examples the picture has two layers – ‘Top’ (1) and ‘Bottom’ (2). In each example the Blend mode of the top layer has been changed to illustrate how the two layers blend together.

The pixels in the top layer are opaque and therefore block the view of the bottom layer. Adjusting the opacity of the top layer will make it semitransparent causing it to blend with the top layer.

Combines the top layer with the bottom using a pattern of pixels. There is no effect if the top layer is at 100% opacity. Reduce the opacity to see the effect. The example is set to 80% opacity.
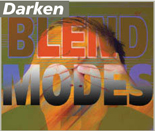
Compares the color of the top and bottom layers and blends the pixels where the top layer is darker than the bottom.

Multiplies the color of the bottom layer with the top layer producing an overall darker result. There is no image change where the top layer is white.
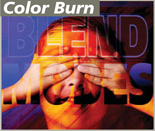
Darkens or ‘burns’ the image using the contents of the top layer. There is no image change where the top layer is white.

Uses the same approach as the Color Burn mode but produces a stronger darkening effect. There is no image change where the top layer is white.
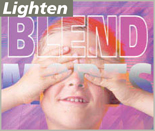
Compares the color in the top and bottom layers and blends the pixels if the top layer is lighter than the bottom.

The opposite to the Multiply mode as it multiplies the inverse of the top layer with the bottom layer producing a much lighter image.

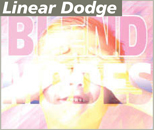
Makes the picture lighter using the top layer to dodge the bottom layer. There is no effect where the top layer is black.
Similar to the Screen mode but produces a much stronger lightening effect. There is no effect where the top layer is black.

Combines the effect of both the Multiply and Screen modes whilst blending the top layer with the bottom. There is no effect if the top layer is 50%
The modes are grouped into several different categories based on the type of changes that they make (1).
The Layer Blend modes are located in the drop-down menu at the top left of the Layers palette (2). Blend modes can also be applied to the painting and drawing tools via a drop-down menu in the Tool’s options bar (3).


Similar to the Overlay mode but produces a more subtle effect. There is no change where the top layer is 50% gray.

Uses the same approach as the Overlay mode but the change is more dramatic. Here the top layer is either Screened or Multiplied depending on its color. There is no effect where the top layer is 50% gray.

Combines the effects of both Color Burn and Color Dodge modes and applies the blend based on the color of the top layer. There is no effect where the top layer is 50% gray.
Similar to the Vivid Light mode but produces a more dramatic result. There is no effect where the top layer is 50% gray.
Blends the light colors in the top layer using the Lighten mode and blends the dark colors using the Darken mode. There is no effect where the top layer is 50% gray.

Creates a flattoned picture with limited colors and lots of posterization. The luminosity of the top layer is blended with the color of the bottom.

Displays the tonal difference between the contents of the two layers by subtracting the lighter pixels from either of the layers. This results in a dark and sometimes reversed image.

Similar to the Difference mode but produces less dramatic effects.

Combines the Hue (color) of the top layer with the Saturation (color vibrancy) and Luminance (tones) of the bottom layer.

Combines the Saturation (color vibrancy) of the top layer with the Hue (color) and Luminance (tones) of the bottom layer.

Combines the Hue (color) and Saturation (color vibrancy) of the top layer with the Luminance (tones) of the bottom layer.
Combines the Luminance (tones) of the top layer with the Saturation (color vibrancy) and Hue (color) of the bottom layer.
Faster Elements at no extra cost
Many dedicated Photoshop Elements users can get substantial speed gains from their existing, albeit modest, equipment by simply optimizing their computer and software so that it runs Elements more efficiently. So to make sure that you are getting the best from the bucks you have already spent, here is a collection of speed-enhancing tips for optimizing your machine.

Allocate a Scratch disk >> Photoshop Elements uses RAM memory to run itself, store picture information and to save undo and history state steps. Unless you are working with particularly small photo files it won’t take too many editing changes before the RAM is completely used up. At this point Elements cleverly uses a portion of hard drive space as ‘fake’ RAM.
This is not a new idea. Most operating systems use the same approach (called Virtual Memory), to ensure that enough memory is available for running essential programs. Photoshop Elements calls this extra memory a ‘Scratch Disk’, and correctly setting up the disk will provide immediate speed and efficiency benefits.
To set your scratch disk, select Full Edit: Edit > Preferences > Performance. Then choose a drive that has the most free space from those listed in the pop-up menu. If you have other drives listed you can also allocate these as extra scratch drives.
Elements will make use of the drive listed first until it is full and then move to the next drive if even more memory is needed.
Most imaging professionals who regularly work with large files install a specific ‘fast access’ drive just to be used as a scratch disk by Photoshop Elements.

Set RAM percentage >> Photoshop Elements shares the RAM on your computer with the Operating System (Windows or OSX) and any other programs running at the same time. The percentage designated in the Photoshop Elements Performance preferences determines the upper amount of RAM memory that can be used by Elements. Most new users push this setting as high as possible, some as much as 90%, thinking that this will speed up the processing of their files.
Unfortunately if this allocation is set too high the operating system, as well as Elements, may need to move information from the fast RAM memory to the slower hard drive memory whilst processing. This action is called page swapping as the data is moved back and forth between the different memory spaces, and results in Photoshop Elements actually running slower.
If you experience slower performance when raising the percentage of RAM allocated to Elements, try reducing the total amount to 50–60% for systems with up to 2Gb, and 70% for computers with 4Gb of RAM.
Remember that you have to restart Photoshop Elements after making any memory changes to ensure that these alterations will take effect.

Defragment your drives >> As images and files are saved and resaved to disk they tend to become fragmented. This means that rather than the whole file being saved in one continuous space on the hard drive the information is broken into pieces and stored in several locations (wherever there is empty disk space). Later when the file is reopened the document is reconstructed from each of the individual pieces. This file fragmentation slows down the opening and saving of files, as well as the running of programs such as Photoshop Elements, if they were fragmented when initially installed. You can overcome this problem by regularly defragmenting the drives you use to store your images and load your programs.
To defragment a drive in Windows XP and Vista:
Click Start > All Programs > Accessories > System Tools > Disk Defragmenter. Choose the drive to be defragmented and then select the Defragment button.
To defragment a drive in Mac OSX:
Despite the fact that the latest version of Mac OSX contains automatic defragmentation of files smaller than 20Mb most Apple users prefer to defrag their drives with third-party utilities.

Minimize History states >> The Photoshop Elements Undo History palette is a great feature especially if you make mistakes as often as I do. Each successive edit is recorded as a step in the palette, enabling you to step back through the changes, gradually reversing your edits as you go. But such a great feature does come at a cost. Each step uses memory resources and, when you make complex changes to large files, you can imagine how much memory is used to store a collection of steps.
Thankfully Adobe provides a setting in the Edit > Preferences > General dialog that can be used to alter the number of History States (or undo steps) stored by your system.
By default it is set to 20, but if you find that Elements is running slowly after making a few editing changes then try reducing the number. Less History States does mean less opportunity to reverse editing changes, but this action frees up memory resources and can bring new life back to a slow running machine.

Reduce the number of open files >> It may seem like stating the obvious, but the more pictures you have open in Elements the more of the total resources of the machine is taken up, just maintaining each open file. When you add in the memory used to ensure undo or multiple History States for each file, it is not too hard to imagine that you will very quickly run out of RAM, forcing Photoshop Elements to use the much slower Scratch Disk space.
To speed up the processing, make sure that you only open (and keep open) files that are essential for your current editing task.

>Alter the Image Cache setting >> Photoshop Elements uses a special image cache to help redraw highresolution images quickly. Instead of displaying all the information contained in these big files, Elements creates lower resolution versions of the photo that are then used to update the screen quickly.
You can elect to store from 1–8 cached versions of the photo. A value of 1 disables the caching. Higher values store multiple versions of the file, which in turn produces faster screen redraws. The default setting is 4, but inputting higher numbers will help speed up the redraw process.
When a high cache number is set, it will take longer to open files as Elements creates the low-resolution versions of the photo at this point. To alter the Image Cache setting select Full Edit: Edit > Preferences > Image Cache and enter a value from 1 to 8 in the Cache Levels text box.

Multi-page documents >> When working with large PSE or multi-page projects you can increase the speed of working by creating the project and then immediately saving and closing the file. After reopening, the images in the Photo Bin are thumbnail versions of each page, but only page 1 is fully open in the Editor. Other pages will open when you click the thumbnail or navigate to them. In this way you can limit the number of open pages when working on large books.

Scratch Disk versus Virtual Memory >> Both Elements and the Windows XP operating system use hard drive space as extra ‘fake’ RAM. Adobe recommends that Elements Scratch Disks be positioned on a different drive to the one used by Windows for its Virtual Memory system. On most set ups the Windows swap file is stored on the start up or C drive.
To help with overall Elements and Windows performance, ensure that you don’t position the Scratch Disk on the same drive. To set the location of your scratch disk select Full Edit: Edit > Preferences > Plug-Ins & Scratch Disks and choose the drive to use from the drop-down menu. Remember, don’t select Startup or C drive unless you have no other choices.

Run Elements by itself >> A simple measure to speed up Elements is to make sure that no other programs are running at the same time. Seemingly simple utilities such as iTunes, Outlook and Word all chew up memory and processor resources that could be used to drive Elements more efficiently.
The golden rule is that if the program is not essential for the editing task then close the software.

Plug-ins
Since the first version of Elements Adobe provided the opportunity for third-party developers to create small pieces of specialist software that could plug into the program. These extra features extend the capabilities of the program and some of them have become so popular that they find themselves added into the program proper in the next release of the software.
Most plug-ins register themselves as extra options in the Filter menu, where they can be accessed just like any other Elements feature.
The Delta100 filter (1) from www. silveroxide.com is a great example of plug-in technology. Designed to reproduce the look of particular types of black and white film stock, the installed filter can be selected from the Silver Oxide group (2) of products in the Filter menu.

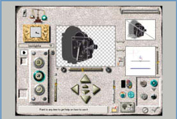
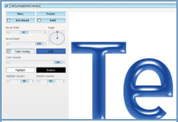
Flaming Pear – Super Blade Pro
Effect: This plug-in provides the most sophisticated control over surface and texture, characteristics of text and objects available.
OS: Mac, Windows Cost: US$30.00
Website: www.flamingpear.com

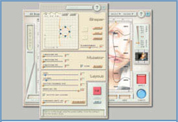
Extensis – Intellihance Pro
Effect: Capable of comparing and applying up to 25 different enhancement options at one time, Intellihance Pro is the master of the quick fix.
OS: Mac, Windows Cost: US$199.00
Website: www.extensis.com

Alien Skin – Eye Candy
Effect: Eye Candy 4000 is a collection of 23 different creative filters used for creating effects such as shadows, bevels, chrome, smoke, wood and even fur.
OS: Mac, Windows Cost: US$169.00
Website: www.alienskin.com

Digital Film – Ozone
Effect: Simulates the same tonal control available when using the film-based Zone system (created by Ansel Adams) with your digital photographs.
OS: Mac, Windows Cost: US$50.00
Website: www.digitalfilmtools.com
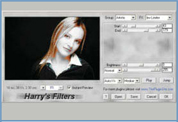
Harry’s – Filters
Effect: A free collection of fi lters that can be used for creating up to 69 different imaging effects. Also contains the option to encrypt your photos.
OS: Mac, Windows Cost: FREE
Website: www.thepluginsite.com

Photowiz – Color Washer
Effect: The Color Washer plug-in is used for the correction and enhancement of colors in your pictures. Great for restoring faded colors in old photos.
OS: Windows Cost: US$49.95
Website: www.thepluginsite.com
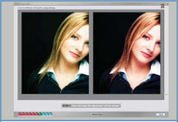
PhotoTune – 20/20 Color MD
Effect: Using a side-by-side comparison approach this PhotoTune plug-in takes the guesswork out of correcting the colors in your photos.
OS: Mac, Windows Cost: US$49.95
Website: www.phototune.com

AutoFX – Photo/Graphic Edges
Effect: Photo/Graphic Edges provides 14 photographic effects that are used to create an astonishing array of edges and borders for your images.
OS: Mac, Windows Cost: US$179.00
Website: www.autofx.com

Power Retouche – Black & White Studio
Effect: This plug-in replicates many of the effects of a traditonal darkroom including specific film looks.
OS: Mac, Windows Cost: US$75.00/£45.00
Website: www.powerretouche.com

VanDerLee – Old Movie
Effect: Create the look and feel of an old photo or movie frame with this plug-in. Includes controls for film type, scratches, camera, dust, fat and hair.
OS: Windows Cost: US$19.95
Website: www.v-d-l.com
Andromeda – Shadow Filter
Effect: Billed as the ‘most advanced shadowing plug-in available’ this filter really lives up to the hype. Master the controls and any shadows are possible.
OS: Mac, Windows Cost: US$109.00
Website: www.andromeda.com

Richard Roseman – Vignette Corrector
Effect: The plug-in removes or adds the darkened edges that are produced by low quality wide angle lenses.
OS: Windows Cost: FREE
Website: www.richardroseman.com
Lokas – Artistic Effects
Effect: The Artistic Effects collection is a series of customized filters that add surface effects to text and shapes. The options include gel, ice, metal, smoke and snow.
OS: Windows Cost: US$59.95
Website: www.artistic-effects.com

NIK – Sharpener Pro Inkjet
Effect: The range of NIK sharpening plug-ins is designed to sharpen your pictures to clarify output to a variety of print devices.
OS: Mac, Windows Cost: US$79.95
Website: www.nikmultimedia.com
AV Bros – Puzzle Pro
Effect: Although at first this seems like a simple jigsawpuzzle maker the ability to customize and add extra shapes really extends the options for this plug-in.
OS: Mac, Windows Cost: US$49.95
Website: www.avbros.com

ASF – Digital GEM Airbrush
Effect: Provides glamor photo-type results by automatically smoothing skin whilst retaining details in the areas like eyelashes and hair.
OS: Mac, Windows Cost: US$99.95
Website: www.asf.com

Digital Element – Aurora
Effect: The Aurora plug-in is an advanced world creator that produces highly sophisticated water, sky and lighting elements.
OS: Mac, Windows Cost: US$199.00
Website: www.digi-element.com

Andrew’s Plugins – V8
Effect: There is plenty of creative choice here with nearly 20 different plug-in sets providing thousands of different effects and only costing $10.00 each.
OS: Mac, Windows Cost: US$10.00
Website: www.graphicxtras.com

The Imaging Factory – Convert to B&W
Effect: Powerful and customizable conversion plug-in designed for the dedicated monochrome enthusiast.
OS: Mac, Windows Cost: US$99.00
Website: www.theimagingfactory.com

PictureCode – Noise Ninja
Effect: Noise Ninja is a very sophisticated noise reduction plug-in that works extremely well with photographs taken using high ISO settings.
OS: Mac, Windows Cost: US$44.95
Website: www.picturecode.com
Jargon buster
A >>
Albums An album is another way that you can order and sort your photos in Elements.
Aliasing The jaggy edges that appear in bitmap images with curves or lines at any angle other than multiples of 90°.
Anti-Aliasing This feature smooths out the saw tooth edges that appear on letters or shapes tha have diagonal or circular sides. The anti-aliasing function in Elements softens around t he edges of images to help make the problem less noticeable.
Aspect ratio This is usually found in dialog boxes concerned with changes of image size and refers to the relationship between width and height of a picture. The maintaining of an image’s aspect ratio means that this relationship will remain the same even when the image is enlarged or reduced Not maintaining the aspect ratio will result in the image being distorted – squished or stretched.
Automatically Tile Windows Automatically resizes open windows to fit the current work-space.
B >>
Background layer An image can only have one background layer. It is the bottom-most layer in the stack. No other layers can be moved or dragged beneath this layer. You cannot adjust this layer’s opacity or its Blending mode.
Background printing A printing method that allows the user to continue working whilst an image or document is being printed.
Batch processing Refers to a function called Process Multiple Files. Batching applies a series of commands to several files at the one time. This function is useful for making the same changes to a folder full of images. In Elements this function is found under the File menu and is useful for converting groups of image files from one format to another.
Bit Stands for ‘binary digit’ and refers to the small-est part of information that makes up a digital file. It has a value of only 0 or 1. Eight of these bits make up one byte of data.
Bitmap or ‘raster’ The form in which digital photographs are stored and is made up of a matrix of pixels.
Blend mode The way in which a color or a layer interacts with others. The most important after Normal are probably Multiply, which darkens everything, Screen, which adds to the colors to make everything lighter, Lighten, which lightens only colors darker than itself, and Darken, which darkens only colors lighter than itself. Both the latter therefore flatten contrast. Color maintains the shading of a color but alters the hue to the selected foreground color. Glows therefore are achieved using Screen mode, and Shadows using Multiply.
Brightness range The range of brightnesses between shadow and highlight areas of an image.
Burn tool Used to darken an image, can be targeted to affect just the Shadows, Midtones or Highlights. Opposite of the Dodge tool. Part of the toning trio, which also includes the Sponge.
Byte The standard unit of digital storage. One byte is made up of 8 bits and can have any value bet ween 0 and 2 55 . 10 2 4 bytes are equa l to 1 kilobyte. 1024 kilobytes are equal to 1 megabyte. 1024 m e gabytes a re equal to 1 gigabyte.
C >>
Canvas Elements makes a distinction between the canvas, upon which pictures and other content is placed, and the image content itself.
Caption Captions are another way to ‘title’ your photos beyond the standard file name and can be added using the Properties pane in Elements.
Catalog When you import pictures into the Photo Browser Elements creates a database of the images and their details. This database is called a catalog.
CCD or Charge Coupled Device Many of these devices placed in a grid format comprise the sensor of most modern digital cameras.
Clone Stamp or Rubber Stamp tool Allows a user to copy a part of an image to somewhere else. It is therefore ideal for repair work, e.g. unwanted spots or blemishes. Equivalent to Copy and Paste in a brush.
Color mode The way that an image represents the colors that it contains. Different color modes include Bitmap, RGB and Grayscale.
Compression Refers to a process where digital files are made smaller to save on storage space or transmission time. Compression is available in two types – lossy, where parts of the original image are lost at the compression stage, and lossless, where the integrity of t he file is maintained during the compression process. JPEG and GIF use lossy compression whereas TIFF is a lossless format.
D >>
Defringe The defringe command removes the contrasting edge pixels from picture parts that have been cut or extracted from their backgrounds.
Digitize This is the process by which analog images or signals are sampled and changed into digital form.
Dodge tool For lightening areas in an image. See also Burn tool.
Downsample To reduce the size of a digital photo. Most methods for achieving this result remove unwanted pixels in the process.
DPI or Dots per inch A term used to indicate the resolution of a scanner or printer.
Dynamic range The measure of the range of brightness levels that can be recorded by a sensor.
E >>
Enhancement A term that refers to changes in brightness, color and contrast that are designed to improve the overall look of an image.
Export The Export feature in the Photo Browser is designed to provide a quick easy automated way to create and save copies of multi-selected pictures from inside the workspace.
F >>
Feather The Feather command softens the transition between selected and non-selected areas of a photo.
File format The way that a digital image is stored. Different formats have different characteristics. Some are cross-platform, others have inbuilt compression capabilities or a limited color range.
Filter In digital terms a filter is a way of applying a set of image characteristics to the whole or part of an image. Most image editing programs contain a range of filters that can be used for creating special effects.
Front page Sometimes called the Home or Index page, refers to the initial screen that the viewer sees when logging onto a website. Often the name and spelling of this page file is critical if it is to work on the web server. Consult your ISP staff for the precise name to be used with your site.
G >>
Gamma The contrast of the midtone areas of a digital image.
Gamut The range of colors or hues that can be printed or displayed by particular devices.
Gaussian Blur When applied to an image or a selection, this filter softens or blurs the image.
GIF or Graphic Interchange Format This is an indexed color mode format that contains a maximum of 256 colors that can be mapped to any palette of actual colors. It is extensively used for web graphics, buttons and logos, and small animated images.
Grayscale A monochrome image containing just monochrome tones ranging from white through a range of grays to black.
Group You can group photos with similar content into a single Image Stack in the Photo Browser workspace.
Grow The Select > Grow feature increases the size of an existing selection by incorporating pixels of similar color and tone to those already in the selection.
H >>
Histogram A graph that represents the tonal distribution of pixels within a digital image.
History Adobe’s form of Multiple Undo.
Hot linked This term refers to a piece of text, graphic or picture that has been designed to act as a button on a web page. When the viewer clicks the hot linked item they are usually transported to another page or part of a website.
HTML The Hyper Text Mark Up language is the code used to create web pages. The char-acteristics of pages are stored in this language and when a page file is downloaded to your computer the machine lays out and displays the text, image and graphics according to what is stated in the HTML file.
Hue Refers to the color of the light and is separate from how light or dark it is.
I >>
Image layers Images in Elements can be made up of many layers. Each layer will contain part of the picture. When viewed together all layers appear to make up a single continuous image. Special effects and filters can be applied to layers individually.
Indexed color The Indexed Color mode can support up to 256 different colors and is the default Color mode for the GIF file format.
Interpolation This is the process used by image editing programs to increase the resolution of a digital image. Using fuzzy logic the program makes up the extra pixels that are placed between the original ones that were generated at the time of scanning.
ISP The Internet Service Provider is the company that hosts or stores web pages. If you access the web via a dial-up account then you will usually have a portion of free space allo-cated for use for your own site; others can obtain free (with a small banner advert attached) space from companies like www.tripod.com.
J >>
JPEG A file format designed by the Joint Photographic Experts Group that has inbuilt lossy compression that enables a massive reduction in file sizes for digital images. Used extensively on the web and by press professionals for transmitting images back to newsdesks worldwide.
JPEG2000 The newest version of JPEG is called JPEG2000 and uses wavelet technology to produce smaller (by up to 20%) sharper files with less artifacts than traditional JPEG.
L >>
Layer opacity The opacity or transparency of each layer can be changed independently . Depending on the level of opacity the parts of the layer beneath will become visible. You can change the opacity of each layer by moving the Opacity slider in the Layers palette.
LCD or Liquid Crystal Display A display screen type used in preview screens on the back of digital cameras, in laptop computers and more and more as replacement desktop screens.
Liquify A tool that uses brushes to perform distor-tions upon selections or the whole of an image.
M >>
Marquee A rectangular selection made by click-dragging to an opposite corner.
Maximize mode The Maximize mode is one of the many ways that open pictures can be viewed in Photoshop Elements. Selecting the option from the Window > Images menu switches the view from Auto Tiled mode to a single image surrounded by the gray work area background.
Megapixel One million pixels. Used to describe the resolution of digital camera sensors.
Metadata Metadata is a variety of non-image information about your picture that is attached to the photo file. Some of the detail is created at time of capture or creation and other parts are added as the file is edited or enhanced.
N >>
Navigator In Elements, a small scalable palette showing the entire image with the possibility of displaying a box representing the current image window frame. The frame’s color can be altered; a new frame can be drawn (scaling the Image window with it) by holding the Command/Ctrl keys and making a new marquee. The frame can be dragged around the entire image with the Hand tool. The Zoom tools (Mountain icons) can be clicked, the slider can be dragged, or a figure can be entered as a percentage.
Noise Noise is the digital equivalent of the grain that appeared in photos taken with high ISO films. Noisy photos or those images that contain a lot of random speckled pixels instead of smooth tones generally result from long exposures times or the use of a high ISO or sensitivity setting. The Reduce Noise filter in Elements can be used to help correct this picture problem.
O >>
Optical resolution The resolution that a scanner uses to sample the original image. This is often different from the highest resolution quoted for the scanner as this is scaled up by interpolating the optically scanned file.
Optimization for Web The best way to optimize your photos for web use is via the Save for Web option. This feature provides before and after previews of the compression process as well as options for compression and reducing the dimen-sions of your pictures, all in the one dialog.
Options bar Long bar beneath the menu bar, which immediately displays t he various settings for whichever tool is currently selected. Can be moved to other parts of t he screen if preferred.
P >>
Palette A window that is used for the alteration of image characteristics: Options palette, Layers palette, Styles palette, Hints palette, File Browser, History, etc. These can be docked together verti-cally around the main image window or if used less frequently can be docked in the Palette Well at the top right of the screen (dark gray area).
Palette Bin The Palette Bin stores the Elements palettes and sits to the right of the main screen in the Editor workspace.
Photo Browser The Photo Browser or Organizer workspace is the main picture viewing, sorting and management area in Elements. Pictures can be imported into the Browser using the Get Photos command, viewed side by side with the Photo Compare command and seen as a slide show by selecting the Photo Review option.
Pixel Short for picture element, refers to the smallest image part of a digital photograph.
Q >>
Quantization Refers to the allocation of a numerical value to a sample of an analog image. Forms part of the digitizing process.
R >>
RGB All colors in the image are made up of a mixture of red, green and blue colors. This is the typical mode used for desktop scanners, paint-ing programs and digital cameras.
S >>
Sponge tool Used for saturating or desaturat-ing part of an image that is exaggerating or lessening the color component as opposed to the lightness or darkness.
Status bar Attached to the base of the window (Mac) or beneath the window (PC). Can be altered to display a series of items from Scratch Disk usage and file size to the time it took to carry out the last action or the name of the current tool.
Stock A printing term referring to the type of paper or card that the image or text is to be printed on.
Swatches In Elements, refers to a palette that can display and store specific individual colors for immediate or repeated use.
T >>
Thumbnail A low resolution preview version of larger image files used to check before opening the full version.
TIFF or Tagged Image File Format A file format that is widely used by imaging professionals. The format can be used across both Macintosh and PC platforms and has a lossless compression system built in.
W >>
Warp tool A means of creating differing distortions to pieces of text such as arcs and flag ripples.
Keyboard shortcuts
General >>
| Action | Windows | Macintosh |
| Open a file | Ctrl + O | Command + O |
| Open file browser | - | Shift + Command + 0 |
| Close a file | Ctrl + 1/1/ | Command + 1/1/ |
| Save a file | Ctrl + S | Command + S |
| Step backward | Ctrl + Z | Command + Z |
| Step forward | Ctrl + Y | Command + Y |
| Free Transform | Ctrl + T | Command + T |
| Auto levels | Shift + Ctrl + L | Shift + Command + L |
| Auto contrast | Alt + Shift + Ctrl + L | Option + Shift + Command + L |
| Auto Color Correction | Shift + Ctrl + B | Shift + Command + B |
| Convert to Black and White | Alt + Ctrl + B | Option + Command + B |
| Hue/Saturation | Ctrl + U | Command + U |
| Levels | Ctrl + L | Command + L |
| Select All | Ctrl + A | Command + A |
| Apply last filter | Ctrl + F | Command + F |
| Show/Hide rulers | ||
| Show/Hide selection | Ctrl + H | Command + H |
| Help | F1 | Command + ? |
| Print Preview | Ctrl + P | Command + P |
| Exit Elements | Ctrl + Q | Command + Q |
| Deselect | Ctrl + D | Command + D |
| Feather a selection | Alt + Ctrl + D | Option + Command + D |
| Action | Windows | Macintosh |
| Fit image on screen | Ctrl + O | Command + O |
| 100% magnification | Alt + Ctrl + O | Option + Command + O |
| Zoom in | Ctrl + + | Command + + |
| Zoom out | Ctrl + - | Command + - |
| Scroll image with Hand tool | Spacebar + drag mouse pointer | Spacebar + drag mouse pointer |
| Scroti up or down 1 screen | Page Up or Page Down | Page Up or Page Down |
Selection/Drawing tools >>
| Action | Windows | Macintosh |
| Add to an existing selection | Shift + Selection tool | Shift + Selection tool |
| Subtract from an existing selection | Alt + Selection tool | Command + Selection tool |
| Constrain Marquee to Square or circle | Shift + drag Selection tool | Shift + drag Selection tool |
| Draw Marquee from center | Alt + drag Selection tool | Option + drag Selection tool |
| Constrain Shape tool to Square or circle | Shift + drag Shape tool | Shift + drag Shape tool |
| Draw Shape tool from center | Alt + drag Shape tool | Option + drag Shape tool |
| Exit Cropping tool | Esc | Esc |
| Enter Cropping tool selection | Enter | Return |
| Switch Magnetic Lasso to Lasso | Alt + drag tool | Option + drag tool |
| Switch Magnetic Lasso to Polygonal Lasso | Alt + drag tool | Option + drag tool |
| Switch from Selection to Move tool | Ctrl (except Hand tool is selected) | Command |
| Action | Windows | Macintosh |
| Change to Eyedropper | Alt + painting or Shape tool | Option + painting or Shape tool |
| Cyde through blending modes | Shift + + or - | Shift + + or - |
| Set exposure or opacity for painting | Painting tool + Number key ( %= number key x 10) | Painting tool + Number key ( %= number key x 10) |
| Display Fill dialog box | Shift + Backspace | Shift + Delete |
| Perform Fill with background color | Ctrl + Backspace | Command + Delete |
| Change Brush tip size | [ to decrease size ] to increase size | [ to decrease size ] to increase size |
| Change Brush tip hardness | Shift + [ to decrease hardness Shift + ] to increase hardness | Shift + [ to decrease hardness Shift + ] to increase hardness |
Type editing >>
| Action | Windows | Macintosh |
| Select word | Double-dick | Double-dick |
| Select line | Triple-click | Triple-click |
| Decrease fönt size by 2 points/pixels | Selected text + Shift + < | Selected text + Shift + < |
| Increase fönt size by 2 points/pixels | Selected text + Shift + > | Selected text + Shift + > |
Elements/Photoshop feature equivalents
| Activity | Elements | Photoshop |
| Lighten shadow areas in an image | FiII Flash feature (ver. 1.0/2.0), ShadowsIHighlights (ver. 3.0 – 7.0) Ad just Color Curves (ver. 5.0 – 7.0) | Curves and Shadowl Highlight feature |
| Darken highlight areas in an image | Backlighting feature (ver. 1.012.0), ShadowsIHighlights (ver. 3.0 – 7.0) Ad just Color Curves (ver. 5.0 – 7 0) | Curves and Shadowl Highlight feature |
| Transformation | Image > Transform | Edit > Transform |
| Rotate layer | Image > Rotate > Layer 90° left | Edit > Trans form > Rotate 90° CCW |
| Rotate canvas | Image > Rotate > 90° left | Image > Rotate Canvas > 90° CW |
| Resize image | Image > Resize > Image Size | Image > Image Size |
| Resize canvas | Image > Resize > Canvas Size | Image > Canvas Size |
| Batch dialog | File > Process Multiple Files | File > Automate > Batch |
| Web Photo Gallery | File > Create Web Photo Gallery or Create>HTML Photo Gallery | File > Automate > Web Photo Gallery |
| Contact Sheet | File > Print Layouts > Contact Sheet or File > Process Multiple Files | File > Automate > |
| Picture Package | File > Print Layouts > Picture Package or File > Process multiple Files | File > Automate > Picture Package |
| Auto Levels | Enhance > Auto Levels | Image > Adjustments > Auto Levels |
| Auto Contrast | Enhance > Auto Contrast | Image > Adjustments > Auto Contrast |
| Auto Color Correction | Enhance > Auto Color Correction | Image > Adjustments > Auto Color |
| HuelSaturation | Enhance > Adjust Color > Huel Saturation | Image > Adjustments > HuelSaturation |
| Color Variations | Enhance > Adjust Color > Color Variations | Image > Adjustments > Variations |
| Brightness/Contrast | Enhance > Adjust BrightnessIContrast > BrightnessIContrast | Image > Adjustment > BrightnessIContrast |
| Levels | Enhance > Adjust BrightnessIContrast > Levels | Image > Adjustments > Levels |