Let's dig in a bit deeper to get a better understanding of how Records Management has been integrated into Alfresco Share. To do that, let's look in more detail at how the Records Management dashlet is built.
The Alfresco Records Management application is deployed using two AMP files. An AMP file, or an Alfresco Module Package, is a bundled collection of files that together extend the Alfresco platform to provide a new set of related functionality.
Alfresco Records Management functionality is split across two AMP files. One of the AMP files is applied to the Alfresco WAR, extending basic Repository services, and the other AMP file is applied to the Share WAR, defining the Share Records Management site.
AMP files are ZIP files that are packaged and arranged in a folder structure that mirrors the directory structure of the WAR files that they are being deployed into. While we may be adding only Records Management, a single new Alfresco module, the files that make up the Records Management functionality are stored across many standard Alfresco Repository and Alfresco Share directories.
From a systems perspective, when trying to analyze Records Management internals or when trying to modify and customize Records Management behavior, Records Management files are spread across many directories and mixed with the files already in those directories. Because Records Management files are mixed together with non-Records Management files, once the Records Management module is installed, it can be hard when looking at the files in a directory to identify which files in that directory are specific to Records Management.
As a tip, it can be useful when troubleshooting functionality specific to Records Management to isolate only those files related to Records Management. That's easy to do. We can just unzip the AMP files into a directory outside the normal Alfresco structure and then use the files in this location when searching code. The directory structure of the unzipped AMP files mirrors the directory structure of the files that are active in the Share application. Searching across only the Records Management files, while not always foolproof, can make for a more efficient way of searching Alfresco source code, limiting ourselves to looking at only those files that are specific to the Records Management implementation.
The next screenshot shows the unzipped AMP folder hierarchy. We can see that there are many different directories where files for the Share Records Management AMP file are stored:

The Alfresco Records Management dashlet provides the starting point for installing the Records Management site and also provides an easily accessible link to an administration page that is specific to configuring and managing the Records Management site. The Records Management dashlet itself is an excellent example of how dashlets within Alfresco Share work.
Let's look briefly at the Records Management Dashlet to gain some insight into how dashlets work within Alfresco and also to understand how we can customize the Records Management dashlet to work differently.
In order to understand how Alfresco dashlets work, let's take a step back and look at the general flow of information in Alfresco webscripts. The flow that we'll now discuss is at the core of understanding how Alfresco Share dashlets, pages, and components work.
In the next diagram, we can see the flow of information in the Alfresco Webscript Framework. The Webscript Framework is basically Spring Surf, an Open Source framework for building web pages. The framework was first used to build the Alfresco Share application. Later, in cooperation with SpringSource, Alfresco donated the web framework technology to the Spring open source community using an Apache license.
Webscripts consist of files written using the scripting language, JavaScript, the templating language, FreeMarker, and XML to define and describe how the webscript will operate. Webscripts provide a lightweight framework for building complex interfaces and applications.
Note
The announcement of the formation of the open source Spring Surf project was jointly announced by Alfresco and SpringSource in December, 2009. The Spring Surf website is available at this URL: http://springsurf.org.
Spring Surf uses a design pattern found frequently in software architecture called Model-View-Controller (MVC). Alfresco webscripts follow the MVC design pattern. In the MVC pattern, a model or data package is built by a software element called the controller. The model data is then applied to a view template that can render the model data for display.
The advantage of MVC is that it cleanly allows business logic to be separated from the presentation or view logic. The MVC principle encourages developers to write code that is more reusable and modular.
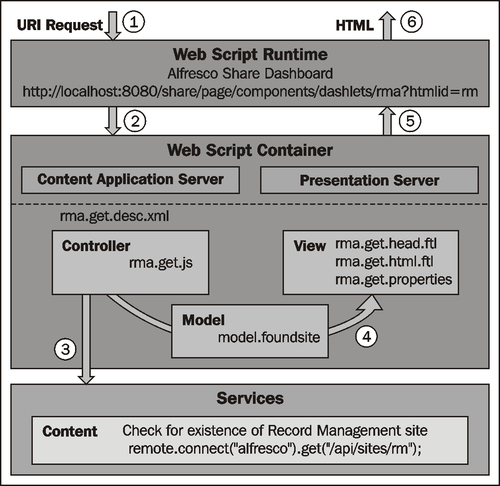
Let's walk through the steps, as shown in the next diagram, to see the flow through the web framework from the initial HTTP request to the response. The steps are as follows:
- An HTTP/HTTPS request is made by invoking a URI. The URI is associated with an application that processes the parameters of the URI and then handles where the request is to be sent next.
- The request is dispatched to the Controller element in the Webscript Container, which matches the parameters of the request. This hand off to the Controller starts the MVC process. For some simple, basically static pages or components, it isn't necessary to have a controller element or model; in those cases, control is passed directly to the view in step 5. The Controller logic is typically written using JavaScript, but for more complex tasks, it is also possible to write the Controller as a Java bean that can get wired into the MVC framework.
- The controller is tasked with building the model, which returns a set of named properties that are used by the view during rendering. To build the model, the controller will often need to call out to services to retrieve the data and sometimes also process or transform the data before entering it into the model.
- The dispatcher next finds the view template that contains the markup instructions for how to render the information contained in the model. The controller then passes off the model data to the view.
- The view consists of FreeMarker tags that specify the layout and instructions for rendering the information. Based on the requested format, the view constructs the formatted view. Typically, the view will format the information in HTML, JSON, or RSS, but almost any format is possible.
- The formatted view information is finally returned in the response to the HTTP request.

Let's see now how the flow of the Records Management dashlet follows the Web Framework MVC pattern that we just discussed.
To do that, let's first identify the files that make up the website dashlet. These files were bundled into the Site-webscripts directory of the Alfresco Share Records Management AMP. By navigating to the tomcatwebappsshareWEB-INFclassesalfrescosite-webscriptsorgalfrescocomponentsdashlets directory, we'll find the files specific to the Records Management dashlet.
The following table lists the Records Management dashlet files with a brief description of their purpose:
|
Filename |
Description |
|---|---|
|
|
The descriptor file for the dashlet. This file defines the name, description, and URL for the dashlet. |
|
|
This file contains the definition of a function for checking to see if the Records Management site has already been created or not. The script also executes the function, returning true or false. |
|
|
This file defines markup to include the client JavaScript file |
|
|
This file provides the FreeMarker tags that define the layout and appearance of the dashlet. |
|
|
This file defines the text shown on labels of the dashlet UI and also contains the text for messages that may be displayed. The text in this file is English, but localized versions of this file can be created for displaying text in different languages corresponding to different locales. |
In addition to these files, the client-side JavaScript file referenced in rma.get.head.ftl is also involved in rendering the Records Management dashlet. This file is in the directory tomcatwebappssharecomponentsdashlets:
|
Filename |
Description |
|---|---|
|
|
This client-side JavaScript file defines actions associated with clicking on some of the links displayed on the dashlet. |
These files are used to construct the Records Management dashlet using the Web Framework MVC pattern as follows:
- The dashboard has a reference to the URI for the Records Management dashlet. When it is called, it will look something like:
http://localhost:8080/share/page/components/dashlets/rma?htmlid=rmid. - The Web Framework runtime then processes the URL and tries to determine if a controller exists to initiate MVC processing for the dashlet. To do that, the framework identifies the file
rma.get.desc.xmlas the descriptor file for the dashlet. rma.get.jsis the controller file for the dashlet. Its name matches the file name signature of the descriptor file. This file is run and determines if the Records Management site is already installed into Alfresco Share. To do that, it calls into the Alfresco repository and queries for the existence of the site.- The model is then constructed by adding a single parameter into it called
sitefound. If the Records Management site exists, the parameter is true, otherwise it is false. - The model data then gets dispatched to the view. The view is constructed with the files
rma.get.head.ftl, rma.get.html.ftl, andrma.get.properties. The view generates the appropriate HTML for the display of the dashlet on the dashboard.rma.get.head.ftladds an<include>tag into the<head>tag of the dashboard page for the client-side JavaScript filerma-dashlet.js. - The HTML data is returned in the response.
If we markup the previous diagram of the Web Framework MVC process with the names of the files that are involved, we can see something that looks like the following:
When a user logs into Share, the dashboard page will collect the page layout and display all dashlets for the user. Each dashlet is referenced and displayed based on the URI defined in the descriptor file for the dashlet.
The descriptor file for the Records Management dashlet is the file rma.get.desc.xml. The contents of that file are as follows:
<webscript>
<shortname>Records Management Config</shortname>
<description>Records Management site configuration and helper component</description>
<family>user-dashlet</family>
<url>/components/dashlets/rma</url>
</webscript>
The descriptor for the dashlet webscript defines a shortname and a description. Webscripts are assigned a family, which is similar to a tag, and is used to group together webscripts of a similar type when browsing or searching for webscripts. The last parameter in this file defines a URL value for referencing the dashlet. The dashlet URL would expand to something like http://localhost:8080/share/page/components/dashlets/rma?htmlid=rmid.
When the Records Management dashlet is first invoked for display on the dashboard, the controller file is run. The controller populates the values for the properties of the model. If we examine the code in the controller file, we see a very simple model with only the property foundsite. foundsite is a Boolean flag that specifies whether or not the Records Management site has already been created.
The value for foundsite is determined by connecting with the Alfresco Content Repository and checking to see if a site called rm, the Records Management site, exists.
function main()
{
// Check for RMA site existence
var conn = remote.connect("alfresco");
var res = conn.get("/api/sites/rm");
if (res.status == 404)
{
// site does not exist yet
model.foundsite = false;
}
else if (res.status == 200)
{
// site already exists
model.foundsite = true;
}
}
main();
The model generated by the Controller is then passed to the view.
If we open the file rma.get.html.ftl, we can see the markup that specifies the layout for the dashlet UI. A lot of the file uses standard HTML tags, and FreeMarker tags are used to identify message labels and to hide or display links on the dashlet. The message labels that are referenced are defined in the properties file. Putting text into a properties file is considered a best practice that is used frequently in Java programming and which easily enables localization of text.
<script type="text/javascript">
//<![CDATA[
new Alfresco.dashlet.RMA("${args.htmlid}").setMessages(${messages});
//]]>
</script>
<div class="dashlet">
<div class="title">${msg("label.title")}</div>
<div class="body theme-color-1">
<div class="detail-list-item-alt theme-bg-color-2 theme-color-2" style="padding: 0.5em;border-bottom: 1px solid #DDD6A0">
<h4>${msg("label.summary")}</h4>
</div>
<div id="${args.htmlid}-display-site" class="detail-list-item"
<#if !foundsite="">style="display:none"</#if>>
<a href="${url.context}/page/site/rm/dashboard"> ${msg("label.display-site")}</a>
</div>
<div id="${args.htmlid}-create-site" class="detail-list-item"
<#if foundsite="">style="display:none"</#if>>
<a id="${args.htmlid}-create-site-link" href="#">${msg("label.create-site")}</a>
</div>
<#if user.isAdmin="">
<div id="${args.htmlid}-load-data" class="detail-list-item"
<#if !foundsite="">style="display:none"</#if>>
<a id="${args.htmlid}-load-data-link" href="#">${msg("label.load-test-data")}</a>
</div>
</#if>
<div class="detail-list-item last-item">
<a id="${args.htmlid}-role-report-link" href="${url.context}/page/console/rm-console/"> ${msg("label.rm-console")}</a>
</div>
</div>
</div>
By looking up the string values in the rma.get.properties file, we can see the basic content that will be displayed in the dashlet.
|
Property file label |
Text string value |
|---|---|
|
|
Records Management |
|
|
Configuration and setup for the Records Management site |
|
|
Create the Records Management site |
|
|
The Records Management site |
|
|
Load test data |
|
|
The Management console |
The header file is also a great place to reference any custom stylesheets. But the Records Management dashlet is fairly simple. It conforms to the standard look of the Alfresco dashboard and does not use a custom stylesheet.
The dashlet lives in the context of the dashboard page, but it is interesting to see the URL for the dashlet render outside the context of the dashboard. If we do that, we can see something like the following screenshot. We can then look at the source code for the rendered page and can see that the HTML created for the dashlet lacks<head> and<body> tags and also doesn't contain a reference to the Records Management dashlet client-side JavaScript file. The dashlet also relies on the standard stylesheet for the dashboard page, so the rendering of it here is different than it would be on the dashboard page:
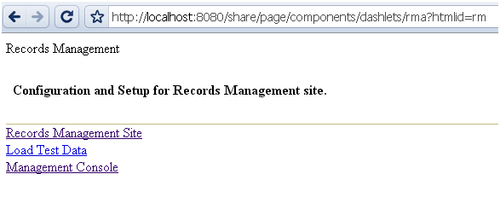
If we look at the source code of this page after being rendered in the browser, we can see how the messages are evaluated and used. The messages are passed in as an argument to the creation method for the client-side RMA dashlet object. All the dashlet labels and display strings have been evaluated too, like the title and link text:
<script type="text/javascript">//<![CDATA[
new Alfresco.dashlet.RMA("rm").setMessages({"label.summary": "Configuration and Setup for Records Management site.", "label.load-test-data": "Load Test Data", "message.creating": "Creating Records Management Site please wait...", "label.rm- console": "Management Console", "message.create-fail": "Failed to create Records Management Site.", "message.importing": "Importing Records Management test data please wait...", "label.create- site": "Create Records Management Site", "label.user-role- report": "User Role Report", "message.import-fail": "Failed to import test data into Records Management Site.", "message.create- ok": "Records Management Site successfully created.", "label.display-site": "Records Management Site", "message.import- ok": "Records Management Site import successful.", "label.title": "Records Management"});
//]]></script>
<div class="dashlet">
<div class="title">Records Management</div>
<div class="body theme-color-1">
<div class="detail-list-item-alt theme-bg-color-2 theme-color- 2" style="padding: 0.5em;border-bottom: 1px solid #DDD6A0">
<h4>Configuration and Setup for Records Management site.</h4>
</div>
<div id="rm-display-site" class="detail-list-item" >
<a href="/share/page/site/rm/dashboard">Records Management Site</a>
</div>
<div id="rm-create-site" class="detail-list-item" style="display:none">
<a id="rm-create-site-link" href="#">Create Records Management Site</a>
</div>
<div id="rm-load-data" class="detail-list-item" >
<a id="rm-load-data-link" href="#">Load Test Data</a>
</div>
<div class="detail-list-item last-item">
<a id="rm-role-report-link" href="/share/page/console/rm-console/">Management Console</a>
</div>
</div>
</div>
In the HTML for the dashlet that we just looked at, some of the<a> tags referenced "#" as the target href link value. The "#" refers to the current HTML page. In these cases, the dashlets, instead of linking to a new URL from an href target value, are activated by click events, which call JavaScript methods.
For example, consider the following line from the evaluated HTML:
<a id="rm-create-site-link" href="#">Create Records Management Site</a>
What is important here is the id for the<a> tag.
Recall that the dashlet file, rma.get.head.ftl, includes markup in the<head> tag for the dashboard HTML page to include the client-side JavaScript file rma-dashlet.js. If we look at the contents of that JavaScript file, we'll find the constructor for an RMA object:
Alfresco.dashlet.RMA = function RMA_constructor(htmlId)
{
return Alfresco.dashlet.RMA.superclass.constructor.call(this, "Alfresco.dashlet.RMA", htmlId);
};
The constructor method is called from the script at the top of the file rma.get.html.ftl that we discussed above. The object Alfresco.dashlet.RMA that is created by the constructor extends from the Alfresco.component.base object. The RMA object is constructed using elements of the Yahoo! User Interface library or YUI.
Much of the Share JavaScript client code is written to use the YUI 2.0 library. YUI provides a set of utilities and controls for more easily creating rich browser-based applications. It uses techniques based on DOM scripting, DHTML, and AJAX. YUI uses the BSD license and is free to use. It is important to understand the basics of YUI in order to fully understand how many of the Alfresco Share JavaScript files work.
Note
More details of the Yahoo! User Interface library can be found here: http://developer.yahoo.com/yui/2/.
The skeleton of the object methods for the Alfresco dashlet.RMA object is as follows:
YAHOO.extend(Alfresco.dashlet.RMA, Alfresco.component.Base,
{
/**
* Fired by YUI when parent element is available for scripting
* @method onReady
*/
onReady: function RMA_onReady()
{
...
},
/**
* Create Site link click event handler
*
* @method onCreateSite
* @param e {object} DomEvent
* @param args {array} Event parameters (depends on event type)
*/
onCreateSite: function RMA_onCreateSite(e, args)
{
...
},
/**
* Load Test Data link click event handler
*
* @method onLoadTestData
* @param e {object} DomEvent
* @param args {array} Event parameters (depends on event type)
*/
onLoadTestData: function RMA_onLoadTestData(e, args)
{
...
},
/**
* User Role Report link click event handler
*
* @method onUserRoleReport
* @param e {object} DomEvent
* @param args {array} Event parameters (depends on event type)
*/
onUserRoleReport: function RMA_onUserRoleReport(e, args)
{
...
}
}
The RMA_onReady method defines the element IDs in the HTML that can trigger actions. In the dashlet HTML, we saw the element IDs for the<a> tags above: rm-create-site-link, rm-load-data-link, and rm-report-link. The element ID names were constructed by taking an HTML ID value that is passed in and appending a string to it. In our test, we used "rm" for the HTML ID. In general, the base HTML ID is a fairly long text string of various concatenated pieces of information that may look something like this: page_x002e_component-1-3_x002e_user_x007e_admin_x007e_dashboard-create-site:
onReady: function RMA_onReady()
{
var me = this;
this.widgets.feedbackMessage = null;
// setup link events
Event.on(this.id + "-create-site-link", "click", this.onCreateSite, null, this);
Event.on(this.id + "-load-data-link", "click", this.onLoadTestData, null, this);
Event.on(this.id + "-role-report-link", "click", this.onUserRoleReport, null, this);
}
We saw earlier in this chapter that one of the last steps in installing and creating the Records Management site is to click on the link Create Records Management Site. The event caused by clicking on the link caused the onCreateSite method action to be called:
onCreateSite: function RMA_onCreateSite(e, args)
{
Event.stopEvent(e);
if (this.widgets.feedbackMessage === null)
{
this.widgets.feedbackMessage = Alfresco.util.PopupManager.displayMessage(
{
text: this.msg("message.creating"),
spanClass: "wait",
displayTime: 0
});
// call web-tier to perform site creation
Alfresco.util.Ajax.request(
{
method: Alfresco.util.Ajax.GET,
url: Alfresco.constants.URL_SERVICECONTEXT + "utils/create-rmsite?shortname=rm",
successCallback:
{
fn: function()
{
this.widgets.feedbackMessage.destroy();
Alfresco.util.PopupManager.displayMessage(
{
text: this.msg("message.create-ok")
});
// refresh UI appropriately
Dom.setStyle(this.id + "-create-site", "display", "none");
Dom.setStyle(this.id + "-display-site", "display", "block");
Dom.setStyle(this.id + "-load-data", "display", "block");
Alfresco.util.Anim.pulse(this.id + "-display- site");
// reset feedback message - to allow another action if required
this.widgets.feedbackMessage = null;
},
scope: this
},
failureCallback:
{
fn: function()
{
this.widgets.feedbackMessage.destroy();
Alfresco.util.PopupManager.displayMessage(
{
text: this.msg("message.create-fail")
});
// reset feedback message - to allow another action if required
this.widgets.feedbackMessage = null;
},
scope: this
}
});
}
}
The onCreateSite method first displays a message indicating that the Records Management site is being created. Next an AJAX call is made to create the Records Management site for Share on the server. If the site is created successfully, a pop-up message displays a success message, and the visibility of the links on the dashlet are adjusted, hiding the Create Records Management Site link, and now showing as available links for loading test data and for navigating to the newly created Records Management site. If the site fails to be created, a failure message will be displayed.
We just saw how the onCreateSite method for the Alfresco dashlet.RMA object made an AJAX call to the server to create the Records Management site. The Share webscript that is referenced in the AJAX call is Alfresco.constants.URL_SERVICECONTEXT + "utils/create-rmsite?shortname=rm
This will evaluate to a URL that looks something like http://localhost:8080/share/service/utils/create-rmsite?shortname=rm. We can find that this URL is defined by the Records Management webscript create-rmsite that was installed into Share.
This AJAX call provides another example of the use of webscripting within Alfresco Share. The files for the create-rmsite webscript can be found in the directory tomcatwebappsshareWEB-INFclassesalfrescosite-webscriptsorgalfrescoutils. The files that define this webscript are as follows:
|
Filename |
Description |
|---|---|
|
|
The descriptor file for the webscript. It includes text strings for the shortname and description. It also defines the URL reference to the webscript. |
|
|
This file contains the FreeMarker markup that is used to construct the HTML response to a call to the webscript. |
|
|
This properties file contains the text strings used that are displayed in the response page for the webscript. |
|
|
This JavaScript file acts as the controller for the response to a call to the webscript. |
Let's now look at the internals of the create-rmsite webscript to see how it builds the Records Management site. Here we can see the contents of the file create-rmsite.get.desc.xml:
<webscript>
<shortname>Create RM Site</shortname>
<description>
Will create a new RM site in the repo and create the RM preset in the web-tier.
</description>
<url>/utils/create-rmsite?shortname={shortname}</url>
</webscript>
The shortname and description values are self-explanatory. The URL value is a location that the web framework dispatcher will check when it tries to match incoming URLs to be evaluated. In this case, we see that it is necessary to include the shortname parameter on the URL (which is different from the shortname used in the webscript XML). We saw that the site will be called with the shortname "rm" from the onCreateSite method discussed above.
Next, let's look at the controller JavaScript file for this webscript. The contents of the file create-rmsite.get.js are as follows:
function main()
{
// Call the repo to create the site
var siteJson =
{
shortName: args["shortname"],
sitePreset: "rm-site-dashboard",
title: msg.get("title.rmsite"),
description: msg.get("description.rmsite")
};
var scriptRemoteConnector = remote.connect("alfresco"),
repoResponse = scriptRemoteConnector.post("/api/sites", jsonUtils.toJSONString(siteJson), "application/json");
if (repoResponse.status == 401)
{
status.setCode(repoResponse.status, "error.loggedOut");
return;
}
else
{
var repoJSON = eval('(' + repoResponse + ')'),
// Check if we got a positive result
if (repoJSON.shortName)
{
// Yes we did, now create the site in the webtier
var tokens = new Array();
tokens["siteid"] = repoJSON.shortName;
sitedata.newPreset("rm-site-dashboard", tokens);
model.success = true;
}
else if (repoJSON.status.code)
{
status.setCode(repoJSON.status.code, repoJSON.message);
return;
}
}
}
main();
Here the Controller posts back to the Alfresco Repository API to create the Records Management site, passing into the API method an object with parameters that define the new site. Some of the parameter values come from the string message data found in the properties file create-rmsite.get.properties:
title.rmsite=Records Management description.rmsite=DoD 5015.02-STD Electronic Recordkeeping
If the site structure is successfully created in the repository, the Share root object sitedata is updated to now know about the new Records Management site available within Share. The controller populates the Boolean parameter success in the model and returns it for use in the view.
Note
A complete description of sitedata and other root-scoped objects that are available with the Spring Surf web framework in Share can be found on the Alfresco wiki: http://wiki.alfresco.com/wiki/Surf_Platform_-_Freemarker_Template_and_JavaScript_API
Finally, the View component of the MVC process is invoked and has available to it the model from the Controller. The contents of the View file create-rmsite.get.html.ftl is as follows:
<#if success>
Successfully created RM site '<a href="${url.context}/page/site/${args["shortname"]}/dashboard"> ${args["shortname"]}</a>'.
</#if>
<#if code?exists><br>Error code: ${code}</#if>
<#if error?exists><br>Error: ${error}</#if>
Here, if the model returned success, the HTML markup returned will report success with a link to the dashboard page of the Records Management site. If an error occurred, an error code is reported.
Note
In this "How does it work?" section and in similar sections in subsequent chapters, we try to get a look at how both Alfresco Share and the Records Management module work. As a user of the system, this information isn't mandatory to know, but the knowledge of system internals can be useful in troubleshooting, and also for understanding how and where customizations in the system are possible.
Alfresco provides a truly open system. All of the source code is readily available, and Alfresco promotes itself as a core around which content-based applications can be built.
The use of dashlets and webscripts provide an ideal starting point for users that want to customize Alfresco. The scripting and template languages used by webscripts make rapid iterative development possible, and dashlets typically only require a modest amount of code to write.
That concludes our introduction to the internals of the Spring Surf web framework within the Alfresco Share application. In future chapters, we'll continue our discussion on 'How does it work?' and our understanding of the Alfresco MVC process will be applied to other components of the Records Management module. As we've seen, the architecture for Share is quite clean and that promotes rapid development.