
11
Reactive Architecture with Event Grid
Azure Event Grid is another cloud component that represents serverless services in Azure. It can be considered an events gateway or a handler. It is able to both make our solution work faster and reverse control, so our services don’t have to wait for others, burning available resources just to be idle. Additionally, it’s a great routing tool that is able to quickly distribute load and multiply it, allowing jobs to be finished faster.
In this chapter, the following topics will be covered:
- Azure Event Grid and reactive architecture
- Connecting to other services through Azure Event Grid
- The security features of Azure Event Grid
- Using different event schemas
- Receiving and filtering events
Technical requirements
To perform exercises within this chapter, you will need the following:
- An Azure subscription
- Visual Studio Code
- The Azure CLI
Azure Event Grid and reactive architecture
When working with multiple services in the cloud, often, you need to have a centralized service that is responsible for routing events to a different endpoint. This makes the exchange of data a piece of cake—you do not have to maintain different URLs of APIs, as you can leverage a common event schema and custom routing configuration that is based on, for example, the event type. In Azure, such a service is called Azure Event Grid—a serverless event gateway, which is one of the newer cloud components available. With a pay-as-you-go pricing model, you can quickly build a reactive architecture that inverts the communication between your services and makes them passive. In this chapter, you will learn how to work with Event Grid and integrate it with other Azure components.
Reactive architecture
To get started, let’s consider the architecture shown in the following diagram:

Figure 11.1 – A simple flow of pushing a file from an actor to a blob
In the preceding diagram, you can see an example flow of uploading, for instance, an image for an avatar from a user. A file is transferred through Azure App Service and put into Azure Blob Storage. Then, it is processed by Azure Functions. While such a setup is perfectly fine, consider the following disadvantage—to be able to process the image, Azure Functions must be notified about the fact that a new file was uploaded.
Since Azure Blob Storage is unable to do so (at least with the functionality available publicly), the only way to achieve that is to pool some kind of storage and somehow maintain the processed files. While conceptually, this is not rocket science, you must bear in mind that, in the cloud, when you use a resource, you pay for the time taken. So, essentially, in the preceding scenario, you would be paying even if no file was uploaded to storage, since a trigger in Azure Functions (here, a Blob trigger) will have to maintain a state of the available files and check, at intervals, whether something new appeared, so you will often pay for nothing. Now, consider the following change:
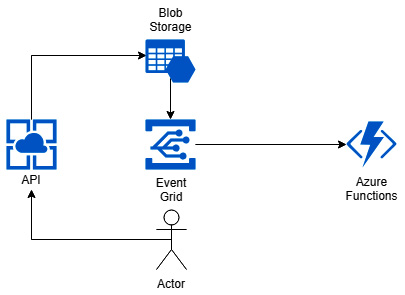
Figure 11.2 – Using Event Grid as an intermediary handler of an event
As you can see, I put Azure Event Grid between Azure Blob Storage and Azure Functions. What has it changed? Well, functions processing a blob do not have to pool storage to get information about the uploaded files. This is possible thanks to version 2 of Azure Storage (you can find a link to a description in the Further reading section)—it can publish events to Azure Event Grid so that they can then be forwarded to all subscribers of that event type. Thanks to this, Azure Functions can remain passive—they will be called by Azure Event Grid when needed, so if nothing is uploaded, you will pay nothing. Of course, this is an element of serverless architecture—being able to pay for usage makes such a setup possible.
Note
Remember that you will not be charged if you only use the Consumption plan in Azure Functions. If you must use an App Service or Premium Service plan for your functions, you will not be able to save money with the preceding architecture—on the other hand, you will save some compute power, which could be used for other workloads, so reactive architecture concepts will still be valid.
This is what we call reactive architecture—a model where your components can remain idle and wait for upcoming requests.
Topics and event subscriptions
There are five main topics when it comes to working with Azure Event Grid:
- Events
- Event handlers
- Event sources
- Topics
- Event subscriptions
In this section, we will go through each of them to gain a better understanding of this service.
Event sources
Currently, Azure Event Grid supports the following event sources:
- Azure App Configuration
- Azure App Service
- Azure API Management
- Azure Blob Storage
- Azure Container Registry
- Azure Machine Learning
- Azure Media Services
- Azure Subscriptions
- Azure Key Vault
- Resource groups
- Azure Event Hubs
- Azure IoT Hub
- Azure Policy
- Azure SignalR
- Azure Maps
- Azure Cache for Redis
- Azure Kubernetes Service (currently in preview)
- Azure Service Bus
- Azure FarmBeats
- Azure Communication Services
- Custom topics
As you can see, there are plenty of different services integrated and available when working with Event Grid. While we know which event sources we can use, we still have not defined what an event source is. Look at the following diagram:

Figure 11.3 – A simple flow of pushing a blob to Azure Functions via Azure Event Grid
In this scenario, a file uploaded to Azure Blob Storage triggers an event, which is then fetched by Azure Event Grid and passed further to the consumer. The event source is the origin of an event that was then handled by Event Grid. When working with this service, all event sources have a way to publish an event and communicate with Azure Event Grid. There is also one extra event source possible—that is custom topics. It is possible to publish your own custom events directly to an Event Grid endpoint—we will cover that later in this chapter.
Event handlers
In the previous example, we covered event sources. Let’s take a similar scenario:

Figure 11.4 – Handling an event in two different Azure services
Once more, we have Azure Blob Storage as a publisher. However, this time, events are forwarded to both Azure Functions and Azure Event Hub. In this architecture, services presented on the right-hand side are event handlers. Here is a list of currently supported services:
- Azure Functions
- Azure Logic Apps
- Azure Automation
- WebHooks
- Azure Queue Storage
- Hybrid Connections
- Azure Event Hubs
- Power Automate
- Azure Service Bus
So, what is an event handler? You can think of it as the processor of an event—based on the configuration, Azure Event Grid will forward events to handlers, where they will be deserialized and analyzed.
Note
In general, Azure Event Grid uses a common event schema when delivering events to handlers. What is more, it can deliver more than just one event at a time—you must be prepared for a possible batch of events.
Topics and subscriptions
A topic is a general messaging concept that allows for one-to-many communication. It works with subscriptions in the following way—you publish a message to a topic in a messaging service and then subscribe to it with your consumers. In Azure Event Grid, you are responsible for creating a topic—that means you must publish a custom application that handles communication between publishers and the Event Grid endpoint. You can have a single application or many of them—this depends on your design and expected throughput. Additionally, you must configure subscriptions—in the next section, you will see how to do that and how to set up proper filtering. The general structure could look like this:

Figure 11.5 – Sending events to multiple event handlers after fetching them from publishers
The left-hand side of the preceding diagram represents publishers and a topic (the line between the publisher and Azure Event Grid) and subscriptions with handlers. Each line is a different topic and subscription. The whole configuration and routing reside within the Event Grid endpoint and can be managed there.
Note
Azure Event Grid takes care of retrying undelivered messages. This can be configured with a custom policy that defines the rules for retrying. Additionally, when a custom topic is used, events must be published in batches to make it work.
To sum up, we can define both a topic and a subscription as follows:
- Topic: A channel between a service and Azure Event Grid, which allows the former to push an event to the Azure service
- Subscription: A channel between Azure Event Grid and a service, which is used to retrieve events in the former
Now, let’s check how we can connect to various services using Azure Event Grid and what the main configuration options are.
Connecting services through Azure Event Grid
Now that you have learned something about what Azure Event Grid is and how it works, we will try to test your knowledge and create a working solution. We will start by creating an instance in the Azure Portal and configuring it to accept and route events. Additionally, you will learn what the schema of an event is and how to leverage it so that you can send custom events that will be handled by Event Grid.
Creating Azure Event Grid in the Azure Portal
To get started with Azure Event Grid, do the following in the Azure Portal:
- Click on + Create a resource and search for Event Grid. From the list, select Event Grid Topic and click on Create.
- You will see a simple form, where you must enter the name of the instance of a service. For now, we will skip the rest of the settings:

Figure 11.6 – Creating a topic in the Azure Portal
- When you click on Review + create and wait a moment, an instance of a service will be created. Once it is finished, you can go to your resource to see an empty instance:

Figure 11.7 – The Overview blade for the Event Grid topic
As you can see, there is no subscription created yet. What is more, there is also no topic, which is what would send events to our instance. Before we proceed, let’s look at what we have in the Overview blade. Besides the option to create a subscription, there is also one other important thing—Topic Endpoint. This can be used to publish events from your custom topics. There is also an important blade—Access keys. When you click on it, you will see two keys that can be used to authorize access to Azure Event Grid:

Figure 11.8 – Access keys for an instance of an Event Grid topic
Now, let’s try to add a subscription to the topic. To do this, we will use the following code snippet:
az eventgrid event-subscription create --name <subscription-name> --source-resource-id <source-resource-id> --endpoint <event-receiving-endpoint>
Your endpoint should be a generic HTTP endpoint that accepts passing an authorization code from Azure Event Grid, as follows: https://mywebsite.net/api/eventgrid?code=code.
Before we proceed, let’s explain a little bit about the preceding command. As you can see, there are three parameters required to complete the process:
- --name: This represents the custom name of your subscription.
- --source-resource-id: This is the fully qualified identifier (resource ID) of your resource from which events will be fetched. You must use a resource that is supported by Event Grid as an event source.
- --endpoint: This is an HTTP endpoint called by Event Grid when an event has been sent.
After running the command, Event Grid will start pushing events to an endpoint defined in the --endpoint parameter. However, if you execute the code, you might notice the following warning and the process freezes in the Running state:
If you are creating an event subscription from a topic that has “Azure” as the value for its “kind” property, you must validate your webhook endpoint by following the steps described in https://aka.ms/eg-webhook-endpoint-validation.
So, what has happened? Well, it turns out that we cannot create a subscription, because our endpoint is not validated. The Kind property can be seen when you access the Overview blade of your topic:

Figure 11.9 – The Kind property in the Overview blade
How can we validate our endpoint so that it will be possible to create a subscription? I will explain this shortly.
Azure Event Grid security
Besides access tokens, Azure Event Grid also checks whether an endpoint is valid and secure. This validation will not happen for the following handler types:
- Azure Logic Apps
- Azure Automation
- Azure Functions when EventGridTrigger is used
The remaining endpoints (and especially those triggered by an HTTP request) must be validated to be used. Here is how that kind of validation is processed:
- Firstly, SubscriptionValidationEvent is sent to an endpoint containing multiple fields, such as a topic, validation code, and more. Additionally, a special aeg-event-type: SubscriptionValidation header is sent.
- Secondly, Event Grid expects a successful response containing a validation code that was sent in the request.
Here is an example of a validation event:
[{
  “id”: “3d178aaf-364c-67b-bq0c-e34519da4eww”,
=  “topic”: “/subscriptions/xxxxxxxx-xxxx-xxxx-xxxx-xxxxxxxxxxxx”,
  “subject”: “”,
  “data”: {
    “validationCode”: “512d38b6-c7b8-40c8-89fe-f46f9e9622b6”,
    “validationUrl”: “<validation-url>”
  },
  “eventType”: “Microsoft.EventGrid.SubscriptionValidationEvent”,
  “eventTime”: “2018-08-10T10:20:19.4556811Z”,
  “metadataVersion”: “1”,
  “dataVersion”: “1”
}]
In this scenario, to validate an endpoint, you would have to return the following response:
{
  “validationResponse”: “512d38b6-c7b8-40c8-89fe-f46f9e9622b6”
}
After that, you should be able to create a subscription.
Note
As you might have noticed, the validation event also contains the validationUrl property. This allows you to manually validate a subscription instead of redeploying code with proper application logic.
Creating a subscription
Now that you are familiar with the topic of endpoint validation, we can try to create a subscription once more:
- To do this, I created a function that is triggered by an HTTP request. It can be a function written in any of the supported languages (the following example has been written in CSX for simplicity):
#r “Newtonsoft.Json”
using System.Net;
using Newtonsoft.Json;
public static async Task<HttpResponseMessage> Run(HttpRequestMessage req, TraceWriter log)
{
var @event = JsonConvert.DeserializeObject(await req.Content.ReadAsStringAsync());
log.Info(@event.ToString());
return req.CreateResponse(HttpStatusCode.OK);
}
Thanks to the preceding code, I can see that the validation event data was sent to an endpoint. Note the value of validationUrl in the payload.
- Now, when you can see the whole validation event payload, you can use it to prepare validation logic. In the following snippet, you can find the overall concept of such a function:
#r “Newtonsoft.Json”
using System.Net;
using Newtonsoft.Json;
public static async Task<HttpResponseMessage> Run(HttpRequestMessage req, TraceWriter log)
{
var @event = JsonConvert.DeserializeObject<ValidationEvent[]>(await req.Content.ReadAsStringAsync())[0];
return req.CreateResponse(HttpStatusCode.OK, new {validationResponse = @event.Data.ValidationCode} );
}
public class ValidationEvent {
public ValidationEventData Data {get;set;}
}
public class ValidationEventData {
public string ValidationCode {get;set;}
}
- Note that I am deserializing the validation event as ValidationEvent[], so it is actually an array of events. It is important to bear this in mind to avoid any potential issues.
Note
If events were sent to an endpoint that wasn’t validated, the batch would be divided into two parts: one with a single validation event and the second one with the actual events.
- Now, for example, if you create a resource in the resource group that publishes events to Event Grid, an event similar to the following will occur:
{
“subject”: “/subscriptions/.../Microsoft.Storage/storageAccounts/handsonazure”,
“eventType”: “Microsoft.Resources.ResourceWriteSuccess”,
“eventTime”: “2018-08-10T08:51:32.3888833Z”,
“id”: “37f85f91-1af9-4ee3-84a6-ee1955c74edc”,
“data”: {
“authorization”: {
“scope”: “/subscriptions/.../handsonazure-rg/providers/Microsoft.Storage/storageAccounts/handsonazure”,
“action”: “Microsoft.Storage/storageAccounts/write”,
“evidence”: {
“role”: “Subscription Admin”
}
},
“claims”: {
“aud”: “https://management.core.windows.net/”,
(...)
}
}
}
- Also, it is possible to create a connection like this without the CLI—if you navigate to your resource group, you will see the Events blade:
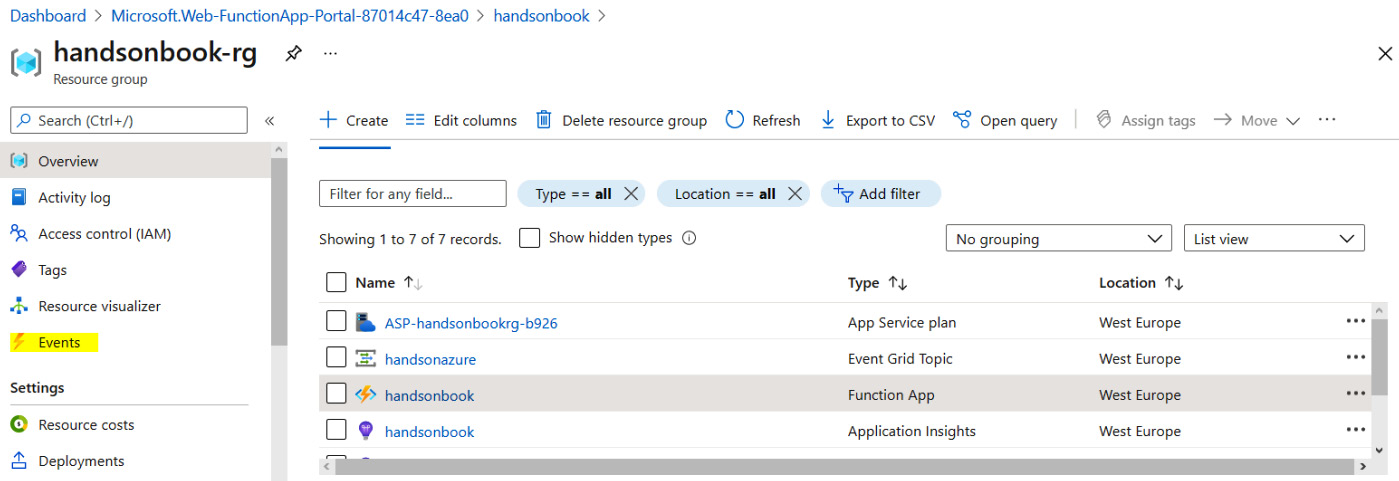
Figure 11.10 – The Events blade in a resource group
- When you click on the + Event subscription button, you will see a form that makes the whole process much easier. You can use this form if you prefer configuring services in the portal, instead of the CLI:

Figure 11.11 – Configuring an event subscription in a resource group
Note that when creating a topic directly on a resource group level, you are asked for a system topic name. In fact, in Azure Event Grid, there are two types of topics:
- System topics, which can be used only by Azure to publish events
- Custom topics, which do not have that limitation
System topics will not be visible to you as they are created in the background. What is more, if you create a system topic and, for example, use Azure Functions with an HTTP trigger, you will not be asked to validate the endpoint as opposed to the custom topic.
Now, let’s see how you can work with different event schemas.
Using different schemas in Event Grid
When creating an Event Grid instance, you have the option to choose which event schema will be used for your system:
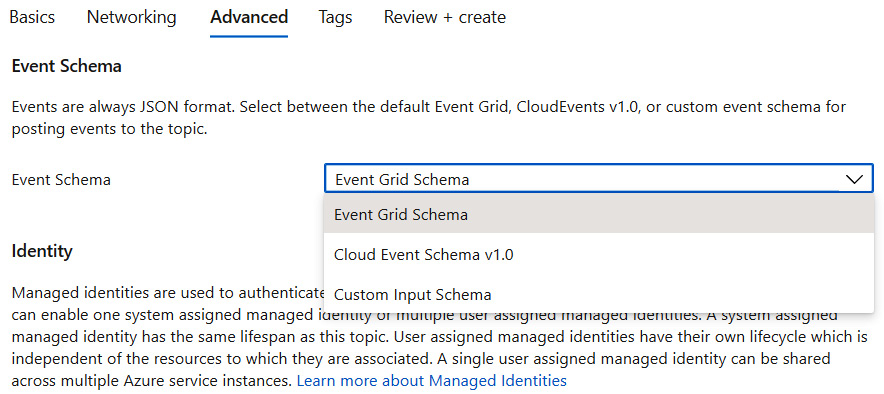
Figure 11.12 – Choosing between different event schemas for Event Grid
Depending on your requirement, one of the preceding options might fit better with your apps. While there are no strategic differences in the supported schemas, the choice made when provisioning an instance of Event Grid will impact how other services integrate with it.
Event Grid schema
When using the default schema, you will expect that each event uses the following properties when sending data:
[
  {
    “topic”: string,
    “subject”: string,
    “id”: string,
    “eventType”: string,
    “eventTime”: string,
    “data”:{
      object-unique-to-each-publisher
    },
    “dataVersion”: string,
    “metadataVersion”: string
  }
]
The only unique part will be what is sent in the data field—this is the part of an event that is set individually by each event publisher. For example, when Azure Blob Storage sends its event, the data object will look like this:
“data”: {
      “api”: “PutBlockList”,
      “clientRequestId”: “<client-id>”,
      “requestId”: “<request-id>”,
      “eTag”: “<etag>”,
      “contentType”: “application/octet-stream”,
      “contentLength”: <content-length>,
      “blobType”: “BlockBlob”,
      „url”: „https://<storage-account-name>.blob.core.windows.net/<container>/<blob>”,
      “sequencer”: “<sequencer-value>”,
      “storageDiagnostics”: {
        “batchId”: “<batch-id>”
      }
    }
Each event for the supported event publishers is described within the documentation (for more information, please see the Further reading section).
Note
When using a custom event publisher, you will decide what the event schema will look like. Event Grid does not assume anything related to events sent by external publishers.
If you feel that the default schema is not enough, you can try the second option with the CloudEvents schema.
The CloudEvents schema
The CloudEvents schema is an open specification not related to Azure. Any publisher can implement that schema specification, so it is easier to integrate different systems with each other by ensuring that they follow a common specification. An example event representing the mentioned schema could look like this:
{
    “specversion”: “1.0”,
    “type”: “Microsoft.Storage.BlobCreated”,
    “source”: “/subscriptions<subscription>/resourceGroups<resource-group>/providers/Microsoft.Storage/storageAccounts/<account-name>
    “id”: “<id>”,
    “time”: “<time>”,
    “subject”: “blobServices/default/containers/<container>/blobs<file>
    “dataschema”: “#”,
    “data”: {
        “api”: “PutBlockList”,
        “clientRequestId”: “<client-id>”,
        “requestId”: “<request-id>”,
        “eTag”: “<etag>”,
        “contentType”: “image/png”,
        “contentLength”: <content-length>,
        “blobType”: “BlockBlob”,
        „url”: „https://<account-name>.blob.core.windows.net/<container<file>
        “sequencer”: “<sequencer>”,
        “storageDiagnostics”: {
            “batchId”: “<batch-id>”
        }
    }
}
As you can see, the CloudEvents schema is very similar to the default Event Grid schema, so even if you have multiple components using different schemas, it should be easy to integrate them. What is more, switching from one schema to another will not be that difficult either. The specification of the CloudEvents schema is available in the Further reading section.
Custom schema
When selecting the custom schema option while creating Event Grid, you will see a custom schema configuration view, as shown in the following screenshot:

Figure 11.13 – The custom schema configuration tool
For example, the configurator allows you to tell that the eventType field should be mapped to an eventTypeValue field. This allows you to adjust the schema accordingly and make sure that it can work with your system. The main concept of using the custom schema is backward compatibility—if you have an already working component and changing the schema seems like a lot of work, it is easier to reroute fields using the configurator.
After describing the different event schemas, let’s switch our focus to the last topic of this chapter, which is receiving and filtering events.
Receiving and filtering events
As mentioned earlier, if you use Event Grid to publish events to any endpoint triggered by an HTTP trigger, you will have to validate an endpoint. This is not the best solution, but fortunately, it is possible to use Azure Functions with EventGridTrigger, which allows us to skip the endpoint validation step when configuring services. This topic itself is quite big, so we will not cover each problem possible. However, I will point you to the specific parts of the documentation, which will help you understand the topic even better.
EventGridTrigger in Azure Functions
In general, the easiest way to integrate Azure Functions with Azure Event Grid is to use HttpTrigger:
[FunctionName(“Function1”)]
public static async Task<IActionResult> Run(
    [HttpTrigger(AuthorizationLevel.Anonymous, “get”, “post”, Route = null)] HttpRequest req,
    ILogger log)
{
    ...
}
This is the most generic setup. It provides direct access to a request message and enables you to control its specific parts. However, there is an alternative to the preceding setup—we can use EventGridTrigger instead:
[FunctionName(“CloudEventTriggerFunction”)]
public static void Run(
    ILogger logger,
    [EventGridTrigger] CloudEvent e)
{
    // …
}
Here, with EventGridTrigger, you can directly access the payload of a request, which is useful if you are not interested in the remaining part of it. Additionally, you do not have to validate an endpoint.
Testing Azure Event Grid and Azure Functions
You are probably thinking about the options for testing Azure Event Grid and Azure Functions locally. In fact, currently, you have two ways of doing this:
- Capturing and resending events to your application
- Using ngrok, which is available at https://ngrok.com/, to forward requests to your local computer
The method you choose will depend on your capabilities (for example, ngrok exposes your computer’s port, so it can be a security concern), so you will have to figure out by yourself what the best option is. Both methods are described in the link mentioned in the Further reading section. The only thing you need to do is to ensure that the request reaches your local endpoint for Event Grid. It will only be available if it is exposed via EventGridTrigger:
http://localhost:7071/runtime/webhooks/eventgrid?functionName={FUNCTION_NAME}Here, you can find an example request:
http://localhost:7071/runtime/webhooks/eventgrid?functionName={FUNCTION_NAME}
Host: localhost:7071
Content-Type: application/json
aeg-event-type: Notification
Cache-Control: no-cache
 [
  {
    “subject”: “example”,
    “id”: “1”,
    “eventType”: “SectionFinished”,
    “eventTime”: “2018-08-12T07:41:00.9584103Z”,
    “data”:{
      “section”: 3
    },
    “dataVersion”: “1”,
  }
]
Note one important thing here—you have to set aeg-event-type to Notification. If you fail to do so, you will receive an HTTP 400 response. With such a setup, you can emulate how your function will behave when deployed to Azure.
Filtering events
To set a filter for incoming events, you need to configure it when creating a subscription. Let’s go back to one of the commands used earlier in this chapter:
includedEventTypes=”<event-types>”
az eventgrid event-subscription create --name <rg-name> --resource-group myResourceGroup --endpoint <endpoint-URL> --included-event-types $includedEventTypes
By using –included-event-types, we can filter events based on the event type presented in the event payload. Each event publisher has a list of events published by it, and in general, an event type looks like this:
- Microsoft.Resources.ResourceWriteFailure
- Microsoft.Storage.BlobCreated
Of course, if you publish a custom event, its custom type might not follow the naming convention presented in the preceding list. Besides filtering based on the event type, you can filter events based on a subject using the –subject-begins-with and –subject-ends-with parameters:
az eventgrid event-subscription create --resource-id <resource-id>
  --name <rg-name> --endpoint <endpoint-URL> --subject-ends-with “.txt”
More advanced filtering includes subscriptions with advanced filters, where you use various operators to decide whether an event should be included or not. To do that, you need the –advanced-filter parameter. This concept is presented in the Further reading section.
Summary
In this chapter, you learned what reactive architecture is and how to use it with Azure Event Grid. You integrated different event producers with event handlers and used custom topics to publish custom events. What is more, now you have the knowledge of how to integrate Azure Event Grid with Azure Functions and test it locally.
This chapter ends the second part of the book, which has been about serverless services and architectures. In the next part, we will cover different storage options and messaging and monitoring services, which will broaden your proficiency with Azure even more.
Questions
Here are some questions to test your knowledge of the important topics in this chapter:
- What are the supported event schemas in Azure Event Grid?
- How can you authorize a request to an Event Grid endpoint when posting a custom event?
- What must be returned when validating an endpoint?
- When will an endpoint not have to be validated?
- What happens if an endpoint doesn’t return a successful response?
- How can you filter events in Azure Event Grid?
- How can you test Event Grid integration with Azure Functions?
Further reading
For more information, please refer to the following resources:
- The official Event Grid documentation: https://docs.microsoft.com/en-us/azure/event-grid/overview
- Event filtering: https://docs.microsoft.com/en-us/azure/event-grid/event-filtering
- The standard CloudEvents specification: https://cloudevents.io/
- Event delivery in Azure Event Grid: https://docs.microsoft.com/en-us/azure/event-grid/manage-event-delivery
- Azure Event Grid bindings for Azure Functions: https://docs.microsoft.com/en-us/azure/azure-functions/functions-bindings-event-grid
- CloudEventsSchema: https://github.com/cloudevents/spec/blob/v1.0/spec.md