
![]()
Appendix C
Computation in R and Stan
![]()
We illustrate some practical issues of simulation by fitting a single example—the hierarchical normal model for the eight schools described in Section 5.5. After some background in Section C.1, we show in Section C.2 how to fit the model using the Bayesian inference package Stan, operating from within the general statistical package R. Sections C.3 and C.4 present several different ways of programming the model directly in R. These algorithms require programming efforts that are unnecessary for the Stan user but are useful knowledge for programming more advanced models for which Stan might not work. We conclude in Section C.5 with some comments on practical issues of programming and debugging. It may also be helpful to read the computational tips in Section 10.7 and the discussion of Hamiltonian Monte Carlo and Stan in Sections 12.4–12.6.
C.1 Getting started with R and Stan
Go to http://www.r-project.org/ and http://mc-stan.org/. Further information including links to help lists are available at these webpages. We anticipate continuing improvements in both packages in the years after this book is released, but the general computational strategies presented here should remain relevant.
R is a general-purpose statistical package that is fully programmable and also has available a large range of statistical tools, including flexible graphics, simulation from probability distributions, numerical optimization, and automatic fitting of many standard probability models including linear regression and generalized linear models. For Bayesian computation, one can directly program Gibbs and Metropolis algorithms (as we illustrate in Section C.3) or Hamiltonian Monte Carlo (as shown in Section C.4). Computationally intensive tasks can be programmed in Fortran or C and linked from R.
Stan is a high-level language in which the user specifies a model and has the option to provide starting values, and then a Markov chain simulation is automatically implemented for the resulting posterior distribution. It is possible to set up and fit models entirely within Stan, but in practice it is almost always necessary to process data before entering them into a model, and to process the inferences after the model is fitted, and so we run Stan by calling it from R using the stan() function, as illustrated in Section C.2.
When working in R and Stan, it is helpful to set up the computer to simultaneously display four windows: the R console, an R graphics window, a text editor with the R script, and a text editor with Stan code. Rather than typing directly into R, we prefer to enter the R code into the editor and then source the file to run the commands in the R console. Using the text editor is convenient because it allows more flexibility in writing functions and loops. Another alternative is to use a workspace such as RStudio (http://rstudio.org/) which maintains several windows within a single environment.
C.2 Fitting a hierarchical model in Stan
In this section, we describe all the steps by which we would use Stan to fit the hierarchical normal model to the educational testing experiments in Section 5.5. These steps include writing the model in Stan and using R to set up the data and starting values, call Stan, create predictive simulations, and graph the results.
Stan model file
The hierarchical model can be written in Stan in the following form, which we save as a file, schools. stan, in our working directory:

The first paragraph of the above code specifies the data: the number of schools, J; the vector of estimates, y1, …, yJ; and the standard errors, σ1, … σJ. Data are labeled as integer or real and can be vectors (or, more generally, arrays) if dimensions are specified. Data can also be constrained; for example, in the above model J has been restricted to be nonnegative and the components of σy must all be positive.
The code next introduces the parameters: the unknowns to be estimated in the model fit. These are the school effects, θj; the mean, μ, and standard deviation, τ, of the population of school effects, the school-level errors η, and the effects, θ. In this model, we let θ be a transformation of μ, τ, and η instead of directly declaring θ as a parameter. By parameterizing this way, the sampler runs more efficiently; the resulting multivariate geometry is better behaved for Hamiltonian Monte Carlo.
Finally comes the model, which looks similar to how it would be written in this book. (Just be careful: in our book, the second argument to the N(·,·) distribution is the variance; Stan parameterizes using the standard deviation.) We have written the model in vector notation, which is cleaner and also runs faster in Stan (by making use of more efficient autodifferentiation). It would also be possible to write the model more explicitly, for example replacing y ~ normal(theta,sigma); with a loop over the J schools, for ![]() .
.
R script for data input, starting values, and running Stan
We put the data into a file, schools.csv, in the R working directory, with headers describing the data:

From R, we then execute the following script to read in the data:

We now run Stan with 4 chains for 1000 iterations and display the results numerically and graphically:

When the computations are finished, summaries of the inferences and convergence are displayed in the R console (see Figure C.1) and in an R graphics window (not shown here).
In this example, the sequences have mixed well—the estimated potential scale reduction factor ![]() is below 1.1 for all the parameters and quantities of interest displayed. If mixing were not so good, the natural next step would be to run the simulation a bit longer. For example, we could run four chains for 2000 iterations and saving the second half of each chain (the default option):
is below 1.1 for all the parameters and quantities of interest displayed. If mixing were not so good, the natural next step would be to run the simulation a bit longer. For example, we could run four chains for 2000 iterations and saving the second half of each chain (the default option):
![]()
The first argument, fit=schools_fit, gives the location of the already-fit model so that Stan does not have to compile it again. This can also be done when refitting a model with new data.
Stan is a stochastic algorithm and so results will not be identical when re-running it. For example, here is the line of output for the parameter θ1 in our first Stan run (repeated from Figure C.1):
![]()
and here is the corresponding result from the second run:
The inferences are similar but not identical. The simulation estimate for E(θ1![]() y) is 12.1 under one simulation and 11.4 under the other, not much of a difference considering that the posterior standard deviation is about 10 (more precisely, estimated to be 11.0 under one simulation and 8.2 under the other). The quantiles have the same general feel, but one must beware of overinterpretation. For example, the 95% posterior interval for θ1 is [-3.0, 40.1] in one simulation and [-1.9, 31.5] in the other. (The 95% interval can be obtained from the function call, print(schools_fit, “theta[1]”,probs=c(.025,.975)); it is not shown in the default display in Figure C.1.) In practice, the intervals from the two different simulation runs contain simular information but their variability indicates that, even after approximate convergence, the tail quantiles of posterior quantities have a fair amount of simulation variability. The importance of this depends on what the simulation will be used for.
y) is 12.1 under one simulation and 11.4 under the other, not much of a difference considering that the posterior standard deviation is about 10 (more precisely, estimated to be 11.0 under one simulation and 8.2 under the other). The quantiles have the same general feel, but one must beware of overinterpretation. For example, the 95% posterior interval for θ1 is [-3.0, 40.1] in one simulation and [-1.9, 31.5] in the other. (The 95% interval can be obtained from the function call, print(schools_fit, “theta[1]”,probs=c(.025,.975)); it is not shown in the default display in Figure C.1.) In practice, the intervals from the two different simulation runs contain simular information but their variability indicates that, even after approximate convergence, the tail quantiles of posterior quantities have a fair amount of simulation variability. The importance of this depends on what the simulation will be used for.

Figure C.1 Numerical output from the print() function applied to the Stan code of the hierarchical model for the educational testing example. For each parameter, mean is the estimated posterior mean (computed as the average of the saved simulation draws), se_mean is the estimated standard error (that is, Monte Carlo uncertainty) of the mean of the simulations, and sd is the standard deviation. Thus, as the number of simulation draws approaches infinity, se_mean approaches zero while sd approaches the posterior standard deviation of the parameter. Then come several quantiles, then the effective sample size neff (formula (11.8) on page 287) and the potential scale reduction factor ![]() (see (11.4) on page 285). When all the simulated chains have mixed,
(see (11.4) on page 285). When all the simulated chains have mixed, ![]() = 1. Beyond this, the effective sample size and standard errors give a sense of whether the simulations suffice for practical purposes. Each line of the table shows inference for a single scalar parameter in the model, with the last line displaying inference for the unnormalized log posterior density calculated at each step in Stan.
= 1. Beyond this, the effective sample size and standard errors give a sense of whether the simulations suffice for practical purposes. Each line of the table shows inference for a single scalar parameter in the model, with the last line displaying inference for the unnormalized log posterior density calculated at each step in Stan.
Both simulations show good mixing (![]() ≈ 1), but the effective sample sizes are much different. This sort of variation is expected, as neff is itself a random variable estimated from simulation draws. The simulation with higher effective sample size has a lower standard error of the mean and more stable estimates.
≈ 1), but the effective sample sizes are much different. This sort of variation is expected, as neff is itself a random variable estimated from simulation draws. The simulation with higher effective sample size has a lower standard error of the mean and more stable estimates.
Accessing the posterior simulations in R
The output of the R function stan() is an object from which can be extracted various information regarding convergence and performance of the algorithm as well as a matrix of simulation draws of all the parameters, following the basic idea of Figure 1.1 on page 24. For example:
![]()
The result is a list with four elements corresponding to the five quantities saved in the model: theta, eta, mu, tau, 1p__. The vector θ of length 8 becomes a 20,000 × 8 matrix of simulations, the vector η similarly becomes a 20,000 × 8 matrix, the scalars μ and τ each become a vector of 20,000 draws, and the 20,000 draws of the unnormalized log posterior density are saved as the fourth element of the list. We include the statement permuted=TRUE so that we are only saving the draws after warmup, and they are permuted so that they can be analyzed directly without concerns of autocorrelation.
For example, we can display posterior inference for τ:
![]()
Or compute the posterior probability that the effect is larger in school A than in school C:
![]()
Posterior predictive simulations and graphs in R
Replicated data in the existing schools. Having run Stan to successful convergence, we can work directly in R with the saved parameters, θ, μ, τ. For example, we can simulate posterior predictive replicated data in the original 8 schools:

We now illustrate a graphical posterior predictive check. There are not many ways to display a set of eight numbers. One possibility is as a histogram; the possible values of yrep are then represented by an array of histograms as in Figure 6.2 on page 144. In R, this could be programmed as

The upper-left histogram displays the observed data, and the other 19 histograms are posterior predictive replications, which in this example look similar to the data.
We could also compute a numerical test statistic such as the difference between the best and second-best of the 8 coaching programs:

Replicated data in new schools. As discussed in Section 6.5, another form of replication would simulate new parameter values and new data for eight new schools. To simulate data yj ~ N(θj, σj2) from new schools, it is necessary to make some assumption or model for the data variances σj2. For the purpose of illustration, we assume these are repeated from the original 8 schools.

Numerical and graphical comparisons can be performed as before.
Alternative prior distributions
The model as programmed above has nearly uniform prior distributions on the hyperparameters μθ and σθ. An alternative is a half-Cauchy for σθ, which we could implement by taking the Stan model on page 590 and adding the line, tau ~ cauchy(0,25);.
We can fit the model as before. This new hyperprior distribution leads to changed inferences. In particular, the posterior mean and median of τ are lower and shrinkage of the θj’s is greater than in the previously fitted model with a uniform prior distribution on τ. To understand this, it helps to graph the prior density in the range for which the posterior distribution is substantial. Figure 5.9 on page 131 shows that the prior density is a decreasing function of τ which has the effect of shortening the tail of the posterior density.
Using the t model
It is straightforward to expand the hierarchical normal distribution for the coaching effects to a t distribution as discussed in Section 17.4, by replacing eta ~ normal(0,1); with eta ~ student_t(nu,0,1); and declaring nu as a parameter that takes on a value of 1 or greater (real<lower=1> nu;) and assigning it a prior distribution.
C.3 Direct simulation, Gibbs, and Metropolis in R
In this section we demonstrate several different ways to fit the 8-schools model by directly programming the computations in R.
Marginal and conditional simulation for the normal model
We begin by programming the calculations in Section 5.4. The programs provided here return to the notation of Chapter 5 (for example, τ is the population standard deviation of the θ’s) as this allows for easy identification of some of the variables in the programs (for example, mu_hat and V_mu are the quantities denoted by the corresponding symbols in (5.20)).
We assume that the dataset has been read into R as in Section C.2, with J the number of schools, y the vector of data values, and sigma the vector of standard deviations. Then the first step of our programming is to set up a grid for τ, evaluate the marginal posterior distribution (5.21) for τ at each grid point, and sample 1000 draws from the grid. The grid here is n_grid=2000 points equally spread from 0 to 40. Here we use the grid as a discrete approximation to the posterior distribution of τ. We first define ![]() and Vμ of (5.20) as functions of τ and the data, as these quantities are needed here and in later steps, and then compute the log density for τ.
and Vμ of (5.20) as functions of τ and the data, as these quantities are needed here and in later steps, and then compute the log density for τ.

We compute the posterior density for τ on the log scale and rescale it to eliminate the possibility of computational overflow or underflow that can occur when multiplying many factors.

The last step draws the simulations of τ from the approximate discrete distribution. The remaining steps are sampling from normal conditional distributions for μ and the θj’s as in Section 5.4. The sampled values of the eight θj’s are collected in an array.

We now have created 1000 draws from the joint posterior distribution of τ, μ, θ. Posterior predictive distributions are easily generated using the random number generation capabilities of R as described above in the Stan context.
Gibbs sampler for the normal model
Another approach, actually simpler to program, is to use the Gibbs sampler. This computational approach follows the outline of Section 11.6 with the simplification that the observation variances σj2 are known.

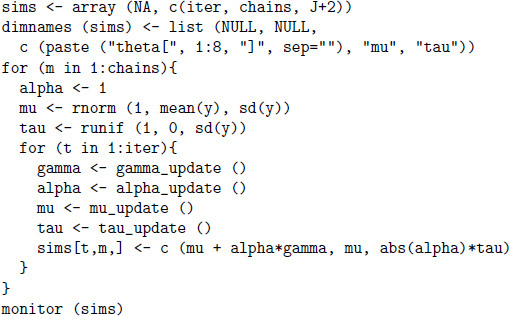
We now generate five independent Gibbs sampling sequences of length 1000. We initialize μ and τ with overdispersed values based on the range of the data y and then run the Gibbs sampler, saving the output in a large array, sims, that contains posterior simulation draws for θ, μ, τ.

We then check the mixing of the sequences using the R function monitor that carries out the convergence diagnostic and effective sample size computation described in Section 11.4:
![]()
The monitor function is part of the rstan package and thus is already loaded if you have entered library(“rstan”) in your current R session. The function takes as input an array of posterior simulations from multiple chains, and it returns an estimate of the potential scale reduction ![]() , effective sample size neff, and summary statistics for the posterior distribution (based on the last half of the simulated Markov chains).
, effective sample size neff, and summary statistics for the posterior distribution (based on the last half of the simulated Markov chains).
The model can also be computed using alternative parameterizations. For example, in a parameter-expanded model, the Gibbs sampler steps can be programmed as

The Gibbs sampler can then be implemented as
Gibbs sampling for the t model with fixed degrees of freedom
As described in Chapter 17, the t model can be implemented using the Gibbs sampler using the normal-inverse-![]() 2 parameterization for the θj’s and their variances. Following the notation of that chapter, we take Vj to be the variance for θj and model the Vj’s as draws from an inverse-
2 parameterization for the θj’s and their variances. Following the notation of that chapter, we take Vj to be the variance for θj and model the Vj’s as draws from an inverse-![]() 2 distribution with degrees of freedom ν and scale τ. As with the normal model, we use a uniform prior distribution on (μ, τ).
2 distribution with degrees of freedom ν and scale τ. As with the normal model, we use a uniform prior distribution on (μ, τ).
As before, we first create the separate updating functions, including a new function to update the individual-school variances Vj.

Initially we fix the degrees of freedom at 4 to provide a robust analysis of the data.

Gibbs-Metropolis sampling for the t model with unknown degrees of freedom
We can also include ν, the degrees of freedom in the above analysis, as an unknown parameter and update it conditional on all the others using the Metropolis algorithm. We follow the discussion in Chapter 17 and use a uniform prior distribution on (μ, τ, 1/ν).
To do Metropolis updating function, we write a function log_post to calculate the logarithm of the conditional posterior distribution of 1/ν given all of the other parameters. (We work on the logarithmic scale to avoid computational overflows, as mentioned in Section 10.7.) The log posterior density function for this model has three terms—the logarithm of a normal density for the data points yj, the logarithm of a normal density for the school effects θj, and the logarithm of an inverse-![]() 2 density for the variances Vj. Actually, only the last term involves ν, but for generality we compute the entire log-posterior density:
2 density for the variances Vj. Actually, only the last term involves ν, but for generality we compute the entire log-posterior density:

We introduce the function that performs the Metropolis step and then describe how to alter the R code given earlier to incorporate the Metropolis step. The following function performs the Metropolis step for the degrees of freedom (recall that we work with the reciprocal of the degrees of freedom). The jumping distribution is normal with mean at the current value and standard deviation sigma_jump_nu (which is set as described below). We compute the jumping probability as described on page 278, setting it to zero if the proposed value of 1/ν is outside the interval (0, 1] to ensure that such proposals are rejected.

This updating function stores the acceptance probability p_jump_nu which is used in adaptively setting the jumping scale sigma_jump_nu, as we discuss when describing the Gibbs-Metropolis loop.
Given these functions, it is relatively easy to modify the R code that we have already written for the t model with fixed degrees of freedom. When computing the Metropolis updates, we store the acceptance probabilities in an array, p_jump_nu, to monitor the efficiency of the jumping. Theoretical results given in Chapter 11 suggest that for a single parameter the optimal acceptance rate—that is, the average probability of successfully jumping—is approximately 44%. We can vary sigma_jump_nu in a pilot study to aim for this rate. For this example we can settle on a value such as sigma_jump_nu=1, which has an average jumping probability of about 0.4.

Parameter expansion for the t model
Finally, we can make the computations for the t model more efficient by applying parameter expansion. In the expanded parameterization, the new Gibbs sampler steps can be programmed in R as

The posterior density can conveniently be calculated in terms of the original parameterization, as shown in the function nu_update() above. We can then run the Gibbs-Metropolis algorithm as before (see the program on the bottom part of page 599 and the top of page 599), adding initialization steps for γ and α just before the ‘for (t in 1:iter)’ loop:
![]()
adding updating steps for γ and α inside the loop,
![]()
and replacing the last line inside the loop with simulations transformed to the original θ, μ, τ parameterization:
![]()
We must once again tune the scale of the Metropolis jumps. We started for convenience at sigma_jump_nu= 1, and this time the average jumping probability for the Metropolis step is 17%. This is lower than the optimal rate of 44% for one-dimensional jumping, and so we would expect to get a more efficient algorithm by decreasing the scale of the jumps (see Section 12.2). Reducing sigma_jump_nu to 0.5 yields an average acceptance probability p_jump_nu of 32%, and sigma_jump_nu= 0.3 yields an average jumping probability of 46% and somewhat more efficient simulations—that is, the draws of ν from the Gibbs-Metropolis algorithm are less correlated and yield a more accurate estimate of the posterior distribution. Decreasing sigma_jump_nu any further would make the acceptance rate too high and reduce the efficiency of the algorithm.
C.4 Programming Hamiltonian Monte Carlo in R
We demonstrate Hamiltonian Monte Carlo (HMC) by programming the basic eight-schools model. For this particular problem, HMC is overkill but it might help to have this code as a template.
We begin by reading in and setting up the data:

Our model has 10 parameters, which we string into a single vector which we label as th = (theta[1], …, theta[8],mu,tau). In the HMC program we work with this ten-dimensional vector, extracting its components as needed. First we program the log posterior density:

The scale parameter τ is restricted under the model to be positive, hence the if-statement above which has the effect of setting the posterior density to zero if τ jumps below zero.
Next we program the analytical gradient, the derivative of the log posterior with respect to each parameter:


If τ is less than zero, we have set the gradient to zero.
For debugging purposes we also write a numerical gradient function based on first differences:

Next we program a single HMC iteration that takes as inputs the parameter vector θ, the data y, σy, the step size ![]() , the number of leapfrog steps L per iteration, and a diagonal mass matrix, expressed as a vector, M:
, the number of leapfrog steps L per iteration, and a diagonal mass matrix, expressed as a vector, M:
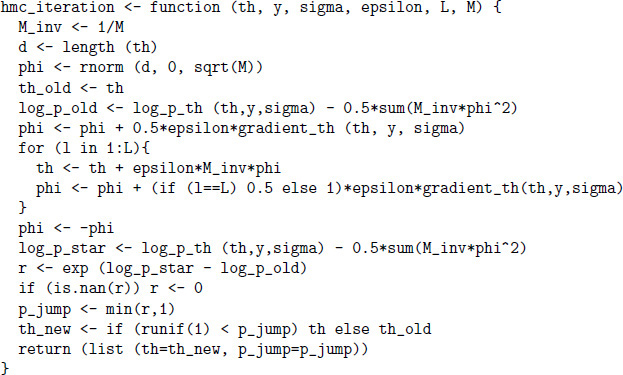
The above function performs the L leapfrog steps of an HMC iteration and returns the new value of θ (which is the same as the old value if the trajectory was rejected) and the acceptance probability, which can be useful in monitoring the efficiency of the algorithm.
Our next function is a wrapper that runs hmc_iteration and takes several arguments: an m × d matrix of starting values (corresponding to m sequences and a vector of d parameters to start each chain); the number of iterations to run each chain; the baseline step size ![]() 0 and number of steps L0, and the mass vector M. After setting up empty arrays to store the results, our HMC function, hmc_run runs the chains one at a time. Within each sequence,
0 and number of steps L0, and the mass vector M. After setting up empty arrays to store the results, our HMC function, hmc_run runs the chains one at a time. Within each sequence, ![]() and L are randomly drawn at each iteration in order to mix up the algorithm and give it the opportunity to explore differently curved areas of the joint distribution. At the end, inferences are obtained using the last halves of the simulated sequences, summaries are printed out, and the simulations and acceptance probabilities are returned:
and L are randomly drawn at each iteration in order to mix up the algorithm and give it the opportunity to explore differently curved areas of the joint distribution. At the end, inferences are obtained using the last halves of the simulated sequences, summaries are printed out, and the simulations and acceptance probabilities are returned:

Now it is time to get ready to run the algorithm. We define a vector with the names of the parameters and set the number of chains to 4:

Next we define a diagonal mass matrix to be on the rough scale of the inverse variance matrix of the posterior distribution. Given the estimates and standard errors in Table 5.2 on page 120, we can crudely approximate this scale as 15 for each of the parameters; thus,
![]()
Then we set up an array of random starting points defined on roughly the same scale, being careful to restrict the starting points for τ to be positive:

We are finally ready to go! We start with our default values ![]() 0 = 0.1, L0 = 10, running for only 20 iterations to make sure the program does not crash:
0 = 0.1, L0 = 10, running for only 20 iterations to make sure the program does not crash:

Here are the results:

The acceptance rates seem low (recall our goal of approximately 65% acceptances), and so we decrease the base step size from 0.1 to 0.05 and increase the base number of steps from 10 to 20:
![]()
This looks better:
Inference for the input samples (4 chains: each with iter=100; warmup=50):

We re-run for 1000 and then 10,000 iterations and obtain stable inferences:

For each parameter, n_eff is a crude measure of effective sample size, and Rhat is the potential scale reduction factor on split chains (at convergence, Rhat=1).
Avg acceptance probs: 0.57 0.62 0.62 0.66
For this little hierarchical model, setting up and running HMC was costly both in programming effort and computation time, compared to the Gibbs sampler. More generally, though, Hamiltonian Monte Carlo can work in complicated problems where Gibbs and Metropolis fail, which is why in Stan we implemented HMC (via the no-U-turn sampler). In addition, this sort of hierarchical model exhibits better HMC convergence when parameterized in terms of the group-level errors (that is, the vector η, where θj = μ + τηj for j = 1, …, J), as demonstrated in the Stan model in Section C.2.
C.5 Further comments on computation
We have already given general computational tips in Section 10.7: start by computing with simple models and compare to previous inferences when complexity is adding. We also recommend getting started with smaller or simplified datasets, but this strategy was not really relevant to the current example with only eight data points.
There are various ways in which the programs in this appendix could be made more computationally efficient. For example, in the Metropolis updating function nu_update() for the t degrees of freedom in Section C.3, the log posterior density can be saved so that it does not need to be calculated twice at each step. It would also probably be good to use a more structured programming style in our R code (for example, in our updating functions mu_update(), tau_update(), and so forth) and perhaps to store the parameters and data as lists and pass them directly to the functions. We expect that there are many other ways in which our programs could be improved. Our general approach is to start with transparent (and possibly inefficient) code and then reprogram more efficiently once we know it is working.
We made several mistakes in the process of implementing the computations described in this appendix. Simplest were syntax errors in Stan models and related problems such as feeding in the wrong inputs when calling the stan() function from R.
We fixed syntax errors and other minor problems in the R code by cutting and pasting to run the scripts one line at a time, and by inserting print statements inside the R functions to display intermediate values.
We debugged the Stan and R programs in this appendix by comparing them against each other, and by comparing each model to previously fitted simpler models. We found many errors, including treating variances as standard deviations (for example, the expression rnorm(1,alpha_hat, V_alpha) instead of rnorm(1,alpha_hat,sqrt(V_alpha)) when simulating from a normal distribution in R), confusion between ν and 1/ν, forgetting a term in the log-posterior density, miscalculating the Metropolis updating condition, and saving the wrong output in the sims array in the Gibbs sampling loop.
More serious conceptual errors included a poor choice of prior distribution, which we realized was a problem by comparing to posterior simulations computed using a different algorithm. We also originally had an error in the programming of a reparameterized model, a mistake we discovered because the inferences differed dramatically from the simpler parameterization.
As the examples in this appendix illustrate, Bayesian computation is not always easy, even for relatively simple models. However, once a model has been debugged, it can be applied and then generalized to work for a range of problems. Ultimately, we find Bayesian simulation to be a flexible tool for fitting realistic models to simple and complex data structures, and the steps required for debugging are often parallel to the steps required to build confidence in a model. We can use R to graphically display posterior inferences and predictive checks.
C.6 Bibliographic note
R is available at R Project (2002), and its parent software package S is described by Becker, Chambers, and Wilks (1988). Two statistics texts that use R extensively are Fox (2002) and Venables and Ripley (2002). For more on Stan, see Stan Development Team (2012). R and Stan have online documentation, and their websites have pointers to various help files and examples.