
![]()
Reporting
In most projects, reporting is often overlooked until the last minute. Everyone is focused on getting information into the system and making the views look and feel right. Then someone starts using the application and says, “Wouldn’t it be nice if users could print out a copy of the information to take with them?” “Oops, we didn’t think about that.” (Insert chirping crickets here.)
It makes sense that users would want to take their todo information with them. But you’re in a hurry and want to get this application rolled out quickly. What do you do?
In this chapter, you will learn how to create a reporting facility using the Collab-Todo domain and a popular open source reporting engine, JasperReports.1 Creating a reporting facility will give you a slightly different view of Grails. You will use dynamic invocation to retrieve data for the report and pass the data to JasperReports. Along the way, you will see how easy it is to use third-party libraries in a Grails application.
The Report
The goal of this chapter is to allow users to run a report that contains their lists of todo items.
Start by adding some technical constraints to help frame the solution:
- You want to be able to create multiple reports.
- Reports should be available in multiple formats, including PDF, HTML, TXT, RTF, XLS, CSV, and XML.
- You believe in the DRY principle and want to maintain a separation of concerns and encapsulation.
- You’ll leverage the Grails domain model and dynamic methods to retrieve the report data.
Taking these technical constraints into consideration, you can construct the solution illustrated in Figure 10-1.
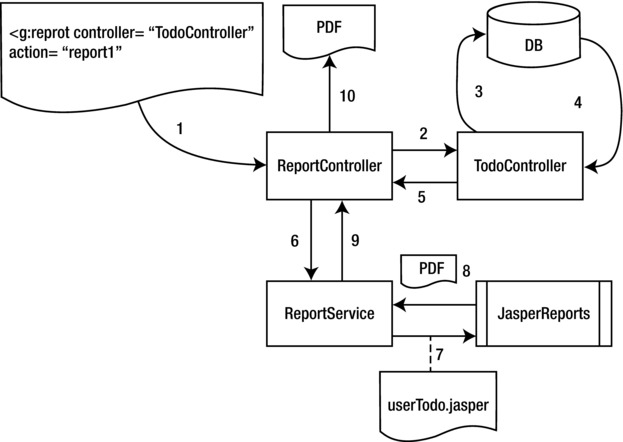
Figure 10-1 . Reporting facility overview
The first component in the top-left of Figure 10-1 represents an HTML page. The HTML page needs to provide a way for users to indicate that they want to generate a report. You accomplish this by creating a report tag. You could just hard-code all the logic required to invoke the next step in the process, but since there are multiple reports, that would be a lot of copying, pasting, and tweaking. It wouldn’t be very user friendly to the HTML developer either. By creating a tag, you’re able to encapsulate all of the invocation knowledge.
Just like most links in Grails, a tag invokes an action on a controller. If you consider the technical constraints, the controller should have very little knowledge about the actual report to be created. It should control (pun intended) the execution of the reporting process. In this case, it calls the TodoController to gather the data for the report.
The TodoController uses dynamic finder methods on the Todo class to retrieve the report data from the database, and returns the result to the ReportController. Now that the ReportController has data for the report, it calls the ReportService to create the report.
The ReportService prepares the data, locates the appropriate report template, and invokes the report engine, JasperReports. The report engine merges the data and the template to create the report. It returns the report to the ReportService, which in turn returns the report to the ReportController. The ReportController then wraps the report in the appropriate headers and returns it to the browser to be displayed.
This is just an overview. The rest of the chapter will explore each step in more detail and will hopefully answer most, if not all, of your questions.
DYNAMIC FINDERS OR EMBEDDED SQL?
A question that needs to be addressed straightaway is, “Why does the ReportController pass the report data to the report instead of the report looking up the data using a simple SQL statement embedded in the report template?” The answer is pretty simple. That would be a perfectly legitimate approach in many situations (see the “An Alternate Approach” section at the end of the chapter), but using the dynamic finder and the domain model provides a couple of advantages.
First, when the domain model becomes more complicated, writing the SQL to navigate all of the tables and relationships is error-prone and difficult. You already defined all of this information in the domain model using GORM, so why not just reuse it?
Second, your goal is to learn Grails, and using embedded SQL would cause you to miss out on using dynamic finders and dynamically calling the appropriate action on the TodoController to gather the data.
Now that you have an idea of how to approach creating the reporting facility, you need to add JasperReports to the application and create the report template. The next couple of sections will take you through that process. With that accomplished, you will construct the individual components and tie everything together. By the end of this chapter, you will have a pretty nice reporting facility that will allow you to easily create reports in multiple output formats.
In this section, you will receive a high-level overview of JasperReports (the runtime reporting engine) and iReports (the report designer). You will install iReports and add the appropriate JasperReports libraries to the application.
Overview
JasperReports is a popular open source Java reporting engine from JasperSoft.2 You can use JasperReports to define robust, professional reports that include graphics and charts. You set up and define JasperReports reports using XML. The reporting engine uses the report definition and a data source to produce a report in a variety of output formats, including PDF, XML, HTML, CSV, XLS, RTF, and TXT.
JasperReports uses third-party libraries to render reports. The engine itself is not an executable application. It is intended to be embedded into a client or server-side application. The application is responsible for passing the XML report definition, data source, parameters, and configuration information to a report exporter. The exporter returns a ByteArrayOutputStream containing the report content to the application. In the case of a typical server application, the application sets the appropriate content type on an HTML response and streams the results to the browser.
![]() Tip JasperReports relies on Abstract Window Toolkit (AWT) to render the report. If you intend to run Collab-Todo in a Linux/Unix environment without graphics support, you will need to specify the headless environment by setting -Djava.awt.headless=true. You can do this by setting the JAVA_OPT environmental variable (e.g., JAVA_OPT='–Djava.awt.headless=true').
Tip JasperReports relies on Abstract Window Toolkit (AWT) to render the report. If you intend to run Collab-Todo in a Linux/Unix environment without graphics support, you will need to specify the headless environment by setting -Djava.awt.headless=true. You can do this by setting the JAVA_OPT environmental variable (e.g., JAVA_OPT='–Djava.awt.headless=true').
The XML report definition, known as a report template in Jasper terms, defines the content and layout of the report. You can define the report by hand using an XML editor, but this is time-consuming and error-prone. Luckily, JasperSoft created iReports, a graphic report designer for JasperReports that defines and compiles JasperReports. It is much easier to build reports using iReports than it is to build the XML report definition by hand.
Installing JasperReports and iReports
Installing JasperReports and iReports is easy. You can download iReports from the iReports home page5 or from SourceForge.6 Download and execute the Windows installer version.
![]() Note If you’re using an operating system other than Windows, you need to download the .zip or.tar file and install it manually by unzipping or unpacking it into an appropriate location.
Note If you’re using an operating system other than Windows, you need to download the .zip or.tar file and install it manually by unzipping or unpacking it into an appropriate location.
The Windows installer installs iReports in the directory of your choice; remember where it’s installed. iReports includes JasperReports and all of the required third-party libraries. Copy the following files from the iReports/lib directory to the collab-todo/lib directory:
- poi-x.x.x-FINAL-x.jar
- commons-beanutils-x.x.jar
- commons-collections-x.x.jar
- commons-dbcp-x.x.x.jar
- commons-digester-x.x.jar
- commons-logging-x.x.x.jar
- commons-logging-api-x.x.x.jar
- commons-pool-x.x.jar
- itext-x.x.x.jar
- jasperreports-x.x.x.jar
Grails uses these JAR files to invoke JasperReports.
Creating the Todo Report
Now that iReports is installed, you’re ready to build the todo report, as shown in Figure 10-1. You will take the following steps to create the report:
- Define a JavaBeans data source for Collab-Todo.
- Create the first iteration of the report using the iReport Wizard.
- Enhance the report.
- Compile the report.
If you recall from the overview, the ReportController gathers the report data from another controller and ultimately passes the data to the reporting engine. This means that instead of using a JDBC database connection, the report uses a JavaBeans data source. Let’s define the data source:
- From iReports, select the Data
 Connections/Data Sources menu option. A list of currently defined and example data sources is shown.
 - Click the New button to define a new data source. The “Connections properties” dialog box opens.
- Select the “JavaBeans set data source” option from the list of available data sources, and click the Next button. The “JavaBeans set data source” options are shown.
- Set the name to Collab-Todo and blank out the factory class and static method fields. Figure 10-2 shows the contents of this page.

Figure 10-2 . The “JavaBeans set data source” page
- Click the Save button. You should see your new data source in the list of available data sources.
- Close this window.
You’re now ready to define the report using the wizard.
Using iReports
Now that you’ve defined a data source, you’re ready to start building the report. If you’re already familiar with iReports, you can skim through this section and move on to the “The Report Tag” section.
MAKING IREPORTS AWARE OF THE COLLAB-TODO CLASSES
iReports uses the Collab-Todo domain class to create the report, so you need to make iReports aware of the domain classes. Ideally, you would just add the location of the CollabTodo classes to the iReports classpath. At the time of writing, however, a bug in iReports prevents this from working as expected. You have to decide whether to manually describe the JavaBean fields within iReports, or create a JAR file of the classes and put it in the iReports lib directory.
For our purposes, it’s easier and less errorprone to create a JAR file of the Collab-Todo classes. By default, the Collab-Todo classes should be located in workspacecollab-todo arget. You can use your favorite JAR/ZIP tool to create a JAR of the classes and place it in the iReports lib directory. This will make iReports aware of the Collab-Todo domain classes.
If you’re familiar with iReports, you can go ahead and create the report however you see fit. However, we’re assuming that you’re new to iReports, so follow these steps to use the iReports Wizard.
- Select the File Report Wizard menu option.
- Specify the data that you want in the report. For your purposes, you want to set the Connections/Data Sources field to Collab-Todo, if it isn’t already. This tells iReports that you’re using a JavaBeans data source.
- Specify which domain class contains the data. You’re creating a todo report, so the “JavaBean class” field should be set to Todo. The wizard should look something like Figure 10-3.

Figure 10-3 . Specifying the data source
- Assuming that you followed the instructions in the “Making iReports Aware of the Collab-Todo Classes” sidebar, when you click the Next button, you select the fields that should be included in the report. The wizard should look something like Figure 10-4.

Figure 10-4 . Selecting fields
Add all of the fields except for the class and metaClass, and click the Next button. The metaClass is internal Grails metadata and isn’t appropriate for a report. The next screen lists the fields and their datatypes. Click the Next button to continue. - You should now be on step 3, “Group by.” You don’t have any work to do here, so click the Next button to move to step 4, Layout.
- The wizard lets you pick from predefined layouts. As a starting point, check “Columnar layout” and highlight classicC.xml. Your screen should look something like Figure 10-5.
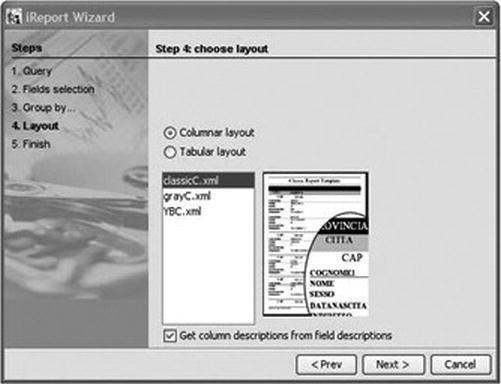
Figure 10-5 . Selecting the layout
- Click the Next button to move to step 5, Finish. Click the Finish button to generate the report template. You should have a report template that looks like Figure 10-6.

Figure 10-6 . The todo report template
Congratulations; you have your first report. It isn’t pretty, but it is functional. At this point, you could compile the report and run it. If that’s what you want to do, skip forward to “Compiling the Report.” Otherwise, let’s make the report a little more usable first.
As you can see, iReports used the attribute names to create the labels. As a first step in making the report more usable, type in your own text for the labels. You may have to resize the field by dragging the right side of the label.
Enhancing the Report
As you can see, iReports used the Todo property names to create the labels. You should rearrange the labels and fields to an order that makes more sense. You may want to copy the example shown in Figure 10-7.
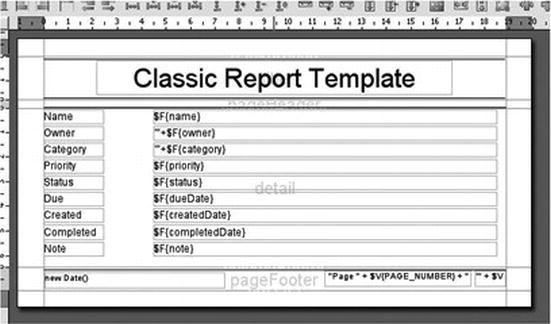
Figure 10-7 . Rearranged labels and fields
The report is starting to look better, but you could do more. Follow these steps to enhance the report:
- Take a good look at the Note field. It’s a little small, so expand it by dragging the bottom edge of the field down.
- The title could use a little work, so add the username, which is passed to the report as a parameter. To define the username, right-click the parameter entry in the Document Structure window and select Add Parameter. iReports displays a pop-up window that lets you input the parameter name. Set the Parameter Name field to userName, as shown in Figure 10-8.

Figure 10-8 . Setting up the parameter
- Now that you defined the parameter, you can use it in the report header. Insert the userName parameter into the header by dragging it from the list of parameters in the Document Structure window to the report header. Also, change the current text to read “Todo for:”. Figure 10-9 shows an example of the new header.

Figure 10-9 . The new header
- Save the report as userTodo.jrxml in the Collab-Todo application directory.
You’re now ready to compile the report and start integrating it into the application.
Now that you’ve set up the report, it’s time to make it available to the application. You need to compile it and copy the compiled file to the appropriate application directory.
Select Build ![]() Compile in iReports. You will see the results of the compilation at the bottom of iReports in the output console. Hopefully, the build is successful the first time, but if it isn’t, work through the error messages and try again. Once you have a successful build, copy the userTodo.jasper file from the iReports home directory to the collab-todo/web-app/reports directory.
Compile in iReports. You will see the results of the compilation at the bottom of iReports in the output console. Hopefully, the build is successful the first time, but if it isn’t, work through the error messages and try again. Once you have a successful build, copy the userTodo.jasper file from the iReports home directory to the collab-todo/web-app/reports directory.
You have used several tags, but now it’s time to create your own. If you have developed tags before, you will be pleasantly surprised by how easy it is in Grails. You will create a report tag library to hold the report tag and then implement the tag as a closure.
It is a best practice to group tags by topic into a tag library. In this case, all report tags are grouped in the grails-app/taglib/ReportTagLib.groovy. Notice the Grails conventions again: tag libraries end with TagLib.groovy and are located in the grails-app/taglib directory. The following command illustrates creating the tag library:
> grails create-tag-lib Report
The results of the command can be seen here:
| Created file grails-app/taglib/collab/todo/ReportTagLib.groovy
| Created file test/unit/collab/todo/ReportTagLibTests.groovy
As you have come to expect, Grails created the tag library and a unit test. The next step is to create the tag.
As you saw in Chapter 8, a tag is a closure that has two arguments: a map of tag attributes and the body of the tag. Listing 10-1 illustrates the tag library class.
Listing 10-1. Tag Library Class
class ReportTagLib {

    def report = { attrs, body ->

    ...

    }
}
Now you have to figure out what to put between the curly braces. You know you have to let the users choose in which format they want to receive the report, and you know that you have to invoke the ReportController to generate the report. With this in mind, you can start designing the tag inputs. Let’s take a look at it from a usage point of view. Listing 10-2 illustrates how that tag might look inside a view.
Listing 10-2. Report Tag
<g:report id="todoReport" controller="TodoController"
            action="userTodo" report="userTodo"
            format="PDF,HTML,CSV,XLS,RTF,TXT,XML">
<input type="hidden" name="userName" value="${todoList[0]?.owner}" />
</g:report>
Based upon the requirements, this should make some sense. The report tag has an id attribute to uniquely identify it. The controller and action attributes work together to specify which action to run to get the report data. The report attribute specifies which report to generate, and the format attribute supplies a list of report formats for users to select. The hidden input determines which user’s information to gather. With this information, you can turn your attention back to the tag implementation. The tag body gives you a hint about the implementation. The tag generates a <form> element that invokes the ReportController’s index action. The format attribute is used to display icons representing each of the report formats. Listing 10-3 contains the implementation of the report tag.
Listing 10-3. Report Tag Implementation
1.  def report = { attrs, body ->
2.
3.    validateAttributes(attrs)
4.    def appPath = grailsAttributes.getApplicationUri(request)
5.
6.    out <<"""
7.        <form id="${attrs['id']}" name="${attrs['report']}"
8.          action="${appPath}/report">
9.        <input type="hidden" name="format"/>
10.        <input type="hidden" name="file" value="${attrs['report']}"/>
11.       <input type="hidden" name="_controller"
12.          value="${attrs['controller']}"/>
13.       <input type="hidden" name="_action" value="${attrs['action']}"/>
14.   """
15.   TreeSet formats = attrs['format'].split(",")
16.   formats.each{
17.     out <<"""
18.         <a href="#${attrs['report']}Report"
19.                    onClick="document.getElementById('${attrs['id']}').
20.                     format.value = '${it}';
21.                     document.getElementById('${attrs['id']}').submit()">
22.         <img width="16px" height="16px" border="0"
23.                    src="${appPath}/images/icons/${it}.gif" />
24.         </a>
25.     """
26.   }
27.   out << body()
28.   out <<"</form>"
29. }
30.
31. private void validateAttributes(attrs) {
32.   //Verify the 'id' attribute
33.   if(attrs.id == null)
34.     throw new Exception("The 'id' attribute in 'report' tag mustn't be 'null'")
35.
36.   //Verify the 'format' attribute
37.   def availableFormats = ["CSV","HTML","RTF","XLS","PDF","TXT","XML"]
38.   attrs.format.toUpperCase().split(",").each{
39.     if(!availableFormats.contains(it)){
40.       throw new Exception("""Value ${it} is a invalid format attribute.
41.             Only ${availableFormats} are permitted""")
42.     }
43.   }
44.
Let’s take a look at the tag implementation line by line. In line 1, the tag takes two arguments: an attribute map and the body. Because you specified the report formats on the tag, the tag in line 3 has to validate that you specified supported report formats. Line 4 creates a local variable for the application path. Lines 6-14 create the form and hidden input fields to allow tag attributes to be passed to the ReportController. But wait, where was out defined? The out variable is a handle to the output stream that is injected by Grails.
Lines 15-25 iterate over the tag format attribute to create icons for each of the report formats. Looking closely, note that when the user selects the report format, the hidden input field format is set and the form is submitted. Line 27 outputs the tag body, and line 28 completes the form definition. Lines 31-44 are the body of the validateAttributes method called on line 3. This method iterates through the tag format attribute to validate that you specified valid report formats.
The ReportController and the ReportService
The ReportController follows these three steps to create the report:
- Gather data for the report by invoking a controller/action.
- Locate a compiled report.
- Ask the ReportService to generate the report, and wrap the output with the appropriate content type.
Start by running the following code to create the ReportController:
> grails create-controller Report
Now you need to implement the three previously listed steps. Listing 10-4 illustrates gathering the report data
Listing 10-4. Gathering the Report Data
   def index() {
      // Gather data for the report.
      // 1) Find the controller
      ApplicationContext ctx = (ApplicationContext) session.
         getServletContext().
         getAttribute(GrailsApplicationAttributes.APPLICATION_CONTEXT);
DEF CONTROLLER = CTX.GETBEAN("${PARAMS._CONTROLLER}");

      // 2) Invoke the action
      def inputCollection = controller."${params._action}"(params)
      params.inputCollection = inputCollection
...
}
The first step in gathering data for the report is to dynamically invoke the action supplied by the report tag. The tag specifies the controller and the action to be invoked to gather the data. The controller and the action to invoke are passed in the params map. The problem is that the values are just strings. You use the Spring application context to get an instance of the controller. Then you invoke the action on the controller, passing the params map to it.
Next, you need to locate the report. The compiled reports are located in the web-app/reports directory. Listing 10-5 illustrates using the servletContext to locate and load the report.
Listing 10-5. Locating and Loading the Report
// Find the compiled report
def reportFileName = reportService.reportFileName("${params.file}")
def reportFile = servletContext.getResource(reportFileName)

if(reportFile == null){
    throw new FileNotFoundException(""""${reportFileName}" file must be in
        reports repository.""")
}
Finally, you need to generate the report and wrap the output with the proper content type. The ReportController calls the ReportService to generate the report. You could collapse the service into the controller, but the controller’s purpose is to control, not do the actual work. The controller should delegate the actual work to some other component. Delegating the actual report generation to the report service maintains a separation of concerns and encapsulates knowledge of the JasperReports libraries into a single location, theReportService. Listing 10-6 illustrates delegating to the ReportService and wrapping the output in the appropriate context type.
Listing 10-6. Calling the ReportService
// Call the ReportService to invoke the reporting engine
   switch(params.format){
      case "PDF":
         createPdfFile(reportService.generateReport(reportFile,
            reportService.PDF_FORMAT,params ).toByteArray(),params.file)
         break
      case "HTML":
         render(text:reportService.generateReport(reportFile,
            reportService.HTML_FORMAT,params),contentType:"text/html")
         break
      case "CSV":
         render(text:reportService.generateReport(reportFile,
            reportService.CSV_FORMAT,params),contentType:"text")
         break
      case "XLS":
         createXlsFile(reportService.generateReport(reportFile,
            reportService.XLS_FORMAT,params).toByteArray(),params.file)
         break
      case "RTF":
         createRtfFile(reportService.generateReport(reportFile,
            reportService.RTF_FORMAT,params).toByteArray(),params.file)
         break
      case "XML":
         render(text:reportService.generateReport(reportFile,
            reportService.XML_FORMAT,params),contentType:"text")
         break
      case "TXT":
         render(text:reportService.generateReport(reportFile,
            reportService.TEXT_FORMAT,params),contentType:"text")
         break
      default:
         throw new Exception("Invalid format")
         break
   }
}

/**
* Output a PDF response
*/
def createPdfFile = { contentBinary, fileName ->
   response.setHeader("Content-disposition", "attachment; filename=" +
        fileName + ".pdf");
   response.contentType = "application/pdf"
   response.outputStream << contentBinary
}

/**
* Output an Excel response
*/
def createXlsFile = { contentBinary, fileName ->
   response.setHeader("Content-disposition", "attachment; filename=" +
      fileName + ".xls");
   response.contentType = "application/vnd.ms-excel"
   response.outputStream << contentBinary
}

/**
* Output an RTF response
*/
def createRtfFile = { contentBinary, fileName ->
   response.setHeader("Content-disposition", "attachment; filename=" +
        fileName + ".rtf");
   response.contentType = "application/rtf"
   response.outputStream << contentBinary
}
Now that you have the controller, you need to set up the ReportService. You can create the ReportService by running this command:
> grails create-service Report
The main functionality in the ReportService is encapsulation of the logic to generate the report using the JasperReports API. Listing 10-7 contains the ReportService.
Listing 10-7. ReportService
1.  import java.io.ByteArrayOutputStream
2.  import java.io.InputStream
3.  import java.sql.Connection
4.  import java.sql.Timestamp
5.  import java.util.HashMap
6.
7.  import net.sf.jasperreports.engine.JRException
8.  import net.sf.jasperreports.engine.JRExporter
9.  import net.sf.jasperreports.engine.JasperPrint
10. import net.sf.jasperreports.engine.JasperFillManager
11. import net.sf.jasperreports.engine.JRExporterParameter
12. import net.sf.jasperreports.engine.export.JRCsvExporter
13. import net.sf.jasperreports.engine.export.JRHtmlExporter
14. import net.sf.jasperreports.engine.export.JRHtmlExporterParameter
15. import net.sf.jasperreports.engine.export.JRPdfExporter
16. import net.sf.jasperreports.engine.export.JRXlsExporter
17. import net.sf.jasperreports.engine.export.JRXmlExporter
18. import net.sf.jasperreports.engine.export.JRRtfExporter
19. import net.sf.jasperreports.engine.export.JRTextExporter
20. import net.sf.jasperreports.engine.export.JRTextExporterParameter
21. import net.sf.jasperreports.engine.data.JRBeanCollectionDataSource
22.
23. class ReportService {
24.
25.   boolean transactional = true
26.
27.   int PDF_FORMAT = 1;
28.   int HTML_FORMAT = 2;
29.   int TEXT_FORMAT = 3;
30.   int CSV_FORMAT = 4;
31.   int XLS_FORMAT = 5;
32.   int RTF_FORMAT = 6;
33.   int XML_FORMAT = 7;
34.
35.
36.
37.   /**
38.   * Generate the Report
39.   */
40.   def generateReport = {jasperFile, format, parameters ->
41.
42.     // Setup the Data Source
43.     JRBeanCollectionDataSource ds = new JRBeanCollectionDataSource(
44.           parameters.inputCollection);
45.
46.     InputStream input = jasperFile.openStream()
47.     JRExporter exporter
48.     ByteArrayOutputStream byteArray = new ByteArrayOutputStream()
49.     JasperPrint jasperPrint = JasperFillManager.fillReport(input, parameters,ds)
50.     switch (format) {
51.       case PDF_FORMAT:
52.         exporter = new JRPdfExporter()
53.         break
54.       case HTML_FORMAT:
55.         exporter = new JRHtmlExporter()
56.         exporter.setParameter(JRHtmlExporterParameter.
57.             IS_USING_IMAGES_TO_ALIGN, FALSE)
58.         break
59.       case CSV_FORMAT:
60.         exporter = new JRCsvExporter()
61.         break
62.       case TEXT_FORMAT:
63.         exporter = new JRTextExporter()
64.         exporter.setParameter(JRTextExporterParameter.CHARACTER_WIDTH,
65.             new Integer(10));
66.         exporter.setParameter(JRTextExporterParameter.CHARACTER_HEIGHT,
67.             new Integer(10
68.         break
69.       case XLS_FORMAT:
70.         exporter = new JRXlsExporter()
71.         break
72.       case RTF_FORMAT:
73.         exporter = new JRRtfExporter()
74.         break
75.       case XML_FORMAT:
76.         exporter = new JRXmlExporter()
77.         break
78.       default:
79.         throw new Exception("Unknown report format
80.     }
81.     exporter.setParameter(JRExporterParameter.OUTPUT_STREAM, byteArray)
82.     exporter.setParameter(JRExporterParameter.JASPER_PRINT, jasperPrint)
83.     exporter.exportReport()
84.     return byteArray
85.   }
86.
87.     def reportFileName = { reportName ->
88.        return "/reports/"+reportName+".jasper"
89.     }
90. }
Let’s walk through this. Line 40 is the beginning of the generateReport closure. As you can see, generateReport takes three input parameters: the report template, the report format, and parameters. Lines 42-44 define and populate a JavaBeans collection data source. Looking closely, note that the data source is populated from an input collection contained with the parameters. This is the collection that the ReportController created.
Lines 46-48 do some additional setup. Line 49 passes the report template, parameters, and JavaBeans data source to the reporting engine. Lines 50-80 set up the appropriate rendering component based upon the report format type requested, while lines 81-82 set some additional parameters on the renderer. Line 83 is where the real magic happens: it causes the report to be generated. The results are returned to the caller on line 84.
In Listing 10-5, you may recall seeing something like the following:
reportService.reportFileName($params.file)
Lines 87-89 contain the implementation of this method, which, as you can tell, is pretty basic. You simply prepend the directory and append the file extension to create the report file name. You could easily have done this in the ReportController, but you really don’t want the ReportController to know that you’re using JasperReports. By doing it this way, you maintain a separation of concerns and encapsulation.
You’re now ready to tie it all together and see the result of your work.
Tying It All Together
You’re about to see the result of your work. You installed iReports and copied the appropriate libraries to the application. You created the report and the report tag library. You created the ReportService and the ReportController. The only thing left to do is to write the code that gathers the report data and hook the report tag into the application.
Gathering the Report Data
Recall from “The Report Tag” section that the tag allows you to specify the controller and the action to call to gather the report data. In this case, you’ll specify the TodoController and the userTodo action, so you’ll need to create a userTodo action on the TodoController. Listing 10-8 contains the content of the action.
Listing 10-8. Gathering the Report Data
def userTodo = {
    def user = User.get(session.user.id)
    return Todo.findAllByOwner(user)
}
The code in Listing 10-8 finds all of the todos for the current user and returns the results. Now, you have to hook the report tag into the application.
Adding the Report Tag to the Application
The last step is to add the report tag to the Todo List view and then edit the Todo List view (grails-app/views/todo/list.gsp). At the bottom of the file, after the paginate logic, add the report tag. Follow Listing 10-9 as an example.
Listing 10-9. Adding the Report Tag
    ...
<div class="paginateButtons">
<g:paginate total="${Todo.count()}" />
</div>
<g:report id="todoReport" controller="TodoController"
action="userTodo" report="userTodo"
format="PDF,HTML,CSV,XLS,RTF,TXT,XML">
<input type="hidden" name="userName" value="${todoList[0]?.owner}" />
</g:report>
</div>
</body>
</html>
Now let’s take a look at the results. Start the application, log in, and select the PDF icon. Figure 10-10 shows the report
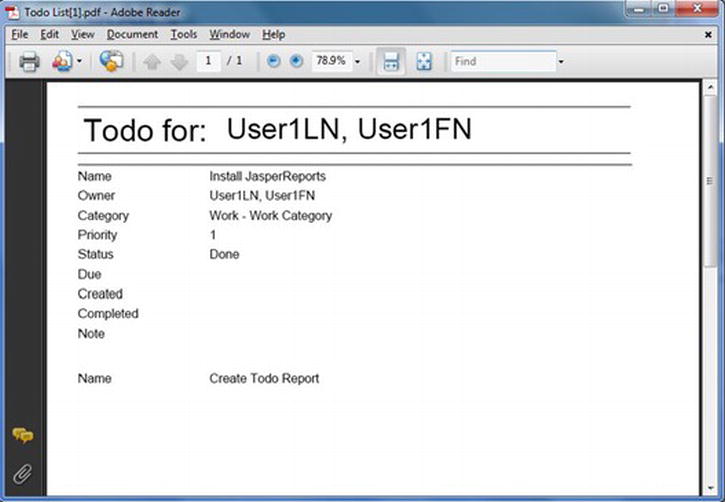
Figure 10-10 . The report
Congratulations, you successfully built a reporting facility. Now that you have one, it would be a shame to not reuse it.
The Report List
You did a lot of good work; you constructed all of the core components of a reporting facility and enhanced a view with the report tag to give users access to reports. You also saw how to use the following command to pass report parameters to the data collection action:
<input type="hidden" name="userName" value="${todoList[0]?.owner}" />
In this case, the parameter was a hidden field, but it could have just as easily been a visible input field.
It would be reasonable for users expect to be able to specify a due-date range and only see todo items that are within the range. What would it take to fulfill such a request? Well, you would need to construct a Reports List view and hook it into the application. This view would need to list all of the available reports. If a report doesn’t require any additional parameters, you could execute it directly from the Reports List view. If a report requires additional parameters, it will launch another page that allows users to specify the input parameters for the report.
The best thing is, you can reuse all of the components you just created. Pretty cool. Given that this is all a rehash of everything you have learned, we will leave this as an exercise for you to develop on your own.
An Alternate Approach
Earlier in the chapter, we discussed using the domain model to give data to the reports or using embedded SQL. We decided to use the domain model approach for several good reasons, but the alternative is worth considering.
Marcos Fábio Pereira created a Jasper plugin for Grails. As a matter of fact, Marcos’ work provided some of the inspiration for this chapter. So here is a big shoutout to Marcos: thank you Marcos; your good work is appreciated.
The Jasper plugin takes the embedded SQL approach. Depending upon your circumstances, this may be a good solution for you. You can take a look at the Jasper plugin by running Grails Plugin Manager as shown in Figure 10-11.
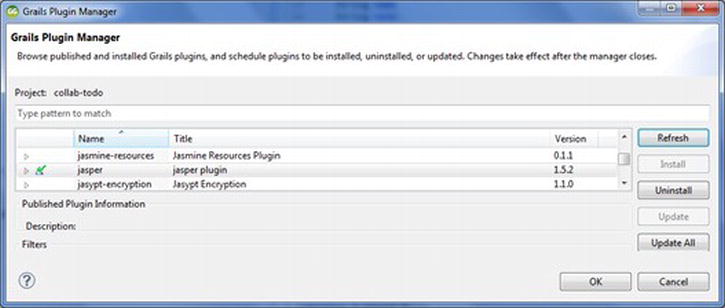
Figure 10-11 . Installing the Jasper plugin
This installs the Jasper plugin as shown in the output:
| Loading Grails 2.1.0
| Configuring classpath.
| Environment set to development.....
| Resolving plugin jasper. Please wait…
| Installing zip jasper-1.5.2.zip.....
| Installed plugin jasper-1.5.2
| Resolving plugin JAR dependencies.....
| Plugin installed.
Similar to the approach we discussed in the previous section, to create a report from Jasper, we need to create a .jrxml and compile it to the .jasper report file. In addition, we use jasperReport tags as illustrated in Listing 10-10.
Listing 10-10. Using the jasperReport Tag
<g:jasperReport controller="todo" action="todoReport" jasper="userTodo" format="PDF"  />
<g:jasperReport controller="todo" action="todoReport" jasper="userTodo" format="XLS"  />
The controller and action attributes of the jasperReport tag work together to specify which action to run to get the report data. The jasper attribute specifies which report to generate, and the format attribute supplies a format/list of report formats for users to select. Listing 10-11 illustrates the action todoReport fragment.
Listing 10-11. Action Attribute of the jasperReport Tag
def createReport() {
        def todos = Todo.list()
        chain(controller:'jasper',action:'index',model:[data:todos],params:params)
}
Figure 10-12 shows the result of using Listing 10-10 and Listing 10-11.
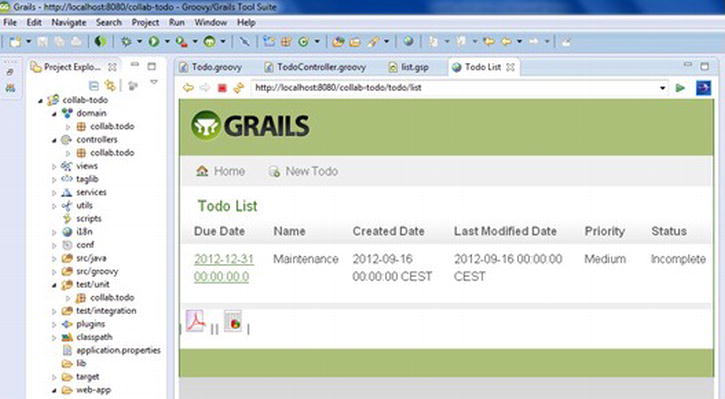
Figure 10-12 . pdf and xls icons for reports
As we added the jasperReport tag in the list.gsp, the Todo list screen shows the pdf and xls icons for PDF and XLS reports.
Summary
You accomplished a lot in this chapter. Instead of building a static solution for one report, you built a dynamic reporting facility that supports multiple reports and multiple formats, and accepts input to drive the selection of report data.
In the process of building the reporting facility, you installed and configured the JasperReports reporting engine and the iReports report designer. You used iReports to define and compile the report template.
You then moved on to creating a report tag library. You created the ReportController for the report tag to call. The ReportController took care of facilitating the data collection and invoking the ReportService to generate the report. In the ReportService, you wrapped the Todo domain objects in a JavaBeans data source, and you passed the data source, parameters, and report template to the JasperReports reporting engine for processing. The reporting engine returned a binary version of the report, which the ReportController then returned to the user.
This chapter allowed you to learn some new things, and it reinforced some things you learned earlier. It showed you how to build a reporting facility that supports multiple reports and formats. The next chapter leverages the ReportService in a nightly batch job to generate and e-mail user todo reports.
3 TeodorDanciu and Lucian Chirita, The Definitive Guide to JasperReports (Berkeley, CA: Apress, 2007).
4 GiulioToffoli, The Definitive Guide to iReports (Berkeley, CA: Apress, 2007).