
![]()
Web 2.0—Ajax and Friends
So far in this book, we have relied on a few basic items to create our site, and, as of right now, it is fully functioning. Users have the ability to log in, create todos, and so on. And while these make for a good application, good applications will not generate revenue. The Web is filled with many bad applications, a lot of good ones, and very few excellent ones. In this and the following two chapters, we will try to add some excellence to our web application by applying some Web 2.0 techniques.
What do we mean by excellence? Some developers try to cram every Ajax component and every Web 2.0 concept under the sun into their applications. Many times, this approach fails. You end up complicating the page and making it difficult to use. In this chapter’s examples, we will try to toe the line between enhancing the page and making it unmanageable. Each component we add will supply functionality that the users should be able to enjoy.
We will start slowly, with basic plugins that add some Web 2.0 functionality. From there, we will add a mail service, which we will use in this chapter and in Chapter 10 (which covers reporting). After that, we will dive into some good old-fashioned Ajax and demonstrate the flexibility of Ajax in Grails. We will finish up with an RSS feed, which can be useful if you want to be able to displayyour todoson an RSS reader like iGoogle.
Advanced Presentation Components
In this section we will focus on three areas to enrich the presentation:
- Allow for the use of rich text in the todo notes.
- Make the todos searchable.
- Allow for uploading a file associated with a todo.
To add these features, we will make use of an ever-growing list of plugins for Grails.
Adding RichText Capabilities
Currently, todo note entry is limited. You cannot style text (such as italics or boldface) or format it (say, into a bulleted list). Adding a rich text editor can provide near Microsoft Word–type functionality to a web site. Not only can you allow rich text, but you can also let the users upload images, Flash movies, and even files to your web application. The CK editor plugin1 is a good example of this sort of editor. You can install ckeditor using this command:
>grails install-plugin ckeditor
Or you can use Grails Plugin Manager, as shown in Figure 8-1.

Figure 8-1 . Installing CK editor plugin using Grails Plugin Manager
To start using the plugin, add the ckeditor tag in the head and page sections as illustrated in Listing 8-1 and Listing 8-2:
Listing 8-1. Adding ckeditor Tag to head
<head>
. . .
<ckeditor:resources/>
. . .
</head>
Listing 8-2. Adding ckeditor Tag to page
<ckeditor:editor name="myeditor" height="400px" width="80%">
${initialValue}
</ckeditor:editor>
Figure 8-2 shows an example of the CK editor embedded into an application. Although this is, as Borat would say, “very nice,” it is overkill for our needs. Not only that, it might break some of the smooth lines of our page.
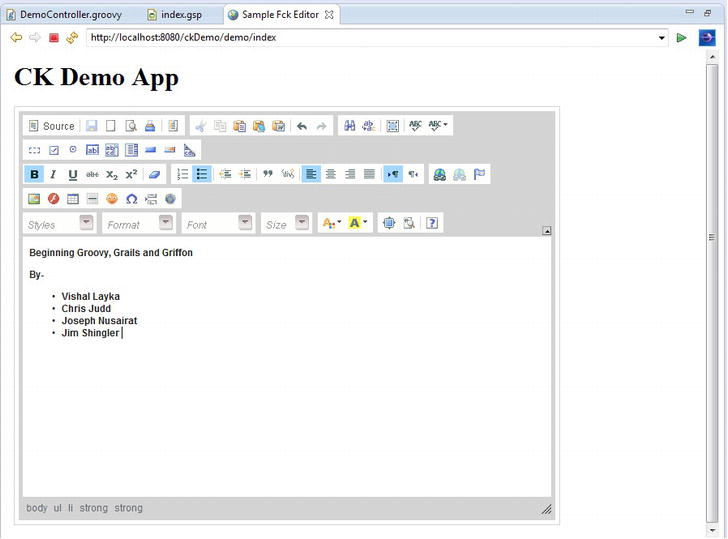
Figure 8-2 . The CK editor plugin in action
Currently, the only way to search for a particular task is to literally open up every task and see what is in there. While this may work if you have a small number of tasks, it quickly becomes cumbersome as the application grows—especially if you’re looking for akeyword that is buried in the notes.
As in previous chapters, we are not only going to make use of a plugin, but a plugin that is based on triedand-true Java technologies. The Searchable plugin is based on the OpenSymphony Compass Search Engine framework, which in turn uses Apache Luceneunder the covers.
The Searchable plugin is supplied with Grails. Install it by issuing the following command:
> grails install-plugin searchable
Or you can use Grails Plugin Manager, as shown in Figure 8-3.
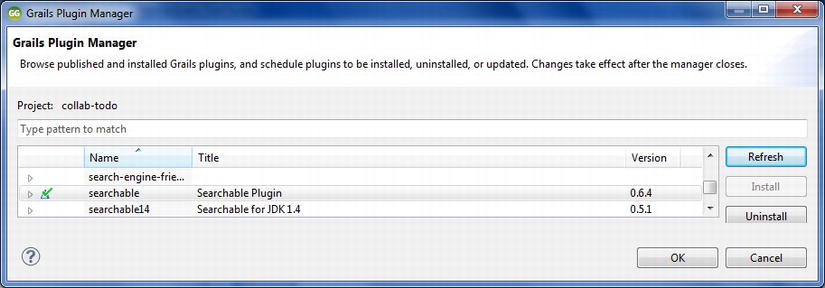
Figure 8-3 . Installing searchable plugin using Grails Plugin manager
The Searchable plugin is a snap to set up and use. The plugin allows you to decide which domain objects should be searchable. We want to make the todos searchable, so we add the line static searchable = true to our Todo domain object, as shown in Listing 8-3.
Listing 8-3. Marking Our Todo as Searchable in domain/Todo.groovy
class Todo {
    static searchable = true
    // . . . continued . . .
}
And that is all we need to do. So what does that give us? If you go to http://localhost:8080/collab-todo/searchable , you see the default searchable page (see Figure 8-4).
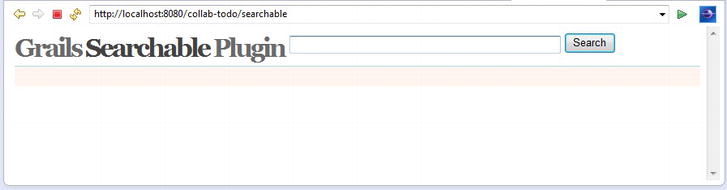
Figure 8-4. Default searchable
To see the searchable plugin in action, let’s search through the list of tasks shown in Figure 8-5.
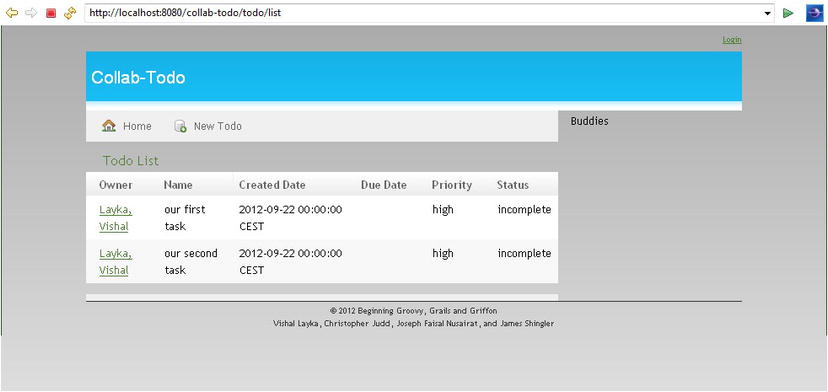
Figure 8-5 . List of tasks
You can type in a word to search for and get the results. Figure 8-6 shows the results of searching for task.

Figure 8-6 . The results of searching for the word “task”
Allowing File Uploads
Some web applications allow users to upload files. For our application, we’ll add the ability to upload a file for each of the todos, and then retrieve (download) that file later. The uploaded files can be stored either on the application server or the database itself. For our example, we wantto store the file in the database, mainly since that’s easy and because we’re working with only one file, so space is not an issue.
Uploading the File
Grails will use Spring’s file upload capability to help upload the file. Uploading a file is a fairly simple process, requiring the following steps:
- Review necessary properties on the Todo domain.
- Add a link to upload it in our list page.
- Add configurations to the Spring resources.xml file.
- Create the necessary code in our controller to store and retrieve the file.
In order to store the data, all you are required to have is a byte[] for data. But when you return the data, the end user probably wants to have the original name of the file. In addition, being specific about the type of data returned will help the browser know how to process the data. For example, if it’s a PDF, the browser automatically knows to open it as a PDF. To handle this, we added the variable associatedFile byte[] and Strings of filename and contentType to our Todo domain object, as shown in Listing 8-4.
Listing 8-4. Updating the Todo Domain Object (in domain/Todo.groovy)
class Todo {
    User owner
    Category category
    String name
    String note
    Date createDate
    Date startDate
    Date dueDate
    Date completeDate
    Date lastModifiedDate
    String priorityf    String status
    byte[] associatedFile
    String fileName
    String contentType
    . . .
}
Once you restart the server, it automatically creates the entry in the database as a BLOB, or TINYBLOB if you are using MySQL.
The next part is to add a section to our page to upload the file. As shown in Listing 8-5, we add a file upload tag after the due date.
Listing 8-5. The File Upload Tag for the Todo (in views/todo/list.gsp)
<tr class='prop'>
<td valign='top' class='name'><label for='dueDate'>File:</label></td>
<td valign='top'
    class='value ${hasErrors(bean:todo,field:'asociatedFile','errors')}'>
<input type="file" name="associatedFile" />
</td>
</tr>
Performing file uploads also requires a change in the form tag itself. You must change the form to a multipart request. To do this, add the attribute shown in Listing 8-6 to the form tag.
Listing 8-6. The Multipart Tag for the Form (in views/todo/list.gsp)
enctype="multipart/form-data"
Figure 8-7 shows an example of the result of our additions: a todo is created, with a file selected to upload.
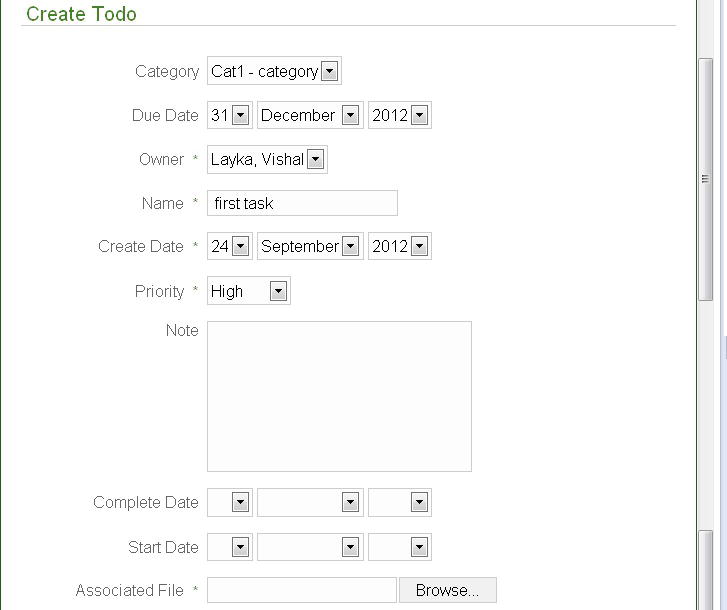
Figure 8-7 . Choosing a file to upload with a new todo
As we said earlier, we make use of Spring for our file upload capability, and you cansee when we update the controller, next, that there are calls to Spring objects. However, in order to use the Spring objects, we need to add a bean in Spring’s resources.xml file. This is where we define Spring resources to be used in Grails. Add the following linesto conf/spring/resources.xml.
<bean class="org.springframework.web.multipart.commons.CommonsMultipartResolver">
<property name="maxUploadSize"><value>1000000</value></property>
</bean>
The final step is to actually save the file. This is not complicated, but it does require making use of some Spring objects. We will cast the request coming in as a MultipartHttpServletRequest and retrieve the items off the file as necessary. Listing 8-7 shows the new method to handle the file upload.
Listing 8-7. The uploadFileData Method on the TodoController (in controllers/TodoController.groovy)
import org.springframework.web.multipart.MultipartHttpServletRequest;
import org.springframework.web.multipart.commons.CommonsMultipartFile;
. . .
def uploadFileData = { todo ->
    if (request instanceof MultipartHttpServletRequest) {
        MultipartHttpServletRequest multiRequest
            = (MultipartHttpServletRequest)request;
        CommonsMultipartFile file =
            (CommonsMultipartFile)multiRequest.getFile("associatedFile");
        // Save the object items.
        todo.fileName = file.originalFilename
        todo.contentType = file.contentType
        todo.associatedFile = file.bytes
    }
}
Simply call this method before you persist on your save method in order to set the appropriate properties on the Todo.
Downloading the File
Now that it is stored, we want to be able to retrieve the file on the fly. The file that is returned from the database is in a byte[], hence you can use any common method of response rendering to render the returned item. When you return a file, you put the byte[] into the output stream of the response, setting some header data. A basic example of a file return is shown in Listing 8-8.
Listing 8-8. A Download File Method for TodoController (in controller/TodoController.groovy)
def downloadFile = {
    def todo = Todo.get( params.id )
    response.setHeader("Content-disposition",
"attachment; filename=${todo.fileName}")
    response.contentType = todo.contentType
    response.outputStream << todo.associatedFile
}
This method can be called by a link on our todo page, just by passing in the ID of the todo. As you can see in the method, the header and contentType returns are why we needed to save those two items in the first place.
Adding Mail Services
Another common feature of web sites is the ability to send e-mail from them. We will add this capability to our application. For now, we will use the mail service to send an e-mail when a user registers. In Chapter 10, we will use it again to send reports.
If you are familiar with the Spring e-mail service, you will be right at home with the Grails system, since it uses Spring Mail underneath.
We will create an e-mail service, and then adjust our user registration process to call it and send an e-mail. This requires the following steps:
- Create the service to send an e-mail.
- Create the authenticator to use for logging in to an SMTP server.
- Update the Spring resources.xml file.
Creating the E-Mail Service
Because Grails uses Spring’s e-mail support, we will use the org.springframework.mail. MailSender class to actually send the e-mail. In order to make this easier for all of us, we will wrap the call to the class in a service. The service will provide an easy, generic set of parameters to send the e-mail. That way, the callers do not need to worry about creating MIME messages. Listing 8-9 shows the EMailAuthenticatedService.
Listing 8-9. The EMailAuthenticatedService, Responsible for Sending E-Mail
 1. import org.apache.log4j.Logger;
 2.
 3. import org.springframework.core.io.InputStreamResource
 4. import org.springframework.core.io.ByteArrayResource
 5.
 6. import org.springframework.mail.MailException
 7. import org.springframework.mail.MailSender
 8. import org.springframework.mail.javamail.MimeMessageHelper
 9.
10. import javax.mail.internet.MimeMessage
11. import javax.mail.internet.InternetAddress;
12.
13. class EMailAuthenticatedService {
14.     boolean transactional = false
15.     MailSender mailSender
16.
17.     def sendEmail = { mail, eMailProperties, attachements ->
18.         MimeMessage mimeMessage = mailSender.createMimeMessage()
19.
20.         MimeMessageHelper helper
                  = new MimeMessageHelper(mimeMessage, true, "ISO-8859-1")
21.         helper.from = eMailProperties.from
22.         helper.to = getInternetAddresses(mail.to)
23.         helper.subject = mail.subject
24.         helper.setText(mail.text, true);
25.         if(mail.bcc) helper.bcc = getInternetAddresses(mail.bcc)
26.         if(mail.cc) helper.cc = getInternetAddresses(mail.cc)
27.
28.         attachements.each { key, value ->
29.             helper.addAttachment(key, new ByteArrayResource(value))
30.         }
31.
32.         mailSender.send(mimeMessage)
33.     }
34.
35.     private InternetAddress[] getInternetAddresses(List emails) {
36.         InternetAddress[] mailAddresses = new InternetAddress[emails.size()]
37.         emails.eachWithIndex {mail, i ->
38.             mailAddresses[i] = new InternetAddress(mail)

39.         }
40.         return mailAddresses
41.     }
42. }
On line 15, we have a reference to MailSender. Since this is not set explicitly, you can assume it will be injected by Grails. You will see later how we reference MailSender in Spring’s resources.xml file.
The only public method starts on line 17. This is the method that any clients using the service will use. The parameters passed to it are simple. We will send a mail object, which will be passed to the method as a Map.
Creating the Mail Sender
The EMailAuthenticatedSender has a MailSender as an injectable component. This is relatively easy to create but does require a few steps. We need to add a few entries into resources.xml and one new service. We will work this sort of in reverse by building up the top entries, and then going through their dependents.
We begin by defining the mailSender in resources.xml, as shown in Listing 8-10.
Listing 8-10. mailSender Defined in resources.xml
<bean id="mailSender" class="org.springframework.mail.javamail.JavaMailSenderImpl">
<property name="host" value="smtp.apress.com" />
<property name="session" ref="mailSession" />
</bean>
As you can see, the mailSender itself defines two variables: a host and a session. The host is a String bean identifying the host through which we send the e-mail. For a production server, it could easily be localhost or anther host on the network. In our example, we use a fictional Apress SMTP server.
The session is a bit more complex and requires us to define another injectable object. So, we need to add another bean, mailSession, in our resources.xml file, as shown in Listing 8-11.
Listing 8-11. mailSession Defined in resources.xml
<bean id="mailSession" class="javax.mail.Session" factory-method="getInstance">
<constructor-arg>
<props>
<prop key="mail.smtp.auth">true</prop>
<!-- If SSL needed. . .
<prop key="mail.smtp.socketFactory.port">465</prop>
<prop key="mail.smtp.socketFactory.class">
        javax.net.ssl.SSLSocketFactory
</prop>
<prop key="mail.smtp.socketFactory.fallback">
        false
</prop>
      -->
</props>
</constructor-arg>
<constructor-arg ref="smtpAuthenticator" />
</bean>
Here, we defined the session to work with a nonSSL source, but as you can see by the commented-out code, switching to an SSL source is quite easy as well.
As you may have guessed, we have yet another item to inject, the smtpAuthenticator. We need to create an object and define the bean for it. First, let’s define the bean in resources.xml, as shown in Listing 8-12.
Listing 8-12. smtpAuthenticator Defined in resources.xml
<bean id="smtpAuthenticator" class="SmtpAuthenticator">
<constructor-arg value="[email protected]" />
<constructor-arg value="xxxxxx" />
</bean>
We defined a constructor that takes in a username and a password (blanked out because, well, we don’t need everyone checking our e-mail).
Now we need to create a bean for this. We’ll create this class in the services folder, and simply extend javax.mail.Authenticator. Listing 8-13 shows our authentication bean.
Listing 8-13. The Custom SmtpAuthenticator Bean
import javax.mail.Authenticator

class SmtpAuthenticator extends Authenticator {

  private String username;
  private String password;

public SmtpAuthenticator(String username, String password) {
    super();
    this.username = username;
    this.password = password;
  }

  public javax.mail.PasswordAuthentication getPasswordAuthentication() {
    return new javax.mail.PasswordAuthentication(username, password);
  }
}
Updating the Registration Page
Now that our bean and all of its subcomponents are defined, it’s time to put it to use. We will modify the registration page to send an e-mail message. Listing 8-14 shows the method that we will use.
Listing 8-14. Registration Page to Send E-mail (in controller/UserController.groovy)
private sendAcknowledgment = { user ->
    // Let's first design the email that we want to send
    def emailTpl = this.class.classloader.getResource(
"web-app/WEB-INF/templates/regisrationEmail.gtpl")
    def binding = ["user": user]
    def engine = new SimpleTemplateEngine()
    def template = engine.createTemplate(emailTpl).make(binding)
    def body = template.toString()

    // Set up the email to send.
    def email = [
        to: [user.email],
        subject: "Your Collab-Todo Report",
        text: body
    ]

    try {
        // Check if we "need" attachments
        eMailAuthenticatedService.sendEmail(email, [])
                } catch (MailException ex) {
        log.error("Failed to send emails", ex)
        return false
    }
  true
    }
This e-mail call is actually relatively simple. We will pass in a map defining the To and Subject lines and text. The email message body is generated by using a Groovy template engine on the file registrationEmail.gptl.
Note that you can reuse this code in other places to send e-mail messages.
Tag Libraries
Tag libraries provide sets of custom actions that you perform inside pages. Generally, the actions are repetitive or would be too long to write scriptlets within the page.
You have seen many of the Grails built-in tag libraries in use in our examples so far. We have used these tags to output data, render lists, and so on, and we will continue to use them throughout the book. See the “Grails Tags” section in Chapter 5 for an overview of the Grails tags.
Here, we cover how to create your own custom tag library. If you created tag libraries in the past with Java frameworks, you know that it is actually quite a pain. Your tag library class must extend a base class. You then need to define the tag and its attributes in your tag library definition. Optionally, you can then reference that tag library in the web.xml. Finally, you reference the specific tag you are using in the page itself. Wow—that’squite a bit of work just to create something that may be only a formatter. Fortunately, creating a tag library with Grails is simpler than that.
You may have noticed that on our application’s todo page, the option to add a todo is always shown. But users may go to that page and just want to see the list. It would be good to be able to hide the add section and open it when necessary. We can create a tag library to handle this. It will mark an area with div tags and allow the user to click a JavaScript link to open that section. Creating this will require two sets of code segments: one to display the JavaScript and the other to actually call that JavaScript for any div section. Normally, with JSP, this requires two classes and a host of XML. Thanks to Grails, we can handle this with one class and no XML.
Creating the Tag Library
Tag libraries reside in the grails-app/taglib folder, so that is where we will create our new tag library. Listing 8-15 shows the outline of our tag library with all the global objects we will use.
Listing 8-15. The ShowHideTagLib Outline
class ShowHideTagLib {
}
As you can see, this doesn’t contain much; that’s because this is all we need for the basic outline.
We are actually creating two separate tag libraries. While this is normally done with different classes, with Grails, we merely have separate methods. Listing 8-16 shows the methods we are adding to ShowHideTagLib.
Listing 8-16. The Contents of ShowHideTagLib
    def showHide = { attrs, body ->

        def divId = attrs['update']
        out <<"""<a href="javascript:showhide('$divId'),">${body()}</a>"""
    }
    def preLoadShowHide = { attrs, body ->
        out <<"""<script language="javascript">
<!--
            function showhide(layer_ref) {
                // Let's get the state.
                var state = document.getElementById(layer_ref).style.display;
                if (state == 'block') {
                    state = 'none';
                } else {
                    state = 'block';
                }
                if (document.all) { //IS IE 4 or 5 (or 6 beta)
                    eval("document.all." + layer_ref + ".style.display = state");
                }
                if (document.layers) { //IS NETSCAPE 4 or below
                    document.layers[layer_ref].display = state;
                }

                if (document.getElementById &&!document.all) {
                    hza = document.getElementById(layer_ref);
                    hza.style.display = state;
                }
            }
            //-->
</script>
"""
    }
Here, we have two tag library calls. Each of them shows how great it is to use Groovy when creating tag libraries.
Since creating tag libraries requires the output of the code to be HTML markups, this generally involves a lotof string building. Not only that, but when you have output with quotation marks, you need to escape them with backslashes () throughout the code. Yuck! However, with Groovy, we can use triple quotes. The triple quote style allows us to not only fully embed strings with markups, but also to return characters and referenced values.
The first method, showHide, passes in two objects: attrs and body. The body is simply the section of the page between the opening and closing bracket of your tag library. The attrs is a map of attributes you want to pass into the method. With regular JSP tag libraries, you need define them individually as getters and setters on the page, and in the tag library XML. With Grails and Groovy, that is not necessary. As you can see, we mapped a value called update, which is the div tag section we want activated.
The second method, preLoadShowHide, doesn’t contain any dynamic code per se. We are simply outputting the JavaScript in there.
Referencing the Tag Library
Referencing the tag library is simple as well. By default, the tag library is referenced in the g namespace—the same one in which all the built-in Grails tags are referenced. Then the method name is used as the tag’s reference name. Listing 8-17 shows the calls to the tags in todo/list.gsp.
Listing 8-17. Excerpts from todo/list.gsp Showing the Calls to the Custom Tags
<g:preLoadShowHide/>
<g:javascript library="scriptaculous" />
<div class="body">
<h2>Todo List<g:showHide update="addToDo">
<img border=0 src="${createLinkTo(dir:'images',file:'add_obj.gif')}"
        alt="[ADD]"/>
</g:showHide>
But what if you don’t want to use the g namespace? Perhaps you are bundling the application as a tag library and are worried about name conflicts, or you simply want to remember it’s not part of the core Grails functionality. In order to change the namespace used, add a static namespace reference in your tag library. For example, to use the namespace todo for our code, you would add the following line to ShowHideTagLib:
static namespace = 'todo'
We certainly could not have a Web 2.0 chapter without including a discussion of Ajax. Ajax stands for Asynchronous JavaScript and XML, which oddly enough, is not a 100% accurate definition. Although Ajax is usually asynchronous, usually written in JavaScript, and often deals with transmission of XML, none of these items is a must for it. You can send Ajax messages synchronously, you do not have to use JavaScript to send them, and your response can be an XML file but can also be a regular string.
![]() Note The term Ajax was originally coined by Jesse James Garrett. But the technology was first developed by Microsoft in an attempt to deal with remote scripting.
Note The term Ajax was originally coined by Jesse James Garrett. But the technology was first developed by Microsoft in an attempt to deal with remote scripting.
One of the biggest “secrets” about Ajax is that, for the most part, it’s not that complex, at least conceptually. There is nothing you can do with Ajax that you could not do in a normal application; however, using Ajax can help your application not only perform better, but also give a richer user experience.
The core of Ajax is just sending data to the server and parsing the data on the return without forcing the display to refresh. The complexity lies in making use of the data, and this is where you start to see frameworks emerge. The fact is that these frameworks are not 100% Ajax—if they were, they wouldn’t be very big. Instead, these frameworks wrap Ajax with JavaScript UI enhancements. Some of the calls won’t even involve Ajax. However, here we will refer to these frameworks as Ajax frameworks.
Using Ajax Frameworks in Grails
Popular Ajax frameworks include Prototype, Dojo:http://dojotoolkit.org/, script.aculo.us, and Yahoo! User Interface (YUI) Library:http://developer.yahoo.com/yui/. Even Google has come onboard with its own rather complex Ajax framework, Google Web Toolkit (GWT).
Most of the popular web frameworks have implemented Ajax. The majority of these did not create their own Ajax framework, but merely wrapped code from previous Ajax frameworks. Ruby on Rails uses script.aculo.us, Tapestry’s Tacos uses Dojo, and so on. So what does Grails use? The answer is all of the above.
In an effort to provide maximum flexibility, Grails currently accepts all of the frameworks out there. So what does this mean? Is this good or bad? It’s a bit of both. While it allows us more flexibility in choosing a framework, in the end, we need to write more code than other frameworks usually demand, especially when it comes to the JavaScript UI portions of the Ajax items. If you are familiar with other Java or Rails Ajax uses, this will become apparent to you in the upcoming examples.
By default, Grails ships with the jQuery library, but through the Plugin system provides support for other frameworks such as Prototype, DojoYahoo UI, and the Google Web Toolkit.
Each of these frameworks has its own custom UI components. If you are familiar with Rails or Tapestry’s Tacos, you know that they generally provide complete support for the underlying framework. In other words, there is usually a tag library wrapper for the whole framework. This makes it easy to not only support the Ajax components, but also the JavaScript components. Unfortunately, this is not the case in Grails.
Grails includes several Ajax tags, which call a controller action and update a page element with the results. Grails supports a variety of popular JavaScript libraries with regard to its Ajax tags. To use these tags, we need to tell Grails which library we are using. We do this with the <g:javascript> tag and its library attribute. This tag is placed in the <head> section of a page.
In Grails we extensively use GSP templates to render the response to Ajax calls. A GSP template is a GSP file that begins with an underscore (_example.gsp). GSP templatesprovide an easy way to share common code across multiple pages. You can include a GSP template in a GSPpage with the <g:render> tag, like this:
<g:render template="sampleTemplate" />
This line would render a template called _sampleTemplate.gsp in the same directory as the page from which it is called.
Grails supports just the standard Ajax components, as listed in Table 8-1. However, this does give us a good subset of components to use.
Table 8-1. Ajax Components in Grails
| Tag | Description |
|---|---|
| remoteField | Creates a text field that sends its value to a remote link when it changes |
| remoteFunction | Creates a remote JavaScript function that can be assigned to a DOM event |
| remoteLink | Creates a link that calls a remote function |
| formRemote | Creates a form that executes an Ajax call on submission |
| javascript | Loads a JavaScript function |
| submitToRemote | Creates a button that submits the form as an Ajax call |
Using remoteField
This tag creates an input field that fires an Ajax request when its value changes (typically when the user presses Return inside the field). We will use the controller in Listing 8-18 to illustrate the usage of the remoteField tag, as shown in Listing 8-19.
Listing 8-18. Example Controller for the Usage of remoteField Tag
class CategoryController {
def changeDescription() {
       def cat = Category.get(params.id)
       cat.description = params.value
       cat.save()
    }
}
Listing 8-19. Using remoteField Tag
<g:remoteField action="changeDescription" update="descDiv"
               name="description" value="${category?.description}" />
<div id="descDiv">
This div is updated
</div>
By default the parameter name sent is called value as shown in Listing 8-19; you can change this by specifying a paramName attribute.
Using remoteFunction
This tag creates a remote Javascript function call that fires an Ajax request to call the remote method. We will use the controller in Listing 8-20 to demonstrate the usage of the remoteFunction tag.
Listing 8-20. Example UserController for the Usage of Ajax Tags
class UserController {
def list() {
        [users: User.list(params)]
    }
def show() {
        [user: User.get(params.id)]
    }
def byFirstName() {
        [user: User.findByName(params.firstName)]
    }
 def byLastName() {
        [users: User.findByName(params.lastName, params)]
    }
}
Listing 8-21. Using remoteFunction Tag
$('mydiv').onclick = <g:remoteFunction action="show" id="1" />
Using remoteLink
This tag creates an HTML link to a controller action that generates an Ajax request when it is clicked. Listing 8-22 illustrates the usage of the submitToRemote tag for the controller in Listing 8-20.
Listing 8-22. Using remoteLink Tag
<g:remoteLink action="show" id="1">Test 1</g:remoteLink>
<g:remoteLink action="show" id="1" update="[success:'success',failure:'error']"
    on404="alert('not found'),">Test 2</g:remoteLink>
This tag creates a form that fires an Ajax request when it is submitted, serializing the form elements and falling back to a normal form submit if JavaScript is not supported. Listing 8-23 illustrates the usage of the submitToRemote tag for the controller in Listing 8-20.
Listing 8-23. Using formRemote Tag
<g:formRemote name="myForm" on404="alert('not found!')" update="updateDiv"
              url="[controller: user, action:'show']">
User Id: <input name="id" type="text" />
</g:formRemote>
<div id="updateDiv">this div is updated with the result of the show call</div>
Using javascript
This tag Includes JavaScript libraries and scripts as well as providing a kind of shorthand for inline JavaScript, as illustrated in Listing 8-24.
Listing 8-24. Using javascript Tag
1. <g:javascript src="script.js" />
2. <g:javascript library="scriptaculous" />
3. <g:javascript>alert('hello')</g:javascript>
Listing 8-24 illustrates three different uses of the javascript tag. The tag on line 1 actually imports script.js, and the tag on Line 2 imports all the necessary js for the scriptaculous library. The tag on line 3 does not include a library or src attribute but instead provides a body; the result is an inline script.
Using submitToRemote
This tag creates a submit button that fires an Ajax request when it is pressed and submits the containing form as a remote Ajax call, serializing the fields into parameters. Listing 8-25 illustrates the usage of the submitToRemote tag for the controller in Listing 8-20.
Listing 8-25. Using submitToRemote Tag
<g:form action="show">
    Login: <input name="login" type="text" />
<g:submitToRemote update="updateDiv" />
</g:form>
<div id="updateDiv ">this div will be updated with the form submit response</div>
Handling Ajax Events
Specific JavaScript can be called if certain events occur. All the events start with the “on” prefix and let you give feedback to the user where appropriate, or take other action.
Listing 8-26. Handling Ajax Events
<g:remoteLink action="show"
        id="1"
        update="success"
        onLoading="showProgress()"
        onComplete="hideProgress()">
Show task 1
</g:remoteLink>
The code in Listing 8-26 executes the showProgress() function, which may show a progress bar or whatever is appropriate.
Table 8-2 shows the different events.
Table 8-2. Ajax Events
| Field Name | Description |
|---|---|
| onSuccess | The JavaScript function to call if successful |
| onFailure | The JavaScript function to call if the call failed |
| on_ERROR_CODE | The JavaScript function to call to handle specified error codes |
| onUninitialized | The JavaScript function to call if the Ajax engine failed to initialize |
| onLoading | The JavaScript function to call when the remote function is loading the response |
| onLoaded | The JavaScript function to call when the remote function hascompleted loading the response |
| onComplete | The JavaScript function to call when the remote function is complete, including any updates |
Dynamic Rendering of Data
Our first example demonstrates using one of the most basic and popular types of Ajax components. This is where you type data into the page, submit it, remotely call the server, process the data, and re-render only a portion of the page. For our example, we will modify the todo add page to do a partial page re-rendering. Now when adding a new todo, instead of doing an entire page refresh, the page will dynamically render the todo list section of the page.
In order to perform this, we need to take a few steps, the first of which is not necessarily Ajax-specific:
- Move the list section of the page into its own page (called a template or partial page).
- Change our current add call to do an Ajax remote call instead of submitting the whole page.
- Change the TodoController’s return to render the new page we created instead of the whole page.
![]() Note One of the big issues you will run into when performing the dynamic rendering of data is partial page updates. Partial page updating refers to re-rendering a part of the page. Some frameworks, like Tapestry’s Tacos, allow you to perform this in line. However, the majority of web frameworks, including Grails and Ruby on Rails, force you to call to another page. In reality, this is not a big deal. It does add to the number of GSPs you need to write, but on the plus side, it keeps the GSPs clean.
Note One of the big issues you will run into when performing the dynamic rendering of data is partial page updates. Partial page updating refers to re-rendering a part of the page. Some frameworks, like Tapestry’s Tacos, allow you to perform this in line. However, the majority of web frameworks, including Grails and Ruby on Rails, force you to call to another page. In reality, this is not a big deal. It does add to the number of GSPs you need to write, but on the plus side, it keeps the GSPs clean.
Rendering a Template
Rendering a page from another page is fairly simple to do. First, we need a page to call from, which obviously must be a GSP page. We will use the <g:render /> tag library to define the area of the page that will call out to another GSP page. Grails refers to these partial pages as templates.
Our first step is to take our list of todos in todo/list.gsp and pull that section out to its own page. We will replace the list with what is in Listing 8-27. Also, instead of taking the entire code, we will take everything but the for loop. This is because we can tell the renderer to render a collection.
Listing 8-27. A Template of todo/list.gsp with the Modified Todo List Display
<div id="todoList">
<g:render template="detail" var="todo" collection="${todoList}" />
</div>
Here, we simply tell Grails to take our collection labeled todoList and iterate through the list, rendering the detail page each time for every item in the collection. The item in the collection is then referenced in the page by the variable var.
Creating a Template
The name of the page we are creating will not actually be detail.gsp. Instead, Grails chooses the page to render by taking the rendered template attribute and adding underscores at the beginning to indicate the page is a template. The page must also be located in the same directory as the calling controller. Thus, for this example, we will create _detail.gsp in the todo directory, as shown in Listing 8-28.
Listing 8-28. The _detail.gsp Page
<div id="todoDetail${todo.id}" class="todo">

<div class="todoTitle">${todo.name?.encodeAsHTML()}
<g:link action="edit" id="${todo.id}">
<img border=0
           src="${createLinkTo(dir:'images',file:'write_obj.gif')}" alt="[EDIT]"/>
</g:link>
<g:remoteLink
             action="removeTask"
             id="${todo.id}"
             update="todoDetail$todo.id"
             onComplete="highlight('todoDetail$todo.id'),">
<img border=0 src="${createLinkTo(dir:'images',file:'delete_obj.gif')}"
             alt="[EDIT]"/>
</g:remoteLink>

<g:showHide update="todoDetailFull${todo.id}">
<img border=0
               src="${createLinkTo(dir:'images',file:'add_obj.gif')}"
                alt="[Show All]"/></g:showHide>
</div>

<div id="todoDetailFull${todo.id}" class="todo" style="display:none">
    Status: ${todo.status?.encodeAsHTML()} <br />
    Priority: ${todo.priority?.encodeAsHTML()} <br />
    Created date: ${todo.createDate?.encodeAsHTML()} <br />
    Last Modified date: ${todo.lastModifiedDate?.encodeAsHTML()} <br />

<g:if test="${todo.completeDate == null}">
        Complete Task: <input type="checkbox"
                              onclick="${remoteFunction(
                                            action:'completeTask',
                                            id:todo.id,
                                            update:'todoDetail' + todo.id,
                                            onComplete:'highlight('todoDetail' + todo.id+'')' )};"/><br />
</g:if>
<g:else>
        Completed Date: ${todo.completeDate?.encodeAsHTML()} <br />
</g:else>
<!-- show notes -- mark in the code that we should use a todo -->
<g:radeoxRender>${todo?.note}</g:radeoxRender>
<!-- update:[success:'great', failure:'ohno'], -->
<!--

<g:remoteLink action="showNotes" id="${todo.id}"
         update="todoDetailNote${todo.id}">
        Notes
</g:remoteLink><br/>
<div id="todoDetailNote${todo.id}">
</div>
    -->
</div>
</div>
Our first step is complete. In reality, there is nothing in the page that is Ajax-enabled yet. Right now, the page works exactly as it did before, and in theory, you could have used these techniques to help segregate the code.
Making the Page Dynamic
Now we will do the partial page form rendering, which is a two-step process:
- Change the form to take an Ajax form tag.
- Have the save call on the controller render the tag instead of the whole page.
For the first part, change the form encapsulation in list.gsp to the code shown in Listing 8-29.
Listing 8-29. Adding an Ajax Form Tag (in views/todo/list.gsp)
<g:formRemote name="todoForm"
              url="[controller:'todo',action:'save']"
              update="todoList"
              onComplete="showhide('addToDo')"
              enctype="multipart/form-data">
   . . .
</g:formRemote>
This calls the save action on our TodoController, and then on completion, hides the add section. In addition, the update attribute will tell us which <div> section we are updating. In Listing 8-27 notice that we surrounded our rendered items with the <div> tag todoList. This is the section that the Ajax JavaScript will re-render upon return.
The changes to the save action are equally as easy. Instead of the standard return, where we redirect to the list page, we have a line to get the collection and call out to render the GSP we marked, as shown in Listing 8-30.
Listing 8-30. Rendering Just the Tag (in views/todo/list.gsp)
render(TEMPLATE:'DETAIL', VAR: 'TODO', COLLECTION:LISTBYOWNER())
As you can see, besides having to move some data, this was all relatively simple. And that is all that is needed. If you go back to the page now, it will do an update without needing to return the whole page.
RSS feeds have become an increasingly popular feature to incorporate on a web site. Contributing to RSS feed popularity is the increasing number of RSS readers out there, including the new iGoogle2 and the RSS Web Clip in Gmail. So we will go over creating a basic RSS reader. This will be an extremely basic example; in a real-world application, you would want to add more items for security checking.
Creating an RSS feed basically requires creating an XML output in a fairly strict format. The reader then takes that XML and parses it for content.
We could do this by hand, but the format based on the feeds can be somewhat complex, and you would also need to write quite a bit of repetitive code. Luckily, there is aplugin that will help us cheat a bit and create the feeds. The Feeds plugin3 shown in Figure 8-8 supports creating feeds in the popular RSS and Atom formats (with multiple versions of each supported). Start by installing the plugin:

Figure 8-8 . Installing feeds plugin using Grails Plugin Manager
> grails install-pluginfeeds
The next step is to create a controller with one method in it. This method will be rendering the XML in a way that the renderer can understand. For this example, we will use the Atom format to format the output. Listing 8-31 shows our RSSControllerwith a feed method.
Listing 8-31. Our RSSController with the feed Method (in controller/RssController.groovy)
import feedsplugin.FeedBuilder
class RssController {

    def feed = {
        render(feedType:"atom") { // optional - , feedVersion:"2.0") {
            title = "Todo List"
link = " http://localhost:8080/collab-todo/rss "

            Todo.list(sort: "name", order: "asc").each {
                def todo = it
                entry(it.name) {
                    title = "${todo.name}"
                    link = " http://localhost:8080/collab-todo/todo/view/ ${todo.id}"
                    author = "${todo.owner.lastName}, ${todo.owner.firstName}"
                }
            }
        }
    }
}
Here we use a standard renderer, and in it we define a few items. We define the title and the link. Then we iterate through a list of items queried from the database sorted in ascending order. For each item, we need to define an entry. The entry has three items on it: itstitle, its URL link, and its contents. Table 8-3 lists a few of the common fields you would expect to have in a feed.
Table 8-3 . Some Common Fields for a Feed
| Field Name | Description |
|---|---|
| publishedDate | The date the entry of the field is published |
| categories | The list of categories related to the entry |
| author | The name of the author of the entry |
| link | The link to a full description of the entry |
| title | The title of the entry |
In our example, we used title, link, and author. We sorted based on creation date (actually, we could have sorted based on anything). Note that if you supply publishedDate, your feeder may automatically sort on that date instead. An example of the output for this example is shown in Figure 8-9.
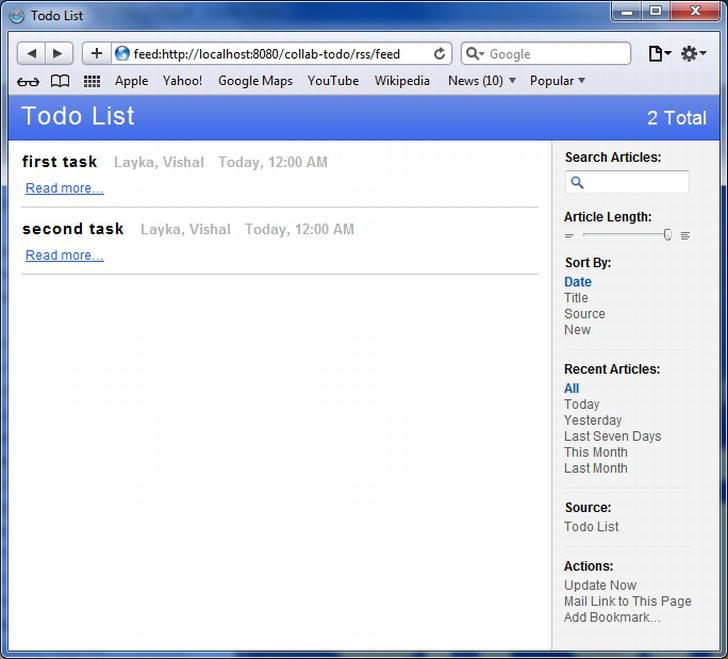
Figure 8-9 . Our RSS reader in a Safari browser
Summary
This chapter was the start of transforming our working todo application into a more robust application. We added features that not only make it more useful, but also make it more visually appealing. These characteristics are extremely important for a web site.
The purpose of this chapter was to expose you to a variety of more advanced webstyling techniques for our application, taking advantage of the Ajax framework. There are more Ajax techniques and plugins available on the Grails site. We suggest taking a peek to see if any meet your needs. And if they don’t, you always have the option of creating your own plugin and joining the Grails community that way.
In the next few chapters, we will expand the todo application and add even more functionality, including reporting and batch jobs.
1 http://grails.org/plugin/ckeditor
3 http://grails.codehaus.org/Feeds +Plugin.