![]()
Working with XML
Beginning with SQL Server 2005, Microsoft added the XML data type, the XQuery language, and several new functions for working with XML data in addition to the functionality found in SQL Server 2000. XML stands for Extensible Markup Language, and it looks a lot like HTML except that it generally contains data while HTML is used to create web pages. Companies often use XML to exchange data between incompatible systems or with their vendors and customers. SQL Server also extensively uses XML data to store query plans.
Fully covering XML support in SQL Server would take another complete book, so I’ll just briefly discuss it here. In the past, to work with XML, databases stored the XML data in string columns. The database was just a storage place for the XML data. There was nothing to validate the XML data or to query just part of the XML data. To learn about SQL Server support for XML in depth, check out the book Pro SQL Server 2008 XML by Michael Coles (Apress, 2008).
The Parts of XML
An XML document is often said to be self-describing. That is, the tags tell you what is in the document. It is generally easy to read an XML document and have an idea about what it contains.
The document itself begins with an optional XML declaration followed by the markup and content. The markup consists of tags that start and end with pointed brackets (< >). Within the tags, you will find descriptions of the data. The content is the data itself.
Here is a sample XML document:
<?xml version="1.0" encoding="UTF-8"?>
<Products>
<Product ProductID="32565451" ProductName="Bicycle Pump">
   <Order ProductID="32565451" SalesID="5" OrderDate="2011-07-04T00:00:00">
      <OrderDetail OrderID="10248" CustomerID="22" Quantity="12"/>
      <OrderDetail OrderID="10248" CustomerID="11" Quantity="10"/>
   </Order>
</Product>
<Product ProductID="57841259" ProductName="Bicycle Seat">
   <Order ProductID="57841259" SalesID="3" OrderDate="2011-015-16T00:00:00">
      <OrderDetail OrderID="54127" CustomerID="72" Quantity="3"/>
   </Order>
</Product>
</Products>
The declaration states that this is version 1.0, the only option available at this time. Then the name of the code set, UTF-8, is specified. It is the most common set to use and can represent all the Unicode characters. This document is organized by Product. Within the Product, you will find one or more Orders, and each Order has one or more OrderDetails. Notice that each tag that is opened has a closing tag. If a tag has no child elements, the tag can be closed at the end of the same tag with a slash and closing pointed bracket (/>).
In the previous example, Products, Product, Order, and OrderDetail are elements and the values ProductID, ProductName, SalesID, OrderDate, OrderID, CustomerID, and Quantity are called attributes. The next is an element-centric example.
<?xml version="1.0" encoding="UTF-8"?>
<Products>
<Product>
    <ProductID>32565451</ProductID>
    <ProductName>Bicycle Pump</ProductName>
        <Order>
            <ProductID>32565451</ProductID>
            <SalesID>5</SalesID>
            <OrderDate>2011-07-04T00:00:00</OrderDate>
            <OrderDetail>
                <OrderID>10248</OrderID>
                <CustomerID>22</CustomerID>
                <Quantity>12</Quantity>
            </OrderDetail>
            <OrderDetail>
                <OrderID>10248</OrderID>
                <CustomerID>11</CustomerID
                <Quantity>10</Quantity>
            </OrderDetail>
        </Order>
</Product>
<Product>
    <ProductID>57841259</ProductID>
    <ProductName>Bicycle Seat</ProductName>
        <Order>
            <ProductID>57841259</ProductID>
            <SalesID>3</SalesID>
            <OrderDate>2011-015-16T00:00:00</OrderDate>
            <OrderDetail>
                <OrderID>54127</OrderID>
                <CustomerID>72</CustomerID>
                <Quantity>3</Quantity>
            </OrderDetail>
         </Order>
</Product>
</Products>
Converting XML Using OPENXML
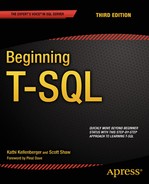
There are primarily two ways of handling XML. Either you need to convert an XML document into a rowset (table) or you have a rowset and want to convert it into an XML document. Converting an XML document into a rowset is called shredding, and this is the purpose of the OPENXML command introduced with SQL Server 2000. OPENXML must also be used in conjunction with two other commands: sp_xml_preparedocument and sp_xml_removedocument. The first command loads the XML document into memory; this process is expensive and takes up to one-eighth of SQL Server’s total memory. The command sp_xml_removedocument removes the XML from SQL Server memory and should always be executed at the very end of the script. Listing 15-1 shows how this is done, and Figure 15-1 shows the results from the query.
Listing 15-1. OPENXML Query
--1
DECLARE @hdoc int;
DECLARE @doc varchar(1000) = N'
<Products>
<Product ProductID="32565451" ProductName="Bicycle Pump">
   <Order ProductID="32565451" SalesID="5" OrderDate="2011-07-04T00:00:00">
      <OrderDetail OrderID="10248" CustomerID="22" Quantity="12"/>
      <OrderDetail OrderID="10248" CustomerID="11" Quantity="10"/>
   </Order>
</Product>
<Product ProductID="57841259" ProductName="Bicycle Seat">
   <Order ProductID="57841259" SalesID="3" OrderDate="2011-015-16T00:00:00">
      <OrderDetail OrderID="54127" CustomerID="72" Quantity="3"/>
   </Order>
</Product>
</Products>';

--2
EXEC sp_xml_preparedocument @hdoc OUTPUT, @doc;

--3
SELECT *
FROM OPENXML(@hdoc, N'/Products/Product'),

--4
EXEC sp_xml_removedocument @hdoc;
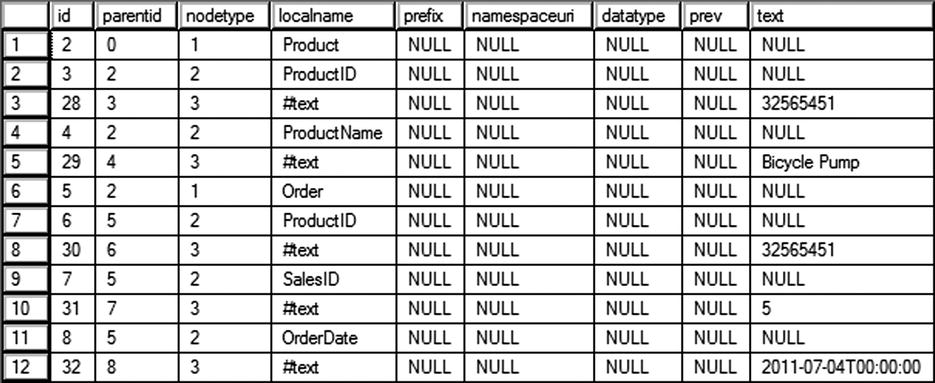
Figure 15-1. Partial results of the OPENXML query
Statement block 1 declares two variables to be used in the script. The first variable, @hdoc, is a number referring to the XML document in memory. The @doc variable is the document itself. In statement 2, the document is loaded into memory with the sp_xml_preparedocument command. In statement 3, the OPENXML command is called with the @hdoc parameter and the rowpattern. The rowpattern, /Products/Product, identifies the nodes in the XML document. Finally, statement 4 removes the XML from memory.
Notice that SQL Server predefines the columns in the results. These column names are based on the XML edge table format. This format is the default structure for XML represented in table format. Luckily, you can modify the column output in order to customize your rowset definitions. You accomplish this by specifying the optional WITH clause in your select statement. Listing 15-2 runs the same OPENXML query but includes the WITH clause, and Figure 15-2 shows the results of the OPENXML query.
Listing 15-2. OPENXML Query Using the WITH Clause
--1
DECLARE @hdoc int;
DECLARE @doc varchar(1000) = N'
<Products>
<Product ProductID="32565451" ProductName="Bicycle Pump">
   <Order ProductID="32565451" SalesID="5" OrderDate="2011-07-04T00:00:00">
      <OrderDetail OrderID="10248" CustomerID="22" Quantity="12"/>
      <OrderDetail OrderID="10248" CustomerID="11" Quantity="10"/>
   </Order>
</Product>
<Product ProductID="57841259" ProductName="Bicycle Seat">
   <Order ProductID="57841259" SalesID="3" OrderDate="2011-015-16T00:00:00">
      <OrderDetail OrderID="54127" CustomerID="72" Quantity="3"/>
   </Order>
</Product>
</Products>';

--2
EXEC sp_xml_preparedocument @hdoc OUTPUT, @doc;

--3
SELECT *
FROM OPENXML(@hdoc, N'/Products/Product/Order/OrderDetail')
WITH (CustomerID int '@CustomerID',
     ProductID int '../@ProductID',
     ProductName varchar(30) '../../@ProductName',
     OrderID int '@OrderID',
     Orderdate varchar(30) '../@OrderDate'),

--4
EXEC sp_xml_removedocument @hdoc;

Figure 15-2. Using the WITH clause with OPENXML
This example differs from Listing 15-1 because it uses the WITH clause of the OPENXML function. Within the WITH clause, a table specification is provided along with a mapping to the attributes. The attribute at the innermost level can be specified by using the name preceded by an at symbol (@). For each level up in the hierarchy, add two periods and a slash (../).
Retrieving Data as XML Using the FOR XML Clause
As mentioned, XML is normally handled in one of two ways. The first way is when you have an XML document and you need to shred it into a table format. For this method, use the OPENXML command. The other way to work with XML is to convert table data into an XML document using FOR XML.
The FOR XML clause, added with SQL Server 2000, is actually part of a SELECT statement. A SELECT statement returns data from a table in rowset format. Adding the FOR XML clause at the end converts the rowset data into XML format. The command has four modes and each mode provides a different level of control. The modes determine how much control you want when converting rowset data containing columns and rows into an XML document consisting of elements and attributes. The four modes are RAW, AUTO, EXPLICIT, and PATH. Each one provides certain advantages and disadvantages. Table 15-1 gives a brief summary of each.
Table 15-1. FOR XML Modes
|
MODE |
Description |
|---|---|
|
RAW |
Easiest to use but provides the least flexibility. Each row creates a single element. |
|
AUTO |
Similar to RAW but provides more flexibility. Each column returned is an element and each referenced table with a column in the SELECT clause is an element. |
|
EXPLICIT |
Difficult to use but provides improved granularity for creating complex XML documents. Allows you to mix attributes and elements but requires specific syntax structure in the SELECT clause. |
|
PATH |
It is recommended to use the PATH mode instead of EXPLICIT. This mode provides similar functionality but with less complexity. |
The RAW mode is the simplest mode but provides the least flexibility when generating XML from rowsets. Listing 15-3 shows an example; this mode is an excellent means to quickly generate XML documents from tables. Figure 15-3 shows the initial output.
Listing 15-3. Generating XML Using the FOR XML RAW Command
SELECT TOP(5) FirstName
FROM Person.Person
FOR XML RAW;

Figure 15-3. Using the FOR XML RAW command
When you click the XML hyperlink you can see the XML document:
<row FirstName="Syed" />
<row FirstName="Catherine" />
<row FirstName="Kim" />
<row FirstName="Kim" />
<row FirstName="Kim" />
As you can tell from the output, RAW mode produces a single node “row” for each row returned and each element has a column-based attribute. By default, RAW mode produces an attribute-centric XML document. Remember that attribute-centric XML consists of inline attributes. Also, each node is named row, which is not very helpful when describing the contents of the XML data. To create an element-centric XML document with a friendlier node name, you will need to include the ELEMENTS option along with a node definition. Listing 15-4 shows an example.
Listing 15-4. Creating Element-Centric XML Using XML RAW
SELECT TOP(5) FirstName, LastName
FROM Person.Person
FOR XML RAW ('NAME'), ELEMENTS;
The following is some of the output:
<NAME>
  <FirstName>Syed</FirstName>
  <LastName>Abbas</LastName>
</NAME>
<NAME>
  <FirstName>Catherine</FirstName>
  <LastName>Abel</LastName>
</NAME>
<NAME>
  <FirstName>Kim</FirstName>
  <LastName>Abercrombie</LastName>
</NAME>
<NAME>
  <FirstName>Kim</FirstName>
  <LastName>Abercrombie</LastName>
</NAME>
<NAME>
  <FirstName>Kim</FirstName>
  <LastName>Abercrombie</LastName>
</NAME>
In Listing 15-4, the FOR XML RAW clause takes NAME as an input. This defines the node name. The ELEMENTS option converts the columns from attributes to elements within the NAME node.
![]() Note It is possible to mix attribute-centric mapping with element-centric mapping using FOR XML. To do so requires using nested FOR XML queries. Nested FOR XML queries are beyond the scope of this book. Actually, using the PATH option, that you will learn about later in the “FOR XML PATH” section, with nested FOR XML is considered better practice than using the EXPLICIT option. You can get more information at http://msdn.microsoft.com/en-us/library/bb510436(v=SQL.120).aspx.
Note It is possible to mix attribute-centric mapping with element-centric mapping using FOR XML. To do so requires using nested FOR XML queries. Nested FOR XML queries are beyond the scope of this book. Actually, using the PATH option, that you will learn about later in the “FOR XML PATH” section, with nested FOR XML is considered better practice than using the EXPLICIT option. You can get more information at http://msdn.microsoft.com/en-us/library/bb510436(v=SQL.120).aspx.
Keep in mind that even with the ability to use FOR XML RAW to create attribute-centric XML or element-centric XML, the mode still limits your ability to form complex XML documents. FOR XML RAW is well suited for testing or creating simple XML documents. For more complex XML documents, you will want to work with the other available modes.
Another option is AUTO mode. This mode is similar to RAW (and just as easy to use) but produces a more complex XML document based on your SELECT query. AUTO creates an element for each table in the FROM clause that has a column in the SELECT clause. Each column in the SELECT clause is represented as an attribute in the XML document. Look at Listing 15-5 to see an example of FOR XML in use.
Listing 15-5. Using AUTO Mode
SELECT TOP(5) CustomerID, LastName, FirstName, MiddleName
FROM Person.Person AS Person
INNER JOIN Sales.Customer AS Customer ON Person.BusinessEntityID = Customer.PersonID
ORDER BY CustomerID
FOR XML AUTO;
The following is an example of the output that you’ll get from executing the query in Listing 15-5:
<Customer CustomerID="11000">
  <Person LastName="Yang" FirstName="Jon" MiddleName="V" />
</Customer>
<Customer CustomerID="11001">
  <Person LastName="Huang" FirstName="Eugene" MiddleName="L" />
</Customer>
<Customer CustomerID="11002">
  <Person LastName="Torres" FirstName="Ruben" />
</Customer>
<Customer CustomerID="11003">
  <Person LastName="Zhu" FirstName="Christy" />
</Customer>
<Customer CustomerID="11004">
  <Person LastName="Johnson" FirstName="Elizabeth" />
</Customer>
Listing 15-6 shows how AUTO mode converts the tables Customer and Person into elements. SQL Server was intelligent enough to link the corresponding columns as attributes in the respective elements. For example, CustomerID is a column in the Sales.Customer table, so AUTO mode created CustomerID as an attribute in the Customer element. The AUTO mode would continue to expand the XML document for each table and column you add to the query.
Now add the ELEMENTS option in Listing 15-6 like you did with RAW mode to see how it affects the XML output.
Listing 15-6. Using AUTO Mode with the ELEMENTS Option
SELECT TOP(3) CustomerID, LastName, FirstName, MiddleName
FROM Person.Person AS Person
INNER JOIN Sales.Customer AS Customer ON Person.BusinessEntityID = Customer.PersonID
ORDER BY CustomerID
FOR XML AUTO, ELEMENTS;
The following is the output from Listing 15-6:
<Customer>
  <CustomerID>11000</CustomerID>
  <Person>
    <LastName>Yang</LastName>
    <FirstName>Jon</FirstName>
    <MiddleName>V</MiddleName>
  </Person>
</Customer>
<Customer>
  <CustomerID>11001</CustomerID>
  <Person>
    <LastName>Huang</LastName>
    <FirstName>Eugene</FirstName>
    <MiddleName>L</MiddleName>
  </Person>
</Customer>
<Customer>
  <CustomerID>11002</CustomerID>
  <Person>
    <LastName>Torres</LastName>
    <FirstName>Ruben</FirstName>
  </Person>
</Customer>
Just as in the example using RAW mode, the ELEMENTS option displays columns as elements for each node instead of the default attribute mapping. One difference is the exclusion of the ElementName option that you saw in the previous RAW mode (RAW(NAME)). You can leave this out because AUTO mode automatically names the nodes after the name of each table; in fact, you will receive a syntax error if you try to use the option.
The most complicated means to convert table data into XML is by using the FOR XML EXPLICIT mode, but with complexity comes flexibility and control. The complexity lies in the rigorous requirement that you structure your SELECT clause so the output forms a universal table.
As you can see from previous examples, XML is based on hierarchies. Listing 15-7 shows a Customer element or node and under Customer is a subelement called Person. Person is a child element of Customer. In order to create a similar XML document using the EXPLICIT mode, you need to define this relationship in the universal table. This is done by creating two columns called Tag and Parent. Think of this as the relationship between manager and employee. A manager would have a tag ID of 1 and the employee would have a tag ID of 2. Because you are only concerned about the manager level in the hierarchy, the manager would have a parent of 0 (NULL) but the employee would have a parent of 1. Listing 15-7 shows a simple example.
Listing 15-7. Using XML FOR EXPLICIT
SELECT 1 AS Tag,
       NULL       AS Parent,
       CustomerID AS [Customer!1!CustomerID],
       NULL       AS [Name!2!FName],
       NULL       AS [Name!2!LName]
FROM Sales.Customer AS C
INNER JOIN Person.Person AS P
ON  P.BusinessEntityID = C.PersonID
UNION ALL
SELECT 2 AS Tag,
       1 AS Parent,
       CustomerID,
       FirstName,
       LastName
FROM Person.Person P
INNER JOIN Sales.Customer AS C
ON P.BusinessEntityID = C.PersonID
ORDER BY [Customer!1!CustomerID], [Name!2!FName]
FOR XML EXPLICIT;
The partial results are as follows:
<Customer CustomerID="11000">
  <Name FName="Jon" LName="Yang" />
</Customer>
<Customer CustomerID="11001">
  <Name FName="Eugene" LName="Huang" />
</Customer>
<Customer CustomerID="11002">
  <Name FName="Ruben" LName="Torres" />
</Customer>
<Customer CustomerID="11003">
  <Name FName="Christy" LName="Zhu" />
</Customer>
<Customer CustomerID="11004">
  <Name FName="Elizabeth" LName="Johnson" />
</Customer>
<Customer CustomerID="11005">
  <Name FName="Julio" LName="Ruiz" />
</Customer>
By using the UNION ALL operator, you can define different Tag and Parent values in each SELECT clause. This allows you to nest the XML and create hierarchies. In this case, you assigned to Customer a tag of 1 and Parent as NULL. In the next SELECT statement, you assigned Name a tag of 2 and Parent a tag of 1. Table 15-2 shows what the universal table looks like for CustomerID 11008 in Listing 15-7.
Table 15-2. Example Universal Table for the EXPLICIT Mode

In addition to the Tag and Parent values, the ElementName!TagNumber!Attribute defines where in the hierarchy each column exists. The value Customer!1!CustomerID tells you the value belongs with the Customer element, the !1! tells you it is tag 1 and CustomerID is the attribute.
![]() Note There is an optional value called Directive when creating the universal table. The format is ElementName!TagNumber!Attribute!Directive. This allows you to control how to encode values (ID, IDREF, IDREFS) and how to map string data to XML (hide, element, elementxsinil, xml, xmltext, and cdata). The details of each can be found at http://msdn.microsoft.com/en-us/library/ms189068(v=SQL.120).aspx or in Pro SQL Server 2008 XML (Apress 2008) by Michael Coles.
Note There is an optional value called Directive when creating the universal table. The format is ElementName!TagNumber!Attribute!Directive. This allows you to control how to encode values (ID, IDREF, IDREFS) and how to map string data to XML (hide, element, elementxsinil, xml, xmltext, and cdata). The details of each can be found at http://msdn.microsoft.com/en-us/library/ms189068(v=SQL.120).aspx or in Pro SQL Server 2008 XML (Apress 2008) by Michael Coles.
As you can readily see, using the EXPLICIT mode can quickly become cumbersome. So for complex XML documents that mix and match attributes and elements, you will want to use the FOR XML PATH mode with nested XML.
As mentioned previously, if you need to develop complex XML documents from table data, the best tool to use is the FOR XML PATH mode. This is primarily because PATH mode takes advantage of the XPath standard. XPath is a W3C standard for navigating XML hierarchies. XPath includes other useful tools such as XQuery and XPointer.
![]() Note W3C, or World Wide Web Consortium (www.w3.org), is a group of professionals (both volunteer and paid) who help to define Internet standards. Without a central organization developing standards, it would be difficult for the Internet to exist and thrive. XPath is a standard developed for navigating XML documents. This is just one of the items that makes XML such a powerful tool for sharing data between systems around the world running on differing platforms.
Note W3C, or World Wide Web Consortium (www.w3.org), is a group of professionals (both volunteer and paid) who help to define Internet standards. Without a central organization developing standards, it would be difficult for the Internet to exist and thrive. XPath is a standard developed for navigating XML documents. This is just one of the items that makes XML such a powerful tool for sharing data between systems around the world running on differing platforms.
Listing 15-8 demonstrates a simple example of the PATH mode. This example runs a SELECT statement against the Production.Product table.
Listing 15-8. Simple FOR XML PATH Query
SELECT TOP(3) p.FirstName,
       p.LastName,
       s.Bonus,
       s.SalesYTD
FROM Person.Person p
JOIN Sales.SalesPerson s
ON p.BusinessEntityID = s.BusinessEntityID
ORDER BY s.SalesYTD DESC
FOR XML PATH;
The output from the query in Listing 15-8 will appear as follows:
<row>
  <FirstName>Linda</FirstName>
  <LastName>Mitchell</LastName>
  <Bonus>2000.0000</Bonus>
  <SalesYTD>4251368.5497</SalesYTD>
</row>
<row>
  <FirstName>Jae</FirstName>
  <LastName>Pak</LastName>
  <Bonus>5150.0000</Bonus>
  <SalesYTD>4116871.2277</SalesYTD>
</row>
<row>
  <FirstName>Michael</FirstName>
  <LastName>Blythe</LastName>
  <Bonus>4100.0000</Bonus>
  <SalesYTD>3763178.1787</SalesYTD>
</row>
Without any modification, the XML PATH mode will create a simple element-centric XML document. Listing 15-8 produces an element for each row. As always, you may want to enhance the format of the output. Listing 15-9 demonstrates how you can easily mix and match element- and attribute-centric XML document styles.
Listing 15-9. Defining XML Hierarchy Using PATH Mode
SELECT TOP(3) p.FirstName "@FirstName",
       p.LastName "@LastName",
           s.Bonus "Sales/Bonus",
           s.SalesYTD "Sales/YTD"
FROM Person.Person p
JOIN Sales.SalesPerson s
ON p.BusinessEntityID = s.BusinessEntityID
ORDER BY s.SalesYTD DESC
FOR XML PATH;
The following is the output:
<row FirstName="Linda" LastName="Mitchell">
  <Sales>
    <Bonus>2000.0000</Bonus>
    <YTD>4251368.5497</YTD>
  </Sales>
</row>
<row FirstName="Jae" LastName="Pak">
  <Sales>
    <Bonus>5150.0000</Bonus>
    <YTD>4116871.2277</YTD>
  </Sales>
</row>
<row FirstName="Michael" LastName="Blythe">
  <Sales>
    <Bonus>4100.0000</Bonus>
    <YTD>3763178.1787</YTD>
  </Sales>
</row>
If you think the SELECT statement in Listing 15-9 looks familiar, you’re right. A similar query was used in Listing 15-2 when navigating an XML document in the OPENXML command using the WITH statement. Keep in mind when mapping columns to an XML document that any column defined with an at (@) sign becomes an attribute of the node, and any column defined with a slash (/) becomes a separate element. Similar to the OPENXML example, if you add a name value to the PATH mode (FOR XML PATH ('Product')), you can rename the root node from “row” to “Product.” Listing 15-10 shows what this looks like.
Listing 15-10. Simple FOR XML PATH Query with NAME Option
SELECT TOP(5) ProductID "@ProductID",
       Name "Product/ProductName",
       Color "Product/Color"
FROM Production.Product
ORDER BY ProductID
FOR XML PATH ('Product'),
The query output is as follows:
<Product ProductID="1">
  <Product>
    <ProductName>Adjustable Race</ProductName>
  </Product>
</Product>
<Product ProductID="2">
  <Product>
    <ProductName>Bearing Ball</ProductName>
  </Product>
</Product>
<Product ProductID="3">
  <Product>
    <ProductName>BB Ball Bearing</ProductName>
  </Product>
</Product>
<Product ProductID="4">
  <Product>
    <ProductName>Headset Ball Bearings</ProductName>
  </Product>
</Product>
<Product ProductID="316">
  <Product>
    <ProductName>Blade</ProductName>
  </Product>
</Product>
When choosing from the FOR XML methods, the PATH mode is the preferred means to generate complex XML documents. It allows for granular control of structuring the document but is not overly complicated as is the EXPLICIT mode. Beyond the previous legacy modes, Microsoft has developed even more robust methods of generating and handling XML in SQL Server.
Beginning with SQL 2005, you can define a column as XML when creating a table object. Doing so specifically tells SQL Server to treat the data in the column as XML. You can also use the XML built-in data type when defining variables. Data types are discussed in more detail in Chapter 16. Listing 15-11 creates a sample table with a column defined as a built-in XML data type.
Listing 15-11. Built-in XML Data Type
USE tempdb;
GO

CREATE TABLE dbo.ProductList (ProductInfo XML);
You’ll find XML data types scattered throughout the AdventureWorks database. For example, the Person.Person table has two columns defined as XML: AdditionalContactInfo and Demographics. The AdditionalContactInfo column is NULL but is useful for working with XML inserts and updates, while the Demographics column shows how the data is, in fact, stored as XML. In the past, this data would be stored one of the string data types. Keep in mind the following rules around a column with the XML data type:
- It can’t be used as a primary or foreign key.
- You can’t convert or cast the column to a text or ntext. It is recommended to use varchar(max) or nvarchar(max). Text and ntext will be deprecated in future versions of SQL Server.
- Column can’t be used in a GROUP BY statement.
- The data can’t be greater than 2GB.
Let’s create another table with an XML column and populate it with some data. Type in and execute the code in Listing 15-12.
Listing 15-12. Using XML as a Data Type
--1
CREATE TABLE #CustomerList (CustomerInfo XML);

--2
DECLARE @XMLInfo XML;

--3
SET @XMLInfo = (SELECT CustomerID, LastName, FirstName, MiddleName
FROM Person.Person AS p
INNER JOIN Sales.Customer AS c ON p.BusinessEntityID = c.PersonID
FOR XML PATH);

--4
INSERT INTO #CustomerList(CustomerInfo)
VALUES(@XMLInfo);

--5
SELECT CustomerInfo FROM #CustomerList;
DROP TABLE #CustomerList;
Figure 15-4 shows the results of running this code. Statement 1 creates a table with an XML column. Statement 2 declares a variable with the XML data type. Statement 3 saves the information in XML format about each customer from the Sales.Customer and Person.Person tables into a variable. The data comes from the same query that you saw in the previous section. Statement 4 inserts a row into the #CustomerList table using the variable. Query 5 returns the CustomerInfo column from the table without using the FOR XML clause. Because the table stores the data in XML format, the statement looks just like a regular SELECT statement yet returns the data as XML.

Figure 15-4. The results of using the XML data type
XML Methods
XML methods provide ways to handle XML in the XML data type. They allow you to update the XML, convert the XML to rowsets, check whether the XML has nodes, and many other useful options. They provide many of the same functionalities you saw with the legacy XML commands. Table 15-3 summarizes these methods and I’ll discuss each of them.
Table 15-3. XML Data Type Methods
|
Method |
Description |
|---|---|
|
Executes an XQuery against the XML data type. Returns an XML type. |
|
|
Executes an XQuery against the XML data type and returns an SQL scalar value. |
|
|
Executes an XQuery against the XML data type and returns a bit value representing a criteria of 1 if there is at least one node, 0 if there are no nodes, and NULL if the XML data type in the XQuery is NULL. |
|
|
Used to update XML stored as the XML data type. |
|
|
Used to convert (shred) an XML data type into a rowset (table). If you want to convert XML into a relational form, use this method. |
The QUERY Method
Use the QUERY method when you need to extract elements from an XML column or variable. You have the capability to extract specific elements and create new XML documents. Listing 15-13 creates and populates a temp table with an XML column. You will use this table for the rest of the examples in this section.
Listing 15-13. Create a Temp Table with an XML Column
--1
CREATE TABLE #Bikes(ProductID INT, ProductDescription XML);

--2
INSERT INTO #Bikes(ProductID, ProductDescription)
SELECT ProductID,
        (SELECT ProductID, Product.Name, Color, Size, ListPrice, SC.Name AS BikeSubCategory
        FROM Production.Product AS Product
        JOIN Production.ProductSubcategory SC
                ON Product.ProductSubcategoryID = SC.ProductSubcategoryID
        JOIN Production.ProductCategory C
                ON SC.ProductCategoryID = C.ProductCategoryID
        WHERE Product.ProductID = Prod.ProductID
        FOR XML RAW('Product'), ELEMENTS) AS ProdXML
FROM  Production.Product AS Prod
        JOIN Production.ProductSubcategory SC
                ON Prod.ProductSubcategoryID = SC.ProductSubcategoryID
        JOIN Production.ProductCategory C
                ON SC.ProductCategoryID = C.ProductCategoryID
WHERE C.Name = 'Bikes';

--3
SELECT *
FROM #Bikes;
Figure 15-5 shows the partial results of running this code. Statement 1 creates the temp table, #Bikes, with just a ProductID and the ProductDescription columns. The ProductDescription column is the XML data type. Statement 2 inserts data from AdventureWorks into the temp table. A correlated subquery is used to populate the ProductDescription column using a technique you learned earlier in this chapter, FOR XML.
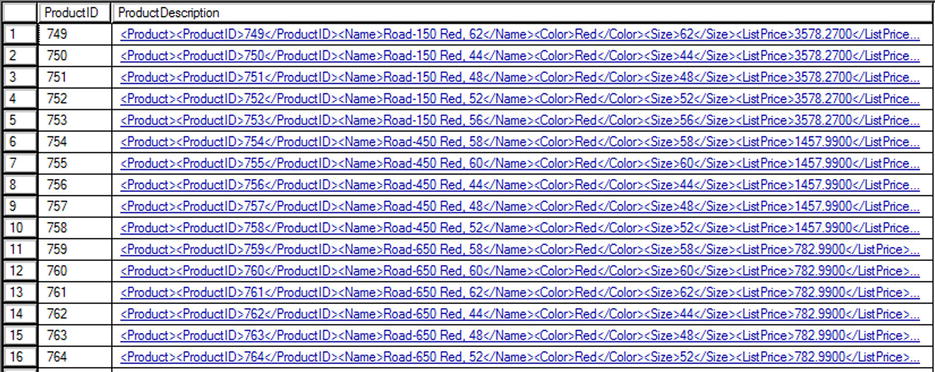
Figure 15-5. The partial #Bikes temp table data
Up to this point in the book, the columns and variables of the data types you have used have had values. You can retrieve or modify the values, but nothing else. The XML data type also has methods. Type in Listing 15-14 to learn how to use the QUERY method to retrieve an element. Note that the method name is case sensitive and must be lower case.
Listing 15-14. Using the QUERY method
SELECT ProductID,
    ProductDescription.query('Product/ListPrice') AS ListPrice
FROM #Bikes;
Figure 15-6 shows the results of running this code. The QUERY method takes the path to the element as an argument. Notice that it returns XML.

Figure 15-6. The partial results of using the QUERY method
The VALUE Method
Although the QUERY method allowed you to extract a particular element in XML format, the VALUE method extracts a scalar value instead. Type in and execute Listing 15-15 to see how to use the VALUE method. This example also uses the temp table created in Listing 15-13.
Listing 15-15. Using the VALUE Method
SELECT ProductID,
    ProductDescription.value('(/Product/ListPrice)[1]', 'MONEY') AS ListPrice
FROM #Bikes;
Figure 15-7 shows the partial results of running this code. This example is a bit more complex than the QUERY method example. A second argument specifying the SQL data type is required. Because this is a scalar function, only one value can be returned. To ensure that only the first value is returned, the index [1] is appended to the element path. This is similar to an array syntax. In this case, there is only one possible value, but you are still required to specify it. Because there is only one ListPrice in each document, if you change the index to a different number, nothing will be returned.

Figure 15-7. The partial results of using the VALUE method
If the XML document you are working with contains attributes, you can specify the attribute with the at (@) symbol. Listing 15-16 shows an example.
Listing 15-16. Using the VALUE Method with an Attribute
DECLARE @test XML = '
<root>
<Product ProductID="123" Name="Road Bike"/>
<Product ProductID="124" Name="Mountain Bike"/>
</root>';

SELECT @test.value('(/root/Product/@Name)[2]','NVARCHAR(25)'),
This script returns the value “Mountain Bike” because it has requested the Name attribute of the second Product.
The EXIST Method
The EXIST method allows you to search for specific values in the XML. It returns a 1 if the value is found or a 0 if it is not. Similar to the VALUE method, you must specify the particular instance of the element you are looking for. Listing 15-17 demonstrates how to use the EXIST method in the WHERE clause.
Listing 15-17. Using the EXIST method
SELECT ProductID,
    ProductDescription.value('(/Product/ListPrice)[1]', 'MONEY') AS ListPrice
FROM #Bikes
WHERE ProductDescription.exist('/Product/ListPrice[text()[1] lt 3000]') = 1;
Figure 15-8 shows the partial results of running this code. This example locates the rows with XML documents where the ListPrice is less than 3,000. The text value of the first ListPrice element is compared to 3,000. You can also use eq for equal to and gt for greater than.
Figure 15-8. The partial results of using EXIST
When working with dates in XML along with EXIST, you must cast the XML value to a date. Type in and execute Listing 15-18, which has two examples:
Listing 15-18. Using EXIST with Dates
--1
DECLARE @test1 XML = '
<root>
    <Product ProductID="123" LastOrderDate="2014-06-02"/>
</root>';

--2
DECLARE @test2 XML = '
<root>
    <Product>
            <ProductID>123</ProductID>
                <LastOrderDate>2014-06-02</LastOrderDate>
        </Product>
</root>';

--3
SELECT @test1.exist('/root/Product[(@LastOrderDate cast as xs:date?)
    eq xs:date("2014-06-02")]'),
@test2.exist('/root/Product/LastOrderDate[(text()[1] cast as xs:date?)
    eq xs:date("2014-06-02")]'),
Both expressions from statement 3 return 1. This example shows how to work with both attributes and elements.
The MODIFY Method
You will use the MODIFY method if you want to modify data stored as an XML data type. The MODIFY method is similar to using update, insert, and delete commands. One primary difference is that the MODIFY method can only be used in a SET clause of an UPDATE statement or the SET statement. Listing 15-19 shows the different ways to use the MODIFY method to change data in an XML document assigned to a variable.
Listing 15-19. Using the MODIFY method
--1
DECLARE @x xml =
'<Product ProductID = "521487">
  <ProductType>Paper Towels</ProductType>
  <Price>15</Price>
  <Vendor>Johnson Paper</Vendor>
  <VendorID>47</VendorID>
  <QuantityOnHand>500</QuantityOnHand>
</Product>';

--2
SELECT @x;

--3
/* inserting data into xml with the modify method */
SET @x.modify('
insert <WarehouseID>77</WarehouseID>
into (/Product)[1]'),

--4
SELECT @x;

--5
/* updating xml with the modify method */
SET @x.modify('
replace value of (/Product/QuantityOnHand[1]/text())[1]
with "250"'),

--6
SELECT @x;

--7
/* deleting xml with the modify method */
SET @x.modify('
delete (/Product/Price)[1]'),

--8
SELECT @x;
The original XML looked like the following:
<Product ProductID="521487">
  <ProductType>Paper Towels</ProductType>
  <Price>15</Price>
  <Vendor>Johnson Paper</Vendor>
  <VendorID>47</VendorID>
  <QuantityOnHand>500</QuantityOnHand>
</Product>
Statement 3 inserted the Warehouse element into the XML. Statement 5 changed the QuantityOnHand to 250. Finally, statement 7 removed the Price element. After all of the modifications have been completed, the XML looks like this:
<Product ProductID="521487">
  <ProductType>Paper Towels</ProductType>
  <Vendor>Johnson Paper</Vendor>
  <VendorID>47</VendorID>
  <QuantityOnHand>250</QuantityOnHand>
  <WarehouseID>77</WarehouseID>
</Product>
The NODES Method
You can use the NODES method along with the VALUE method to shred XML into relational data. In this case, you can expand the individual elements. Listing 15-20 is an example.
Listing 15-20. Using the NODES method
--1
DECLARE @XML XML = '
<Product>
        <ProductID>749</ProductID>
        <ProductID>749</ProductID>
        <ProductID>750</ProductID>
        <ProductID>751</ProductID>
        <ProductID>752</ProductID>
        <ProductID>753</ProductID>
        <ProductID>754</ProductID>
        <ProductID>755</ProductID>
        <ProductID>756</ProductID>
        <ProductID>757</ProductID>
        <ProductID>758</ProductID>
</Product>';

--2
SELECT P.ProdID.value('.', 'INT') as ProductID
FROM @XML.nodes('/Product/ProductID') P(ProdID);
Figure 15-9 shows the results of running this code. The XML in this example contains several ProductID numbers. By using the NODE method and specifying the path, the list of ProductID values can be returned using the VALUE method. The table of values returned is aliased as “P” with the column ProdID. The table name plus the column named joined with a period along with the VALUE function is used in the SELECT list to return the results.
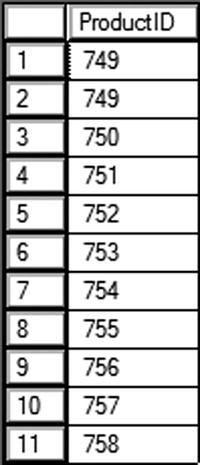
Figure 15-9. The results of using the NODE method
Namespaces
Namespaces can be confusing when first learning XML, but the concept is simple. XML uses namespaces to uniquely define element and attribute names in an XML document. The classic example is the element <table>. If the XML document is used by a furniture company, <table> would mean a piece of furniture. If the XML document is used by a company writing data modeling software, <table> would mean a database table. In this case, the furniture company and the data modeling company will use different namespaces. In order to facilitate data transfers and communication, all furniture companies may use the same namespace so that <table> always refers to the same thing.
XML data can be typed or untyped. So far in this chapter, you have worked with untyped XML data. XML data that is typed is associated with a schema, an explicit definition for that document. All of the XML columns in the AdventureWorks database are typed.
If you take a look at any of the XML data in AdventureWorks, you will see that each document begins with the namespace. Run this query and then click the XML to see an example:
SELECT Demographics FROM Sales.Store;
The XML for one of the rows looks like this:
<StoreSurvey xmlns="http://schemas.microsoft.com/sqlserver/2004/07/adventure-works/StoreSurvey">
  <AnnualSales>800000</AnnualSales>
  <AnnualRevenue>80000</AnnualRevenue>
  <BankName>United Security</BankName>
  <BusinessType>BM</BusinessType>
  <YearOpened>1996</YearOpened>
  <Specialty>Mountain</Specialty>
  <SquareFeet>21000</SquareFeet>
  <Brands>2</Brands>
  <Internet>ISDN</Internet>
  <NumberEmployees>13</NumberEmployees>
</StoreSurvey>
When writing a query using any of the XML methods against the Demographics column, you will refer to the namespace found at http://schemas.microsoft.com/sqlserver/2004/07/adventure-works/StoreSurvey. This namespace was defined for you in the stored XML. The namespace must be included in your query because the XML data includes it.
Within the query, you declare the required namespace. You can then refer to the XML elements using the namespace prefix. In the following example, you use the prefix /ss to refer to each element. For example, /ss:StoreSurvey/ss:AnnualSales grabs the AnnualSales element from the XML. The braces symbol {} tell the QUERY method to insert a value into the output. Listing 15-21 demonstrates how to use the namespace along with the QUERY method.
Listing 15-21. Using a Namespace
SELECT Demographics.query('declare namespace ss = "http://schemas.microsoft.com/sqlserver/2004/07/adventure-works/StoreSurvey";
<Store AnnualSales = "{ /ss:StoreSurvey/ss:AnnualSales }"
       BankName = "{ /ss:StoreSurvey/ss:BankName }" />
') AS Result
FROM Sales.Store;
Splitting a String
Splitting a delimited string into its individual elements is an interesting use of the XML methods. For example, imagine that you have a comma-delimited list of values that have been supplied as an argument to a stored procedure. In order to work with the values, the string must be separated into the individual values. Type in and execute Listing 15-22 to learn this method.
Listing 15-22. Splitting a String Using XML
--1
DECLARE @values NVARCHAR(30) = N'Bike,Seat,Pedals,Basket';

--2
DECLARE @XML XML

--3
SELECT @XML = '<item>' + REPLACE(@values,',','</item><item>') + '</item>';

--4
SELECT @XML;

--5
SELECT I.Product.value('.','NVARCHAR(10)') AS Item
FROM @XML.nodes('/item') AS I(Product);
Figure 15-10 shows the results of running this code. Statement 1 saves the list of items into a variable. Statement 2 declares a variable to hold the list once it is converted into XML. Statement 3 uses the REPLACE function to replace the commas with closing and opening item tags; an opening tag is required at the beginning of the string and a closing tag is required at the end. Statement 4 displays the XML. This is just to verify that statement 3 is correct. Finally, the NODES method is used to shred the XML into a list.
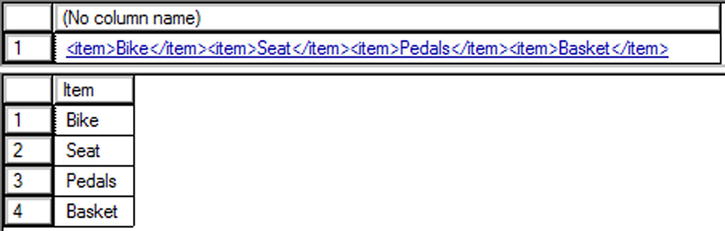
Figure 15-10. Splitting a string into individual elements
Summary
This chapter only scratches the surface of SQL Server’s capabilities in handling XML data. The XML data and its associated methods allow much greater flexibility and control than the legacy OPENXML command. I strongly suggest using the new methods of VALUE, MODIFY, EXIST and NODES over the legacy commands, especially when implementing the XML data type.
In the next chapter you will learn more about the data types available with SQL Server.