![]()
Understanding T-SQL Programming Logic
Even though the primary purpose of T-SQL is to retrieve and manipulate data, like other programming languages, it also contains logic elements. Most of the time you will write T-SQL statements that retrieve or update data, but you can also set up loops and write code with conditional flow. Often database administrators write scripts in T-SQL to perform maintenance tasks that require more than just retrieving or updating data. For example, you might need to write a script that checks the last backup date of all databases on the server or checks the free space of all the databases. Although most administrative tasks are beyond the scope of this book, you may find many uses in your environment for the techniques you will learn in this chapter.
Variables
If you have programmed in any other language, you have probably used variables in your programs. Variables hold temporary values used to help you in designing programming logic. For example, you might use a variable to hold the results of a calculation, the results of a string concatenation, or to control the number of times a loop executes.
Declaring and Initializing a Variable
To use avariable, you must first declare it. SQL Server also gives you the option to initialize a variable, that is, assign a value to the variable at the same time you declare it. By default, the variable will be assigned the value NULL if you don’t assign an explicit value. Versions earlier than SQL Server 2008 required that you assign a value on a separate line. Here is the syntax for declaring a variable and assigning a value at the same time and later in the code:
DECLARE @variableName <type> = <value1>
SET @variableName = <value2>
You assign a value to a variable after you declare it by using the SET statement or by using the SELECT statement. The SET statement lets you work with only one variable at a time. The SELECT statement allows multiple variables to be modified in the same statement. Using a SELECT statement to assign values to multiple variables is more efficient than individual SET statements. You can also assign a value to a variable from a column within a query. When using SELECT to assign the value of a variable from a query, make sure that the query returns only one row. Otherwise, when doing so, that will be the only thing the query can do; the query can’t return a result set. Type in and execute Listing 12-1 to learn how to declare and assign variables.
Listing 12-1. Declaring and Using Variables
--1
DECLARE @myNumber INT = 10;
PRINT 'The value of @myNumber';
PRINT @myNumber;
SET @myNumber = 20;
PRINT 'The value of @myNumber';
PRINT @myNumber;
GO

--2
DECLARE @myString VARCHAR(100), @myBit BIT;
SELECT @myString = 'Hello, World', @myBit = 1;
PRINT 'The value of @myString';
PRINT @myString;
PRINT 'The value of @myBit';
PRINT @myBit;
GO

--3
DECLARE @myUnicodeString NVARCHAR(100);
SET @myUnicodeString = N'This is a Unicode String';
PRINT 'The value of @myUnicodeString';
PRINT @myUnicodeString;
GO

--4
DECLARE @FirstName NVARCHAR(50), @LastName NVARCHAR(50);
SELECT @FirstName  = FirstName, @LastName = LastName
FROM Person.Person
WHERE BusinessEntityID = 1;

PRINT 'The value of @FirstName';
PRINT @FirstName;
PRINT 'The value of @LastName';
PRINT @LastName;
GO

--5
PRINT 'The value of @myString';
PRINT @myString;
Figure 12-1 shows the results of running this code. The script in Listing 12-1 consists of five batches separated by the word GO. Batch 1 declares and initializes the local variable @myNumber in one line to the value 10. Local variables in T-SQL begin with the at (@) symbol and are in scope within the current connection and the current batch. Another line in the batch sets the value of the variable to 20 using the SET command. The SET command will set the value of only one variable at a time. Using the PRINT command, you can print the value of a variable.

Figure 12-1. The results of declaring and initializing a variable
Batch 2 demonstrates how you can declare more than one variable on the same line. The batch uses a SELECT statement to assign values to both variables in the same statement. Batch 3 demonstrates that you set the value of an NVARCHAR string a bit differently. You should begin the string with the uppercase letter N. By doing so, SQL Server converts the string to Unicode. If you don’t begin the string with N, you may lose any special characters.
In batch 4, the SELECT statement assigns the value of the FirstName and LastName columns to two variables from one row of the Person.Person table. In this case, the WHERE clause restricts the SELECT statement to just one row. If the statement didn’t have a WHERE clause or a less restrictive one, the value from every row would be assigned to the variable. Eventually, the variable will contain the final value assigned from the query. Because SQL Server doesn’t guarantee the order of the results returned, this could be any value in the results.
Batch 5 demonstrates that the variable declared in batch 2 is no longer in scope. Variables go out of scope when the batch completes. Even if there is only one batch in the script, once the code completes, the variable goes out of scope and is no longer in memory.
Using Expressions and Functions with Variables
The previous example demonstrated how to declare and assign a literal value or a value from a query. You can also use any expression and function to assign a value to a variable. For example, you may need to save the count of the rows of a query for later in the script, or you may need to save the value of a file name concatenated to a file path for a maintenance script. Type in and execute the code in Listing 12-2 to learn more about variables.
Listing 12-2. Using Expressions and Functions to Assign Variable Values
--1
DECLARE @myINT1 INT = 10, @myINT2 INT = 20, @myINT3 INT;
SET @myINT3 = @myINT1 * @myINT2;
PRINT 'Value of @myINT3: ' + CONVERT(VARCHAR(30),@myINT3);
GO

--2
DECLARE @myString VARCHAR(100);
SET @myString = 'Hello, ';
SET @myString += 'World';
PRINT 'Value of @myString: ' + @myString;
GO

--3
DECLARE @CustomerCount INT;
SELECT @CustomerCount = COUNT(*)
FROM Sales.Customer;
PRINT 'Customer Count: ' + CAST(@CustomerCount AS VARCHAR(30));

--4
DECLARE @FullName NVARCHAR(152);
SELECT @FullName = FirstName + ISNULL(' ' + MiddleName,'') + ' ' + LastName
FROM Person.Person
WHERE BusinessEntityID = 1;
PRINT 'FullName: ' + @FullName;
Figure 12-2 shows the results of running this code. Batch 1 declares three integer variables and assigns a value to two of them. The next line uses the SET statement to assign the product of the two variables to the third one. Finally, to print the label explaining the value and the value on the same line, the code converts the value of the @myINT3 variable to a string.

Figure 12-2. The results of using variables with expressions
Batch 2 assigns the value Hello (with a space after it) to the @myString variable. The next line uses the += operator to concatenate another string, World, to the variable. The += operator is available in many programming languages as a shorter way to write an assignment. Without the shortcut, the code would look like this:
SET @myString = @myString + 'World';
Batch 3 assigns the result of the expression COUNT(*) to the variable @CustomerCount. When assigning a value to a variable from a query, you will assign only one value to a variable. Make sure that only one row is returned when you use this technique. In this case, the query returns only one value, the count of all the rows from the table. The query in batch 4 also returns one row because of the criteria in the WHERE clause. The query assigns a value to the @FullName variable for one row only.
Using Variables in WHERE and HAVING Clauses
So far, the examples in this book have used literal values in the expressions, also known as predicates, in WHERE and HAVING clauses. You will often not know ahead of time what values will be needed, so it makes sense to use variables. Type in and execute the code in Listing 12-3 to learn more about using a variable instead of a literal value in a WHERE or HAVING clause.
Listing 12-3. Using a Variable in a WHERE or HAVING Clause Predicate
--1
DECLARE @ID INT;
SET @ID = 1;

SELECT BusinessEntityID, FirstName, LastName
FROM Person.Person
WHERE BusinessEntityID = @ID;
GO

--2
DECLARE @FirstName NVARCHAR(50);
SET @FirstName = N'Ke%';

SELECT BusinessEntityID, FirstName, LastName
FROM Person.Person
WHERE FirstName LIKE @FirstName
ORDER BY BusinessEntityID;
GO

--3
DECLARE @ID INT = 1;
--3.1
SELECT BusinessEntityID, FirstName, LastName
FROM Person.Person
WHERE @ID = CASE @ID WHEN 0 THEN 0 ELSE BusinessEntityID END;

SET @ID = 0;

--3.2
SELECT BusinessEntityID, FirstName, LastName
FROM Person.Person
WHERE @ID = CASE @ID WHEN 0 THEN 0 ELSE BusinessEntityID END;

GO

--4
DECLARE @Amount INT = 10000;

SELECT SUM(TotalDue) AS TotalSales, CustomerID
FROM Sales.SalesOrderHeader
GROUP BY CustomerID
HAVING SUM(TotalDue) > @Amount;
Figure 12-3 shows the results of running this code. Batch 1 declares a variable @ID and assigns the value 1. The query uses the variable in the WHERE clause to restrict the results to just the row from the Person.Person table where the BusinessEntityID is 1. Batch 2 demonstrates how pattern matching with LIKE can be used. The variable contains the wildcard %. The query returns all rows where the FirstName begins with Ke.

Figure 12-3. The partial results of using a variable in the WHERE and HAVING clauses
Batch 3 uses the variable @ID within a CASE expression in the WHERE clause. The variable starts out with the value 1. Query 3.1 returns only the row in which BusinessEntityID equals 1. Take a closer look at the CASE expression. The variable does not equal 0, so the CASE expression returns the column BusinessEntityID. The variable @ID equals the BusinessEntityID in only one row. Use caution with this technique. Remember that embedding a column in a function causes the index to be scanned. In query 3.2, the value of @ID is 0. The CASE expression returns 0 because @ID is equal to 0. Because @ID is equal to 0 and the CASE expression returns 0, the query returns every row. Zero is always equal to zero.
Batch 4 demonstrates that the variables can also be used in the HAVING clause of an aggregate query. Recall from Chapter 7 that you use the HAVING clause to filter the rows after the database engine processes the GROUP BY clause. The query returns only the rows from the Sales.SalesOrderHeader table where the TotalSales value by CustomerID exceeds the value stored in @Amount.
Now that you understand some of the things you can do with variables, practice working with them by completing Exercise 12-1.
Use the AdventureWorks database to complete this exercise. You can find the solutions at the end of the chapter.
- Write a script that declares an integer variable called @myInt. Assign 10 to the variable, and then print it.
- Write a script that declares a VARCHAR(20) variable called @myString. Assign 'This is a test' to the variable, and print it.
- Write a script that declares two integer variables called @MaxID and @MinID. Use the variables to print the highest and lowest SalesOrderID values from the Sales.SalesOrderHeader table.
- Write a script that declares an integer variable called @ID. Assign the value 70000 to the variable. Use the variable in a SELECT statement that returns all the rows from the Sales.SalesOrderHeader table that have a SalesOrderID greater than the value of the variable.
- Write a script that declares three variables, one integer variable called @ID, an NVARCHAR(50) variable called @FirstName, and an NVARCHAR(50) variable called @LastName. Use a SELECT statement to set the value of the variables with the row from the Person.Person table with BusinessEntityID = 1. Print a statement in the “BusinessEntityID: FirstName LastName” format.
- Write a script that declares an integer variable called @SalesCount. Set the value of the variable to the total count of sales in the Sales.SalesOrderHeader table. Use the variable in a SELECT statement that shows the difference between the @SalesCount and the count of sales by customer.
The IF . . . ELSE Construct
Use IF along with the optional ELSE keyword to control code flow in your T-SQL scripts. Use IF just as you would in any other programming language to execute a statement or group of statements based on an expression that must evaluate to TRUE or FALSE. For example, you might need to display an error message if the count of the rows in a table is too low. If the count exceeds a given value, your code repopulates a production table.
Using IF
Always follow the keyword IF with a condition that evaluates to TRUE or FALSE. You can follow the condition with the next statement to run on the same line or on the next line. If the condition applies to a group of statements, you will use BEGIN and END to designate which statements are within the IF block. Here is the syntax:
IF <condition> <statement>

IF <condition> BEGIN
    <statement1>
    [<statement2>]
END
To make my code more readable and avoid mistakes, I generally use the second method. You can actually put the statement to execute on a new line. For example, I might decide later to add a PRINT statement before the line to execute when the condition is true. In that case, I might accidentally cause the IF to apply just to the PRINT statement by forgetting to go back and add BEGIN and END. Type in and execute the code in Listing 12-4 to learn how to use IF.
Listing 12-4. Using IF to Control Code Execution
--1
DECLARE @Count INT;

SELECT @Count = COUNT(*)
FROM Sales.Customer;

IF @Count > 500 BEGIN
   PRINT 'The customer count is over 500.';
END;
GO

--2
DECLARE @Name VARCHAR(50);

SELECT @Name = FirstName + ' ' + LastName
FROM Person.Person
WHERE BusinessEntityID = 1;

--2.1
IF CHARINDEX('Ken',@Name) > 0 BEGIN
    PRINT 'The name for BusinessEntityID = 1 contains "Ken"';
END;
--2.2
IF CHARINDEX('Kathi',@Name) > 0 BEGIN
    PRINT 'The name for BusinessEntityID = 1 contains "Kathi"';
END;
Figure 12-4 shows the results of running this code. Batch 1 retrieves the count of the rows in the Sales.Customer table. If the count exceeds 500, then the PRINT statement executes. You can use any valid statements within the IF block. These code examples use PRINT statements so that you can easily see the results. Batch 2 assigns the value returned by the expression FirstName + ' ' + LastName to the variable. The 2.1 IF block executes the PRINT statement if the value contains Ken. The 2.2 IF block executes the PRINT statement if the value contains Kathi. Because the value doesn’t contain Kathi, nothing prints.

Figure 12-4. The results of using IF
Using ELSE
Often you will need to perform an alternate option if the condition you are checking is false. If you are using the BEGIN and END keywords in the IF block, you must close the block first before adding ELSE. Just like IF, you can use BEGIN and END to designate the ELSE block. You can also type the statement on the same line or the next line if you choose. Here are some syntax examples for many of the ways you can use ELSE:
IF <condition> <statement>
ELSE <statement>

IF <condition> BEGIN
    <statement1>
    [<statement2>]
END
ELSE <statement>

IF <condition> BEGIN
    <statement1>
    [<statement2>]
END
ELSE BEGIN
    <statement1>
    [<statement2>
END
The syntax examples show some of the ways you can use ELSE along with IF. You can use BEGIN and END with both or either parts of the construct. Type in and execute Listing 12-5 to learn how to use ELSE.
Listing 12-5. Using ELSE
--1
DECLARE @Count INT;

SELECT @Count = COUNT(*)
FROM Sales.Customer;

IF @Count < 500 PRINT 'The customer count is less than 500.';
ELSE PRINT 'The customer count is 500 or more.';
GO

--2
DECLARE @Name NVARCHAR(101);

SELECT @Name = FirstName + ' ' + LastName
FROM Person.Person
WHERE BusinessEntityID = 1;

--2.1
IF CHARINDEX('Ken', @Name) > 0 BEGIN
    PRINT 'The name for BusinessEntityID = 1 contains "Ken"';
END;
ELSE BEGIN
    PRINT 'The name for BusinessEntityID = 1 does not contain "Ken"';
    PRINT 'The name is ' + @Name;
END;
--2.2
IF CHARINDEX('Kathi', @Name) > 0 BEGIN
    PRINT 'The name for BusinessEntityID = 1 contains "Kathi"';
END;
ELSE BEGIN
    PRINT 'The name for BusinessEntityID = 1 does not contain "Kathi"';
    PRINT 'The name is ' + @Name;
END;
Figure 12-5 shows the results of running this code. This listing looks almost like the code in Listing 12-4 except that it contains the ELSE blocks. Batch 1 saves the count of the customers in a variable. This time, if the count is less than 500, the PRINT statement in the IF block executes. In this case, the count exceeds 500, so the PRINT statement in the ELSE block executes. Batch 2 executes the PRINT statement in the IF block of the 2.1 section of code because the value of the variable contains Ken. The 2.2 section of code executes the PRINT statement in the ELSE block because the value of the variable does not contain Kathi.

Figure 12-5. The results of using ELSE
Using Multiple Conditions
So far, theexamples have shown only one condition along with each IF or ELSE. You can include multiple conditions along with AND and OR just like within a WHERE clause. You can also control the logic with parentheses. For example, you may need to execute a statement only if the current day is Monday and the count of the rows in a table exceeds a certain value. Type in and execute the code in Listing 12-6.
Listing 12-6. Using Multiple Conditions with IF and ELSE
--1
DECLARE @Count INT;
SELECT @Count = COUNT(*)
FROM Sales.Customer;
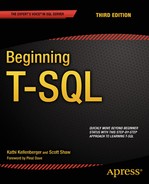
IF @Count > 500 AND DATEPART(dw,getdate()) = 2 BEGIN
PRINT 'The count is over 500.';
PRINT 'Today is Monday.';
END;
ELSE BEGIN
PRINT 'Either the count is too low or today is not Monday.';
END;
--2
IF @Count > 500 AND (DATEPART(dw,getdate()) = 2 OR DATEPART(m,getdate())= 3) BEGIN
PRINT 'The count is over 500.';
PRINT 'It is either Monday or the month is March.';
END;
Figure 12-6 shows the results of running this code. This listing contains just one batch after setting the database context. The IF block in code section 1 checks to see whether the count exceeds 500 and whether the current day of the week is Monday. You may get different results depending on the day of the week you run the code. The IF block in code section 2 checks first to see whether the day of the week is Monday or whether the current month is March. The block then checks the count, which must exceed 500. Because both the count exceeds 500 and I executed the code in March, the statements print. Again, you may get different results depending on when you run the code example.

Figure 12-6. The results of using multiple conditions with IF
Nesting IF ... ELSE
You can nest IF and ELSE blocks inside other IF and ELSE blocks to create even more complex logic. For example, you may need to check to make sure the current date is not a Sunday and execute a statement. Then within the IF block, check to make sure the table has at least a certain number of rows before executing another statement. The BEGIN and END keywords are sometimes optional, but I suggest you include them to make sure that the code is correct and readable. Here are two of the possible syntax examples:
IF <condition> BEGIN
    [<statement1>]
    IF <condition> BEGIN
        <statement2>
    END
END

IF <condition> BEGIN
    <statement1>
END
ELSE BEGIN
    [statement2]
    IF <condition> BEGIN
        <statement3>
        [<statement4>]
    END
    ELSE <statement5>
END
As you can probably tell, nesting IF blocks can cause your code to become complex. Be sure to use comments and consistent formatting to aid in your understanding of the code when you come back to it a few months or years after you write it. Type in and execute the code in Listing 12-7 to learn how to nest IF blocks.
Listing 12-7. Using a Nested IF Block
DECLARE @Count INT;

SELECT @Count = COUNT(*)
FROM Sales.Customer;

IF @Count > 500 BEGIN
    PRINT 'The count is over 500.';
    IF DATEPART(dw,getdate())= 2 BEGIN
        PRINT 'Today is Monday.';
    END;
    ELSE BEGIN
        PRINT 'Today is not Monday.';
    END;
END;
Figure 12-7 shows the results. Because the count exceeds 500, the code executes the first PRINT statement. Then, depending on the day that you execute the code, one of the statements inside the nested IF ... ELSE block will print. When writing nested IF blocks, make sure that the logic actually acts in the way you intended.
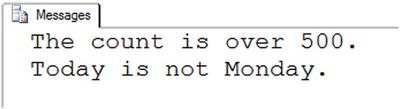
Figure 12-7. The results of using a nested IF block
Using IF with a Query
You can use IF with a query either to check for the existence of rows with EXISTS or to check the results of one value from one row. For example, you could check to see whether a certain part number is listed in the parts table. If it is, then based on the results, you can choose to begin or end the script or raise an error. You may have noticed IF EXISTS being used throughout the book to check the system tables to make sure a table exists before dropping it. Here is the syntax:
IF [NOT] EXISTS(SELECT * FROM <TABLE1> [WHERE <condition>]) BEGIN
     <statement1>
    [<statement2>]
END

IF (SELECT <expression> FROM <table>) = <value> BEGIN
    <statements>
END
Using EXISTS is one case where using the asterisk (*) is perfectly acceptable. You could also substitute a 1 or any value in place of the asterisk. The database engine just checks to see whether the query will return even one row but doesn’t return any rows at all. The EXISTS function returns only TRUE or FALSE. Type in and execute Listing 12-8 to learn how to use IF with subqueries.
Listing 12-8. Using IF EXISTS
--1
IF EXISTS(SELECT * FROM Person.Person WHERE BusinessEntityID = 1) BEGIN
   PRINT 'There is a row with BusinessEntityID = 1';
END;
ELSE BEGIN
   PRINT 'There is not a row with BusEntityID = 1';
END;

--2
IF (SELECT COUNT(*) FROM Person.Person WHERE FirstName = 'Kathi') = 0 BEGIN
   PRINT 'There is not a person with the first name "Kathi".';
END;
Figure 12-8 shows the results of running this code. The IF block in code section 1 checks to see whether there is a row in the Person.Person table with BusinessEntityID = 1. You can also use ELSE along with IF EXISTS. The IF block in code section 2 checks the value of the expression, the count of the rows, to make sure there isn’t a row with the FirstName of Kathi and executes the PRINT statements because there isn’t a row with that name.

Figure 12-8. The results of using IF EXISTS
You should now know how to use IF and ELSE in a number of situations. Practice what you have learned by completing Exercise 12-2.
Use the AdventureWorks database to complete this exercise. You can find the solutions at the end of the chapter.
- Write a batch that declares an integer variable called @Count to save the count of all the Sales.SalesOrderDetail records. Add an IF block that prints “Over 100,000” if the value exceeds 100,000. Otherwise, print “100,000 or less.”
- Write a batch that contains nested IF blocks. The outer block should check to see whether the month is October or November. If that is the case, print “The month is” and the month name. The inner block should check to see whether the year is even or odd and print the result. You can modify the month to check to make sure the inner block fires.
- Write a batch that uses IF EXISTS to check to see whether there is a row in the Sales.SalesOrderHeader table that has SalesOrderID = 1. Print “There is a SalesOrderID = 1” or “There is not a SalesOrderID = 1” depending on the result.
WHILE
Use the WHILE construct to set up loops, or sections of code that execute a number of times, in T-SQL. For example, you might have a script that updates 10,000 rows each time within the loop because updating 10,000 rows at a time is more efficient than updating millions of rows at once. Updating the very large number of rows in one transaction could cause excessive locking and logging and impact the performance of the application. Although it is definitely better to update sets of data, not a row at a time, it is often necessary to update smaller batches.
Using a WHILE Loop
The WHILE loop uses a Boolean expression (an expression that evaluates to true or false) to determine when the looping should stop. If you don’t specify an expression or the expression never evaluates to false, the loop will run until you stop it manually or some error condition causes it to stop. Here is the syntax:
WHILE <boolean expression> BEGIN
    <statement1>
   [<statement2>]
END
You can use several different techniques to create the Boolean expression that the database engine checks to determine when to exit the loop. One technique is to declare a variable, usually an integer, to be used as a counter. At the beginning of the loop, the code compares the variable to a value. Inside the loop, the code increments the variable. Another common way to control the loop is by using the EXISTS keyword with a query or to check the value of a column from a query. This might be used if a statement within the loop modifies data in the table used in the EXISTS condition. Type in and execute Listing 12-9 to learn how to use WHILE.
Listing 12-9. Using WHILE
--1
DECLARE @Count INT = 1;

WHILE @Count < 5 BEGIN
    PRINT @Count;
    SET @Count += 1;
END;
GO

--2
IF  EXISTS (SELECT * FROM sys.objects
            WHERE object_id = OBJECT_ID(N'dbo.demoContactType')
                AND type in (N'U'))
DROP TABLE dbo.demoContactType;
GO
CREATE TABLE dbo.demoContactType(ContactTypeID INT NOT NULL PRIMARY KEY,
    Processed BIT NOT NULL);
GO
INSERT INTO dbo.demoContactType(ContactTypeID,Processed)
SELECT ContactTypeID, 0
FROM Person.ContactType;
DECLARE @Count INT = 1;
WHILE EXISTS(SELECT * From dbo.demoContactType  WHERE Processed = 0) BEGIN
    UPDATE dbo.demoContactType SET Processed = 1
    WHERE ContactTypeID = @Count;
    PRINT 'Executed loop #' + CAST(@Count AS VARCHAR(10));
    SET @Count += 1;
END;
PRINT 'Done!';
Figure 12-9 shows the partial results of running this code. Batch 1 declares a variable and sets the value to 1 to use as a counter. Once the value of @Count reached 5, the execution exited the loop. It is very important that you set the value of the counter before the WHILE statement. If the value is NULL, then the loop will not run at all because comparing NULL to 5 will return UNKNOWN.
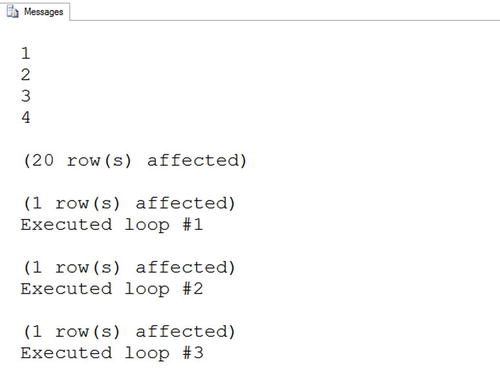
Figure 12-9. The partial results of using a WHILE loop
The code prints the value of the counter each time through the loop of code section 1 followed by the messages and row counts from code section 2.
The second example contains more than one batch because it creates and populates a table to be updated within the loop. This example also contains a variable called @Count, but the value of @Count doesn’t control the execution. This WHILE loop checks to see whether any rows in table dbo.demoContactType have a zero value in the Processed column. Each time through the loop, the code updates any rows with a ContactTypeID equal to the current value of @Count. (I removed all but two of the statements reporting that one row has been updated to save space in Figure 12-9.) When no more rows exist with Processed = 0, the code completes, and the PRINT statement executes. I purposely chose a small table for this example because processing a table row by row is very inefficient.
Nesting WHILE Loops
Just as you can nest IF blocks, you can also create WHILE loops within WHILE loops. You can also nest IF blocks within WHILE loops and WHILE loops within IF blocks. The important thing to remember when your T-SQL scripts become more complex is to keep your formatting consistent and add comments to your code. You may understand what your code does when you write it, but you may have a hard time figuring it out months or years later when you need to troubleshoot a problem or make a change. Type in and execute Listing 12-10 to learn how to nest WHILE loops.
Listing 12-10. Using a Nested WHILE Loop
DECLARE @OuterCount INT = 1;
DECLARE @InnerCount INT;

WHILE @OuterCount < 10 BEGIN
    PRINT 'Outer Loop';
    SET @InnerCount = 1;
    WHILE @InnerCount < 5 BEGIN
        PRINT '    Inner Loop';
        SET @InnerCount += 1;
    END;
    SET @OuterCount += 1;
END;
Figure 12-10 shows the partial results of running this code. The PRINT statements show which loop is executing at the time. Make sure you reset the value of the inner loop counter in the outer loop right before the inner loop. Otherwise, the inner loop will not run after the first time because the counter is already too high.
Figure 12-10. The partial results of running a nested WHILE loop
Exiting a Loop Early
Most of the time a WHILE loop continues until the Boolean expression returns false. You can also cause code execution to exit early by using the BREAK statement. Usually you will include a nested IF statement that controls when the BREAK statement will execute. One reason you might want to use BREAK is if you decide not to include a controlling condition at the top of the loop and include the expression in an IF block instead. The condition may be a query checking to see whether any rows remain to be updated. Type in and execute the code in Listing 12-11 to learn how to use BREAK.
Listing 12-11. Using BREAK
DECLARE @Count INT = 1;

WHILE @Count < 50  BEGIN
    PRINT @Count;
    IF @Count = 10 BEGIN
        PRINT 'Exiting the WHILE loop';
        BREAK;
    END;
    SET @Count += 1;
END;
Figure 12-11 shows the results of running this code. If the code didn’t include the BREAK statement, the loop would print the numbers from 1 to 49. Instead, the loop exits when it reaches 10.

Figure 12-11. The results of using the BREAK command
Using CONTINUE
The CONTINUE command causes the loop to continue at the top. In other words, the code following the CONTINUE statement doesn’t execute. Generally, you will find the CONTINUE within an IF block nested inside the WHILE loop. Use caution when writing a loop with CONTINUE to make sure you fully understand why you need this and are not creating an infinite loop. Type in and execute Listing 12-12 to learn how to use CONTINUE.
Listing 12-12. Using CONTINUE in a WHILE Loop
DECLARE @Count INT = 1;

WHILE @Count < 10 BEGIN
    PRINT @Count;
    SET @Count += 1;
    IF @Count = 3 BEGIN
       PRINT 'CONTINUE';
       CONTINUE;
    END;
    PRINT 'Bottom of loop';
END;
Figure 12-12 shows the results of running this code. Each time though the loop, the PRINT statement at the bottom of the loop executes except for the time when the counter equals 3. Notice that the counter increments before the IF block. If the counter incremented at the bottom of the loop, then the loop would execute indefinitely.
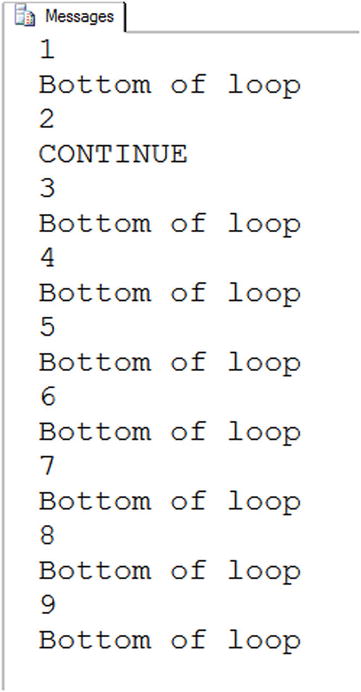
Figure 12-12. The results of using CONTINUE in a WHILE loop
Now that you know how to write code with a WHILE loop, practice what you have learned by completing Exercise 12-3.
Use the AdventureWorks database to complete this exercise. You can find the solutions at the end of the chapter.
- Write a script that contains a WHILE loop that prints out the letters A to Z. Use the function CHAR to change a number to a letter. Start the loop with the value 65. Here is an example that uses the CHAR function:
DECLARE @Letter CHAR(1);
SET @Letter = CHAR(65);
PRINT @Letter; - Write a script that contains a WHILE loop nested inside another WHILE loop. The counter for the outer loop should count up from 1 to 100. The counter for the inner loop should count up from 1 to 5. Print the product of the two counters inside the inner loop.
- Change the script in question 2 so the inner loop exits instead of printing when the counter for the outer loop is evenly divisible by 5.
- Write a script that contains a WHILE loop that counts up from 1 to 100. Print “Odd” or “Even” depending on the value of the counter.
Temporary Tables and Table Variables
Temporary, or temp, tables and table variables allow you to save data in short-lived table structures that you can use in your scripts. For example, you may need to save the results of complicated calculations for further processing. The use of temp tables and table variables is controversial. You can find many articles and newsgroup discussions stating that no one should ever use these structures. In my opinion, temp tables and table variables are just more tools that you can use if you need them. I have found that they often allow me to break extremely complicated queries into smaller, more manageable pieces—sometimes with better performance.
You can create two kinds of temp tables: local and global. When creating a local temp table, you can access the table only within the connection where it was created. When the connection closes, the database engine destroys the temp table. When creating a global temp table, any connection can see the table. When the last connection to the temp table closes, the database engine destroys the temp table.
Creating Local Temp Tables
Local temp tables look and behave just like regular tables except that they live in the tempdb database instead of a user database like AdventureWorks. The tempdb database is one of the system databases required for SQL Server. SQL Server also uses tempdb as a work area for sorting and other behind-the-scene tasks.
To create a local temp table, preface the table name with the number sign (#). Only the connection in which the table was created can see a local temp table. Chapter 14 covers creating tables with the CREATE TABLE command, but you have learned how to use the SELECT INTO syntax to create a table. You have also typed in numerous CREATE TABLE statements to create work tables for examples and exercises in Chapter 11. Here is the minimum syntax to create a local temp table using the CREATE TABLE command:
CREATE TABLE #tableName (<col1> <data type>,<col2> <data type>)
Temp tables can have anything that a regular table has, such as primary keys, defaults, and indexes. Type in and execute the code from Listing 12-13 to learn how to create a temp table.
Listing 12-13. Creating and Populating Local Temp Table
CREATE TABLE #myCustomers(CustomerID INT, FirstName VARCHAR(25),
    LastName VARCHAR(25));
GO

INSERT INTO #myCustomers(CustomerID,FirstName,LastName)
SELECT C.CustomerID, FirstName, LastName
FROM Person.Person AS P INNER JOIN Sales.Customer AS C
ON P.BusinessEntityID = C.PersonID;

SELECT CustomerID, FirstName, LastName
FROM #myCustomers;

DROP TABLE #myCustomers;
Figure 12-13 shows the results of running this code. The code first uses the CREATE TABLE command to create the table, #myCustomers. This example is very simple. The command could define a primary key, CustomerID, and define that the FirstName and LastName columns should not contain NULL values. The script could include an ALTER TABLE command to add an index. The script populates the table with a regular insert statement, inserting the rows from a join on two tables. The SELECT statement looks like any other SELECT statement. Finally, the DROP TABLE command destroys the table. Even though the table will drop automatically when the connection closes, it’s a good practice to drop temp tables when you are done using them. The order in which your data is returned may differ from my results.

Figure 12-13. The partial results of creating and populating a temp table
Creating Global Temp Tables
Global temp tables begin with two number signs (##). Type in and execute the code from Listing 12-14 to learn how to create a global temp table. Don’t close the query window when you’re done.
Listing 12-14. Creating and Populating a Global Temp Table
CREATE TABLE ##myCustomers(CustomerID INT, FirstName VARCHAR(25),
    LastName VARCHAR(25));
GO

INSERT INTO ##myCustomers(CustomerID,FirstName,LastName)
SELECT C.CustomerID, FirstName,LastName
FROM Person.Person AS P INNER JOIN Sales.Customer AS C
ON P.BusinessEntityID = C.PersonID;

SELECT CustomerID, FirstName, LastName
FROM ##myCustomers;

--Run the drop statement when you are done
--DROP TABLE ##myCustomers;
By using ## in the name, you create a global temp table. Open another query window and type the same SELECT statement to see that you can access the table from another connection. The results will look the same as those shown in Figure 12-13. Be sure to drop temp tables, especially global temp tables, when you no longer need them.
You won’t find many reasons to use global temp tables. For example, suppose that an application creates a global temp table. If another user runs the same code to create the global temp table with the same name while the first temp table exists, an error will occur. I have actually seen this error happen in a commercially available application!
Creating Table Variables
Table variables became available in SQL Server 2000. At that time, many T-SQL developers decided they should always use table variables instead of temp tables because of a myth about them. Many developers believe that table variables exist in memory instead of tempdb, but that is not the case. Table variables do live in tempdb. Here is the syntax for creating a table variable:
DECLARE @tableName TABLE (<col1> <data type> [Primary Key],<col2> <data type>)

DECLARE @tableName TABLE (<col1> <data type> [Primary Key],
    <col2> <data type>, <col3> <data type> [INDEX <indexName> (<col2>,<col3> )]
Because a table variable is a variable, it follows the same scoping rules as other variables. Table variables go out of scope at the end of the batch, not when the connection closes. Prior to SQL Server 2014 you couldn’t have nonclustered indexes in a table variable because you couldn’t perform an ALTER TABLE command, which would change the table variable once it was declared. Starting with SQL Server 2014, you can add nonclustered indexes as part of the declaration, as shown in the second example. Table variables are fine for small tables that you won’t need after running the batch. Table variables do not contain statistics. Statistics help the optimizer come up with a good query plan. Temp tables are the better choice for tables with large numbers of rows that could benefit from statistics or when you need to use the table after the batch is done.
Starting with SQL Server 2014, memory-optimized table variables are available with the new In-Memory OLTP features. These features are beyond the scope of this book.
Type in and execute Listing 12-15 to learn how to use a table variable.
Listing 12-15. Creating and Populating Table Variable
DECLARE @myCustomers TABLE (CustomerID INT, FirstName VARCHAR(25),
    LastName VARCHAR(25))

INSERT INTO @myCustomers(CustomerID,FirstName,LastName)
SELECT C.CustomerID, FirstName,LastName
FROM Person.Person AS P INNER JOIN Sales.Customer AS C
ON P.BusinessEntityID = C.PersonID;

SELECT CustomerID, FirstName, LastName
FROM @myCustomers;
The results are identical to those shown in Figure 12-14. Again, if you need to save a large number of rows temporarily, you may find that a temporary table is a better choice. Another reason you might want to use a temp table is that you can create it with a SELECT INTO statement, which is not possible with a table variable. The advantage of a SELECT INTO is that you don’t need to know the column names and data types up front. See the “Creating and Populating a Table in One Statement” section in Chapter 10 for more information.
Using a Temp Table or Table Variable
You may be wondering why you might need to use a temporary table. For example, in many human resource system databases, most of the tables have history and future rows. The tables have effective dates and effective sequences. The effective sequences determine the valid row for a given date for a given employee. Instead of figuring out the effective date and effective sequence for each employee over and over in my scripts, I create a temporary table to hold that information. When using this technique, also check to see if a common table expression might be more efficient.
Another way I use temp tables is to store a list of a small number of values for filtering queries. For example, suppose a user can select one or more values to filter a report. The reporting application sends a comma-delimited list of values to a stored procedure. You can add each value from the comma-delimited list to a temp table or table variable and then use that table to filter the report results. You will learn about stored procedures in Chapter 14. Listing 12-16 shows how to use a table variable populated from a list of values. Type in and execute the code.
Listing 12-16. Using a Temp Table to Solve a Query Problem
--1
DECLARE @IDTable TABLE (ID INT);
DECLARE @IDList VARCHAR(2000);
DECLARE @ID INT;
DECLARE @Loc INT;

--2
SET @IDList = '16496,12506,11390,10798,2191,11235,10879,15040,3086';

--3
SET @Loc = CHARINDEX(',',@IDList);
--4
WHILE @Loc > 0 BEGIN
    --4.1
    SET @ID = LEFT(@IDList,@Loc-1);
    --4.2
    SET @IDList = SUBSTRING(@IDList,@Loc +1,2000);
    --4.3
    INSERT INTO @IDTable(ID)
    VALUES (@ID);
    --4.4
    SET @Loc = CHARINDEX(',',@IDList);
END;
--5
IF LEN(@IDList) > 0 BEGIN
    SET @ID = @IDList;
    INSERT INTO @IDTable(ID)
    VALUES (@ID);
END;

--6
SELECT BusinessEntityID, FirstName, LastName
FROM Person.Person AS p
WHERE BusinessEntityID IN (SELECT ID FROM @IDTable);
Figure 12-14 shows the results of running this code. Code section 1 declares four variables: @IDTable, which is a table variable; @IDList to hold the comma-delimited list sent from the application; @ID to hold one individual value from the list; and @Loc to hold the location of the comma. Statement 2 sets the value of @IDList, which represents the list of values sent by the application.
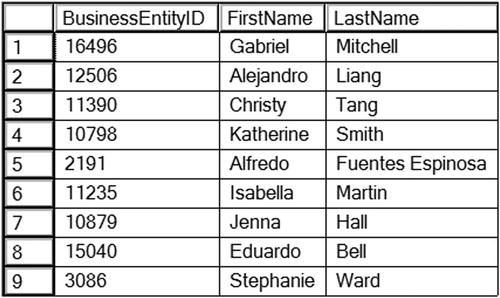
Figure 12-14. The results of using a table variable
The code finds each ID value from the comma-delimited string and stores the value in the table variable. Statement 3 finds the location of the first comma in the list and stores the location in @Loc. Code section 4 is a WHILE loop. Inside the WHILE loop, statement 4.1 stores the first value in the @ID variable, and statement 4.2 removes that value along with the comma from @IDList based on the value of @Loc. Statement 4.3 inserts the value stored in @ID into the table variable, @IDTable. Finally, at the bottom of the loop, statement 4.4 locates the next comma, resetting the value of @Loc. The loop continues as long as the code continues to find a comma in @IDList. Once the loop completes, the last value is most likely still in @IDList. Code section 5 checks the length of @IDList and inserts the last value into the table variable. This technique should only be used on a small number of values. Chapter 15 will demonstrate another method to parse the string using XML. Query 6 uses @IDTable in a subquery to filter the Person.Person table.
Using a Temp Table or Table Variable Like an Array
An array is a collection of values used in many programming languages. T-SQL doesn’t have an array structure, but programmers sometimes use temp tables or table variables in the same manner as arrays. I often use this method in my administrative scripts to perform a backup or check the space used on each database on a server, for example. Listing 12-17 demonstrates how you might use a table variable like an array. Type in and execute the code to learn how to use this technique.
Listing 12-17. Using an Array
--1
SET NOCOUNT ON;
GO

--2
DECLARE @IDTable TABLE([Index] INT NOT NULL IDENTITY,
    ID INT);
DECLARE @RowCount INT;
DECLARE @ID INT;
DECLARE @Count INT = 1;

--3
INSERT INTO @IDTable(ID)
VALUES(500),(333),(200),(999);

--4
SELECT @RowCount = COUNT(*)
FROM @IDTable;

--5
WHILE @Count <= @RowCount BEGIN
    --5.1
    SELECT @ID = ID
    FROM @IDTable
    WHERE [Index] = @Count;
    --5.2
    PRINT CAST(@COUNT AS VARCHAR) + ': ' + CAST(@ID AS VARCHAR);
    --5.3
    SET @Count += 1;
END;
Figure 12-15 shows the results of running this code. Statement 1 sets the NOCOUNT property to ON. This will remove the messages showing how many each statement affects. In this case, the messages just get in the way. Code section 2 declares the variables used in this example. The table variable, @IDTable, contains an identity column called ArrayIndex. See Chapter 10 for more information about identity columns. Statement 3 populates @IDTable with several values. Because the database engine populates the INDEX column automatically, you now have a two-dimensional “array.” Statement 4 populates the @RowCount variable with the number of rows in @IDTable. Code section 5 is a WHILE loop that runs once for each row in @IDTable. During each iteration of the loop, statement 5.1 sets the value of @ID with the ID column from @IDTable corresponding to the ArrayIndex column matching @Count. Statement 5.2 prints the @Count and @ID values, but you could do whatever you need to do instead of just printing the values. Statement 5.3 increments the @Count.
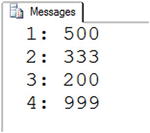
Figure 12-15. The results of using an array
Temp tables and table variables are just more tools in your T-SQL tool belt, but use them wisely.
Using a Cursor
Another way to loop through a result set is by using a cursor. This is a very controversial topic, especially for beginners. Developers frequently overuse cursors and end up writing poorly performing code, because when writing procedural code, you expect to go row by row. I’ll cover cursors so that you are familiar with them and so that you understand the example in the “Thinking About Performance” section. Type in and execute the code from Listing 12-18, which shows a simple example.
Listing 12-18. Using a Cursor
--1
DECLARE @ProductID INT;
DECLARE @Name NVARCHAR(25);

--2
DECLARE products CURSOR FAST_FORWARD FOR
    SELECT ProductID, Name
    FROM Production.Product;

--3
OPEN products;

--4
FETCH NEXT FROM products INTO @ProductID, @Name;

--5
WHILE @@FETCH_STATUS = 0 BEGIN
    --5.1
    PRINT @ProductID;
    PRINT @Name;
    --5.2
    FETCH NEXT FROM products INTO @ProductID, @Name;
END

--6
CLOSE products;
DEALLOCATE products;
Figure 12-16 shows the results of running this code. Code section 1 declares variables that will be used later in the code. Statement 2 declares the cursor. The cursor must have a name and a SELECT statement. I included the option FAST_FORWARD to improve the performance. This option means that the cursor is read-only and you can only go forward in the data, not backward. See Books Online if you are interested in learning more about cursor options.

Figure 12-16. The partial results of using a cursor
Statement 3 opens the cursor so that it is ready for access. Statement 4 reads the first row from the cursor into the variables. There must be one variable for each column selected in the cursor definition. The WHILE loop checks the status of the last read of the cursor. As long as the value is zero, the loop continues. Section 5.1 prints out the variables, but you could do anything you need to do at this point. Statement 5.2 is very important; it reads the next row. Without statement 5.2, the WHILE loop would continue indefinitely. Finally, section 6 cleans up the cursor. Cursors are another tool at your disposal, but use them only when another better-performing option is not available. Developers often use cursors to update one row at a time, which is usually a very bad idea.
Complete Exercise 12-4 to practice what you have learned about temporary tables and table variables.
Use the AdventureWorks database to complete this exercise. You can find the solutions at the end of the chapter.
- Create a temp table called #CustomerInfo that contains CustomerID (INT), FirstName, and LastName columns (NVARCHAR(50) for each one). Include CountOfSales (INT) and SumOfTotalDue (MONEY) columns. Populate the table with a query using the Sales.Customer, Person.Person, and Sales.SalesOrderHeader tables.
- Change the code written in question 1 to use a table variable instead of a temp table.
- Create a table variable with two integer columns, one of them an IDENTITY column. Use a WHILE loop to populate the table with 1,000 random integers using the following formula. Use a second WHILE loop to print the values from the table variable one by one.
CAST(RAND() * 10000 AS INT) + 1
Thinking About Performance
This chapter focuses on the logic features available in T-SQL instead of retrieving or updating data. Depending on the task at hand, you may or may not need to use this functionality. Often you may need to write or support very complex T-SQL scripts that run once each night. The performance of these scripts is not as critical as that of the performance of T-SQL code in an application or a report, but over time you may have to rewrite several to perform better. For example, a programmer from a software vendor writes a custom program that creates a denormalized table of information from a financial system. That table is needed by many other systems in the enterprise. The program as originally written takes more than an hour to run. Luckily, you have access to the original source code and find that the program populated this table one row and one column at a time. Another way of writing the code and having it run much faster is by using a set-based approach and inserting or updating all the rows at once from each source table instead of one row at a time.
The following example compares two ways to solve a typical problem. The first uses a cursor solution and the second a set-based approach. The requirements are to calculate sales totals by order year, order month, and TerritoryID. The report must also show the total sales for the previous month in the same row. Every territory, year, and month possible must appear on the report even if there are no sales for a particular combination. To save typing, you might want to download the code from this book’s page at www.apress.com. Listing 12-19 uses a cursor and two nested WHILE loops to create a temp table with the totals. On my laptop, the code took 19 seconds to run.
Listing 12-19. Using a Cursor to Populate a Report
DECLARE @Year INT;
DECLARE @Month INT;
DECLARE @TerritoryID INT;
DECLARE @Total MONEY;
DECLARE @PreviousTotal MONEY;
DECLARE @FirstYear INT;
DECLARE @LastYear INT;
DECLARE @BeginDate DATETIME;
DECLARE @EndDate DATETIME;

--Create a table to hold the results
CREATE TABLE #Totals(OrderYear INT, OrderMonth INT,
    TerritoryID INT, TotalSales MONEY,
    PreviousSales MONEY);

--Grab the first and last years from the sales
SELECT @FirstYear = MIN(YEAR(OrderDate)),
    @LastYear = MAX(YEAR(OrderDate))
FROM Sales.SalesOrderHeader;

--Here we declare the cursor
DECLARE Territory CURSOR FAST_FORWARD FOR
    SELECT TerritoryID
    FROM Sales.SalesTerritory;

--Open the cursor
OPEN Territory;
--Save the values of the first row in variables
FETCH NEXT FROM Territory INTO @TerritoryID;
WHILE @@FETCH_STATUS = 0 BEGIN
    SET @Year = @FirstYear;
    --loop once for every year
    WHILE @Year <= @LastYear BEGIN
        --loop once for each month
        SET @Month = 1;
        WHILE @Month <= 12 BEGIN
            --find the beginning or end of the month
            SET @BeginDate = CAST(@Year AS VARCHAR) + '/' +
                CAST(@Month AS VARCHAR) + '/1';
            SET @EndDate = DATEADD(M,1,@BeginDate);
            --reset the total
            SET @Total = 0;
            --save the current value in the variable
            SELECT @Total = SUM(LineTotal)
            FROM Sales.SalesOrderDetail AS SOD
            INNER JOIN Sales.SalesOrderHeader AS SOH
            ON SOD.SalesOrderID = SOH.SalesOrderID
            WHERE TerritoryID = @TerritoryID
                AND OrderDate >= @BeginDate AND OrderDate < @EndDate;
            --set variables for this month
            SET @PreviousTotal = 0;
            SET @EndDate = @BeginDate;
            SET @BeginDate = DATEADD(M,-1,@BeginDate);

            --save the previous total
            SELECT @PreviousTotal = SUM(LineTotal)
            FROM Sales.SalesOrderDetail AS SOD
            INNER JOIN Sales.SalesOrderHeader AS SOH
            ON SOD.SalesOrderID = SOH.SalesOrderID
            WHERE TerritoryID = @TerritoryID
               AND OrderDate >= @BeginDate AND OrderDate < @EndDate;

            --insert the values
            INSERT INTO #Totals(TerritoryID, OrderYear,
            OrderMonth,TotalSales, PreviousSales)
            SELECT @TerritoryID, @Year, @Month,
            ISNULL(@Total,0), ISNULL(@PreviousTotal,0);

            SET @Month +=1;
        END; -- Month loop
        SET @Year += 1;
    END; -- Year Loop
    FETCH NEXT FROM Territory INTO @TerritoryID;
END; -- Territory cursor
CLOSE Territory;
DEALLOCATE Territory;

SELECT OrderYear, OrderMonth, TerritoryID,
    TotalSales, PreviousSales
FROM #Totals
WHERE TotalSales <> 0
ORDER BY OrderYear, OrderMonth, TerritoryID;

DROP TABLE #Totals;
The code in Listing 12-19 uses a cursor-based approach to populate a temp table for the report. The code creates a cursor that loops through the TerritoryID values. Inside the cursor loop, a WHILE loop of months is nested inside a WHILE loop of possible years. The code performs the calculations and inserts a row within the innermost loop. Finally, after the loops complete, a statement displays the results. This code actually performs better than some other code I have seen. It is not unusual to see code that not only loops through the territories but also loops through all the individual sales. Now try the example in Listing 12-20, which produces the same results much faster using a technique you learned in Chapter 8.
Listing 12-20. Producing the Report Without a Cursor
SELECT YEAR(OrderDate) AS OrderYear,
    MONTH(OrderDate) AS OrderMonth,
        TerritoryID,
        SUM(LineTotal) AS TotalSales,
        LAG(SUM(TotalDue),1,0)
            OVER(PARTITION BY TerritoryID
            ORDER BY YEAR(OrderDate),MONTH(OrderDate)) AS PreviousSales
FROM Sales.SalesOrderHeader AS SOH
JOIN Sales.SalesOrderDetail AS SOD
ON SOH.SalesOrderID = SOD.SalesOrderID
GROUP BY YEAR(OrderDate),
    MONTH(OrderDate), TerritoryID
    ORDER BY OrderYear, OrderMonth, TerritoryID;
Listing 12-20 uses the LAG function introduced to you in Chapter 8.
The point of this example is to show that most of the time a set-based approach can be found and is more efficient. It may take more practice and experience before you come up with this solution, but the more you work with T-SQL, the better you will get.
Summary
If you know one programming language, you will probably find the second and third languages even easier to learn because the logic is very similar. You will generally have ways to execute or avoid executing lines of code based on certain criteria. You will have ways to repeatedly execute lines code of code by looping. Whether or not you decide to implement this logic in T-SQL scripts will depend on the design of your application, the standards in your shop, or what works best for the problem at hand.
This chapter covered using variables, conditional logic, looping, and temporary table structures. In Chapter 13, you will use some of what you learned to trap errors in transactions. In Chapter 14, you will use what you have learned in this chapter to create stored procedures, user-defined functions, and more.
Answers to the Exercises
This section provides solutions to the exercises found on programming logic.
Solutions to Exercise 12-1: Variables
Use the AdventureWorks database to complete this exercise.
- Write a script that declares an integer variable called @myInt. Assign 10 to the variable, and then print it.
DECLARE @myInt INT = 10;
PRINT @myInt; - Write a script that declares a VARCHAR(20) variable called @myString. Assign 'This is a test' to the variable, and print it.
DECLARE @myString VARCHAR(20) = 'This is a test';
PRINT @myString; - Write a script that declares two integer variables called @MaxID and @MinID. Use the variables to print the highest and lowest SalesOrderID values from the Sales.SalesOrderHeader table.
DECLARE @MaxID INT, @MinID INT;
SELECT @MaxID = MAX(SalesOrderID),
    @MinID = MIN(SalesOrderID)
FROM Sales.SalesOrderHeader;
PRINT CONCAT('Max: ', @MaxID);
PRINT CONCAT('Min: ', @MinID); - Write a script that declares an integer variable called @ID. Assign the value 70000 to the variable. Use the variable in a SELECT statement that returns all the rows from the Sales.SalesOrderHeader table that have a SalesOrderID greater than the value of the variable.
DECLARE @ID INT = 70000;
SELECT SalesOrderID
FROM Sales.SalesOrderHeader
WHERE SalesOrderID > @ID; - Write a script that declares three variables, one integer variable called @ID, an NVARCHAR(50) variable called @FirstName, and an NVARCHAR(50) variable called @LastName. Use a SELECT statement to set the value of the variables with the row from the Person.Person table with BusinessEntityID = 1. Print a statement in the “BusinessEntityID: FirstName LastName” format.
DECLARE @ID INT, @FirstName NVARCHAR(50),
    @LastName NVARCHAR(50);

SELECT @ID = BusinessEntityID,
    @FirstName = FirstName,
    @LastName = LastName
FROM Person.Person
WHERE BusinessEntityID = 1;

PRINT CONVERT(NVARCHAR,@ID) + ': ' + @FirstName + ' ' + @LastName; - Write a script that declares an integer variable called @SalesCount. Set the value of the variable to the total count of sales in the Sales.SalesOrderHeader table. Use the variable in a SELECT statement that shows the difference between the @SalesCount and the count of sales by customer.
DECLARE @SalesCount INT;
SELECT @SalesCount = COUNT(*)
FROM Sales.SalesOrderHeader;

SELECT @SalesCount - COUNT(*) AS CustCountDiff,
    CustomerID
FROM Sales.SalesOrderHeader
GROUP BY CustomerID;
Solutions to Exercise 12-2: The IF . . . ELSE Construct
- Write a batch that declares an integer variable called @Count to save the count of all the Sales.SalesOrderDetail records. Add an IF block that prints “Over 100,000” if the value exceeds 100,000. Otherwise, print “100,000 or less.”
DECLARE @Count INT;
SELECT @Count = COUNT(*)
FROM Sales.SalesOrderDetail;

IF @Count > 100000 BEGIN
    PRINT 'Over 100,000';
END
ELSE BEGIN
    PRINT '100,000 or less.';
END; - Write a batch that contains nested IF blocks. The outer block should check to see whether the month is October or November. If that is the case, print “The month is ” and the month name. The inner block should check to see whether the year is even or odd and print the result. You can modify the month to check to make sure the inner block fires.
IF MONTH(GETDATE()) IN (10,11) BEGIN
    PRINT 'The month is ' +
        DATENAME(mm, GETDATE());
    IF YEAR(GETDATE()) % 2 = 0 BEGIN
        PRINT 'The year is even.';
    END
    ELSE BEGIN
        PRINT 'The year is odd.';
    END
END; - Write a batch that uses IF EXISTS to check to see whether there is a row in the Sales.SalesOrderHeader table that has SalesOrderID = 1. Print “There is a SalesOrderID = 1” or “There is not a SalesOrderID = 1” depending on the result.
IF EXISTS(SELECT * FROM Sales.SalesOrderHeader
          WHERE SalesOrderID = 1) BEGIN
    PRINT 'There is a SalesOrderID = 1';
END
ELSE BEGIN
    PRINT 'There is not a SalesOrderID = 1';
END;
Solutions to Exercise 12-3: WHILE
Use the AdventureWorks database to complete this exercise.
- Write a script that contains a WHILE loop that prints out the letters A to Z. Use the function CHAR to change a number to a letter. Start the loop with the value 65.
DECLARE @Letter CHAR(1);
SET @Letter = CHAR(65);
PRINT @Letter;

DECLARE @Count INT = 65;
WHILE @Count < 91 BEGIN
    PRINT CHAR(@Count);
    SET @Count += 1;
END; - Write a script that contains a WHILE loop nested inside another WHILE loop. The counter for the outer loop should count up from 1 to 100. The counter for the inner loop should count up from 1 to 5. Print the product of the two counters inside the inner loop.
DECLARE @i INT = 1;
DECLARE @j INT;

WHILE @i <= 100 BEGIN
    SET @j = 1;
    WHILE @j <= 5 BEGIN
        PRINT @i * @j;
        SET @j += 1;
    END;
    SET @i += 1;
END; - Change the script in question 2 so the inner loop exits instead of printing when the counter for the outer loop is evenly divisible by 5.
DECLARE @i INTEGER = 1;
DECLARE @j INTEGER;
WHILE @i <= 100 BEGIN
    SET @j = 1;
    WHILE @j <= 5 BEGIN
        IF @i % 5 = 0 BEGIN
            PRINT 'Breaking out of loop.'
            BREAK;
        END;
        PRINT @i * @j;
        SET @j += 1;
    END;
    SET @i += 1;
END; - Write a script that contains a WHILE loop that counts up from 1 to 100. Print “Odd” or “Even” depending on the value of the counter.
DECLARE @Count INT = 1;
WHILE @Count <= 100 BEGIN
    IF @Count % 2 = 0 BEGIN
        PRINT 'Even';
    END
    ELSE BEGIN
        PRINT 'Odd';
    END
    SET @Count += 1;
END;
Solutions to Exercise 12-4: Temporary Tables and Table Variables
Use the AdventureWorks database to complete this exercise. You can find the solutions at the end of the chapter.
- Create a temp table called #CustomerInfo that contains CustomerID (INT), FirstName, and LastName columns (NVARCHAR(50) for each one). Include CountOfSales (INT) and SumOfTotalDue (MONEY) columns. Populate the table with a query using the Sales.Customer, Person.Person, and Sales.SalesOrderHeader tables.
CREATE TABLE #CustomerInfo(
    CustomerID INT, FirstName NVARCHAR(50),
    LastName NVARCHAR(50),CountOfSales INT,
    SumOfTotalDue MONEY);
GO
INSERT INTO #CustomerInfo(CustomerID,FirstName,LastName,
    CountOfSales, SumOfTotalDue)
SELECT C.CustomerID, FirstName, LastName,COUNT(*),SUM(TotalDue)
FROM Sales.Customer AS C
INNER JOIN Person.Person AS P ON C.CustomerID = P.BusinessEntityID
INNER JOIN Sales.SalesOrderHeader
    AS SOH ON C.CustomerID = SOH.CustomerID
GROUP BY C.CustomerID, FirstName, LastName; - Change the code written in question 1 to use a table variable instead of a temp table.
DECLARE @CustomerInfo TABLE (
    CustomerID INT, FirstName VARCHAR(50),
    LastName VARCHAR(50),CountOfSales INT,
    SumOfTotalDue MONEY);
INSERT INTO @CustomerInfo(CustomerID,
    FirstName, LastName,
    CountOfSales, SumOfTotalDue)

SELECT C.CustomerID, FirstName,
    LastName,COUNT(*),SUM(TotalDue)
FROM Sales.Customer AS C
INNER JOIN Person.Person AS P
    ON C.CustomerID = P.BusinessEntityID
INNER JOIN Sales.SalesOrderHeader
    AS SOH ON C.CustomerID = SOH.CustomerID
GROUP BY C.CustomerID, FirstName, LastName; - Create a table variable with two integer columns, one of them an IDENTITY column. Use a WHILE loop to populate the table with 1,000 random integers using the following formula. Use a second WHILE loop to print the values from the table variable one by one.
CAST(RAND() * 10000 AS INT) + 1Here’s a possible solution:
DECLARE @test TABLE (ID INTEGER NOT NULL IDENTITY, Random INT)
DECLARE @Count INT = 1;
DECLARE @Value INT;

WHILE @Count <= 1000 BEGIN
    SET @Value = CAST(RAND()*10000 AS INT) + 1;
    INSERT INTO @test(Random)
    VALUES(@Value);
    SET @Count += 1;
END;
SET @Count = 1;
WHILE @Count <= 1000 BEGIN
    SELECT @Value = Random
    FROM @test
    WHERE ID = @Count;
    PRINT @Value;
    SET @Count += 1;
END;