STILL LIFE

Still life is a unique genre that allows the curious artist to explore arrangements, textures, and colors in a variety of inanimate objects. The style originated in the Middle Ages, and paintings often carried symbolic meanings. Still life has evolved into a wide range of interpretations and has become a popular subject for sketching and journaling. Is there a better way to cherish memories than using your journal to draw objects, write notes, create colors, or include anything that inspires you?
In this chapter, I invite you to join me on a trip to Paris and create an inky map while learning new techniques. We’ll discover how to draw a pomegranate without painting every seed, and I’ll share my secrets for drawing my favorite dessert. Grab your inks and imagination, and let’s dive in!

LESSON: PARIS MAP

Let’s create a stylized map of Paris depicting the most enchanting sites that are my favorite places to visit. Choose any place you love, and even if you’ve never been there, I’m sure your imagination is fueled with scenes from books, films, and photos to create fantastic artwork.
1 Print a map from the Internet, photocopy a map, or draw your own. Place it on a light table or window and put a sheet of Bristol paper over it (both sheets can be secured with low-tack tape). With pencil, trace the most significant landmarks of the map (your map doesn’t have to be topographically correct). For this map of Paris I included the Seine river, a few major roads, and the Louvre Museum, Eiffel Tower, Moulin Rouge, Sacré-Cœur Basilica, Notre-Dame Cathedral, Musée d’Orsay, and Pompidou Centre. Draw simplified icons that represent the places on the list.

2 Cover all the main roads and landmarks with masking fluid using an old brush or a fine-tip applicator. This will protect these areas from ink. Allow the fluid to dry.

3 Pour purple ink onto a palette and dab a sponge dauber into it. I mixed purple with white to get a light purple hue. I also didn’t mix them thoroughly, which resulted in an uneven color and visual texture. Cover the entire map, making sure to pounce the sponge straight down on the paper. Apply color a few times to achieve the desired density of the marks. Try adding color with brushes and paper towels as well. Allow the ink to dry.

4 Apply a light wash of the same color from step 3 over the map with the mop brush, completely filling out the silhouette. Allow the layers to dry.

5 Remove the masking fluid by rubbing it away gently with your fingers. You can also remove it with a rubber cement eraser, but I wanted to keep the pencil marks, since they’ll be handy for inking the lettering and landmarks. Paint the river with ultramarine, using the size 6 round brush. Avoid painting the bridges for now.

6 Ink the landmarks in red with the size 3 round brush. Paint small geolocation signs at some of the landmarks. Add other related icons; I included a croissant and a café table and chairs. Paint a wind rose in red with the same brush adding an “N” indicating north. (A wind rose is also known as a compass rose or a rose of the wind. All show the cardinal directions: north, south, east, and west.) Allow the ink to dry.

7 Create a pastel mint color by mixing green and white. This provides a nice contrast to the main map colors. Use the size 2 round brush to paint several areas of greenery around the map indicating parks and supporting the design of the city.
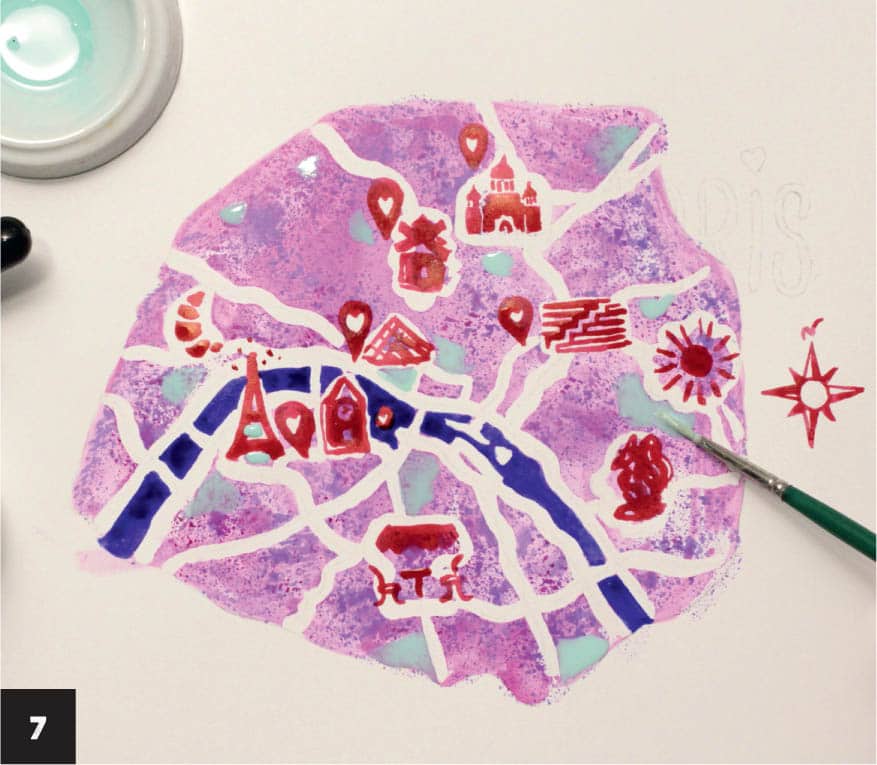
8 Letter the name of the city and places of interest with Prussian blue, or any dark opaque color, and the size 2 round brush. Use your print handwriting, which will make the map look personal and authentic.

9 Apply a second layer of ink in areas you want to be more opaque or darker and touch up any details. Make sure you included all the elements you wanted. Fill in empty spaces with tiny people or additional labels. You can scan your map and use it as a postcard or poster.

LESSON: POMEGRANATE

Looking at pomegranates, you might wonder how it’s possible to draw that many seeds. Have no doubt—it’s much easier than you think. This ancient beauty is created with a minimalistic modern approach that preserves the ruby glow. The secret lies in the limited color combination and the grouping of shapes.
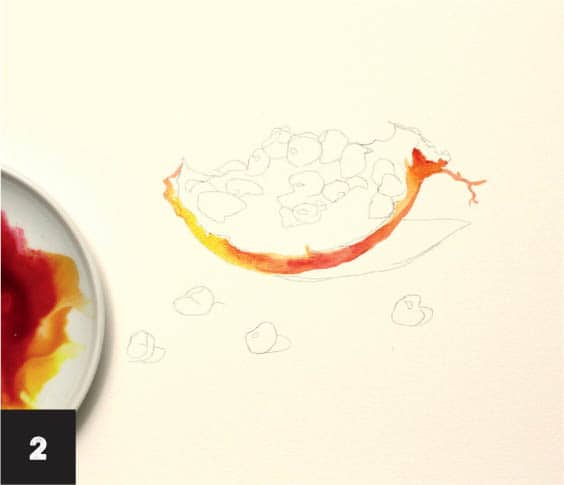
1 Create a brilliant orange-red for the outside of the pomegranate. I find that a 60:40 mix of carmine and warm yellow is perfect for inking fruits, berries, and flowers. Try mixing some reds and oranges you already have in various proportions to get a lustrous combination.
2 Ink the rind with the size 6 round brush, changing the coloration of the mix directly on the paper by turning it into a gradient (see here). Since the pomegranate’s peel has an uneven color, create a mixed gradient. Make the color darker closer to the tip. Use a smaller size 3 brush to make finer lines.
3 Paint the large areas of the pulp membranes with light yellow, using the size 6 round brush. Paint around where the groups of seeds will be, leaving the white of the paper, and don’t worry about the direction of the strokes. The membrane has a matte texture to it, so even irregular strokes and marks will look appropriate. There should be a strong contrast between the rind and the pulp. Darken the rind by adding another layer of the orange-red mix from step 1.
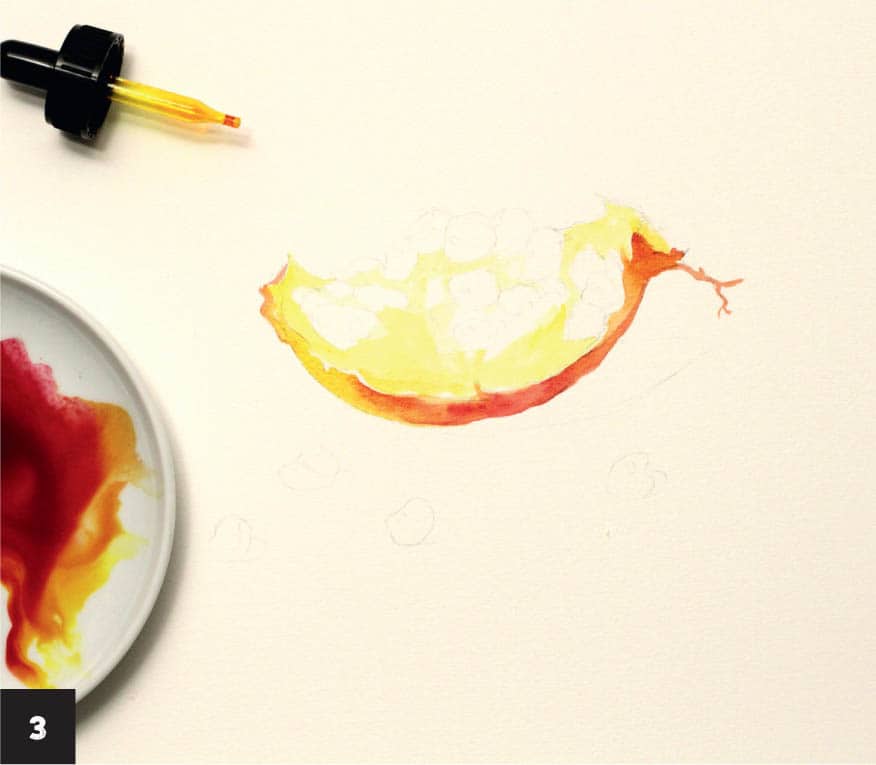
4 Painting the seeds is quite easy. Paint oval seeds using a diluted carmine wash (4A). Using the size 6 round brush, cover the white space left in step 3, but don’t fill it completely. Imagine you’re inking small groups of seeds that look like spots of ink, not separate seeds. Be sure to leave some white highlights here and there on the seeds (4B).
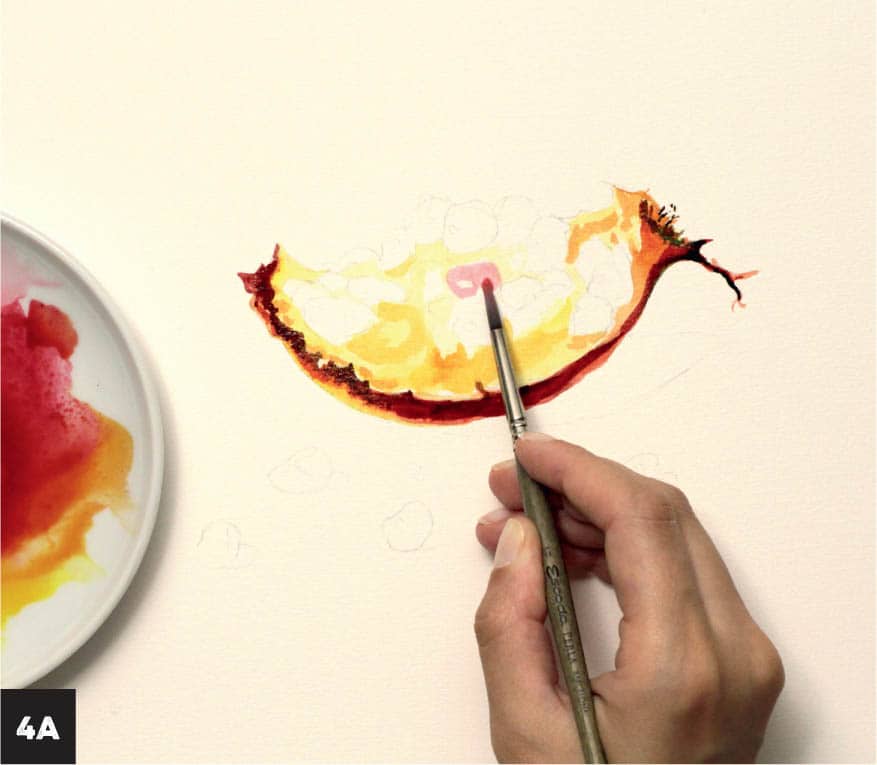

5 While the ink is still wet, load the size 3 round brush with undiluted carmine and dab it on the seed in various spots, creating the illusion of three-dimensional shapes. Maintain the white areas as highlights.

6 Once the rind has dried completely, create a shadow underneath the pomegranate using the size 6 round brush. Add a small amount of green to the carmine wash and paint a semioval under the fruit, adding a lot of water. Note that the shadow should be darker near the subject and slightly dissolve farther away.

7 While the shadow dries, ink some scattered seeds. Repeat steps 4 and 5, starting with a light wash and dabbing darker ink around the white highlights to sculpt the shape of the seeds. Add a light angled shadow under each seed. Allow the ink to dry.

8 Intensify the shadows by adding a small amount of green to carmine in a 30:70 mix, adjusting it according to the intensity of the inks. Test a few versions on a separate sheet of paper first. Use the size 3 round brush and apply just a bit of this color on the shadows, seeds, around the highlights, and on the edges of the rind.

9 Intensify the shadow under the pomegranate with the mix from the previous step to add the feeling of space. If the edges are too sharp, blend them with clean water and a synthetic brush. These brushes have stiffer bristles, which allow you to lift and mix pigment better than natural brushes.

LESSON: CAFÉ DESSERT

My favorite dessert is Pavlova, a meringue dessert named after the famous Russian ballerina from St. Petersburg, which is my hometown. You’ll paint this meringue while learning new ways of inking white space and adding special effects to create the look of powdered sugar.
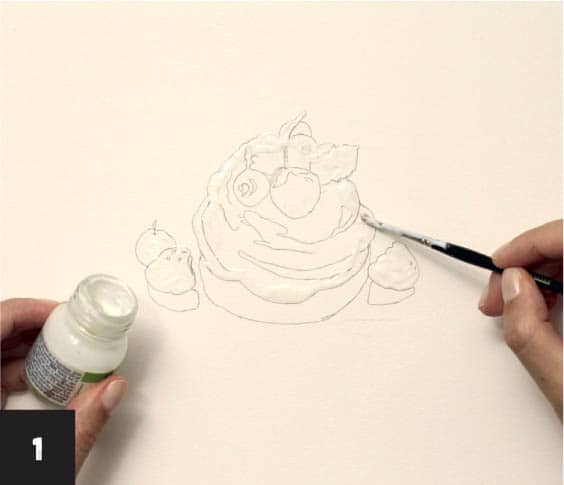
1 Using the template, a reference image, or your imagination, create a pencil sketch of a Pavlova. An effective way to create a vivid illustration with a lot of white, like this one, is to place it on a brilliant background. Apply masking fluid with an old brush on the edges of the dessert and the fruit around it, protecting the white areas. Allow the masking fluid to dry. Alternatively, you can use another negative painting technique (see here).
2 Load the mop brush with water and turquoise ink and paint a background with a few large circular brushstrokes, forming a round shape. Since the masking fluid is protecting the edges, you’ll see the outline of the dessert clearly.

3 While the turquoise background is still wet, add a shadow under the Pavlova and the fruit around it using the size 6 round brush with a neutral tint or any dark color. The wet-on-wet technique provides a smooth effect, but be sure to use a small amount of ink to avoid having the color bleed into the background.

4 Sculpt the shadow edge by sweeping the same round brush from edge to edge. To remove excessive ink or water, blot the brush with a paper towel and repeat the sweeping technique.

5 Remove the masking fluid with your fingers or a rubber cement eraser and start sculpting the meringue shape. Add brushstrokes to the dessert to create a three-dimensional form, using a light wash of neutral tint. With horizontal strokes and the size 6 round brush, paint shadows on the underlayers of the meringue, leaving the top parts white as highlights. The outlines of the shadows are indicated on the template, but you can ink just a few to get a general impression of value. Use a lighter wash on top of the meringue and create a wash that’s twice as dark for areas closer to the base.

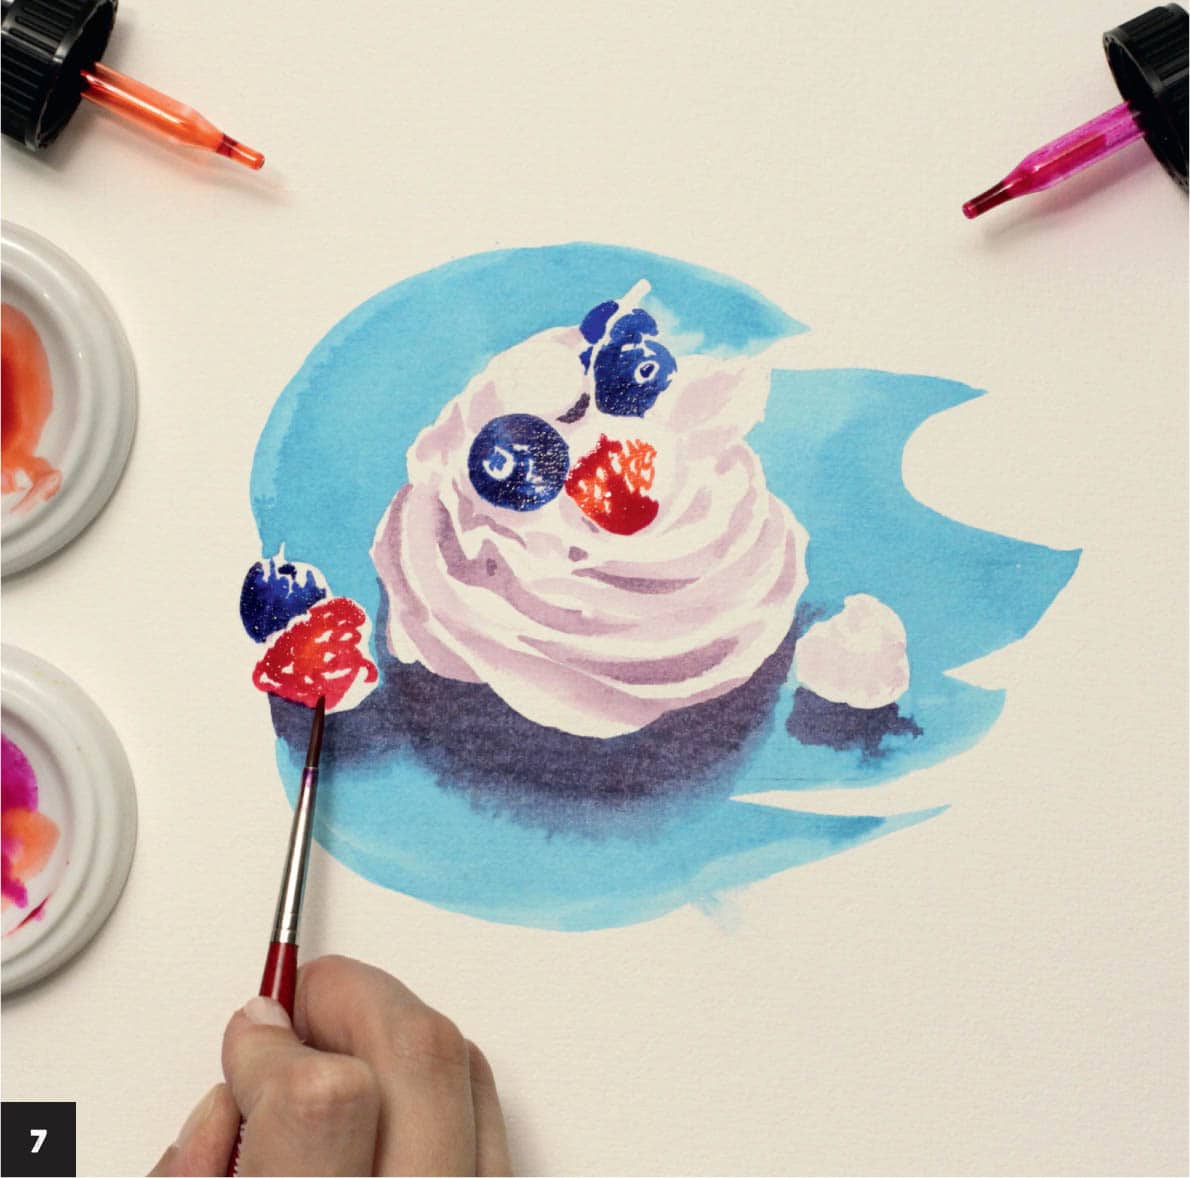
6 Load the size 3 round brush with cobalt and ink the blueberries. Create highlights by leaving small areas of white paper showing on the berries, imagining where a light source would be. Create shadows close to the edges by applying the second layer of undiluted cobalt ink on the opposite side of the highlights. Make the berries more realistic (even on a small scale) by leaving a small oval area at the top white.

7 Ink the remainder of the berries using a 1:1 mix of scarlet and purple, or any vivid red shade. Leave tiny white dots on the raspberries (the white paper) to bolster the shapes and create shadows by adding green or blue ink to the edges.
8 Load the size 6 round brush with yellow-green and paint a leaf on top of the Pavlova. Add final touches, including refining the shadows and highlights, unifying the artwork. Allow the ink to dry.
Add the look of powdered sugar with ink and the spatter technique (see here)—my favorite part. Load the size 3 round brush with white ink and snap the brush against your finger. Tiny sparkles of white ink will fill the page, turning the image into a lively illustration.
