
ANIMALS AND BIRDS

In this chapter, you’ll explore the fascinating world of creatures who live above ground. Birds, butterflies, and animals living in trees symbolize traveling to other realms. What could be more inspiring for an artist?
In these lessons the focus will be on essential elements such as combining colors, creating the look of fur with ink, painting vibrant feathers, depicting expressive eyes, and simplifying details to create a unified impression. You’ll create vibrant artwork in just a few steps using simple shapes that catch the viewer’s attention. Let’s take off!
LESSON: BUTTERFLY

Painting butterflies in ink can be a fun, creative exercise because you can invent your own patterns and use imaginative, brilliant colors. In this lesson, you’ll create a morpho butterfly with open wings using three hues of blue: cobalt, ultramarine, and turquoise. Throughout the process, you’ll discover how combining three similar colors creates an alluring and dazzling effect.
1 Using the template, another reference, or your imagination, draw a simple butterfly outline with pencil (it can be any size you’re comfortable working with). Color the butterfly using the wet-on-wet technique (see here): Brush clean water on the right wing and, while the paper is still wet, apply a light layer of turquoise ink with the size 6 round brush.

2 While the paper is still wet, dab the same brush into cobalt ink and paint the edge of the wing. This creates a gradient and the inks will mix directly on the paper. Slightly wet the brush with clean water and smooth the borders between the colors.

3 Repeat step 2, using ultramarine ink and the same brush. Brush ink only at the edges and smudge it with a slightly wet larger brush to create a seamless color transition.

4 Repeat steps 1 through 3 on the left wing. Let your brush fly! Add a few strokes here and there to create a hint of the veins in the wings. Continue working on a slightly damp surface to maintain a unified look.
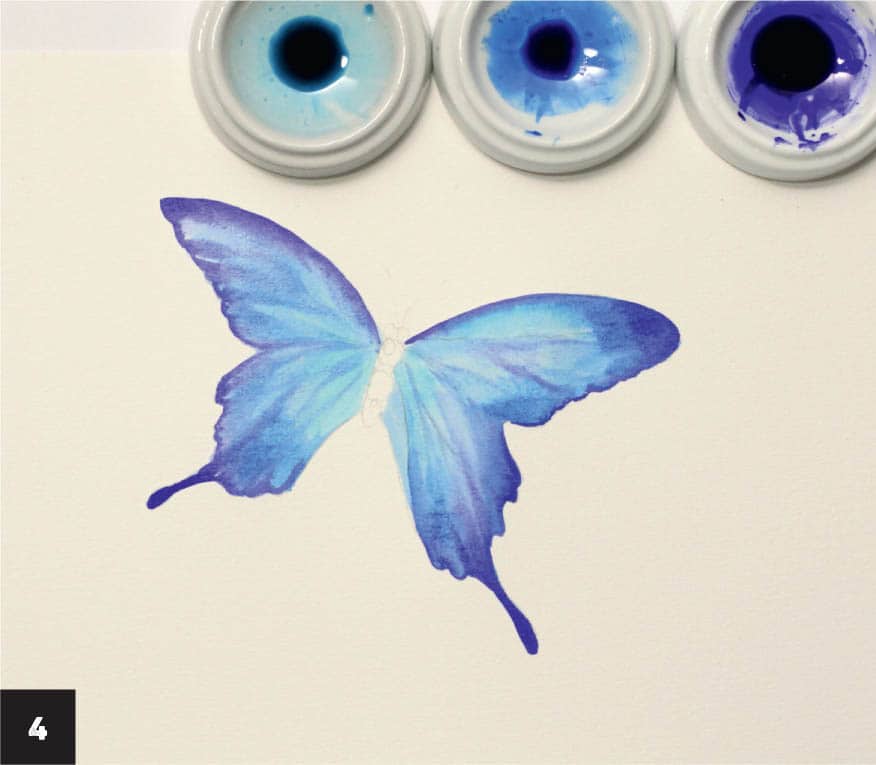
5 Color the butterfly’s body with warm yellow, which provides a nice contrast with the blue wings. Use the size 3 round brush for better control while painting small areas.

6 Add the illusion of depth. Mix yellow with any darker color you’ve been using and ink two long triangular shapes near the body and inner sides of the hind wings to support and contrast some edges.

7 Lightly outline a few veins in the wings with yellow, using the size 3 round brush. The color will optically mix with blue and create more interest (see finished image, opposite page). If you’re not sure about how this mix will turn out, do an optical mixing exercise (see here).
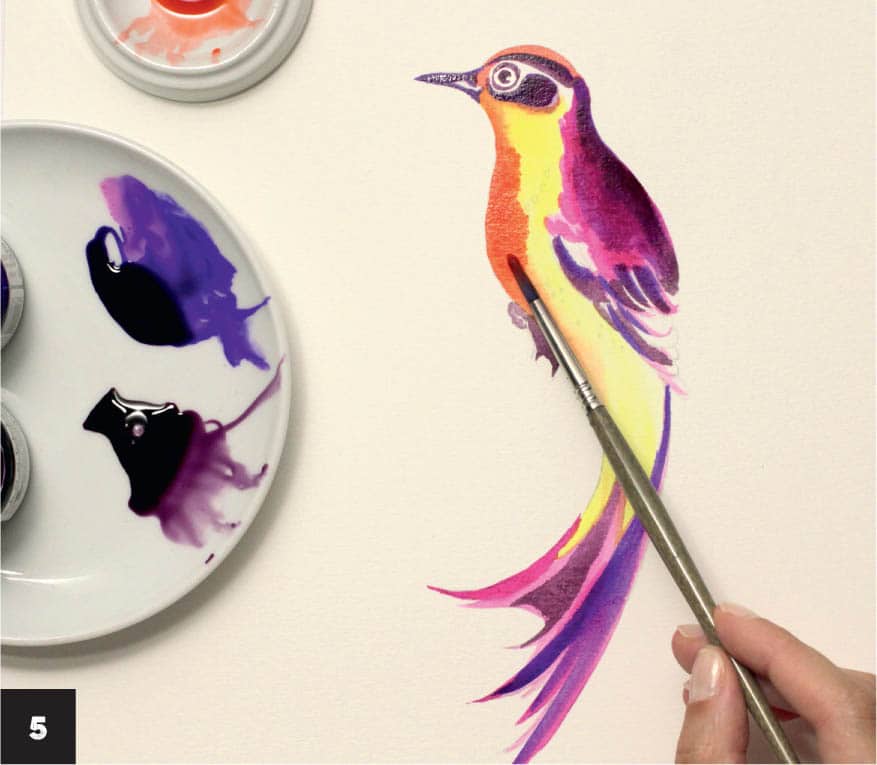
LESSON: COLORFUL BIRD

Are you fascinated by a particular owl, peacock, nightingale, or sparrow? If so, don’t let the complexity of feathers and details stop you from painting them. Use anatomical diagrams that show the crown, forehead, beak, eye, wing, breast, leg, back, and tail or draw your own imaginary winged creature.
The secret technique of depicting a bird is dividing the image into simple shapes and inking them separately, creating a unified impression. The feathers can be painted as simple strokes that suggest their downiness and volume. The cheerful and bright effect of a colorful bird can be achieved with as few as three to five colors.
1 Using the template, a reference image, or your imagination, sketch a real or imaginary bird with clearly defined shapes for the head, wings, and tail that will be inked. The most important part of the bird is the head, since its eyes make a connection with the viewer, so I defined the eye area by drawing a circle around it. Fill in the bird’s breast and lower tail feathers with warm yellow.

2 Add a bit of scarlet or orange on the edge of the breast and the head while the yellow ink is still wet using the size 6 round brush. A gradient will emerge. Working with analogous colors on a large area is an effective strategy. Ink areas of the wings, tail, and crown with purple.

3 Define the crown area, beak, and a few feathers with violet using the size 3 round brush. Try making uneven brushstrokes to suggest depth. Diluting the inks with water will enrich the tonal values. Be sure to leave some white showing on the wing.

4 Define the sparkling eye and the areas around it with the size 3 round brush and a neutral tint that looks like faded violet. Add a few strokes here and there of that color on the tails and wing—don’t fill in the entire area. Use the neutral tint to define part of the foot.

5 If a color seems too subtle, wait until it dries completely and add a second layer. The more diluted the inks, the more layers the paper can absorb. Shellac ink can become glossy after applying a few layers, so if you don’t want that effect, plan ahead. Allow the ink to dry completely.
6 Paint half of the eye with yellow and the other half with carmine or orange, creating an impactful look. Use the size 3 round brush. Leaving white space around the eye helps visually organize the focus and draws the viewer to the most important area.

7 Prepare a mix of your darkest colors; I mixed violet and the neutral tint. Areas with the deepest colors attract attention and help the eye focus on them. This bird has a peculiar pattern that I scattered on the upper wing and supported with oval strokes on the feathers.
When the ink on the body is completely dry, add a few ovals and dots on the yellow area of the body. Vary the intensity and direction of the dots to create the illusion of depth.

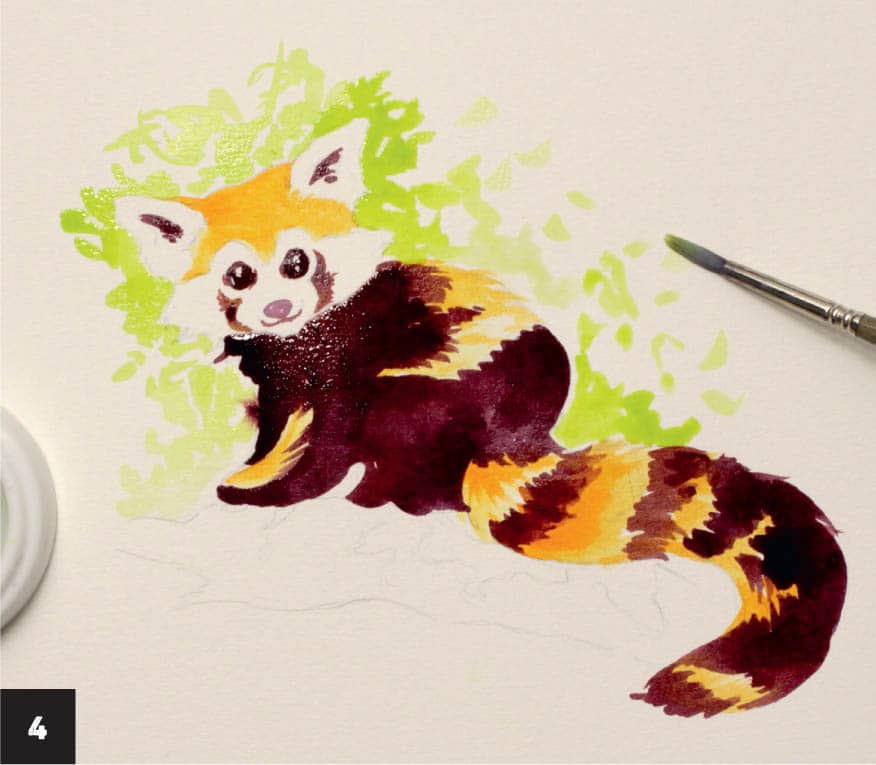
LESSON: RED PANDA

This adorable fluffy fellow is as fire-colored as a red fox and reminds me of both a raccoon and a big cat. In this lesson, you’ll draw an irresistible red panda. You’ll use just six colors and stylized shapes to capture the impression of this unique creature.
1 Using the template or your own drawing, sketch clearly defined areas of dark and light elements. To make the red panda recognizable, we need to pay special attention to its individual characteristics. The panda’s bushy tail has a few ochre rings; define them with orange or yellow, adding more than one layer if necessary, using the size 6 round brush. Keep in mind the direction of the fur as you paint. You don’t need to be precise, but this helps unify the artwork.

2 Combine sanguine with the neutral tint in a 70:30 mix and paint the eyes and the distinctive dark tear markings on the panda’s face. Use the size 3 round brush for better control of the ink. Define the nose with a lighter wash of the neutral tint to complete this adorable face.

3 Prepare a dark reddish mix of sanguine, neutral tint, and a bit of orange for the fluffy body and define general masses on other areas, such as the tail. Use the size 6 round brush. The red panda has long fur, so use a large brush and add enough color to show the thickness and volume. Add a few more marks on the ears and face with the same color, defining the markings that are similar to those of a raccoon.

4 Make several rough brushstrokes with yellow-green ink to create greenery around the head. The panda has a very light and rounded upper body with a few white areas and adding some green will make them stand out.
5 Define the tree branch using the size 6 round brush and inks from the previous mixes, such as sanguine with neutral tint for darker areas and yellow-green for lighter ones. Make a few brushstrokes that suggest texture. Focus on the face, because this has the most detail and is a focal point. The rest of the artwork supports the general impression of the piece, so it can be less detailed.

6 Further define the tear marks on the face and inner parts of the fluffy ears with a light wash of sanguine and the size 3 round brush.
