

Chapter 14 Operating System Interface and Environmental Control
14.1 System Options
14.1.1 Initialization Options
14.1.2 Data Processing Options
14.1.3 Saving SAS System Options
14.2 Using an AUTOEXEC Program
14.3 Using the Configuration File
14.3.1 Changing the SASAUTOS Location
14.3.2 Controlling DM Initialization
14.4 In the Display Manager
14.4.1 Showing Column Names in ViewTable
14.4.2 Using the DM Statement
14.4.3 Enhanced Editor Options and Shortcuts
14.4.4 Macro Abbreviations for the Enhanced Editor
14.4.5 Adding Tools to the Application Tool Bar
14.4.6 Adding Tools to Pull-Down and Pop-up Menus
14.4.7 Adding Tools to the KEYS List
14.5 Using SAS to Write and Send E-mails
14.6 Recovering Physical Location Information
14.6.1 Using the PATHNAME Function
14.6.2 SASHELP VIEWS and DICTIONARY Tables
14.6.3 Determining the Executing Program Name and Path
14.6.4 Retrieving the UNC (Universal Naming Convention) Path
Very often a significant portion of our use of SAS interfaces with the Operating System, OS. Fortunately there are a number of tools and techniques that can be used to help us make that interface smoother. Usually it is a matter of passing information between the OS and SAS. Other times it is helpful to be able to have SAS execute OS commands directly. Some of the techniques that I have found to be useful are included in this chapter.
An important interface that is not discussed in this chapter is SAS Enterprise Guide. This topic is thoroughly covered by Slaughter and Delwiche (2010). Other less frequently used interfaces, which are also not discussed in this chapter include: SAS/ASSIST, SAS Desktop, and SAS/INSIGHT.
MORE INFORMATION
A great deal of information on SAS’s interface with the operating system is available in various forms of metadata (see Section 13.8).
SEE ALSO
Peter Crawford (2006b) discusses a number of Display Manager techniques.
14.1 System Options
Most system options either control the SAS environment or they control the way that SAS interfaces with the operating system. While most of these options are fairly straightforward to use, you need to at least be aware of them. In addition some have proven to be especially useful. A few of the options that fall into one or more of these categories are included here.
14.1.1 Initialization Options
Initialization options are specified when SAS is invoked and usually along with the same script that calls the SAS execution file. Although initialization options are available for all operating systems, the syntax and application varies by OS. Most of the examples shown here are for the Windows OS; however, the implementation with other operating systems should be fairly straightforward.
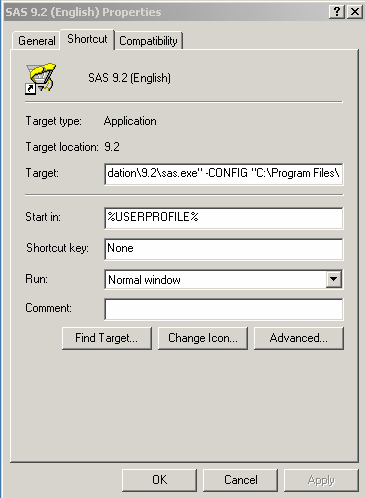
Under the Windows OS, when executing interactively, these options are declared on the target line of the properties of the SAS shortcut. The options themselves are preceded by a dash (-). Here the -CONFIG initialization option is specified on the TARGET line. Notice that all paths are enclosed in double quotes (double quotes are required by Microsoft for all paths that have any embedded blanks).
Most of the options shown in this section can also be specified in the configuration file (see Section 14.3).
SEE ALSO
Hurley (2007) introduces the use of initialization options.
The -SASINITIALFOLDER Option
This initialization option controls the default location that SAS first opens when the Display Manager brings a SAS program into the editor. Simply follow the option with the path to the desired folder.
-sasinitialfolder "folder location"
For the sample code associated with this book the -SASINITIALFOLDER option might contain:
-sasinitialfolder "C:InnovativeTechniquesSASCode"
The ‘Start In:’ location on the PROPERTIES dialog box has limited utility in this context. It can be used to designate the base path information, but not necessarily the location of the SAS code of interest.
The -SYSPARM Option
The -SYSPARM option is used to pass information into a SAS program where it can be accessed using the automatic macro variable &SYSPARM. Here a portion of a path is passed into the SAS session when SAS is initialized ![]()
![]()
![]()
![]()
-sysparm "c: emp" 
libname advrpt v9 ![]()
The -SPLASHLOC Option
This option is more fun than practical. It allows you to point to a bit mapped image, BMP file, that replaces the normal splash screen shown while SAS is being loaded. Instead of seeing the SAS logo, you can view a cute picture of your favorite dog, cat, or moose. Of course the image is not displayed for long. The only practical application that I have seen, other than on April 1, is for use with a specific tool or program that you want to identify visually.
The -AUTOEXEC Option
The -AUTOEXEC option identifies the path and name of a SAS program that is to be automatically executed when SAS is started (see Section 14.2). This program executes after the configuration file and can be extremely useful when setting up a SAS environment that is to be tailored for a specific application.
The -CONFIG Option
The -CONFIG option identifies the path and name of a SAS configuration file (see Section 14.3). This is not a SAS program, but is used during the initialization process to set up the base SAS environment. Many SAS installations restrict the modification of this file.
The -ALTLOG Option
Using this option you can write a separate copy of the LOG to a file of your choice. This becomes an alternative to using PROC PRINTTO.
The -SYSIN Option
When running SAS programs in batch mode, a specific SAS program can be named to be executed using the -SYSIN option. When you use this option, it becomes unnecessary to change
the location for the launching of SAS. You only need to specify the path to the program that is to be executed.
SEE ALSO
The sasCommunity.org article by Ron Fehd “Batch processing under Windows” has examples of the use of -SYSIN and other initialization options http://www.sascommunity.org/wiki/Batch_processing_under_Windows.
The -RTFCOLOR Option
I do not remember where I heard about this option and I have not found it documented, but it seems to work under Windows during an interactive session. Using this initialization option allows you to write your log to a RTF file with preserved colors (notes, warnings, and errors).
During your SAS session or from within your SAS program, issue a DM statement with the WRTFSAVE option. Alternatively you could issue the WRTFSAVE command from the command line when the LOG window is active.
DM 'log; WRTFSAVE "c: empmylog3.rtf"';
Even with -RTFCOLOR specified, logs generated with PROC PRINTTO and the -ALTLOG initialization option do not retain their color.
CAVEAT Use this option with care, do not write applications that depend on it, because this option is undocumented and there is no guarantee or even likelihood that it will continue to even exist, let alone be supported in future releases of SAS.
The -INITSTMT and -TERMSTMT Options
The -INITSTMT and -TERMSTMT options are generally used together, and provide a mechanism to automatically execute a SAS statement at the beginning and end of a SAS session. The -INITSTMT option designates a statement that is to execute immediately following the execution of the AUTOEXEC, while the -TERMSTMT option specifies a statement that will execute just before the session closes. When the SAS statement is a macro call, the entire macro is executed at the appropriate time.
Since macro variables are stored in memory, their values are not retained from one SAS session to the next. This example uses the -INITSTMT and -TERMSTMT options to save and restore macro variable values between SAS sessions. These options designate macro calls to %GETGLOBAL and %SAVEGLOBAL, both of which are autocall macros.
-initstmt='%getglobal' -termstmt='%saveglobal'
The %GETGLOBAL macro recovers the saved values from the data set ADVRPT.GLOBALVARS and uses the SYMPUTX routine to reestablish them as global macro variables. Because %GETGLOBAL macro definition is in the autocall library, which was established by the AUTOEXEC, the macro can be immediately executed by the -INITSTMT option.
%macro GetGlobal;
data _null_;
set advrpt.globalvars(where=(name ne 'PATH'));
call symputx(name,value,'g'),
run;
%mend getGlobal;
The %SAVEGLOBAL macro will be executed as the SAS session terminates. All macro variables currently defined with a scope of global are written to the data set ADVRPT.GLOBALVARS, where they will be available for the next SAS session. For interactive sessions the ENDSAS statement must be executed in order for the -TERMSTMT option to be triggered.
%macro SaveGlobal;
data advrpt.GlobalVars(keep=name value);
set sashelp.vmacro(where=(scope='GLOBAL'));
run;
%mend saveglobal;
The -NOWORKINIT and -NOWORKTERM Options
By default the WORK location is initialized at the start of the SAS session and is cleared at the end of the SAS session. Usually this is exactly what you want to have happen; however, occasionally you may want to maintain the WORK location across SAS sessions. The
-NOWORKINIT option prevents SAS from initializing the WORK location at the start of the SAS session, and -NOWORKTERM prevents SAS from clearing the WORK location when SAS terminates.
These two options are independent of each other but will generally be used together, as they allow you to maintain the WORK space across session boundaries.
14.1.2 Data Processing Options
There are a few SYSTEM options that are either misused or underutilized. This is by no means an exhaustive list, just a few that I have encountered. Some of these should be used only by the advanced user who has full knowledge of the ramifications of their use.
The MERGENOBY Option
Unless done in a very deliberate manner, performing a MERGE without a BY statement (one-to-one merge) can be very risky. When done inadvertently, the result is almost always not what is desired. Worse, the errors are often not obvious, and these may not produce any warnings, notes, or error messages in the LOG. The MERGENOBY option can be used to change this behavior. The MERGENOBY determines what action should be taken when the MERGE statement is used without a corresponding BY statement.
|
merge takes place without warning (this is the default) |
|
merge takes place and a warning is issued |
|
merge does not take place and an error is written to the LOG |
The MERGENOBY=WARN designation ![]()
options mergenoby=warn;
data aemed;
merge advrpt.ae
advrpt.conmed;
run;
WARNING: No BY statement was specified for a MERGE statement. NOTE: There were 127 observations read from the data set ADVRPT.AE. NOTE: There were 199 observations read from the data set ADVRPT.CONMED. NOTE: The data set WORK.AEMED has 199 observations and 13 variables |
MORE INFORMATION
A MERGE statement without a BY appears in a ‘look-ahead’ example in Section 3.1.4. The code associated with that example changes and then resets the current setting of the MERGENOBY option.
The DATASTMTCHK Option
This option protects the user from overwriting data sets due to dropped semicolons by restricting the use of certain data set names. The default is COREKEYWORDS which prevents you from naming a data set UPDATE, MERGE, RETAIN, or SET.
|
data sets may not have a name corresponding to a core keyword (default) |
|
also excludes all names that can start SAS DATA step statements (i.e., ARRAY, DO, OUTPUT) |
|
no restrictions (defacto default prior to V7) |
In this DATA step the semicolon has been left off of the DATA statement ![]()
data ae 
set advrpt.ae;
run;
22 data ae 23 set advrpt.ae; --- 56 ERROR 56-185: SET is not allowed in the DATA statement when option DATASTMTCHK=COREKEYWORDS. Check for a missing semicolon in the DATA statement, or use DATASTMTCHK=NONE |
As an aside, neither the COREKEYWORDS nor the ALLKEYWORDS values will flag a data set, regardless of its name, which includes a libref. Consequently it would be possible, although of doubtful utility, to name a data set WORK.UPDATE, when naming it without the libref, UPDATE, would fail.
The VALIDVARNAME Option
The VALIDVARNAME option is used to determine valid variable naming conventions, and how the variable names are handled.
|
variable names must conform to V6 conventions (up to 8 characters). option value is no longer documented, but still works for the current versions of SAS. |
|
allows up to 32 character names, and the case at variable definition is remembered (the default). |
|
case is not remembered or used. |
|
allows non-standard naming conventions. Non-standard naming conventions have limited utility outside of Base SAS and SAS/STAT. |
The VALIDVARNAME=V6 Option
Useful when you are creating data sets that must conform to V6 naming conventions. While acceptable for all other values of VALIDVARNAME, the following DATA step fails when VALIDVARNAME=v6, because the variable name has more than 8 characters. This value of the VALIDVARNAME= option may not be supported in future releases of SAS. In SAS 9.2 it has not been included in the documentation for the VALIDVARNAME option. Although the V6 value restricts the length of variable names it does not restrict the length of data set names, as was the case for SAS V6.
option validvarname=v6;
data a;
abcdefghig= 5;
run;
The VALIDVARNAME=ANY Option
This setting permits variable names that may come from other sources, such as ORACLE or EXCEL, that do not use the same naming conventions as SAS. We access these non-standard variables through the use of named literals that are needed whenever the name contains non-standard characters. Once the data have been imported into SAS, it is generally recommended that these variables are renamed to conform to standard SAS naming conventions. When a data set contains variables defined using named literals, in order to include non-standard characters, VALIDVARNAME= must always be set to ANY before the data set can be used. Also, whenever you access any variable containing non-standard characters you must always use named literals to name the variable.
A named literal is enclosed in quotes and the quoted string is followed by the letter n. Named literals are used just like any other variable name. Three variables are included in the VAR statement to the left.
options validvarnames=any;
proc print data=aexls;
var subject 'ae-date'n 'ae#type'n;
run;
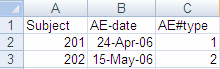
The application of the use of VALIDVARNAMES=ANY can be shown using the EXCEL file E14_1_2AE.XLS. This spreadsheet has column headers that do not meet SAS naming standards. PROC IMPORT can be used to convert this EXCEL table to a SAS data set. Since the GETNAMES=YES option is used, SAS will attempt to use the column headers as variable names. Without first specifying VALIDVARNAME=ANY, non-standard characters would be converted to underscores. In this example it would not have a large impact; however, naming conflicts can arise. By using VALIDVARNAME=ANY, we know what the columns will be named in the SAS data set (WORK.AEXLS). A look at the properties of WORK.AEXLS shows that the non-standard names are being used by SAS.
option validvarname=any;
PROC IMPORT OUT= WORK.AeXLS
DATAFILE= "&pathdataE14_1_2AE.xls"
DBMS=EXCEL REPLACE;
SHEET="Sheet1$";
GETNAMES=YES;
MIXED=NO;
SCANTEXT=YES;
USEDATE=YES;
SCANTIME=YES;
RUN;

Non-standard data set names are generally only honored in Base SAS and SAS/STAT, therefore it is generally a good idea to rename these variables as soon as is convenient. In this case the variable’s label will reflect the original name.
data ae;
set aexls(rename=('ae-date'n=AEDate
'ae#type'n=AEType));
run;
When using a non-standard name, such as is done in this RENAME option, a named literal is used - the variable name is surrounded by quotes, which are immediately followed by the letter n.
14.1.3 Saving SAS System Options
Typically the settings for SAS System Options persist for the duration of the current job or the current SAS session. It is possible, however, to save the current system options settings in either the registry or in a data set. Once saved, they can be retrieved for a future session or job. Saving the options in a data set is more flexible as it allows other users to acquire the same option settings, which can include macro and format library controls.
Not all system options can be saved; most notably are initialization options and options that contain passwords.
The options can be saved and retrieved by the use of either procedures or commands.
MORE INFORMATION
The -INITSTMT and -TERMSTMT system options described in Section 14.1.1 could also be used to capture and save system options using similar techniques to those shown in that section to capture and save macro variable values.
SEE ALSO
The SAS Forum thread http://communities.sas.com/message/101546 discusses a number of ways to gather and reestablish system options.
Using PROCs OPTSAVE and OPTLOAD
The OPTSAVE procedure is used to write the current option settings to a SAS data set. The data set is like any other and consists of two columns (OPTNAME and OPTVALUE). A portion of the data set ADVRPT.CURRENT_ SETTINGS is shown here. Notice the SASAUTOS option in line
155 ![]()
proc optsave out=advrpt.current_settings;
run;
14.1.3 Saving System Options
Options saved using PROC OPTSAVE
Obs OPTNAME OPTVALUE
148 REPLACE 1
149 REUSE NO
150 RIGHTMARGIN 0.000 IN
151 RSASIOTRANSERROR 1
152 S 0
153 S2 0
154 S2V 0
155 SASAUTOS (advmac, sasautos)
156 SASCMD
…portions of the table not shown…
In the code that follows, the SASAUTOS option is ‘inadvertently’ changed ![]()
![]()
![]()
![]()
33 proc options option=sasautos;
34 run;
SAS (r) Proprietary Software Release 9.2 TS2M2
SASAUTOS=adv Search list for autocall macros 
NOTE: PROCEDURE OPTIONS used (Total process time):
real time 0.00 seconds
cpu time 0.00 seconds
35 proc optload data=advrpt.current_settings
(where=(optname='SASAUTOS')); 
36 run;
NOTE: PROCEDURE OPTLOAD used (Total process time):
real time 0.12 seconds
cpu time 0.01 seconds
37 proc options option=sasautos; 
38 run;
SAS (r) Proprietary Software Release 9.2 TS2M2
SASAUTOS=(advmac, sasautos)
Search list for autocall macros
NOTE: PROCEDURE OPTIONS used (Total process time):
real time 0.00 seconds
cpu time 0.00 seconds
![]()
Here we have recovered the setting of a single option. If the WHERE clause had not been used ![]()
Using the DMOPTSAVE and DMOPTLOAD Commands
The DMOPTSAVE and DMOPTLOAD commands are similar to the PROC steps described above. As commands they are designed to be executed from the command line in the Display Manager, but this also means that they can either be assigned a key in the KEYS window (see Section 14.4.7), or that they can be executed from within the DM statement. Since the DM statement is generally the most flexible, the code is shown here.
dm 'dmoptsave advrpt.current_settings'; 
options sasautos=adv2; 
proc options option=sasautos; 
run;
dm "dmoptload advrpt.current_settings 
(where=(optname='SASAUTOS'))";
run;
proc options option=sasautos;
run;
![]()
![]()
![]()
![]()
MORE INFORMATION
The DM statement is also discussed in Section 14.4.2.
14.2 Using an AUTOEXEC Program
When SAS initializes and starts execution, it automatically looks for and executes (if it exists) a program named AUTOEXEC.SAS. By default the AUTOEXEC.SAS program will only be found if it is in the !SASROOT directory. Through the use of the -AUTOEXEC initialization option (see Section 14.1.1), you can point to any SAS program in any location.
The AUTOEXEC.SAS can be any ordinary SAS program. It is commonly used to set up macro libraries, system options, librefs, and filerefs. Although the program can be named anything (Fred.jpg), AUTOEXEC.SAS is less obscure.
* Autoexec.sas *;
%let path =
libname advrpt v9 "&pathData";
filename advmac "&pathsascodesasmacros";
options nodate nonumber nocenter;
options sasautos=(advmac, sasautos);
The AUTOEXEC.SAS shown here could be used to set up the libref used to access the data associated with this book. It expects that the automatic macro variable &SYSPARM ![]()
![]()
![]()
![]()
Typically my Windows desktop contains a different SAS icon for each active client/project. Each has its own unique autoexec program. This ensures that I use the correct data and the correct programs for each project. If you install and use the AUTOEXEC.SAS program that comes with the sample code for this book, the libref and autocall macro library used by the sample programs will automatically be available for your use.
14.3 Using the Configuration File
When SAS initializes, the configuration file is executed before the autoexec program. The configuration file is not a SAS program, and if you make changes, the editing must be done carefully. Some companies use the configuration file to provide common setup instructions to all the site’s SAS installations and consequently do not allow the modification of this file.
If you do want to customize this file, I would suggest that you do not modify the original version, which can be found in the !SASROOT location. Instead you can copy and then edit the copy. You then point to the modified configuration file using the -CONFIG initialization option (see Section 14.1.1).
The default name for this file is SASV9.CFG. The location will vary according to OS and installation. Under a standard Windows setup, you may find it at one of the following locations:
|
C:Program FilesSASSAS 9.1 lsen |
|
C:Program FilesSASSASFoundation9.2 lsen |
|
C:Program FilesSASHomeSASFoundation9.3 |
Common customizations include:
- addition of a macro library location to SASAUTOS
- changing the location of the WORK directory
- modification of other default values like memory allocation and macro symbol table size
14.3.1 Changing the SASAUTOS Location
The following portion of a configuration file adds a directory ![]()
/* Setup the SAS autocall library definition */
-SET SASAUTOS ("\groupserversascodemacros"
"!sasrootcoresasmacro"
"!sasext0inttechsasmacro"
"!sasext0accesssasmacro"
"!sasext0assistsasmacro"
"!sasext0eissasmacro"
"!sasext0etssasmacro"
"!sasext0graphsasmacro"
"!sasext0imlsasmacro"
"!sasext0orsasmacro"
"!sasext0qcsasmacro"
"!sasext0sharesasmacro"
"!sasext0statsasmacro"
)
In the configuration file the -SET keyword is used to establish an environmental variable, which will later be interpreted as a fileref.
Rather than modify the original CONFIG file (or a copy as described above), it is possible to invoke a second tailored configuration file that will augment or override selected portions of the original file. The configuration file shown below makes it unnecessary to modify the SASAUTOS option when defining your autocall library. It does this by inserting the locations directly into the SASAUTOS system option.
Inserting locations in the autocall library using the INSERT option in the CONFIG.CFG file has been problematic. Fortunately the following technique was worked out by Peter Crawford of Crawford Software Consultancy Limited.
-set advtech "C:InnovativeTechniquesSASCode"
-sasautos (sasautos)
-insert sasautos !advtechProdMacros
-insert sasautos !advtechSASMacros
![]()
![]()
![]()
![]()
![]()
![]()
-config "C:InnovativeTechniquesSASCodeChapter14E14_3_1.cfg"
![]()
![]()
proc options option=sasautos;
run;
%put %sysget(advtech);
The LOG shows that the SASAUTOS option has been modified and that the ADVTECH environmental variable has the anticipated value. Notice that the SASAUTOS fileref is not quoted ![]()
5 proc options option=sasautos; 6 run; SAS (r) Proprietary Software Release 9.2 TS2M2 SASAUTOS=( '!advtechSASMacros' '!advtechProdMacros' sasautos )
Search list for autocall macros NOTE: PROCEDURE OPTIONS used (Total process time): real time 0.00 seconds cpu time 0.00 seconds 7 8 %put %sysget(advtech); C:InnovativeTechniquesSASCode
|
Other common initialization options that could be declared in this second configuration file could include:
|
(see Section 14.1.1) |
|
(see Sections 14.1.1 and 14.2) |
|
Show option setting in the log at initialization |
SEE ALSO
SAS Problem Note 44791 discusses the problem associated with inserting an autocall location, but does not suggest the solution worked out by Peter Crawford http://support.sas.com/kb/44/791.html. Sample Code 42360 demonstrates the use of the APPEND option http://support.sas.com/kb/42/360.html.
14.3.2 Controlling DM Initialization
When the Display Manager is initialized you can, to a large extent, control the appearance and the available tools through the use of initialization options. This level of control is most generally of interest when you are executing an application, perhaps through SAS/AF or SAS/EIS, and you need to control your user’s ability to access SAS.
![]()
![]()
-AWSCONTROL NOTITLE
Alternatively you can change the title from the default (SAS) to one of your choosing:
-AWSTITLE "ABC Project"
![]()
The -INITCMD option allows you to specify control commands when executing an application, such as SAS/AF. The initialization option shown here starts a SAS/AF application and closes most of the user’s access to the rest of SAS.
/* Prep for AF start up appliction */
-initcmd "af c=control.Control.wrapper.frame af;
toolclose;
zoom;
command close;
wstatusln off;
wwindowbar off;"
14.4 In the Display Manager
The Display Manager is extremely customizable. Many of these possible customizations are a bit over the top, but there are a number that are very helpful.
SEE ALSO
Richard DeVenezia's Web site has a useful section on "actions" you might consider adding to the explorer window http://www.devenezia.com/downloads/sas/actions/.
14.4.1 Showing Column Names in ViewTable
By default the VIEWTABLE window displays variable labels as column headers. I find this to be very annoying as I almost always want to see the variable name. Fortunately the default can be changed to show the column names instead of the labels.

Although the following steps will be basically the same, the setup of some of the following dialog boxes will vary according to OS and version of SAS.
With the SAS Explorer Window active, select: TOOLS → OPTIONS → EXPLORER.

This brings up the Explorer Options dialog box, select: MEMBERS → TABLE → EDIT

Edit the line with the ACTION of &OPEN and add colheading= name. The default for VIEWTABLE will now be to display variable names. Repeat the process for VIEWS.

MORE INFORMATION
Rather than change the default behavior you can also change this setting when the ViewTable is invoked. Section 14.4.2 shows a DM command that invokes the ViewTable using column names rather than labels.
14.4.2 Using the DM Statement
The DM statement allows you to execute one or more Display Manager commands from within a SAS Program. These are the same commands that can be used in the command box, on the command line, or from the KEYS window.
DM <windowname> 'action' <windoname>;
If you do not need to designate or change the active window all you need is the action. This is common when performing a DM task from within a batch program.
The following command can be used to clear the LOG window.
dm log 'clear';
Multiple DM commands can be included in a single DM statement by chaining them together with semicolons. This DM statement turns off the program editor and executes a SAS/AF program making the SAS/AF window active.
dm af "pgm off; af cat = appls.allproj.passwd.program";
dm log 'clear';
You can also route the LOG much as you can by using PROC PRINTTO.
dm 'log; file "&pathlogdump1.log"';
The POST command can be used to post a message box to the users screen. This can be a much stronger attention grabber than just a message to the LOG.
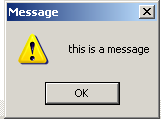
dm 'post "this is a message"';dm 'wedit "C:InnovativeTechniquessascodechapter14e14_3_1.sas"' ;
The enhanced editor is designated using the WEDIT command, and if followed by a filename, a specific file can be loaded and opened for editing.
The ViewTable can be invoked as well using either the VIEWTABLE or VT command. Here the data set ADVRPT.DEMOG is opened with the variable names shown as column headings (COLHEADING=LABELS is the default).
dm "viewtable advrpt.demog colheading=names";
The DM statement can also be used to assign a specific command to a function key (see Section 14.4.7). The KEYDEF command is used to make the assignment. Here the F12 key is assigned to clear the log.
dm 'keydef f12 "log;clear"';
For combination keystrokes enclose the key definition in quotes as well. The SHIFT F9 key will now close the next open ViewTable window. Close a series of open ViewTable windows with successive selections.
dm 'keydef "shf f9" "next VIEWTABLE:; end"';
MORE INFORMATION
The DM statement is used to execute the DMOPTSAVE and DMOPTLOAD commands in Section 14.1.3. Section 14.4.7 discusses the execution of DM commands through hot key assignments.
SEE ALSO
The DM statement and the WEDIT command are discussed in the SAS Forum thread http://communities.sas.com/thread/12520. Rosenbloom and Lafler (2011c) assign a macro call to a function key.
14.4.3 Enhanced Editor Options and Shortcuts
There are a number of options and shortcuts available for use with the Enhanced Editor. It is also possible to do a fair amount of customization.
Enhanced Editor Setup
There are only a few set up preferences that I would recommend that you change. Most of the defaults are fine for typical users. The options for the Enhanced Editor can be found when the editor is the active window. Use TOOLS → Options → Enhanced Editor. This brings up the Enhanced Editor Options dialog box.
I like to select ‘Show Line numbers’ ![]()
![]()
![]()


Enhanced Editor Keys
The editor has been set up with a number of shortcut key combinations. Depending on how you work and what things you tend to do, some of these key combinations can be very useful. You can see and learn more of these key combinations through the Enhanced Editor Keys pull-down menu. While the Enhanced Editor is the active window, go to TOOLS → OPTIONS → ENHANCED EDITOR KEYS.

Explore the resulting dialog box to find the key combinations that are most useful to you. I especially like to use:
|
Ctrl+/ |
add comments |
|
Ctrl+shift+/ |
remove comments |
|
Ctrl+F2 |
mark a line in a program |
|
F2 |
jump to the next marked line |
|
Shift+F2 |
jump to the previous marked line |
Not only are the defined key combinations very useful, but you can redefine the combinations and add new keyed operations. Notice that the BEEP command has no assigned key combinations and is therefore not available. While BEEP is probably not particularly useful, others can be; you can scroll down the list of available operations until you find one of interest. Here “Sort the selected lines” has been highlighted. Next press the “Assign keys…” button.


The ‘Assign Keys’ dialog box is used to assign a set of key strokes to this operation. Highlight the none in the ‘Press new shortcut key:’ box, and then press the desired keys. If you select a combination that is already in use, the keystroke combination is changed to be used with the new operation. In this example we are choosing to use Alt + Shift + R (this key combination will no longer be used to ‘Start/Complete macro’).
We can now use this key combination in the Enhanced Editor to sort rows.


The list of variables on the left, which have been pasted into the Enhanced Editor, are in the ADVRPT.DEMOG data set and have been written in variable number order. If the first 14 rows are highlighted and we press the Alt+Shift+R keys the rows are reordered. And the list becomes the one shown on the right.
SEE ALSO
A short write-up on select Enhanced Editor keys can be found on the Tek-Tips Forum http://www.tek-tips.com/faqs.cfm?fid=5140.
The following LinkedIn thread has a number of suggestions http://www.linkedin.com/groupItem?view=&srchtype=discussedNews&gid=70702&item=63659611&type=member&trk=eml-anet_dig-b_pd-ttl-cn.
Marking a Block of Text
While most applications allow you to hold the left mouse button (LMB) while dragging the mouse to highlight entire lines of text, in the Enhanced Editor you can go a couple of steps further. Dragging while the cursor is in the gray area (left side of the editor), ensures that all the text in the first and last lines will be highlighted.

You can highlight, while controlling for columns and lines, by also pressing the ‘Alt’ key at the same time as dragging with the LMB depressed. In the image to the right, ‘delete’ would shift lines 14-23 five columns to the left.
SEE ALSO
Under SAS 9.1 there was a problem with the feature to mark blocks of text on machines for which SAS Enterprise Guide was also installed. Problem note #30455 shows how to resolve this conflict. This note can be found at http://support.sas.com/kb/30/455.html.
AUTOSAVE – Finding the Backup File
Files being edited by the Enhanced Editor are automatically saved every few minutes (the frequency is set in the DM preferences under the TOOLS → OPTIONS → PREFERENCES → EDIT tab). If you need to recover the saved file the location can be a bit difficult to find and it varies with OS and version of SAS. Usage Note 12392 states: Enhanced Editor Autosave should be consulted to find the location of these backup versions of your program. Under Windows the file extension is .ASV.
SEE ALSO
Usage Note 12392 can be found at http://support.sas.com/kb/12/392.html.
14.4.4 Macro Abbreviations for the Enhanced Editor
The Enhanced Editor enables you to build abbreviations for your editor. Much like abbreviations in other applications, a single word or part of a word can be typed and then other (generally longer) text can be substituted at a keystroke.
For the purposes of this example assume that you want to type the following header block at the top of each of your programs. Typing it once is fine, but more than once becomes tedious. Let’s make a macro abbreviation that does the typing for us.
* xxx.sas
*
* Purpose:
*
* Written by:
* Art Carpenter
* 06Nov2011
* (907)865-9167
*
* Inputs:
*
* Outputs:
*
* Notes:
*
* Modifications:
*
*
*********************************;
While the Enhanced Editor is the active window, use the pull-down menus TOOLS → ADD ABBREVIATION (or the editor short cut keys CTRL+SHIFT+A). This brings up the Add Abbreviation dialog box.

In the Add Abbreviation dialog box enter a name for the new abbreviation (header) ![]()
![]()
To use the abbreviation simply type in the name of the abbreviation while in the Enhanced Editor. As soon as the last letter of the abbreviation has been entered, a small pop-up ‘tip’ text box containing the first few characters of the abbreviation is displayed. If at that point you press the TAB or ENTER key, the name of the abbreviation will be replaced by the text that you stored.
The following screen shot shows that the name of the HEADER abbreviation has been entered in the Enhanced Editor and the first few characters of the text to be substituted is shown in the pop-up ‘tip’ box. Pressing the TAB or ENTER key causes the abbreviation name to be replaced by the stored text.

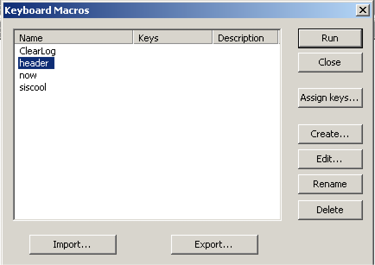
Once created macro abbreviations can be edited or deleted just like any other keyboard macro. Use the pull-down menus TOOLS → KEYBOARD MACROS →MACROS to bring up the KEYBOARD MACROS dialog box.


Using this dialog box you may also export/import your macro abbreviations so that they may be standardized across your work group. Use the EXPORT button to create a file with the KMF extension. This file can then be imported by another SAS user by using the IMPORT button. A number of KMF files have been gathered at the sasCommunity.org site http://www.sascommunity.org/wiki/Abbreviations/Macros.
The date in the HEADER abbreviation shown above is static. There are a number of predefined edits that we can apply to a keyboard macro (remember that a macro abbreviation is a special form of a keyboard macro). Several of these predefined edits allow the insertion of date values. Using these we can automatically insert the current date time stamp from when the abbreviation is executed. The following steps reestablish the HEADER abbreviation with the current date time value replacing the static date (06Nov2011).
Edit the HEADER keyboard macro (it has already been established as an abbreviation (TOOLS →KEYBOARD MACROS → MACROS). Select HEADER and the EDIT button.

The original HEADER definition is going to be replaced so delete the one line that starts with “Insert the string. . .”. This will completely clear the abbreviation definition. That is OK for now. We are about to insert new text. The important thing is that HEADER has already been established as an abbreviation.

The commands on the left of the Edit Keyboard Macro dialog box can be inserted into the macro. Once you have deleted the definition, scroll down the list of commands until you find “Insert the string”. Select it and press the double arrow in the middle of the dialog box to move the command to the right-hand box.
Paste the portion of the header text up to, but not including, the static date into the Insert String dialog box and select OK.

Select the date or date time values of interest. Here the “Insert current date and time” command has been selected. We want the subsequent text to start on the next line so the command to “Insert a carriage return” has also been selected.
The remainder of the header text can now be inserted using the ‘Insert the string’ command.
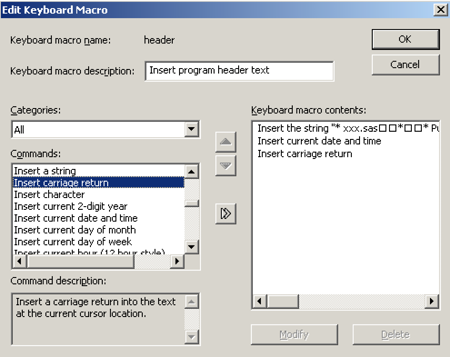
The “Insert a string” command is again selected and the remainder of the text is typed or pasted into the Insert String dialog box.

Specify OK as you exit from each of the dialog boxes. The revised HEADER abbreviation is now ready to use.
The HEADER abbreviation will now insert the current date time stamp into the header text.
* xxx.sas
*
* Purpose:
*
* Written by:
* Art Carpenter
* Thursday, November 17, 2011 20:49:54
* (907)865-9167
*
* Inputs:
*
* Outputs:
*
* Notes:
*
* Modifications:
*
*
*********************************;
The name of the abbreviation will now also appear in the Enhanced Editor Keys dialog box (introduced in Section 14.4.3). You can use this dialog box to assign a set of keys to execute the abbreviation.
Select the abbreviation (HEADER) and press the ‘Assign keys. . .’ button. Highlight the text in the ‘Press new shortcut key:’ box and press the shortcut keys of choice. Here the CTRL+SHIFT+H keys were chosen. This key combination will now execute the HEADER abbreviation and will no longer bring up HELP.

Carpenter (2003b) introduces this example for the creation of a macro abbreviation. A collection of abbreviations as well as links to other references with more information can be found on the sasCommunity.org article http://www.sascommunity.org/wiki/Abbreviations/Macros.
14.4.5 Adding Tools to the Application Tool Bar
Like most applications that have pull-down menus and tool bars, it is possible to modify or customize the list of available tools. A common usage is when you have a program or code snippet that you run regularly, and would like to have it readily available. By modifying the tool bar, you can add an icon that will instantly execute your program.
Consider the following program that will delete all the data sets in the work directory. We would like to add an icon on the tool bar associated with the Enhanced Editor that will execute this step. The icon could be placed on any of the tool bars in the DM, this one seems most logical.
proc datasets library=work
memtype=data
kill
nolist;
quit;
With the Enhanced Editor in the active window, use the pull-down menus to select TOOLS → CUSTOMIZE (or right click on the tool bar itself). The CUSTOMIZE TOOLS dialog box for the tool bar is shown. From here you can add or remove items on the tool bar. We would like to add an icon that will execute our PROC DATASETS program.

![]()
![]()
![]()
![]()
![]()
![]()
The tool bar icon used to execute the PROC DATASETS step is shown below. The trash can icon ![]()
![]()
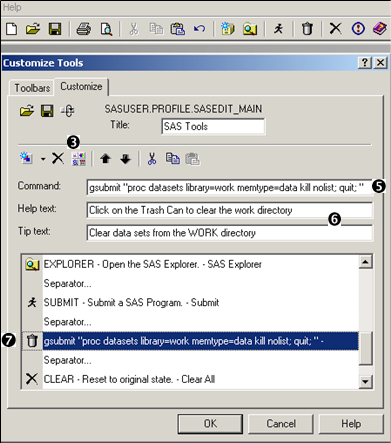
The GSUBMIT command is a corollary of the DM statement. It allows you to insert code where a command is otherwise expected. In this example the entire step has been placed in the GSUBMIT command. This would have been quite inconvenient if the step had been any longer. Actually the GSUBMIT command only allows 500+ characters. For longer steps consider submitting a macro call or a %INCLUDE statement.
The %INCLUDE becomes a bit problematic if the path to the location of the program contains a macro variable. This is an issue because the string associated with the GSUBMIT command must be quoted. However, the %INC also expects either a quoted string or a fileref. Strings within strings are often an issue for macro language elements, because at some point the macro variable (e.g., &PATH) will be within single quotes. Fortunately in this case, because of how the line is parsed, the single quotes can be used without masking the macro variable.
gsubmit '%inc "&pathsascodechapter14e14_4_5.sas";'
The GSUBMIT command is only one of a very long list of commands that can be issued from within the Display Manager. Other useful commands include those that bring up other DM windows, such as:
- KEYS
- LIBNAME
- LOG
- FILENAME
- TITLE
SEE ALSO
Howard (2004) shows this and some similar examples. The PMENU procedure can be used to design, build, and save customized pull-down menus and tool bars. Charlie Huang’s 9/11/2011 blog entry “Add 10 buttons to enhance SAS 9.3 environment” suggests a number of buttons that could be added to the tool bar http://www.sasanalysis.com/2011/09/10-buttons-to-tweak-sas-93-environmnet.html.
14.4.6 Adding Tools to Pull-Down and Pop-up Menus
Sometimes adding a specialized tool to the pull-down or pop-up menus used in the DM can be very beneficial. In Section 14.4.5 the GSUBMIT command was used to execute a SAS program from a tool bar. You can do the same sort of thing from a pull-down or pop-up menu.

gsubmit "%%put Obs count is %%obscnt(dsn=%8b.'%32b'N);"
Consider the pop-up menu shown on the left, if you right-click on a data set from within the Explorer window. We would like to have the ability to execute a specialized tool against a SAS data set simply by clicking on a menu item in this pop-up menu.
While the Explorer window is active, this menu is controlled through the TOOLS → OPTIONS → EXPLORER menus. This brings up the EXPLORER OPTIONS dialog box.

This box is worth exploring just because it is used to control access to a variety of objects from within the SAS Explorer. Since we want to apply our tool to a SAS data table, we select the MEMBERS tab ![]()
![]()
![]()

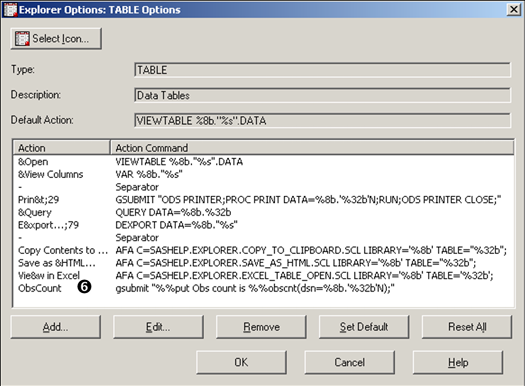
Notice that the EXPLORER OPTIONS: TABLE OPTIONS dialog box is used to form the primary pop-up menu that you see when you right-click on a SAS data table (see the first figure in this section). The items in the ACTION COMMANDS section in this dialog box are worth examining. Notice the use of the VIEWTABLE, VAR, GSUBMIT, and QUERY commands. The table name is brought into the script using %8b for the libref, and ‘%32b’N for the data set name.

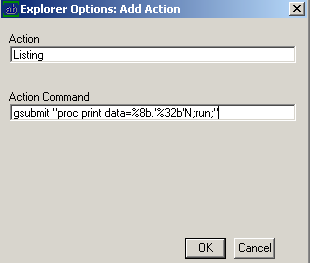
We are going to add a GSUBMIT item to this menu by using the ADD action button ![]()
![]()
gsubmit "proc print data=%8b.'%32b'N;run;") that is to take place. Exit from each of the dialog boxes using OK. A new entry, titled ‘Listing’ ![]()

Inserting a PROC PRINT is a bit of a silly thing to do. If you notice the third item in the ‘table options’ list, you will see that it already contains a GSUBMIT for a PROC PRINT which utilizes ODS.
In the following example instead of inserting a GSUBMIT for a PROC step, we use it to submit macro language elements.
gsubmit "%%put Obs count is %%obscnt(dsn=%8b. '32b'N);");
Because the scripting uses the percent sign in the data set name, you must be careful when calling macro language elements from within the GSUBMIT. This is demonstrated by adding a call to the %OBSCNT macro which returns the number of observations in a SAS data set. If we use it in a %PUT statement the number of observations is written to the LOG. %OBSCNT (see Section 13.4.2) is an autocall macro and is part of the autocall library that comes with the programs associated with this book. Notice that the percent signs associated with the macro language are doubled. This delays their interpretation until the macro statement has been submitted which takes place after the data set name has been inserted. For the data set WORK.NEW the resultant submitted %PUT statement will become:
%put Obs count is %obscnt(dsn=work.new);
The TABLE OPTIONS dialog box shows this definition, and the ObsCount entry now appears on the pop-up menu. ![]()
gsubmit "%%nrstr(%%printit(dsn=%8b.'%32b'N));"

The previous example uses a %PUT statement to write the number of observations to the LOG. You could just have easily have passed the name of the data set to a macro for execution. The GSUBMIT would be essentially the same. The following GSUBMIT executes the %PRINITIT macro for the displayed data set. The macro quoting function %NRSTR is used to delay the interpretation of the macro call and may be required when the macro resides in a stored compiled macro library. For most standard data set names this code can usually be simplified by removing the quotes around the data set name(%32b).
gsubmit "%%nrstr(%%printit(dsn=%8b.%32b));"
SEE ALSO
Art Trabachneck et al (2010) demonstrate additional and more extensive techniques.
14.4.7 Adding Tools to the KEYS List
The KEYS window (TOOLS → OPTIONS → KEYS or F9 or KEYS on the command line) lists DM commands that have been pre-assigned to specific key combinations, including function keys and mouse buttons. The key assignments can be modified by the user and can include Display Manager commands and even macro calls.
The first few key definitions of the KEYS window are shown to the left. Notice that multiple commands can be concatenated with a semicolon.

You can type in a new command, either by overwriting an existing command or by typing it in any available space. Commands can also be inserted into the key definitions using the KEDYDEF command on a DM statement (see Section 14.42).

Like in Section 14.4.6, if you want to submit code, the GSUBMIT command can be used. CTL F2 and CTL F3 have been designated to submit the %MAKETEMPWORK and %CLEARTEMPWORK macro calls. The macro definitions have been saved in the autocall library so that they can be loaded when the appropriate key combinations are selected.
%macro MakeTEMPWORK;
%local rc;
%let rc=%sysfunc(fileexist("c: empwork"));
%if &rc=0 %then %do;
%sysexec md "c: empwork";
%let rc=%sysfunc(libname(tempwork,c: empwork));
%end;
%mend maketempwork;
%macro ClearTEMPWORK;
%local rc;
%let rc=%sysfunc(fileexist("c: empwork"));
%if &rc ne 0 %then %do;
%let rc=%sysfunc(libname(tempwork));
%sysexec del /Q "c: empwork*.*";
%sysexec rd /Q "c: empwork";
%end;
%mend cleartempwork;
The %MAKETEMPWORK macro creates a directory and assigns the libref TEMPWORK to it. When the library is no longer needed, perhaps at the end of the session, the user can press CTL+F3, which executes the macro %CLEARTEMPWORK, which in turn clears the contents of the directory and deletes the directory. Since these macros utilize the %SYSEXEC macro function, the system option NOXWAIT should be declared to prevent prompts from the OS.
Once modified, the new key definitions can be saved using the SAVE command. Key definitions are stored as catalog entries with an entry type of keys. Saved definitions can be recovered through the use of the COPY command.
MORE INFORMATION
Display Manager commands can also be executed through the use of the DM statement (see Sections 14.1.3 and 14.4.2).
SEE ALSO
Rosenbloom and Lafler (2011c) use SUBMIT rather than GSUBMIT in the assignment of several different macros to KEYS.
14.5 Using SAS to Write and Send E-mails
During or after the processing of a program, you can use SAS to generate e-mails. These can be notifications of error conditions or the successful termination of the program. The e-mail can even contain attachments. This simple example will get you started. Read the SEE ALSO references for details that provide refinements of the technique.
options emailsys=SMTP emailid="[email protected]"
emailhost="caloxy.com" EMAILPORT=25;
* Define the fileref with the email engine;
FILENAME genmail email
subject="Patient 205 ConMeds"
to = "[email protected]"
from = "[email protected]"
      attach ="&path
esultsE14_5.pdf";
ods pdf file="&path
esultse14_5.pdf"
style=journal2;
proc print data=advrpt.conmed
(where=(subject='205'));
id subject;
var medstdt medspdt drug;
run;
ods pdf close;
data _null_;
file genmail;
put "Here are the ConMeds for Subject 205"; 
run;
![]()
![]()
![]()
![]()
![]()
EMAILID ![]()
![]()
![]()
![]()
![]()
![]()
SEE ALSO
A number of papers have been written on using SAS to e-mail results. Hunley (2010) has a number of extended examples including a discussion of texting. Whitworth (2010) has an example that includes zipping the file before e-mailing it. Rosenbloom and Lafler(2011d) have a brief e-mail example.
The SAS Jedi (Mark Jordan) has written a couple of blogs on the use of SAS to e-mail documents http://blogs.sas.com/sastraining/index.php?/archives/81-Jedi-SAS-Tricks-Email-from-the-Front-Part-2.html. He has also created a YouTube video on the topic http://www.youtube.com/watch?v=qPobPZg2osc&feature=related.
Two SAS Forum threads include discussions on the use of e-mail
http://communities.sas.com/thread/10467 and http://communities.sas.com/thread/11086.
14.6 Recovering Physical Location Information
Under the WINDOWS OS there are a number of techniques that you can use to find the physical location of a data set or file given the information available to SAS.
SEE ALSO
Carpenter (2008b) discusses these and other techniques in more detail.
14.6.1 Using the PATHNAME Function
The PATHNAME function returns the physical path for a given fileref or libref. While rarely used in the DATA step it has proven to be invaluable in the macro language. Often times we do not necessarily know the physical path even though we know a libref or fileref. Here the physical path is loaded into a macro variable where it is displayed in the LOG.
filename saspgm "&pathsascodee14_6.sas";
%let pgmpath = %sysfunc(pathname(saspgm));
%put &pgmpath;
C:InnovativeTechniquessascodee14_6.sas
You can even use it on concatenated filerefs such as the autocall library. To gather the current location of all of the locations in the SASAUTOS fileref you could specify:
%sysfunc(pathname(sasautos))
MORE INFORMATION
One of the examples in Section 13.8.2 recovers some location information using the PATHNAME function.
14.6.2 SASHELP VIEWS and DICTIONARY Tables
The path information for existing librefs and filerefs can be gathered by examining the SASHELP views and SQL DICTIONARY tables. Here you can find not only the path that would be returned by the PATHNAME function, but other things such as the ENGINE as well.
SASHELP.VLIBNAM and DICTIONARY.LIBNAMES
Each row in the view SASHELP.VLIBNAM (note the spelling) contains the libref and path information for each libref (more than one row for concatenated librefs). A portion of a listing of
this view shows the primary variables. Notice that the first few locations of the concatenated SASHELP libref are included as well.
Returning a Physical Location 14.6.2 SASHELP VIEWS and DICTIONARY Tables Obs libname engine path 1 ADVRPT V9 C:InnovativeTechniquesData 2 SASHELP V9 C:Program FilesSASSASFoundation9.2 lsenSASCFG 3 SASHELP V9 C:Program FilesSASSASFoundation9.2coresashelp 4 SASHELP V9 C:Program FilesSASSASFoundation9.2inttechsashelp 5 SASHELP V9 C:Program FilesSASSASFoundation9.2mddbservsashelp . . . . portions of the table are not shown . . . .
|
SASHELP.VEXTFL and DICTIONARY.EXTFILES
The location of external files (such as raw data and programs) can also be retrieved from either the SASHELP.VEXTFL view or the SQL dictionary table DICTIONARY.EXTFILES.
Using the SASHELP.VEXTFL view, the path information can be retrieved through a DATA step and loaded into a macro variable. The view as well as the dictionary table can be accessed from within an SQL step.
data _null_;
set sashelp.vextfl(keep=fileref xpath
where=(fileref='SASPGM'));
call symputx('pgmpath2',xpath,'l'),
run;
%put &pgmpath2;
proc sql noprint;
select xpath into :pgmsqlpath
from dictionary.extfiles
where fileref='SASPGM';
quit;
%put &pgmsqlpath;
MORE INFORMATION
Section 13.8.1 goes into more detail on the use of these SASHELP views and SQL DICTIONARY tables.
14.6.3 Determining the Executing Program Name and Path
Sometimes we need to be able to automatically detect the name or location of an executing program. This can be especially helpful when we write applications that need to self document, perhaps by placing the name and location of the executing program in a footnote of the generated table.
This is fairly straightforward when the executing program is running in batch mode. In batch mode the name of the executing program is stored in the system option SYSIN, and the value of system options can be retrieved using the GETOPTION function
Under the Windows OS, the name of the executing program and its path is stored in the environmental variables SAS_EXECFILENAME and SAS_EXECFILEPATH. Environmental variables are maintained by the OS; however, SAS can both populate and access their values. Whenever a SAS program is executed, this includes when it is executed through the Display Manager from the Enhanced Editor, these environmental variables are updated.
The values of environmental variables are accessed through the use of the %SYSGET macro function. The returned value can then be loaded into a macro variable or just written to the LOG as is done here.
%put %sysget(SAS_EXECFILENAME);
E14_6.sas
When you want the name of the program without the SAS extension it can easily be stripped off using the %SCAN or %QSCAN function.
%put %qscan(%sysget(SAS_EXECFILENAME),1,.);
E14_6
When we need to know not just the name, but the location of the SAS program (when executing from the Enhanced Editor this is the location from where the executing program was retrieved), we can use the SAS_EXECFILEPATH environmental variable. Here the value is retrieved by the macro %GRABPATHNAME and then written to the LOG.
%macro grabpathname;
%sysget(SAS_EXECFILEPATH)
%mend grabpathname;
%put %grabpathname;
114 %put %grabpathname;
C:InnovativeTechniquesSASCodeChapter14E14_6.sas
14.6.4 Retrieving the UNC (Universal Naming Convention) Path
When a program resides on a network server, the server name is generally mapped to a drive letter. Since this drive letter can be user specific, knowing that a program resides on the F: drive for one user is not necessarily helpful to someone else. As was shown using all of the previous methods, it is always the mapped drive that is returned; therefore, a different approach is needed to retrieve the actual or UNC path. Although the UNC path information is not stored in a location that is directly available to SAS, it is still possible to get this information - the process is just a bit more challenging.
Certainly we know that the OS has to know the relationship between the mapped drive letter and the actual UNC location. Under Windows this information is stored in a Dynamic Link Library, DLL. Windows has internal tools for accessing the information contained in a DLL and these tools can be accessed from within SAS using the CALL MODULE routine (the MODULEN and MODULEC functions can also be used). To make the tools available to the CALL MODULE routine we must first create a CATALOG SOURCE entry for it to operate against. This entry contains the arguments that are passed to and from the Windows DLL routine, which for retrieving the UNC path, is named WNetGetConnectionA (be careful, this name is case sensitive).
The arguments themselves are specific to each routine. The WNetGetConnectionA routine expects three arguments. Here the SOURCE entry has been written to a catalog in the WORK directory; however, you will generally make this permanent so that you only have to run this step once.
filename sascbtbl catalog "work.temp.attrfile.source";
data _null_;
file sascbtbl;
  put "routine WNetGetConnectionA module=mpr minarg=3 maxarg=3
       stackpop=called returns=long;";
put " arg 1 char input byaddr format=$cstr200.;";
put " arg 2 char update byaddr format=$cstr200.;";
put " arg 3 num update byaddr format=pib4.;";
run;
![]()
![]()
The CALL MODULE routine can then be used to access the WNetGetConnectionA routine and to retrieve the location.
%macro grabdrive;
%qtrim(%qleft(%qscan(%sysget(SAS_EXECFILEPATH),1,)))
%mend grabdrive;
%MACRO getUNC;
%local dir path;
%* Determine the UNC path for the SAS program being executed.;
DATA _NULL_;
length input_dir $200 output_dir $200;
* The input directory drive letter: ONLY e.g. j: ;
input_dir = "%grabdrive";
output_dir = ' ';
output_len = 200;
call module("WNetGetConnectionA",
input_dir,
output_dir,
output_len);
call symputx('dir',input_dir,'l'),
call symputx('path',output_dir,'l'),
RUN;
%* Get the name for the program of execution.;
%put drive letter is &dir;
%put path is &path;
%put name is %grabpathname;
%MEND getunc;
![]()
![]()
![]()
![]()
![]()
![]()
drive letter is F: ➑
path is \CALOXYDELLInnovativeTechniques ➒
name is F:sascodeChapter14e14_6_showUNC.sas ➓
![]()
![]()
The macro %GETUNC is called by a program that is not on the C: drive. In this case the program resides on the F: drive. The UNC path ![]()
%* Place this program in a mapped
%* drive (NOT the C: drive);
%getunc