Chapter 6
Voice: solo and accompanied
This chapter is concerned with recording the classically trained voice as a soloist with piano. For other aspects of voice recording, see Chapters 15 and 16.
6.1 The singer in a recording session
Singers have the reputation of being more temperamental than most, and it is worth taking the time to prepare well for the session and try to pre-empt every possible source of difficulty, from temperature and draughts to refreshments and breaks. Because the singer’s instrument is also part of their body, the need for them to feel comfortable during a recording session can be of even greater importance than for other musicians. A trained singer will be able to give of their best for about three hours in a day, and you should be aware of this; repeating difficult cadenzas multiple times will be inherently time-limited.
Make sure the artist feels comfortable and secure at the start of the session. Listen attentively to them singing live in the studio, and remember that the voice that they hear is not the same as the voice a listener hears; their voice is conducted to their ears through the bones of their head as well as via the surrounding air. You will have to convince them that what you are capturing is an honest representation of their voice, especially if they have little recording experience, so building up their trust in you is essential. It is also a good idea to talk to the accompanist, especially if they are experienced and tactful and know the singer well; where problems occur, the accompanist can often help to smooth things over by agreeing with your suggestions at the right time. If this all sounds like treading on eggshells, it can be exactly that.
6.2 The classical voice and microphone placement
The classically trained voice is designed to project over an orchestra in a big, live space without additional amplification, and as such, it has a huge dynamic range and power. This has implications for both recording and mixing; you will have to actively manage the dynamic range while mixing and leave sufficient headroom when recording. An experienced singer will save their voice to a certain extent during rehearsals, and so you should be prepared for an additional 10 dB or so in level once they are live in a session take or a concert. If you are in any doubt about your recorded levels, under-modulate; do not be overly concerned with recording at 10 dB below peak level, as in a practical sense it matters very little, and you can restore the level afterwards. Yes, the signal-to-noise ratio will be very slightly worse, but if you overshoot in the other direction, the recording can be unusable where it has clipped in the digital domain. The increased noise level will only start to be a real problem if you record a large multitrack at 16-bit, with all tracks under-modulated; if you are recording 24-bit and using relatively few microphones, some under-modulation should not be of any concern.
It is important to emphasise that in manipulating levels manually, you are not aiming to achieve the very restricted dynamic range of a pop vocal but more to support the voice when it is singing in a lower, weaker register by raising the level in the mix. While automatic compression is the norm when recording pop vocals, its use on a classical voice recording is not; it is important for the voice to retain the natural control, phrase shaping, and expression that the singer has worked so hard to achieve. A compressor is designed to act over a relatively short time frame and alters the envelope of the sound; skilful fader riding will be able to work with the musical phrase to achieve a really transparent and natural sounding result while supporting weaker passages and allowing crescendos and climaxes to achieve their full force. This sort of ‘intelligent compression’ (i.e. fader riding) will be discussed in section 6.9.
The distance at which a classical singer should be recorded is also different to that generally used for the pop singer. The voice is designed to be heard at a distance and relies on an acoustic space to integrate the whole sound together. The harmonic content of the voice changes with distance, and very close to the front of an operatic singer, the HF content will dominate the sound at the expense of warmth and richness, and the hidden gear changes from chest voice to head voice will be more apparent. The voice will have a ‘presence’ edge that is undesirable in classical singing because it feels too close to the listener, and the illusion of ‘natural’ perspective in the recording as a whole will not be sustainable. A microphone that is placed too close will only pick up the parts of the frequency content that are projected in the microphone’s direction, and a much more complete blend of the overall voice is best achieved at a distance of at least 90 cm (3′) away. However, there will come a point in moving further away that the singer’s microphones will start to pick up too much of the room and the accompanying piano. This will cause some loss of the desired clarity of sound, and the engineer needs to find the right distance to produce a good balance between clarity and picking up the full spectrum of the singer’s voice. The exact distance will depend on the acoustic characteristics of the room, where the piano and singer are placed in relation to one another, and the microphones used.
Another factor that mitigates against closer microphone placement is the potential for the singer to move. This is part of the performance, and cannot be rigidly constrained if the singer is to perform expressively and musically. The change in tonality and level produced by movement of 15–30 cm (6″ to 12″) back and forth will be much more significant with a close microphone, but less significant when the microphone is placed in the 90–120 cm (3′ to 4′) range. A piece of carpet under the singer’s feet will reduce noise from movement being transmitted acoustically and through the floor to the microphones, and to a certain extent, will act as a psychological barrier to prevent them moving off the carpet towards the microphone. Another barrier to movement would be to place a line of tape on the floor for the singer to keep behind; you should also mark the position of the music stand at the same time as you are marking microphone positions. (See Chapter 2.)
Microphone height above or below the mouth will affect the tone of the voice, although this effect is not as pronounced as it is when working at close pop microphone distances of 10–30 cm (4″ to 12″). Microphone popping caused by plosives should not be a problem at greater distances either (even if using susceptible directional microphones), as the blasts of air from the mouth that produce this effect spread outwards and will have dissipated much of their energy by the time they have travelled 90 cm (3′).
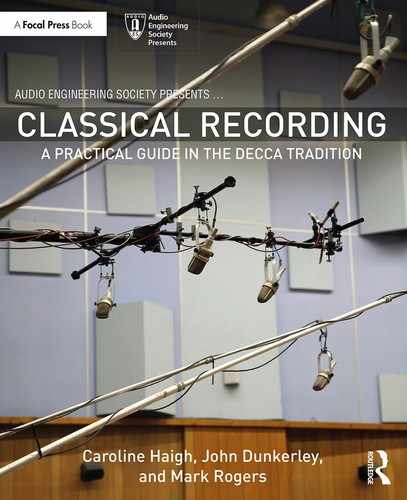
Sibilance and HF content tend to be projected horizontally and slightly downwards, so a common choice is to place the microphone slightly above the mouth line and looking down (Figure 6.1a). This will produce a less harsh sound than directly on-axis if you find that on-axis is over-bright. The only potential drawback for this position is that if the singer has a music stand, there will be times when they glance down slightly to look at the music, and this slight downward movement of the head will result in a momentary loss of focus as the tone loses additional HF.
Figure 6.1b shows the microphone slightly lower than the mouth, but not so low that any stand is in the way. Singers will want to be able to see over the music stand if there is one, so it will not be positioned very high, and the microphone should be able to be positioned looking over the top. In this position, there is less of a change in tone when the singer looks down at the music or lowers their head for any other reason.
Figure 6.1c shows a microphone on-axis to the mouth, which in pop recording is likely to result in a problem with plosives because the microphone is so close, but it will be fine in classical recording as long as you are happy with the HF content of the voice at this angle.
Figure 6.1d shows the use of ‘Pavarotti’ microphones, such as the Schoeps RC Active Extension Tube arrangement, which consist of a normal Schoeps microphone capsule mounted on a long gooseneck extension with the microphone head amplifier mounted at the bottom of the stand. These are designed to be for discreet concert use, and their longest standard length (1200 mm) places the microphone below mouth height of an average singer, although this does not matter in practice. As discussed for Figure 6.1b, microphone placement below the mouth gives a wider safety margin for head movement as singers tend to dip their heads from horizontal rather than tipping them backwards.
To judge where your microphone is placed in relation to the singer’s mouth, it is best to stand and look from the side while the singer is performing. It can be much harder to judge this placement looking on from the front, and the singer will be less distracted and be able to perform naturally if you are not in their sight line.
6.3 Using two microphones on the voice
This is a technique that is used for two different reasons. One is simply to have a backup microphone in a live situation, and it is only ever intended that one of them should be used in the final mix. For this reason, backup microphones and the main microphone will be placed very close together, within about 5 cm (2″), and Schoeps even make a double extension tube with this arrangement for live use (Schoeps R2C KC).
The second reason is to create some width around the singer’s recorded image, as noted for solo instruments in Chapter 4. For this purpose, the microphones are spaced around 20–30 cm (8″ to 12″) and pointing forwards; both microphones will be used in this scenario. This is a very typical Decca technique that has been widely but not universally adopted, and will be discussed here as it is adaptable to most solo instruments (as noted in Chapter 4). The technique aims to give the illusion of size and space, or ‘bloom’ to the voice, but with stability of image as well; we are attempting to trick the listener into perception of a stationary source that does not feel artificially narrowly located. The quality of ‘bloom’ around the singer is best described as a pleasant colouration or smudging that works for that particular voice and repertoire.
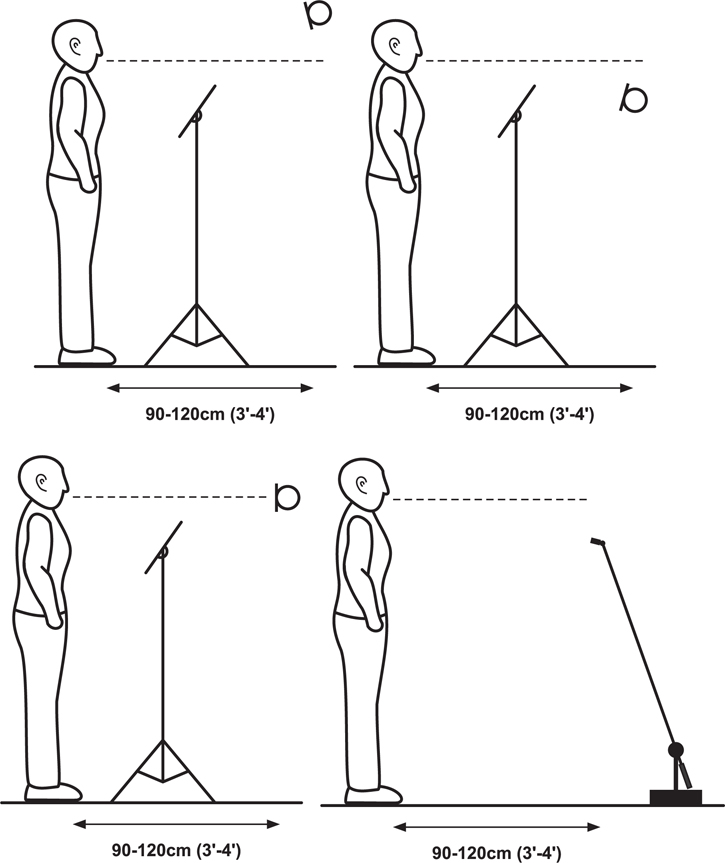
Figure 6.1a–d Alternative microphone positions for a classical singer
6.3.1 Single- versus double-spot microphone
In the context of a stereo recording, using a single microphone on a singer or other soloist will produce an image that is very laterally stable and locked in place, but it can also present as an artificially pinpointed source. As the microphone is faded up, the effect is like looking down an increasingly narrow tunnel at a very focussed, but small singer. This effect limits how much of the spot microphone can be used because as the singer is narrowed to a point source, the image starts to feel artificial. Two microphones, used appropriately, will give the singer a sense of width and space that feels more natural to the listener and blends much more easily with a stereo piano sound.
6.3.2 Suitable microphone spacing
As noted in Chapter 3, both microphone spacing and the mounting angle between a pair of directional microphones can be used to control the image width. With this ‘double-spot’ microphone technique, the microphones are placed parallel to one another facing forwards, which naturally constrains the width of the resulting image even if the microphones are panned fully left and right. As we shall see with this technique, it is common for the pair to be panned inwards a little, to anywhere between about 70%–90% left and right depending on the soloist’s movements, and the engineer’s preference for the quality of the sound.
The most successful spacing (arrived at empirically) is in the range of 20–30 cm (8–12″). Any wider than this and the singer’s image will feel very spacious, but increasingly hard to locate and with a lateral position that partly depends on which note is being sung. The singer’s movements will also become exaggerated because any widely spaced pair tends to widen the L-R lateral placement of the source location. Movement of the soloist while performing is a problem with both singers and musicians that perform standing up, such as violinists, flautists, and other wind players. Seated players, such as cellists, are less able to move their instrument around freely and present less of a problem in this regard.
The next consideration is panning of the pair, which is typically between 70%–90% left and right. Engineers engage in a certain amount of trade-off between microphone spacing and panning to give the right amount and quality of ‘bloom’ to the voice while keeping the performer’s movements in check. Because there are phase differences at each microphone with a spaced pair, panning inwards involves partial summation of signals with different phase and therefore some small boosts and reductions in the level of some frequencies. If taken to the extreme (as when panning a pair of spaced microphones to mono), this could become more obvious comb-filtering, but the partial inward-panning used in this context produces an effect that is viewed positively as another tool to be used to shape the sound as desired. The small amounts of colouration involved are manipulated by the engineer as part of this trade-off between spacing and panning. The difference between spacing at 25 cm (10″) and panning 70% left and 70% right, and spacing at 20 cm (8″) and panning 90% left and 90% right, will be subtle in terms of colouration on the voice, but a preference can be chosen. It is worth taking the time to experiment at the time of recording so that you can choose your preferred combination of spacing and panning for a given voice.
6.4 Microphone choice
The next thing to consider is microphone choice. Singers usually love to have a big microphone to sing into, but it is important to debunk the notion that a large microphone is needed in order for the singer to sound ‘large’. How ‘large’ a singer sounds has to do with the frequency response of the microphone, and in particular, the quality and extent of the LF range. The LF range of a microphone is not connected to the size of the microphone’s casing or the size of its diaphragm; all that is required to reproduce LF is that the diaphragm is able to move back and forth at a reasonable amplitude at low frequencies, and it does not need to have a large diameter in order to be able to do this. Omnidirectional microphones are simple pressure transducers, and as such always have the potential for the most extended LF response regardless of the size of their diaphragm. Omni-condensers can extend down to 10–20 Hz (although this very low extension also collects acoustic rumble very well). Microphones such as the Neumann M49 and M50 appear large, but the actual capsule inside the case is quite small. The physical size of a microphone does have an effect on the off-axis HF, with larger microphones suffering more off-axis HF loss or colouration; in a classical recording context, this will affect the reverb that is picked up and the direct sound from other instruments.
The acoustic level that is produced by an operatic singer does mean that you may need to use the switchable attenuator that is built into the electronics of a condenser microphone. This reduces the level of the signal before it enters the head amplifier, and avoids the microphone distorting or overloading. Ribbon microphones will cope with high SPLs as long as they are not subject to moving air, but this will not be a problem with the microphone at these distances from the singer.
For pop vocals, the choice of microphone will depend on which gives the desired colouration on-axis that best suits the individual voice and also on whether the singer is to sing live in the room with the rest of the band (necessitating a microphone with excellent rear rejection) or is to be overdubbed later. For classical recording of singer and piano, a cardioid condenser microphone with a flatter frequency response is desirable. The off-axis response should also be as flat and uncoloured as possible as it will be picking up the room and the piano, and significant unflattering colouration on this microphone source will adversely affect the piano sound. As with all classical recording, this spill is not to be avoided but embraced; it is useful to the engineer in making sure the whole sound has a sense of cohesion so that the singer and piano do not feel artificially separated into different spaces. The unavoidable tendency for cardioids to be lighter at the bass end than omnis will be apparent on the piano and room spill. For this reason, it is best to use omnis for the piano microphones during a voice and piano recording to ensure that the overall piano and room sound does not suffer from a lack of extended LF. The proximity effect of the cardioids will not come into play when recording at these distances, but if you have to compromise by using closer microphone placement when recording a live concert, be aware of the possibility of LF colouration creeping in.
The Neumann U67 is a very well-liked classical vocal microphone for a couple of reasons. In cardioid mode, it has a little lift in response on the front axis between 5 and 10 kHz, and in the off-axis response at 180° there is also some lift between 3 and 8 kHz, which can be flattering for the room reverb. The Neumann KM84 or KM64 have a fairly flat frequency response, with a small HF rise, and some LF roll-off because they are cardioids. The KM84 in particular has a clean-sounding off-axis response. You should avoid microphones that roll off more quickly in the mid bass end because the loss of warmth at the bottom of the voice will be noticeable, even for a female voice, especially if a mezzo-soprano or alto. For the same reason, if you choose to put in an HPF to help with rumble, it should be no higher than about 75 Hz to avoid losing some body from the voice. It is probably wisest to do this during post-production and not at the time of recording so that you can be sure that you are not damaging the vocal sound.
Ribbon microphones also make a good choice for recording classical singers with piano, depending on the relative position of singer and piano. Figure 6.5 deals with a situation where fig of 8 ribbon microphones would be a good solution to the particular layout. Because the ribbon microphone (such as the Royer R-121 or Coles 4038) has a natural HF roll-off, it can be usefully used to tame very high harmonics in the voice and make it easier to blend in with the piano, which contains relatively lower levels of upper partials and thus sounds duller in tone than a bright soprano or tenor.
Using omnis or wide cardioids would undoubtedly produce a good vocal sound but they will pick up too much piano, and it will be difficult to use fader movements to keep the singer supported at all times without noticeably changing the piano sound.
6.4.1 Managing with a poorer quality microphone
Unfortunately, the solo classical singer has such a complexity of sound that it is very good at showing up deficiencies in microphones and other parts of the signal chain. In the days of vinyl (not counting the current revival in pop vinyl releases; classical recording has always tried to improve the transparency of recording technology), the poorer frequency response and increased tracing distortion that is present towards the end of each side of an LP became horribly apparent on soprano soloists in particular.
If you have limited microphone choice, or only a single microphone that is flawed and is producing colouration on the voice that you don’t like, is there anything that you can do? One suggestion is to try placing the singer off-axis to the microphone by varying amounts, which can be done by raising or lowering the microphone as well as angling it. The frequency and directional response in the horizontal and vertical planes might not be even or symmetrical, and the colouration that is objectionable might only be present in a narrow acceptance angle centred on the front axis. A cardioid is only reduced in level by about 6 dB on its side axis, so going as far as presenting the side of the microphone to the singer will not result in a great deal of level loss but might help the frequency response.
6.5 Use of ambient pairs
An ambient pair is designed to pick up more indirect or reverberant sound from the room than direct sound from any of the instruments. It can be used to supply a clean source of reverberant sound for a particular instrument, to act as a ‘glue’ to support the spot microphones, and to anchor the instruments together in the same acoustic.
When placing a pair to obtain more reverberant sound, we tend to think of placing them horizontally further away from the players, but there is often very good reverberant signal to be picked up above and behind the players. One useful technique for live or studio work is to place an upwards facing ORTF-type or XY pair somewhere high above the performers. The rears of the cardioids are aimed at the performers, so they discriminate in favour of reverberant rather than direct sound. Placing these upstage behind the players can be very visually discreet in a concert recording, and if they are suspended, they will be barely visible. The reverb from this pair will be free of unwanted audience noise, although placing additional microphones in the audience to collect applause is a sensible practice.
In the studio context of recording voice and piano, an ambient pair can be usefully added 1.2–1.5 m (4′ to 5′) behind the piano, well above the lid at about 3 m (9′10″) high and pointing upwards. (See Figure 6.2 Figure 6.3 Figure 6.4 for inclusion of ambient pairs.) In the context of studio opera recordings, ambient pairs have been used high above the singers’ heads to obtain some more ‘air’ around the voices when their solo microphones could not be placed further away. (See Chapter 16.)
6.6 Concert recording layout
Figure 6.2 shows a concert position layout with the singer facing outwards towards the audience. In this position, the solo voice microphones are in a good place to pick up the piano as well; the piano sound will be tonally good, if lacking some detail. The addition of piano microphones will help with this, and the options are to place a pair of omnis at the tail end or move the singer out towards the audience and put some piano microphones behind them. Piano microphones placed in the well of the piano will contain less room reverb and sound a little close, so care will have to be taken when blending them into the mix so that the piano is not inadvertently pulled in front of the singer in the recording perspective. Following the rule that the closer the microphones are placed, the more of them you will need to obtain a good tonal balance from a large instrument, using three microphones as L, C, R will give you more flexibility to adjust the middle voicing of the piano. The preferred solution in a nice sounding room would be the tail pair of omnis, but if the room has poor acoustics, the L, C, R microphones will give you better results (see section 5.7.1). In a concert situation, the use of short stick on the piano is a possibility outside the engineer’s control, although this has a detrimental effect on the piano sound. Microphones can be arranged so that they peer into the small gap between the lid and the piano body in order to pick up some more piano detail. This can be done with either a tail pair or the L, C, R microphones in the well.
It is also possible to obtain a reasonable balance with a single pair if carefully placed, but the microphone position will be a compromise between piano and voice. If the piano lid is open at 35°, then for the piano sound, it can work well to have the microphones at a height that places them at 15°–20° above the horizontal level of the piano strings. Depending on the singer’s height, this is likely to be higher than would be ideal for capturing the singer, so adjusting this until you have a good compromise would be the best place to start. The singer should be central on the microphones, and is best prioritised in terms of sound if you have to choose between the singer and piano (sincere apologies to all accompanists). Using a pair of spaced omnis for this approach will give you the full LF range and a good tone, but the image will not have the finesse and focus that you will get from a skilfully balanced recording using a few more microphones. See Figure 6.3.
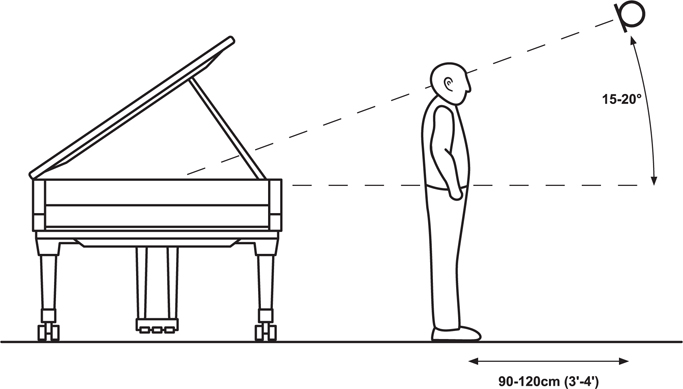
Figure 6.3 Concert layout for voice and piano using a single pair
In many concert halls, you will find a spaced pair of omnis already rigged, slung in front of the stage, although usually too far back or high up to be useful as a single pickup for your voice and piano. They could be used as more overall pickup to give you some warmth and sense of space, in conjunction with a pair of cardioids on the piano and another on the voice to add focus and detail.
6.7 Studio recording and reverse concert positions
In a recording situation, there is no need to retain the concert position layout, and this opens up the potential for improving the communication between the singer and pianist by allowing them to maintain a good line of sight with each other. Some singers also like the opportunity to see the piano keyboard, and almost all of them dislike standing right in the well of the piano. Figure 6.4 shows a recording layout with an arc of possible singer positions, all of which face the piano. In addition, a 3 m (9′10″) high, upwards-facing ambient pair is included, either behind the piano, or just behind the singer.
Positions A and B are good for eye contact with the pianist, and position C means that the singer can also see the pianist’s hands, but the pianist will have to turn his or her head a little to maintain eye contact. All these positions mean that the piano is being picked up on the back of the vocal cardioid microphones, hence the need for a clean off-axis response from these microphones. They need to be at least 90 cm (3′) away from the side of the piano (using a Steinway D model as an example). If they are closer, they will pull in too much of the piano onto the vocal microphones, and this will make it harder to keep the voice balanced against the piano in the mix. Conversely, if you place the singer too far away, the piano spill will be too distant, the vocal spill onto the piano microphones will also be very distant, and the piano and vocal microphones may have such different sounds that they will not blend together well.
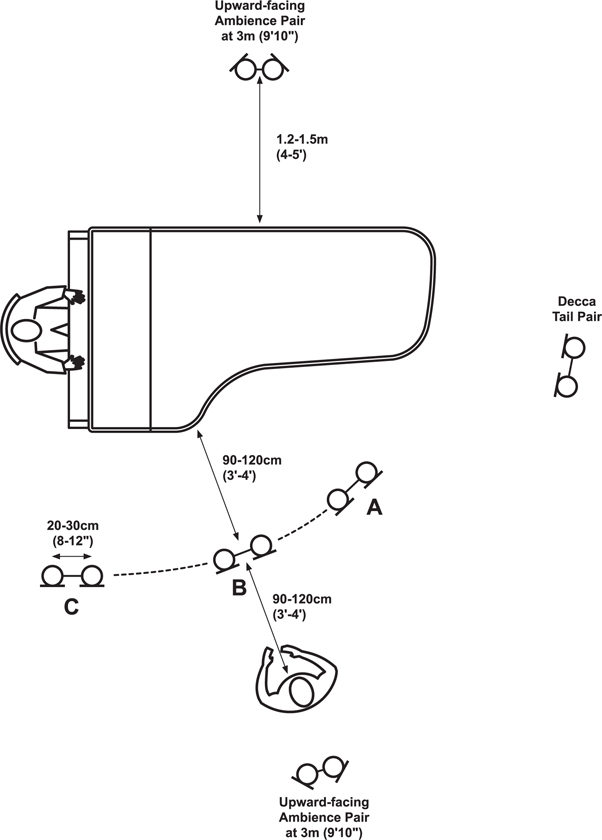
Figure 6.4 Studio layout with alternative singer positions A, B, C
Reduction in level of spill is often achieved in other recording scenarios by choosing to point the back of the microphone at the source that is to be discriminated against. If you are working in a tight space with a dry reverb characteristic such as a theatre pit, the null point of a microphone’s pickup can be used effectively; the acoustic has little reverb and you are close to individual sources. However, when working with piano and singer at microphone distances of greater than 1 m (3′4″) in a live space, the piano is not a point source at which the back of these singer’s microphones can be aimed effectively. It is nearly 3 m (9′10″) long, and is present in the room reverb as well, so it will inevitably be picked up on the singer’s microphones wherever they are placed. Therefore, the first priority should be making sure the singer is comfortable with their position relative to the piano and then to prioritise capture of a good singer sound when placing the vocal microphones. Because the spill is unavoidable and is to be utilised as part of the overall sound, its quality is of great importance. To assess the quality of the piano spill arriving off-axis on the vocal microphones, listen to the piano alone on these microphones, and you will be able to hear if there is a lot of colouration, usually in the form of rather muddy sounding middle bass. The tonal quality of this spill is all dependent on the characteristics of the vocal microphone that you are using, and if it is unsatisfactory, there is little to be done other than change the microphone.
As already mentioned, the piano microphones would ideally be omnis to make sure that the piano’s full timbral range is captured. There will of course be singer spill onto these microphones, and this will be increased significantly if the piano microphones are placed in the arc of the piano rather than as a tail pair as shown in Figure 6.4. If for any reason, the piano microphones have to be placed in the piano arc, cardioids might yield an overall better recording, despite the lack of deeper LF.
Now that we have two stereo pairs of microphones placed on our singer and pianist ensemble, the next question that arises is whether this will cause confusion in the stereo imaging. After all, each pair has a very different ‘view’ of the same ensemble, so which is the most important one, and where do ‘left’ and ‘right’ lie? The answer is that there is enough de-correlation between the pairs for it to be possible to overlay the images from each with no ill effects. The piano pair (panned fully left and right) will provide a balanced piano sound, give a wide overall sense of space, and will also add some warmth and richness to the voice. This will form the basis of the sound, with the vocal pair blended in to give sufficient focus to the voice. Although there is a little more voice level on the left piano microphone, the voice appears only a little to the left on the image from the piano microphones, and this becomes unimportant once the vocal microphones are added and used to centre the voice placement in the image. The vocal microphones alone will not produce a wide image but will just add some focus around the voice, and as such, which way round they are panned when in positions B and C turns out to be not particularly critical. Try both ways (L-R and R-L) and see which you prefer. In position A, where the singer and piano pairs are closer to one another, it is likely to matter more which way around the vocal microphones are panned.
The final recording should not sound like a combination of spot microphones on two separate players, and so if each player feels quite clean and isolated, the microphones are too close and picking up too little of the room and of the other player. It is very important that the singer and piano feel as if they are inhabiting the same space by sharing the same reverb characteristics, and the piano microphones are the key to providing an overall sound of the room and the whole ensemble.
The balance in level and perspective between the piano and the voice is a finely judged one; it will sometimes depend on the musical content, but in general, the piano part is written to be more than a simple accompaniment, and it performs a real dialogue with the singer. However, it is natural that the singer should feel slightly closer than the piano rather than the other way around; this reflects the fact that the singer stands in front of the piano in a concert, and this is the image we have in our minds’ eye when listening to a piano and voice recording. The danger of pulling the piano too close in the perspective is greatly reduced when you are not using close piano microphones in the well of the piano; the tail pair that is performing the role of overall ensemble pickup will be much easier to balance correctly. The singer should always be supported and audible and sufficiently focussed, but you are not aiming to replicate the levels of singer dominance that are found in, say, a Frank Sinatra–type recording where the soloist is very emphatically the central focus.
Figure 6.5 shows a slightly different layout with the singer standing more in the well of the piano and facing towards the pianist, thus placing the piano on his or her right-hand side, a scenario that might be arrived at because of singer preference.
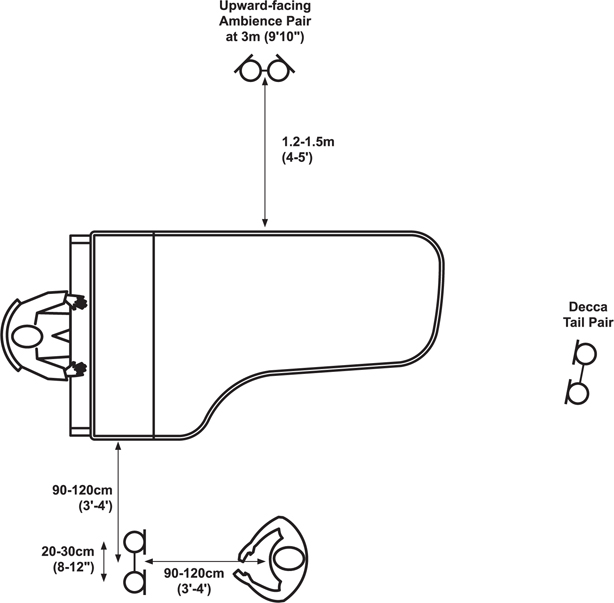
Figure 6.5 Studio layout variation with singer in the well of the piano
The most important difference between this and Figure 6.4 is that the piano will now be more present on the vocal microphones if cardioids are used because they are now picking up the piano on their side axes. As for positions B and C in Figure 6.4, the panning of the vocal microphones (L-R or R-L) is very much down to which works best when you try it, and it does not need to reflect the L-R panning of the piano pair.
To mitigate the presence of too much piano on the vocal microphones in this situation, ribbon fig of 8 microphones could be used to good effect, with the side axes pointing at the piano. The side axis null on a ribbon mic is more effective at source rejection than the rear null on a cardioid (especially on a high-end condenser cardioid, where a flat off-axis response is prioritised over off-axis rejection). Using ribbon microphones in this layout will enable the singer to be a little closer to the piano than in Figure 6.4 because of this increased rejection. The rear of the ribbon microphone in this situation will pick up a lot of room sound which will be useful for the overall mix if the room is good one, and the gentle HF roll-off of a ribbon microphone can be very flattering to a vocal sound and make it easier to blend with the piano. The spacing between the fig of 8s can be in the 20–30 cm (8″ to 12″) range used for the spaced cardioids previously. Small modern ribbon microphones (e.g. Royer R-121) are straightforward to rig this far apart, but be careful when rigging the larger and older Coles 4038 type ribbon microphones as a narrow pair. If they get too close together while you are attaching them to the stereo bar, they can be magnetically attracted to one another, and they can play havoc with your watch!
6.7.1 Vocal duet studio layout
Where there are two singers, they can be recorded with one microphone each, as the other singer’s microphone will contain enough spill to add some sense of width to each singer’s recorded image. Apart from this, the technique can be based on that for a solo singer (i.e. including a tail pair on the piano and an ambient pair in the room).
Figure 6.6a shows an adaptation of the solo singer layout from Figure 6.4 with both singers facing the pianist, side by side along a similar arc, but with only one microphone each. The singers are standing about 1.2 m (4′) apart – wherever is most comfortable for communication – and the microphone heights are the same as for a soloist. This layout is good for maintaining eyelines between both singers and the pianist, but care must be taken to avoid any singer reflections of the piano lid.
Figure 6.6b shows a sideways layout that will allow the use of ribbon microphones and hence reduced piano spill, but the sight lines for communication for the more distant singer are not as good, so the performers might not be as comfortable in this position.
6.8 Classical voice and lute/theorbo/guitar
Classical voice is paired with the lute in early music, such as Dowland’s songs, and the classical guitar is often substituted for the lute. Everything that follows will assume that the guitar is being used, but the same principles apply to the lute or theorbo. All of these instruments are quiet, and the most pressing problem is the mismatch of acoustic power between the lute or guitar, which is very quiet, and the classically trained singer who has the ability to completely overpower the accompaniment if they move into a higher gear. This makes the final result very difficult to balance, and the priority has to be reducing the spill of the singer onto the guitar microphones as much as possible.
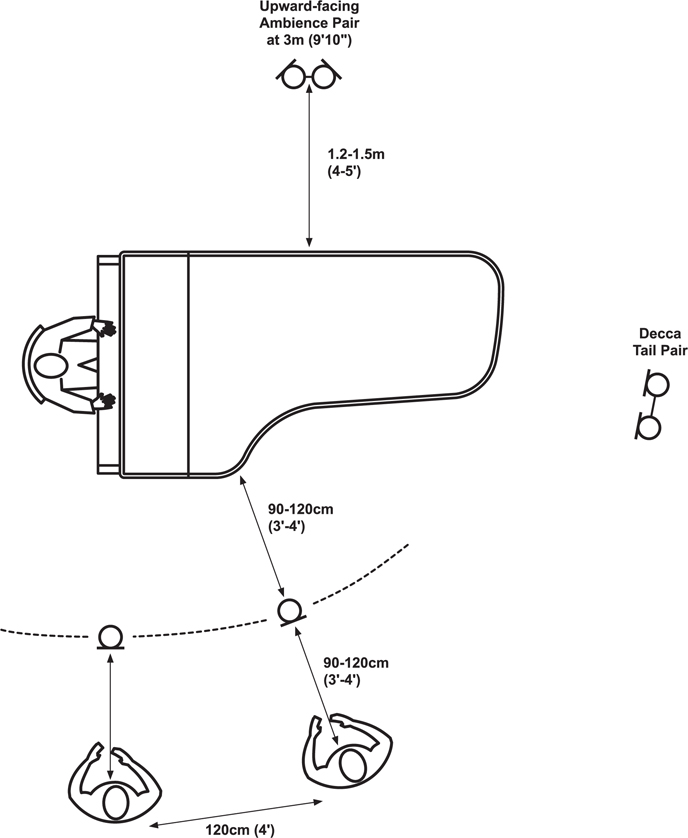

Figure 6.6b Another layout for use with a vocal duet and piano
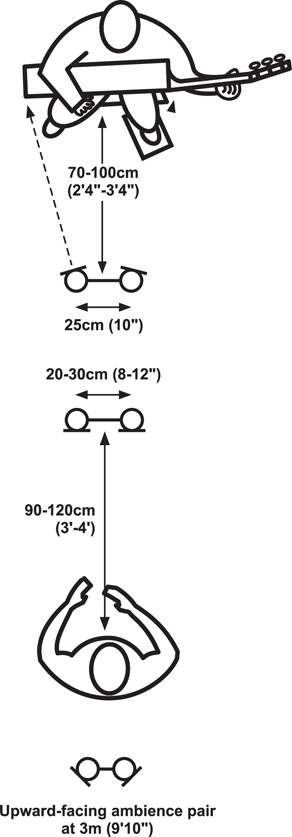
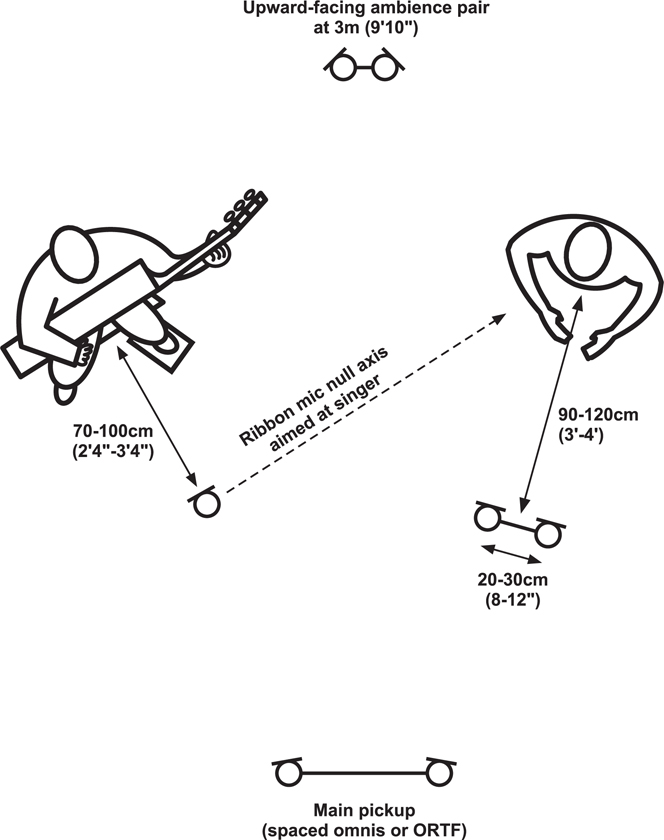
Figure 6.7b An alternative position for singer and guitar on session
The performers need to be comfortable with their positions, and in a recital would normally be side by side. In the studio, if you can persuade them to face each other, then you can use cardioids on both singer and guitarist, and you will have as good a separation as you can hope for. See Figure 6.7a and 6.7b. In addition to microphones on each soloist, you will need some overall pickup and a pair of ambient microphones if the room sounds good enough. If the performers prefer to be positioned more side by side or angled partly towards each other rather than facing each other completely, consider using ribbon microphones on the guitar using the null axis to discriminate against the singer. Chapter 4 gives more details on approaching recording the classical guitar as a solo instrument.
6.9 Mixing and fader riding for a singer
Classical singers have a very large dynamic range, and changes in level need to be anticipated when mixing. If there are going to be some lower, weaker notes that need supporting against the piano accompaniment, it will work better if the fader is already part way to where you need it to be; sudden large changes in level will be audible and disturbing. The scale of fader moves that can be used inaudibly will be anything up to about 4–5 dB.
Very large fader moves in the region of 10 dB on the vocal microphones will affect the piano sound, but smaller ones will be masked by the other microphone sources. (Remember that the main body of the sound will come from the piano microphones, and these faders will not be moved during the recording.) Fader moves will not necessarily solve every problem with level and you might need to encourage the performers to make changes as well. You can ask the pianist not to overpedal or play too loudly where the singer has weaker notes, and talk to the singer about leaning in towards the microphone very slightly when singing low and pulling back a little for high notes. Some singers cannot do this at all, and others will do it beautifully, but you cannot assume that a classical singer will have any microphone technique. It is not part of their traditional training as they are assumed to be performing without amplification; in contrast, pop or jazz singers who have been to a performing arts school or who have had lessons will have been taught microphone technique as part of their craft. Younger classical singers tend to have less well-developed dynamic control than those who are more experienced, and some good fader work can really help to support the performance where this is a problem.