Chapter 5
The piano
There is perhaps no other instrument that quite so divides opinion regarding the best way in which to record it, and there are, of course, many ways to go about it. This chapter aims to provide an overview of the features of the instrument and the principles involved in recording it, and then looks in some detail at the well-tried and trusted method originally developed by Decca engineers that is behind so many wonderful piano recordings. Many engineers with experience of other techniques are naturally sceptical of this approach and find it hard to believe that it could or would work. The best way to decide is to try it and make your own judgement.
The main focus of this chapter will be on grand pianos, and in particular full-size 2.8 m (9′) concert grand pianos such as the Steinway D. Although we are very aware that many readers will be working with smaller pianos than this, using the full-sized model offers the best way of demonstrating the key principles involved in piano recording. Once understood, they can be applied to any piano recording situation, whether on a baby grand or even an upright.
For recording piano with another soloist or as part of a chamber ensemble, see Chapters 6, 7, and 12, and for the piano concerto, see Chapter 11.
5.1 The nature of the sound of a piano
The complexity of the piano as a sound source can make it difficult to record successfully. When you strike most single keys on a piano, the hammer hits three strings tuned to that note, which all start vibrating at their fundamental frequency plus harmonics; these vibrations are then transmitted to the soundboard, which amplifies them in varying amounts according to its own physical properties and sends them out into the room. Along the way, different frequencies will be reflected off parts of the piano body and the lid in particular (see section 5.4), which directs some of the sound out towards the audience. In addition, some of the other 240 or so strings will experience sympathetic vibrations at multiples of their own fundamental frequencies if their dampers are raised at the time (the very highest notes have no dampers), and so the resulting patterns of vibration are very rich and varied.1
The complexity of all these strings causing and reacting to sympathetic vibrations in each other can easily be demonstrated. Sit at a piano, and rest your right arm across as many keys as possible from about middle C upwards. Push the keys down slowly to avoid making a sound; doing so will lift all the dampers for these notes off the strings, leaving them free to vibrate. With your left hand, play a short, loud note towards the lower end of the piano, and listen to the effect – you will hear a really complex mix of pitches ringing on after the loud low note has finished. These come from the strings of the notes you are holding down with your right arm, which have been set into motion by the transient of the low note, and by each other. You will also notice that they die away at different rates; the changing tone colour of piano die-away is a very complex characteristic of the sound that can also make editing more difficult. (See Chapter 18.)
Even though the interaction of vibrating strings is complex, the upper harmonics are not particularly strong. Figure 5.1 shows two spectrograms, one of a violin and one of a piano, recorded at about the same overall loudness as each other; the duration of each is about 20 seconds. Time is shown on the horizontal axis and frequency (0–21 kHz) on the vertical axis. The amplitude of each component of the sound is indicated by its brightness, with greater amplitude producing a brighter colour, or greater ‘whiteness’ in black and white.
The solo violin on the left clearly exhibits significant harmonic energy right up to the top of the human hearing range, with the harmonics appearing at integer multiples of the fundamental frequency. The solo piano on the right shows that the fundamental frequencies contain much more of the total energy (they are brighter) with the harmonics being much lower in level than those of the violin. This concentration of energy at the lower harmonics helps give the piano its warmth of sound, but also can mean that it is very easy for pianos to sound somewhat muddy and unclear, especially in dense passages when lots of notes are sounding.
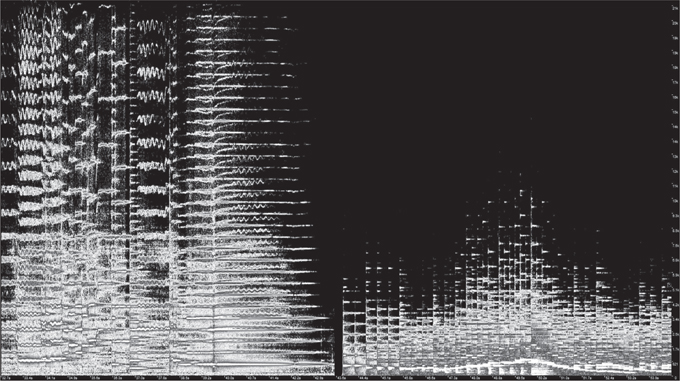
Figure 5.1 Comparison of energy levels in upper harmonics between violin (left) and piano (right)
5.2 The physical layout of a grand piano
Regardless of the manufacturer, the arrangement of strings inside a grand piano follows a similar pattern, with only the overall length of the instrument changing. The strings for the lowest notes are placed so that they cross over the strings for higher notes; this allows for greater string length within a given size of piano case. Reduced length can be traded against increased thickness when making bass strings, but the best tone comes from longer and thinner strings. For this reason, the bass end of a concert grand piano has a much more powerful tone than a baby grand or upright.
Figure 5.2 shows a plan view of a Fazioli F278, with the lid removed. The similarities in frame and string layout are obvious, and are much the same for other large pianos (Bechstein, Blüthner, Yamaha, etc.). The strings have been divided into zones A–D; the lowest bass notes only have one or two strings each whereas the middle and upper notes have three strings per note. All the strings in zones A–C have dampers to prevent them from resonating when they are not being played, and the small, very thin strings in zone D do not have dampers because they do not naturally ring on long enough to need them.
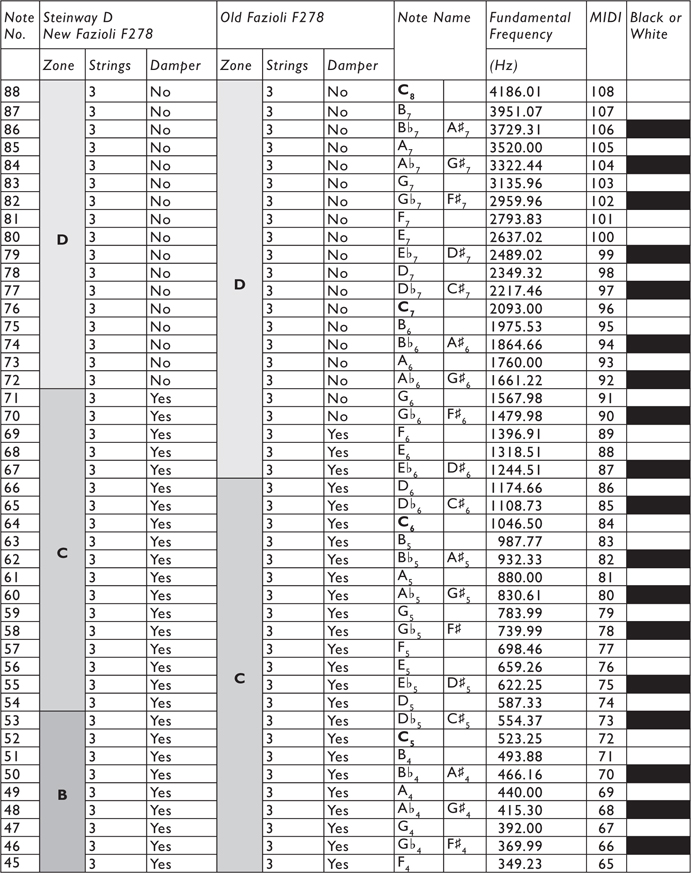
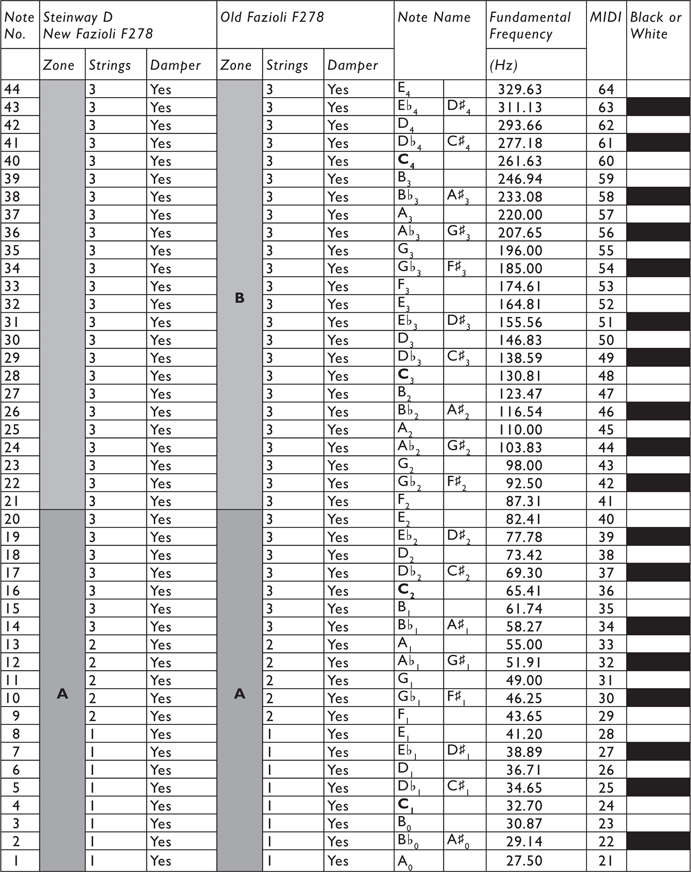
On some pianos, including older models of Fazioli F278, the frame layout is slightly different, meaning zones A–D are of different sizes. Figure 5.3 is a comparative table that brings together various parameters for three grand piano models, such as fundamental frequencies and note numbers. These are shown both as absolute values (from 1 for the lowest note to 88 for the highest) and MIDI note numbers. Note names are given in scientific pitch notation, where middle C = C4.
5.3 The piano lid
A standard grand piano lid has two open positions, each propped up by one of two alternative hinged sticks:
- Full stick – raises the lid to an angle of about 35°
- Short stick – this is about an eighth of the length of the full stick; raises the lid to an angle of about 7°.
Some engineers also use custom-made longer props to raise the lid higher when recording; these should be purpose made, extremely strong, and used in accordance with instructions.
In the underside of the lid are two indentations to hold the end of the stick. It is absolutely essential that the correct indentation is used for each stick – the angle between lid and stick should be 90°. If the short stick indentation is used for the full length stick, it is likely that the weight of the lid will snap the stick, and the lid will come crashing down. Short stick is mainly used as a crude volume control, especially prevalent when accompanying soloists in concert, and its effect has been likened to putting a fire blanket over the piano! Good recorded results can be obtained with a short stick piano, but its use should be avoided if possible.
The sound from the vibrating strings and resonating soundboard projects predominantly upwards, especially at higher frequencies. For some recording purposes, removing the piano lid can be very useful (see Chapter 11 for double piano concertos or for those conducted by the soloist). Outside these unusual circumstances, the piano is designed to be heard from a position seated at some distance in front of it, and the purpose of the open, propped-up lid is to reflect the sound out towards the listeners. The reflections from the lid come together well at this listening position; it can help to think of the lid as a lens that focusses the sound at this distance. However, microphones placed this far away will sound too reverberant and lacking in detail when heard without the visual cues that come from being able to see the instrument. When the microphones are moved in closer to the instrument, the lid reflections can combine with the direct radiation from the strings and soundboard to produce a muddy sound with a perceptible loss of clarity. (See 5.4.1 for the essential balance of ‘clarity’ and ‘warmth’ in a good piano sound.)
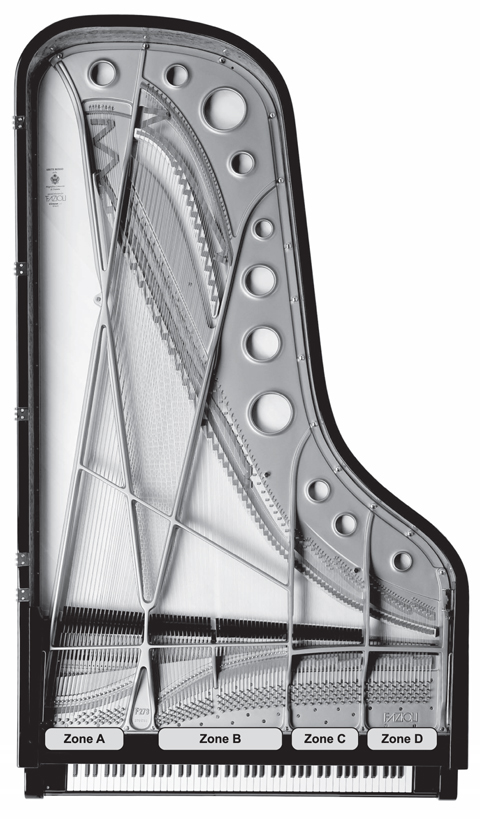
Figure 5.2 Fazioli F278 showing zones A–D
Image: © Fazioli Pianoforti SpA. Photo: Roberto Zava/Studio Step.
The positive side of the lid’s action is that it acts as a binding agent, bringing the sound of individual strings together into a coherent and warm-sounding whole. This action is especially effective at higher frequencies, where the geometry of lid, soundboard, and strings allows for multiple resonances and reflections for these shorter wavelengths. The balance between positive and negative effects of the lid will depend on exactly where the microphones are placed, and much of the challenge of getting the desired balance of ‘clarity’ and ‘warmth’ in the recorded sound comes down to controlling how much influence the lid will have on the recording. The effect is not easily predictable from one piano to another; many engineers have experienced setting up microphones on a piano in the firing line of the lid, fine-tuning the set-up to get a good sound, and then subsequently trying to recreate that good sound on another occasion without success, despite the microphones being in the same position. This kind of problem is primarily caused by the lid, and any reliable, re-creatable microphone technique seeks to ameliorate these effects.
5.4 Recording aims
The attributes of a good piano recording are really the same as for any other instrument although not always easy to achieve: a pleasing tonal balance, a recorded image of believable width and stability, equal sense of perspective and clarity across the whole range of notes, and an enjoyable blend of the instrument with the sound of the room.
5.4.1 Tonality
The fundamental qualitative trade-off, which is a good idea to keep at the forefront of your mind when recording a piano, is between clarity and warmth. The aim is always to keep an appropriate balance between the two, the ideal being to get exactly the right amount of both. However, when you take steps to increase clarity, it is possible that these will have the side effect of reducing warmth and vice versa. Note that there is not one absolute right answer on this balance; it very much depends on the situation, such as the nature of the repertoire being recorded and the other instrumentation, and it is ultimately a subjective decision. But concentrating on getting this balance right (whatever ‘right’ means in any particular context) is the key to getting the best possible recorded sound.
Clarity
- Individual notes are distinct
- Complex, fast passages can be heard clearly
- The sound grabs the attention of the listener
- Details don’t get lost in the dense texture of sound
- Quiet notes are clearly audible, even when other notes are sounding
Warmth
- Multiple notes sound part of a coherent whole
- The sound isn’t too strident or fatiguing
- The complex richness of interacting strings is audible
- The room reverb blends pleasingly with the piano
5.4.2 Stereo imaging and width
When looking at a piano from the audience’s perspective, you might be tempted to think that you would hear a clear stereo spread because of the string positions within the frame; that is the high notes would appear to be on the left and the low notes on the right. In reality, the complex interaction between the vibrating strings, soundboard, frame, and lid mean that although the instrument sounds wide, there is no obviously clear directional source for any range of notes once you stand more than about a metre away. From the player’s point of view, there is a clearer left-right differentiation (low notes on the left, high notes on the right), but for an audience member, this layout is not apparent. This aspect of the instrument needs to be considered when deciding what kind of recorded sound one hopes to achieve. In pop and jazz piano, it is often the convention to present the instrument with the notes laid out as if from the player’s perspective, but for classical/acoustic recording the goal is a more indistinct image as heard from the audience. The Decca technique described in section 5.6 does just this.
A common pitfall when recording classical piano is to give the instrument excessive stereo width and allow it to fill the whole space between left and right loudspeakers. This gives the recording an unnatural feeling, as if it has assumed gargantuan proportions and taken on the size of the room. Because all classical recording tries to set the instrument into some sort of realistic space, it is important that the sense of perspective is maintained. For perspective to be convincing, several aspects of the sound have to reinforce one another: the image width, the proportion of direct to reverberant sound, and the amount of ‘close’ instrumental noises. A grand piano will only fill your whole field of view if you stand right next to it with your head almost inside it. But from this distance, the sound would be dominated by direct sound and a lot of hammer noise. If a more distantly recorded piano is allowed to occupy the whole width, it stops feeling realistic and starts to feel overblown. Personal preference comes into this to some extent, but as a guide, the width of the instrument on a classical piano recording should occupy around 50%–75% of the whole width, with the reverb and sense of the room occupying 100% of the width.
The use of a phase scope as an aid to making judgements about image width is discussed in Chapter 2. Figure 5.4 shows the kind of display you would expect to get from a good piano recording. There is a nice amount of width, but it doesn’t extend all the way between left and right, and almost all of the components of the sound are in phase. This ‘fat cigar’ shape is a reliable indicator that all is well.
Figure 5.5, on the other hand, is too narrow, with the width getting very close to pure mono. Going the other way, Figure 5.6 is really too wide, with the sound spread out almost to the extremes of the loudspeakers. Going even further is Figure 5.7, where the ‘blob’ is becoming squashed horizontally instead of vertically, and you can clearly see some very horizontal elements – all of which indicate a lot of out-of-phase components. Out-of-phase recordings can sound very disorientating and unsettling, with no clear sense of where sounds are coming from, and can make some listeners feel quite unwell. The most important factor in controlling the amount of out-of-phase components when recording a piano is the spacing between microphones; this is discussed in section 5.5.2.
5.5 Recording a solo piano: the spaced pair
The most common method of recording a classical piano is to use a spaced pair, and this section will look at both microphone spacing and position around the piano. This will lead us on to the very particular use of the spaced pair that is the Decca piano technique in section 5.6.
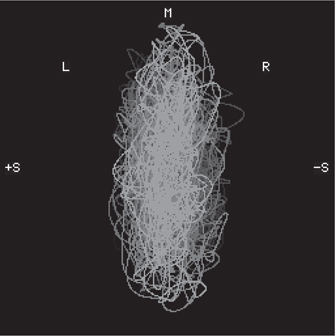
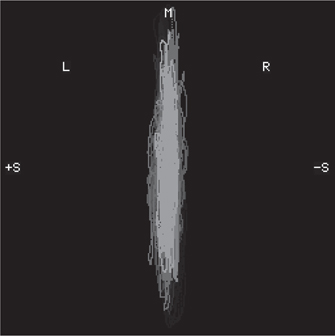
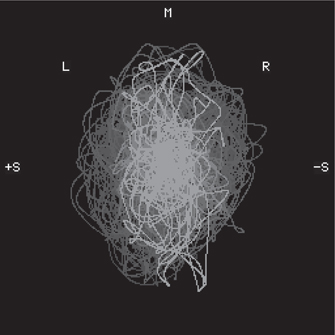
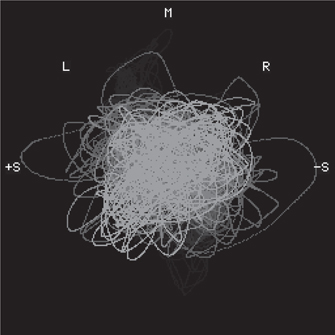
Figure 5.7 Far too wide, with out-of-phase notes clearly visible
5.5.1 Microphone positioning
Figure 5.8 shows an arc of positions for a spaced pair, from the keyboard to the tail. As a guide to the distance away from the edge of the piano, in position D at the tail end, the microphones are in the range of 1.2–1.65 m (4′ to 5′6″) away. Position B, opposite the well of the piano, is a little further away when measured in a straight line into the curve of the well. The microphones can be omnidirectional, cardioid, or even fig of 8 ribbons; the stereo image depends on the spacing of the pair and not the microphone directivity as the microphones are parallel to one another. Ribbon microphones (such as the Royer R-121 or Coles 4038) usually sound very good on piano; their sound is often described as warm, sweet, and lush, and the typically attenuated HF response of a ribbon doesn’t matter on an instrument that is dominated by its lower frequencies. However, omnidirectional mics are usually preferred because of their extended LF response; this is an important consideration for classical repertoire that encompasses the whole instrument (the bottom A on a piano has a fundamental frequency of 27.5 Hz).
Different positions along this arc will produce different effects, and walking around the piano to have a listen while someone is playing can give you an idea of where to start. It is sometimes thought that you will get more HF towards position A, and more LF towards position D, but it is often not quite like this; LF stays reasonably consistent around the arc, and there is a general trend towards reduced HF at the tail end.
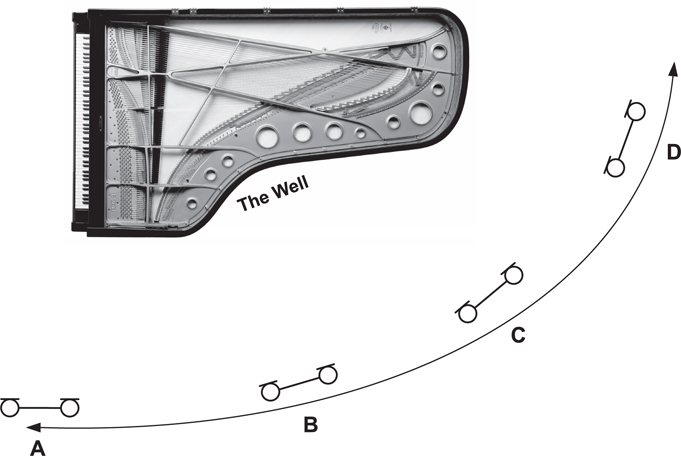
Figure 5.8 Positioning a spaced pair of microphones around a piano
Piano image: © Fazioli Pianoforti SpA. Photo: Roberto Zava/Studio Step.
As suggested in section 5.3, the lid and the reflections it produces are the main reason for the differences in sound along the arc. Because of its projection towards the audience, the muddying factor is heightened around position B; clarity improves and lid effects reduce as you move towards position D. Placing microphones between C and D allows the clarity/warmth balance to be controlled as required – left towards C to get more warmth and integration of the sound from the lid; right towards D to get more clarity. As you get closer to position D, the stereo image narrows (for a constant microphone spacing), and there is a slight drop in HF, which is often compensated for by using omnidirectional mics with a slight HF boost, such as the Schoeps MK2S.
Adjusting height also provides another way of controlling the effects of the lid; raising the microphone pair so that it approaches the height of the plane of the lid can reduce muddiness and give a similar clarity/warmth control to the left-right movement discussed earlier.
After lateral and vertical positioning, the next most important factor to consider is how close to the piano the pair should be. Closer microphone positions have two main effects: one is to increase clarity and instrumental mechanical sounds such as hammer noise, and the other is to make the image of the notes’ layout more distinct, with the high notes on the left and the low notes on the right. Both these attributes are more sought after for pop or jazz piano; a brighter sound is one that will cut through a mix more easily, and using cardioids and a high-pass filter (HPF) can be useful to stop LF content cluttering a busy mix. However, for classical recording, the greater distance brings a feeling of homogeneity, room ambience, and warmth, and we want to avoid the sound that feels as if we are standing right next to the instrument.
5.5.2 Microphone spacing
When using a spaced pair of microphones with them both pointing forwards, the spacing distance is the most important factor in controlling the stereo width, regardless of their directivity. If the microphones are too close together, the sound will be too narrow and mono, and if they are too far apart, the image becomes too wide; a ‘hole in the middle’ can develop, and there can be a lot of unpleasant out-of-phase effects between left and right channels, making the source hard to locate in the stereo image. (The closely related topic of using spaced omni microphones as an overall pair is discussed in Chapter 3.)
For pianos, when recorded somewhere around position D in Figure 5.8, we have found that the optimum separation distance is about 30 cm (12″), measured from capsule to capsule, with full panning L-R. At distances of 25 cm (10″) or less, the sound becomes noticeably more mono, and at 15 cm (6″) the image is really far too narrow. At separations much greater than 33 cm (13″), the image becomes wider and starts to lose focus at the centre. By 45 cm (18″) it is starting to be too wide, and by 60 cm (24″) it is definitely too wide.
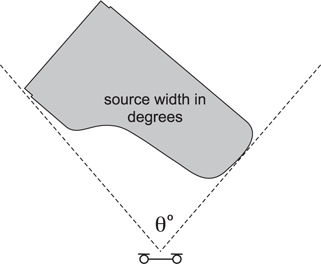
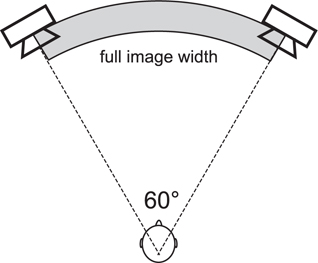
Figure 5.10 shows a useful chart derived from data collected by Michael Williams.2 It shows the expected image width in degrees that will be produced for a given microphone spacing and physical source width, also in degrees. The full image width between loudspeakers set up in an equilateral triangle is assumed to be 60° (±30°) (Figure 5.9b). The bottom axis shows time difference between sound arriving at each microphone; this depends on both microphone spacing and the location of an individual source (such as a single player) in degrees away from the central line (Figure 5.9a).
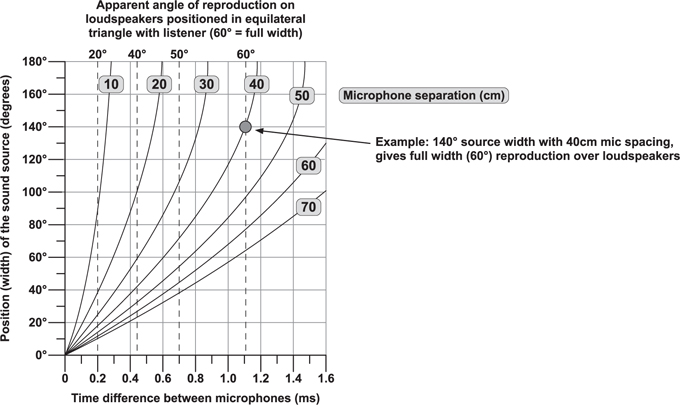
Source: Michael Williams.3
Each of the bold diagonal lines corresponds to a particular separation distance between the microphones, as labelled (in centimetres). The image width (angle of reproduction) is directly correlated to the time difference between the microphones, and is shown by the vertical dotted lines labelled in degrees. The circle on the chart indicates that for a source width of 140°, a spacing of 40 cm (16″) between microphones will produce an image that is full width between the loudspeakers (60°).
To use the chart as a guide to microphone spacing for omnis or parallel directional microphones, first stand at the sort of distance from the piano (or other source) that your microphones are going to be. Point your left arm to one extreme of the piano and your right arm to the other extreme, and have a look at the angle between your arms; this is your source width at the microphone position. Next, decide on your final desired image width; for piano, we earlier suggested about 50%–75% of the full width, which is about 30°–45°. You can then use the chart to work out a suggested microphone spacing. Microphone distance from the source will alter the source width; this distance will usually be chosen according to the balance of direct and reverberant sound, unless your microphone placement is constrained by other factors.
It goes without saying that this is a guide only; the ultimate decision about microphone distance and spacing rests with the engineer on the basis of how it sounds.
5.5.3 Measurements of out-of-phase components
Another important aspect of the microphone spacing is the impact it has on the amount of out-of-phase components that are present in the sound, which is always a potential problem with spaced microphone techniques. The different path lengths taken by soundwaves to reach each microphone will result in some phase differences between the left and right signals, and their significance depends on the wavelengths involved. For example, the wavelength of a 1 kHz signal is approximately 34 cm (13″), and this is the kind of distance by which we are separating the microphones. The wavelength of 100 Hz is around 3.4 m, so a microphone spacing of 30 cm (12″) is less significant for these frequencies.
Phase differences for individual notes can be seen quite clearly if you get a pianist to play individual notes one at a time and look at the results on a phase scope. Some notes will be in phase (predominantly vertical display on the scope), some will experience an intermediate phase shift (generally circular display on the scope), and others will be distinctly out of phase (predominantly horizontal display on the scope). It is these latter ones which are potentially a problem. With spaced microphone techniques you can never get rid of them altogether, but if there are too many then it will start to affect the overall feel of the sound, and it is a good idea to reduce (or at least control) the number of notes that are distinctly out of phase.
In a test performed by Mark Rogers, all 88 notes on a Steinway D were played individually and recorded simultaneously at three different microphone spacings: 20 cm (8″), 40 cm (16″), and 60 cm (24″). The results are shown in Figure 5.11, where it can clearly be seen that the number of notes that are distinctly out of phase increases along with the distance between the microphones, while the number of notes that are clearly in phase decreases. The out-of-phase notes tend to be at the higher end of the frequency range, as the lower notes have wavelengths that are too long to produce this effect.
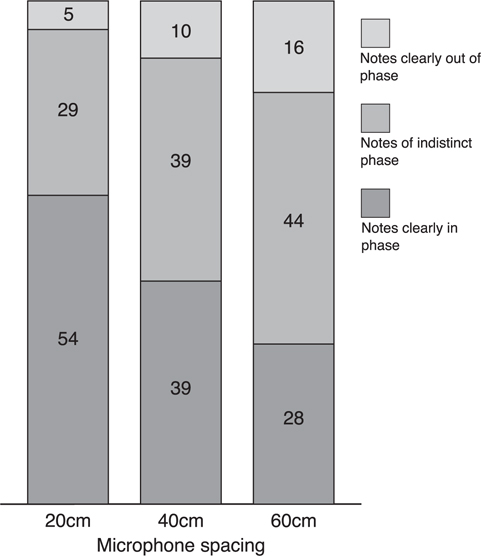
Figure 5.11 Effect of microphone separation distance on phase response of individual piano notes
Having a few out-of-phase notes does not adversely affect the listening experience, and again this suggests that a spacing of around 12″ (30 cm) is most likely to give a satisfactory width without too much in the way of out-of-phase effects.
5.6 The Decca piano technique
All of the aforementioned factors led Decca engineers to develop a practical technique that gave consistently excellent results and allowed adjustment of the tonal palette with simple, small adjustments. Figure 5.12 shows a pair of omnidirectional microphones, spaced 30 cm (12″) apart and positioned 120–150 cm (4′ to 5′) from the end of the piano, measured from the closest piece of wood to the microphone capsules. Height is usually around 150–180 cm (5′ to 6′) – at greater heights, the mics are looking over the lid.
The default starting position is for the right microphone to look directly along the middle bass string, pointing at the top of the metal frame at the keyboard end (see Figure 5.13). If observed from the keyboard end, this will be approximately in line with the lowest C (see Figure 5.14).
The left microphone points at the highest note with a damper (see Figure 5.15). The pair is rotated so that a perpendicular centre line from midway between the microphones points at the middle of the keyboard (E/F above middle C). Microphones should be panned fully left and right.
The given positions are just starting points; there is nothing sacred about them, and it is likely that some adjustments will be necessary:
- Forwards (closer to the piano) and backwards – adjusts the balance of direct to reverberant sound.
- Sideways movement – adjusts the amount of the mid and high frequencies while leaving the LF more or less constant. Moving to the left will increase them, and moving to the right will reduce them. Therefore, to make the pianist’s left hand (mainly LF) more prominent, move the microphones a little to the right. Often a small correction of a few centimetres or inches will make the required difference.
- Height – this can adjust the amount of lid colouration. With the pair below the lid, some of the ‘glue’ effect of the lid that integrates the sound together will be obtained. Microphones placed in the plane of the lid will remove much of the lid effect altogether. If the pair is up at 180 cm (6′), it could be looking right over the plane of the lid. Sometimes this doesn’t really matter, but if the R microphone is above the plane of the lid and the L microphone is below it, a slightly phasey effect on the bottom end can result. The microphones can be lowered, or sometimes a small move to the left will bring both of them just under the lid. As mentioned earlier, some engineers use custom lid props to raise the angle of the lid wider, which allows for higher microphone placement and changes the lid’s effect.

Figure 5.12 The Decca piano recording technique
Piano image: © Fazioli Pianoforti SpA. Photo: Roberto Zava/Studio Step.

Figure 5.13 Right microphone pointing down centre line of Zone A strings
Photo: Mark Rogers.
- Microphone spacing – adjusts the image width for a given distance from the piano. Again, only a small change can give the desired result, and in accordance with earlier comments, wider spacing than about 35 cm (14″) will start to make the image too wide.
There may be an overall lack of HF at the tail end, so it is common to use mics with an HF boost to give a little more reach or focus. Before Schoeps introduced the MK2S, Decca often used Neumann KM83s, M50s, and KM53s.
A strong point in favour of the Decca technique is that it generally produces a consistent perceived distance from the sound source across the full keyboard range. Despite the distance of the microphones from the upper strings, the high notes are very clear and do not feel like they are further away than the low notes. Moving the microphones around to the left (towards positions C and B in Figure 5.8) often seems to make the higher notes recede a little, despite closer proximity to the upper strings.
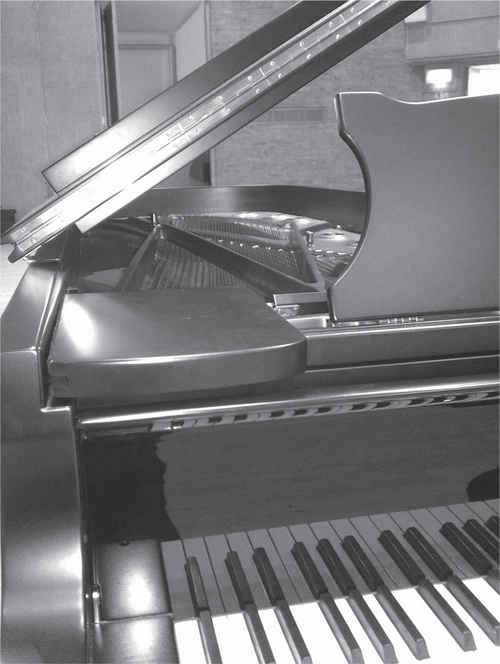
Figure 5.14 Looking from the keyboard, the centre line of Zone A matches up with lowest C key
Photo: Mark Rogers.
In some rooms, and on some pianos, the Decca technique (with a 30 cm (12″) spacing) can make notes between C5 and C6 prone to boosting and/or cancellation. It is worth doing a test by playing a chromatic scale of consistent loudness in the room, recording it, and seeing which notes, if any, are louder or softer on playback. Very small movements of the pair can sometimes eliminate these problems.

Figure 5.15 Left microphone pointing at transition from dampers (Zone C) to no dampers (Zone D)
Photo: Mark Rogers.
5.7 Techniques for other scenarios
This section is intended to cover recording pianos in more difficult circumstances where it is not possible to use a spaced pair or the Decca technique.
5.7.1 The three-microphone LCR method
There are many occasions when it is necessary to get closer to the piano with microphones; this might be in a concert situation where space is tight or where a tail pair cannot be used for other reasons. It is more commonly used where the piano is performing as part of an ensemble rather than for solo recital. As with all close microphone placement, it is important to try and obtain even coverage of the instrument. The useful analogy with spotlighting when trying to obtain even coverage of a group of players is explored in Chapters 8, 9, and 15. The same principles apply when trying to pick up a large instrument evenly from a close distance. Given the sheer size of the grand piano, if you have to place spaced microphones quite close to it in the well of the piano, the chances are that two microphones will not be sufficient to cover all the strings evenly, and three microphones will have to be used. These can be placed at a height of about 1.2–1.5 m (4′ to 5′), looking down onto the strings with the capsules placed just back from the edge of the instrument. Avoid taking the microphones right under the lid and closer to the strings unless you are aiming for a more hammery, jazz-orientated sound.
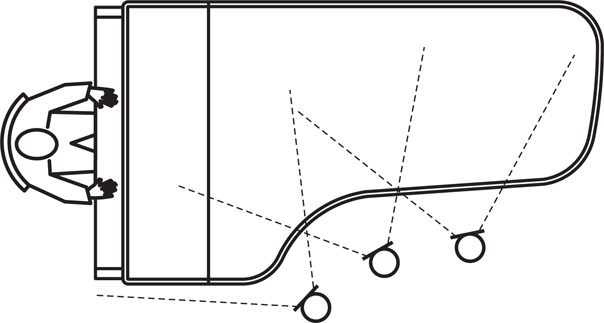
Figure 5.16 Plan view of three microphones covering a piano from a closer distance
Figure 5.16 shows a plan view of the microphones’ locations and areas of coverage of the strings and soundboard. The microphones are aimed at the high, middle and low strings respectively and can be panned fully L, C, and fully R. The recording image does not come out as overwide because of the anchoring action of the centre microphone. The level of this microphone can be used to alter the middle voicing of the piano in a range of up to about ±4 dB with respect to the left and right microphones. Figure 5.17 shows a photograph of the technique from a piano trio session in Abbey Road Studio 2.
5.7.2 Recording a piano on short stick
Sometimes you have no choice but to record a piano whose lid is on short stick. Surprisingly, the Decca technique, with the height set so that the microphones point into the small gap between piano and lid, works quite well. Another good option is to use the three-microphone LCR technique outlined in 5.7.1, again with the height adjusted to allow the microphones to point into the gap. The potential for a rather close and bright sound that over-emphasises the mechanics of the instrument can be ameliorated by use of ribbon microphones which soften any transients with their upper frequency roll-off. Wide cardioids (e.g. Schoeps MK21) are a good substitute for omnis if rear rejection is desired.
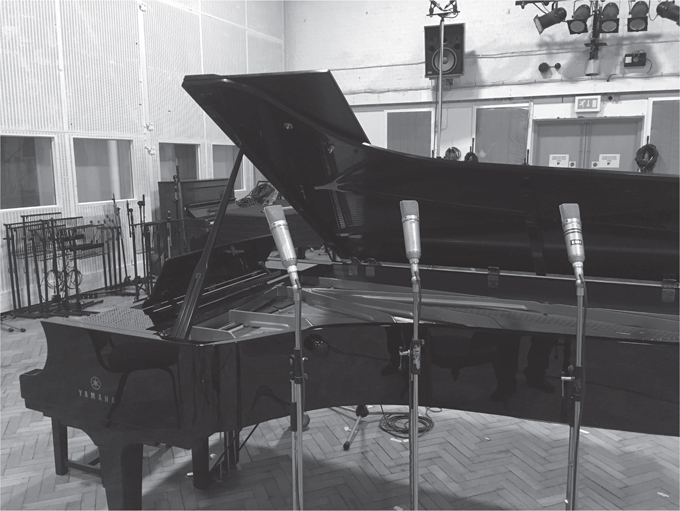
Figure 5.17 The LCR piano technique.
Photo: Carlos Lellis, Programme Director, Abbey Road Institute.
5.7.3 Microphones under the piano
Despite the temptation to hide microphones under the piano during a live event, this is almost never a good idea. The sound under the piano is highly coloured as it comes mainly from the resonating soundboard and not the strings. There is also potential for strong boundary effects with the floor and the setting up of standing waves between the floor and underside of the piano. The sound is often described as ‘honky’, and it needs a lot of EQ to make it usable.
5.7.4 Upright pianos
To get good results on an upright piano, the same principles we have discussed for grand pianos can be used, although there is no large lid to integrate the sound. One option is to open the top of the piano and point the microphones in from above, looking down the length of the strings. Alternatively, if the bottom front cover can be removed, they can be pointed upwards along the length of the strings from the bottom. Removing all the front covers and recording from the front means that the player is potentially in the way, unless you can place a pair high enough and looking downwards. Putting microphones behind an upright piano (behind the soundboard) is similar to putting microphones under a grand piano and can give a similarly coloured and unpleasant sound.
5.8 Practical issues when recording pianos
5.8.1 Loudness and distance
One of the reasons why the piano is such a good instrument both for soloing and accompaniment is that notes played harder do not just sound louder but also sound physically closer thanks to the increase in the transients. The tonal character changes such that if you shut your eyes and try to imagine how far away the sound source is, it will seem to get closer as it is played harder. Thus a skilled player can literally bring a melody forward whilst keeping other notes recessed. However, this feature of the piano can be a trap for the engineer: if you have spent time getting the microphone distance just right with the performer playing one piece, it can be disconcerting to hear it sound too close or too far away when the repertoire or performer changes. Therefore it is a good idea, whilst setting up, to get your performer to play a range of material at a range of dynamics, listen for the changing perceived distance, and settle on a happy middle position.
5.8.2 Monitoring and image width
As noted in Chapter 2, you need to be very careful if monitoring your recording on headphones. It is particularly easy to make a piano sound good on headphones only to discover that it sounds far less so on loudspeakers. Most typically, a relatively narrow and direct piano sound with a lot of additional full-width reverb will sound very impressive on headphones, but when played on loudspeakers the two elements seem quite disjointed and separate, with the reverb seeming washy and overbearing, making it hard to focus on the direct piano sound. However, what sounds good on loudspeakers will almost always sound good on headphones too.
5.8.3 Pedal noise
The pedals on a piano can be quite noisy. Some of the noise can be from the internal mechanism (that which lifts the dampers or shifts the mechanism for playing una corda), and some can be external (such as shoe scrapes on the floor). One of the great advantages of the Decca technique is that the microphones are a long way from the pedal mechanism, which helps to minimise the problem. However, it is always a good idea to take a small piece of carpet or a mat to a session that can be put under the performer’s feet to reduce noises from their interaction with the floor (see Figure 5.18).
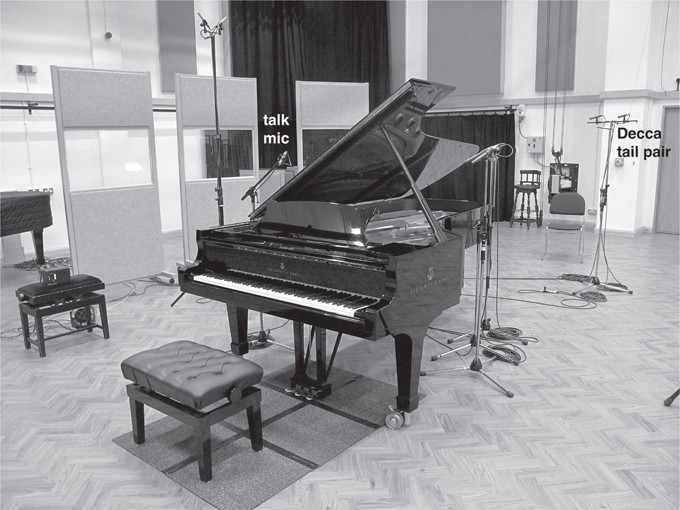
Photo: Caroline Haigh.
5.8.4 Screens and reflective walls
If the recording room has flat walls, reflections can be a problem, especially if the walls are parallel. It can be a good idea to avoid positioning the piano with its long hinged side parallel to the rear wall, and turning the piano to an angle allows the sound to bounce off the walls in different directions. Another very useful solution, if you have access to them, is to use acoustic screens around the piano. These should be placed at different angles and with gaps in between them rather than forming a continuous block. The aim is not to absorb sound waves but to break up reflective paths and make the internal surfaces of the room more complex. (See Figure 5.18 for use of screens.)
5.8.5 Floor effects
The underlying structure and surface material of the floor can have a big effect on a piano sound. Concert hall floors that are suspended or sprung can sometimes act as giant low-frequency resonators, which can have a beneficial effect in warming up and enhancing the low end of the piano. A solid floor has no spring at all and will not couple with the piano in this way. Very reflective surfaces will give a harder sound, and in venues such a churches with stone floors, placing absorptive material under the piano – such as carpet, kneeler cushions, or even the fabric piano cover – can help to counteract this.
5.8.6 Stereo balance and bias
The imprecise imagery of a piano – not really knowing where a sound is coming from – can lead you to set up your microphones so that the recording sounds good initially, but it becomes less pleasing to listen to over a long period. Often this is a result of some kind of left-right balance issue, which might be related to amplitude and/or timing.
It is essential that the two microphones have the same gain so that any imbalance between left and right can be corrected by adjusting only the timing (e.g. by rotating the pair so that one or other mic gets closer to the piano). Here is a useful set-up method:
- 1Before mounting the microphones, hold them together so that their capsules are next to each other and talk directly on-axis into them whilst observing the signal on a phase scope. Any gain discrepancy will be seen as a bend to the left or right. Adjust gains so that the line is vertical.
- 2Next, set up the microphones in position and ask the pianist to play whilst you listen on headphones and/or loudspeakers (headphones are particularly good for this test).
- 3Whilst listening, repeatedly toggle a left-right reverse function on your monitoring system. This will switch between sending the left microphone to the left monitor and the right microphone to the right monitor, and vice versa.
The image will be different when you left-right reverse (the piano is not a symmetrical instrument), but if set correctly, you should not feel a major image shift from one side to the other. If you are experiencing movement, you will be able to work out if the pair is producing a signal that is left or right heavy (when panned the correct way around.) Given that the microphones have been electrically balanced in step 1, any left-right imbalance is due to microphone placement. To correct this, try these options:
- 1Move the whole mic array left or right if it looks as if the piano is physically offset from the centre line of the pair.
- 2Rotate the mic array (if fitted on a stereo bar) to adjust the time of arrival for the pair of mics. If the image is right heavy, then rotate the array clockwise (viewed from above) to bring the left microphone closer and the right microphone further away. In the default Decca setup, a perpendicular line from the centre of the stereo bar points to the middle notes of the piano, but as the microphones are moved leftwards (towards C and B in Figure 5.8), you will find that the line points more towards the bottom end of the piano.
Middle keyboard sounds (two octaves around middle C) are particularly helpful for this adjustment.
5.8.7 And finally, talkback
As noted in Chapter 2, if your microphones are a long way from the player of the instrument, you cannot rely on them for communications as well. If you use the Decca technique, the microphones really are a long way from the pianist, and in a session environment it is essential to put up an extra microphone close to the player in order for them to be able to talk to you. (See Figure 5.18). This microphone should not be included in the recorded mix, but only in the monitoring. Inevitably, you will forget to mute it at some point, so if the current take sounds strange, your first thought should always be to wonder if you’ve left the talkback microphone on.