Chapter 12
Chamber ensembles
Chamber ensembles come in many varieties, but they all perform music designed for a more intimate space and work without a conductor. Communication and eyelines between the players are therefore very important, and this needs to be taken into consideration when deciding on studio recording layouts. Small classical brass ensembles (of quintet size) have been included in Chapter 13.
We will consider some of the most common ensembles in turn.
12.1 String quartet in studio layout
The string quartet consists of two violins, a viola, and a cello; music has been written for this combination of string players from the 18th century to the present day. Whatever method is used to record the quartet, the aim is stability and focus in the recorded image. This is a greater priority than it would be for a large orchestra or choir where the overall blend of players is most important. Each player in a quartet has a different musical line and so needs to be heard as an individual as well as part of the whole.
The traditional seating layout from left to right is first violin, second violin, viola, cello. However, sometimes when recording, the cello and viola prefer to swap places, and this might affect both the internal acoustic balance and hence the recorded balance. One of the common difficulties with any quartet layout is the cello sounding a little recessed in perspective compared with the other players. The cello’s radiation is less directional than that of the violins and violas, and from the point of view of microphones that are positioned looking down from a height, it is further away. Where this loss of contact with the cello is apparent, additional spot microphones might be used to help to bring it more into focus (see section 18.1.3 on using additional spot microphones).
There are a few approaches to recording the string quartet, depending on how close the players like to sit, how well acoustically balanced they are, and what sort of space you are working in. We will concentrate here on two primary techniques: the small Decca Tree and spaced omnis in conjunction with a near-coincident pair of cardioids.
12.1.1 Small Decca Tree and no spot microphones
The standard Decca Tree spacing is designed for orchestral use, and as such it is too wide to use on a string quartet; it would be wider than the ensemble and the imaging would be very unfocussed. A smaller Decca Tree can be used, with each of the three microphones spaced at around 50–56 cm (19.5″ to 22″) from the centre point of the tree and the centre microphone placed about 15 cm (6″) back from the front edges of the musicians’ chairs. It allows the quartet to sit close together in a quite a tight, closed-in horseshoe, but it does require the quartet to have a really good internal balance; best results will be obtained from a quartet that prefers to sit close together. (This technique was used for the 1975 recordings of the Fitzwilliam Quartet, who liked to work in this way. The recordings included the Shostakovich string quartets series1 and were made in All Saints’ Church, Petersham, London.)
The microphones are placed at a lower height than for an orchestral tree, at about 2.5–2.7 m (8′2″ to 8′10″). If they are much lower than this, the instrumental noises become more intrusive and the difference in height positioning of the cello and the violins becomes more exaggerated. The cello is naturally situated about another 60 cm (2′) further from the microphones than the violins, and so keeping the distance to the microphones to over 2.5 m (8′2″) reduces the impact on perspective. The outer tree microphones will be pointing directly at the first violin and the cello, and the cellist should be able to turn a little towards the right-hand microphone to gain a little extra focus. The microphones will be panned hard left, centre, and hard right. See Figure 12.1a and 12.1b for plan and side views.
The imaging from a small Decca Tree will not be as sharp or stable as with other stereo techniques, but the overall tonality will be excellent, and with the smaller tree spacing and a tightly knit group, the imaging should be more than acceptable.
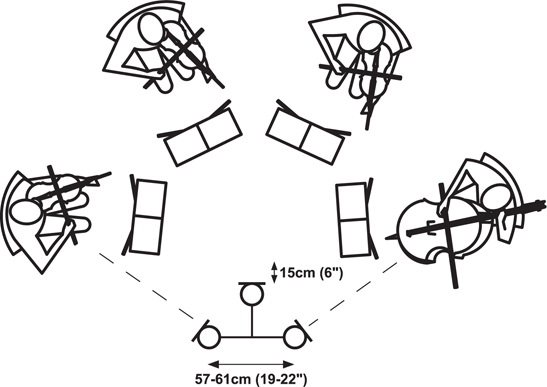
Figure 12.1a String quartet recording layout using a small Decca Tree – plan view
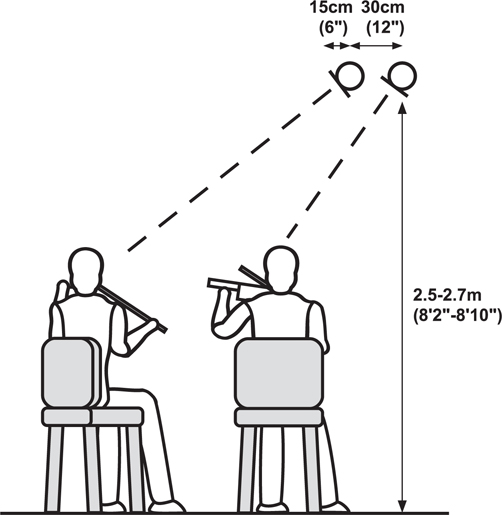
Figure 12.1b String quartet recording layout using a small Decca Tree – side view
12.1.2 Two-microphone tree (spaced omnis) plus ORTF/NOS-type pair
The success or otherwise of two spaced omnis used alone depends on the width of the ensemble, the distance from the ensemble, and the spacing of the microphones. (See Chapter 3.) The distance from the ensemble will be decided by the desired balance between the amount of close sound from the instruments and the amount of reverberation. If the microphones are too far apart on a string quartet (e.g. 1 m (3′4″)), the image will be rather unfocussed and unstable, and player movements can be exaggerated. At even greater extremes of spacing, the effect will be of two mono sources placed in the loudspeakers, with little occupying the centre of the image. If the microphones are too close together (closer than about 30 cm (12″) in this context), then the resulting image will be lacking in width. Therefore, the range of spacings and distances from the players in which this technique will work on its own for a string quartet is quite limited, and it is common practice to combine a pair of spaced omnis (for their quality of sound and extended LF) with a near co-incident pair such as ORTF to provide stability and focus to the image.
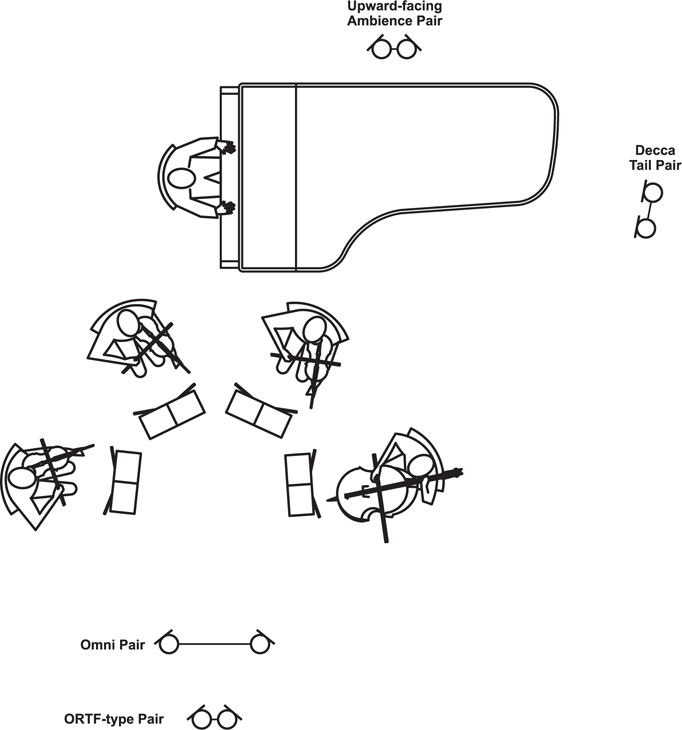
Figure 12.2a and 12.2b shows a typical set up of this kind. The rationale for placing the cardioids further back is that they pick up less reverb than omnis, and the pairs will sound similarly reverberant when the omnis are placed closer. (It is also possible to reverse the position of the pairs, and place the ORTF pair as the closer of the two, with the omnis further back where they will collect a more reverberant sound. In this situation, the ORTF pair will necessarily dominate the mix because the omnis will be too reverberant, and they will just be used to blend in a little more room sound. It means that the sound will be primarily based on cardioid microphones, so it will have reduced LF and a different tone quality to that based on omnis.)
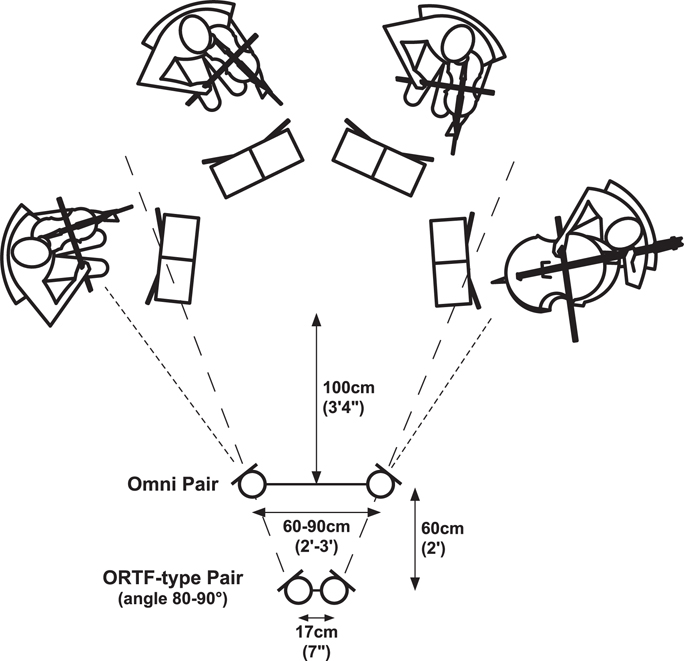
Figure 12.2a String quartet session layout using spaced omnis and ORTF pair – plan view
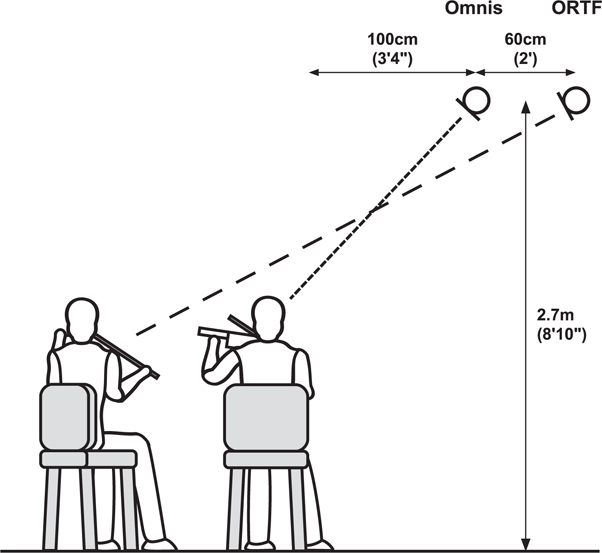
Figure 12.2b String quartet session layout using spaced omnis and ORTF pair – side view
12.1.2.1 The omni pair
The omni pair should be positioned at around 2.7 m (8′10″) in height and 30–100 cm (1′ to 3′4″) back from the instruments, depending the desired ratio of reverb to direct sound and the acoustic of the room. Height is used to gain some distance from the group whilst avoiding the front players appearing significantly closer. The spacing of these microphones is something that can be altered between about 60 cm and 90 cm (2′ and 3′). If it is left at its maximum of around 90 cm (3′), the image will be wider and less focussed, although the addition of the ORTF-type pair in mixing will narrow this to some extent, depending on how much is added. They can be closed in to around 60–70 cm (2′ to 2′4″) whereupon a little breadth will be lost, but you will be less reliant on the ORTF pair to both narrow the image and provide stability. There will be less potential image conflict in the recording if the image of the quartet on each pair is about the same width (see also 12.1.2.3 Mixing the pairs together). The addition of spheres to these microphones (as discussed in Chapter 8) will add some directionality and some HF lift if required.
12.1.2.2 The ORTF-type pair
This does not need to exactly conform to the ORTF standard (refer to Chapter 3 for a discussion of spaced and angled pairs), and the microphone angling or spacing will need to be modified to produce a suitable image width at the distance they are being used. They should be placed about another 60 cm (2′) back from the omnis, and the quartet is likely to fill much of the acceptance angle of a true ORTF pair at this distance, producing a wide image that stretches the full width between the loudspeakers. Generally, a string quartet would need to fill around 50% of the whole image width on a finished recording, so the image width will need to be reduced. Rather than panning inwards, it is preferable to reduce the angle between the microphones to nearer 80°–90° and retain full left and right panning. You will also find that this results in the microphones being pointed between the first and second violins and between the viola and cello. This will avoid the first violin and cello being directly on-axis to the cardioids and dominating the sound.
12.1.2.3 Mixing the pairs together
As with all ‘mixed pair’ techniques, one of the pairs should be chosen as the dominant pair in order to minimise any image confusion. This can occur where two stereo pairs are superimposed on top of one another and both contribute equally to the mix. The confusion can be particularly problematic if the source image width is somewhat different on each pair, but making one pair dominant and paying some attention to matching image widths will usually avoid the problem. With the string quartet, the suggestion would be to use the omnis as the dominant pair and bring in the ORTF-type pair just enough to focus the image. This will usually mean the omnis are around 6–8 dB higher in level. They will give a nice warm sound, extended LF, and the visceral appeal of being slightly closer to the players. As noted in section 12.1.2.1, if the image from the omni pair is slightly over-wide, the addition of some of the ORTF-type pair will pull it in a little. In terms of our lighting analogies, the omnis represent a pair of floodlights and the cardioids some spotlights placed further back. The microphone feeds from the two pairs can be easily captured on multi-track alongside the mix and will enable you to adjust the amount of focus and depth of field later on if needed.
12.1.3 Using spot microphones
It is very common to try and record the string quartet with a spot microphone on each player and a spaced pair of omnis placed further back. Because the spot microphones produce a fairly close-sounding perspective, this makes them hard to blend with the omnis other than at a very low level. However, in order to focus the image from the omnis, the spot microphones often end up being used at quite a high level, and this results in the quartet separating out into four mono sources. This effect can be avoided by using the technique outlined in 12.1.2; using an ORTF-type pair rather than four spot microphones to add focus will avoid isolating each instrument.
However, there are times when a tiny bit of help with balance and/or perspective might be needed, particularly on the cello and viola, and spot microphones can be added but used in small amounts. To avoid these microphones sounding too close, they should be placed at least 2 m (6′7″) high, and aiming them over the top of the players will reduce the amount of HF that is picked up. (The instrument will be situated just off the front axis of the microphone, and this will tone down the HF and any ‘close’ noises.) Spot microphones placed in this way can be added to either of the main techniques outlined in 12.1.1 and 12.1.2, but care should be taken not to overuse them. As noted earlier, occasionally on a recording session a quartet will sit with the cello seated more centrally and the viola seated on the right-hand side, thus projecting away from the main microphones. In this situation, spot microphones for adding a little more contact with the cello and viola might be needed.
12.2 String quartet in concert
The techniques outlined in section 12.1 could be used in concert, as there is little difference in the musicians’ seating arrangements other than a tendency to open out the semicircle a little, but there will be a number of microphone stands in the way of the audience, and you will need to reduce these. To use the ‘omnis plus ORTF’ technique from 12.1.2, there are a few approaches that would be worth considering.
Firstly, mounting on stands. A single stand is far preferable in a live situation, and it is possible to mount both pairs on a single stand by using a central cross piece as shown in Figure 12.3. The attachment shown allows for adjustment of the front-to-back distance between the pairs. It is often possible to improvise a central cross piece using an additional wide stereo bar, although this will usually mean that the front-to-back distance between the pairs has to be fixed.
Where it is not possible to use an arrangement like the one in Figure 12.3, mounting all four microphones on a single wide bar would be a workable compromise. The omnis will be at the outer end of the bar at 60–70 cm (2′ to 2′4″) apart, with the ORTF-type pair in between them. The rig should be placed to get the best sound from the omni pair, even though this will place the ORTF pair a bit too close to the players. The width of the image on this pair will now be a little wider than before (because it is closer and the players take up more of its stereo recording angle). They could be angled a little further inwards to compensate.
Slinging microphones is always more difficult, but it is also more discreet, and the single wide stereo bar would be the easiest option if suspending microphones becomes necessary, as it only requires a single slinging line across the width of the stage (excluding a second safety line). See Chapter 2 for notes about slinging microphones.
12.3 Piano quintet: studio and concert techniques
The piano quintet can be considered as a combination of a string quartet with a piano, and as such, we can combine microphone techniques for the string quartet with those for the piano already outlined in Chapter 5. Please review these sections for more details.

Figure 12.3 Mounting an omni pair and ORTF pair on a single stand
Photo: Mark Rogers.
For both live performance and studio work, the players can either sit in the well of the piano or further out and over towards the piano keyboard, as their preference dictates. Figure 12.4a and 12.4b shows these alternative placements. From the engineer’s point of view, moving the players out of the well of the piano would always be preferred, as there will be lower levels of piano reflecting off the lid and into the string microphones. Therefore, the position in Figure 12.4b would be the favoured recording set-up if it can be arranged. (See section 12.4 for discussion of the difficulties of the reverse-seating position in this context.)
In both these positions, either of the main string quartet techniques outlined in section 12.1 can be used for the string players (a small Decca Tree with optional spot microphones if there is not enough detail or too much piano, or a combination of spaced omnis and ORTF-type pair). It should be noted that in the position in Figure 12.4a, an ORTF pair is likely to pick up a lot of piano from the lid, and this can be helped by lowering its height. If this is still a problem at a lower height, using spot microphones will be the best approach. In addition to the string microphones, a pair needs to be added to the piano to add some focus and to control the piano image placement. If one of the techniques from section 12.1 is used for the strings, there will already be some omnis contributing to the overall tonality of the piano sound. With the lowest LF taken care of by these omnis, the piano microphones themselves can be cardioid or wide cardioid to give a little more image focus and to reduce spill from the strings. In Figure 12.4b in particular, the piano is somewhat to the right on the string microphones, but it should be possible to anchor the piano image more centrally using the piano microphones and panning them fully Left and right around the centre of the image. The tree itself will give a nice full sense of stereo space to the string quartet and the wider room.

In order to pick up some more reverberant sound when using either of these positions or microphone techniques, an ambient pair can be rigged, either upwards-facing behind the piano (remembering that this is a good discreet position in a live situation) or behind the main array of tree or spaced omnis and ORTF. If placed behind the tree for a studio recording, they could be facing backwards instead of upwards without the danger of picking up a lot of audience noise. The aim of these microphones is to provide some natural room reverb that contains all the instruments to help bind them together in the same space.
12.4 Piano quintet: reverse-seated studio position
The string players will often prefer to face the other way around so that they can see and hear both each other and the pianist really well, as shown in Figure 12.5a and 12.5b. Many of the Ashkenazy, Perlman, Zukerman, and Harrell recordings2 were done in this seating position using the microphone technique shown in Figure 12.5b with individual spot microphones.
Once the players are seated this way around, the techniques outlined in sections 12.1 and 12.3 will not be suitable because the string microphone array will be right in the middle of the players and very close to the piano. If there is enough distance between the quartet and the piano (Figure 12.5a), it might be possible to fit in a pair of ORTF-type cardioids to pick up the strings, but any omnis in this position will pick up too much of the piano. Given that the players prefer to sit this way in order to hear and see each other well, the likelihood is that they will be quite close to the piano, and it will not be possible to fit in a pair at an appropriate distance from them. In this situation, the only solution will be to give the string players a microphone each (Figure 12.5b). As noted in section 12.1.3, a great deal of care needs to be taken when relying on spot microphones to avoid the recording sounding like a collection of individual mono sources. The spot microphones should not be too close – at least 2 m (6′7″) high – and some additional ambience microphones might be essential in providing a blended sound of all the players together to soften the effect of the spot microphones. These can be placed either behind the piano or behind and above the string quartet in order to collect a more distant sound from all the players.
Ultimately, the decision about the seating arrangement will be in the hands of the players, and if you are not sure how they are going to want to sit, you should allow yourself enough microphones, stands, and channels to be able to give them a spot microphone each, if that becomes necessary. More experienced players tend to prefer the reverse-seated recording position, but younger players might prefer the outward facing ‘concert’ position as it is familiar. Most players prefer to avoid sitting in the well of the piano, as the sound is loud and overwhelming.
12.5 Piano trio: studio and concert techniques
The piano trio (piano, violin, cello) will normally be seated for performance, as shown in Figure 12.6a, and the techniques outlined for the string quartet and piano quintet can be adapted for use here: a small Decca Tree with optional spot mics, or ORTF and spaced omnis centred on the string players, plus a piano tail pair and an ambient pair. Again, if there is too much piano on the ORTF pair, try reducing its height, and if this doesn’t work, move to using spot microphones.
Figure 12.6b shows an adapted layout for recording with the players moved over to be nearer the piano keyboard for closer communication with the pianist. This includes a small Decca Tree centred on the string players to place them centrally in the recording image and to provide a good sense of space and reverb around the strings, a microphone each on the violin and cello for a little focus, a piano tail pair for the main quality of the piano sound, and a vertically pointing ambience pair to add a little reverb to the piano, as the tree will provide more reverb to the strings than to the piano. The piano pair will be panned L-R in mixing in order to anchor the piano image centrally – the piano will be appear to the right on the string image from the Decca Tree.
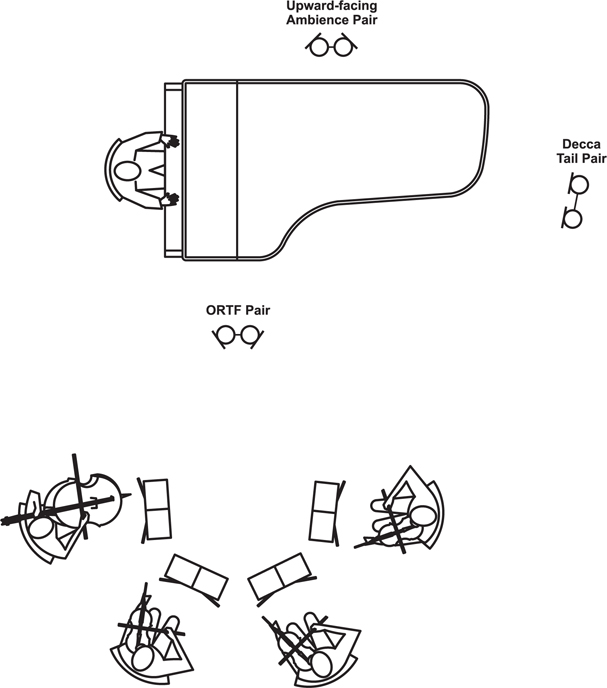
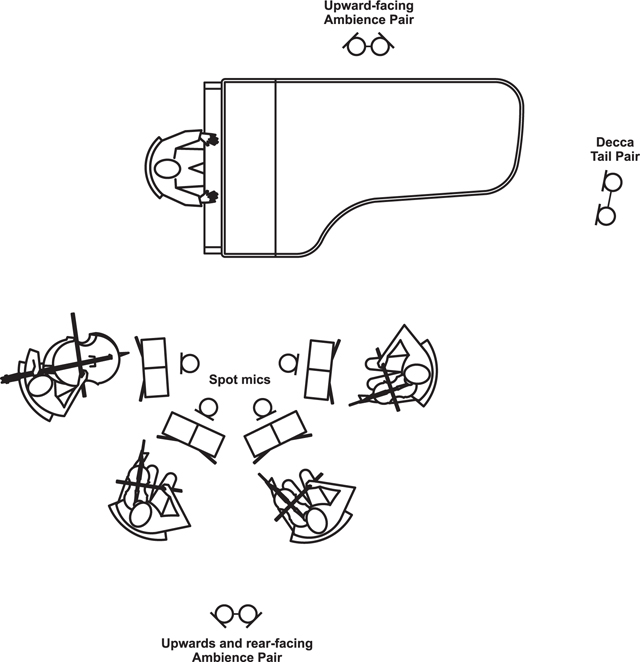
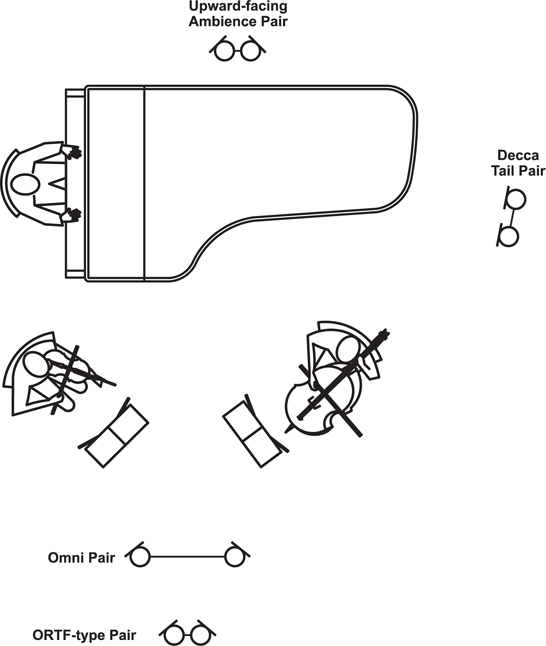
Figure 12.6a Piano trio facing outwards in a typical concert position
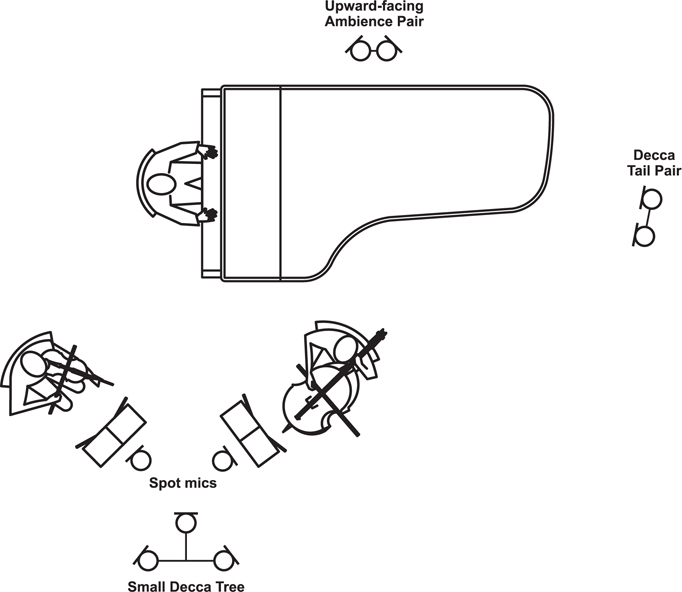
Figure 12.6b Piano trio facing outwards in preferred recording position
As with the piano quintet, if the string players prefer to turn and face the piano for recording, you will probably have to rely on using individual spot microphones placed at least 2 m (6′7″) high; see section 12.4 for notes about the piano quintet. Unless the string players leave a very large gap, there will not be enough room to place a Decca Tree between them and the piano without it being too close to the piano.
12.6 Small wind ensembles: studio or concert layout
This section is aimed at chamber wind ensembles of up to about 12 players. For information about how to record a larger, wind band–sized ensemble, please see Chapter 13.
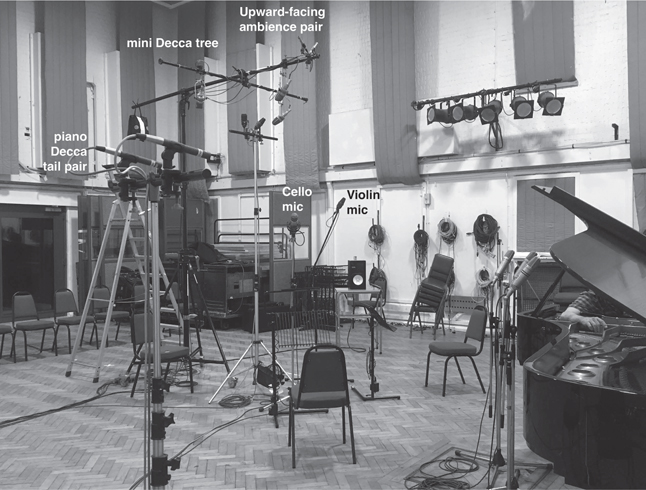
Figure 12.7 Photograph from Abbey Road string trio session set-up similar to Figure 12.6b
Photo: Carlos Lellis, Programme Director, Abbey Road Institute.
There can be a subtle difference in approach when recording wind ensembles as opposed to string ensembles. Strings have a homogeneity of sounds that easily blend together, whereas the woodwinds have their own more distinctive and individual sounds that need greater punctuation and clarity. A certain amount of blended sound is desirable when recording a wind ensemble, but the need for some subtle additional detail means that spot microphones are more likely to be needed. The mixing needs to be more dynamic, relying on small fader moves to bring out individual lines and produce a really musical recording.
For small wind ensembles with piano, the techniques outlined for piano quintets and trios above can be used. Remember that getting too close to the woodwinds is to be avoided because of key noise; the section on wind soloists with piano in Chapter 7 would be useful reading at this point for advice on distances and microphone types.
12.6.1 Wind ensembles without piano: recording or concert
Wind ensembles without piano might range in size from 4 to 12 players, and where possible, it is best to arrange them seated in a single-row semicircle or horseshoe to help the communication between the musicians. All the elaborate microphone techniques in the world will be wasted if the players cannot communicate well, and sight lines between them are of primary importance. Figure 12.8 shows the layout used for recording the Amadeus Winds with Christopher Hogwood in 1987 performing Mozart’s ‘Gran Partita’ K. 361 for 12 winds3 (two oboes, two clarinets, two basset horns, two bassoons, and four horns) plus a double bass or contrabassoon. See Appendix 3 for the set-up sheets for this session.
This is based on a Decca Tree for the overall sense of the ensemble and the space, with an additional ancillary microphone for each pair of instruments and one for all four horns, applied in a similar way to the ancillary microphones used for orchestral recording (see Chapter 9). Also shown are an upwards-facing pair of cardioids for capturing more indirect sound.
The tree used is a full-sized tree rather than the smaller version used for the string quartet, although it would also be possible to use the spaced omnis plus ORTF-type pair technique also discussed in the context of the string quartet. In this case, the omnis would need to be spaced at the wider end of the range given the increased size of the ensemble. This ensemble of 13 players would need to occupy about 70% of the full image width, so the spaced omnis should be panned fully and their spacing adjusted to produce an appropriate image size. Take the same approach with the ORTF pair, and adjust the angle between them to produce an appropriate image width when fully panned. The spot microphones are used in conjunction with either main pickup method to bring a little focus to each pair of players; avoid using microphones with HF lift as spots to reduce the impact of key noise. The spot microphones should be panned as they appear on the image from the main pickup to avoid lateral image movement when they are altered in level during mixing. For example, if spots are panned so instruments appear closer together than on the main image, individual instruments will move inwards as their spot microphones are increased in level. If the panning is well matched, different musical lines can be brought out during mixing using the spot microphones, depending on what is musically important at the time, but the image will remain laterally stable.

Figure 12.8 Wind ensemble layout for Mozart Sonata No. 10 for winds ‘Gran Partita’.
If this were a concert recording, and rigging a tree was considered too intrusive, using the spaced omnis plus ORTF discussed for the live string quartet in section 12.2 would be more discreet. It would still be important to retain some imaging control with ancillary microphones for each pair of players, but having them rigged on stands in front of the players at 2 m (6′7″) high is likely to be unacceptably cluttered. These could be boomed in from behind the players to avoid having to place them very low and in front, but where this is also not possible, lower spot microphones in front of the players will be the final resort. In this case, make sure the microphones are high enough to be above the bell of clarinet and oboe-type woodwinds, and keep as far away as you can to reduce key noise and a localised sound.
Figure 12.9 shows the Wiener Oktet recording in the Sofiensaal, Vienna. A small Decca Tree is shown with some additional spot microphones, including one placed behind the horn, which has acoustic screens placed behind it.
12.6.2 Wind quartets
Where there is a smaller wind group, such as a wind quartet or flute, oboe, clarinet, and bassoon, the overall techniques (small tree, or spaced omnis and ORTF pair) outlined for string quartet earlier can be used as a good basis for the sound. Spot microphones might not be needed if you can get your overall pickup in the right place and the players are well balanced, but if it is a live concert, you should allow for using them just in case.
For the Amsterdam Loeki Stardust recorder quartet recordings of Baroque recorder music in Abbey Road Studio 1 in March 1987,4 an AKG C426 stereo microphone was used with some spaced M50s further back at about 2.75–3 m (9′ to 10′) high. Because of the intermodulation effects that are a feature of recorder ensembles, it is not a good idea to place the microphones too close. Because this group liked to sit close together, there was no room to fit in spot microphones at a suitable distance, and so the AKG stereo microphone was used to provide the detail and the spaced omnis for the overall tonality and sense of space. A recorder group has a homogeneity of sound that is more like the string quartet than a typical wind quartet of flute, oboe, clarinet, and bassoon, and if they are well in tune, well balanced and in time together, the blended sound they produce can sound almost like a pipe organ.
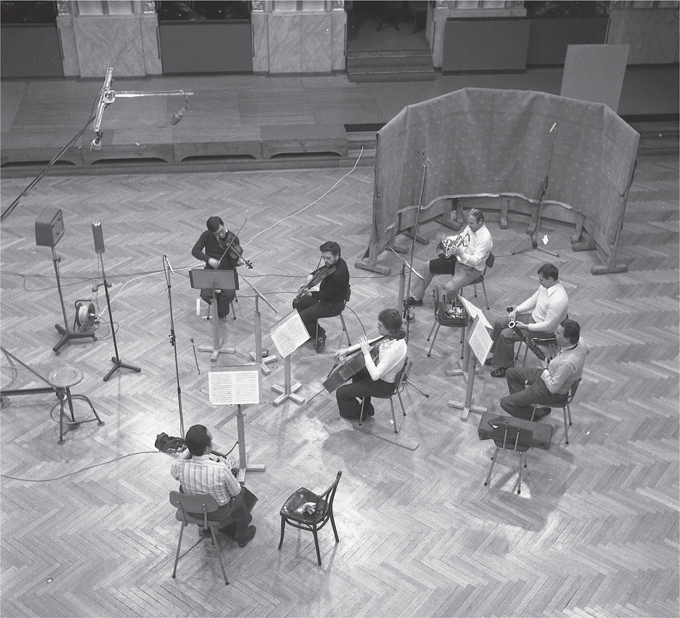
Figure 12.9 Wiener Oktet in Sofiensaal, Vienna
Photo: Courtesy Decca Music Group Ltd.