Chapter 7
Solo instruments and piano
Although we looked at solo instruments in Chapter 4, it is more common to find that a soloist is accompanied by piano, and occasionally by guitar or harp. In order to tackle this combination of instruments, we can draw on the techniques and ideas outlined in Chapters 4 through 6. Section 6.3 details the technique of using a ‘double-spot’ microphone array on the soloist, and the same principles will apply to soloists in this chapter.
Because all these pairings involve the piano, it is worth mentioning some common features here. The piano microphones in all the following scenarios are a tail pair of either omnis or wide cardioids positioned with the aim of creating a good piano sound and without getting concerned over the more distant spill of the soloist. In addition, an upwards-facing ambient pair is included to capture some indirect sound from both instruments and can be used to set them both in the same space.
As we saw in Chapter 6, when recording more than one instrument in a classical context, acoustic spill is unavoidable because the players will be physically close to one another, and the acoustic space could be fairly live. Therefore, spill has to be embraced and can be positively utilised as long as we make sure that the spill is of good quality (meaning it has a good tonal balance and is not too reverberant), so that when it is included as part of the mix, it does not have a detrimental effect on the tone colour or perspective of the instrument. This is a very different approach to recording pop music, where spill is avoided as much as possible to enable closer-sounding instruments and very individual processing of parts. If you are used to pop recording, accepting spill and learning to use it to build the sound can take some getting used to.
Stereo imaging is another aspect of recording two players that can cause some difficulties, either in theory or in practice. As we will see, it is common to use two or three different pairs of microphones on the ensemble, each one of which will form some sort of stereo image. The question arises as to whether overlaying these stereo fields will produce a confusing overall image or whether this can be done without the different images affecting one another greatly. What is usually found in practice is that as long as the pairs of microphones are a certain distance apart (greater than about 2 m (6′7″)), there is enough reduction in correlation between the signals at the different pairs of microphones that their images can be superimposed without any problems occurring.
When mixing the two main components of the ‘piano plus soloist’ recording, it is important to remember that both sets of microphones are equally important, and neither is really a ‘main pair’ in terms of level (although the piano pair will give a wider overall view of the ensemble). Because neither is dominant, you should not use time delays on either pair. Time delaying microphones only works when one array of microphones forms the dominant part of the signal to which the other can be adjusted to be more time coherent. In the case of piano and soloist, the soloist’s spill on the piano microphones will be later than the soloist on its own microphones, and the piano spill on the soloist microphones will be later than the piano on its own microphones. Therefore, introducing delays on either pair can cause more problems and should be left alone. (See Chapter 17 for appropriate use of time delays.) In the same way as for piano and voice, the piano microphones will be panned fully left/right, and the soloist microphones 70%–90% left/right depending on the amount of player movement and its effect on the stability of the image. The ambient pair should also be panned fully left/right. Start with the piano microphones, and then add in the soloist microphones to achieve the right perspective and detail on the solo player. The ambient microphones can be used at a low level to add a little more overall sense of space to both instruments.
It is worth taking the time on session to move the microphones around to get as close to the balance that you want as you possibly can. This is especially true for this sort of chamber music, where the balance of spill and direct sound is so much part of the microphone placement at the time, and all the microphones affect each other. If you assume you can sort out the balance and perspective between piano and soloist later when mixing, you might find that your set-up does not really work and a satisfactory balance is impossible.
Bearing all this in mind, let’s take a look at the most common pairings of soloist and piano.
7.1 Violin and piano in concert
In a concert situation, the violinist will be standing slightly in the well of the piano, facing the audience, or slightly angled towards the pianist for eye contact. There might be restrictions on microphone position due to venue rules about audience sight lines, or the need for clear camera shots from certain angles.
7.1.1 Piano microphones
First of all, let’s consider the piano. It will usually be possible to rig a tail pair as outlined in Chapter 5, which will not be in the audience’s line of sight. It is common for a camera shot to be taken from the piano tail end looking at the pianist along the length of the strings, but this can usually be done whilst keeping the tail pair out of shot. However, you should be aware that the camera operator might get between your microphones and the piano, so take steps to avoid this! This pair should be placed with the aim of picking up a good piano sound without worrying about the inevitable slightly distant sounding violin spill. Given that this spill is onto the front of the piano tail pair, its tone quality will be good, and the distance will be useful in giving a sense of space around the violin. The violin’s main tone quality and focus will come from a different set of microphones. The piano pair can be omnis, cardioids, or wide cardioids depending on whether the stage area is dry and how much reverb you want to collect.
7.1.2 Violin microphones
Placing microphones to pick up the violin in a concert presents a number of potential problems. When a stand is placed on the stage with performers, it is advisable to use a shock mount to prevent seismic transmission of vibrations through the floorboards and microphone stand. Anything placed in front of the violin will almost certainly be in the way of the audience’s view, and it will also be in the firing line for direct piano reflections projected from the raised lid, thus making it harder to discriminate in the violin’s favour. Microphones placed at a height of around 2.5 m (8′2″) on a stand in front of the player (as if recording a solo violinist) are particularly visually intrusive, and the options are to sling them if possible, or to lower the stand as far down as 1.3–1.5 m (4′4″ to 5′) (see pair B placed around the arc as indicated in Figure 7.1). To avoid sounding too close at this height, the pair will need to be placed at least 1.5 m (5′) back from the player. If the stand is placed on the stage, the distance available might be less than this, and the stand would then be better placed on the floor in front of the stage, or ‘Pavarotti’ microphones could be used (see Chapter 6) at a similar height. Although lower microphone positions will not pick up as much of the upper partials of the instrument, the tone should be acceptable. For all these positions, cardioids would be first preference in a live concert to reduce the pickup of audience noise.

The necessity for lower microphone placement might work to your advantage as it might be possible to place the microphones around the arc indicated in Figure 7.1 such that the violinist’s body is blocking some of the piano sound. This will affect the mid to high frequencies more and help to discriminate in the violin’s favour. Whichever solution is adopted, the amount and quality of piano spill present on the violin microphone(s) needs to be assessed to see whether it is detrimental to the overall piano sound. Cut the piano microphones to see what is being picked up, and also listen to the piano playing on its own. Where there is a problem, it usually takes the form of muddy piano bass, and some of the lower frequencies of the piano spill could be filtered off from the violin microphones without losing the essential richness of the violin. The violin’s lowest frequency is around 190 Hz, so the filter should not extend this high to avoid hollowing out the violin sound; the violin sound contains many strong upper partial components, but without the warmth from the 190–400 Hz region, the instrument will sound very thin.
Another approach to discriminating against the piano with the violin microphones would be to use some ribbon fig of 8 microphones for their excellent side axis rejection. Their natural HF roll-off means that the microphones can be placed somewhat closer than brighter condenser microphones without sounding too close. They can then be placed as in position C, much further round the arc indicated in Figure 7.1, but at the same lower height. However, if there is going to be any filming or broadcast of the concert, ribbon microphones, even modern ones (e.g. Royer R-121), will usually be too big to be acceptable to the director. Fig of 8 microphones that are switchable condenser models do not have such good side rejection or the same characteristic HF roll-off as a ribbon microphone, and so will not perform in the same way in this context. Where there are practical objections to the use of a pair of microphones on the violin in a concert situation, a single microphone will have to be used instead, and care must be taken in mixing not to overuse the signal and make the violin sound too localised and mono.
7.1.3 Ambient microphones and mixing
The last component of the recording will come from a pair of microphones set up to collect more ambient and indirect sound, to give a good sense of space around both instruments. This will be used at a fairly low level in the mix to join together the sound from the piano and violin microphones. In this context, an upwards-facing XY pair of cardioids or wide cardioids placed behind the piano at a height of around 2.7–3 m (9′ to 10′) will be visually discreet and relatively free of audience noise. In any live situation, this will be an effective method of collecting clean, indirect sound and preferable to placing a distant pair of microphones further back into the auditorium. Viewed from the audience, they will be mainly out of sight, and might just be visible sticking up behind the piano’s raised lid. Microphones that are susceptible to wind noise (those with more loosely tensioned diaphragms) should have windshields fitted if they are going to be used high in the air; air conditioning can cause gusts of air that are more noticeable higher up in the room.
When it comes to mixing the three pairs of microphones together, panning needs to be considered. The piano pair and the ambient pair should be panned fully, and depending on how much the violinist moves around, panning the violin microphones about 75% left and right should keep the player fairly stable in the image while still endowing it with a sense of width.
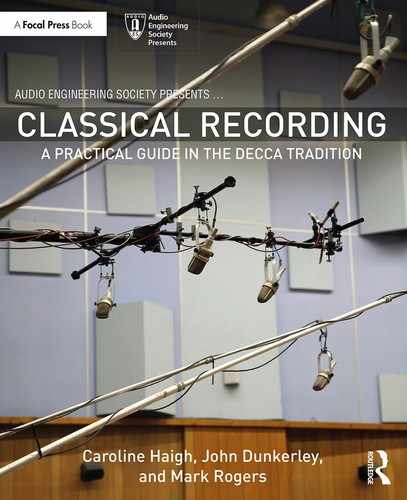
7.2 Violin and piano: studio layout
Once the players are freed from the concert hall scenario, alternative studio layouts can be adopted both to help with the recording and to improve communication between the players. The biggest alteration is that the soloist can turn around and face the pianist; this gives them an arc of possible positions in which to stand, some of which will work well and others which should be avoided.
Each scenario involves placing a tail pair on the piano (see Chapter 5), a pair of violin microphones, and an upwards-facing pair designed to pick up an overall blend of indirect sound from both. They all assume that the piano is on full stick; although the tail pair on the piano will pick up a surprisingly acceptable sound with the piano on short stick, this is not ideal, and from the engineer’s point of view full stick is by far the best for recording.
7.2.1 Choice of violin position
Figure 7.2a–c shows three alternative positions for the violinist on session. Figure 7.2a shows the player in the well of the piano, Figure 7.2b shows the player moved out from the well of the piano towards the keyboard, and Figure 7.2c shows two positions, including one with the player behind the piano. The possibilities inherent in each position are discussed below.
Figure 7.2a is rather like the concert position, but the player has turned to face the pianist. In this position, the level of piano sound coming from a large Steinway on full stick can be quite overpowering, and the player might be used to playing live with the piano on short stick. Because the piano is best on full stick for recording, the soloist might not actually be comfortable standing in the piano well on a session. Another drawback of this position is the degree and quality of piano spill on the violin microphones. They are shown in front of the violin, looking down from a height of 2.5–3 m (8′ to 10′) in order to get a good distance away from the player. This enables the player to stand at a close enough distance to the pianist for communication to be good, but for the microphones still to be placed far enough away to get a well-balanced tone. In this position, they also discriminating to a small extent against the piano, but they will pick up a lot of loud piano on their side axes, and this is likely to be rather muddy in tone, so it is not a good component to add to the piano sound.
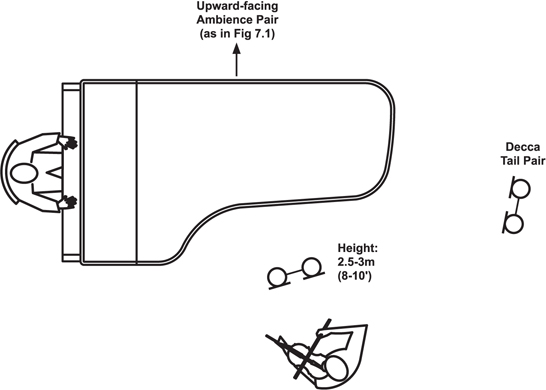
Figure 7.2a Studio layout 1 for violin and piano – reverse concert position in the well
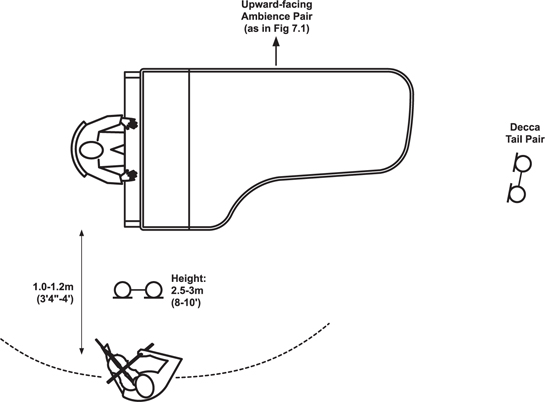
Figure 7.2b Studio layout 2 for violin and piano – out of the well near the keyboard
The position shown in Figure 7.2b is better for both mutual audibility and getting the violin microphones further away from the piano. The dotted line arc shown in the diagram indicates a range of positions for the violinist, depending on where they would prefer to stand; some might like to be far enough around the arc to have a view of the piano keyboard. The line of sight is good between the players in this position, and they should also be able to hear each other well. The distance between the piano and the violinist cannot be less than about 1–1.2 m (3′4″ to 4′) because below this, the benefit of distance on the ability of the microphones to discriminate against the piano starts to be lost. However, if the players are moved much further apart than about 1.2 m (4′), communication and therefore musicality and performance can suffer. If they are moved a great deal further apart, any spill that is present will start to sound too reverberant and have a detrimental effect on the overall sound.
Allow the artists to play together for a while and adjust themselves to a comfortable position along this arc. The violinist will usually take the music stand and place it off to one side to allow for movement and communication with the pianist. Once you and they are happy that they can hear each other properly, you should mark on the floor where the violinist should stand to ensure consistency between takes. A 0.5 m straight line of gaffer tape to stop them getting closer to the pianist should suffice. Once you have seen how the players like to angle themselves for performance, you can then adjust the violin microphones with the aim of getting a good blend of HF straight off the bridge and the wider radiation. In order to really find out how the microphones sound at a height of 2.5–3 m, you would need a stepladder, but even so, walking around in an arc around the front of the player and listening at your natural ear height will give you a good idea of where the tone sounds best. One advantage of placing the microphones at height has already been mentioned: it allows the players to be quite close horizontally while still getting the microphones far enough away from the instrument. The other advantage is that there is less variation in tone from the player’s lateral movements if the microphones are looking down on the player than if they are at violin height. Violinists vary in the amount of physical moving around that they do while playing, but microphones placed high up should achieve a more consistent tone despite any movements.
Figure 7.2c shows two alternative positions in the same picture. One is the same as Figure 7.2b but with the player sideways on to the piano, and fig of 8 ribbon microphones are being used to discriminate against the piano in this case. The other shows the violinist placed on the ‘wrong’ side of the piano, behind the raised lid. From the player’s perspective, some audibility will be lost; the violinist will lose contact with the top end of the piano because of the raised lid, but will still hear a lot of bottom end muddiness coming from underneath the piano. Visually, the players can see each other well, but the loss of audibility might make musical communication more difficult, so not so many duos would like to play in this position. From the point of view of microphones, this layout does help with discrimination against the piano on the violin microphones, so it has that in its favour, although much of the piano LF will be picked up regardless. The discrimination might be helped even further by placing an acoustic screen in between the violin and side of the piano, parallel to the hinge edge of the piano. However, this will only affect HF, much of which is stopped by the lid anyway, as LF will still diffract effectively around any screen. It should be possible to filter off some of this LF from the violin microphones, as long as nothing higher than about 190 Hz is affected; however, the screen will reduce the violinist’s ability to hear the piano even further, and this is likely to be an uncomfortable playing environment for the players. Thought should be given to whether the reduction of spill is a price worth paying for a potentially worse performance.
Other things that might be useful additions to the violin and piano scenario are a small square of carpet under the pianist’s feet to reduce pedalling noise from the pianist’s foot and the floor. It will not have much effect if you have a squeaky pedal, and this needs fixing before the recording goes ahead. Some violinists can be noisy footed, stomping in a rhythmic fashion while playing, and another square of carpet underneath their feet might help with this. Avoid the carpet being too large, or the HF response of the room will be affected, as the carpet will absorb HF reflections and reduce the HF content of the natural reverb.
7.2.2 Placing violin microphones
When you are placing the violin microphones, you are trying to achieve three things: a really good violin sound, as much discrimination against the piano as possible, and good quality piano spill. The microphone placement has to work for both instruments.
The piano is going to be picked up by the violin microphones on around the 90° (side) axis. Therefore the microphones used need a good off-axis response with low colouration, and this will be a really important factor in your microphone choice. If the off-axis sound has an uneven frequency response, you will hear it in the piano sound. Listen to the piano microphones alone and then add in the violin microphones. If the piano starts to get muddy and coloured at this point, the problem lies with your violin microphones; you should also listen to these microphones alone to hear what they are doing to the piano sound. Given that the piano will be on the side axis of the microphones, this is another scenario where using ribbon fig of 8 microphones could be very effective in discriminating against the piano if placed with the side axis pointing along the keyboard, as shown in Figure 7.2b. This would work well for a violinist who is standing at the well end of the arc of possible positions.
7.3 Cello and piano in concert
Figure 7.3 shows a normal concert layout for cello and piano, with the cellist seated in the well of the piano and facing the audience.
The microphones for the piano and ambience can remain the same as for the violin and piano concert recording outlined earlier. Similarly, the important thing to avoid is picking up too much piano projecting off the piano lid on the cello microphones. With the cello, however, it is a lot easier to place these microphones lower down out of the line of the piano lid reflections, so the situation is an easier one to manage. In this case, ‘low down’ means about 75 cm (2′6″) off the ground, looking towards the bridge; microphones in this position will be visually acceptable from the audience point of view and will also produce an acceptable recorded sound. Floor reflections will usually enhance the sound if the cellist is on a stage rather than on a riser that might have a specific resonance. (See Chapter 4.)

7.4 Cello and piano: studio layout
As with the violin and piano recording, moving the soloist out of the piano well where the piano is too loud is a good idea. Once again, a tail pair of omnis are shown on the piano along with an upwards-facing pair of ambience microphones. There is a similar range of cello positions that could be used, all facing towards the piano and along an arc about 0.9–1.2 m (3–4′) away, as shown in Figure 7.4a. For all positions discussed herein, the cellist will need something to stop the spike slipping; using a small piece of carpet under the player can help this, as long as it is not too big so that the floor reflections are very damped down around the instrument. The feedback from the floor can be a useful component to the cello sound.

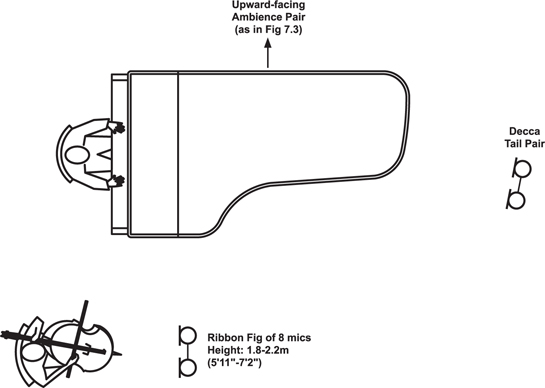
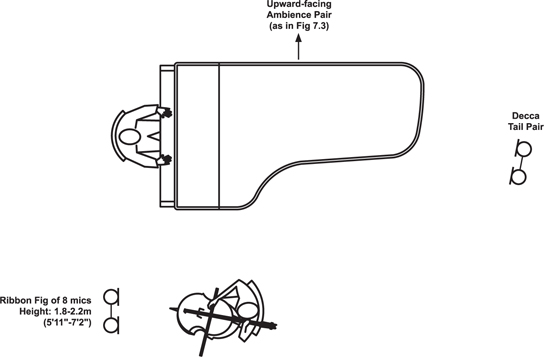
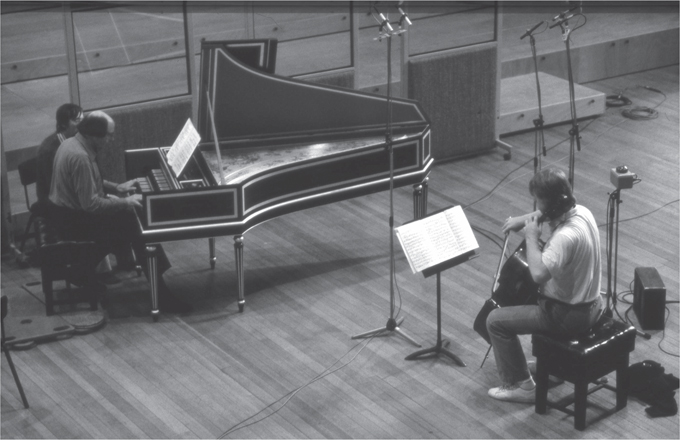
Figure 7.5 Lynn Harrell on cello and Igor Kipnis on harpsichord, recording Bach and Handel sonatas in Henry Wood Hall, 19871
Photo: Mike Evans; courtesy Decca Music Group Ltd.
The best position for the players will be the one in which they can maintain the closest contact in terms of being able both to see and hear each other well. It is important to prioritise player contact over acoustic separation because it is so central to getting a good performance. Figure 7.4b and 7.4c show more positions with the cello more sideways to the piano, one with the players seated facing in the same direction and one with them facing each other. In both positions, fig of 8 microphones can be used to discriminate against the piano.
Figure 7.5 shows Lynn Harrell in a cello and harpsichord session in a position that enables good communication with the harpsichord player. The harpsichord microphones are similar to a Decca piano tail pair, and the soloist’s pair can clearly be seen.
7.4.1 Microphone position
For the position of the cello microphones, there is no reason to have to keep them low as for the concert performance, and so they can be placed at a greater height to give an appropriate sense of distance to the cello sound without having to be horizontally far removed. The cello is lower down when played, and so the microphones do not need to be at the height used for violin; around 1.8–2.2 m (5′11″ to 7′2″) would be a good place to start if using cardioids for any of the positions shown in Figure 7.4a. The microphones are placed in the plane that lies perpendicular to the front face of the cello’s body, as this is where the most HF will be radiated (see Figure 7.6 to clarify this). They should face the cello and be directed away from the piano, even though the rear axis will be pointing up to the ceiling and the piano will be more on the side axis. A cardioid that is warm sounding, with no HF lift or bright top end, will be best suited to the cello.
There is some argument for using omnis on the cello for their extended LF response, but there are a number of things to think about before committing to this. If omnis are used, the cellist will need to be physically a little further away from the piano to avoid picking up too much piano on the cello microphones. To reduce too much reverb pickup, it is necessary to move in closer to the instrument with omni microphones, and this brings with it several potential problems; the tone quality could become localised to part of the instrument, instrumental noises could be picked up disproportionately, and a slightly compressed quality could result. The risk using this method is that control over the cello will be lost when the pianist plays loudly and increases the piano spill onto the cello microphones. Any fader changes to the cello microphones that might be needed in mixing to keep the cello from being drowned in the louder sections will also affect the piano significantly, and so it becomes impossible to independently control the cello level. Using omnis on the soloist as well as the piano is most successful if the players are very good at balancing themselves acoustically and the piece does not have a large dynamic range. Given a more expansive piece, or players that might not always balance themselves perfectly, the margin for error is much narrower than if you use cardioids. Considering the overall set-up, the omnis that are used on the piano will pick up the cello warmth and richness, and so the reduction of these qualities from the solo cello microphones if cardioids are used will not have as dramatic an effect on the cello tone as might be first thought.

Figure 7.6 Showing what is meant by ‘perpendicular to the cello’s face’
If the cellist is in the position shown in Figure 7.4b and 7.4c, then using fig of 8 microphones with the side axis towards the piano will give some good separation as well as producing a warm and flattering sound.
When discussing the violin and piano earlier, we looked at the possibility of placing the violinist on the ‘wrong’ side of the piano. This position is not particularly useful when recording the cello; there is little in terms of separation to be gained, as the piano spill on the far side of the piano is mainly muddy lower end. This sort of coloured spill is a disadvantage when recording any instrument, but it is particularly unhelpful with cello as it cannot be EQ’d from the cello microphones in the way that it could be done for the violin or another higher pitched instrument.
7.5 Woodwind and piano
One of the important considerations when recording wind instruments is to avoid picking up too much key noise, and this means not getting too close. Using microphones with an HF lift will exacerbate the situation, and in a concert situation where microphone placement is often a compromise, ribbon microphones (Royer R-121 or Coles 4038) with their HF roll-off could be useful. Avoiding closeness is also important in obtaining a good overall tonal balance; too close and some part of the spectrum will be overemphasised. The end-blown woodwinds radiate their HF in an increasingly narrow cone shape centred on the axis of the instrument, and where there are open holes, much of the lower frequencies are able to radiate out of these. This means that, close up, the tone changes a lot with position. As discussed in Chapter 4, the side-blown flute radiates fairly equally to the front and back, so this opens up more potential microphone positions when combined with other instruments. Breath noise is a problem with flute in particular, and microphones in front will emphasise this. Any muddy LF piano spill can be removed from the higher winds with a high-pass filter as long as care is taken to ensure the filter’s effects are not felt higher up the spectrum. As a guideline, the lowest frequency of the flute is around 250 Hz and that of the oboe 240 Hz. The clarinets have a more extended range, so the lowest note of the B-flat clarinet is around 135 Hz and the lowest note of the bassoon is 60 Hz.
In a live situation, there are a couple of options for woodwind microphones (see Figure 7.7). To avoid problems with audience sight lines, one method would be to use a pair in front of the instrument at about 1.2 m (4′) high, which is low enough to be out of the way but not so low as to be in line with the bell (where excessive HF and air noises will be picked up). If the microphone is still too high from the audience point of view, the microphone is better moved to one side rather than lowered in height to avoid being on-axis to the bell. The main danger from this low pair is that it can be too close to the instrument and thus emphasise key noise (and also breath noise in the case of the flute). Unfortunately, it will not usually be possible to rig a pair higher up on a stand because of the visual intrusion, so moving further back might help reduce key noise. The other alternative microphone set-up would be a more distant spaced pair of omnis or wide cardioids (depending on distance and how live the room is) suspended above and in front of the player at about 2.75 m (9′) high and 0.9–1.2 m (3′ to 4′) in front. This will behave almost like a main pair; it will give some space around the soloist whilst reducing the pickup of key noise. Bassoons can be particularly prone to key noise, and the more distant microphones are likely to be the better option in this instance.

Figure 7.7 Woodwind and piano concert layout showing both closer and more distant pairs on the soloist
If there is an opportunity to use both of these pairs, then a useful balance could be struck by using the more distant pair to provide most of the sound and width to the source, and the closer pair (or single microphone) to provide some additional focus while avoiding excessive key noise. The 1998 EMI recordings from Saratoga with Martha Argerich and Michael Collins performing Bartók made use of both a close and more distant pair in this way.
Care should be taken to use shock mounts if you have them for the close, low mics placed on the stage, as this will physically decouple the microphones from the staging and avoid very low frequencies being transmitted mechanically to the microphones. If you don’t have access to shock mounts, it should be possible to high-pass filter these microphones, as the piano microphones will provide some good LF content to the overall sound.
The approach to recording wind and piano in the studio can be exactly the same as that for the violin outlined in section 7.2. The soloist microphones are high but not too far back from the players, which yields a well-rounded sound and reduced instrumental noise.
7.6 Brass and piano
The most pressing problem recording brass and piano is one of level; brass instruments are capable of generating very high SPLs, and achieving a satisfactory balance in terms of level and perspective can be difficult. For a concert recording of trumpet or trombone and piano, the main difficulty will be getting reasonable piano level so that some detail can be added to the part to enable it to be heard. You will need to be a bit closer than usual with the piano microphones, remembering that if you need to get some cardioids in the well of the piano, using three of them (LCR) will give more even coverage. (See sections 6.6 and 5.7.1).
Solo brass and piano differ from more traditional chamber music ensembles such as string quartets and piano trios, which are designed to be heard in an intimate setting. Therefore, it might be more difficult to decide on the desired recording presentation; should it be presented as intimate chamber music or as something more suited to a larger space?
The techniques outlined earlier in the chapter can be adapted for solo brass and piano provided the potential for soloist spill onto the piano microphones is borne in mind. To help with this, getting a little more distance between the instruments is a good idea, provided the quality of the spill does not get too reverberant.
Figure 7.8 shows a position suitable for trumpet or trombone, both forward-facing brass.
In this position, at least 1.2–1.5 m (4′ to 5′) away from the piano, good contact can still be maintained with the pianist, and ribbon microphones can be used with their side axes aimed at the piano to aid a degree of separation. As when recording a brass ensemble (see Chapter 13), the microphones for the soloist should avoid being directly on-axis to the bell; the HF from a brass instrument’s bell is increasingly narrowly beamed as the frequency increases, and any small player movements will result in large changes in tone. Place the microphones about 30 cm (1′) higher than the bell – about 1.2–1.5 m (4–5′) off the ground if the player is seated, and higher up if they are standing. This will also avoid any possibility of wind damage to ribbon microphones, especially from the trombone which produces moving air. In the case of the trumpet, whose lowest note is around 165 Hz, much of the LF spill from the piano onto the soloist’s microphones can be filtered off. In the case of trombone, greater care would need to be taken as the lowest note is an octave lower, at around 80 Hz. In both cases, the instrument is facing away from the piano tail pair, but there will still be distant sounding spill on the piano microphones. This can be embraced as providing a sense of space to the sound of the soloist.

The French horn can be approached a bit differently because it fires sideways and backwards from the player’s right-hand side. Figure 7.9 shows the horn seated in such a way that the player has good eye contact with the pianist, and the instrument is firing away from the piano microphones.
The horn microphones are placed behind the player, at about 1.2–1.5 m (4′ to 5′) back from the horn and just high enough to be looking down to the bell, thus avoiding being on-axis to it. The tone quality from the horn can be changed by moving around in an arc behind it; the more the player’s body is in the way, the less HF content is apparent in the sound. Although the horn microphones are pointing towards the piano in this position, their low height and the shielding effect of the player’s body reduce the problem of piano spill. Microphone choices can include cardioids, wide cardioids, and ribbons.
