
4 Externalized configuration management
- Configuring Spring with properties and profiles
- Applying external configuration with Spring Boot
- Implementing a configuration server with Spring Cloud Config Server
- Configuring applications with Spring Cloud Config Client
In the previous chapter, we built a RESTful application for managing a catalog of books. As part of the implementation, we defined some data to configure certain aspects of the application (in an application.yml file), such as the Tomcat thread pool and connection timeout. The next step might be to deploy the application to different environments: first in a test environment, then staging, and finally in production. What if you needed a different Tomcat configuration for each of these environments? How would you achieve that?
Traditional applications were usually packaged as a bundle, including the source code and a series of configuration files containing data for different environments, with the appropriate configuration being selected through a flag at runtime. The implication was that you had to make a new application build every time you needed to update the configuration data for a specific environment. A variant of this process was to create a different build for each environment, meaning that you had no guarantee whether what you ran in a staging environment would work the same way in production because they were different artifacts.
Configuration is defined as everything likely to change between deployments (as per the 15-Factor methodology), like credentials, resource handles, and URLs to backing services. An application deployed in multiple locations will likely have different needs in each location and require different configurations. A key aspect of cloud native applications is that the application artifact will stay immutable across environments. No matter which environment you deploy it to, the application build will not be changed.
Each release you deploy is a combination of build and configuration. The same build can be deployed to different environments with different configuration data, as shown in figure 4.1.
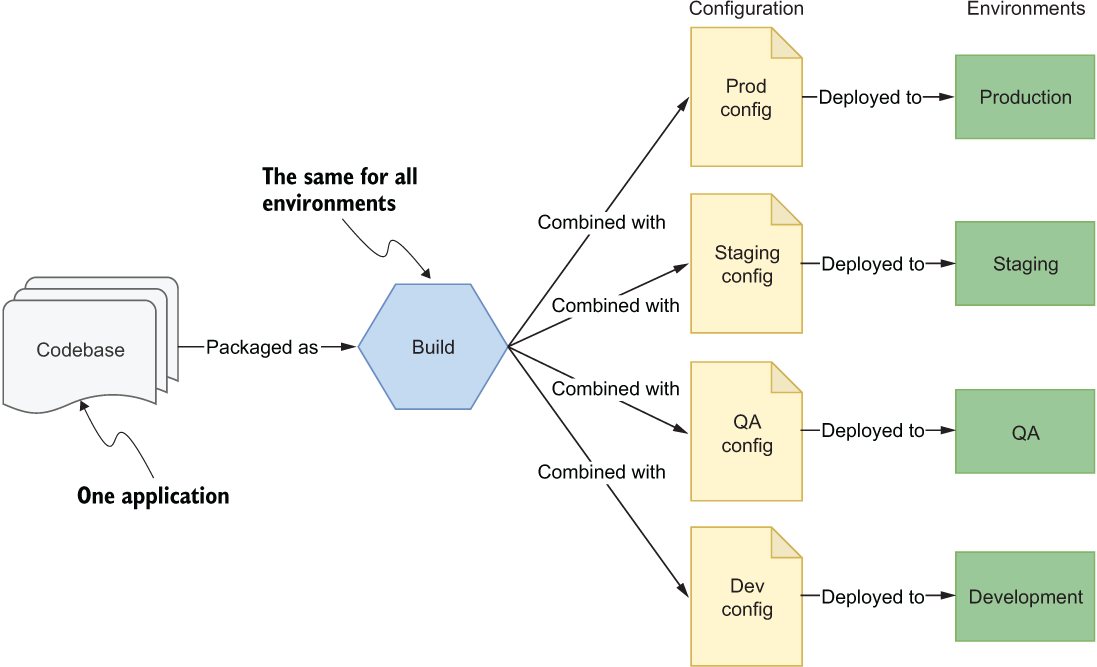
Figure 4.1 Each release you deploy is a combination of build and configuration, which is different for each environment.
Anything that might need to change across deployments should be configurable. For example, you’ll probably want to change feature flags, credentials for accessing backing services, resource handles for databases, or URLs to external APIs, all depending on the environment to which you’re deploying the application. Cloud native applications favor externalized configuration so that you can replace it without having to rebuild your code. Regarding credentials, it’s even more critical not to store them with your application code. There have been countless data breaches because of companies including credentials in a repository that went public by accident. Make sure you won’t be one of them.
In Spring, configuration data is abstracted as properties (key/value pairs) defined in different sources, such as property files, JVM system properties, and system environment variables. This chapter covers various aspects of configuring Spring applications that are relevant in a cloud native context. I’ll first present the main concepts behind how Spring handles configuration, including properties and profiles, and how you can apply externalized configuration with Spring Boot. Then I’ll show you how to set up a configuration server with Spring Cloud Config Server, using a Git repository as the backend for storing your configuration data. Finally, you’ll learn how to use the config server to configure a Spring Boot application by relying on Spring Cloud Config Client.
By the end of this chapter, you’ll be able to configure your cloud native Spring applications in different ways, depending on your needs and the type of configuration data you have. Table 4.1 summarizes the three main strategies for defining configuration data for cloud native applications covered in this chapter. Chapter 14 will further extend the subjects covered here, including secrets management and how to use ConfigMaps and Secrets in Kubernetes.
Note The source code for the examples in this chapter is available in the Chapter04/04-begin and Chapter04/04-end folders, which contain the initial and final states of the project (https://github.com/ThomasVitale/cloud-native-spring-in-action).
Table 4.1 Cloud native applications can be configured according to different strategies. You will likely use them all, depending on the type of configuration data and the application requirements.
4.1 Configuration in Spring: Properties and profiles
The term configuration can have different meanings depending on the context. When discussing the Spring Framework’s core features and its ApplicationContext, configuration refers to which beans (Java objects registered in Spring) have been defined to be managed by the Spring container and are injected where needed. For example, you can define beans in an XML file (XML configuration), in a @Configuration class (Java configuration), or by relying on annotations like @Component (annotation-driven configuration).
In this book, unless specified otherwise, whenever I mention configuration, I don’t mean the previous concept, but rather everything that’s likely to change between deployments, as defined by the 15-Factor methodology.
Spring provides you with a convenient Environment abstraction that gives you access to any configuration data, no matter its source. The two key aspects of a Spring application environment are properties and profiles. You have already worked with properties in the previous chapter. Profiles are a tool for labeling logical groups of beans or configuration data that should be loaded at runtime only if a given profile is enabled. Figure 4.2 shows the main aspects of a Spring application environment.
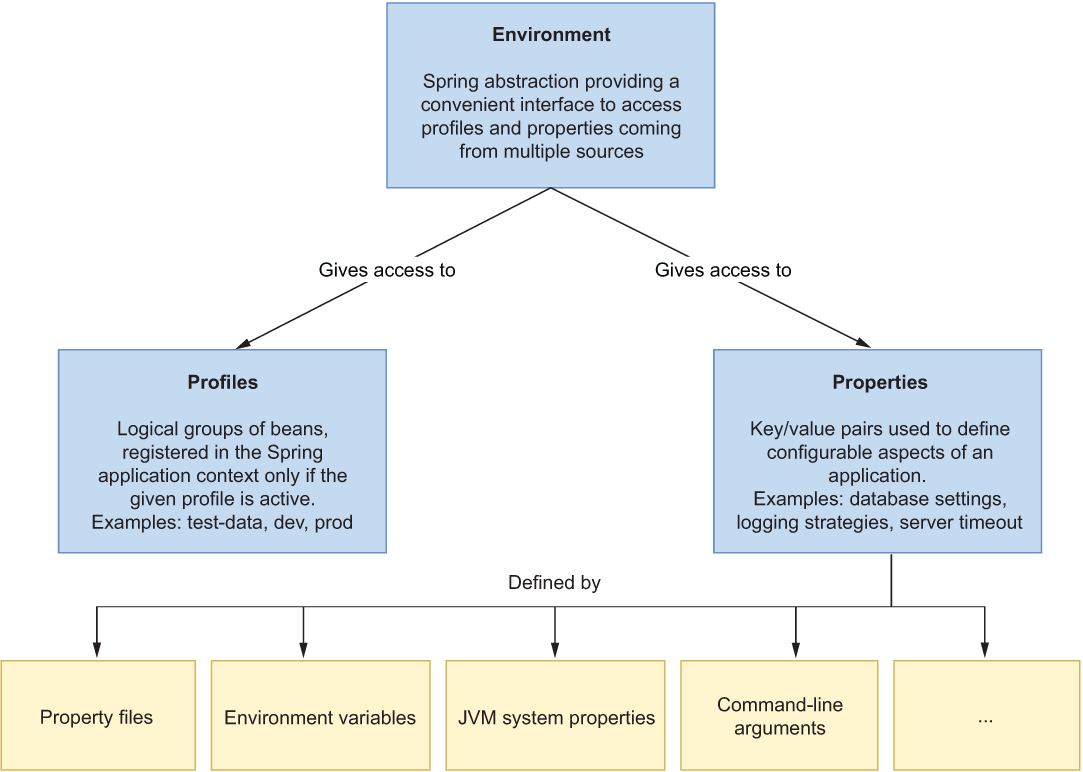
Figure 4.2 The Environment interface gives access to the two key aspects of any Spring application configuration: properties and profiles.
This section will cover the fundamental aspects of properties and profiles for cloud native applications, including how to define custom properties and when to use profiles.
4.1.1 Properties: Key/value pairs for configuration
Properties are key/value pairs supported in Java as first-class citizens with java.util .Properties. They play an essential role in many applications for storing configuration parameters outside of the compiled Java code. Spring Boot automatically loads them from different sources. When the same property is defined in multiple sources, there are rules that determine which one takes precedence. For example, if you specify a value for the server.port property both in a property file and a command-line argument, the latter takes precedence over the former. The following is a prioritized list of some of the most common property sources, starting with the highest priority:
For the complete list, you can refer to the Spring Boot documentation (https://spring.io/projects/spring-boot).
Configuration data files can be further prioritized, starting with the highest priority:
-
Profile-specific application properties from application-{profile}.properties and application-{profile}.yml files packaged outside your JAR
-
Application properties from application.properties and application.yml files packaged outside your JAR
-
Profile-specific application properties from application-{profile}.properties and application-{profile}.yml files packaged inside your JAR
-
Application properties from application.properties and application.yml files packaged inside your JAR
The beauty of property handling in Spring is that you don’t need to know the specific property source to get a value: the Environment abstraction lets you access any property defined in any source through a unified interface. And if the same property is defined in multiple sources, it returns the one with the highest priority. You can even add your own custom sources and assign a priority to them.
Note Spring Framework has built-in support for properties defined according to the Properties format. On top of that, Spring Boot adds support for defining properties using the YAML format. YAML is a superset of JSON that provides more flexibility than the simpler Properties format. The official website describes YAML as “a human-friendly data serialization language for all programming languages” (https://yaml.org). Feel free to choose either approach in your applications. All the examples in the book will use YAML.
There are a few ways to access properties from a Java class, as shown in figure 4.3. The most generic approach is based on the Environment interface, which you can autowire wherever you need access to an application property. For example, you can use it to access the value for the server.port property as follows:
@Autowired
private Environment environment;

public String getServerPort() {
  return environment.getProperty("server.port");
}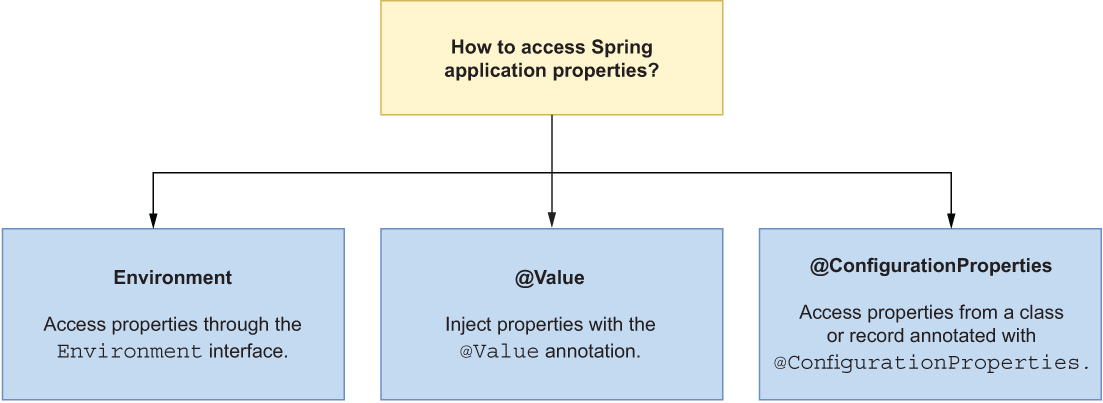
Figure 4.3 You can access Spring properties in different ways.
Properties can also be injected without explicitly invoking the Environment object. Just like you use the @Autowired annotation for injecting Spring beans, you can apply the @Value annotation to inject property values:
@Value("${server.port}")
private String serverPort;

public String getServerPort() {
  return serverPort;
}
You can configure the application using properties without hardcoding values inside the code, which is one of our goals. But when using the Environment object or the @Value annotation, you still have a hardcoded value that can become difficult to manage: the property key. A more robust and maintainable option, which is also the one recommended by the Spring team, is to use special beans marked with the @ConfigurationProperties annotation to hold configuration data. We’ll explore this feature in the next section while you learn how to define custom properties.
Spring Boot comes bundled with tons of properties for configuring any aspect of your application, depending on which starter dependency you import into your project. Sooner or later, though, you’ll find you need to define your own properties.
Let’s consider the Catalog Service application we have been working on. In chapter 2, we defined an HTTP endpoint that returned a welcome message to users. We now have a new requirement to implement: the welcome message should be configurable. This is probably not the most useful functionality, but it will help me illustrate the different configuration options.
The first thing to do is tell Spring Boot to scan the application context for configuration data beans. We can do so by adding the @ConfigurationPropertiesScan annotation to the CatalogServiceApplication class in your Catalog Service project (catalog-service).
Listing 4.1 Enabling scanning of configuration data beans
package com.polarbookshop.catalogservice;

import org.springframework.boot.SpringApplication;
import org.springframework.boot.autoconfigure.SpringBootApplication;
import org.springframework.boot.context.properties
➥ .ConfigurationPropertiesScan;

@SpringBootApplication
@ConfigurationPropertiesScan              ❶
public class CatalogServiceApplication {
  public static void main(String[] args) {
    SpringApplication.run(CatalogServiceApplication.class, args);
  }
}
❶ Loads configuration data beans in the Spring context
Note Instead of making Spring scan the application context, searching for configuration data beans, you can directly specify which ones Spring should consider by using the @EnableConfigurationProperties annotation.
Next, you can define a new com.polarbookshop.catalogservice.config package, and create a PolarProperties class annotated with @ConfigurationProperties to mark it as a holder of configuration data. The @ConfigurationProperties annotation takes a prefix argument, combined with a field name, to produce the final property key. Spring Boot will try to map all properties with that prefix to fields in the class. In this case, there’s only one property mapped to the bean: polar.greeting. Optionally, you can add a description for each property using JavaDoc comments that can be converted into metadata, as I’ll show you in a minute.
Listing 4.2 Defining custom properties in a Spring bean
package com.polarbookshop.catalogservice.config;

import org.springframework.boot.context.properties.ConfigurationProperties;

@ConfigurationProperties(prefix = "polar")    ❶
public class PolarProperties {
  /**
   * A message to welcome users.
   */
  private String greeting;                    ❷

  public String getGreeting() {
    return greeting;
  }

  public void setGreeting(String greeting) {
    this.greeting = greeting;
  }
}
❶ Marks the class as a source for configuration properties starting with the prefix “polar”
❷ Field for the custom polar.greeting (prefix + field name) property, parsed as String
Optionally, you can add a new dependency on the Spring Boot Configuration Processor in your build.gradle file. That will automatically generate metadata for the new properties and store them in META-INF/spring-configuration-metadata.json when building the project. The IDE can pick them up, show you the description message for each property, and help you with autocompletion and type checks. Remember to refresh or reimport the Gradle dependencies after the new addition.
Listing 4.3 Adding dependency for the Spring Boot Configuration Processor
configurations {        ❶
  compileOnly {
    extendsFrom annotationProcessor
  }
 }

dependencies {
  ...
  annotationProcessor
  ➥ 'org.springframework.boot:spring-boot-configuration-processor'
}
❶ Configures Gradle to use the Configuration Processor when building the project
Now you can trigger the metadata generation by building your project (./gradlew clean build). At this point you can go ahead and define a default value for the polar.greeting property in the application.yml file. While you are inserting the new property, your IDE should provide you with an autocompletion option and type check, as shown in figure 4.4.
Listing 4.4 Defining a value for a custom property in Catalog Service
polar:
  greeting: Welcome to the local book catalog!

Figure 4.4 Using the Spring Boot Configuration Processor, the JavaDoc comment from your custom property bean is converted into metadata that’s used by your IDE to provide useful information, autocompletion, and a type check.
In listing 4.2, the greeting field will be mapped to the polar.greeting property, for which you have just defined a value in application.yml.
Classes or records annotated with @ConfigurationProperties are standard Spring beans, so you can inject them wherever you need them. Spring Boot initializes all the configuration beans at startup and populates them with the data provided through any of the supported configuration data sources. In the case of Catalog Service, the data will be populated from the application.yml file.
The new requirement for Catalog Service is to make the welcome message returned by the root endpoint configurable via the polar.greeting property. Open the HomeController class and update the handler method to get the message from the custom property instead of using a fixed value.
Listing 4.5 Using custom properties from a configuration properties bean
package com.polarbookshop.catalogservice;

import com.polarbookshop.catalogservice.config.PolarProperties;
import org.springframework.web.bind.annotation.GetMapping;
import org.springframework.web.bind.annotation.RestController;

@RestController
public class HomeController {
  private final PolarProperties polarProperties;           ❶

  public HomeController(PolarProperties polarProperties) {
    this.polarProperties = polarProperties;
  }

  @GetMapping("/")
  public String getGreeting() {
    return polarProperties.getGreeting();                  ❷
  }
}
❶ Bean to access the custom properties injected via constructor autowiring
❷ Uses the welcome message from the configuration data bean
You can now build and run the application to verify that it works as intended (./gradlew bootRun). Then open a Terminal window, and send a GET request to the root endpoint exposed by Catalog Service. The result should be the message you configured in application.yml for the polar.greeting property:
$ http :9001/
Welcome to the local book catalog!
Note Property files packaged with your application code are useful for defining sensible default values for your configuration data. They can also act as specifications for what configuration properties your application supports.
The following section will cover the other key aspect modeled by the Spring Environment abstraction: profiles, and how to use them for cloud native applications. Before moving on, you can stop the application with Ctrl-C.
4.1.2 Profiles: Feature flags and configuration groups
Sometimes you might want to load a bean into the Spring context only under specific conditions. For example, you might want to define a bean responsible for generating test data only when you’re working locally or testing the application. Profiles are logical groups of beans that are loaded into the Spring context only if the specified profile is active. Spring Boot also extends this concept to property files, allowing you to define groups of configuration data that are loaded only if a specific profile is active.
You can activate zero, one, or more profiles at a time. All beans not assigned to a profile will always be activated. Beans assigned to the default profile are only activated when no other profile is active.
This section presents Spring profiles in the context of two different use cases: feature flags and configuration groups.
Using profiles as feature flags
The first use case for profiles is for loading groups of beans only if a specified profile is active. The deployment environment shouldn’t influence the reasoning behind the groupings too much. A common mistake is using profiles like dev or prod to load beans conditionally. If you do that, the application will be coupled to the environment, which is usually not what we want for a cloud native application.
Consider the case where you deploy applications to three different environments (development, test, and production) and define three profiles to load certain beans conditionally (dev, test, and prod). At some point you decide to add a staging environment, where you also want to enable the beans marked with the prod profile. What do you do? You have two options. Either you activate the prod profile in the staging environment (which doesn’t make much sense), or you update the source code to add a staging profile, and assign it to the beans marked as prod (which prevents your application from being immutable and deployable to any environment without any change to the source code). Instead, I recommend using profiles as feature flags when they’re associated with groups of beans to be loaded conditionally. Consider what functionality a profile provides, and name it accordingly, rather than thinking about where it will be enabled.
You might still have cases where a bean that handles infrastructural concerns is required in specific platforms. For example, you might have certain beans that should only be loaded when the application is deployed to a Kubernetes environment (no matter whether it is for staging or production). In that case, you could define a kubernetes profile.
In chapter 3 we built the Catalog Service application to manage books. Whenever you run it locally, there are no books in the catalog yet, and you need to add some explicitly if you want to work with the application. A better option would be to let the application generate some test data at startup, but only when it’s needed (for example, in a development or test environment). Loading test data can be modeled as a feature that you enable or disable through configuration. You could define a testdata profile to toggle the loading of this test data. In that way, you’ll keep the profiles independent from the deployment environment, and you can use them as feature flags with no constraint on the deployment environment whatsoever. Let’s do that.
First, add a new com.polarbookshop.catalogservice.demo package to your Catalog Service project, and create a BookDataLoader class. You can instruct Spring to load this class only when the testdata profile is active by applying the @Profile annotation. Then you can use the BookRepository we implemented in chapter 3 to save the data. Finally, the @EventListener(ApplicationReadyEvent.class) annotation will trigger the test data generation after the application has completed the startup phase.
Listing 4.6 Loading book test data when the testdata profile is active
package com.polarbookshop.catalogservice.demo;

import com.polarbookshop.catalogservice.domain.Book;
import com.polarbookshop.catalogservice.domain.BookRepository;
import org.springframework.boot.context.event.ApplicationReadyEvent;
import org.springframework.context.annotation.Profile;
import org.springframework.context.event.EventListener;
import org.springframework.stereotype.Component;

@Component
@Profile("testdata")                                 ❶
public class BookDataLoader {
  private final BookRepository bookRepository;
  public BookDataLoader(BookRepository bookRepository) {
    this.bookRepository = bookRepository;
  }

  @EventListener(ApplicationReadyEvent.class)        ❷
  public void loadBookTestData() {
    var book1 = new Book("1234567891", "Northern Lights",
      "Lyra Silverstar", 9.90);
    var book2 = new Book("1234567892", "Polar Journey",
      "Iorek Polarson", 12.90);
    bookRepository.save(book1);
    bookRepository.save(book2);
  }
}
❶ Assigns the class to the testdata profile. It will be registered only when the testdata profile is active.
❷ The test data generation is triggered when an ApplicationReadyEvent is sent—that is when the application startup phase is completed.
In your development environment, you can use the spring.profiles.active property to set the testdata profile as active. You could set it in the application.yml file for the Catalog Service project, but it’s not ideal to have the test data feature enabled by default. What if you forget to overwrite it in production? A better option is configuring it specifically for the local development environment when running the bootRun task. You can achieve that by adding the following code to the build.gradle file.
Listing 4.7 Defining the active profiles for the development environment
bootRun {
  systemProperty 'spring.profiles.active', 'testdata'
}
Let’s verify that it works. Build and run the application (./gradlew bootRun). You’ll see a message in the application logs listing all the active profiles (in this case, it’s just testdata, but there can be more), as shown in figure 4.5.

Figure 4.5 The logs for Catalog Service when the “testdata” profile is active
Then you can send a request to the application to fetch all the books in the catalog:
$ http :9001/books
It should return the test data we created in listing 4.6. When you’re done, stop the application with Ctrl-C.
Note Instead of using profiles as feature flags, a more scalable and structured approach is defining custom properties to configure functionality, and relying on annotations such as @ConditionalOnProperty and @ConditionalOnCloudPlatform to control when certain beans should be loaded into the Spring application context. That’s one of the foundations of Spring Boot auto-configuration. For example, you could define a polar.testdata.enabled custom property and use the @ConditionalOnProperty(name = "polar.testdata .enabled", havingValue = "true") annotation on the BookDataLoader class.
Next, I’ll show you how to use profiles to group configuration data.
Using profiles as configuration groups
The Spring Framework’s profile functionality allows you to register some beans only if a given profile is active. Likewise, Spring Boot lets you define configuration data that is loaded only when a specific profile is active. A common way to do that is inside a property file named with the profile as a suffix. In the case of the Catalog Service, you could create a new application-dev.yml file and define a value for the polar.greeting property, which would be used by Spring Boot only if the dev profile was active. Profile-specific property files take precedence over the non-specific property files, so the value defined in application-dev.yml would take precedence over the one in application.yml.
In the context of property files, profiles are used to group configuration data, and they can be mapped to deployment environments without facing the same issues we analyzed in the previous section when using profiles as feature flags. But that applies only as long as you don’t package the profile-specific property files with the application. The 15-Factor methodology recommends not batching configuration values into groups named after environments and bundled with the application source code because it wouldn’t scale. As a project grows, new environments might be created for different stages; developers might create their own custom environments to try out new functionality. You can quickly end up with way too many configuration groups, implemented like Spring profiles and requiring new builds. Instead, you’ll want to keep them outside the application, such as in a dedicated repository served by a configuration server, as you’ll see later in this chapter. The only exception is for defaults and development-oriented configuration.
The following section will cover how Spring Boot addresses externalized configuration. You’ll learn how to use command-line arguments, JVM system properties, and environment variables to provide configuration data from the outside while using the same application build.
4.2 Externalized configuration: One build, multiple configurations
Property files bundled with the application source code are useful for defining some sensible defaults. Still, if you need to provide different values depending on the environment, you’ll need something else. Externalized configuration allows you to configure your application depending on where it’s deployed while consistently using the same immutable build for your application code. The critical aspect is that you don’t change your application after you build and package it. If any configuration change is needed (for example, different credentials or database handles), it’s done from the outside.
The 15-Factor methodology promotes storing configuration in the environment, and Spring Boot provides several ways to achieve that. You can use one of the higher priority property sources to override the default values, depending on where the application is deployed. In this section you’ll see how to use command-line arguments, JVM properties, and environment variables to configure a cloud native application without rebuilding it. Figure 4.6 illustrates how the precedence rules work for overriding a Spring property.

Figure 4.6 Spring Boot evaluates all property sources according to a precedence list. In the end, each property will have the value defined from the source with the highest precedence.
Let’s consider the Catalog Service application. First, you need to package the application as a JAR artifact. You can do so from a Terminal window, navigating to the project’s root folder and running the following command:
$ ./gradlew bootJar
We’re not relying on Gradle to run the application this time because I want to demonstrate how you can change the application configuration while using the same immutable JAR artifact (that is, changing the configuration without rebuilding the application). You can run it as a standard Java application:
$ java -jar build/libs/catalog-service-0.0.1-SNAPSHOT.jar
You haven’t overridden any properties yet, so the root endpoint will return the polar.greeting value defined in the application.yml file:
$ http :9001/
Welcome to the local book catalog!
In the following sections you’ll see how to provide a different value for the polar .greeting property. Remember to terminate the Java process (Ctrl-C) before moving on to new examples.
4.2.1 Configuring an application through command-line arguments
By default, Spring Boot converts any command-line argument to a property key/value pair and includes it in the Environment object. In a production application, that is the property source with the highest precedence. Using the same JAR you built earlier, you can specify a command-line argument to customize the application configuration:
$ java -jar build/libs/catalog-service-0.0.1-SNAPSHOT.jar
    --polar.greeting="Welcome to the catalog from CLI"
The command-line argument has the same name as the Spring property, prefixed with the familiar -- for CLI arguments. This time the application will use the message defined in the command-line argument, since it takes precedence over property files:
$ http :9001/
Welcome to the catalog from CLI
4.2.2 Configuring an application through JVM system properties
JVM system properties can override Spring properties much like command-line arguments, but they have a lower priority. It’s all part of externalizing the configuration, so you don’t need to build a new JAR artifact—you can still use the one packaged earlier. Terminate the Java process from the previous example (Ctrl-C) and run the following command:
$ java -Dpolar.greeting="Welcome to the catalog from JVM"
    -jar build/libs/catalog-service-0.0.1-SNAPSHOT.jar
The JVM system property has the same name as the Spring property, prefixed with the usual -D for JVM arguments. This time the application will use the message defined as a JVM system property, since it takes precedence over property files:
$ http :9001/
Welcome to the catalog from JVM
What if you specify both a JVM system property and a CLI argument? The precedence rules will ensure Spring uses the value specified as a command-line argument, since it takes precedence over JVM properties.
Once again, terminate the previous Java process (Ctrl-C) and run the following command:
$ java -Dpolar.greeting="Welcome to the catalog from JVM"
    -jar build/libs/catalog-service-0.0.1-SNAPSHOT.jar
    --polar.greeting="Welcome to the catalog from CLI"
The result, as you can imagine, will be the following:
$ http :9001/
Welcome to the catalog from CLI
Both CLI arguments and JVM properties let you externalize the configuration and keep the application build immutable. However, they require different commands to run the application, which might result in errors at deployment time. A better approach is using environment variables, as recommended by the 15-Factor methodology. Before moving on to the next section, terminate the current Java process (Ctrl-C).
4.2.3 Configuring an application through environment variables
Environment variables defined in the operating system are commonly used for externalized configuration, and they are the recommended option according to the 15-Factor methodology. One of the advantages of environment variables is that every operating system supports them, making them portable across any environment. Furthermore, most programming languages provide features for accessing environment variables. For example, in Java, you can do that by calling the System.getenv() method.
In Spring, you are not required to read environment variables from the surrounding system explicitly. Spring automatically reads them during the startup phase and adds them to the Spring Environment object, making them accessible, just like any other property. For example, if you run a Spring application in an environment where the MY_ENV_VAR variable is defined, you can access its value either from the Environment interface or using the @Value annotation.
On top of that, Spring Boot extends the Spring Framework functionality by allowing you to use environment variables to override Spring properties automatically. For command-line arguments and JVM system properties, you used the same naming convention as the Spring property. However, environment variables have some naming constraints dictated by the operating system. For example, on Linux, the common syntax consists of having all capital letters and words separated by an underscore.
You can turn a Spring property key into an environment variable by making all the letters uppercase and replacing any dot or dash with an underscore. Spring Boot will map it correctly to the internal syntax. For example, a POLAR_GREETING environment variable is recognized as the polar.greeting property. This feature is called relaxed binding.
In the Catalog Service application, you can override the polar.greeting property with the following command:
$ POLAR_GREETING="Welcome to the catalog from ENV"
    java -jar build/libs/catalog-service-0.0.1-SNAPSHOT.jar
Tip On Windows, you can achieve the same result by running $env:POLAR_ GREETING="Welcome to the catalog from ENV"; java -jar build/libs/ catalog-service-0.0.1-SNAPSHOT.jar from a PowerShell console.
During the startup phase of Catalog Service, Spring Boot will read the variables defined in the surrounding environment, recognize that POLAR_GREETING can be mapped to the polar.greeting property, and store its value in the Spring Environment object, overriding the value defined in application.yml. The result will be the following:
$ http :9001/
Welcome to the catalog from ENV
After testing the application, stop the process with Ctrl-C. If you ran the application from Windows PowerShell, remember to unset the environment variable with Remove-Item Env:POLAR_GREETING.
When you use environment variables for storing configuration data, you don’t have to change the command to run your application (as you did for CLI arguments and JVM properties). Spring will automatically read environment variables from the context where it’s deployed. This approach is less error-prone and fragile than using CLI arguments or JVM system properties.
Note You can use environment variables to define configuration values that depend on the infrastructure or platform where the application is deployed, such as profiles, port numbers, IP addresses, and URLs.
Environment variables work seamlessly on virtual machines, OCI containers, and Kubernetes clusters. However, they might not be enough. In the next section, I’ll go through some of the issues affecting environment variables and how Spring Cloud Config can help address them.
4.3 Centralized configuration management with Spring Cloud Config Server
With environment variables, you can externalize your application’s configuration and follow the 15-Factor methodology. However, there are some issues they cannot handle:
-
Configuration data is as important as the application code, so it should be handled with the same care and attention, starting from its persistence. Where should you store configuration data?
-
Environment variables don’t provide granular access control features. How can you control access to configuration data?
-
Configuration data will evolve and require changes, just like application code. How should you keep track of the revisions to configuration data? How should you audit the configuration used in a release?
-
After changing your configuration data, how can you make your application read it at runtime without requiring a full restart?
-
When the number of application instances increases, it can be challenging to handle configuration in a distributed fashion for each instance. How can you overcome such challenges?
-
Neither Spring Boot properties nor environment variables support configuration encryption, so you can’t safely store passwords. How should you manage secrets?
The Spring ecosystem offers many options to address those issues. We can categorize them into three groups.
-
Configuration services—The Spring Cloud project provides modules you can use to run your own configuration services and configure your Spring Boot applications.
-
Spring Cloud Alibaba provides a configuration service using Alibaba Nacos as the data store.
-
Spring Cloud Config provides a configuration service backed by a pluggable data source, such as a Git repository, a data store, or HashiCorp Vault.
-
Spring Cloud Consul provides a configuration service using HashiCorp Consul as the data store.
-
Spring Cloud Vault provides a configuration service using HashiCorp Vault as the data store.
-
Spring Cloud Zookeeper provides a configuration service using Apache Zookeeper as the data store.
-
-
Cloud vendor services—If you run your applications on a platform provided by a cloud vendor, you might consider using one of their configuration services. Spring Cloud provides integration with the main cloud vendor configuration services that you can use to configure your Spring Boot applications.
-
Cloud platform services—When running your applications on a Kubernetes platform, you can seamlessly use ConfigMaps and Secrets to configure Spring Boot.
This section will show you how to set up a centralized configuration server with Spring Cloud Config that’s responsible for delivering configuration data stored in a Git repository to all applications. Chapter 14 will cover more advanced configuration topics, including secrets management and Kubernetes features like ConfigMaps and Secrets. Many of the features and patterns you’ll use with Spring Cloud Config are easily applicable to the other solutions involving configuration services and cloud vendor services.
Note Your choice of configuration service will depend on your infrastructure and requirements. For example, suppose you’re running your workloads on Azure already, and you need a GUI to manage configuration data. In that case, it might make sense to use Azure Key Vault rather than running a configuration service yourself. If you want to version-control your configuration data with Git, Spring Cloud Config or Kubernetes ConfigMaps and Secrets would be a better choice. You might even compromise and use a managed Spring Cloud Config service offered by vendors like Azure or VMware Tanzu.
The idea of centralized configuration is built around two main components:
-
A data store for configuration data, providing persistence, versioning, and possibly access control
-
A server sitting on top of the data store to manage configuration data and serve it to multiple applications
Imagine having many applications deployed in different environments. A configuration server could manage configuration data for all of them from a centralized place, and that configuration data might be stored in different ways. For example, you could use a dedicated Git repository for storing non-sensitive data and use HashiCorp Vault to store your secrets. No matter how the data is stored, a configuration server will deliver it to different applications through a unified interface. Figure 4.7 shows how centralized configuration works.

Figure 4.7 A centralized configuration server manages external properties for many applications across all environments.
It’s clear from figure 4.7 that the configuration server becomes a backing service for all the applications, which means it’s at risk of being a single point of failure. If it’s suddenly unavailable, all the applications will probably fail to start up. This risk can be easily mitigated by scaling the config server, as you would with other applications requiring high availability. When using a configuration server, it’s fundamental to deploy at least two replicas.
Note You can use a centralized configuration server for configuration data that doesn’t depend on the specific infrastructure or deployment platform, such as credentials, feature flags, URLs to third-party services, thread pools, and timeouts.
We’ll use Spring Cloud Config Server to set up a centralized configuration server for the Polar Bookshop system. The project also provides a client library (Spring Cloud Config Client) that you can use to integrate Spring Boot applications with the config server.
Let’s start by defining a repository for storing configuration data.
4.3.1 Using Git to store your configuration data
The config server will be responsible for providing configuration data to Spring applications. Before setting that up, though, we need a way to store and keep track of that data. Spring Cloud Config Server integrates with many different backend solutions to store configuration data. One of the most common choices is a Git repository.
First, create a new config-repo Git repository (for the final result, you can refer to Chapter04/04-end/config-repo). The repository can be local or remote, but for this example I recommend initializing a remote one on GitHub, just like you did for the application repositories. I’m using main as the default branch name.
Inside the config repo, you can store properties directly in Spring format as *.properties or *.yml files.
Continuing with the Catalog Service example, let’s define an external property for the welcome message. Navigate to the config-repo folder and create a catalog-service.yml file. Then define a value for the polar.greeting property used by the Catalog Service.
Listing 4.8 Defining a new message for when the config server is used
polar:
  greeting: "Welcome to the catalog from the config server"
Next, create a catalog-service-prod.yml file, and define a different value for the polar.greeting property to be used only when the prod profile is active.
Listing 4.9 Defining a new message for when the prod profile is active
polar:
  greeting: "Welcome to the production catalog from the config server"
Finally, commit and push your changes to the remote repository.
How does Spring Cloud Config resolve the correct configuration data for each application? How should you organize the repository to host properties for multiple applications? The library relies on three parameters to identify which property file to use to configure a specific application:
-
{application}—The name of the application as defined by the spring .application.name property.
-
{profile}—One of the active profiles defined by the spring.profiles.active property.
-
{label}—A discriminator defined by the specific configuration data repository. In the case of Git, it can be a tag, a branch name, or a commit ID. It’s useful for identifying a versioned set of config files.
Depending on your needs, you can organize the folder structure using different combinations, such as these:
/{application}/application-{profile}.yml
/{application}/application.yml
/{application}-{profile}.yml
/{application}.yml
/application-{profile}.yml
/application.yml
For each application, you can either use property files named after the application itself and placed in the root folder (e.g., /catalog-service.yml or /catalog-service-prod.yml) or use the default naming and put them in a subfolder named after the application (e.g., /catalog-service/application.yml or /catalog-service/application-prod.yml).
You can also put application.yml or application-{profile}.yml files in the root folder to define default values for all applications. They can be used as a fallback whenever there is no more specific property source. Spring Cloud Config Server will always return the properties from the most specific path, using the application name, active profiles, and Git labels.
The label concept is particularly interesting when using Git as the backend for the config server. For example, you could create long-lived branches of your config repo for different environments or short-lived branches while testing specific features. Spring Cloud Config Server can use the label information to return the correct configuration data from the right Git branch, tag, or commit ID.
Now that you have a Git repository in place for your configuration data, it’s time to set up a config server to manage them.
4.3.2 Setting up a configuration server
Spring Cloud Config Server is a project that lets you set up a configuration server with minimal effort. It’s a standard Spring Boot application with specific properties that enable the configuration server functionality and the Git repository as the configuration data backend. The Polar Bookshop system will use this server to provide configuration to the Catalog Service application. Figure 4.8 illustrates the architecture of the solution.
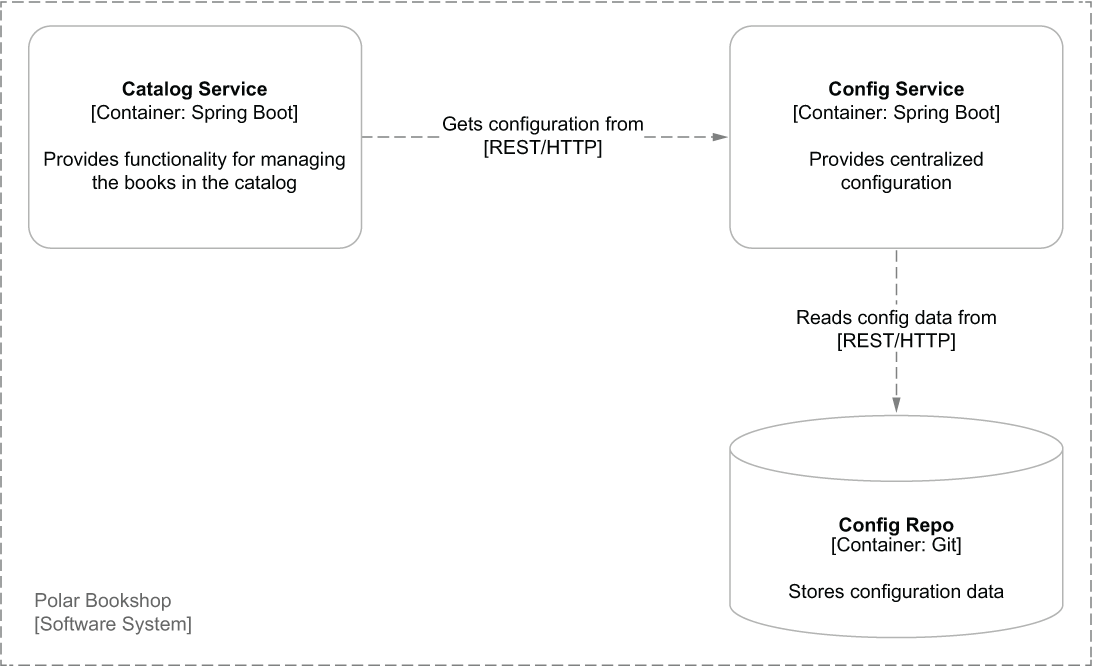
Figure 4.8 A centralized configuration server, backed by a Git repository, provides configuration to the Catalog Service application.
The Polar Bookshop system needs a Config Service application to provide centralized configuration. You can initialize the project from Spring Initializr (https://start.spring.io/) and store the result in a new config-service Git repository. The parameters for the initialization are shown in figure 4.9.

Figure 4.9 The parameters for initializing the Config Service project from Spring Initializr
Tip You may prefer to avoid manually generating the project through the Spring Initializr website. In the begin folder for this chapter, you can find a curl command that you can run in a Terminal window to download a zip file containing all the code you need to get started.
In the generated build.gradle file, you can see how the management of Spring Cloud dependencies works differently than for Spring Boot. All Spring Cloud projects follow an independent release train that relies on a bill of materials (BOM) to manage all the dependencies. Spring Cloud release trains are named after a year (for example, 2021.0.3) rather than adopting a semantic version strategy (for example, the Spring Boot version is 2.7.3).
Listing 4.10 The Gradle configuration for Config Service
plugins {
  id 'org.springframework.boot' version '2.7.3'
  id 'io.spring.dependency-management' version '1.0.13.RELEASE'
  id 'java'
}
group = 'com.polarbookshop'
version = '0.0.1-SNAPSHOT'
sourceCompatibility = '17'

repositories {
  mavenCentral()
}

ext {
  set('springCloudVersion', "2021.0.3")                ❶
}

dependencies {
  implementation 'org.springframework.cloud:spring-cloud-config-server'
  testImplementation 'org.springframework.boot:spring-boot-starter-test'
}

dependencyManagement {
  imports {
    mavenBom "org.springframework.cloud:
➥spring-cloud-dependencies:${springCloudVersion}"     ❷
  }
}

tasks.named('test') {
  useJUnitPlatform()
}
❶ Defines the Spring Cloud version to use
❷ BOM for Spring Cloud dependency management
These are the main dependencies:
-
Spring Cloud Config Server (org.springframework.cloud:spring-cloud-config-server)—Provides libraries and utilities to build a configuration server on top of Spring Web.
-
Spring Boot Test (org.springframework.boot:spring-boot-starter-test)—Provides several libraries and utilities to test applications, including Spring Test, JUnit, AssertJ, and Mockito. It’s automatically included in every Spring Boot project.
Enabling the configuration server
Turning the project you initialized earlier into a functioning configuration server doesn’t require too many steps. The only thing you need to do in Java is add the @EnableConfigServer annotation on a configuration class, such as ConfigServiceApplication.
Listing 4.11 Enabling configuration server in Spring Boot
package com.polarbookshop.configservice;

import org.springframework.boot.SpringApplication;
import org.springframework.boot.autoconfigure.SpringBootApplication;
import org.springframework.cloud.config.server.EnableConfigServer;

@SpringBootApplication
@EnableConfigServer                         ❶
public class ConfigServiceApplication {
  public static void main(String[] args) {
    SpringApplication.run(ConfigServiceApplication.class, args);
  }
}
❶ Activates the configuration server implementation in the Spring Boot application
Configuring the configuration server
The next step is configuring the behavior of the config server. Yes, that’s right. Even a configuration server needs configuration! First of all, Spring Cloud Config Server runs on an embedded Tomcat server, so you can configure connection timeouts and thread pools as you did for Catalog Service.
You previously initialized a Git repository to host configuration data, so you should now instruct Spring Cloud Config Server where to find it. You can do so in an application.yml file located in the src/main/resources path of your Config Service project (rename the autogenerated application.properties file as application.yml).
The spring.cloud.config.server.git.uri property should point to where you defined the config repo. If you followed along with what I did, it will be on GitHub, and the default branch will be called main. You can configure which branch the config server should consider by default by setting the spring.cloud.config.server.git .default-label property. Remember that, when using Git repositories, the label concept is an abstraction over Git branches, tags, or commit IDs.
Listing 4.12 Configuring integration between config server and config repo
server:
  port: 8888                                     ❶
  tomcat:
    connection-timeout: 2s
    keep-alive-timeout: 15s
    threads:
      max: 50
      min-spare: 5

spring:
  application:
    name: config-service                         ❷
  cloud:
    config:
      server:
        git:
          uri: <your-config-repo-github-url>     ❸
          default-label: main                    ❹
❶ The port that the Config Service application will listen on
❷ A name for the current application
❸ The URL to the remote Git repository to use as the configuration data backend. For example, https://github.com/ PolarBookshop/config-repo.
❹ By default, the server will return configuration data from the “main” branch.
Warning The configuration I used for Config Service assumes the config repo is publicly available on GitHub. When you use private repositories (which is often true for real-world applications), you need to specify how to authenticate with the code repository provider by using additional configuration properties. For more information, refer to the official Spring Cloud Config documentation (https://spring.io/projects/spring-cloud-config). I’ll further discuss handling credentials in chapter 14.
4.3.3 Making the configuration server resilient
The Config Service might become a single point of failure in your system. If all the applications rely on it to fetch configuration data, you need to ensure it’s highly available. The first step toward that goal is deploying multiple instances of Config Service in a production environment. If one of them stops working for some reason, another replica can provide the required configuration. In chapter 7, you’ll learn more about scaling applications and how to make that work in Kubernetes.
However, scaling the Config Service is not enough. Since it’s using a remote Git repository as the configuration data backend, you’ll need to make that interaction more resilient too. First, you can define a timeout to prevent the config server from waiting too long to establish a connection with the remote repository. You can do so with the spring.cloud.config.server.git.timeout property.
Spring Cloud Config is implemented to clone the remote repository locally upon the first request for configuration data. I recommend using the spring.cloud.config .server.git.clone-on-start property so that the repo clone happens at startup. Even though it makes the startup phase a bit slower, it makes your deployment fail faster if there’s any difficulty communicating with the remote repository, rather than waiting for the first request to find out that something is wrong. Also, it makes the first request from a client faster.
The local copy of the repository improves the config server’s fault tolerance because it ensures it can return configuration data to the client applications even if the communication with the remote repository is temporarily failing (for example, if GitHub is down or there’s a problem with the network). However, if the config server hasn’t cloned the repository locally yet, there’s no fallback in place. That’s why it’s better to fail fast at startup and investigate the issue right away.
When a local copy of the repository is created successfully, there’s a chance the local repo may get changed independently of the remote repo. You can ensure your config server always uses the same data that’s defined in the remote repository by setting the spring.cloud.config.server.git.force-pull property so that a fresh copy is pulled whenever the local copy is corrupted, and any local changes are discarded. By default, the local repository is cloned in a folder with a random name. If needed, you can control where it is cloned through the spring.cloud.config.server.git .basedir property. For Config Service, we’ll rely on the default behavior.
You can update the application.yml file for the Config Service application as follows and make it more resilient to faults affecting interactions with the code repository service (in this case, GitHub).
Listing 4.13 Making Config Service more resilient
spring:
  application:
    name: config-service
  cloud:
    config:
      server:
        git:
          uri: <your-config-repo-github-url>
          default-label: main
          timeout: 5               ❶
          clone-on-start: true     ❷
          force-pull: true         ❸
❶ Time limit to establish a connection with the remote repository
❷ Clones the remote repository locally on startup
❸ Forces pulling the remote repository and discarding any local changes
In the next section we’ll verify that Config Service is working correctly.
4.3.4 Understanding the configuration server REST API
Spring Cloud Config Server works seamlessly with Spring Boot applications, providing properties in their native formats through a REST API. You can try it out fairly easily. Build and run Config Service (./gradlew bootRun), open a Terminal window, and make an HTTP GET request to /catalog-service/default:
$ http :8888/catalog-service/default
The result is the configuration that’s returned when no Spring profile is active. You can try fetching the configuration for the scenario where the prod profile is active as follows:
$ http :8888/catalog-service/prod
As shown in figure 4.10, the result is the configuration defined for the Catalog Service application in catalog-service.yml and catalog-service-prod.yml, where the latter takes precedence over the former because the prod profile is specified.
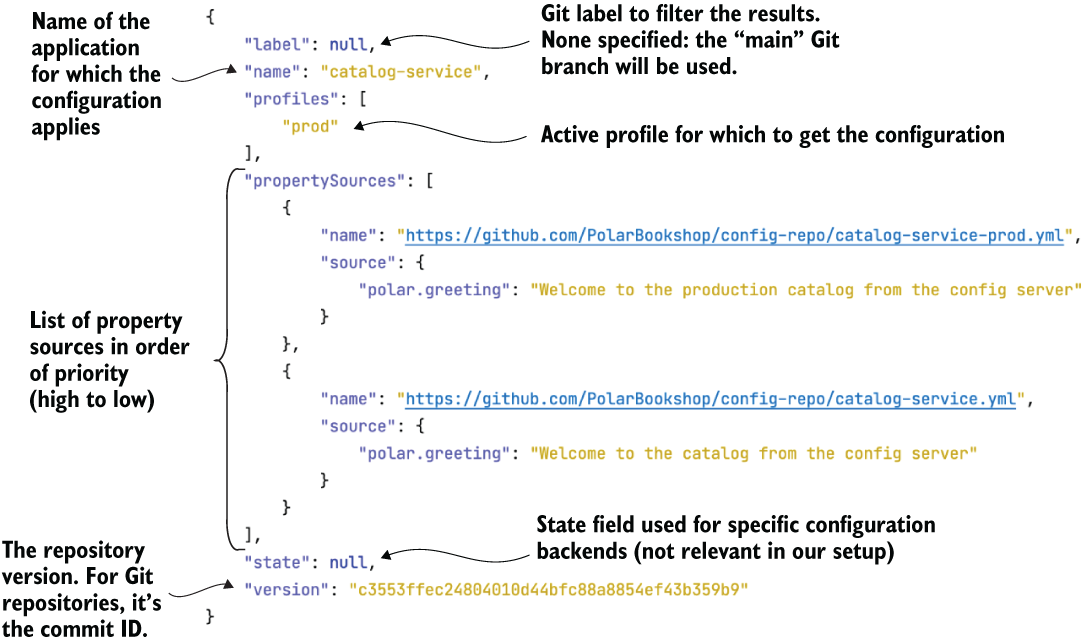
Figure 4.10 The configuration server exposes a REST API to fetch configuration data based on the application name, profile, and label. This image shows the result for the /catalog-service/prod endpoint.
When you are done testing the application, stop its execution with Ctrl-C.
Spring Cloud Config Server exposes properties through a series of endpoints using different combinations of the {application}, {profile}, and {label} parameters:
/{application}/{profile}[/{label}]
/{application}-{profile}.yml
/{label}/{application}-{profile}.yml
/{application}-{profile}.properties
/{label}/{application}-{profile}.properties
You won’t need to call these endpoints from your application when using Spring Cloud Config Client (it does that for you), but it’s useful to know how the server exposes configuration data. A configuration server built with Spring Cloud Config Server exposes a standard REST API that any application can access over a network. You can use the same server for applications built with other languages and frameworks and use the REST API directly.
In chapter 14, I’ll address more aspects of how to handle configuration. For example, Spring Cloud Config has a few features for encrypting properties containing secrets before storing them in a Git repository. Also, multiple backend solutions can be used as configuration data repositories, meaning that you could save all the non-sensitive properties in Git and use HashiCorp Vault to store secrets. Furthermore, the REST API itself should be protected, and I’ll talk about that as well. I will address all those critical aspects from a security point of view—considering these issues is necessary before deploying to production.
For now, let’s complete our solution and update Catalog Service to integrate with the Config Service application.
4.4 Using a configuration server with Spring Cloud Config Client
The Config Service application built in the previous section is a server that exposes configuration through a REST API. In general, applications would interact with this API, but you can use Spring Cloud Config Client for Spring applications.
This section will teach you how to use Spring Cloud Config Client and integrate Catalog Service with the config server. You’ll see how to make the interaction more robust and how to refresh the client’s configuration when new changes are pushed to the config repo.
4.4.1 Setting up a configuration client
The first thing you’ll need to do to integrate a Spring Boot application with a config server is add a new dependency to Spring Cloud Config Client. Update the build.gradle file for the Catalog Service project (catalog-service) as follows. Remember to refresh or reimport the Gradle dependencies after the new addition.
Listing 4.14 Adding dependency for Spring Cloud Config Client
ext {
  set('springCloudVersion', "2021.0.3")
}

dependencies {
  ...
  implementation 'org.springframework.cloud:spring-cloud-starter-config'
}

dependencyManagement {
  imports {
    mavenBom "org.springframework.cloud:
    ➥ spring-cloud-dependencies:${springCloudVersion}"
  }
}
We now need to instruct Catalog Service to fetch its configuration from the Config Service. You can do that via the spring.config.import property by passing configserver: as the property value. You probably don’t want the config server running in your local environment when working with client applications like Catalog Service, and in that case you can make the interaction optional with the optional: prefix (optional:configserver:). If the config server is not running when you start Catalog Service, the application will log a warning, but it won’t stop working. Be careful not to make this optional in production, or you’ll risk using the wrong configuration.
Next, Catalog Service needs to know the URL to contact the Config Service. You have two options. Either you can add it to the spring.config.import property (optional:configserver:http://localhost:8888) or rely on the more specific spring .cloud.config.uri property. We’ll use the second option so we only need to change the URL value when deploying the application in different environments.
Since the config server uses the application name to return the correct configuration data, you’ll also need to set the spring.application.name property to catalog-service. Remember the {application} parameter? That’s where the spring .application.name value is used.
Open the application.yml file for your Catalog Service project and apply the following configuration.
Listing 4.15 Instructing Catalog Service to get config from Config Service
spring:
  application:
    name: catalog-service               ❶
  config:
    import: "optional:configserver:"    ❷
  cloud:
    config:
      uri: http://localhost:8888       ❸
❶ The name of the application, used by the config server to filter the configuration
❷ Imports configuration data from a config server when available
❸ The URL of the configuration server
Let’s go ahead and verify that it works correctly. The Catalog Service application contains a polar.greeting property with the value “Welcome to the local book catalog!” When using a configuration server, the centralized properties take precedence over the local ones, so the value you defined in the config-repo repository will be used instead.
First, run Config Service (./gradlew bootRun). Then package Catalog Service as a JAR artifact (./gradlew bootJar) and run it as follows:
$ java -jar build/libs/catalog-service-0.0.1-SNAPSHOT.jar
Then, in another Terminal window, send a GET request to the root endpoint:
$ http :9001/
Welcome to the catalog from the config server!
As expected, the welcome message returned by the application is the one defined in the config-repo repository, specifically in the catalog-service.yml file.
You can also try running the application with the prod profile enabled. Stop Catalog Service with Ctrl-C, and then start the application again with prod as an active profile:
$ java -jar build/libs/catalog-service-0.0.1-SNAPSHOT.jar
    --spring.profiles.active=prod
The expected result is now the message defined in the catalog-service-prod.yml file in the config-repo repository:
$ http :9001/
Welcome to the production catalog from the config server
Once again, stop the previous application’s execution with Ctrl-C.
The following section will cover how you can make the interaction between application and config server more fault-tolerant.
4.4.2 Making the configuration client resilient
When the integration with the config server is not optional, the application fails to start up if it cannot contact a config server. If the server is up and running, you could still experience issues due to the distributed nature of the interaction. Therefore it’s a good idea to define some timeouts to make the application fail faster. You can use the spring.cloud.config.request-connect-timeout property to control the time limit for establishing a connection with the config server. The spring.cloud.config.request-read-timeout property lets you limit the time spent reading configuration data from the server.
Open the application.yml file for your Catalog Service project and apply the following configuration to make the interaction with Config Service more resilient. Once again, there’s no universal rule for setting up timeouts. Depending on your architecture and infrastructure characteristics, you might need to adjust these values.
Listing 4.16 Making Spring Cloud Config Client more resilient
spring:
  application:
    name: catalog-service
  config:
    import: "optional:configserver:"
  cloud:
    config:
      uri: http://localhost:8888
      request-connect-timeout: 5000     ❶
      request-read-timeout: 5000        ❷
❶ Timeout on waiting to connect to the config server (ms)
❷ Timeout on waiting to read configuration data from the config server (ms)
Even if Config Service is replicated, there’s still a chance it will be temporarily unavailable when a client application like Catalog Service starts up. In that scenario, you can leverage the retry pattern and configure the application to try again to connect with the config server before giving up and failing. The retry implementation for Spring Cloud Config Client is based on Spring Retry, so you’ll need to add a new dependency to the build.gradle file for your Catalog Service project. Remember to refresh or reimport the Gradle dependencies after the new addition.
Listing 4.17 Adding dependency for Spring Retry in Catalog Service
dependencies {
  ...
  implementation 'org.springframework.retry:spring-retry'
}
In chapter 8, I’ll explain the retry pattern in detail. For now, I’ll show you how to configure Catalog Service so that it retries connecting to Config Service a few times before failing (spring.cloud.config.retry.max-attempts). Each connection attempt is delayed according to an exponential backoff strategy, computed as the current delay multiplied by the value of the spring.cloud.config.retry.multiplier property. The initial delay is configured by spring.cloud.config.retry.initial-interval, and each delay cannot exceed the value of spring.cloud.config.retry.max-interval.
You can add the retry configuration to the application.yml file in the Catalog Service project.
Listing 4.18 Applying retry pattern to Spring Cloud Config Client
spring:
  application:
    name: catalog-service
  config:
    import: "optional:configserver:"
  cloud:
    config:
      uri: http://localhost:8888
      request-connect-timeout: 5000
      request-read-timeout: 5000
      fail-fast: true                ❶
      retry:
        max-attempts: 6              ❷
        initial-interval: 1000       ❸
        max-interval: 2000           ❹
        multiplier: 1.1              ❺
❶ Makes a failure to connect to the config server fatal
❸ Initial retry interval for backoff (ms)
❹ Maximum retry interval for backoff (ms)
❺ Multiplier to compute the next interval
The retry behavior is enabled only when the spring.cloud.config.fail-fast property is set to true. You probably don’t want to retry in your local environment if the config server is down, especially considering we made it an optional backing service. Feel free to test the application’s behavior when retrying the connection with the config server down, but remember to set the fail-fast property back to false if you want to keep it optional in your local environment. In production you can set it to true using one of the strategies covered in this chapter. When you’re done testing the applications, stop both of them with Ctrl-C.
You are now ready to use the Config Service to configure any application you want. However, there’s still an aspect I haven’t covered yet. How can we change the configuration at runtime?
4.4.3 Refreshing configuration at runtime
What happens when new changes are pushed to the Git repository that’s backing the Config Service? For a standard Spring Boot application, you would have to restart it when you change a property (either in a property file or an environment variable). However, Spring Cloud Config gives you the possibility to refresh configuration in client applications at runtime. Whenever a new change is pushed to the configuration repository, you can signal all the applications integrated with the config server, and they will reload the parts affected by the configuration change. Spring Cloud Config offers different options for doing that.
In this section, I’ll show you a simple refresh option consisting of sending a special POST request to a running Catalog Service instance to trigger the reloading of the configuration data that has changed (hot reload). Figure 4.11 shows how it works.

Figure 4.11 After changing the configuration in the Git repository backing the Config Service, a signal is sent to Catalog Service to refresh the parts of the application using the configuration.
This functionality is one of those administrative processes described by the 15-Factor methodology introduced in chapter 2. In this case, the strategy adopted for managing the process was to embed it in the applications themselves, with the ability to activate it by calling a specific HTTP endpoint.
Note In production, you’ll probably want a more automated and efficient way of refreshing configuration than explicitly triggering each application instance. When a remote Git repository backs your config server, you can configure a webhook that notifies the config server automatically whenever new changes are pushed to the repository. In turn, the config server can notify all client applications through a message broker like RabbitMQ, using Spring Cloud Bus. Chapter 14 will cover more scenarios for refreshing configuration in production.
Enabling configuration refresh
After committing and pushing the new configuration changes to the remote Git repository, you can send a POST request to a client application through a specific endpoint that will trigger a RefreshScopeRefreshedEvent inside the application context. You can rely on the Spring Boot Actuator project to expose the refresh endpoint by adding a new dependency in the build.gradle file for the Catalog Service project. Remember to refresh or reimport the Gradle dependencies after the new addition.
Listing 4.19 Adding dependency for Spring Boot Actuator in Catalog Service
dependencies {
  ...
  implementation 'org.springframework.boot:spring-boot-starter-actuator'
}
The Spring Boot Actuator library configures an /actuator/refresh endpoint that triggers a refresh event. By default, the endpoint is not exposed, so you have to enable it explicitly in the application.yml file of your Catalog Service project (catalog-service).
Listing 4.20 Making Spring Boot Actuator expose the refresh endpoint
management:
  endpoints:
    web:
      exposure:
        include: refresh    ❶
❶ Exposes the /actuator/refresh endpoint through HTTP
Note I will discuss Spring Boot Actuator extensively in chapter 13, so don’t worry if you don’t fully understand the preceding configuration. For now, it’s enough to know that Spring Boot Actuator provides many useful endpoints for monitoring and managing applications in production.
The refresh event, RefreshScopeRefreshedEvent, will have no effect if there is no component listening. You can use the @RefreshScope annotation on any bean you’d like to be reloaded whenever a refresh is triggered. Here’s the nice part: since you defined your custom properties through a @ConfigurationProperties bean, it is already listening to RefreshScopeRefreshedEvent by default, so you don’t need to make any changes to your code. When a refresh is triggered, the PolarProperties bean will be reloaded with the latest configuration available. Let’s see if it works.
Changing configuration at runtime
In this final section, I’ll show you how to change configuration at runtime. First, make sure you have both the Config Service and Catalog Service up and running (./gradlew bootRun). Then open the config-repo repository hosting the configuration data and change the value of the polar.greeting property in the config-repo/ catalog-service.yml file.
Listing 4.21 Updating the welcome message value in the config repo
polar:
  greeting: "Welcome to the catalog from a fresh config server"
Next, commit and push the changes.
Config Service will now return the new property value. You can check that by running the http :8888/catalog-service/default command. However, no signal has been sent yet to Catalog Service. If you try running the http :9001/ command, you will still get the old “Welcome to the catalog from the config server” message. Let’s trigger a refresh.
Go ahead and send a POST request to the Catalog Service application at the /actuator/refresh endpoint:
$ http POST :9001/actuator/refresh
This request will trigger a RefreshScopeRefreshedEvent event. The PolarProperties bean, because it’s annotated with @ConfigurationProperties, will react to the event and read the new configuration data. Let’s verify that:
$ http :9001/
Welcome to the catalog from a fresh config server
Finally, stop the execution of both applications with Ctrl-C.
Good job! You have just updated the configuration of an application at runtime without restarting it, without rebuilding the application, and ensuring the traceability of changes. It’s perfect for the cloud. In chapter 14, you’ll learn more advanced techniques for managing configuration that you’ll need in production, including secrets management, ConfigMaps, and Secrets.
Summary
-
The Spring Environment abstraction provides a unified interface for accessing properties and profiles.
-
Profiles are logical groups of beans registered only when a specific profile is active.
-
Spring Boot collects properties from different sources according to precedence rules. From the highest to the lowest precedence, properties can be defined in command-line arguments, JVM system variables, OS environment variables, profile-specific property files, and generic property files.
-
Spring beans can access properties from the Environment object by injecting the value with the @Value annotation, or from a bean mapped to a set of properties with the @ConfigurationProperties annotation.
-
The active profiles can be defined with the spring.profiles.active property.
-
The @Profile annotation marks beans or configuration classes to be considered only when the specified profile is active.
-
Properties, as managed in Spring Boot, provide externalized configuration as defined by the 15-Factor methodology, but that’s not enough.
-
A configuration server handles aspects like secret encryption, configuration traceability, versioning, and context refreshing at runtime with no restart.
-
A configuration server can be set up with the Spring Cloud Config Server library.
-
The configuration itself can be stored according to different strategies, such as in a dedicated Git repository.
-
The config server uses the application name, active profiles, and Git-specific labels to identify which configuration should be provided to which application.
-
A Spring Boot application can be configured through a config server using the Spring Cloud Config Client library.
-
@ConfigurationProperties beans are configured to listen to RefreshScopeRefreshedEvent events.
-
RefreshScopeRefreshedEvent events can be triggered after a new change is pushed to the configuration repository, so that the client application reloads the context using the latest configuration data.
-
Spring Boot Actuator defines an /actuator/refresh endpoint that you can use to trigger the event manually.