
7 Kubernetes fundamentals for Spring Boot
- Moving from Docker to Kubernetes
- Deploying Spring Boot applications on Kubernetes
- Understanding service discovery and load balancing
- Building scalable and disposable applications
- Establishing a local Kubernetes development workflow
- Validating Kubernetes manifests with GitHub Actions
In the previous chapter, you learned about Docker and the main characteristics of images and containers. With Buildpacks and Spring Boot, you can build a production-ready image in one command, without even having to write your own Dockerfile or install additional tools. With Docker Compose, you can simultaneously control multiple applications, which is convenient for architectures like microservices. But what if a container stops working? What if the machine where your containers are running (the Docker host) crashes? What if you want to scale your applications? This chapter will introduce Kubernetes into your workflow to address issues that Docker alone cannot.
As a developer, it’s not your job to configure and manage a Kubernetes cluster. You would probably use either a managed service offered by a cloud provider such as Amazon, Microsoft, or Google, or a service managed on premises by a specialized team in your organization (commonly known as the platform team). For now you’ll use a local Kubernetes cluster provisioned with minikube. Later in the book you’ll use a managed Kubernetes service offered by a cloud provider.
In our daily job as developers, we don’t want to spend too much time on infrastructural concerns, but it’s critical to know the basics. Kubernetes has become the de facto orchestration tool and the common language for talking about containerized deployments. Cloud vendors have been building platforms on top of Kubernetes to provide a better experience for developers. Once you know how Kubernetes works, it’ll be straightforward to use those platforms, because you’ll be familiar with the language and the abstractions.
This chapter will walk you through the main features of Kubernetes and teach you how to create and manage Pods, Deployments, and Services for your Spring Boot applications. Along the way you’ll enable graceful shutdown for your applications, learn how to scale them, and learn how to use the service discovery and load balancing features provided by Kubernetes. You’ll also learn to automate your local development workflow with Tilt, visualize your workloads with Octant, and validate your Kubernetes manifests.
Note The source code for the examples in this chapter is available in the Chapter07/07-begin and Chapter07/07-end folders, which contain the initial and final states of the project (https://github.com/ThomasVitale/cloud-native-spring-in-action).
7.1 Moving from Docker to Kubernetes
With Docker Compose, you can manage the deployment of several containers at once, including the configuration of networks and storage. That is extremely powerful, but it’s limited to one machine.
Using Docker CLI and Docker Compose, the interaction happens with a single Docker daemon that manages Docker resources on a single machine, called the Docker host. Furthermore, it’s not possible to scale a container. All of this is limiting when you need cloud native properties like scalability and resilience for your system. Figure 7.1 shows how you target a single machine when using Docker.
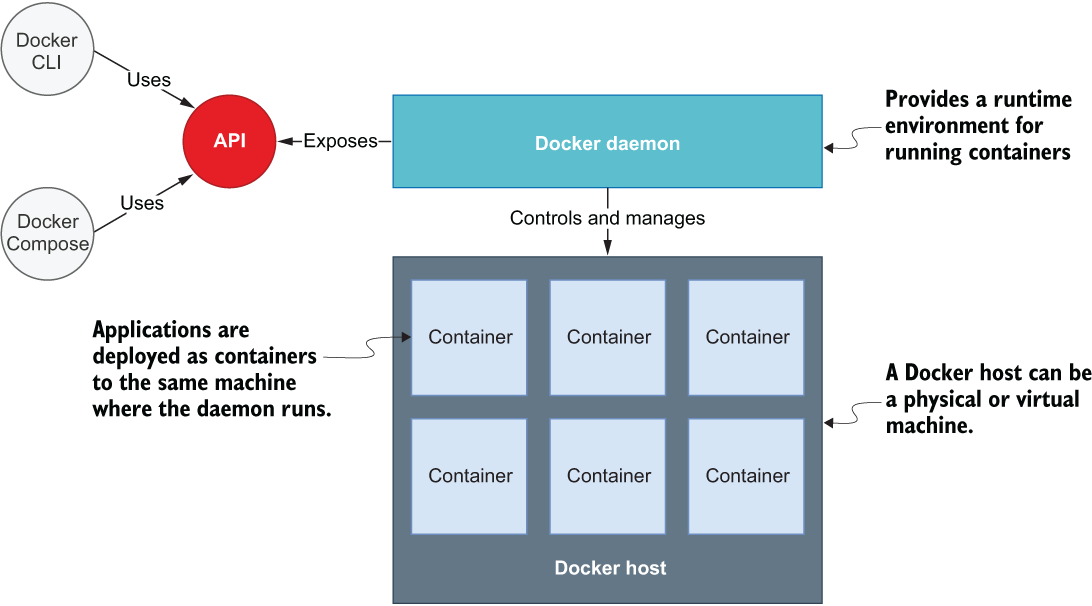
Figure 7.1 Docker clients interact with a Docker daemon that can only manage resources on the machine where it is installed, called the Docker host. Applications are deployed as containers to the Docker host.
You learned in chapter 2 that we change our point of view when we move from a container runtime like Docker to an orchestration platform like Kubernetes. With Docker, we deploy containers to an individual machine. With Kubernetes, we deploy containers to a cluster of machines, enabling scalability and resilience.
Kubernetes clients use an API to interact with the Kubernetes Control Plane, which is responsible for creating and managing objects in a Kubernetes cluster. In this new scenario, we still send commands to a single entity, but it acts on several machines rather than only one. Figure 7.2 shows the logical infrastructure when we use Kubernetes.

Figure 7.2 Kubernetes clients interact with the Control Plane, which manages containerized applications in a cluster consisting of one or more nodes. Applications are deployed as Pods to the nodes of a cluster.
These are the main components shown in figure 7.2:
-
Cluster—A set of nodes running containerized applications. It hosts the Control Plane and comprises one or more worker nodes.
-
Control Plane—The cluster component exposing the API and interfaces to define, deploy, and manage the life cycle of Pods. It comprises all the essential elements that implement the typical features of an orchestrator, like cluster management, scheduling, and health monitoring.
-
Worker nodes—Physical or virtual machines providing capacity such as CPU, memory, network, and storage so that containers can run and connect to a network.
-
Pod—The smallest deployable unit wrapping an application container.
Now that you have a good understanding of the Kubernetes infrastructure, let’s see how you can create and manage a Kubernetes cluster on your local machine.
7.1.1 Working with a local Kubernetes cluster
In chapter 2, we worked with minikube (https://minikube.sigs.k8s.io), a tool for running Kubernetes clusters on local environments. We used the minikube CLI to create a local Kubernetes cluster relying on the default configuration. In this section, you’ll see how to define a custom configuration for minikube that you can use when initializing a new local Kubernetes cluster for deploying Polar Bookshop.
Note If you haven’t installed minikube yet, refer to the instructions in section A.3 of appendix A.
Since we run minikube on top of Docker, remember to start the Docker Engine first. Then make sure the default cluster is not running by executing the minikube stop command. From now on, we won’t use the default cluster. Instead, we’ll create a custom one for working with Polar Bookshop. With minikube you can create and control multiple clusters identified via profiles. When no profile is specified, minikube falls back on the default cluster.
Warning Running the examples on a local Kubernetes cluster requires Docker to have at least 2 CPUs and 4 GB of memory. If you are using Docker Desktop for Mac or for Windows, and you need to increase the resources assigned to the Docker Engine, refer to the product documentation for instructions on how to do that for your specific operating system (https://docs.docker.com/desktop).
Let’s create a new Kubernetes cluster named polar on top of Docker. This time, we also want to declare the resource limits for CPU and memory:
$ minikube start --cpus 2 --memory 4g --driver docker --profile polar
You can get a list of all the nodes in the cluster with the following command:
$ kubectl get nodes

NAME    STATUS   ROLES                  AGE   VERSION
polar   Ready    control-plane,master   21s   v1.24.3
The cluster we have just created is composed of a single node, which hosts the Control Plane and acts as a worker node for deploying containerized workloads.
You can use the same Kubernetes client (kubectl) to interact with different local or remote clusters. The following command will list all the available contexts with which you can interact:
$ kubectl config get-contexts

CURRENT   NAME      CLUSTER     AUTHINFO
*         polar     polar       polar
If you have more than one context, make sure kubectl is configured to use polar. You can verify which is the current context by running this command:
$ kubectl config current-context
polar
If the result is different from polar, you can change the current context as follows:
$ kubectl config use-context polar
Switched to context "polar".
For the rest of the chapter, I will assume you have this local cluster up and running. At any time, you can stop the cluster with minikube stop --profile polar and start it again with minikube start --profile polar. If you ever want to delete it and start over, you can run the minikube delete --profile polar command.
In the next section, you’ll complete the setup for your local Kubernetes cluster by deploying a PostgreSQL database.
7.1.2 Managing data services in a local cluster
As you learned in chapter 5, data services are the stateful components of a system and require special care in a cloud environment due to the challenges of handling their storage. Managing persistence and storage in Kubernetes is a complex topic, and it’s not usually the responsibility of developers.
When you deploy the Polar Bookshop system in production, you’ll rely on the managed data services offered by the cloud provider, so I have prepared the configuration for deploying PostgreSQL in your local Kubernetes cluster. Check the source code repository accompanying this book (Chapter07/07-end) and copy the content of the polar-deployment/kubernetes/platform/development folder into the same path in your polar-deployment repository. The folder contains basic Kubernetes manifests to run a PostgreSQL database.
Open a Terminal window, navigate to the kubernetes/platform/development folder located in your polar-deployment repository, and run the following command to deploy PostgreSQL in your local cluster:
$ kubectl apply -f services
Note The preceding command creates the resources defined in the manifests within the services folder. In the next section, you’ll learn more about the kubectl apply command and Kubernetes manifests.
The result will be a Pod running a PostgreSQL container in your local Kubernetes cluster. You can check it out with the following command:
$ kubectl get pod

NAME                              READY   STATUS    RESTARTS   AGE
polar-postgres-677b76bfc5-lkkqn   1/1     Running   0          48s
Tip You can check the database logs by running kubectl logs deployment/polar-postgres.
For the rest of the chapter, I’ll assume you have a PostgreSQL instance running in your local cluster. If at any point you need to undeploy the database, you can run the kubectl delete -f services command from the same folder.
The following section will present the main Kubernetes concepts and guide you through deploying Spring Boot applications on your local cluster.
7.2 Kubernetes Deployments for Spring Boot
This section will walk you through the main Kubernetes objects you’ll be working with as a developer and the vocabulary necessary to communicate efficiently with a platform team and deploy your applications to a cluster.
You have already gone through the containerization of a Spring Boot application. A Spring Boot application on Kubernetes is still packaged as a container, but it runs in a Pod controlled by a Deployment object.
Pods and Deployments are core concepts you need to understand when working with Kubernetes. Let’s start by looking at some of their main characteristics, after which you’ll practice declaring and creating Kubernetes resources to deploy the Catalog Service application.
7.2.1 From containers to Pods
As we discussed in the previous section, Pods are the smallest deployable units in Kubernetes. When moving from Docker to Kubernetes, we switch from managing containers to managing Pods.
A Pod is the smallest Kubernetes object, and it “represents a set of running containers” in a cluster. It’s usually set up to run a single primary container (your application), but it can also run optional helper containers with additional features like logging, monitoring, or security (https://kubernetes.io/docs/reference/glossary).
A Pod is usually comprised of one container: the application instance. When that happens, it’s not much different from working with containers directly. However, there are some scenarios where your application container needs to be deployed together with some helper containers that perhaps perform initialization tasks required by the application or add extra functionality such as logging. For example, Linkerd (a service mesh) adds its own container (a sidecar) to Pods to perform operations such as intercepting HTTP traffic and encrypting it to guarantee secure communication between all Pods via mTLS (mutual Transport Layer Security). Figure 7.3 illustrates single-container and multi-container Pods.
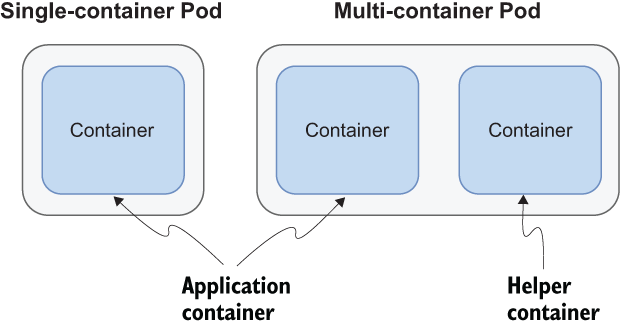
Figure 7.3 Pods are the smallest deployable units in Kubernetes. They run at least one primary container (the application) and might run optional helper containers for additional features like logging, monitoring, or security.
In this book, you’ll work with single-container Pods, where the container is the application. Compared to containers, Pods allow you to manage related containers as a single entity. But that’s not enough. Directly creating and managing Pods would not be much different than working with plain Docker containers. We need something at a higher level of abstraction to define how we want to deploy and scale our applications. That’s where the Deployment objects come into play.
7.2.2 Controlling Pods with Deployments
How can you scale an application to have five replicas running? How can you ensure there are always five replicas up and running even when failures occur? How can you deploy a new version of the application without downtime? With Deployments.
A Deployment is an object that manages the life cycle of a stateless, replicated application. Each replica is represented by a Pod. The replicas are distributed among the nodes of a cluster for better resilience (https://kubernetes.io/docs/reference/glossary).
In Docker you manage your application instances directly by creating and removing containers. In Kubernetes you don’t manage Pods. You let a Deployment do that for you. Deployment objects have several important and valuable characteristics. You can use them to deploy your applications, roll out upgrades without downtime, roll back to a previous version in case of errors, and pause and resume upgrades.
Deployments also let you manage replication. They make use of an object named ReplicaSet to ensure there’s always the desired number of Pods up and running in your cluster. If one of them crashes, a new one is created automatically to replace it. Furthermore, replicas are deployed across different nodes in your cluster to ensure even higher availability if one node crashes. Figure 7.4 shows the relationship between containers, Pods, ReplicaSets, and Deployments.
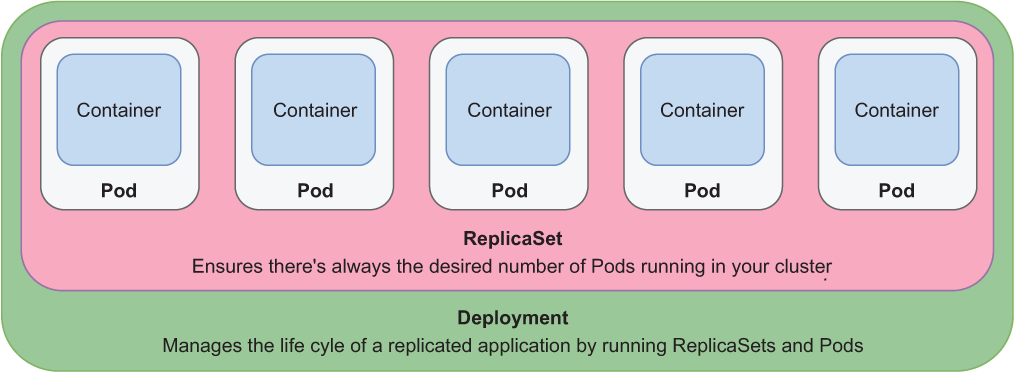
Figure 7.4 A Deployment manages replicated applications with ReplicaSets and Pods in your cluster. A ReplicaSet ensures the desired number of Pods is always up and running. A Pod runs a containerized application.
Deployments provide a convenient abstraction for us to declare what we want to achieve (the desired state), and we can let Kubernetes make it happen. You don’t need to worry about how to achieve a specific result. Unlike imperative tools such as Ansible or Puppet, you can just tell Kubernetes what you want, and the orchestrator will figure out how to achieve the desired result and keep it consistent. That’s what we call declarative configuration.
Kubernetes uses controllers that watch the system and compare the desired state with the actual state. When there is any difference between the two, it acts to make them match again. Deployments and ReplicaSets are controller objects, handling rollout, replication, and self-healing. For example, suppose you declare that you want three replicas of your Spring Boot application deployed. If one crashes, the associated ReplicaSet notices it and creates a new Pod to align the actual state with the desired one.
After packaging a Spring Boot application as an OCI image, all you need to do to run it in a Kubernetes cluster is define a Deployment object. You’ll learn how in the next section.
7.2.3 Creating a Deployment for a Spring Boot application
There are a few options for creating and managing Kubernetes objects in a cluster. In chapter 2 we used the kubectl client directly, but that approach lacks version control and reproducibility. It’s the same reason why we prefer Docker Compose over the Docker CLI.
In Kubernetes, the recommended approach is to describe an object’s desired state in a manifest file, typically specified in YAML format. We use declarative configuration: we declare what we want instead of how to achieve it. In chapter 2 we imperatively used kubectl to create and delete objects, but when we work with manifests, we apply them to the cluster. Then Kubernetes will automatically reconcile the actual state in the cluster with the desired state in the manifest.
A Kubernetes manifest usually comprises four main sections, as shown in figure 7.5:
-
apiVersion defines the versioned schema of the specific object representation. Core resources such as Pods or Services follow a versioned schema composed of only a version number (such as v1). Other resources like Deployments or ReplicaSet follow a versioned schema consisting of a group and a version number (for example, apps/v1). If in doubt about which version to use, you can refer to the Kubernetes documentation (https://kubernetes.io/docs) or use the kubectl explain <object_name> command to get more information about the object, including the API version to use.
-
kind is the type of Kubernetes object you want to create, such as Pod, ReplicaSet, Deployment, or Service. You can use the kubectl api-resources command to list all the objects supported by the cluster.
-
metadata provides details about the object you want to create, including the name and a set of labels (key/value pairs) used for categorization. For example, you can instruct Kubernetes to replicate all the objects with a specific label attached.
-
spec is a section specific to each object type and is used to declare the desired configuration.

Figure 7.5 A Kubernetes manifest is typically composed of four main sections: apiVersion, kind, metadata, and spec.
Now that you’re familiar with the main sections of a Kubernetes manifest, let’s define one for a Deployment object that will run a Spring Boot application.
Defining a Deployment manifest with YAML
There are different strategies for organizing Kubernetes manifests. For the Catalog Service application, create a “k8s” folder in the project root (catalog-service). We will use it to store the manifests for the application.
Note If you haven’t followed along with the examples implemented in the previous chapters, you can refer to the repository accompanying the book (https://github.com/ThomasVitale/cloud-native-spring-in-action) and use the project in Chapter07/07-begin/catalog-service as a starting point.
Let’s start by creating a deployment.yml file inside the catalog-service/k8s folder. As you saw in figure 7.5, the first sections you need to include are apiVersion, kind, and metadata.
Listing 7.1 Initializing a Deployment manifest for Catalog Service
apiVersion: apps/v1          ❶
kind: Deployment             ❷
metadata:
  name: catalog-service      ❸
  labels:                    ❹
    app: catalog-service     ❺
❶ The API version for Deployment objects
❷ The type of object to create
❹ A set of labels attached to the Deployment
❺ This Deployment is labeled with “app=catalog-service.”
Note The Kubernetes API can change over time. Make sure you always use the API supported by the version of Kubernetes you’re running. If you have followed along so far, you shouldn’t have this problem. But if it happens, kubectl will return a very descriptive error message telling you exactly what’s wrong and how to fix it. You can also use the kubectl explain <object_ name> command to check the API version supported by your Kubernetes installation for a given object.
The spec section of a Deployment manifest contains a selector part to define a strategy for identifying which objects should be scaled by a ReplicaSet (more on this later) and a template part describing the specifications for creating the desired Pod and containers.
Listing 7.2 The desired state for the Catalog Service deployment
apiVersion: apps/v1
kind: Deployment
metadata:
  name: catalog-service
  labels:
    app: catalog-service
spec:
  selector:                                                  ❶
    matchLabels:
      app: catalog-service
  template:                                                  ❷
    metadata:
      labels:                                                ❸
        app: catalog-service
    spec:
      containers:                                            ❹
      - name: catalog-service                                ❺
        image: catalog-service                               ❻
        imagePullPolicy: IfNotPresent                        ❼
        ports:
          - containerPort: 9001                              ❽
        env:                                                 ❾
          - name: BPL_JVM_THREAD_COUNT                       ❿
            value: "50"
          - name: SPRING_DATASOURCE_URL                      ⓫
            value: jdbc:postgresql://polar-postgres/polardb_catalog
          - name: SPRING_PROFILES_ACTIVE                     ⓬
            value: testdata
❶ Defines the labels used to select the Pods to be scaled
❷ The template for creating a Pod
❸ Labels attached to the Pod object. They should match the ones used as selectors.
❹ The list of containers in the Pod (one in this case)
❻ The image used to run the container. No tag is defined, so “latest” will be used implicitly.
❼ Instructs Kubernetes to pull the image from a container registry only if it’s not present locally yet
❽ The ports exposed by the container
❾ The list of environment variables passed to the Pod
❿ A Paketo Buildpacks environment variable to configure the number of threads for memory calculation
⓫ A value for the spring.datasource.url property pointing to the PostgreSQL Pod deployed previously
⓬ Enables the “testdata” Spring profile
The containers part should look familiar, since it resembles how you defined containers in the services section of a Docker Compose file. Like you did with Docker, you can use an environment variable to define the URL for the PostgreSQL instance the application should use. The hostname part of the URL (polar-postgres) is the name of the Service object that was used to expose the database and was created previously from the kubernetes/platform/development folder. You’ll learn more about Services later in the chapter. For now, it’s enough to know that polar-postgres is the name through which other objects in the cluster can communicate with the PostgreSQL instance.
In a production scenario, the image would be fetched from a container registry. During development, it’s more convenient to work with local images. Let’s build one for Catalog Service, as you learned in the previous chapter.
Open a Terminal window, navigate to the Catalog Service root folder (catalog-service), and build a new container image as follows:
$ ./gradlew bootBuildImage
Tip If you’re working on ARM64 machines (such as Apple Silicon computers), you can add the --builder ghcr.io/thomasvitale/java-builder-arm64 argument to the previous command to use an experimental version of Paketo Buildpacks with ARM64 support. Be aware that it’s experimental and not ready for production. For more information, you can refer to the documentation on GitHub: https://github.com/ThomasVitale/paketo-arm64. Without this workaround, until official support is added (https://github.com/paketo-buildpacks/stacks/issues/51), you can still use Buildpacks to build containers and run them via Docker Desktop on Apple Silicon computers, but the build process and application startup phase will be slower than usual.
By default, minikube doesn’t have access to your local container images, so it will not find the image you have just built for Catalog Service. But don’t worry: you can manually import it into your local cluster:
$ minikube image load catalog-service --profile polar
Note YAML is an expressive language, but it can make your coding experience quite bad due to its constraints about spaces or perhaps the lack of support from your editor. When a kubectl command involving a YAML file fails, verify that spaces and indentation are used correctly. For Kubernetes, you can install a plugin in your editor to support you while writing YAML manifests, ensuring that you always use the correct syntax, spaces, and indentation. You can find a few plugin options in the README.md file in the repository accompanying this book: https://github.com/ThomasVitale/cloud-native-spring-in-action.
Now that you have a Deployment manifest, let’s move on and see how to apply it to your local Kubernetes cluster.
Creating a Deployment object from a manifest
You can apply Kubernetes manifests to a cluster using the kubectl client. Open a Terminal window, navigate to your Catalog Service root folder (catalog-service), and run the following command:
$ kubectl apply -f k8s/deployment.yml
The command is processed by the Kubernetes Control Plane, which will create and maintain all the related objects in the cluster. You can verify which objects have been created with the following command:
$ kubectl get all -l app=catalog-service

NAME                                   READY   STATUS    RESTARTS   AGE
pod/catalog-service-68bc5659b8-k6dpb   1/1     Running   0          42s

NAME                              READY   UP-TO-DATE   AVAILABLE   AGE
deployment.apps/catalog-service   1/1     1            1           42s

NAME                                         DESIRED   CURRENT   READY   AGE
replicaset.apps/catalog-service-68bc5659b8   1         1         1       42s
Since you used labels consistently in your Deployment manifest, you can use the label app=catalog-service to fetch all the Kubernetes objects related to the Catalog Service deployment. As you can see, the declaration in deployment.yml resulted in the creation of a Deployment, a ReplicaSet, and a Pod.
To verify that Catalog Service started up correctly, you can check the logs from its Deployment as follows:
$ kubectl logs deployment/catalog-service
Note You can monitor whether Pods have been created successfully by inspecting the STATUS column when you run kubectl get pods. Should a Pod fail to be deployed, check that column. Common error statuses are ErrImagePull or ImagePullBackOff. They happen when Kubernetes can’t pull the image used by the Pod from the configured container registry. We’re currently working with local images, so make sure you built and loaded a Catalog Service container image into minikube. You can use the kubectl describe pod <pod_name> command to get more information about the error and kubectl logs <pod_name> to get the application logs from a specific Pod instance.
When deploying containers in a cloud environment like a Kubernetes cluster, you’ll want to be sure it has enough resources to operate. In chapter 15, you’ll learn how to assign CPU and memory resources to a container running in Kubernetes and how to configure memory for the JVM by applying the Java memory calculator provided by Cloud Native Buildpacks. For now, we’ll rely on the default resource configuration.
So far, you have created a Deployment for a Spring Boot application and run it in your local Kubernetes cluster. But it’s not possible to use it yet, since it’s isolated inside the cluster. In the next section you’ll learn how to expose your application to the outside world and how to use the service-discovery and load-balancing functionality provided by Kubernetes.
7.3 Service discovery and load balancing
We’ve talked about Pods and Deployments, so let’s dig into Services a bit. You’ve got the Catalog Service application running as a Pod in your local Kubernetes cluster, but there are still unanswered questions. How can it interact with the PostgreSQL Pod running in the cluster? How does it know where to find it? How can you expose a Spring Boot application to be used by other Pods in the cluster? How can you expose it outside the cluster?
This section will answer those questions by introducing two important aspects of cloud native systems: service discovery and load balancing. I’ll present the two main patterns available to implement them when working with Spring applications: client-side and server-side. Then you’ll apply the latter approach, which is conveniently offered natively by Kubernetes through Service objects, meaning you don’t have to change anything in your code to support it (unlike the client-side option). Finally, you’ll learn how the communication between the Catalog Service Pod and the PostgreSQL Pod happens, and you’ll expose the Catalog Service application as a network service.
7.3.1 Understanding service discovery and load balancing
When one service needs to communicate with another, it must be provided with information about where to find it, such as an IP address or a DNS name. Let’s consider two applications: Alpha App and Beta App. Figure 7.6 shows how the communication between the two would happen if there were only one Beta App instance.

Figure 7.6 If there were only one Beta App instance, the interprocess communication between Alpha App and Beta App would be based on a DNS name resolving to the IP address of Beta App.
In the scenario illustrated in figure 7.6, we say that Alpha App is upstream and Beta App is downstream. Furthermore, Beta App is a backing service with respect to Alpha App. There’s only one instance of Beta App running, so the DNS name gets resolved to its IP address.
In the cloud, you’ll probably want to have multiple instances of a service running, and each service instance will have its own IP address. Unlike physical machines or long-running virtual machines, a service instance will not live long in the cloud. Application instances are disposable—they can be removed or replaced for different reasons, such as when they are not responsive anymore. You can even enable the auto-scaling feature to automatically scale your application in and out, depending on the workload. Using IP addresses for interprocess communication in the cloud is not an option.
To overcome that issue, you might consider using DNS records, relying on a round-robin name resolution pointing to one of the IP addresses assigned to the replicas. Knowing the hostname, you can reach the backing service even if one of the IP addresses changes because the DNS server would be updated with the new ones. However, this approach is not the best fit for cloud environments because the topology changes too often. Some DNS implementations cache the results of name lookups even after they should have expired. Similarly, some applications cache DNS lookup responses for too long. Either way, there’s a high chance of using a hostname/IP address resolution that is no longer valid.
Service discovery in cloud environments requires a different solution. First, we need to keep track of all the service instances running and store that information in a service registry. Whenever a new instance is created, an entry should be added to the registry. When it’s shut down, it should be removed accordingly. The registry recognizes that multiple instances of the same application can be up and running. When an application needs to call a backing service, it performs a lookup in the registry to determine which IP address to contact. If multiple instances are available, a load-balancing strategy is applied to distribute the workload across them.
We distinguish between client-side and server-side service discovery, depending on where the problem is solved. Let’s take a look at both options.
7.3.2 Client-side service discovery and load balancing
Client-side service discovery requires applications to register themselves with a service registry upon startup and unregister when shutting down. Whenever they need to call a backing service, they ask the service registry for an IP address. If multiple instances are available, the registry will return the list of IP addresses. The application will choose one of them, depending on a load-balancing strategy defined by the application itself. Figure 7.7 shows how that works.
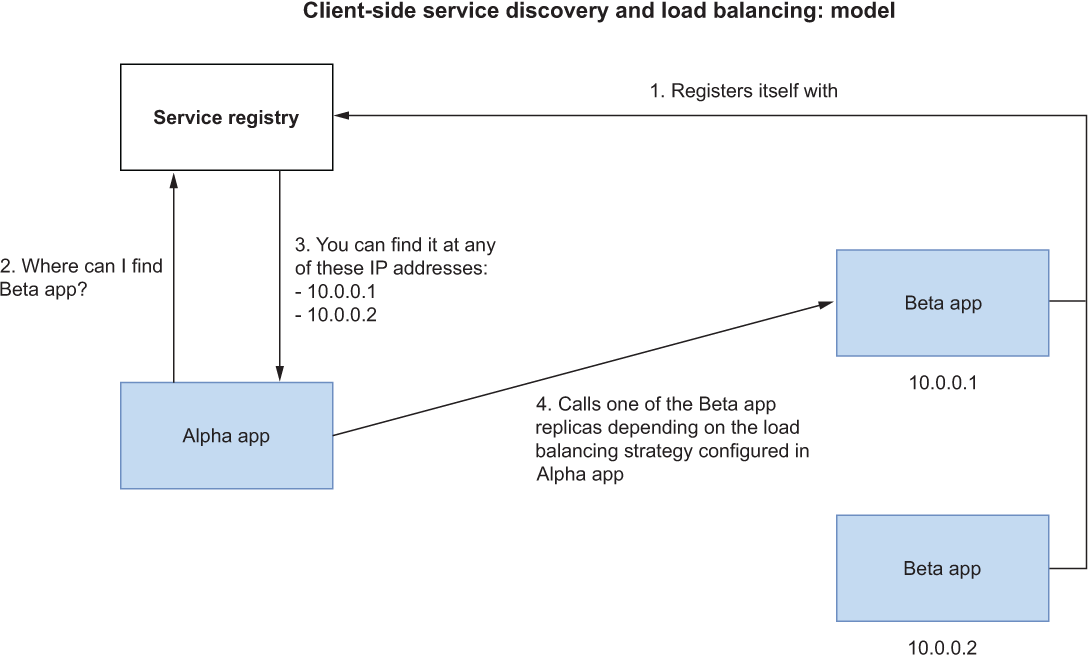
Figure 7.7 The interprocess communication between Alpha App and Beta App is based on the IP address of the specific instance to call, chosen from a list of IP addresses returned upon lookup in the service registry.
The Spring Cloud project offers a few options for adding client-side service discovery to your Spring applications. One of the popular choices is Spring Cloud Netflix Eureka, which wraps the Eureka service registry developed by Netflix. Alternatives are Spring Cloud Consul, Spring Cloud Zookeeper Discovery, and Spring Cloud Alibaba Nacos.
Besides managing a service registry explicitly, you’ll also need to add the correct integration to all your applications. For each of the previously mentioned options, Spring Cloud provides a client library you can add to your Spring application so it can use the service registry with minimal effort. Finally, Spring Cloud Load Balancer can be used for client-side load balancing, which is the preferred choice over Spring Cloud Netflix Ribbon (no longer maintained).
All those libraries offered by Spring Cloud contributed to making it an excellent choice for building cloud native applications and implementing microservices architectures. A benefit of such a solution is that your applications have complete control over the load-balancing strategy. Suppose you need to implement patterns like hedging: sending the same request to multiple instances to increase the chance one responds correctly within a specific time limit. Client service discovery can help you with that.
A drawback is that client service discovery assigns more responsibility to developers. If your system includes applications built using different languages and frameworks, you’ll need to handle the client part of each of them in different ways. Also, it results in one more service to deploy and maintain (the service registry), unless you use PaaS solutions like Azure Spring Apps or VMware Tanzu Application Service, which provide it for you. Server-side discovery solutions solve these issues at the expense of fine-grained control in the application. Let’s see how.
7.3.3 Server-side service discovery and load balancing
Server-side service discovery solutions move a lot of responsibility to the deployment platform, so that developers can focus on the business logic and rely on the platform to provide all the necessary functionality for service discovery and load balancing. Such solutions automatically register and deregister application instances and rely on a load-balancer component to route any incoming requests to one of the available instances according to a specific strategy. In this case, the application doesn’t need to interact with the service registry, which is updated and managed by the platform. Figure 7.8 shows how that works.

Figure 7.8 The interprocess communication between Alpha App and Beta App is based on a DNS name that gets resolved to one of the instance IP addresses by a load-balancer component. The service registration process is handled by the platform transparently.
The Kubernetes implementation of this service discovery pattern is based on Service objects. A Service is “an abstract way to expose an application running on a set of Pods as a network service” (https://kubernetes.io/docs/reference/glossary).
A Service object is an abstraction targeting a set of Pods (typically using labels) and defining the access policy. When an application needs to contact a Pod exposed by a Service object, it can use the Service name instead of calling the Pod directly. That’s what you did to let the Catalog Service application interact with the PostgreSQL instance (polar-postgres was the name of the Service exposing the PostgreSQL Pod). The Service name is then resolved to the IP address of the Service itself by a local DNS server running in the Kubernetes Control Plane.
Note The IP address assigned to a Service is fixed for its lifetime. Therefore, the DNS resolution of a Service name doesn’t change as often as it would with application instances.
After resolving the Service name to its IP address, Kubernetes relies on a proxy (called kube-proxy), which intercepts the connection to the Service object and forwards the request to one of the Pods targeted by the Service. The proxy knows all the replicas available and adopts a load-balancing strategy depending on the type of Service and the proxy configuration. There is no DNS resolution involved in this step, solving the problems I mentioned earlier. The service discovery implementation adopted by Kubernetes is shown in figure 7.9.
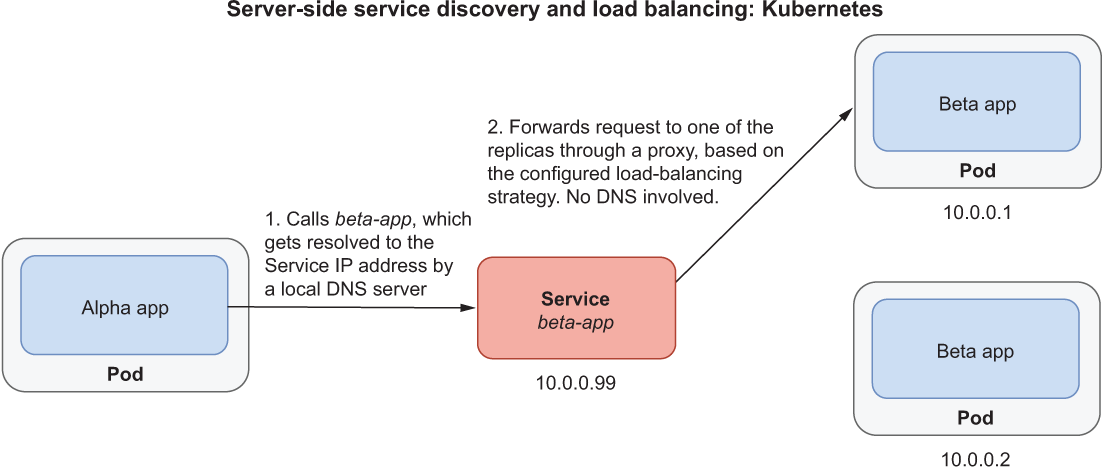
Figure 7.9 In Kubernetes, the interprocess communication between Alpha App and Beta App happens through a Service object. Any request arriving at the Service is intercepted by a proxy that forwards it to one of the replicas targeted by the Service based on a specific load-balancing strategy.
This solution is transparent to your Spring Boot applications. Unlike options like Spring Cloud Netflix Eureka, you get service discovery and load balancing out of the box in Kubernetes, without requiring any change to your code. That’s why it’s the preferred option when you use a Kubernetes-based platform to deploy your applications.
With this general understanding of how service discovery and load balancing are implemented in Kubernetes, let’s look at how we can define a Service to expose a Spring Boot application.
7.3.4 Exposing Spring Boot applications with Kubernetes Services
As you learned in the previous section, Kubernetes Services let you expose a set of Pods via an interface that other applications can call without knowing the details about the individual Pod instances. This model provides applications with transparent service-discovery and load-balancing functionality.
First of all, there are different types of Services, depending on which access policy you want to enforce for the application. The default and most common type is called ClusterIP, and it exposes a set of Pods to the cluster. This is what makes it possible for Pods to communicate with each other (for example, Catalog Service and PostgreSQL).
Four pieces of information characterize a ClusterIP Service:
-
The selector label used to match all the Pods that should be targeted and exposed by the Service
-
The port on which the Service is listening (we’re going to use port 80 for all our application Services)
-
The targetPort, which is the port exposed by the targeted Pods to which the Service will forward requests
Figure 7.10 shows the relationship between a ClusterIP Service and a set of target Pods running applications exposed on port 8080. The name of the Service must be a valid DNS name, since it will be used by other Pods as a hostname to access the targeted Pods.
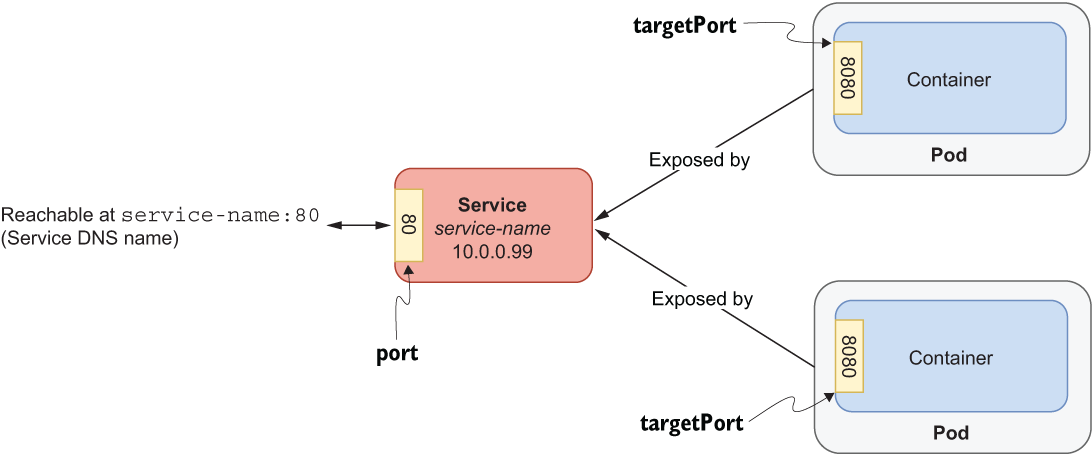
Figure 7.10 A ClusterIP service exposes a set of Pods to the network inside the cluster.
Defining a Service manifest with YAML
Let’s see how we can define a manifest for a Service object to expose the Catalog Service application through the DNS name catalog-service and port 80. Open the catalog-service/k8s folder you created earlier and add a new service.yml file.
Listing 7.3 Service manifest for the Catalog Service application
apiVersion: v1              ❶
kind: Service               ❷
metadata:
  name: catalog-service     ❸
  labels:
    app: catalog-service    ❹
spec:
  type: ClusterIP           ❺
  selector:
    app: catalog-service    ❻
  ports:
  - protocol: TCP           ❼
    port: 80                ❽
    targetPort: 9001        ❾
❶ The API version for Service objects
❷ The type of object to create
❸ The name of the Service; it must be a valid DNS name.
❹ A label attached to the Service
❻ The label used to match the Pods to target and expose
❼ The network protocol used by the Service
❽ The port exposed by the Service
❾ The port exposed by the Pods targeted by the Service
Creating a Service object from a manifest
You can apply a Service manifest as you did for Deployments. Open a Terminal window, navigate to your Catalog Service root folder (catalog-service), and run the following command:
$ kubectl apply -f k8s/service.yml
The command will be processed by the Kubernetes Control Plane, which will create and maintain the Service object in the cluster. You can verify the result with the following command:
$ kubectl get svc -l app=catalog-service

NAME              TYPE        CLUSTER-IP      EXTERNAL-IP   PORT(S)   AGE
catalog-service   ClusterIP   10.102.29.119   <none>        80/TCP    42s
Since it’s of type ClusterIP, the Service makes it possible for other Pods within the cluster to communicate with the Catalog Service application, either using its IP address (called the cluster IP) or through its name. That will be useful for the applications you’ll build in the next chapters, but what about us? How can we expose the application outside the cluster to test it?
For now, we’ll rely on the port-forwarding feature offered by Kubernetes to expose an object (in this case, a Service) to a local machine. You did that already in chapter 2, so the command should look familiar:
$ kubectl port-forward service/catalog-service 9001:80
Forwarding from 127.0.0.1:9001 -> 9001
Forwarding from [::1]:9001 -> 9001
You can finally call the application from localhost on port 9001, and all requests will be forwarded to the Service object and ultimately to the Catalog Service Pod. Try visiting http://localhost:9001 from your browser to see the welcome message, or http://localhost:9001/books to browse the books available in the catalog.
Tip The process started by the kubectl port-forward command will keep running until you explicitly stop it with Ctrl-C. Until then, you’ll need to open another Terminal window if you want to run CLI commands.
Figure 7.11 illustrates how the communication works between your computer, Catalog Service, and PostgreSQL.

Figure 7.11 The Catalog Service application is exposed to your local machine through port forwarding. Both Catalog Service and PostgreSQL are exposed to the inside of the cluster through the cluster-local hostname, IP address, and port assigned to the Service objects.
So far we’ve been working with only one instance of Catalog Service, but we can take advantage of Kubernetes and scale it out. The following section will cover how to scale Spring Boot applications and address aspects such as fast startup and graceful shutdown, which are essential for cloud native applications.
Note Imagine running all those commands every time you change something in your application, and you want to test it locally. It doesn’t look very appealing, does it? Don’t worry! In section 7.5 I’ll show you how to set up a local Kubernetes development workflow to automate all those operations.
7.4 Scalability and disposability
Deploying multiple instances of the same application helps in achieving high availability. When the workload is high, it can be distributed across different replicas. When an instance enters a faulty state and can’t process requests anymore, it can be deleted and a new one created. This continuous and dynamic scaling of application instances requires stateless and disposable applications, as per the 15-Factor methodology.
This section will show you what it means for an application to be disposable, how to enable graceful shutdown, and how to scale an application in Kubernetes.
7.4.1 Ensuring disposability: Fast startup
Traditional applications deployed on application servers take quite some time to start. It’s not rare for them to take several minutes before they’re ready to accept connections. On the other hand, cloud native applications should be optimized for starting quickly, taking a few seconds rather than minutes to become ready. Spring Boot is already optimized for fast startup, and each new version is shipped with more improvements.
Fast startup is relevant in a cloud environment because applications are disposable and are frequently created, destroyed, and scaled. The quicker the startup, the sooner a new application instance is ready to accept connections.
Standard applications, like microservices, are good with a startup time in the range of a few seconds. On the other hand, serverless applications usually require a faster startup phase in the range of milliseconds rather than seconds. Spring Boot covers both needs, but the second use case might require a bit of additional configuration.
In chapter 16, you’ll learn about serverless applications with Spring Cloud Function, and I’ll show you how to package them as native images using Spring Native and GraalVM. The result will be an application with almost instant startup time, reduced resource consumption, and reduced image size.
7.4.2 Ensuring disposability: Graceful shutdown
Having applications start quickly is not enough to address our scalability needs. Whenever an application instance is shut down, it must happen gracefully without clients experiencing downtime or errors. Gracefully shutting down means the application stops accepting new requests, completes all those still in progress, and closes any open resources, like database connections.
All the embedded servers available in Spring Boot support a graceful shutdown mode, but in slightly different ways. Tomcat, Jetty, and Netty stop accepting new requests entirely when the shutdown signal is received. On the other hand, Undertow keeps accepting new requests but immediately replies with an HTTP 503 response.
By default, Spring Boot stops the server immediately after receiving a termination signal (SIGTERM). You can switch to a graceful mode by configuring the server.shutdown property. You can also configure the grace period, which is how long the application can spend processing all the pending requests. After the grace period expires, the application is terminated even if there are still pending requests. By default, the grace period is 30 seconds. You can change it through the spring.lifecycle.timeout-per-shutdown-phase property.
Let’s configure graceful shutdown for Catalog Service. We could do that via environment variables or set it as a default configuration. We’ll go with the second option. Open the application.yml file located in the catalog-service/src/main/resources folder, and update the configuration as follows:
server:
  port: 9001
  shutdown: graceful                  ❶
  tomcat:
    connection-timeout: 2s
    keep-alive-timeout: 15s
    threads:
      max: 50
      min-spare: 5

spring:
  application:
    name: catalog-service
  lifecycle:
    timeout-per-shutdown-phase: 15s   ❷
...
Since we’ve modified the application source code, we need to build a new container image and load it into minikube. That’s not very efficient, is it? Later in the chapter, I’ll show you a better way. For now, follow the procedure I described earlier to package Catalog Service as a container image (./gradlew bootBuildImage) and load it into the Kubernetes cluster we are using for Polar Bookshop (minikube image load catalog -service --profile polar).
After enabling application support for graceful shutdown, you need to update the Deployment manifest accordingly. When a Pod has to be terminated (for example, during a downscaling process or as part of an upgrade), Kubernetes sends a SIGTERM signal to it. Spring Boot will intercept that signal and start shutting down gracefully. By default, Kubernetes waits for a grace period of 30 seconds. If the Pod is not terminated after that period, Kubernetes sends a SIGKILL signal to force the Pod’s termination. Since the Spring Boot grace period is lower than the Kubernetes one, the application is in control of when it will terminate.
When it sends the SIGTERM signal to a Pod, Kubernetes will also inform its own components to stop forwarding requests to the terminating Pod. Since Kubernetes is a distributed system, and the two actions happen in parallel, there is a short time window when the terminating Pod might still receive requests, even if it has already started the graceful shutdown procedure. When that happens, those new requests will be rejected, resulting in errors in the clients. Our goal was to make the shutdown procedure transparent to the clients, so that scenario is unacceptable.
The recommended solution is to delay sending the SIGTERM signal to the Pod so that Kubernetes has enough time to spread the news across the cluster. By doing so, all Kubernetes components will already know not to send new requests to the Pod when it starts the graceful shutdown procedure. Technically, the delay can be configured through a preStop hook. Let’s see how we can update the Deployment manifest for Catalog Service to support a transparent and graceful shutdown.
Open the deployment.yml file located in catalog-service/k8s, and add a preStop hook to delay the SIGTERM signal by 5 seconds.
Listing 7.4 Configuring a delay in Kubernetes before the shutdown starts
apiVersion: apps/v1
kind: Deployment
metadata:
  name: catalog-service
  labels:
    app: catalog-service
spec:
  ...
  template:
    metadata:
      labels:
        app: catalog-service
    spec:
      containers:
        - name: catalog-service
          image: catalog-service
          imagePullPolicy: IfNotPresent
          lifecycle:
            preStop:                    ❶
              exec:
                command: [ "sh", "-c", "sleep 5" ]
          ...
❶ Makes Kubernetes wait 5 seconds before sending the SIGTERM signal to the Pod
Finally, apply the updated version of the Deployment object with kubectl apply -f k8s/deployment.yml. Kubernetes will reconcile the new desired state and replace the existing Pod with a new one for which graceful shutdown is fully configured.
Note When a Pod contains multiple containers, the SIGTERM signal is sent to all of them in parallel. Kubernetes will wait up to 30 seconds. If any of the containers in the Pod are not terminated yet, it will shut them down forcefully.
Now that we’ve configured the graceful shutdown behavior for Catalog Service, let’s look at how to scale it in a Kubernetes cluster.
7.4.3 Scaling Spring Boot applications
Scalability is one of the main properties of a cloud native application, as you learned in chapter 1. To be scalable, applications should be disposable and stateless, as per the 15-Factor methodology.
We handled disposability in the previous section, and Catalog Service is already a stateless application. It has no state but relies on a stateful service (the PostgreSQL database) to permanently store the data about books. We scale applications in and out, and if they weren’t stateless, we would lose the state every time an instance is shut down. The general idea is to keep the applications stateless and rely on data services for storing the state, just like we do in Catalog Service.
In Kubernetes, replication is handled at the Pod level by a ReplicaSet object. As you saw earlier, Deployment objects are already configured to use ReplicaSets. All you need to do is specify how many replicas you want to be deployed. You can do that in the Deployment manifest.
Open the deployment.yml file located in catalog-service/k8s, and define how many replicas of the Pod running Catalog Service you want. Let’s go with two.
Listing 7.5 Configuring number of replicas for the Catalog Service Pod
apiVersion: apps/v1
kind: Deployment
metadata:
  name: catalog-service
  labels:
    app: catalog-service
spec:
  replicas: 2         ❶
  selector:
    matchLabels:
      app: catalog-service
  ...
❶ How many Pod replicas should be deployed
The replication is controlled using labels. In listing 7.5, the configuration instructs Kubernetes to manage all Pods with the label app=catalog-service so that there are always two replicas running.
Let’s check it out. Open a Terminal window, navigate to the catalog-service folder, and apply the updated version of the Deployment resource:
$ kubectl apply -f k8s/deployment.yml
Kubernetes will realize that the actual state (one replica) and the desired state (two replicas) don’t match, and it will immediately deploy a new replica of Catalog Service. You can verify the result with the following command:
$ kubectl get pods -l app=catalog-service

NAME                               READY   STATUS    RESTARTS   AGE
catalog-service-68bc5659b8-fkpcv   1/1     Running   0          2s
catalog-service-68bc5659b8-kmwm5   1/1     Running   0          3m94s
In the “age” column, you can tell which Pod is the one that has just been deployed to achieve a state with two replicas.
What happens if one of them terminates? Let’s find out. Pick one of the two Pod replicas and copy its name. For example, I might use the Pod named catalog-service-68bc5659b8-kmwm5. Then, from a Terminal window, delete that Pod with the following command:
$ kubectl delete pod <pod-name>
The Deployment manifest declares two replicas as the desired state. Since there is now only one, Kubernetes will immediately step up to ensure the actual state and the desired state are aligned. If you inspect the Pods again with kubectl get pods -l app=catalog-service, you will still see two Pods, but one of them has just been created to replace the deleted Pod. You can identify it by checking its age:
$ kubectl get pods -l app=catalog-service

NAME                               READY   STATUS    RESTARTS   AGE
catalog-service-68bc5659b8-fkpcv   1/1     Running   0          42s
catalog-service-68bc5659b8-wqchr   1/1     Running   0          3s
Under the hood, a ReplicaSet object keeps checking the number of replicas deployed and ensures they are always in the desired state. That’s the basic functionality on top of which you can configure an autoscaler to dynamically increase or decrease the number of Pods, depending on the workload and without having to update the manifest every time.
Before moving on to the next section, make sure you change the number of replicas back to one and clean up your cluster by removing all the resources you have created so far. First, open a Terminal window, navigate to the catalog-service folder where you defined the Kubernetes manifests, and delete all the objects created for Catalog Service:
$ kubectl delete -f k8s
Finally, go to your polar-deployment repository, navigate to the kubernetes/platform/development folder, and delete the PostgreSQL installation:
$ kubectl delete -f services
7.5 Local Kubernetes development with Tilt
In the previous sections, you learned about the basic Kubernetes concepts and worked with the fundamental objects used to deploy applications to a cluster: Pods, ReplicaSets, Deployments, and Services. After defining the Deployment and Service manifests, you probably don’t want to keep rebuilding container images manually and using the kubectl client to update the Pods whenever you make a change. Luckily for you, you don’t have to.
This section will show you how to set up a local Kubernetes development workflow to automate steps like building images and applying manifests to a Kubernetes cluster. It’s part of implementing the inner development loop of working with a Kubernetes platform. Tilt takes care of many infrastructural concerns and lets you focus more on the business logic of your applications. I’ll also introduce Octant, which will help you visualize and manage your Kubernetes objects through a convenient GUI.
7.5.1 Inner development loop with Tilt
Tilt (https://tilt.dev) aims at providing a good developer experience when working on Kubernetes. It’s an open source tool that offers features for building, deploying, and managing containerized workloads in your local environment. We’ll use some of its basic features to automate a development workflow for a specific application, but Tilt can also help you orchestrate the deployment of multiple applications and services in a centralized way. You can find information about how to install it in section A.4 of appendix A.
Our goal will be to design a workflow that will automate the following steps:
-
Package a Spring Boot application as a container image using Cloud Native Buildpacks.
-
Upload the image to a Kubernetes cluster (in our case, the one created with minikube).
-
Apply all the Kubernetes objects declared in the YAML manifests.
-
Enable the port-forwarding functionality to access applications from your local computer.
-
Give you easy access to the logs from the applications running on the cluster.
Before configuring Tilt, make sure you have a PostgreSQL instance up and running in your local Kubernetes cluster. Open a Terminal window, navigate to the kubernetes/ platform/development folder in your polar-deployment repository, and run the following command to deploy PostgreSQL:
$ kubectl apply -f services
Let’s now see how to configure Tilt to establish that automated development workflow.
Tilt can be configured via a Tiltfile, an extensible configuration file written in Starlark (a simplified Python dialect). Go to your Catalog Service project (catalog-service) and create a file named “Tiltfile” (with no extension) in the root folder. The file will contain three main configurations:
Listing 7.6 Tilt configuration for Catalog Service (Tiltfile)
# Build
custom_build(
    # Name of the container image
    ref = 'catalog-service',
    # Command to build the container image
    command = './gradlew bootBuildImage --imageName $EXPECTED_REF',
    # Files to watch that trigger a new build
    deps = ['build.gradle', 'src']
)

# Deploy
k8s_yaml(['k8s/deployment.yml', 'k8s/service.yml'])

# Manage
k8s_resource('catalog-service', port_forwards=['9001'])
Tip If you’re working on ARM64 machines (such as Apple Silicon computers), you can add the --builder ghcr.io/thomasvitale/java-builder-arm64 argument to the ./gradlew bootBuildImage --imageName $EXPECTED_REF command to use an experimental version of Paketo Buildpacks with ARM64 support. Be aware that it’s experimental and not ready for production. For more information, you can refer to the documentation on GitHub: https://github.com/ThomasVitale/paketo-arm64.
The Tiltfile configures Tilt to use the same approach we used throughout the chapter for building, loading, deploying, and publishing applications on the local Kubernetes cluster. The main difference? It’s all automated now! Let’s give it a try.
Open a Terminal window, navigate to the root folder of your Catalog Service project, and run the following command to start Tilt:
$ tilt up
Tilt started on http://localhost:10350/
The process started by the tilt up command will keep running until you explicitly stop it with Ctrl-C. One of the useful features provided by Tilt is a convenient GUI where you can keep track of the services managed by Tilt, check application logs, and trigger updates manually. Go to the URL where Tilt started its services (by default, it should be http://localhost:10350), and monitor the process that Tilt follows to build and deploy Catalog Service (figure 7.12). The first time it can take one or two minutes because the Buildpacks libraries need to be downloaded. The subsequent times it will be much faster.
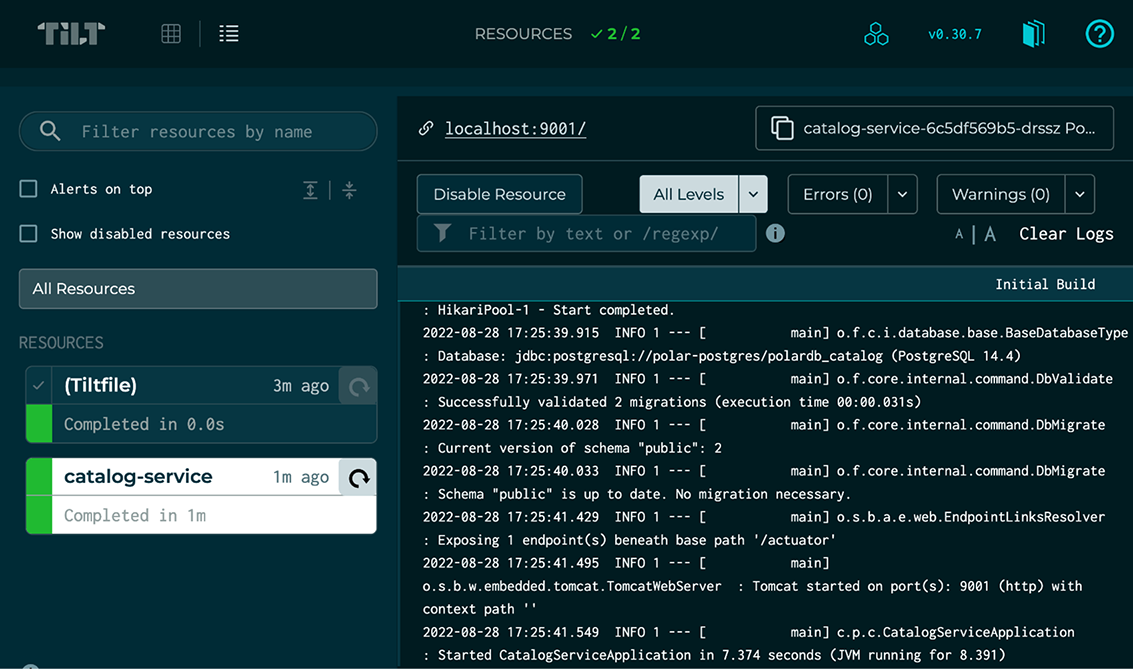
Figure 7.12 Tilt provides a convenient GUI where you can monitor and manage applications.
Besides building and deploying the application, Tilt has also activated port forwarding to your local machine on port 9001. Go ahead and verify that the application is working correctly:
$ http :9001/books
Tilt will keep the application in sync with the source code. Whenever you make any change to the application, Tilt will trigger an update operation to build and deploy a new container image. All of that happens automatically and continuously.
Note Rebuilding the whole container image every time you change something in your code is not very efficient. You can configure Tilt to synchronize only the changed files and upload them into the current image. To achieve that, you can rely on the features offered by Spring Boot DevTools (https://mng.bz/nY8v) and Paketo Buildpacks (https://mng.bz/vo5x).
When you’re done testing the application, stop the Tilt process in the Catalog Service project and run the following command to undeploy the application:
$ tilt down
7.5.2 Visualizing your Kubernetes workloads with Octant
When you start deploying multiple applications to a Kubernetes cluster, it can become challenging to manage all the related Kubernetes objects or investigate failures when they happen. There are different solutions for visualizing and managing Kubernetes workloads. This section will cover Octant (https://octant.dev), an “open source developer-centric web interface for Kubernetes that lets you inspect a Kubernetes cluster and its applications.” You can find information about how to install it in section A.4 of appendix A.
I expect you still have the local Kubernetes cluster you used in the previous section up and running and PostgreSQL deployed. You can also deploy Catalog Service by going into the project’s root folder and running tilt up. Then, open a new Terminal window and run the following command:
$ octant
This command will open the Octant Dashboard in your browser (usually at http://localhost:7777). Figure 7.13 shows the Dashboard. The Overview page provides a picture of all the Kubernetes objects running in the cluster. If you followed along, you should have PostgreSQL and Catalog Service running in the cluster.
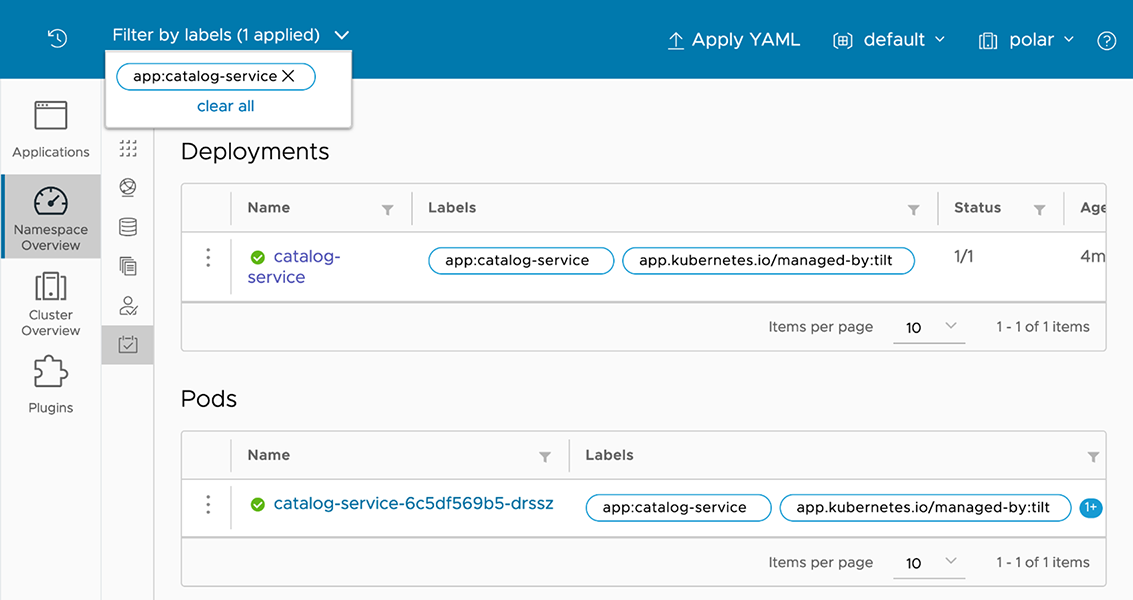
Figure 7.13 Octant offers a web interface for inspecting a Kubernetes cluster and its workloads.
From the Overview page you can expand the objects to get more details. For example, if you click the item corresponding to the Catalog Service Pod, you’ll get access to information about the object, as shown in figure 7.14. You can also perform several operations like enabling port forwarding, reading the logs, modifying the Pod’s manifest, and investigating failures.

Figure 7.14 Octant lets you access Pod information easily, check their logs, and enable a port forward.
Take your time exploring the many features provided by Octant. It’s a convenient tool that you can use to inspect and troubleshoot a local Kubernetes cluster or a remote one. We’ll also use Octant to examine the remote production cluster where we’ll deploy the Polar Bookshop application. For now, close Octant by stopping its process with Ctrl-C.
When you’re done, you can stop the Tilt process in the Catalog Service project and run tilt down to undeploy the application. Then go to your polar-deployment repository, navigate to the kubernetes/platform/development folder, and delete the PostgreSQL installation with kubectl delete -f services. Finally, stop the cluster as follows:
$ minikube stop --profile polar
7.6 Deployment pipeline: Validate Kubernetes manifests
Chapter 3 introduced the concept of a deployment pipeline and its importance in the continuous delivery approach for delivering software quickly, reliably, and safely. So far we’ve automated the first part of a deployment pipeline: the commit stage. After a developer commits new code to the mainline, this stage goes through build, unit tests, integration tests, static code analysis, and packaging. At the end of this stage, an executable application artifact is published to an artifact repository. That is a release candidate.
In this chapter, you learned how to deploy Spring Boot applications on Kubernetes using a declarative approach based on resource manifests. They are fundamental to a successful deployment of the release candidate on Kubernetes, so we should guarantee their correctness. This section will show you how to validate Kubernetes manifests as part of the commit stage.
7.6.1 Validating Kubernetes manifests in the commit stage
Throughout this chapter, we’ve worked with resource manifests for creating Deployments and Services in a Kubernetes cluster. A manifest is “a specification of a Kubernetes API object in JSON or YAML format.” It specifies “the desired state of an object that Kubernetes will maintain when you apply the manifest” (https://kubernetes.io/docs/reference/glossary).
Since a manifest specifies the desired state of an object, we should ensure that our specification complies with the API exposed by Kubernetes. It’s a good idea to automate this validation in the commit stage of a deployment pipeline to get fast feedback in case of errors (rather than waiting until the acceptance stage, where we need to use those manifests to deploy the application in a Kubernetes cluster). Figure 7.15 illustrates the main steps of the commit stage after including the validation of Kubernetes manifests.

Figure 7.15 When Kubernetes manifests are included in the application repository, a new step in the commit stage is included to validate them.
There are several ways of validating Kubernetes manifests against the Kubernetes API. We’ll use Kubeval (www.kubeval.com), an open source tool. You can find information about how to install it in section A.4 of appendix A.
Let’s see how it works. Open a Terminal window and navigate to the root folder of your Catalog Service project (catalog-service). Then use the kubeval command to validate the Kubernetes manifests within the k8s directory (-d k8s). The --strict flag disallows adding additional properties not defined in the object schema:
$ kubeval --strict -d k8s

PASS - k8s/deployment.yml contains a valid Deployment (catalog-service)
PASS - k8s/service.yml contains a valid Service (catalog-service)
In the next section, you’ll see how to use Kubeval in the commit stage workflow we implemented with GitHub Actions.
7.6.2 Automating Kubernetes manifests validation with GitHub Actions
GitHub Actions is the workflow engine we used to implement the commit stage for the Catalog Service’s deployment pipeline. Let’s extend it to include the Kubernetes manifest validation step, as illustrated in figure 7.15.
Go to your Catalog Service project (catalog-service), and open the commit-stage.yml file within the .github/workflows folder. To implement the validation step, we’ll rely on an action built by Stefan Prodan. He’s the maintainer of FluxCD, a CNCF-incubating project providing a continuous deployment solution on Kubernetes based on the GitOps principles. The action lets you install specific versions of useful Kubernetes-related tools. We’ll configure the action to install kubectl and Kubeval.
Listing 7.7 Validating the Kubernetes manifests for Catalog Service
name: Commit Stage
on: push
...

jobs:
  build:
    name: Build and Test
    ...
    steps:
      ...
      - name: Validate Kubernetes manifests
        uses: stefanprodan/kube-tools@v1         ❶
        with:
          kubectl: 1.24.3                        ❷
          kubeval: 0.16.1                        ❸
          command: |
            kubeval --strict -d k8s              ❹
  package:
    ...
❶ An action capable of installing useful tools to work with Kubernetes
❷ Includes the Kubernetes CLI in the installation
❸ Includes Kubeval in the installation
❹ Uses Kubeval to validate the Kubernetes manifests in the k8s folder
After updating the commit-stage.yml file with the additional validation step, you can commit and push your changes to your catalog-service repository on GitHub and verify that the commit stage workflow completes successfully, meaning what you included in the manifests is compliant with the Kubernetes API.
Summary
-
Docker works fine when running single-instance containers on a single machine. When your system needs properties like scalability and resilience, you can use Kubernetes.
-
Kubernetes provides all the features for scaling containers across a cluster of machines, ensuring resilience both when a container fails and when a machine goes down.
-
Rather than creating Pods directly, you can use a Deployment object to declare the desired state for your applications, and Kubernetes will ensure it matches the actual state. That includes having the desired number of replicas up and running at any time.
-
The cloud is a dynamic environment, and the topology keeps changing. Service discovery and load balancing let you dynamically establish interactions between services, managed either on the client side (for example, using Spring Cloud Netflix Eureka) or on the server side (for example, using Kubernetes).
-
Kubernetes provides a native service-discovery and load-balancing feature that you can use through the Service objects.
-
Each Service name can be used as a DNS name. Kubernetes will resolve the name to the Service IP address and, ultimately, forward the request to one of the instances available.
-
You can deploy Spring Boot applications to a Kubernetes cluster by defining two YAML manifests: one for the Deployment object and one for the Service object.
-
The kubectl client lets you create objects from a file with the command kubectl apply -f <your-file.yml>.
-
Cloud native applications should be disposable (fast startup and graceful shutdown) and stateless (rely on data services for storing the state).
-
Graceful shutdown is supported both by Spring Boot and Kubernetes and is an essential aspect of scalable applications.
-
Kubernetes uses ReplicaSet controllers to replicate your application Pods and keep them running.
-
Tilt is a tool that automates your local development workflow with Kubernetes: you work on the application while Tilt takes care of building the image, deploying it to your local Kubernetes cluster, and keeping it up-to-date whenever you change something in the code.
-
The Octant dashboard lets you visualize your Kubernetes workloads.
-
Octant is a convenient tool that you can use not only for inspecting and troubleshooting a local Kubernetes cluster but also for a remote one.
-
Kubeval is a convenient tool you can use to validate Kubernetes manifests. It’s particularly useful when it’s included in your deployment pipeline.