
8 Reactive Spring: Resilience and scalability
- Understanding reactive programming with Reactor and Spring
- Building reactive servers with Spring WebFlux and Spring Data R2DBC
- Building reactive clients with WebClient
- Improving resilience for applications with Reactor
- Testing reactive applications with Spring and Testcontainers
Polarsophia, the organization behind the Polar Bookshop business, is very happy with the progress of its new software product. Its mission is to spread knowledge and awareness about the North Pole and the Arctic, and making its book catalog available worldwide is an essential part of this.
The Catalog Service application you built so far is a good starting point. It fulfills the requirements of browsing and managing books, and it does that while following cloud native patterns and practices. It’s self-contained and stateless. It uses a database as a backing service to store the state. It can be configured externally through environment variables or a configuration server. It respects environment parity. It’s verified through the automated execution of tests as part of a deployment pipeline, following continuous delivery practices. For maximum portability, it’s also containerized and can be deployed to a Kubernetes cluster using native functionality like service discovery, load balancing, and replication.
Another essential feature of the system is the possibility of purchasing books. In this chapter, you will start working on the Order Service application. This new component will interact not only with a database but also with Catalog Service. When you have applications extensively relying on I/O operations such as database calls or interactions with other services like HTTP request/response communications, the thread-per-request model used in Catalog Service begins to expose its technical limits.
In the thread-per-request model, each request is bound to a thread exclusively allocated to its processing. If database or service calls are part of the processing, the thread will send out a request and then block, waiting for a response. During idle time, the resources allocated for that thread are wasted, since they cannot be used for anything else. The reactive programming paradigm solves this problem and improves scalability, resilience, and cost-effectiveness for all I/O-bound applications.
Reactive applications operate asynchronously and in a non-blocking way, meaning that computational resources are used more effectively. That’s a huge advantage in the cloud, since you pay for what you use. When a thread sends a call to a backing service, it will not wait idle, but it will move on to executing other operations. This eliminates the linear dependency between the number of threads and the number of concurrent requests, leading to more scalable applications. With the same amount of computational resources, reactive applications can serve more users than their non-reactive counterparts.
Cloud native applications are highly distributed systems deployed in a dynamic environment where change is a constant and failures can and will happen. What if the service is not available? What happens if the request gets lost on its way to the target service? What if the response gets lost on its way back to the caller? Can we guarantee high availability in this context?
Resilience is one of the goals for moving to the cloud and one of the properties characterizing cloud native applications. Our systems should be resilient to failures and stable enough to ensure a certain service level to their users. The integration points between services over a network are among the most critical areas for achieving a stable and resilient system for production. It’s so important that Michael T. Nygard spends a large part of his book Release It! Design and Deploy Production-Ready Software (Pragmatic Bookshelf, 2018) on the subject.
This chapter will focus on building resilient, scalable, and efficient applications for the cloud using the reactive paradigm. First I’ll introduce the event loop model and the main features of Reactive Streams, Project Reactor, and the Spring reactive stack. Then you’ll build a reactive Order Service application using Spring WebFlux and Spring Data R2DBC.
Order Service will interact with Catalog Service to check the availability of books and their details, so you’ll see how to implement a reactive REST client using Spring WebClient. The integration point between the two services is a critical area that needs extra care to achieve robustness and fault tolerance. Relying on the Reactor project, you’ll adopt stability patterns like retries, timeouts, and failovers. Finally, you’ll write autotests to verify the behavior of a reactive application using Spring Boot and Testcontainers.
Note The source code for the examples in this chapter is available in the Chapter08/08-begin and Chapter08/08-end folders, containing the initial and final states of the project (https://github.com/ThomasVitale/cloud-native-spring-in-action).
8.1 Asynchronous and non-blocking architectures with Reactor and Spring
The Reactive Manifesto (www.reactivemanifesto.org) describes a reactive system as responsive, resilient, elastic, and message-driven. Its mission to build loosely coupled, scalable, resilient, and cost-effective applications is fully compatible with our definition of cloud native. The new part is achieving that goal by using an asynchronous and non-blocking communication paradigm based on message-passing.
Before diving into building reactive applications in Spring, we’ll explore the basics of reactive programming, why it matters for cloud native applications, and how it differs from imperative programming. I’ll introduce the event loop model, which overcomes the thread-per-request model’s shortcomings. Then you’ll learn the essential concepts of the Reactive Streams specification implemented by Project Reactor and the Spring reactive stack.
8.1.1 From thread-per-request to event loop
As you saw in chapter 3, non-reactive applications allocate a thread per request. Until a response is returned, the thread will not be used for anything. That is the thread-per-request model. When the request handling involves intensive operations like I/O, the thread will block until those operations are completed. For example, if a database read is required, the thread will wait until data is returned from the database. During the waiting time, the resources allocated to the handling thread are not used efficiently. If you want to support more concurrent users, you’ll have to ensure you have enough threads and resources available. In the end, this paradigm sets constraints on the application’s scalability and doesn’t use computational resources in the most efficient way possible. Figure 8.1 shows how it works.

Figure 8.1 In the thread-per-request model, each request is handled by a thread dedicated exclusively to its handling.
Reactive applications are more scalable and efficient by design. Handling requests in a reactive application doesn’t involve allocating a given thread exclusively—requests are fulfilled asynchronously based on events. For example, if a database read is required, the thread handling that part of the flow will not wait until data is returned from the database. Instead, a callback is registered, and whenever the information is ready, a notification is sent, and one of the available threads will execute the callback. During that time, the thread that requested the data can be used to process other requests rather than waiting idle.
This paradigm, called event loop, doesn’t set hard constraints on the application’s scalability. It actually makes it easier to scale, since an increase in the number of concurrent requests does not strictly depend on the number of threads. As a matter of fact, a default configuration for reactive applications in Spring is to use only one thread per CPU core. With the non-blocking I/O capability and a communication paradigm based on events, reactive applications allow for more efficient utilization of computational resources. Figure 8.2 shows how it works.
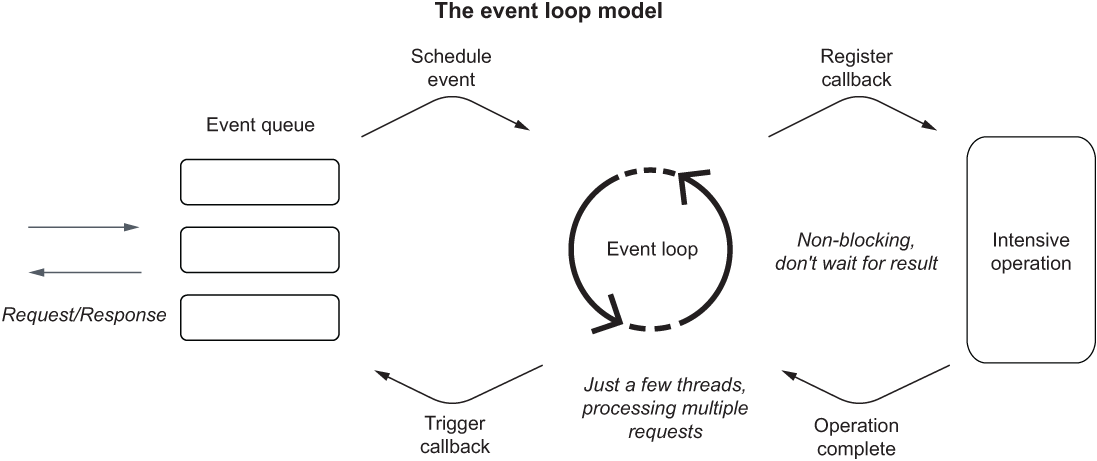
Figure 8.2 In the event loop model, requests are handled by threads that don’t block while waiting for an intensive operation, allowing them to process other requests in the meantime.
I wanted to briefly mention the difference between those two paradigms because it helps explain the reasoning behind reactive programming. However, you don’t need to know the details of these paradigms’ inner mechanics since we won’t have to work at such a low level or implement an event loop. Instead, we’re going to rely on convenient higher-level abstractions that will let us focus on the business logic of our applications rather than spending time handling the processing at the thread level.
Scale and cost optimization are two critical reasons for moving to the cloud, so the reactive paradigm perfectly fits cloud native applications. Scaling applications to support a workload increase becomes less demanding. By using resources more efficiently, you can save money on the computational resources offered by a cloud provider. Another reason for moving to the cloud is resilience, and reactive applications also help with that.
One of the essential features of reactive applications is that they provide non-blocking backpressure (also called control flow). This means that consumers can control the amount of data they receive, which lowers the risk of producers sending more data than consumers can handle, which can cause a DoS attack, slowing the application, cascading the failure, or even leading to a total crash.
The reactive paradigm is a solution to the problem of blocking I/O operations that require more threads to handle high concurrency and which may lead to slow or entirely unresponsive applications. Sometimes the paradigm is mistaken as a way to increase the speed of an application. Reactive is about improving scalability and resilience, not speed.
With great powers come great troubles, though. Going reactive is an excellent choice when you expect high traffic and concurrency with fewer computational resources or in streaming scenarios. However, you should also be aware of the additional complexity introduced by such a paradigm. Besides requiring a mindset shift to think in an event-driven way, reactive applications are more challenging to debug and troubleshoot because of the asynchronous I/O. Before rushing to rewrite all your applications to make them reactive, think twice about whether that’s necessary, and consider both the benefits and drawbacks.
Reactive programming is not a new concept. It’s been used for years. The reason for the recent success of the paradigm in the Java ecosystem is due to the Reactive Streams specification and its implementations, like Project Reactor, RxJava, and Vert.x, which provided developers with convenient and high-level interfaces for building asynchronous and non-blocking applications without dealing with the underlying details of designing a message-driven flow. The following section will introduce Project Reactor, the reactive framework used by Spring.
8.1.2 Project Reactor: Reactive streams with Mono and Flux
Reactive Spring is based on Project Reactor, a framework for building asynchronous, non-blocking applications on the JVM. Reactor is an implementation of the Reactive Streams specification, and it aims to provide “a standard for asynchronous stream processing with non-blocking back pressure” (www.reactive-streams.org).
Conceptually, reactive streams resemble the Java Stream API in the way we use them to build data pipelines. One of the key differences is that a Java stream is pull-based: consumers process data in an imperative and synchronous fashion. Instead, reactive streams are push-based: consumers are notified by the producers when new data is available, so the processing happens asynchronously.
Reactive streams work according to a producer/consumer paradigm. Producers are called publishers. They produce data that might be eventually available. Reactor provides two central APIs implementing the Producer<T> interface for objects of type <T>, and they are used to compose asynchronous, observable data streams: Mono<T> and Flux<T>:
-
Mono<T>—Represents a single asynchronous value or empty result (0..1)
-
Flux<T>—Represents an asynchronous sequence of zero or more items (0..N)
In a Java stream, you would process objects like Optional<Customer> or Collection <Customer>. In a reactive stream, you would have Mono<Customer> or Flux<Customer>. The possible outcomes of a reactive stream are an empty result, a value, or an error. All of them are handled as data. When the publisher returns all the data, we say that the reactive stream has been completed successfully.
Consumers are called subscribers because they subscribe to a publisher and are notified whenever new data is available. As part of the subscription, consumers can also define backpressure by informing the publisher that they can process only a certain amount of data at a time. That is a powerful feature that puts consumers in control of how much data is received, preventing them from being overwhelmed and becoming unresponsive. Reactive streams are only activated if there’s a subscriber.
You can build reactive streams that combine data from different sources and manipulate it using Reactor’s vast collection of operators. In a Java stream, you can use a fluent API to process data through operators like map, flatMap, or filter, each of which builds a new Stream object that keeps the previous step immutable. Similarly, you can build reactive streams using a fluent API and operators to process the data received asynchronously.
Besides the standard operators available to Java streams, you can use more powerful ones to apply backpressure, handle errors, and increase application resilience. For example, you’ll see how to use the retryWhen() and timeout() operators to make the interaction between Order Service and Catalog Service more robust. Operators can perform actions on a publisher and return a new publisher without modifying the original one, so you can build functional and immutable data streams with ease.
Project Reactor is the foundation of the Spring reactive stack, which lets you implement your business logic in terms of Mono<T> and Flux<T>. In the next section, you’ll learn more about which options you have for building reactive applications with Spring.
8.1.3 Understanding the Spring reactive stack
When you build applications with Spring, you can choose between a servlet stack and a reactive stack. The servlet stack relies on synchronous, blocking I/O and uses the thread-per-request model to handle requests. On the other hand, the reactive stack relies on asynchronous, non-blocking I/O and uses the event loop model to handle requests.
The servlet stack is based on the Servlet API and a Servlet container (such as Tomcat). In contrast, the reactive model is based on the Reactive Streams API (implemented by Project Reactor) and either Netty or a Servlet container (version 3.1 as a minimum). Both stacks let you build RESTful applications using either classes annotated as @RestController (which you used in chapter 3) or functional endpoints called router functions (which you’ll learn about in chapter 9). The servlet stack uses Spring MVC, while the reactive stack uses Spring WebFlux. Figure 8.3 compares the two stacks. (For a broader overview, you can refer to https://spring.io/reactive.)

Figure 8.3 The servlet stack is based on the Servlet API and supports synchronous and blocking operations. The reactive stack is based on Project Reactor and supports asynchronous and non-blocking operations.
Tomcat is the default choice for servlet-based applications like Catalog Service. Netty is the preferred choice for reactive applications, providing the best performance.
All the major frameworks in the Spring ecosystem offer both non-reactive and a reactive options, including Spring Security, Spring Data, and Spring Cloud. Overall, the Spring reactive stack provides a higher-level interface for building reactive applications, relying on the familiar Spring projects without being concerned with the underlying implementation of the reactive streams.
8.2 Reactive servers with Spring WebFlux and Spring Data R2DBC
So far we have worked on Catalog Service, a non-reactive (or imperative) application, using Spring MVC and Spring Data JDBC. This section will teach you how to build a reactive web application (Order Service) using Spring WebFlux and Spring Data R2DBC. Order Service will provide functionality for purchasing books. Like Catalog Service, it will expose a REST API and store data in a PostgreSQL database. Unlike Catalog Service, it will use the reactive programming paradigm to improve scalability, resilience, and cost-effectiveness.
You’ll see that the principles and patterns you learned in the previous chapters also apply to reactive applications. The main difference is that we’ll shift from implementing the business logic in an imperative way to building reactive streams that are processed asynchronously.
Order Service will also interact with Catalog Service through its REST API to fetch details about books and check their availability. That will be the focus of section 8.3. Figure 8.4 shows the new components of the system.
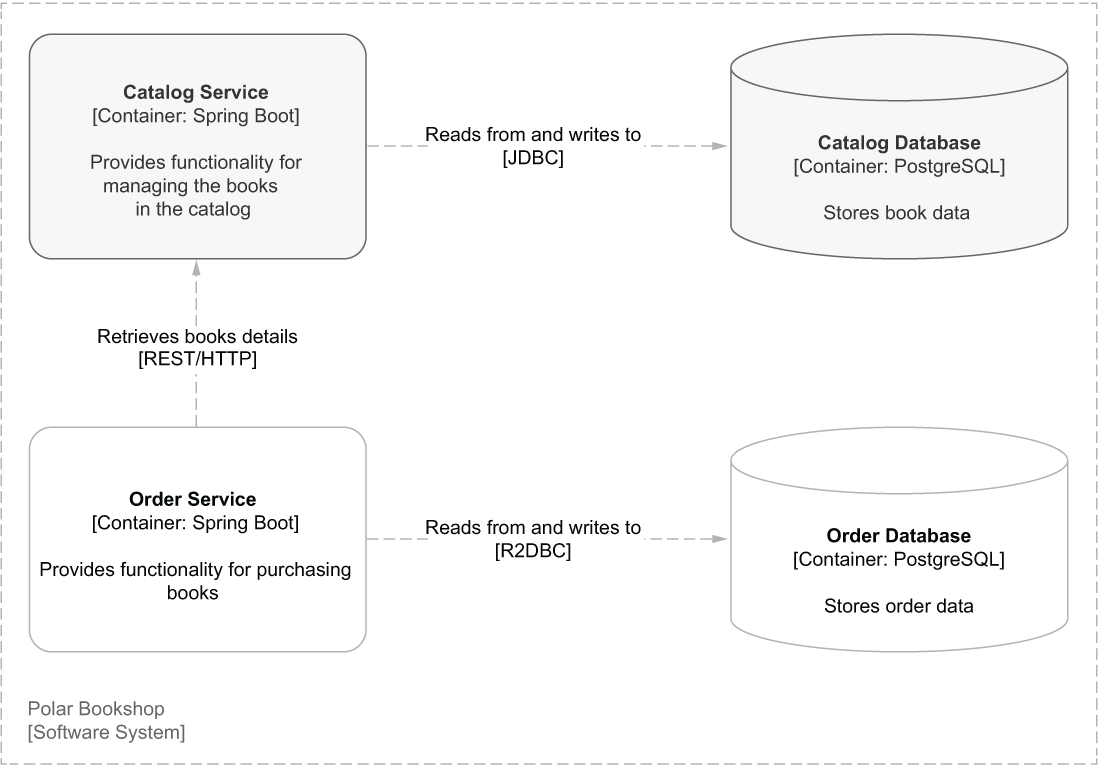
Figure 8.4 The Order Service application exposes an API to submit and retrieve book orders, uses a PostgreSQL database to store data, and communicates with Book Service to fetch book details.
As you learned in chapter 3, we should start with the API first. Order Service will expose a REST API to retrieve existing book orders and submit new ones. Each order can be related to one book only, and up to five copies. The API is described in table 8.1.
Table 8.1 Specifications for the REST API that Order Service will expose
Note If you haven’t followed along with the examples implemented in the previous chapters, you can refer to the repository accompanying the book and use the project in the Chapter08/08-begin folder as a starting point (https://github.com/ThomasVitale/cloud-native-spring-in-action).
8.2.1 Bootstrapping a reactive application with Spring Boot
You can initialize the Order Service project from Spring Initializr (https://start.spring.io), store the result in a new order-service Git repository, and push it to GitHub. The parameters for the initialization are shown in figure 8.5.

Figure 8.5 The parameters for initializing the Order Service project from Spring Initializr
Tip If you don’t want to go through the manual generation on the Spring Initializr website, you’ll find a curl command in the begin folder for this chapter that you can run in a Terminal window to download a zip file. It contains all the code you’ll need to get started.
The dependencies section of the autogenerated build.gradle file is shown here:
dependencies {
  implementation 'org.springframework.boot:spring-boot-starter-data-r2dbc'
  implementation 'org.springframework.boot:spring-boot-starter-validation'
  implementation 'org.springframework.boot:spring-boot-starter-webflux'

  runtimeOnly 'org.postgresql:r2dbc-postgresql'

  testImplementation 'org.springframework.boot:spring-boot-starter-test'
  testImplementation 'io.projectreactor:reactor-test'
  testImplementation 'org.testcontainers:junit-jupiter'
  testImplementation 'org.testcontainers:postgresql'
  testImplementation 'org.testcontainers:r2dbc'
}
These are the main dependencies:
-
Spring Reactive Web (org.springframework.boot:spring-boot-starter-webflux)—Provides the necessary libraries for building reactive web applications with Spring WebFlux and includes Netty as the default embedded server.
-
Spring Data R2DBC (org.springframework.boot:spring-boot-starter-data-r2dbc)—Provides the necessary libraries to persist data in relational databases with R2DBC using Spring Data in reactive applications.
-
Validation (org.springframework.boot:spring-boot-starter-validation)—Provides the necessary libraries for object validation using the Java Bean Validation API.
-
PostgreSQL (org.postgresql:r2dbc-postgresql)—Provides an R2DBC driver that allows the application to connect to a PostgreSQL database reactively.
-
Spring Boot Test (org.springframework.boot:spring-boot-starter-test)—Provides several libraries and utilities to test applications, including Spring Test, JUnit, AssertJ, and Mockito. It’s automatically included in every Spring Boot project.
-
Reactor Test (io.projectreactor:reactor-test)—Provides utilities to test reactive applications based on Project Reactor. It’s automatically included in every reactive Spring Boot project.
-
Testcontainers (org.testcontainers:junit-jupiter, org.testcontainers:postgresql, org.testcontainers:r2dbc)—Provides the necessary libraries for testing applications using lightweight Docker containers. In particular, it provides test containers for PostgreSQL supporting the R2DBC driver.
The default and recommended embedded server for reactive applications in Spring Boot is Reactor Netty, which is built on top of Netty to provide reactive capabilities within Project Reactor. You can configure it either through properties or by defining a WebServerFactoryCustomizer<NettyReactiveWebServerFactory> component. Let’s use the first approach.
First of all, rename the application.properties file generated by Spring Initializr to application.yml, and define the application name using the spring.application.name property. Like you did for Tomcat, you can define the server port through the server.port property, configure the graceful shutdown through server.shutdown, and set the grace period with spring.lifecycle.timeout-per-shutdown-phase. Using the specific Netty properties, you can further customize the server’s behavior. For example, you can define connection and idle timeouts for Netty with the server.netty .connection-timeout and server.netty.idle-timeout properties.
Listing 8.1 Configuring Netty server and graceful shutdown
server:
  port: 9002                           ❶
  shutdown: graceful                   ❷
  netty:
    connection-timeout: 2s             ❸
    idle-timeout: 15s                  ❹

spring:
  application:
    name: order-service
  lifecycle:
    timeout-per-shutdown-phase: 15s    ❺
❶ The port where the server will accept connections
❸ How long to wait for a TCP connection to be established with the server
❹ How long to wait before closing a TCP connection if no data is transferred
With this basic setup in place, we can now define the domain entity and its persistence.
8.2.2 Persisting data reactively with Spring Data R2DBC
In chapter 5, you learned that interactions between a Spring Boot application and a database involve database drivers, entities, and repositories. The same concepts you learned in the context of Spring Data JDBC also apply to Spring Data R2DBC. Spring Data provides common abstractions and patterns, making it straightforward to navigate the different modules.
The main difference for Order Service, compared to Catalog Service, is the type of database driver. JDBC is the most common driver used by Java applications to communicate with a relational database, but it doesn’t support reactive programming. There have been a few attempts to provide reactive access to a relational database. One project that stood out and that is widely supported is Reactive Relational Database Connectivity (R2DBC) initiated by Pivotal (now VMware Tanzu). R2DBC drivers are available for all the major databases (such as PostgreSQL, MariaDB, MySQL, SQL Server, and Oracle DB), and there are clients for several projects, including Spring Boot with Spring Data R2DBC and Testcontainers.
This section will guide you through defining a domain entity and a persistence layer for Order Service using Spring Data R2DBC and PostgreSQL. Let’s get started.
Run a PostgreSQL database for Order Service
First of all, we need a database. We’ll adopt a database-per-service approach to keep our applications loosely coupled. Having decided that Catalog Service and Order Service will have a database each, we have two options for the actual storage. We could either use the same database server for both databases or two different ones. For convenience, we’ll use the same PostgreSQL server we set up in chapter 5 to host both the polardb_catalog database used by Catalog Service and the new polardb_order database used by Order Service.
Go to your polar-deployment repository, and create a new docker/postgresql folder. Then add a new init.sql file in the folder. Add the following code to the init.sql file; it is the initialization script that PostgreSQL should run during the startup phase.
Listing 8.2 Initializing the PostgreSQL server with two databases
CREATE DATABASE polardb_catalog;
CREATE DATABASE polardb_order;
Next, open the docker-compose.yml file and update the PostgreSQL container definition to load the initialization script. Remember to remove the value for the POSTGRES_DB environment variable, since we’ll now delegate the database creation to the script. In the book’s source code, refer to Chapter08/08-end/polar-deployment/docker to check the final result.
Listing 8.3 Initializing the PostgreSQL server from an SQL script
version: "3.8"
services:
  ...
  polar-postgres:
    image: "postgres:14.4"
    container_name: "polar-postgres"
    ports:
      - 5432:5432
    environment:                       ❶
      - POSTGRES_USER=user
      - POSTGRES_PASSWORD=password
    volumes:                           ❷
      - ./postgresql/init.sql:/docker-entrypoint-initdb.d/init.sql
❶ No value is defined for POSTGRES_DB anymore.
❷ Mounts the initialization SQL script to the container as a volume
Finally, start a new PostgreSQL container based on the new configuration. Open a Terminal window, navigate to the folder where you defined the docker-compose.yml file, and run the following command:
$ docker-compose up -d polar-postgres
For the rest of the chapter, I will assume you have the database up and running.
Connecting to a database with R2DBC
Spring Boot lets you configure the integration of a reactive application with a relational database through the spring.r2dbc properties. Open the application.yml file for the Order Service project, and configure the connection with PostgreSQL. Connection pooling is enabled by default, and you can further configure it by defining connection timeout and sizes, just like you did for JDBC in chapter 5. Since it’s a reactive application, the connection pool will probably be smaller than when using JDBC. You can tune the values after monitoring your applications running under normal conditions.
Listing 8.4 Configuring the database integration over R2DBC
spring:
  r2dbc:
    username: user                                         ❶
    password: password                                     ❷
    url: r2dbc:postgresql://localhost:5432/polardb_order   ❸
    pool:
      max-create-connection-time: 2s                       ❹
      initial-size: 5                                      ❺
      max-size: 10                                         ❻
❶ A user with privileges to access the given database
❷ The password for the given user
❸ The R2DBC URL identifying the database you want to establish a connection with
❹ The maximum time to wait to get a connection from the pool
❺ The initial size of the connection pool
❻ The maximum number of connections kept in the pool
Now that you have connected a reactive Spring Boot application to a PostgreSQL database through an R2DBC driver, you can go ahead and define the data you want to persist.
The Order Service application provides functionality for submitting and retrieving orders. That’s the domain entity. Add a new com.polarbookshop.orderservice.order .domain package for the business logic, and create an Order Java record to represent the domain entity, much like you defined Book in Catalog Service.
Following the same approach used in chapter 5, use the @Id annotation to mark the field representing the primary key in the database, and use @Version to provide a version number, which is essential for handling concurrent updates and using optimistic locking. You can also add the necessary fields to hold audit metadata using the @CreatedDate and @LastModifiedDate annotations.
The default strategy for mapping an entity to a relational table is to transform the Java object name into lowercase. In this example, Spring Data would try to map the Order record to an order table. The problem is that order is a reserved word in SQL. It’s not recommended that you use it as a table name because it would require special handling. You can overcome that issue by naming the table orders and configuring the object-relational mapping through the @Table annotation (from the org.springframework.data.relational.core.mapping package).
Listing 8.5 The Order record defines the domain and persistent entity
package com.polarbookshop.orderservice.order.domain;

import java.time.Instant;
import org.springframework.data.annotation.CreatedDate;
import org.springframework.data.annotation.Id;
import org.springframework.data.annotation.LastModifiedDate;
import org.springframework.data.annotation.Version;
import org.springframework.data.relational.core.mapping.Table;

@Table("orders")                ❶
public record Order (

  @Id
  Long id,                      ❷

  String bookIsbn,
  String bookName,
  Double bookPrice,
  Integer quantity,
  OrderStatus status,

  @CreatedDate
  Instant createdDate,          ❸

  @LastModifiedDate
  Instant lastModifiedDate,     ❹

  @Version
  int version                   ❺
){
  public static Order of(
    String bookIsbn, String bookName, Double bookPrice,
    Integer quantity, OrderStatus status
  ) {
    return new Order(
      null, bookIsbn, bookName, bookPrice, quantity, status, null, null, 0
    );
  }
}
❶ Configures the mapping between the “Order” object and the “orders” table
❷ The primary key of the entity
❹ When the entity was modified the last time
Orders can go through different phases. If the requested book is available in the catalog, then the order is accepted. If not, it’s rejected. Once the order is accepted, it can be dispatched, as you’ll see in chapter 10. You can define these three statuses in an OrderStatus enum in the com.polarbookshop.orderservice.order.domain package.
Listing 8.6 Enum describing the statuses for the orders
package com.polarbookshop.orderservice.order.domain;

public enum OrderStatus {
  ACCEPTED,
  REJECTED,
  DISPATCHED
}
The R2DBC auditing functionality can be enabled in a configuration class using the @EnableR2dbcAuditing annotation. Create a DataConfig class in a new com.polarbookshop.orderservice.config package, and enable auditing there.
Listing 8.7 Enabling R2DBC auditing via annotation configuration
package com.polarbookshop.orderservice.config;

import org.springframework.context.annotation.Configuration;
import org.springframework.data.r2dbc.config.EnableR2dbcAuditing;

@Configuration                 ❶
@EnableR2dbcAuditing           ❷
public class DataConfig {}
❶ Indicates a class as a source of Spring configuration
❷ Enables R2DBC auditing for persistent entities
Having defined the data you want to persist, you can go ahead and explore how to access it.
Spring Data provides the repository abstraction for all the modules in the project, including R2DBC. The only difference between this and what you did in chapter 5 is that you’re going to use a reactive repository.
In the com.polarbookshop.orderservice.order.domain package, create a new OrderRepository interface and make it extend ReactiveCrudRepository, specifying the type of data handled (Order) and the data type of the @Id-annotated field (Long).
Listing 8.8 Repository interface for accessing orders
package com.polarbookshop.orderservice.order.domain;

import org.springframework.data.repository.reactive.ReactiveCrudRepository;

public interface OrderRepository
  extends ReactiveCrudRepository<Order,Long> {}   ❶
❶ Extends a reactive repository providing CRUD operations, specifies the type of managed entity (Order), and its primary key type (Long)
The CRUD operations provided by ReactiveCrudRepository are enough for the use cases of the Order Service application, so you won’t need to add any custom methods. However, we’re still missing the orders table in the database. Let’s define it using Flyway.
Managing database schemas with Flyway
Spring Data R2DBC supports initializing data sources through schema.sql and data.sql files, just like Spring Data JDBC. As you learned in chapter 5, that functionality is convenient for demos and experiments, but it’s better to manage schemas explicitly for production use cases.
For Catalog Service we used Flyway to create and evolve its database schemas. We can do the same for Order Service. However, Flyway doesn’t support R2DBC yet, so we need to provide a JDBC driver to communicate with the database. The Flyway migration tasks are only run at application startup and in a single thread, so using a non-reactive communication approach for this one case doesn’t impact the overall application’s scalability and efficiency.
In the build.gradle file for your Order Service project, add new dependencies to Flyway, the PostgreSQL JDBC driver, and Spring JDBC. Remember to refresh or reimport the Gradle dependencies after the new addition.
Listing 8.9 Adding a dependency for Flyway and JDBC in Order Service
dependencies {
  ...
  runtimeOnly 'org.flywaydb:flyway-core'             ❶
  runtimeOnly 'org.postgresql:postgresql'            ❷
  runtimeOnly 'org.springframework:spring-jdbc'      ❸
}
❶ Provides functionality to version-control your database through migrations
❷ Provides a JDBC driver that allows the application to connect to a PostgreSQL database
❸ Provides Spring integration with the JDBC API. It’s part of the Spring Framework, not to be confused with Spring Data JDBC.
Then you can write the SQL script for creating the orders table in a V1__Initial_ schema.sql file under src/main/resources/db/migration. Ensure you type two underscores after the version number.
Listing 8.10 Flyway migration script for schema initialization
CREATE TABLE orders (                                   ❶
  id                  BIGSERIAL PRIMARY KEY NOT NULL,   ❷
  book_isbn           varchar(255) NOT NULL,
  book_name           varchar(255),
  book_price          float8,
  quantity            int NOT NULL,
  status              varchar(255) NOT NULL,
  created_date        timestamp NOT NULL,
  last_modified_date  timestamp NOT NULL,
  version             integer NOT NULL
);
❶ Definition of the orders table
❷ Declares the id field as the primary key
Finally, open the application.yml file, and configure Flyway to use the same database managed with Spring Data R2DBC but using the JDBC driver.
Listing 8.11 Configuring the Flyway integration over JDBC
spring:
  r2dbc:
    username: user
    password: password
    url: r2dbc:postgresql://localhost:5432/polardb_order
    pool:
      max-create-connection-time: 2s
      initial-size: 5
      max-size: 10
  flyway:
    user: ${spring.r2dbc.username}                         ❶
    password: ${spring.r2dbc.password}                     ❷
    url: jdbc:postgresql://localhost:5432/polardb_order    ❸
❶ Gets the value from the username configured for R2DBC
❷ Gets the value from the password configured for R2DBC
❸ The same database configured for R2DBC but using the JDBC driver
As you probably noticed, defining domain objects and adding a persistence layer in a reactive application is similar to what you would do with imperative applications. The main differences you encountered in this session are using the R2DBC driver instead of JDBC and having a separate Flyway configuration (at least until R2DBC support is added to the Flyway project: https://github.com/flyway/flyway/issues/2502).
In the next section you’ll learn how to use Mono and Flux in your business logic.
8.2.3 Implementing the business logic with reactive streams
The Spring reactive stack makes it straightforward to build asynchronous, non-blocking applications. In the previous section, we used Spring Data R2DBC and didn’t have to deal with any underlying reactive concerns. That’s generally true for all the reactive modules in Spring. As a developer, you can rely on a familiar, simple, and productive approach for building reactive applications while the framework takes care of all the heavy lifting.
By default, Spring WebFlux assumes that everything is reactive. This assumption means that you’re expected to interact with the framework by exchanging Publisher<T> objects like Mono<T> and Flux<T>. For example, the OrderRepository we created earlier will give access to orders as Mono<Order> and Flux<Order> objects instead of returning Optional<Order> and Collection<Order> like it would do in a non-reactive context. Let’s see that in action.
In the com.polarbookshop.orderservice.order.domain package, create a new OrderService class. For starters, let’s implement the logic to read orders through the repository. When multiple orders are involved, you can use a Flux<Order> object, representing an asynchronous sequence of zero or more orders.
Listing 8.12 Fetching orders via a reactive stream
package com.polarbookshop.orderservice.order.domain;

import reactor.core.publisher.Flux;
import org.springframework.stereotype.Service;

@Service                                         ❶
public class OrderService {
  private final OrderRepository orderRepository;
  public OrderService(OrderRepository orderRepository) {
    this.orderRepository = orderRepository;
  }
  public Flux<Order> getAllOrders() {            ❷
    return orderRepository.findAll();
  }
}
❶ Stereotype annotation that marks a class to be a service managed by Spring
❷ A Flux is used to publish multiple orders (0..N)
Next, we need a method to submit orders. Until we have the integration with Catalog Service in place, we can always default to rejecting submitted orders. OrderRepository exposes a save() method provided by ReactiveCrudRepository. You can build a reactive stream to pass an object of type Mono<Order> to OrderRepository that will save the order in the database.
Given an ISBN identifying a book and the number of copies to order, you can build a Mono object with Mono.just() in the same way you would build a Java Stream object with Stream.of(). The difference is in the reactive behavior.
You can use the Mono object to start a reactive stream and then rely on the flatMap() operator to pass the data to OrderRepository. Add the following code to the OrderService class, and complete the business logic implementation.
Listing 8.13 Persisting rejected orders upon submitting order requests
...
public Mono<Order> submitOrder(String isbn, int quantity) {
  return Mono.just(buildRejectedOrder(isbn, quantity))        ❶
    .flatMap(orderRepository::save);                          ❷
}

public static Order buildRejectedOrder(
  String bookIsbn, int quantity
) {                                                           ❸
  return Order.of(bookIsbn, null, null, quantity, OrderStatus.REJECTED);
}
...
❶ Creates a “Mono” out of an “Order” object
❷ Saves the Order object produced asynchronously by the previous step of the reactive stream into the database
❸ When an order is rejected, we only specify ISBN, quantity, and status. Spring Data takes care of adding identifier, version, and audit metadata.
In the next section, you’ll complete the basic implementation of Order Service by exposing an API to fetch and submit orders.
8.2.4 Exposing a REST API with Spring WebFlux
There are two options for defining RESTful endpoints in a Spring WebFlux application: @RestController classes or functional beans (router functions). For the Order Service application, we’ll use the first option. Unlike what we did in chapter 3, the method handlers will return reactive objects.
For the GET endpoint, we can use the Order domain entity we defined earlier and return a Flux<Order> object. When submitting an order, the user must provide the ISBN of the desired book and the number of copies they would like to purchase. We can model that information in an OrderRequest record that will act as a data transfer object (DTO). It’s also good practice to validate the input, as you learned in chapter 3.
Create a new com.polarbookshop.orderservice.order.web package, and define an OrderRequest record to hold the submitted order information.
Listing 8.14 The OrderRequest DTO class with validation constraints
package com.polarbookshop.orderservice.order.web;

import javax.validation.constraints.*;

public record OrderRequest (

  @NotBlank(message = "The book ISBN must be defined.")
  String isbn,                                                     ❶

  @NotNull(message = "The book quantity must be defined.")
  @Min(value = 1, message = "You must order at least 1 item.")
  @Max(value = 5, message = "You cannot order more than 5 items.")
  Integer quantity                                                 ❷
){}
❶ Must not be null and must contain at least one non-whitespace character
❷ Must not be null and must contain a value from 1 to 5
In the same package, create an OrderController class to define the two RESTful endpoints exposed by the Order Service application. Since you defined validation constraints for the OrderRequest object, you also need to use the familiar @Valid annotation to trigger the validation when the method is called.
Listing 8.15 Defining handlers to process REST requests
package com.polarbookshop.orderservice.order.web;

import javax.validation.Valid;
import com.polarbookshop.orderservice.order.domain.Order;
import com.polarbookshop.orderservice.order.domain.OrderService;
import reactor.core.publisher.Flux;
import reactor.core.publisher.Mono;
import org.springframework.web.bind.annotation.*;

@RestController                                      ❶
@RequestMapping("orders")                            ❷
public class OrderController {
  private final OrderService orderService;
  public OrderController(OrderService orderService) {
    this.orderService = orderService;
  }

  @GetMapping
  public Flux<Order> getAllOrders() {                ❸
    return orderService.getAllOrders();
  }

  @PostMapping
  public Mono<Order> submitOrder(
    @RequestBody @Valid OrderRequest orderRequest    ❹
  ) {
    return orderService.submitOrder(
     orderRequest.isbn(), orderRequest.quantity()
    );
  }
}
❶ Stereotype annotation marking a class as a Spring component and a source of handlers for REST endpoints
❷ Identifies the root path mapping URI for which the class provides handlers (/orders)
❸ A Flux is used to publish multiple orders (0..N).
❹ Accepts an OrderRequest object, validated and used to create an order. The created order is returned as a Mono.
This REST controller completes our basic implementation of the Order Service application. Let’s see it in action. First, make sure the PostgreSQL container you created earlier is still running. Then open a Terminal window, navigate to the Order Service project’s root folder, and run the application:
$ ./gradlew bootRun
You can try out the API by submitting an order. The application will save the order as rejected and return a 200 response to the client:
$ http POST :9002/orders isbn=1234567890 quantity=3

HTTP/1.1 200 OK
{
  "bookIsbn": "1234567890",
  "bookName": null,
  "bookPrice": null,
  "createdDate": "2022-06-06T09:40:58.374348Z",
  "id": 1,
  "lastModifiedDate": "2022-06-06T09:40:58.374348Z",
  "quantity": 3,
  "status": "REJECTED",
  "version": 1
}
To make it possible to submit orders successfully, we’ll need to make Order Service call Catalog Service to check the book’s availability and fetch the necessary information for processing the order. That’s the focus of the next section. Before moving on, stop the application with Ctrl-C.
8.3 Reactive clients with Spring WebClient
In a cloud native system, applications can interact in different ways. This section focuses on the request/response interactions over HTTP that you’ll establish between Order Service and Catalog Service. In this kind of interaction, the client making the request expects to receive a response. In an imperative application, that would translate into a thread blocking until a response is returned. Instead, in a reactive application, we can use resources more efficiently so that no thread will wait for a response, freeing up resources to deal with other processing.
The Spring Framework comes bundled with two clients that perform HTTP requests: RestTemplate and WebClient. RestTemplate is the original Spring REST client that allows blocking HTTP request/response interactions based on a template method API. Since Spring Framework 5.0, it’s in maintenance mode and practically deprecated. It’s still widely used, but it will not get any new functionality in future releases.
WebClient is the modern alternative to RestTemplate. It provides blocking and non-blocking I/O, making it the perfect candidate for both imperative and reactive applications. It can be operated through a functional-style, fluent API that lets you configure any aspect of the HTTP interaction.
This section will teach you how to use WebClient to establish non-blocking request/response interactions. I will also explain how to make your application more resilient by adopting patterns like timeouts, retries, and failovers using the Reactor operators timeout(), retryWhen(), and onError().
8.3.1 Service-to-service communication in Spring
As per the 15-Factor methodology, any backing service should be attached to an application through resource binding. For databases, you relied on the configuration properties provided by Spring Boot to specify credentials and the URL. When a backing service is another application, you need to provide its URL in a similar way. Following the externalized configuration principle, the URL should be configurable, not hardcoded. In Spring, you can achieve that through a @ConfigurationProperties bean, as you learned in chapter 4.
In the Order Service project, add a ClientProperties record in the com.polarbookshop.orderservice.config package. There, define your custom polar.catalog-service-uri property to configure the URI for calling the Catalog Service.
Listing 8.16 Defining a custom property for the Catalog Service URI
package com.polarbookshop.orderservice.config;

import java.net.URI;
import javax.validation.constraints.NotNull;
import org.springframework.boot.context.properties.ConfigurationProperties;

@ConfigurationProperties(prefix = "polar")    ❶
public record ClientProperties(

  @NotNull
  URI catalogServiceUri                       ❷
){}
❶ The prefix for the custom properties
❷ The property for specifying the Catalog Service URI. It cannot be null.
Note To get autocompletion and type-validation checks from your IDE, you need to add a dependency on org.springframework.boot:spring-boot-configuration-processor with scope annotationProcessor in the build .gradle file, like you did in chapter 4. You can refer to the Chapter08/08-end/order-service/build.gradle file in the code repository accompanying the book to check the final result (https://github.com/ThomasVitale/cloud-native -spring-in-action).
Then, enable the custom configuration properties in your OrderServiceApplication class using the @ConfigurationPropertiesScan annotation.
Listing 8.17 Enabling custom configuration properties
package com.polarbookshop.orderservice;

import org.springframework.boot.SpringApplication;
import org.springframework.boot.autoconfigure.SpringBootApplication;
import org.springframework.boot.context.properties
➥ .ConfigurationPropertiesScan;

@SpringBootApplication
@ConfigurationPropertiesScan             ❶
public class OrderServiceApplication {
  public static void main(String[] args) {
    SpringApplication.run(OrderServiceApplication.class, args);
  }
}
❶ Loads configuration data beans in the Spring context
Finally, add a value for the new property to your application.yml file. As a default, you can use the URI for the Catalog Service instance running in your local environment.
Listing 8.18 Configuring the URI for Catalog Service (application.yml)
...
polar:
  catalog-service-uri: "http://localhost:9001"
Note When deploying the system with Docker Compose or Kubernetes, you can override the property value via an environment variable, taking advantage of the service discovery features offered by the two platforms.
In the next section, you’ll use the value configured through this property to call the Catalog Service from Order Service.
8.3.2 Understanding how to exchange data
Whenever a user submits an order for a specific book, Order Service needs to call Catalog Service to check the requested book’s availability and fetch its details, like the title, author, and price. The interaction (HTTP request/response) is illustrated in figure 8.6.
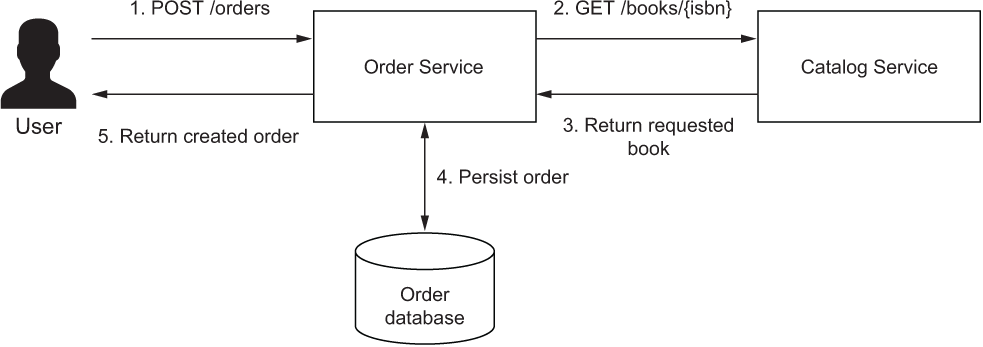
Figure 8.6 When an order is submitted, Order Service calls Catalog Service over HTTP to check the book’s availability and fetch its details.
Each order request is submitted for a specific ISBN. Order Service needs to know the book’s ISBN, title, author, and price to process an order correctly. Currently, Catalog Service exposes a /books/{bookIsbn} endpoint that returns all the available information about a book. In a real scenario, you might expose a different endpoint that returns an object containing only the required information (a DTO). For the sake of this example, we’ll reuse the existing endpoint, since our focus right now is on building reactive clients.
Having established which endpoint to call, how should you model the exchange between the two applications? You’ve just reached a crossroad:
-
Create a shared library—One option is to create a shared library with the classes used by both applications, and import it as a dependency into both projects. As per the 15-factor methodology, such a library would be tracked in its own codebase. Doing so would ensure that the model used by both applications is consistent and never out of sync. However, it would mean adding implementation coupling.
-
Duplicate the class—The other option is to replicate the class into the upstream application. By doing so, you wouldn’t have implementation coupling, but you would have to take care of evolving the replicated model as the original one changes in the downstream application. There are a few techniques like consumer-driven contracts that can identify, through automated tests, when the called API changes. Besides checking the data model, those tests would also verify other aspects of the exposed API, like HTTP methods, response statuses, headers, variables, and so on. I will not cover this subject here, but I recommend checking the Spring Cloud Contract project if you’re interested (https:// spring.io/projects/spring-cloud-contract).
Both are viable options. Which strategy you adopt is up to your project requirements and your organization’s structure. For the Polar Bookshop project, we will use the second option.
In a new com.polarbookshop.orderservice.book package, create a Book record to be used as a DTO, and include only the fields used by the order processing logic. As I pointed out earlier, in a real scenario I would expose a new endpoint in Catalog Service, returning book objects modeled as this DTO. For simplicity, we’ll use the existing /books/{bookIsbn} endpoint, so any information that doesn’t map to any of the fields in this class will be discarded when deserializing the JSON received into the Java object. Make sure the fields you do define have the same names as in the Book object defined in Catalog Service, or else the parsing will fail. That is something that consumer-driven contract tests can verify for you automatically.
Listing 8.19 The Book record is a DTO for storing book information
package com.polarbookshop.orderservice.book;

public record Book(
  String isbn,
  String title,
  String author,
  Double price
){}
Now that you have a DTO in Order Service ready to hold book information, let’s see how you can retrieve it from Catalog Service.
8.3.3 Implementing REST clients with WebClient
The modern and reactive choice for REST clients in Spring is WebClient. The framework provides several ways of instantiating a WebClient object—in this example we’ll use WebClient.Builder. Refer to the official documentation to explore the other options (https://spring.io/projects/spring-framework).
In the com.polarbookshop.orderservice.config package, create a ClientConfig class to configure a WebClient bean with the base URL provided by ClientProperties.
Listing 8.20 Configuring a WebClient bean to call Catalog Service
package com.polarbookshop.orderservice.config;

import org.springframework.context.annotation.Bean;
import org.springframework.context.annotation.Configuration;
import org.springframework.web.reactive.function.client.WebClient;

@Configuration
public class ClientConfig {

  @Bean
  WebClient webClient(
    ClientProperties clientProperties,
    WebClient.Builder webClientBuilder                           ❶
  ) {
    return webClientBuilder                                      ❷
      .baseUrl(clientProperties.catalogServiceUri().toString())
      .build();
  }
}
❶ An object auto-configured by Spring Boot to build WebClient beans
❷ Configures the WebClient base URL to the Catalog Service URL defined as a custom property
Warning If you use IntelliJ IDEA, you might get a warning that WebClient .Builder cannot be autowired. Don’t worry. It’s a false positive. You can get rid of the warning by annotating the field with @SuppressWarnings("SpringJavaInjectionPointsAutowiringInspection").
Next, create a BookClient class in the com.polarbookshop.orderservice.book package. That is where you are going to use the WebClient bean to send HTTP calls to the GET /books/{bookIsbn} endpoint exposed by Catalog Service through its fluent API. The WebClient will ultimately return a Book object wrapped in a Mono publisher.
Listing 8.21 Defining a reactive REST client using WebClient
package com.polarbookshop.orderservice.book;

import reactor.core.publisher.Mono;
import org.springframework.stereotype.Component;
import org.springframework.web.reactive.function.client.WebClient;

@Component
public class BookClient {
  private static final String BOOKS_ROOT_API = "/books/";
  private final WebClient webClient;

  public BookClient(WebClient webClient) {
    this.webClient = webClient;                   ❶
  }

  public Mono<Book> getBookByIsbn(String isbn) {
    return webClient
      .get()                                      ❷
      .uri(BOOKS_ROOT_API + isbn)                 ❸
      .retrieve()                                 ❹
      .bodyToMono(Book.class);                    ❺
  }
}
❶ A WebClient bean as configured previously
❷ The request should use the GET method.
❸ The target URI of the request is /books/{isbn}.
❹ Sends the request and retrieves the response
❺ Returns the retrieved object as Mono<Book>
WebClient is a reactive HTTP client. You’ve just seen how it can return data as reactive publishers. In particular, the result of calling Catalog Service to fetch details about a specific book is a Mono<Book> object. Let’s see how you can include that in the order-processing logic implemented in OrderService.
The submitOrder() method in the OrderService class is currently rejecting orders all the time. But not for long. You can now autowire a BookClient instance and use the underlying WebClient to start a reactive stream to process the book information and create an order. The map() operator lets you map a Book to an accepted Order. If BookClient returns an empty result, you can define a rejected Order with the defaultIfEmpty() operator. Finally, the stream is ended by calling OrderRepository to save the order (either as accepted or rejected).
Listing 8.22 Calling BookClient to get the book info when ordered
package com.polarbookshop.orderservice.order.domain;

import com.polarbookshop.orderservice.book.Book;
import com.polarbookshop.orderservice.book.BookClient;
import reactor.core.publisher.Flux;
import reactor.core.publisher.Mono;
import org.springframework.stereotype.Service;

@Service
public class OrderService {
  private final BookClient bookClient;
  private final OrderRepository orderRepository;

  public OrderService(
   BookClient bookClient, OrderRepository orderRepository
  ) {
    this.bookClient = bookClient;
    this.orderRepository = orderRepository;
  }

  ...

  public Mono<Order> submitOrder(String isbn, int quantity) {
    return bookClient.getBookByIsbn(isbn)                                ❶
      .map(book -> buildAcceptedOrder(book, quantity))                   ❷
      .defaultIfEmpty(                                                   ❸
        buildRejectedOrder(isbn, quantity)
      )
      .flatMap(orderRepository::save);                                   ❹
  }

  public static Order buildAcceptedOrder(Book book, int quantity) {
    return Order.of(book.isbn(), book.title() + " - " + book.author(),
      book.price(), quantity, OrderStatus.ACCEPTED);                     ❺
  }

  public static Order buildRejectedOrder(String bookIsbn, int quantity) {
    return Order.of(bookIsbn, null, null, quantity, OrderStatus.REJECTED);
  }
}
❶ Calls the Catalog Service to check the book’s availability
❷ If the book is available, it accepts the order.
❸ If the book is not available, it rejects the order.
❹ Saves the order (either as accepted or rejected)
❺ When an order is accepted, we specify ISBN, book name (title + author), quantity, and status. Spring Data takes care of adding the identifier, version, and audit metadata.
Let’s try that out. First, ensure the PostgreSQL container is up and running by executing the following command from the folder where you keep your Docker Compose configuration (polar-deployment/docker):
$ docker-compose up -d polar-postgres
Then build and run both Catalog Service and Order Service (./gradlew bootRun).
Warning If you’re using an Apple Silicon computer, the application logs from Order Service might include some warnings related to DNS resolutions in Netty. In this specific case, the application should still work correctly. If you experience issues, you can add the following additional dependency to the Order Service project as runtimeOnly to fix the problem: io.netty:netty-resolver-dns-native-macos:4.1.79.Final:osx-aarch_64.
Finally, send an order for one of the books created in Catalog Service at startup time. If the book exists, the order should be accepted:
$ http POST :9002/orders isbn=1234567891 quantity=3

HTTP/1.1 200 OK
{
  "bookIsbn": "1234567891",
  "bookName": "Northern Lights - Lyra Silverstar",
  "bookPrice": 9.9,
  "createdDate": "2022-06-06T09:59:32.961420Z",
  "id": 2,
  "lastModifiedDate": "2022-06-06T09:59:32.961420Z",
  "quantity": 3,
  "status": "ACCEPTED",
  "version": 1
}
When you are done verifying the interaction, stop the applications with Ctrl-C and the container with docker-compose down.
That concludes our implementation of the order-creation logic. If the book exists in the catalog, the order will be accepted. If an empty result is returned, it’s rejected. But what if Catalog Service takes too much time to reply? What if it’s momentarily unavailable and can’t process any new requests? What if it replies with an error? The following section will answer and handle all these questions.
8.4 Resilient applications with Reactive Spring
Resilience is about keeping a system available and delivering its services, even when failures happen. Since failures will happen, and there’s no way to prevent them all, it is critical to design fault-tolerant applications. The goal is to keep the system available without the user noticing any failures. In the worst-case scenario, the system may have degraded functionality (graceful degradation), but it should still be available.
The critical point in achieving resilience (or fault-tolerance) is keeping the faulty component isolated until the fault is fixed. By doing that, you’ll prevent what Michael T. Nygard calls crack propagation. Think about Polar Bookshop. If Catalog Service enters a faulty state and becomes unresponsive, you don’t want Order Service to be affected as well. Integration points between application services should be carefully guarded and made resilient to failures affecting the other party.
There are several patterns for building resilient applications. In the Java ecosystem, a popular library for implementing such patterns was Hystrix, developed by Netflix, but as of 2018 it entered maintenance mode and will not be developed further. Resilience4J gained a lot of popularity, filling the void left by Hystrix. Project Reactor, the Reactive Spring stack foundation, also provides some useful features for resilience.
In this section, you’ll make the integration point between Order Service and Catalog Service more robust, using Reactive Spring to configure timeouts, retries, and fallbacks. In the next chapter, you’ll learn more about building resilient applications with Resilience4J and Spring Cloud Circuit Breaker.
8.4.1 Timeouts
Whenever your application calls a remote service, you don’t know if and when a response will be received. Timeouts (also called time limiters) are a simple, yet effective, tool for preserving the responsiveness of your application in case a response is not received within a reasonable time period.
There are two main reasons for setting up timeouts:
-
If you don’t limit the time your client waits, you risk your computational resources being blocked for too long (for imperative applications). In the worst-case scenario, your application will be completely unresponsive because all the available threads are blocked, waiting for responses from a remote service, and there are no threads available to handle new requests.
-
If you can’t meet your Service Level Agreements (SLAs), there’s no reason to keep waiting for an answer. It’s better to fail the request.
Here are some examples of timeouts:
-
Connection timeout—This is the time limit for establishing a communication channel with a remote resource. Earlier you configured the server.netty.connection-timeout property to limit the time Netty waits for a TCP connection to be established.
-
Connection pool timeout—This is the time limit for a client to get a connection from a pool. In chapter 5, you configured a timeout for the Hikari connection pool through the spring.datasource.hikari.connection-timeout property.
-
Read timeout—This is the time limit for reading from a remote resource after establishing the initial connection. In the following sections, you’ll define a read timeout for the call to the Catalog Service performed by the BookClient class.
In this section, you’ll define a timeout for BookClient so that if it expires, the Order Service application will throw an exception. You can also specify a failover instead of throwing the exception to the user. Figure 8.7 details how the request/response interaction will work when timeouts and failovers are defined.

Figure 8.7 When a response is received from the remote service within the time limit, the request is successful. If the timeout expires and no response is received, then a fallback behavior is executed, if any. Otherwise, an exception is thrown.
Defining a timeout for WebClient
Project Reactor provides a timeout() operator you can use to define a time limit for completing an operation. You can chain it with the result of the WebClient call to continue the reactive stream. Update the getBookByIsbn() method in the BookClient class as follows to define a timeout of 3 seconds.
Listing 8.23 Defining a timeout for the HTTP interaction
...
public Mono<Book> getBookByIsbn(String isbn) {
  return webClient
    .get()
    .uri(BOOKS_ROOT_API + isbn)
    .retrieve()
    .bodyToMono(Book.class)
    .timeout(Duration.ofSeconds(3));     ❶
}
...
❶ Sets a 3-second timeout for the GET request
Instead of throwing an exception when the timeout expires, you have the chance to provide a fallback behavior. Considering that Order Service can’t accept an order if the book’s availability is not verified, you might consider returning an empty result so that the order will be rejected. You can define a reactive empty result using Mono.empty(). Update the getBookByIsbn() method in the BookClient class as follows.
Listing 8.24 Defining timeout and fallback for the HTTP interaction
...
public Mono<Book> getBookByIsbn(String isbn) {
  return webClient
    .get()
    .uri(BOOKS_ROOT_API + isbn)
    .retrieve()
    .bodyToMono(Book.class)
    .timeout(Duration.ofSeconds(3), Mono.empty())    ❶
}
...
❶ The fallback returns an empty Mono object.
Note In a real production scenario, you might want to externalize the timeout configuration by adding a new field to the ClientProperties. In that way, you can change its value depending on the environment without having to rebuild the application. It’s also essential to monitor any timeout and tune its value if necessary.
Understanding how to use timeouts effectively
Timeouts improve application resilience and follow the principle of failing fast. But setting a good value for the timeout can be tricky. You should consider your system architecture as a whole. In the previous example, you defined a 3-second timeout. This means that a response should get from Catalog Service to Order Service within that time limit. Otherwise, either a failure or a fallback occurs. Catalog Service, in turn, sends a request to the PostgreSQL database to fetch the data about the specific book and waits for a response. A connection timeout guards that interaction. You should carefully design a time-limiting strategy for all the integration points in your system to meet your software’s SLAs and guarantee a good user experience.
If Catalog Service were available, but a response couldn’t get to Order Service within the time limit, the request would likely still be processed by Catalog Service. That is a critical point to consider when configuring timeouts. It doesn’t matter much for read or query operations because they are idempotent. For write or command operations, you want to ensure proper handling when a timeout expires, including providing the user with the correct status about the operation’s outcome.
When Catalog Service is overloaded, it can take several seconds to get a JDBC connection from the pool, fetch data from the database, and send a response back to Order Service. In that case, you could think of retrying the request rather than falling back on a default behavior or throwing an exception.
8.4.2 Retries
When a service downstream doesn’t respond within a specific time limit or replies with a server error related to its momentary inability to process the request, you can configure your client to try again. When a service doesn’t respond correctly, it’s likely because it’s going through some issues, and it’s unlikely that it will manage to recover immediately. Starting a sequence of retry attempts, one after the other, risks making the system even more unstable. You don’t want to launch a DoS attack on your own applications!
A better approach is using an exponential backoff strategy to perform each retry attempt with a growing delay. By waiting for more and more time between one attempt and the next, you’re more likely to give the backing service time to recover and become responsive again. The strategy for computing the delay can be configured.
In this section, you’ll configure retries for BookClient. Figure 8.8 details how the request/response interaction will work when retries are configured with exponential backoff. For example, the figure shows a scenario where each retry attempt’s delay is computed as the number of attempts multiplied by 100 ms (the initial backoff value).
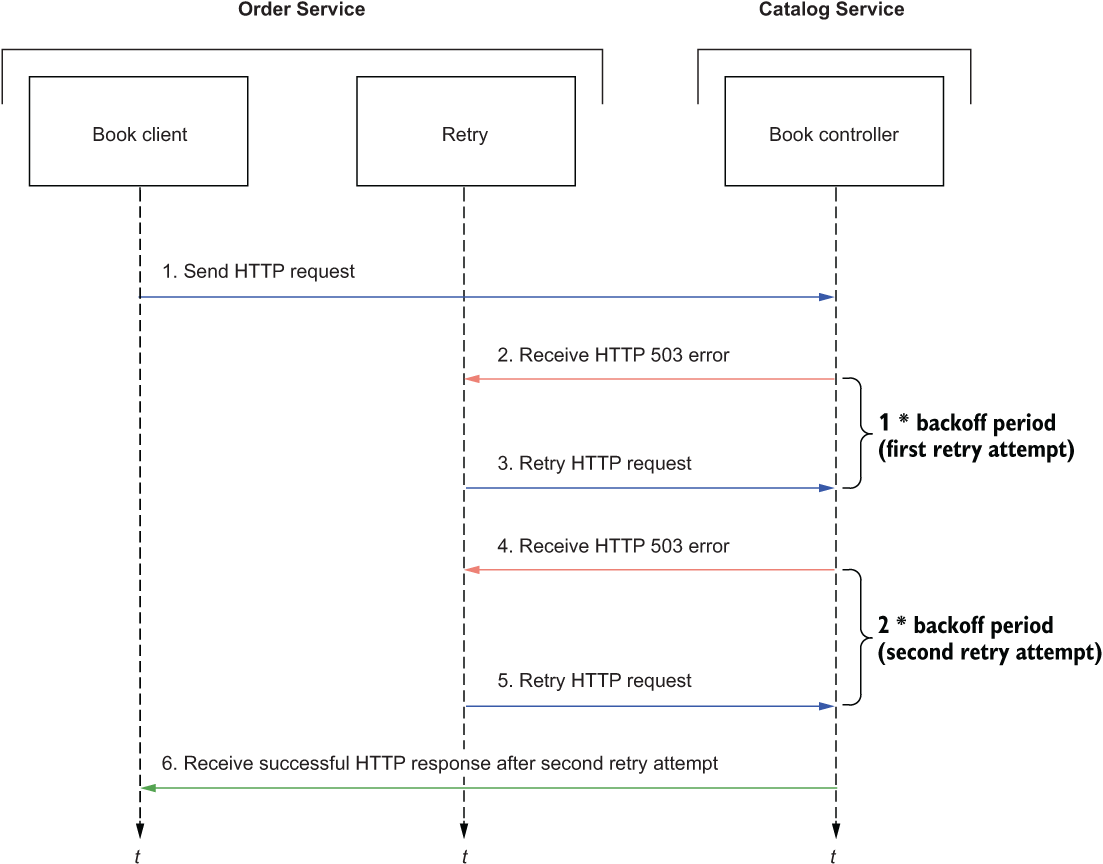
Figure 8.8 When Catalog Service doesn’t respond successfully, Order Service will try at most three more times with a growing delay.
Defining retries for WebClient
Project Reactor provides a retryWhen() operator to retry an operation when it fails. The position where you apply it to the reactive stream matters.
-
Placing the retryWhen() operator after timeout() means that the timeout is applied to each retry attempt.
-
Placing the retryWhen() operator before timeout() means that the timeout is applied to the overall operation (that is, the whole sequence of the initial request and retries has to happen within the given time limit).
In BookClient, we want the timeout to apply to each retry attempt, so we’ll use the first option. The time limiter is applied first. If the timeout expires, the retryWhen() operator kicks in and tries the request again.
Update the getBookByIsbn() method in the BookClient class to configure a retry strategy. You can define the number of attempts and the minimum duration for the first backoff. The delay is computed for each retry as the current attempt number multiplied by the minimum backoff period. A jitter factor can be used to add randomness to the exponential of each backoff. By default, a jitter of at most 50% of the computed delay is used. When you have multiple instances of Order Service running, the jitter factor ensures that the replicas will not retry requests simultaneously.
Listing 8.25 Defining retries with exponential backoff for the HTTP call
public Mono<Book> getBookByIsbn(String isbn) {
  return webClient
    .get()
    .uri(BOOKS_ROOT_API + isbn)
    .retrieve()
    .bodyToMono(Book.class)
    .timeout(Duration.ofSeconds(3), Mono.empty())
    .retryWhen(                                    ❶
      Retry.backoff(3, Duration.ofMillis(100))
    );
}
❶ Exponential backoff is used as the retry strategy. Three attempts are allowed with a 100 ms initial backoff.
Understanding how to use retries effectively
Retries increase the chance of getting a response back from a remote service when it’s momentarily overloaded or unresponsive. Use them wisely. In the context of timeouts, I highlighted the need for handling read and write operations differently. When it comes to retries, this is even more critical.
Idempotent requests like read operations can be retried without harm. Even some write requests can be idempotent. For example, a request to change the author of a book with a given ISBN from “S.L. Cooper” to “Sheldon Lee Cooper” is idempotent. You could perform it a few times, but the outcome will not change. You shouldn’t retry non-idempotent requests, or you’ll risk generating inconsistent states. When you order a book, you don’t want to be charged multiple times just because the first attempt failed due to the response being lost in the network and never received.
When retries are configured in a flow where the user is involved, remember to balance resilience and user experience. You don’t want users to wait too long while retrying the request behind the scenes. If you can’t avoid that, make sure you inform the users and give them feedback about the status of the request.
Retries are a helpful pattern whenever the service downstream is momentarily unavailable or slow due to overloading, but it’s likely to heal soon. In this case, you should limit the number of retries and use exponential backoff to prevent adding extra load on an already overloaded service. On the other hand, you shouldn’t retry the request if the service fails with a recurrent error, such as if it’s entirely down or returns an acceptable error like 404. The following section will show you how to define fallbacks when specific errors happen.
8.4.3 Fallbacks and error handling
A system is resilient if it keeps providing its services in the face of faults without the user noticing. Sometimes that’s not possible, so the least you can do is ensure a graceful degradation of the service level. Specifying a fallback behavior can help you limit the fault to a small area while preventing the rest of the system from misbehaving or entering a faulty state.
In the previous discussion of timeouts, you already provided a fallback behavior if no response is received within the time limit. You’ll want to include fallbacks in your general strategy to make your system resilient, and not just in a specific case like timeouts. A fallback function can be triggered when some errors or exceptions occur, but they’re not all the same.
Some errors are acceptable and semantically meaningful in the context of your business logic. When Order Service calls Catalog Service to fetch information about a specific book, a 404 response might be returned. That’s an acceptable response that should be addressed to inform the user that the order cannot be submitted because the book is not available in the catalog.
The retry strategy you defined in the previous section is not limited: it will retry the request as long as an error response is received, including acceptable ones like 404. However, in that case, you don’t want to retry the request. Project Reactor provides an onErrorResume() operator to define a fallback when a specific error occurs. You can add it to the reactive stream after the timeout() operator and before the retryWhen() so that if a 404 response is received (WebClientResponseException.NotFound exception), the retry operator is not triggered. Then you can use the same operator again at the end of the stream to catch any other exception and fall back to an empty Mono. Update the getBookByIsbn() method in the BookClient class as follows.
Listing 8.26 Defining exception handling and fallbacks for the HTTP call
public Mono<Book> getBookByIsbn(String isbn) {
  return webClient
    .get()
    .uri(BOOKS_ROOT_API + isbn)
    .retrieve()
    .bodyToMono(Book.class)
    .timeout(Duration.ofSeconds(3), Mono.empty())
    .onErrorResume(WebClientResponseException.NotFound.class,
      exception -> Mono.empty())                                ❶
    .retryWhen(Retry.backoff(3, Duration.ofMillis(100)))
    .onErrorResume(Exception.class,
      exception -> Mono.empty());                              ❷
}
❶ Returns an empty object when a 404 response is received
❷ If any error happens after the 3 retry attempts, catch the exception and return an empty object.
Note In a real-world scenario, you would probably want to return some contextual information depending on the type of error, instead of always returning an empty object. For example, you could add a reason field to the Order object to describe why it’s been rejected. Was it because the book is unavailable in the catalog or because of network problems? In the second case, you could inform the user that the order cannot be processed because it’s momentarily unable to check the book’s availability. A better option would be to save the order in a pending state, queue the order submission request, and try it again later, using one of the strategies I’ll cover in chapter 10.
The key goal is designing a resilient system that, in the best-case scenario, can provide its services without the user noticing that there has been a failure. In contrast, in the worst-case scenario, it should still work but with graceful degradation.
Note Spring WebFlux and Project Reactor are exciting subjects in the Spring landscape. If you want to learn more about how reactive Spring works, I recommend looking at Reactive Spring by Josh Long (https://reactivespring.io). In the Manning catalog, see part 3 of Spring in Action, sixth edition, by Craig Walls (Manning, 2022).
In the next section, you’ll write automated tests to verify the different aspects of the Order Service application.
8.5 Testing reactive applications with Spring, Reactor, and Testcontainers
When an application depends on a service downstream, you should test the interaction against the API specification of the latter. In this section, you’ll first try the BookClient class against a mock web server acting as the Catalog Service to ensure the correctness of the client. Then you’ll test the data persistence layer with sliced tests using the @DataR2dbcTest annotation and Testcontainers, much as you did in chapter 5 with @DataJdbcTest. Finally, you’ll write sliced tests for the web layer using the @WebFluxTest annotation, which works in the same way as @WebMvcTest but for reactive applications.
You already have the necessary dependencies on the Spring Boot test libraries and Testcontainers. What is missing is a dependency on com.squareup.okhttp3:mockwebserver, which will provide utilities to run a mock web server. Open the build.gradle file of the Order Service project and add the missing dependency.
Listing 8.27 Adding test dependency for OkHttp MockWebServer
dependencies {
  ...
  testImplementation 'com.squareup.okhttp3:mockwebserver'
}
Let’s start by testing the BookClient class.
8.5.1 Testing REST clients with a mock web server
The OkHttp project provides a mock web server that you can use to test HTTP-based request/response interactions with a service downstream. BookClient returns a Mono<Book> object, so you can use the convenient utilities provided by Project Reactor for testing reactive applications. The StepVerifier object lets you process reactive streams and write assertions in steps through a fluent API.
First, let’s set up the mock web server and configure WebClient to use it in a new BookClientTests class.
Listing 8.28 Preparing the test setup with a mock web server
package com.polarbookshop.orderservice.book;

import java.io.IOException;
import okhttp3.mockwebserver.MockWebServer;
import org.junit.jupiter.api.*;
import org.springframework.web.reactive.function.client.WebClient;

class BookClientTests {
  private MockWebServer mockWebServer;
  private BookClient bookClient;

  @BeforeEach
  void setup() throws IOException {
    this.mockWebServer = new MockWebServer();
    this.mockWebServer.start();                        ❶
    var webClient = WebClient.builder()                ❷
      .baseUrl(mockWebServer.url("/").uri().toString())
      .build();
    this.bookClient = new BookClient(webClient);
  }

  @AfterEach
  void clean() throws IOException {
    this.mockWebServer.shutdown();                     ❸
  }
}
❶ Starts the mock server before running a test case
❷ Uses the mock server URL as the base URL for WebClient
❸ Shuts the mock server down after completing a test case
Next, in the BookClientTests class, you can define some test cases to validate the client’s functionality in Order Service.
Listing 8.29 Testing the interaction with the Catalog Service application
package com.polarbookshop.orderservice.book;

...
import okhttp3.mockwebserver.MockResponse;
import reactor.core.publisher.Mono;
import reactor.test.StepVerifier;
import org.springframework.http.HttpHeaders;
import org.springframework.http.MediaType;

class BookClientTests {
  private MockWebServer mockWebServer;
  private BookClient bookClient;

  ...

  @Test
  void whenBookExistsThenReturnBook() {
    var bookIsbn = "1234567890";

    var mockResponse = new MockResponse()              ❶
      .addHeader(HttpHeaders.CONTENT_TYPE, MediaType.APPLICATION_JSON_VALUE)
      .setBody("""
        {
          "isbn": %s,
          "title": "Title",
          "author": "Author",
          "price": 9.90,
          "publisher": "Polarsophia"
        }
        """.formatted(bookIsbn));

    mockWebServer.enqueue(mockResponse);               ❷

    Mono<Book> book = bookClient.getBookByIsbn(bookIsbn);

    StepVerifier.create(book)                          ❸
      .expectNextMatches(
        b -> b.isbn().equals(bookIsbn))                ❹
      .verifyComplete();                               ❺
  }
}
❶ Defines the response to be returned by the mock server
❷ Adds a mock response to the queue processed by the mock server
❸ Initializes a StepVerifier object with the object returned by BookClient
❹ Asserts that the Book returned has the ISBN requested
❺ Verifies that the reactive stream completed successfully
Let’s run the tests and ensure they succeed. Open a Terminal window, navigate to the root folder of your Order Service project, and run the following command:
$ ./gradlew test --tests BookClientTests
Note When using mocks, there might be situations where the test results depend on the order in which test cases are executed, which tend to be the same on the same operating system. To prevent unwanted execution dependencies, you can annotate the test class with @TestMethodOrder(MethodOrderer.Random.class) to ensure that a pseudo-random order is used at each execution.
After testing the REST client part, you can move on and verify the data persistence layer for Order Service.
8.5.2 Testing data persistence with @DataR2dbcTest and Testcontainers
As you might recall from the previous chapters, Spring Boot allows you to run integration tests by loading only the Spring components used by a specific application slice. For the REST API, you will create tests for the WebFlux slice. Here I’ll show you how to write tests for the R2DBC slice using the @DataR2dbcTest annotation.
The approach is the same you used in chapter 5 for testing the data layer in Catalog Service, but there are two main differences. First, you will use the StepVerifier utility to test the OrderRepository behavior reactively. Second, you will define a PostgreSQL test container instance explicitly.
For the Catalog Service application, we relied on the test container auto-configuration. In this case, we’ll define a test container in the test class and mark it as @Container. Then the @Testcontainers annotation on the class will activate the automatic startup and cleanup of the test container. Finally, we’ll use the @DynamicProperties annotation provided by Spring Boot to pass the test database’s credentials and URL to the application. This approach of defining test containers and overwriting properties is generic and can be applied to other scenarios.
Now, on to the code. Create an OrderRepositoryR2dbcTests class and implement autotests to verify the data persistence layer of the application.
Listing 8.30 Integration tests for the Data R2DBC slice
package com.polarbookshop.orderservice.order.domain;

import com.polarbookshop.orderservice.config.DataConfig;
import org.junit.jupiter.api.Test;
import org.testcontainers.containers.PostgreSQLContainer;
import org.testcontainers.junit.jupiter.Container;
import org.testcontainers.junit.jupiter.Testcontainers;
import org.testcontainers.utility.DockerImageName;
import reactor.test.StepVerifier;
import org.springframework.beans.factory.annotation.Autowired;
import org.springframework.boot.test.autoconfigure.data.r2dbc.DataR2dbcTest;
import org.springframework.context.annotation.Import;
import org.springframework.test.context.DynamicPropertyRegistry;
import org.springframework.test.context.DynamicPropertySource;

@DataR2dbcTest                                                     ❶
@Import(DataConfig.class)                                          ❷
@Testcontainers                                                    ❸
class OrderRepositoryR2dbcTests {

  @Container                                                       ❹
  static PostgreSQLContainer<?> postgresql =
    new PostgreSQLContainer<>(DockerImageName.parse("postgres:14.4"));

  @Autowired
  private OrderRepository orderRepository;

  @DynamicPropertySource                                           ❺
  static void postgresqlProperties(DynamicPropertyRegistry registry) {
    registry.add("spring.r2dbc.url", OrderRepositoryR2dbcTests::r2dbcUrl);
    registry.add("spring.r2dbc.username", postgresql::getUsername);
    registry.add("spring.r2dbc.password", postgresql::getPassword);
    registry.add("spring.flyway.url", postgresql::getJdbcUrl);
  }

  private static String r2dbcUrl() {                               ❻
    return String.format("r2dbc:postgresql://%s:%s/%s",
      postgresql.getContainerIpAddress(),
      postgresql.getMappedPort(PostgreSQLContainer.POSTGRESQL_PORT),
      postgresql.getDatabaseName());
  }

  @Test
  void createRejectedOrder() {
    var rejectedOrder = OrderService.buildRejectedOrder("1234567890", 3);
    StepVerifier
      .create(orderRepository.save(rejectedOrder))                 ❼
      .expectNextMatches(                                          ❽
        order -> order.status().equals(OrderStatus.REJECTED))
      .verifyComplete();                                           ❾
  }
}
❶ Identifies a test class that focuses on R2DBC components
❷ Imports R2DBC configuration needed to enable auditing
❸ Activates automatic startup and cleanup of test containers
❹ Identifies a PostgreSQL container for testing
❺ Overwrites R2DBC and Flyway configuration to point to the test PostgreSQL instance
❻ Builds an R2DBC connection string, because Testcontainers doesn’t provide one out of the box as it does for JDBC
❼ Initializes a StepVerifier object with the object returned by OrderRepository
❽ Asserts that the Order returned has the correct status
❾ Verifies that the reactive stream completed successfully
Since those slice tests are based on Testcontainers, ensure the Docker Engine is running in your local environment. Then run the tests:
$ ./gradlew test --tests OrderRepositoryR2dbcTests
In the next section, you’ll write tests for the web slice.
8.5.3 Testing REST controllers with @WebFluxTest
The WebFlux slice can be tested similarly to how you tested the MVC layer in chapter 3 and using the same WebTestClient utility you used for the integration tests. It’s an enhanced version of the standard WebClient object, containing extra features to simplify tests.
Create an OrderControllerWebFluxTests class, and annotate it with @WebFluxTest(OrderController.class) to collect the slice tests for OrderController. As you learned in chapter 3, you can use the @MockBean Spring annotation to mock the OrderService class and have Spring add it to the Spring context used in the test. That’s what makes it injectable.
Listing 8.31 Integration tests for the WebFlux slice
package com.polarbookshop.orderservice.order.web;

import com.polarbookshop.orderservice.order.domain.Order;
import com.polarbookshop.orderservice.order.domain.OrderService;
import com.polarbookshop.orderservice.order.domain.OrderStatus;
import org.junit.jupiter.api.Test;
import reactor.core.publisher.Mono;
import org.springframework.beans.factory.annotation.Autowired;
import org.springframework.boot.test.autoconfigure.web.reactive.WebFluxTest;
import org.springframework.boot.test.mock.mockito.MockBean;
import org.springframework.test.web.reactive.server.WebTestClient;
import static org.assertj.core.api.Assertions.assertThat;
import static org.mockito.BDDMockito.given;

@WebFluxTest(OrderController.class)                 ❶
class OrderControllerWebFluxTests {

  @Autowired
  private WebTestClient webClient;                  ❷

  @MockBean                                         ❸
  private OrderService orderService;

  @Test
  void whenBookNotAvailableThenRejectOrder() {
    var orderRequest = new OrderRequest("1234567890", 3);
    var expectedOrder = OrderService.buildRejectedOrder(
     orderRequest.isbn(), orderRequest.quantity());
    given(orderService.submitOrder(
     orderRequest.isbn(), orderRequest.quantity())
    ).willReturn(Mono.just(expectedOrder));         ❹

    webClient
      .post()
      .uri("/orders/")
      .bodyValue(orderRequest)
      .exchange()
      .expectStatus().is2xxSuccessful()             ❺
      .expectBody(Order.class).value(actualOrder -> {
        assertThat(actualOrder).isNotNull();
        assertThat(actualOrder.status()).isEqualTo(OrderStatus.REJECTED);
      });
  }
}
❶ Identifies a test class that focuses on Spring WebFlux components, targeting OrderController
❷ A WebClient variant with extra features to make testing RESTful services easier
❸ Adds a mock of OrderService to the Spring application context
❹ Defines the expected behavior for the OrderService mock bean
❺ Expects the order is created successfully
Next, run the slice tests for the web layer to ensure they pass:
$ ./gradlew test --tests OrderControllerWebFluxTests
Great job! You successfully built and tested a reactive application, maximizing scalability, resilience, and cost-effectiveness. In the source code accompanying the book, you can find more test examples, including full integration tests using the @SpringBootTest annotation and slice tests for the JSON layer using @JsonTest, as you learned in chapter 3.
The next chapter will continue our discussion of resilience and introduce more patterns, like circuit breakers and rate limiters, using Spring Cloud Gateway, Spring Cloud Circuit Breaker, and Resilience4J.
Summary
-
When you expect high traffic and concurrency with fewer computational resources, the reactive paradigm can improve the application’s scalability, resilience, and cost-effectiveness at the expense of a steeper initial learning curve.
-
Choose between a non-reactive and a reactive stack according to your requirements.
-
Spring WebFlux is based on Project Reactor and is the core of the reactive stack in Spring. It supports asynchronous, non-blocking I/O.
-
Reactive RESTful services can be implemented through @RestController classes or router functions.
-
The Spring WebFlux slice can be tested through the @WebFluxTest annotation.
-
Spring Data R2DBC provides support for reactive data persistence using the R2DBC driver. The approach is the same as for any Spring Data project: database drivers, entities, and repositories.
-
The persistence slice of a reactive application can be tested using the @DataR2dbcTest annotation and Testcontainers.
-
A system is resilient if it keeps providing its services in the face of faults without the user noticing it. Sometimes that’s not possible, so the least you can do is ensure a graceful degradation of the services.
-
WebClient is based on Project Reactor and works with Mono and Flux publishers.
-
You can use the Reactor operators to configure timeouts, retries, fallbacks, and error handling to make the interaction more resilient to any failure in the service downstream or due to the network.