Chapter 21. Security
This chapter covers the following subjects:
![]() Common Security Threats and Vulnerabilities—Discover the wide variety of electronic, physical, and human vulnerabilities that can be targeted by data thieves, both human and virtual.
Common Security Threats and Vulnerabilities—Discover the wide variety of electronic, physical, and human vulnerabilities that can be targeted by data thieves, both human and virtual.
![]() Common Prevention Methods—Discover how to implement protection at a physical and digital level as well as safeguarding the human element.
Common Prevention Methods—Discover how to implement protection at a physical and digital level as well as safeguarding the human element.
![]() Windows Basic Security Settings—Learn the basic security features built into Windows and how they work.
Windows Basic Security Settings—Learn the basic security features built into Windows and how they work.
![]() Best Security Practices for Workstations—From data encryption to password best practices, discover the policies that help keep workstations on a network safe.
Best Security Practices for Workstations—From data encryption to password best practices, discover the policies that help keep workstations on a network safe.
![]() Securing Mobile Devices—Smartphones and tablets can be exploited by malware and human data thieves. This section discusses how to stop them.
Securing Mobile Devices—Smartphones and tablets can be exploited by malware and human data thieves. This section discusses how to stop them.
![]() Data Destruction and Disposal Methods—In this section, you learn how to destroy data and, when necessary, the devices that store the data to prevent it from being exploited when storage devices and media are retired.
Data Destruction and Disposal Methods—In this section, you learn how to destroy data and, when necessary, the devices that store the data to prevent it from being exploited when storage devices and media are retired.
![]() SOHO Network Security—A small office/home office network could be the pathway to a large-scale attack if it isn’t secured. Discover the methods needed to help lock down both wired and wireless networks.
SOHO Network Security—A small office/home office network could be the pathway to a large-scale attack if it isn’t secured. Discover the methods needed to help lock down both wired and wireless networks.
Server rooms, networks, desktops, laptops, and mobile devices provide access to financial data and personal information for businesses, governments, organizations, and individuals all over the world. And, thanks to the interconnected nature of the Internet, a security breach of a single device or network can lead to identity theft, electronic embezzlement, and other threats to the financial and personal lives of millions.
In this chapter, you learn about the multi-faceted threats to security in the modern computing environment and how to deal with them.
220-902: Objective 3.1 Identify common security threats and vulnerabilities.
220-902: Objective 3.2 Compare and contrast common prevention methods.
220-902: Objective 3.3 Compare and contrast differences of basic Windows OS security settings.
220-902: Objective 3.4 Given a scenario, deploy and enforce security best practices to secure a workstation.
220-902: Objective 3.5 Compare and contrast various methods for securing mobile devices.
220-902: Objective 3.6 Given a scenario, use appropriate data destruction and disposal methods.
220-902: Objective 3.7 Given a scenario, secure SOHO wireless and wired networks.
Foundation Topics
Common Security Threats and Vulnerabilities
Security threats and vulnerabilities can come from software or network attacks, but they also target users themselves and their perceptions of who and what can be trusted. In the following sections, we take a closer look at these threats.
Note
The 220-902 exam expects you to understand the following security threats:
![]() Malware, including:
Malware, including:
![]() Spyware
Spyware
![]() Viruses
Viruses
![]() Worms
Worms
![]() Trojans
Trojans
![]() Rootkits
Rootkits
![]() Ransomware
Ransomware
![]() Phishing
Phishing
![]() Spear phishing
Spear phishing
![]() Spoofing
Spoofing
![]() Social engineering
Social engineering
![]() Shoulder surfing
Shoulder surfing
![]() Zero day attack
Zero day attack
![]() Zombie/botnet
Zombie/botnet
![]() Brute forcing
Brute forcing
![]() Dictionary attacks
Dictionary attacks
![]() Non-compliant systems
Non-compliant systems
![]() Violations of security best practices
Violations of security best practices
![]() Tailgating
Tailgating
![]() Man-in-the-middle
Man-in-the-middle
Malware

Malware is a combination of the words malicious and software. It is any type of software that is used to disrupt computers and gain unauthorized access to systems, networks, and data. The following sections discuss the malware types and infection methods you should understand for the 220-902 exam.
Spyware
Spyware is software that spies on system activities and transmits details of web searches or other activities to remote computers. If you get multiple unwanted pop-up windows when browsing the Internet, it’s a good indicator of spyware. Some pop-up windows will show fake security alerts in the hopes that you will click on something that will lead to a purchase such as rogue or fake antivirus software (or perhaps will lead to more malware). Spyware can possibly cause slow system performance. Figure 21-1 illustrates a fake security alert.

Caution
Some free apps are advertiser-supported. Many of these apps track your web searches and use the information to display targeted ads.
Viruses
A virus is a program that infects files in an operating system; it wreaks havoc on the system by rewriting those files so that they do what the programmer of the virus wants. Viruses can replicate but usually only if the user executes them (unknowingly). Both of these are commonly sent to the unsuspecting user through e-mail or might be found on removable media such as a USB flash drive. Viruses can also hijack a browser and cause it to be redirected to undesirable websites. If your browser suddenly accesses strange sites, a full virus scan will be necessary. Viruses can also cause slow system performance. Viruses might also be the culprit for Internet connectivity issues if they modify the DNS server or gateway address. Computer lockups can also be attributed to viruses and can cause Windows updates to fail.
Worms
Worms are similar to viruses but can self-replicate; no user intervention is required.
Trojan Horse
Trojan horses are malware programs disguised as popular videos or website links that trap keystrokes or transmit sensitive information.
Rootkits
Rootkits are a concealment method used by many types of malware to prevent detection by normal antivirus and anti-malware programs. If you find renamed files, especially system files, this could be an indicator of a rootkit. Another indicator is file permission changes (for example, access denied) and files that suddenly go missing.
Ransomware
Ransomware uses malware to encrypt the targeted computer’s files. The ransom demand might be presented after you call a bogus technical support number displayed by a fake error message coming from the ransomware, or the ransom demand might be displayed on-screen. The ransom must be paid within a specified amount of time or the files will not be decrypted.
Phishing
Phishing involves the creation of bogus websites or sending fraudulent e-mails that trick users into providing personal, bank, or credit card information. A variation, phone phishing, uses an interactive voice response (IVR) system that the user has been tricked into calling to dupe the user into revealing information.
Figure 21-2 illustrates a typical phishing e-mail.

Figure 21-2 This message purports to be about an overdue payment, but shows classic signs of a phishing attack.
Spear Phishing
Spear phishing involves the sending of spoof messages that appear to come from an internal source requesting confidential information, such as payroll or tax information. These attacks typically target a specific person, organization, or business.
Spoofing
Spoofing is a general term for malware attacks that purport to come from a trustworthy source. Phishing, spear phishing, and rogue antivirus programs are three examples of spoofing in use.
Social Engineering
Social engineering is a term popularized by the career of successful computer and network hacker Kevin Mitnick, who used a variety of methods to convince computer users to provide access to restricted systems. One of his favorites is known as “pretexting,” in which the hacker pretends to be from the IT department, an investigator, a co-worker from another department, and so on.
Note
After his hacking career ended, Mitnick became a security consultant. To learn more about how to recognize social engineering and other security threats, see his website at www.mitnicksecurity.com.
Shoulder Surfing
Shoulder surfing is the attempt to view physical documents on a user’s desk or electronic documents displayed on the monitor, by actually looking over the user’s shoulder. While this might sound ludicrous, you would be surprised how many people have had their confidential documents, passwords, and PINs compromised in this manner. Shoulder surfers either act covertly, looking around corners, using mirrors or binoculars, or they might introduce themselves to the user and make conversation in the hopes that the user will let his or her guard down.
Zero-Day Attack
A zero-day attack (zero-day exploit) takes advantage of a not-yet-patched security flaw in an operating system or app, frequently on the same day the vulnerability has become known. For information about current threats, see Trend Micro’s http://www.zerodayinitiative.com/ website.
Zombie/Botnet
A zombie/botnet is a computer on the Internet that has been taken over by a hostile program so it can be used for malware distribution, distributed denial of service (DDoS) or other attacks without notification to the normal users of the computer. Many malware attacks attempt to turn targeted computers into zombies on a hostile botnet.
Brute Forcing
Brute forcing (brute-force attack) is a method of cracking passwords by calculating and using every possible combination of characters until the correct password is discovered. The longer the password used and the greater the number of possible characters in a password, the longer brute forcing will take. Brute forcing can be blocked by locking systems after a specified number of incorrect passwords are offered.
Dictionary Attacks
Dictionary attacks attempt to crack passwords by trying all the words in a list, such as a dictionary. A simple list might include commonly used passwords such as “12345678” and “password.” Dictionary attacks can be blocked by locking systems after a specified number of incorrect passwords are offered.
Non-Compliant Systems
Non-compliant systems are systems that are tagged by a configuration manager application (for example, Microsoft’s System Center Configuration Manager) because they do not have the most up-to-date security patches installed. Systems that don’t have the most up-to-date security patches are especially vulnerable to attacks.
Note
To see if your own system is missing security updates, download and run Belarc Advisor (http://www.belarc.com/free_download.html), and select the option to update security information.
Violations of Security Best Practices
The specifics of a particular organization’s security practices might vary, but in general, systems with the following problems can be said to violate security best practices:
![]() Not updated with the latest security patches for the operating system and apps
Not updated with the latest security patches for the operating system and apps
![]() No password or have weak, easily guessed passwords
No password or have weak, easily guessed passwords
![]() Outdated or no antivirus or anti-malware app
Outdated or no antivirus or anti-malware app
![]() No use of encryption to protect data storage or file transfers
No use of encryption to protect data storage or file transfers
![]() No use of digital certificates to sign websites
No use of digital certificates to sign websites
![]() No limitations on removable media such as USB or rewriteable optical drives
No limitations on removable media such as USB or rewriteable optical drives
![]() No use of SSL or other security measures on websites
No use of SSL or other security measures on websites
![]() No e-mail spam filters
No e-mail spam filters
![]() No network-based security
No network-based security
![]() No wireless security or weak WEP encryption
No wireless security or weak WEP encryption
![]() No user training in how to implement security best practices
No user training in how to implement security best practices
For more details on many of the items in this list, see www.zdnet.com/article/10-security-best-practice-guidelines-for-businesses/.
Tailgating
Tailgating occurs when an unauthorized person attempts to accompany an authorized person into a secure area by following them closely and grabbing the door before it shuts. This is usually done without the authorized person’s consent. If the authorized person is knowingly involved it is known as piggybacking.
Man-in-the-Middle
A man-in-the-middle (MiTM) attack involves the attacker intercepting a connection while fooling the endpoints into thinking they are communicating directly with each other. Essentially, the attacker becomes an unauthorized and undetected proxy or relay point, using this position to capture confidential data or transmit altered information to one or both ends of the original connection.
Bluetooth Threats
Bluetooth isn’t just for convenient wireless connection to devices—it’s a network, and any network has vulnerabilities. Three security threats Bluetooth users need to watch out for include:
![]() Bluejacking—The sending of unauthorized messages over a Bluetooth connection to a device.
Bluejacking—The sending of unauthorized messages over a Bluetooth connection to a device.
![]() Bluesnarfing—Provides unauthorized access from a wireless device through a Bluetooth connection.
Bluesnarfing—Provides unauthorized access from a wireless device through a Bluetooth connection.
![]() Bluebugging—Creates unauthorized backdoor access to connect a Bluetooth device back to the attacker.
Bluebugging—Creates unauthorized backdoor access to connect a Bluetooth device back to the attacker.
Common Prevention Methods
Preventing security breaches includes four factors:
![]() Physical security
Physical security
![]() Digital security
Digital security
![]() User education/acceptable use policy (AUP)
User education/acceptable use policy (AUP)
![]() Principle of least privilege
Principle of least privilege
The following sections explain these concepts in greater detail.
Note
For the 220-902 exam, be familiar with these factors in general and in detail.
Physical Security
In some ways, nothing beats physical security. For example, no matter how great the computer hacker, a computer simply cannot open a physical keyed lock. So having locking doors is the first step in protecting an investment, whatever it might be. The door locking system might also incorporate proximity-based access cards, or smart cards. Some organizations combine these types of door security with a biometrics system that, for example, analyzes a person’s thumbprint. Finally, documents and passwords should be physically protected. This is generally accomplished by locking the documents in a secure area and by implementing a clean-desk policy.
Lock doors
The easiest way to secure an area is to lock doors! Some organizations have written policies explaining how, when, and where to lock doors. Aside from main entrances, you should also always lock server rooms, wiring closets, labs, and other technical rooms when not in use.
Physical door locks might seem low-tech, but they can’t be hacked or taken over by hackers. Other precautions to take include: documenting who has keys to server rooms and wiring closets, and periodically changing locks and keys. Cipher locks that use punch codes also enhance security. Combine these methods with electronic security for greater protection.
Mantrap
Some secure areas include what is known as a mantrap: an area with two locking doors. A person might get past a first door by way of tailgating, but might have difficulty getting past the second door, especially if there is a guard in between the two doors. If the person doesn’t have proper authentication, he will be stranded in the mantrap until authorities arrive.
Cable Locks
Cable locks can be used to secure laptops and other equipment that include the Kensington security lock port. See “Laptop and Cable Locks,” p.547, Chapter 12 for details.
Securing Physical documents/Passwords/Shredding
Securing physical documents, passwords, and shredding are three methods of protecting information in an office.
Confidential documents should never be left sitting out in the open. They should either be properly filed in a locking cabinet or shredded and disposed of if they are no longer needed.
Passwords should not be written down and definitely not left on a desk or taped to a monitor where they can be seen. Many organizations implement a clean desk policy that states users must remove all papers from their desk before leaving for lunch, breaks, or at the end of the day.
Also, the user should lock the computer whenever he leaves the workstation. Desktop and mobile operating systems can also be automatically set to lock after a certain amount of time, even if the user forgets to do so manually.
Biometrics
Biometrics refers to the use of biological information, such as human body characteristics, to authenticate a potential user of a secure area. The most common type of biometric security system for PCs is fingerprint-based, but other methods include voice measurements, face recognition, and scans of the eye’s retina or iris.
Note
Windows Hello (a feature of Windows 10) is an example of biometrics built into an operating system. Windows Hello uses fingerprint readers and high-resolution cameras built into some computers and mobile devices for facial recognition. Learn more about Windows Hello at http://windows.microsoft.com/en-us/windows-10/getstarted-what-is-hello.
ID Badges
ID badges can use a variety of physical security methods:
![]() Photos—If the bearer of the card doesn’t look like the person on the card, the bearer might be using someone else’s card and should be detained.
Photos—If the bearer of the card doesn’t look like the person on the card, the bearer might be using someone else’s card and should be detained.
![]() Barcodes—A barcode enables the card to carry a range of information about the bearer, including levels of access, and can be read quickly by a barcode scanner.
Barcodes—A barcode enables the card to carry a range of information about the bearer, including levels of access, and can be read quickly by a barcode scanner.
![]() RFID technology—Cards with RFID chips can be used to open only doors that are matched to the RFID chip.
RFID technology—Cards with RFID chips can be used to open only doors that are matched to the RFID chip.
To prevent undetected tampering, ID badges should be coated with a tamper-evident outer layer.
RFID Badge
An ID badge can include radio-frequency identification (RFID) technology, making it an RFID badge. RFID badges typically are passive, receiving power from the radio waves of the RFID receiver. The RFID chip can also store information about the user.
Key Fobs
Key fobs can be used with a variety of security devices. They can contain RFID chips, but many key fobs are used as part of a two-phase authentication protocol:
Phase 1. The user logs into the key fob with a PIN.
Phase 2. The user logs into the system or restricted area using a randomly generated access code displayed on the key fob’s LCD display. The code changes every 30 to 60 seconds.
A key fob used in this way is often referred to as a token.
Smart Card
A smart card is a credit-card–sized card that contains stored information and might also contain a simple microprocessor or a radio-frequency identification (RFID) chip. Smart cards can be used to store identification information for use in security applications, stored values for use in prepaid telephone or debit card services, hotel guest room access, and many other functions. Smart cards are available in contact, contactless, or proximity form factors.
A smart card–based security system includes smart cards, card readers that are designed to work with smart cards, and a back-end system that contains a database that stores a list of approved smart cards for each secured location. Smart card–based security systems can also be used to secure individual personal computers.
To further enhance security, smart card security systems can also require the user to input a PIN or security password as well as provide the smart card at secured checkpoints, such as the entrance to a computer room.
Tokens
Any physical device that a user must carry to gain access to a specific system can be called a token, such as a smart card, an RFID card, or a key fob.
Privacy Filters
Anything that shows on the computer screen can be protected in a variety of ways. To protect data while the person is working, you can install a privacy filter, which is a transparent cover for PC monitors and laptop displays. It reduces the cone of vision, usually to about 30 degrees, so that only the person in front of the screen can see the content. Many of these are also antiglare, helping to reduce eye stress of the user.
Entry Control Roster
An entry control roster, which is a list of those individuals or representatives who are authorized to enter a secured area, can be used with a variety of security systems. Potential entrants can be looked up on an entry control roster and will be granted access if their credentials match those listed. A keypad lock on an entrance into a secure area can store a list of authorized PINs. Only users with a recognized PIN can enter the secure area.
Digital Security
Physical security helps stop physical threats, such as stolen paper files, hard disks, or other confidential information. However, for many organizations, a far bigger threat is digital thievery and destruction. Digital security is designed to stop online, network, and e-mail–based threats.
Antivirus/Anti-malware
Protection against viruses and malware is necessary for every type of computing device, from mobile devices to servers. Computer protection suites that include antivirus, anti-malware, anti-adware, and antiphishing protection are available from many vendors, but some users prefer a “best of breed” approach that uses the best available products in each category.
These programs can use some or all of the following techniques to protect users and systems:
![]() Real-time protection to block infection
Real-time protection to block infection
![]() Periodic scans for known and suspected threats
Periodic scans for known and suspected threats
![]() Automatic updating on a frequent (usually daily) basis
Automatic updating on a frequent (usually daily) basis
![]() Renewable subscriptions to obtain updated threat signatures
Renewable subscriptions to obtain updated threat signatures
![]() Links to virus and threat encyclopedias
Links to virus and threat encyclopedias
![]() Inoculation of system files
Inoculation of system files
![]() Permissions-based access to the Internet
Permissions-based access to the Internet
![]() Scanning of downloaded files and sent/received e-mails
Scanning of downloaded files and sent/received e-mails
When attempting to protect against viruses and malware, the most important thing to remember is to keep your anti-malware application up to date. The second most important item is to watch out for unknown data, whether it comes via e-mail, USB flash drive, mobile device, or elsewhere.
Firewalls
A software firewall is a program that examines data packets on a network to determine whether to forward them to their destination or block them. Firewalls can be used to protect against inbound threats only (one-way firewall) or against both unauthorized inbound and outbound traffic; this type of firewall is often referred to as a two-way firewall.
As initially configured, the standard firewall in Windows is a one-way firewall. However, it can be configured to work as a two-way firewall. For more information about how it works, see “Firewall Settings,” p.862, Chapter 16. Most third-party firewall programs, such as ZoneAlarm, are two-way firewalls.
OS X 10.5 includes an application firewall. In OS X 10.6 and newer, the application firewall offers additional customization options. For details, see https://support.apple.com/en-us/HT201642.
Linux, starting with distros based on kernel 2.4.x and above, includes iptables to configure its packet-filtering framework, netfilter. To learn more, see www.netfilter.org. Many distros and third-party Linux apps are available to help make iptables and netfilter easier to configure.
A software firewall can be configured to permit traffic between specified IP addresses and to block traffic to and from the Internet except when permitted on a per-program basis.
Corporate networks sometimes use a proxy server with a firewall as the sole direct connection between the Internet and the corporate network and use the firewall in the proxy server to protect the corporate network against threats.
User Authentication/Strong Passwords
Requiring passwords for user authentication can make systems more secure, but if there is no attempt to enforce the creation of strong passwords, all that is being created is an illusion.
Strong passwords have the following characteristics:
![]() At least 8 characters long—and the longer, the better
At least 8 characters long—and the longer, the better
![]() A variety of uppercase and lowercase letters, numbers, and symbols
A variety of uppercase and lowercase letters, numbers, and symbols
![]() Avoid real names and words
Avoid real names and words
Note
For more about creating strong passwords, see www.businessinsider.com/how-to-create-strong-password-heartbleed-2014-4.
Multifactor Authentication
The best type of authentication system is one that uses two or more authentication methods. This is known as multifactor authentication. An example of this would be a person using a smart card and typing a username and password to gain access to a system. The combination of the password and the physical token makes it very difficult for imposters to gain access to a system.
Directory Permissions
Directory permissions is the term used in OS X and Linux for configuring the access levels a user has to a directory (folder) and individual files. In Windows, the equivalent term is file and folder permissions.
In Linux and OS X, directory permissions include:
![]() Read (opens file)
Read (opens file)
![]() Write (changes file)
Write (changes file)
![]() Execute (runs executable file or opens directory)
Execute (runs executable file or opens directory)
The chmod command is used in Linux to change directory permissions. In OS X, the Get Info menu’s Sharing & Permissions submenu is used to change directory permissions.
In Windows, file and folder permissions on an NTFS drive include:
![]() Full control
Full control
![]() Modify
Modify
![]() Read & Execute
Read & Execute
![]() List folder contents (applies to folders only)
List folder contents (applies to folders only)
![]() Read
Read
![]() Write
Write
These settings are configured through the Security tab of the file or folder’s properties sheet.
VPN
A Virtual Private Network (VPN) is a private (secure) network connection that is carried by an insecure public network, such as the Internet. A VPN connection requires a VPN server at the remote site and a VPN client at the client site. VPN traffic between client and server is encrypted and encapsulated into packets suitable for transmission over the network. VPNs can be used in place of leased lines for connections between locations and for telecommuting workers.
The most common types of VPNs include PPTP and L2TP/IPsec. PPTP uses 128-bit encryption, while L2TP combined with IPsec (L2TP/IPsec) uses 256-bit encryption.
DLP
Data loss/leakage prevention (DLP) refers to the prevention of confidential information from being viewed or stolen by unauthorized parties. DLP goes beyond normal digital security methods such as firewalls and antivirus by observing and analyzing unusual patterns of data access, e-mail, and instant messaging, whether within an organization’s network or from the organization’s network outwards.
Disabling Ports
Disabling ports refers to preventing specified UDP or TCP ports from being used by a service, application, specific device, or all devices with a firewall appliance or software firewall.
Access Control Lists
Access control lists are the lists of permissions by user and operation for a specific object such as a file or folder. ACLs list which users or groups can perform specific operations on the specified file or folder.
Smart Card
Smart cards can be used to enable logins to a network, encrypt or decrypt drives, and be used for digital signatures when supported by the network server.
E-mail Filtering
E-mail filtering can be used to organize e-mail into folders automatically, but from a security standpoint, its most important function is the blocking of spam and potentially dangerous messages.
E-mail filtering can be performed at the point of entry to a network with a specialized e-mail filtering server or appliance as well as by enabling spam and threat detection features built into e-mail clients or added by security software.
Spam or suspicious e-mails can be discarded or quarantined by the user, and false positives that are actually legitimate messages can be retrieved from the spam folder and placed back into the normal Inbox.
Trusted/Untrusted Software Sources
App stores for iOS, Android, Windows 8 and later, OS X, and many Linux distros are examples of trusted sources of software. Apps installed from these sources have been approved by the operating system vendor.
However, not all software for an operating system comes from an app store. Digital certificates included in software are used to identify the publisher, and most operating systems display warning messages when an app without a digital certificate is being installed. Some block the installation of apps that do not have a digital certificate.
Note
Group policy settings available in Windows 7/8/8.1 can be used to create a Trusted Publishers policy setting to restrict which certificates can be accepted.
User Education/AUP (Acceptable Use Policy)
Regardless of the sophistication of physical or digital security measures, the lack of user education and an AUP (acceptable use policy) can lead to security issues. Some elements of a good AUP could include:
![]() Ask for an ID when approached in person by somebody claiming to be from the help desk, the phone company, or the service company.
Ask for an ID when approached in person by somebody claiming to be from the help desk, the phone company, or the service company.
![]() Ask for a name and supervisor name when contacted by phone by someone claiming to be from the help desk, the phone company, or the service company.
Ask for a name and supervisor name when contacted by phone by someone claiming to be from the help desk, the phone company, or the service company.
![]() Provide contact information for the help desk, phone company, or authorized service companies and ask users to call the authorized contact person to verify that the service call or phone request for information is legitimate.
Provide contact information for the help desk, phone company, or authorized service companies and ask users to call the authorized contact person to verify that the service call or phone request for information is legitimate.
![]() Log in to systems themselves and then provide the tech the computer, rather than giving the tech login information.
Log in to systems themselves and then provide the tech the computer, rather than giving the tech login information.
![]() Change passwords immediately after service calls.
Change passwords immediately after service calls.
![]() Report any potential social engineering calls or in-person contacts, even if no information was exchanged. Social engineering experts can gather innocuous-sounding information from several users and use it to create a convincing story to gain access to restricted systems.
Report any potential social engineering calls or in-person contacts, even if no information was exchanged. Social engineering experts can gather innocuous-sounding information from several users and use it to create a convincing story to gain access to restricted systems.
Users should be educated in how to do the following:
![]() Keep antivirus, antispyware, and anti-malware programs updated.
Keep antivirus, antispyware, and anti-malware programs updated.
![]() Scan systems for viruses, spyware, and malware.
Scan systems for viruses, spyware, and malware.
![]() Understand major malware types and techniques.
Understand major malware types and techniques.
![]() Scan removable-media drives (optical disks, USB drives) for viruses and malware.
Scan removable-media drives (optical disks, USB drives) for viruses and malware.
![]() Disable autorun (the steps for this are shown later).
Disable autorun (the steps for this are shown later).
![]() Configure scanning programs for scheduled operation.
Configure scanning programs for scheduled operation.
![]() Respond to notifications when viruses, spyware, or malware have been detected.
Respond to notifications when viruses, spyware, or malware have been detected.
![]() Quarantine suspect files.
Quarantine suspect files.
![]() Report suspect files to the help desk and to the software vendor.
Report suspect files to the help desk and to the software vendor.
![]() Remove malware.
Remove malware.
![]() Disable antivirus when needed (such as during software installations) and to know when to reenable antivirus.
Disable antivirus when needed (such as during software installations) and to know when to reenable antivirus.
![]() Don’t open attachments from unknown senders
Don’t open attachments from unknown senders
![]() Use antiphishing features in web browsers and e-mail clients.
Use antiphishing features in web browsers and e-mail clients.
Principle of Least Permission
The principle of least privilege basically says that a user should only have access to what is required. If a person needs to update Excel files and browse the Internet, that person should not be given administrative access. You might think of this as common sense, but it should not be taken lightly. When user accounts are created locally on a computer and especially on a domain, great care should be taken when assigning users to groups. Also, many programs when installed ask who can use and make modifications to the program; often the default is “all users.” Some technicians just click Next when hastily installing programs without realizing that the user now has full control of the program, something you might not want. Just remember, keep users on a need-to-know basis; give them access only to what they specifically need and no more.
Windows Basic Security Settings
Controlling access to files, folders, printers, and physical locations is essential for system and network security. The following sections discuss the purposes and principles of access control.
For the 220-902 exam, be familiar with:
![]() Users and groups
Users and groups
![]() NTFS vs share permissions
NTFS vs share permissions
![]() Shared files and folders
Shared files and folders
![]() System files and folders
System files and folders
![]() User authentication
User authentication
![]() Run as administrator vs. standard user
Run as administrator vs. standard user
![]() BitLocker
BitLocker
![]() BitLocker To Go
BitLocker To Go
![]() EFS
EFS
Users and Groups
Users in Windows can be assigned to different groups, each with different permissions. The Local Policy (local PCs) and Group Policy (networked PCs connected to a domain controller) settings can restrict PC features by group or by PC. For the 220-902 exam, you need to know the differences between the following accounts:
![]() Power user
Power user
![]() Guest
Guest
There are three standard account levels in Windows:
![]() Standard user—Standard accounts have permission to perform routine tasks. However, these accounts are blocked from performing tasks that involve system-wide changes, such as installing hardware or software unless they can provide an administrator password when prompted by User Account Control (UAC).
Standard user—Standard accounts have permission to perform routine tasks. However, these accounts are blocked from performing tasks that involve system-wide changes, such as installing hardware or software unless they can provide an administrator password when prompted by User Account Control (UAC).
![]() Administrator—Users with an administrator account can perform any and all tasks.
Administrator—Users with an administrator account can perform any and all tasks.
![]() Guest—The guest account level is the most limited. A guest account cannot install software or hardware or run already-existing applications and cannot access files in shared document folders or the Guest profile. The Guest account is disabled by default. If it is enabled for a user to gain access to the computer, that access should be temporary and the account should be disabled again when the user no longer requires access.
Guest—The guest account level is the most limited. A guest account cannot install software or hardware or run already-existing applications and cannot access files in shared document folders or the Guest profile. The Guest account is disabled by default. If it is enabled for a user to gain access to the computer, that access should be temporary and the account should be disabled again when the user no longer requires access.
When a user is created using the Users applet in Windows, the user must be assigned a Standard or Administrator account. Guest accounts are used for visitors.
The Power users account was a specific account type in earlier versions of Windows, having more permissions than standard users, but fewer than administrators. In Windows Vista and later versions, power users have the same rights and permissions as standard users. A custom security template can be created if the Power Users group needs specific permissions, such as for the operation of legacy programs.
NTFS vs Share Permissions
NTFS permissions control both local and network access, and can be set for individual users or groups, while share permissions affect only network shares. Each permission has two settings: Allow or Deny. Generally, if you want a user to have access to a folder, you would add them to the list and select Allow for the appropriate permission. If you don’t want to allow them access, normally you simply wouldn’t add them. But in some cases, an explicit Deny is necessary. This could be because the user is part of a larger group that already has access to a parent folder, but you don’t want the specific user to have access to this particular subfolder. To learn how permissions are inherited and propagated, see the “Permission Inheritance and Propagation” section on p.1041, this chapter.
Moving and Copying Folders and Files
Moving and copying folders and files will have different results when it comes to permissions. Basically, it breaks down like this:
![]() When you copy a folder or file on the same, or to a different volume, the folder or file inherits the permissions of the parent folder it was copied to (target directory).
When you copy a folder or file on the same, or to a different volume, the folder or file inherits the permissions of the parent folder it was copied to (target directory).
![]() When you move a folder or file to a different location on the same volume, the folder or file retains its original permissions.
When you move a folder or file to a different location on the same volume, the folder or file retains its original permissions.
File Attributes
File attributes are used in Windows to indicate how files can be treated. They can be used to specify which files should be backed up, which should be hidden from normal GUI or command-line file listings, whether a file is compressed or encrypted, and others, depending upon the operating system.
To view file attributes in Windows, right-click a file in File Explorer or Windows Explorer and select Properties. To view file attributes from the Windows command line, use the Attrib command.
Shared Files and Folders
Shared files and folders have their permissions assigned via the Security tab of the object’s properties sheet. Folder and file permissions vary by user type or group and can include the following:
![]() Full control—Complete access to contents of file or folder. When Full Control is selected, all of the following are selected automatically.
Full control—Complete access to contents of file or folder. When Full Control is selected, all of the following are selected automatically.
![]() Modify—Change file or folder contents.
Modify—Change file or folder contents.
![]() Read & Execute—Access file or folder contents and run programs.
Read & Execute—Access file or folder contents and run programs.
![]() List Folder Contents—Display folder contents.
List Folder Contents—Display folder contents.
![]() Read—Access a file or folder.
Read—Access a file or folder.
![]() Write—Add a new file or folder.
Write—Add a new file or folder.
Administrative Shares vs Local Shares
Local shares are normally configured on a folder or library basis in Windows. However, Windows sets up special administrative shares available across a network for each local drive. For example, the administrative share for the C drive on a system called MARK-PC is \MARK-PCC$.
To connect to the administrative share, the user must provide a user name and password for an account on that system.
Permission Inheritance and Propagation
Permission propagation and inheritance describes how files and folders receive permissions.
If you create a folder, the default action it takes is to inherit permissions from the parent folder. So any permissions that you set in the parent will be inherited by the subfolder. To view an example of this, locate any folder within an NTFS volume (besides the root folder), right-click it and select Properties, access the Security tab, and then click the Advanced button.
In Windows 7, a checkbox named Inherit from Parent the Permission Entries that apply to Child Objects is visible toward the bottom of the window. This means that any permissions added or removed in the parent folder will also be added or removed in the current folder. In addition, those permissions that are being inherited cannot be modified in the current folder. The box is already checked and it is grayed out, so it cannot be cleared. If you want to make modifications to the permissions, you must click the Change Permissions button, clear the Include inheritable permissions from this object’s parents checkbox, and select Add (converts and adds inherited parent permissions as explicit permissions on this object), Remove (removes inherited permissions), or Cancel.
In Windows 8/8.1/10, the Advanced Security Settings dialog offers these buttons: Add, Remove, View, and Disable Inheritance.
You can also propagate permission changes to subfolders that are not inheriting from the current folder. To do so, select Replace all child object permissions with inheritable permissions from this object. Remember that folders automatically inherit from the parent unless you turn inheriting off—and you can propagate permission entries to subfolders at any time by selecting the Replace option.
System Files and Folders
System files and folders are files and folders with the system (s) attribute. They are normally not displayed in File Explorer or Windows Explorer to help protect them from deletion.
To make these files and folders visible:
Step 1. Click or tap Tools.
Step 2. Click or tap Folder options.
Step 3. Click or tap the View tab.
Step 4. Click the Show hidden files, folders, and drives radio button.
Step 5. Clear the Hide protected operating system files checkbox.
User Authentication
Windows includes a variety of authentication protocols that can be used on a corporate network. These include Kerberos, TLS/SSL, PKU2U, NTLM, and others.
BitLocker and BitLocker to Go
To encrypt an entire drive, you need some kind of full disk encryption software. Several currently are available on the market; one developed for business-oriented versions of Windows by Microsoft is called BitLocker. This software can encrypt the entire disk, which, after completed, is transparent to the user. However, there are some requirements for this including
![]() A Trusted Platform Module (TPM), which is a chip residing on the motherboard that actually stores the encrypted keys.
A Trusted Platform Module (TPM), which is a chip residing on the motherboard that actually stores the encrypted keys.
or
![]() An external USB key to store the encrypted keys. Using BitLocker without a TPM requires changes to Group Policy settings.
An external USB key to store the encrypted keys. Using BitLocker without a TPM requires changes to Group Policy settings.
and
![]() A hard drive with two volumes, preferably created during the installation of Windows. One volume is for the operating system (most likely C:), which will be encrypted; the other is the active volume that remains unencrypted so that the computer can boot. If a second volume needs to be created, the BitLocker Drive Preparation Tool can be of assistance and can be downloaded from the Microsoft Download Center at:
A hard drive with two volumes, preferably created during the installation of Windows. One volume is for the operating system (most likely C:), which will be encrypted; the other is the active volume that remains unencrypted so that the computer can boot. If a second volume needs to be created, the BitLocker Drive Preparation Tool can be of assistance and can be downloaded from the Microsoft Download Center at:
http://www.microsoft.com/en-us/download/details.aspx?id=7806
BitLocker software is based on the Advanced Encryption Standard (AES) and uses a 128-bit encryption key.
Starting with Windows Vista SP1, BitLocker can be used to encrypt internal hard disk volumes other than the system drive. For example, if a hard disk is partitioned as C: and D: drives, BitLocker could encrypt both drives.
In Windows 7 and later versions, BitLocker functionality is extended to external USB drives (including flash drives) with BitLocker To Go. Windows 7 also simplifies BitLocker and BitLocker To Go configuration: Simply right-click a drive and select Enable BitLocker to start the encryption process. During the process, you are prompted to specify a password or a smart card for credentials to access the drive’s contents.
To enable access to the contents of BitLocker To Go USB drives on Windows Vista and Windows XP, Microsoft now offers the BitLocker To Go Reader. Download it from the Microsoft website.
EFS
Business-oriented editions of Windows include support for EFS (Encrypting File System). EFS can be used to protect sensitive data files and temporary files and can be applied to individual files or folders. (When applied to folders, all files in an encrypted folder are also encrypted.)
EFS files can be opened only by the user who encrypted them, by an administrator, or by EFS keyholders (users who have been provided with the EFS certificate key for another user’s account). Thus, they are protected against access by hackers.
Files encrypted with EFS are listed with green filenames when viewed in Windows Explorer or File Explorer. Only files stored on a drive that uses the NTFS file system can be encrypted.
To encrypt a file, follow this process:
Step 1. Right-click the file in Windows Explorer or File Explorer or Computer and select Properties.
Step 2. Click the Advanced button on the General tab.
Step 3. Click the empty Encrypt Contents to Secure Data checkbox.
Step 4. Click OK.
Step 5. Click Apply. When prompted, select the option to encrypt the file and parent folder or only the file as desired and click OK.
Step 6. Click OK to close the properties sheet.
To decrypt the file, follow the same procedure, but clear the Encrypt Contents to Secure Data checkbox in Step 3.
Note
To enable the recovery of EFS encrypted files in the event that Windows cannot start, you should export the user’s EFS certificate key. For details, see the Microsoft TechNet article “Data Recovery and Encrypting File System (EFS)” at http://technet.microsoft.com/en-us/library/cc512680.aspx.
Best Security Practices for Workstations
Keeping a network secure starts with securing the workstations that are used to connect to the network. In the following sections, you learn how to use password best practices, account management, and other methods to make workstations secure.
Note
For the CompTIA A+ Exam 220-902, be familiar with:
![]() Password best practices
Password best practices
![]() Account management
Account management
![]() How to disable autorun
How to disable autorun
![]() Data encryption
Data encryption
![]() Patch/update management
Patch/update management
Password Best Practices
Every user account on a workstation needs a password, but password policies shouldn’t end with that requirement. The guidelines in the following sections reflect password best practices.
Note
Many of these requirements can be enforced through security policy settings made with Group Policy.
Setting Strong Passwords
Setting strong passwords should include requirements for minimum length and a mixture of alphanumeric and symbol characters. Using a password generator can make the creation of strong passwords easier. As an example, the Norton Identity Safe Password Generator (https://identitysafe.norton.com/password-generator) offers highly customizable random passwords and can generate multiple passwords at the same time.
Password Expiration
No matter how strong a password is, the longer it is used, the less secure it is from social engineering, brute forcing, or other attacks. By using a password expiration policy that passwords expire after a particular length of time and must be reset with different characters, the risk of password discovery by unauthorized users is minimized.
Changing Default User Names/Passwords
Default user names and passwords for SOHO router administration or any other device or service with default passwords should be changed. Default user names and passwords are available in documentation for these devices, making it easy for an attacker to take over a router or other device.
Screensaver Required Password
To help protect computers from unauthorized use, users can be required to enter their password to return to the desktop after the screensaver start. Users should also be required to lock their workstations, which also requires a logon to return to the desktop (see “Timeout/Screen Lock,” p.1048, this chapter, for details).
In Windows, the screensaver required password settings (On Resume, Display Logon Screen checkbox) is located in the Screen Saver Settings window, which can be accessed from Control Panel, Personalization. In OS X, use the Desktop & Screen Saver menu to choose a screen saver, and Security & Privacy to require a password to unlock your system. Linux distributions that use the X11 Window System use the XScreenSaver (https://www.jwz.org/xscreensaver/).
BIOS/UEFI Passwords
BIOS/UEFI passwords prevent unauthorized users from changing settings. Note that they can be removed by resetting the CMOS. Most motherboards feature a jumper block or a pushbutton to reset the CMOS. If this feature is not present, the CMOS can be reset by removing the CMOS battery for several minutes.
Note
On a semi-related note, many laptops come equipped with drive lock technology: an HDD password. When enabled, it prompts the user to enter a password for the hard drive when the computer is first booted. If the user of the computer doesn’t know the password for the hard drive, the drive will lock and the OS will not boot. An eight-digit or similar hard drive ID usually associates the laptop with the hard drive that is installed. On most systems this password is clear by default, but if the password is set and forgotten, it can usually be reset within the BIOS. Some laptops come with documentation clearly stating the BIOS and drive lock passwords.
Caution
Some laptops use the password to permanently restrict access to only the password holder. In such cases, the password cannot be bypassed. See the documentation for your laptop or portable system before applying a BIOS password to determine whether this is the case.
Requiring Passwords
PC users should use passwords to secure their user accounts. Through the Local Security Policy and Group Policy in Windows, you can set up password policies that require users to do the following:
![]() Change passwords periodically (Local Policies > Security Options)
Change passwords periodically (Local Policies > Security Options)
![]() Be informed in advance that passwords are about to expire (Account Policies > Password Policy)
Be informed in advance that passwords are about to expire (Account Policies > Password Policy)
![]() Enforce a minimum password length (Account Policies > Password Policy)
Enforce a minimum password length (Account Policies > Password Policy)
![]() Require complex passwords (Account Policies > Password Policy)
Require complex passwords (Account Policies > Password Policy)
![]() Prevent old passwords from being reused continually (Account Policies > Password Policy)
Prevent old passwords from being reused continually (Account Policies > Password Policy)
![]() Wait a certain number of minutes after a specified number of unsuccessful logins has taken place before they can log in again (Account Policies > Account Lockout Policy)
Wait a certain number of minutes after a specified number of unsuccessful logins has taken place before they can log in again (Account Policies > Account Lockout Policy)
To make these settings in Local Security Settings, open the Security Settings node and navigate to the appropriate subnodes (shown in parentheses in the preceding list). In Group Policy (gpedit.msc), navigate to
![]() Computer Configuration > Windows Settings > Security Settings > Account Policies > Password Policy
Computer Configuration > Windows Settings > Security Settings > Account Policies > Password Policy
![]() Computer Configuration > Windows Settings > Security Settings > Account Policies > Account Lockout Policy
Computer Configuration > Windows Settings > Security Settings > Account Policies > Account Lockout Policy
![]() Computer Configuration > Windows Settings > Security Settings > Local Policies > Security Options as appropriate
Computer Configuration > Windows Settings > Security Settings > Local Policies > Security Options as appropriate
Account Management
User account settings, when combined with workstation security settings, help prevent unauthorized access to the network. The following account management settings can enhance security:
Restricting User Permissions
User permissions for Standard users prevent system-wide changes, but additional restrictions can be done with Group Policy or Local Security Policy.
Login Time Restrictions
To prevent a user account from being used after hours or before the start of business, login time restrictions can be used to specify when an account can be used.
Disabling Guest Account
The Guest account in Windows is a potential security risk, so it should be disabled. If visitors need Internet access, a guest wireless network that doesn’t connect to the business network is a good replacement.
Failed Attempts Lockout
Password policy should lock out a user after a specified number of failed attempts to log into an account. A lockout policy can also incorporate a timeout policy, which specifies how long the user must wait after an unsuccessful login before attempting to login again.
Timeout/Screen Lock
Automatic screen locking can be configured to take effect after a specified amount of idle time, helping safeguard systems if a user forgets to lock the system manually. Before screen locking can be used, accounts must have the screen lock feature enabled.
In Windows, users can lock their screens manually by pressing Windows key+L on the keyboard or pressing Ctrl+Alt+Del and select Lock Computer. In Linux, the keys to use vary by desktop environment. In OS X, use Control+Shift+Eject or Control+Shift+Power (for keyboards without the Eject key).
Disabling Autorun
When you disable autorun, an optical disc or USB drive won’t automatically start its autorun application (if it has one) and any embedded malware won’t have a chance to infect the system before you scan the media. AutoPlay is a similar feature that pops up a menu of apps to use for the media on an optical drive or USB flash drive.
The easiest way to turn off AutoRun and AutoPlay in Windows Vista/7/8/8.1/10 is to open the AutoPlay applet in Control Panel, clear the Use AutoPlay for all media and devices, and then click Save. From Windows 8/8.1’s Start screen, search for “AutoPlay settings” and click or tap it. In the PC and Devices menu, move the Use AutoPlay for all media and devices slider to Off.
To disable autorun in Windows using Local Group Policy, complete the following steps:
Step 1. Click Start and in the search field type gpedit.msc. This opens the Local Group Policy Editor.
Step 2. Navigate to Computer Configuration > Administrative Templates > Windows Components > AutoPlay Policies.
Step 3. Double-click the Turn Off Autoplay setting. This displays the Turn Off AutoPlay configuration window.
Step 4. Click the Enabled radio button and then click OK. You are actually enabling the policy named Turn off Autoplay.
Use this sparingly on laptops that do presentations, as these computers might require AutoPlay.
OS X does not support autorun/autoplay features.
In Linux, autoplay/autorun can be disabled on systems that use the nautilus file manager by changing the properties on the Media tab to enable Never prompt or start programs on media insertion and disable Browse media when inserted. See https://scottlinux.com/2011/02/09/ubuntu-linux-disable-autorun/ for details.
Using Data Encryption
Data encryption should be used on laptops and other systems that might be used outside of the more secure corporate network environment. Laptops that contain unencrypted sensitive data have led to many data breaches.
Patch/Update Management
Patches and updates to operating systems and applications should be managed centrally to avoid systems falling out of compliance. Microsoft’s Windows Server Update Services (WSUS) can be used for patch/update management of OS and application patches and updates for Microsoft products. OS X Server’s Software Update service provides the same role for OS X. Linux distributions use various programs to manage updates. A popular choice is Yellowdog Updater Modified, better known as yum (http://yum.baseurl.org/).
Securing Mobile Devices
Because mobile devices are small, expensive, easy to conceal, and could contain confidential data, they become a target for thieves. But there are some things we can do to protect our data and attempt to get the mobile device back.
For the 220-902 exam, be familiar with:
![]() Screen locks
Screen locks
![]() Remote wipes
Remote wipes
![]() Remote backup applications
Remote backup applications
![]() Failed login attempt restrictions
Failed login attempt restrictions
![]() Antivirus/anti-malware
Antivirus/anti-malware
![]() Patching/OS updates
Patching/OS updates
![]() Biometric authentication
Biometric authentication
![]() Full device encryption
Full device encryption
![]() Multifactor authentication
Multifactor authentication
![]() Authenticator applications
Authenticator applications
![]() Trusted sources vs. untrusted sources
Trusted sources vs. untrusted sources
![]() Firewalls
Firewalls
![]() Policies and procedures
Policies and procedures
Screen Locks
The first thing a user should do when receiving a mobile device is to set a passcode, which is a set of numbers. This one of several types of screen locks. These lock the device making it inaccessible to everyone except experienced hackers. The screen lock can be a pattern that is drawn on the display, a PIN (passcode lock), or a password. A very strong password is usually the strongest form of screen lock.
This can be accessed on an Android device by going to Settings > Security.
You can also select how long the phone waits after inactivity to lock. Generally this is set to 3 or 5 minutes or so, but in a confidential environment you might set this to “immediate.” Swipe lock apps immediately lock the device when the user swipes the display to one side.
The next option on the Security screen is Visible Passwords. If check marked, this shows the current letter of the password being typed by the user. This type of setting is vulnerable to shoulder surfers (people looking over your shoulder to find out your password) and should be deselected. When deselected, only asterisks (*) are shown when the user types a password.
There is also a Credential Storage option. By default, secure credentials are dropped after a session is over. (an exception to this rule is a Gmail or other similar login). But, if Use Secure Credentials is check marked, and a user accesses a website or application that requires a secure certificate, the credentials are stored on the device. A user can set a password here so that only he or she can view or clear credentials, or install credentials from a memory card. The use of secure credentials is usually only configured if a user needs access to confidential company information on the Internet.
Passcode locking can be accessed on iPad and iPhone devices by going to Settings > Passcode> and tapping Passcode Lock. This displays the Passcode Lock screen. Tap Turn Passcode On to set a passcode.
To enable Auto-Lock, go to Settings > General > Auto-Lock and select an amount of minutes. If it is set to “never” then the device will never sleep, negating the security of the passcode, and using valuable battery power. The default setting is two minutes.
Aside from the default timeout, devices can also be locked by pressing the power button quickly. If configured, the passcode must be supplied whenever a mobile device comes out of a sleep or lock state and whenever it is first booted.
Some devices support other types of screen locking, including fingerprint lock (the user’s fingerprint is matched against a list of authorized users) and face lock (the user’s face is matched against a list of authorized users). Windows Hello, a Windows 10 feature supported on some devices, is an example of a face lock.
Locator Applications
By installing or enabling a locator application or service such as Android Device Manager, Lookout for iOS or Android, or Find My iPhone, a user can track down a lost device.
Remote Wipes
Even if you track your mobile device and find it, it might be too late. A hacker can get past passcodes and other screen locks. It’s just a matter of time before the hacker has access to the data. So, an organization with confidential information should consider a remote wipe program. As long as the mobile device still has access to the Internet, the remote wipe program can be initiated from a desktop computer, which deletes all the contents of the remote mobile device.
Some devices (such as the iPhone) have a setting where the device will be erased after a certain amount of incorrect password attempts (10 in the case of the iPhone). There are also third-party apps available for download for most mobile devices that will wipe the data after x amount of attempts. Some apps configure the device to automatically take a picture after three failed attempts and e-mail the picture to the owner.
Examples of software that can accomplish this include Google Sync, Google Apps Device Policy, Apple’s Data Protection, and third-party apps such as Mobile Defense. In some cases, such as Apple’s Data Protection, the command that starts the remote wipe must be issued from an Exchange server or Mobile Device Management server. Of course, you should have a backup plan in place as well so that data on the mobile device is backed up to a secure location at regular intervals. This way, if the data needs to be wiped, you are secure in the fact that most of the data can be recovered. The type of remote wipe program, backup program, and policies regarding how these are implemented vary from one organization to the next. Be sure to read up on your organization’s policies to see exactly what is allowed from a mobile security standpoint.
Remote Backup Applications
There are two ways to back up a mobile device: via a USB connection to a desktop or laptop computer, or to the cloud by using a remote backup application.
Apple’s iCloud offers free cloud backup service for a limited amount of data (currently 5GB), with more space available by subscription. iTunes can be used for USB-based backup, which enables the entire device to be backed up at no additional cost.
Android users have free backup for e-mail, contacts, and other information via Google Cloud. However, backing up photos, music, contents, and other documents must either be performed manually via USB or file sync to the cloud using a service such as Dropbox or with a third-party app.
Both iOS and Android users can use popular third-party cloud-based backups also supported for OS X and Windows such as Mozy (mozy.com), iDrive (www.idrive.com), and others.
Failed Login Attempts Restrictions
Most mobile devices include failed login attempts restrictions. If a person fails to enter the correct passcode after a certain amount of attempts, the device will lock temporarily and the person will have to wait a certain amount of time before attempting the passcode again. If the person fails to enter the correct passcode again, the timeout will increase on most devices.
Antivirus/Anti-malware
Just like there is antivirus software for PCs, there is also antivirus anti-malware software for mobile devices. These are third-party applications that need to be paid for, downloaded, and installed to the mobile device. Some common examples for Android include McAfee’s VirusScan Mobile, AVG, Lookout, Dr. Web, and NetQin.
iOS works a bit differently. iOS is a tightly controlled operating system. One of the benefits of being a closed-source OS is that it can be more difficult to write viruses for it, making it somewhat more difficult to compromise. But there is no OS that can’t be compromised. For the longest time there was no antivirus software for iOS. However, starting in 2011, jailbreaking software began to make iOS devices more vulnerable. As a result, Apple allowed antivirus and anti-malware vendors onto its App Store.
Note
iOS jailbreaking is the process of removing the limitations that Apple imposes on its devices that run iOS. This enables users to gain root access to the system and allows the download of previously unavailable applications and software not authorized by Apple.
Patching/OS Updates
Patching/OS updates help protect mobile devices from. By default, you are notified automatically about available updates on Android and iOS-based devices. However, you should know where to go to manually update these devices as well. For Android go to Settings > General > About device > Software update or Settings > System > About device > Software update > check for updates.
Updates for iOS can be located at Settings > General > Software Update.
When it comes to large organizations that have many mobile devices, a Mobile Device Management (MDM) suite should be used. McAfee (and many other companies from AirWatch to LANDESK Mobility Manager to Sybase) have Mobile Device Management software suites that can take care of pushing updates and configuring many mobile devices from a central location. Decent quality MDM software will secure, monitor, manage, and support multiple different mobile devices across the enterprise.
Note
Mobile Device Management (MDM) and Mobile Application Management (MAM) solutions are available to assist large enterprises with over the air device management and distribution of mobile applications.
Biometric Authentication
Both current and older Android and iOS devices can use biometric authentication through the use of add-on fingerprint readers or iris readers.
Recent and current iOS devices have built-in support for fingerprint reading with the Touch ID feature for iPhone 5s or later, iPad Pro, iPad Air 2, or iPad mini 3 or later. Learn more at https://support.apple.com/en-us/HT201371.
Full Device Encryption
Apple’s iOS devices feature full device encryption that is activated when a passcode is assigned to the device. To learn more about this and other iOS security, see https://www.apple.com/business/docs/iOS_Security_Guide.pdf.
With Android devices running version 5.x or earlier, you must assign a passcode first before you can encrypt the device. Then, go to Settings > Lock screen and security > Other security settings > Encrypt device. You must have at least an 80% charge in your device and plug the device into AC power during the process. Encryption can take an hour or longer. You must also assign a new passcode of six characters or longer including at least one letter and one number. Once you encrypt your Android device, you must enter the passcode every time you turn on or awaken your device from sleep.
With full device encryption, your data is not accessible to would-be thieves unless they know the passkey.
Multifactor Authentication
Any authentication method for e-mail, ebanking, or other tasks that requires two forms of authentication uses multifactor authentication. For example, websites and apps might require you to authenticate not only the account information (name and password) but the device being used to access the account. Typically, this is done by sending an SMS text message or making a robocall to the pre-registered mobile phone of the account holder. The account holder must enter the code received when prompted by the website or app before the app can run or the website opens. Unless the app is deleted or cookies are deleted from the browser, the device is now an approved device for that account.
Authenticator Applications
An authenticator application is used to receive or generate authentication codes for one or more apps or services.
The Google Authenticator from the Google Play app store enables the user to receive or generate multifactor codes with Android, iOS, and BlackBerry devices. It supports options to add or remove trusted computers and devices and works with the Security Key USB device.
Other authenticator apps for mobile devices include LastPass Authenticator, Authy, FreeOTP, and Toopher.
Before selecting an authenticator app, be sure to determine which websites and services it supports.
Trusted Sources vs. Untrusted Sources
The app stores for iOS (Apple App Store), Android (Google Play), and Windows Store (Windows 10 Mobile) are trusted sources for apps for the respective mobile devices. App downloaded from other locations are considered untrusted sources, and should not be used.
Firewalls
Android does not include a firewall, so third-party apps must be used to provide protection against unwanted Internet traffic. Google Play offers many free firewall apps.
Apple does not include a firewall because the design of iOS uses a feature called “sandboxing” that runs apps in separate protected space.
Policies and Procedures
Many individually owned mobile devices are now being used on corporate networks. Because these devices were not configured by the corporation, they could potentially represent a security threat. To prevent security threats, organizations need to address these issues in their policies and procedures.
BYOD versus Corporate Owned Devices
Benefits of bring your own device (BYOD) devices include:
![]() No hardware cost to organization
No hardware cost to organization
![]() Higher usage due to employee satisfaction with their selected device
Higher usage due to employee satisfaction with their selected device
![]() Greater productivity
Greater productivity
![]() Hidden costs of management and security
Hidden costs of management and security
![]() Possibility that some employees will not want to buy their own devices
Possibility that some employees will not want to buy their own devices
Profile Security Requirements
Whether an organization uses corporate-owned mobile devices, BYOD, or a mixture, setting and following profile security requirements are very important to achieving increased productivity without incurring significant risks.
These can include specifying approved devices and operating system versions, requiring passwords and lock screens, device encryption, support issues, and when and how to remove company information when an employee leaves the organization.
Note
For more information, see www.cio.com/article/2395944/consumer-technology/7-tips-for-establishing-a-successful-byod-policy.html and http://www.techrepublic.com/blog/it-consultant/learn-byod-policy-best-practices-from-templates/.
Data Destruction and Disposal Methods
Even after a computer has reached the end of its useful life, the hard disk it contains represents a potential security risk. To prevent confidential company or client information from being accessed from a computer that is being disposed of for resale, recycling, or deconstruction for parts, you can use one of the methods discussed in the following sections.
Note
For the 220-902 exam, be familiar with:
![]() Physical destruction methods
Physical destruction methods
![]() Recycling or repurposing best practices
Recycling or repurposing best practices
Physical Destruction Methods
Physical destruction methods render a mass storage device into small pieces that cannot be reconstructed, making the data inside unrecoverable. Methods include:
Shredder
Some office-grade shredders can be used to destroy optical media. Heavy-duty shredders made for hard disk and mass storage devices are used by electronics recyclers to reduce storage devices, tape, or other types of media into small bits of material.
Drill / Hammer
Remove the hard disks and destroy their platters with a drill, hammer, or other device; then recycle the scrap.
Electromagnetic (Degaussing)
Other tools such as electromagnetic degaussers and permanent magnet degaussers can also be used to permanently purge information from a disk. The drive is physically intact, but all data, formatting, and control track data is missing. Use this if you want to use a drive for display purposes.
Incineration
Incineration of tape, floppy, and other types of magnetic and optical media is available from some firms.
Certificate of Destruction
Data-recycling companies that destroy hard disks or other storage devices can provide a certificate of destruction.
Recycling or Repurposing Best Practices
As long as the data on a hard disk or other mass storage device can be rendered unrecoverable, it is not necessary to destroy the media itself. The following sections discuss this approach.
Low-Level Format vs. Standard Format
The standard format used in operating systems is a quick format. This type of format only clears the root folder. The remainder of the data on the disk can be recovered until it is overwritten.
A long format rewrites the disk surface. However, data recovery programs available from many third-party firms can recover data from a formatted drive. A low-level format is performed by the drive manufacturer before the drive is shipped and cannot be performed in the field.
Overwrite
Some disk maintenance programs from mass storage vendors include options to overwrite a hard disk or SSD’s data area with zeros. Once again, however, data recovery programs can often recover data that has been overwritten in this fashion.
Drive Wipe
To assure the complete destruction of retrievable data on a storage device, it must be overwritten with a program that meets or exceeds recognized data-destruction standards such as the U.S. Department of Defense 5220.22-M (7 passes) or Peter Gutman’s 35-pass maximum-security method. These programs destroy existing data and partition information in such a way as to prevent data recovery or drive forensics analysis. Use this method when maintaining the storage device as a working device is important for repurposing (such as for donation or resale). A variety of commercial and freeware programs can be used for this task, which is variously known as disk scrubbing, disk wiping, or drive wiping.
External hard disks should also be handled in one of these ways when being disposed of. USB flash drives that contain sensitive information can be physically destroyed or can be bulk-erased to prevent information from being recovered. To protect information on optical media, shredding is recommended.
SOHO Network Security
Wireless networks have become important to businesses of all sizes as well as individual users. However, they also represent a significant potential vulnerability if they are not properly secured. The following sections help you understand how the different encryption methods work and the additional steps that must be taken to completely secure a wireless network.
For the 220-902 exam, be familiar with:
![]() Wireless specific security settings
Wireless specific security settings
![]() Change default usernames and passwords
Change default usernames and passwords
![]() Enable MAC filtering
Enable MAC filtering
![]() Assign static IP addresses
Assign static IP addresses
![]() Firewall settings
Firewall settings
![]() Port forwarding/mapping
Port forwarding/mapping
![]() Disabling ports
Disabling ports
![]() Content filtering/parental controls
Content filtering/parental controls
![]() Update firmware
Update firmware
![]() Physical security
Physical security
Wireless-Specific Security
The default settings for a wireless network should be changed to provide security. The following sections discuss these issues.
Changing Default SSID
The Service Set Identifier (SSID) can provide a great deal of useful information to a potential hacker of a wireless network. All wireless networks must have an SSID, and by default, WAPs and wireless routers typically use the manufacturer’s name or the device’s model number as the default SSID. If a default SSID is broadcast by a wireless network, a hacker can look up the documentation for a specific router or the most common models of a particular brand and determine the default IP address range, the default administrator username and password, and other information that would make it easy to attack the network.
To help “hide” the details of your network and location, a replacement SSID for a secure wireless network should not include any of the following:
![]() Your name
Your name
![]() Your company name
Your company name
![]() Your location
Your location
![]() Any other easily identifiable information
Any other easily identifiable information
An SSID that includes a sports team popular in the area or obscure information (such as the name of your first pet) would be a suitable replacement.
Setting Encryption
An encrypted wireless network relies on the exchange of a passphrase between the client and the wireless access point (WAP) or router before the client can connect to the network. There are three standards for encryption: WEP, WPA, and WPA2.
Wireless equivalent privacy (WEP) was the original encryption standard for wireless Ethernet (Wi-Fi) networks. It is the only encryption standard supported by most IEEE 802.11b-compliant hardware. Unfortunately, WEP encryption is not strong enough to resist attacks from a determined hacker. There are several reasons this is true, including key length (64-bit WEP uses a 10-character hex key, and 128-bit WEP uses a 26-character hex key) and the use of unencrypted transmissions for some parts of the handshaking process. Because WEP encryption is not secure, it should not be used to “secure” a wireless network.
As a replacement to WEP, Wi-Fi Protected Access (WPA) was developed a few years ago. It is available in two strengths: WPA (which uses TKIP encryption) and the newer, stronger WPA2 (which uses AES encryption). WPA and WPA2’s encryption is much stronger than WEP, supports a key length from 8 up to 63 alphanumeric characters (enabling the use of punctuation marks and other characters not permitted with WEP) or 64 hex characters, and supports the use of a RADIUS authentication server in corporate environments.
Note
In some environments, WPA and WPA2 are both referred to as WPA, so the encryption method selected during wireless security configuration determines whether WPA or WPA2 has been chosen.
Because all clients and WAPs or wireless routers on a wireless network must use the same encryption standard, use the strongest standard supported by all hardware.
Ideally, all wireless networks should be secured with WPA2 (WPA has been cracked, although cracking WPA is much harder than cracking WEP). However, the use of WPA2 encryption might require upgraded drivers for older network adapters and upgraded firmware for older WAPs or wireless routers. All currently manufactured Wi-Fi Certified adapters and WAPs or wireless routers must support WPA2.
There are various ways to create a strong passphrase for use with a WPA or WPA2 network. Some vendors of WAPs and wireless routers include a feature sold under various brand names that is compliant with the Wi-Fi Protected Setup standard (also known as Easy Config). If this cannot be used on some hardware, you can obtain a dynamically generated strong passphrase at Gibson Research Corporation’s Perfect Passwords website: https://www.grc.com/passwords.htm.
Copy and paste the passphrase provided into Notepad or another plain-text editor and then copy or paste it into the configuration dialog for a WAP, wireless router, and wireless client as needed.
Disabling SSID Broadcast
Disabling SSID broadcast is widely believed to be an effective way to prevent your wireless network from being detected and is so regarded by the A+ Certification exams.
Caution
Although disabling SSID broadcast prevents casual bandwidth snoopers from finding your wireless network, Microsoft does not recommend disabling SSID broadcasting as a security measure. According to a TechNet white paper, “Non-broadcast Wireless Networks with Microsoft Windows,” available at http://technet.microsoft.com, wireless client systems running Windows transmit (“advertise”) the names of non-broadcast (also known as hidden) wireless networks they are configured to connect to. This information can be used by wireless network hacking programs to help launch an attack against the network.
Figure 21-3 illustrates a Linksys router configuration dialog in which several of these security recommendations have been implemented.
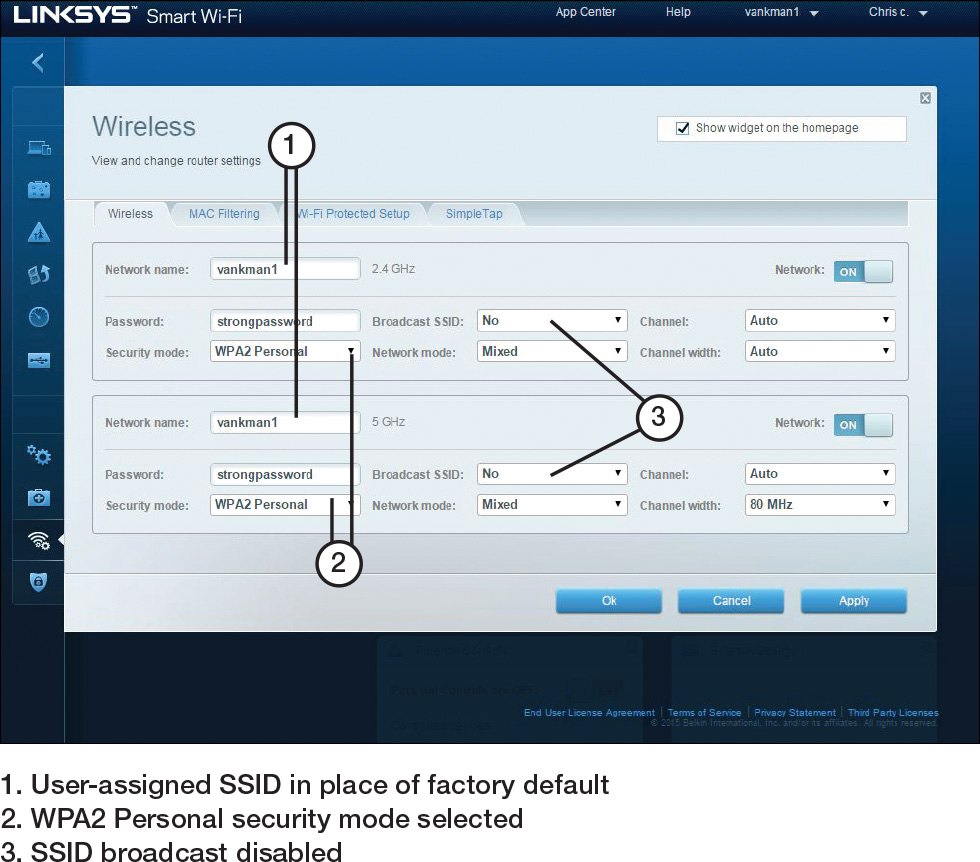
Figure 21-3 Configuring a router with alternative SSIDs, WPA2 encryption enabled, and SSID broadcast diabled.
Antenna and Access Point Placement
When configuring and/or troubleshooting wireless connections, think about WAP location. The placement of the access point plays a big part in a strong signal. Generally, it should be placed in the middle of an office to offer greatest coverage while reducing the chance of outsiders being able to connect to the device. The antennas on the access point should also be set at a 90-degree angle to each other. Keep the device away from any forms of electrical interference such as other wireless devices, speakers, and any devices that use a lot of electricity.
Radio Power Levels
Another thing to watch out for is radio power levels. Some wireless routers and access points have adjustable radio power levels. When set too low, clients at the perimeter of the building will not be able to gain access. When set too high, computers located in neighboring businesses will be able to attempt access.
If the wireless signal is too weak regardless of the router location and radio power levels, and the router is a 150Mbps Wireless-N or older technology (Wireless-G, Wireless-B, or Wireless-A), consider replacing it with a Wireless-AC (802.11ac) router.
Wi-Fi Protected Setup (WPS)
Wi-Fi Protected Setup (WPS) is an easy way to configure a secure wireless network with a SOHO router, provided that all devices on the network support WPS. There are several ways that WPS can be configured. The most common ways include:
![]() PIN—A PIN marked on the router is entered into each new device added to the network. This is the only mandatory WPS method and is the default method.
PIN—A PIN marked on the router is entered into each new device added to the network. This is the only mandatory WPS method and is the default method.
![]() Push button—The router or WAP has a push button, and each new device has a physical push button or (more often) a software push button in the setup program. Both buttons must be pushed within a short period of time to make the connection.
Push button—The router or WAP has a push button, and each new device has a physical push button or (more often) a software push button in the setup program. Both buttons must be pushed within a short period of time to make the connection.
A security flaw with the PIN method was discovered in late 2011, so the push-button method is recommended if WPS is to be used.
Change Default Usernames and Passwords
As mentioned previously, the documentation for almost all WAPs and wireless routers lists the default administrator password, and the documentation can be readily downloaded in PDF or HTML form from the vendors’ websites. Because an attacker could use this information to “take over” the device, it’s a good idea to change the default.
Most routers use the Administration or Management dialog for the password and other security settings.
Tip
To further secure the router or WAP, configure the device so it can be managed only with a wired Ethernet connection.
Enable MAC Filtering
Every network adapter—whether it’s built in to a PC, an add-on card, or built in to a specialized device such as a media adapter or a networked printer—has a unique identification known as the media access control address or MAC address. The MAC address (sometimes known as the physical address) is a list of six two-digit hexadecimal numbers (0–9, A–F). The MAC address is usually found on a label on the side of the network adapter. Depending on the device, the MAC address might be labeled MAC, MAC address, or ID No. Many devices that have integrated network adapters also list their MAC address on a label. Note that MAC addresses are sometimes listed as 12 digits rather than in six groups of 2 digits.
With most wireless routers and WAPs, you can specify the MAC addresses of devices on your network. Only these devices can access your network; some routers can also be configured to block a list of specified MAC addresses from accessing the network.
MAC filtering can be a useful way to block casual hackers from gaining access to a wireless (or wired) network. However, keep in mind that it is possible to use software to change the MAC address of a network device (a feature sometimes referred to as MAC address cloning), and that MAC addresses are not encrypted and can be detected by software used to hack networks. Thus, MAC address filtering alone should not be relied on to stop serious attacks.
Assign Static IP Addresses
The DHCP server built into a router hands out IP addresses to all computers they’re connected to. This is a convenience, but if you want to limit access to the Internet for certain computers or log activity for computers by IP address, this setting should be disabled and a static IP address should be assigned to each computer instead, using each client’s IP configuration dialog. Make sure you assign an IP address range supported by the router. For details, see “Dynamic versus Static IP Addresses,” p.444, Chapter 11.
Firewall Settings
By default, most WAPs and wireless routers use a feature called Network Address Translation (NAT) to act as a simple firewall. NAT prevents traffic from the Internet from determining the private IP addresses used by computers on the network. However, many WAPs and wireless routers offer additional firewall features that can be enabled, including
![]() Access logs
Access logs
![]() Filtering of specific types of traffic
Filtering of specific types of traffic
![]() Enhanced support for VPNs
Enhanced support for VPNs
See the router documentation for more information about advanced security features.
Port Forwarding/Mapping
Use port forwarding (also known as port mapping) to allow inbound traffic on a particular TCP or UDP port or range to go to a particular IP address rather than to all devices on a network. To learn more, see the “Port Forwarding, Port Triggering, and DNAT” section in Chapter 11.
Disabling Ports
Blocking TCP and UDP ports, also known as disabling ports, is performed with a firewall app such as the Windows Firewall with Advanced Security. For details, see “Configuration,” p.865, Chapter 16.
Content Filtering / Parental Controls
Microsoft provides optional content filtering parental controls in Microsoft Windows 7 with Windows Family Safety, available from http://windows.microsoft.com/en-us/windows/download-windows-essentials. Windows Family Safety is built into Windows 8/8.1/10. Family Safety monitors accounts’ web surfing, app usage, and social network usage. To learn more, see http://windows.microsoft.com/en-us/windows/set-up-family#set-up-family and select your versions of Windows.
Parental controls are built into recent versions of OS X. Enable this feature through the Parental Controls menu. To learn more, see https://support.apple.com/kb/PH18571?locale=en_US.
Although Linux distros do not include parental controls, many third-party apps are available. To learn more, see https://help.ubuntu.com/community/ParentalControls for details.
Some wireless routers made for SOHO use also include content filtering and parental controls.
Update Firmware
Most vendors issue at least one firmware update during the lifespan of each model of WAP and wireless router. Updates can solve operational problems and might add features that enhance Wi-Fi interoperability, security, and ease of use. To determine whether a WAP or wireless router has a firmware update available, follow these steps:
Step 1. View the device’s configuration dialogs to see the current firmware version.
Step 2. Visit the device vendor’s website to see whether a newer version of the firmware is available. Note that you must know the model number and revision of the device. To find this information, look on the rear or bottom of the device.
Step 3. Download the firmware update to a PC that can be connected to the device with an Ethernet cable.
Step 4. Connect the PC to the device with an Ethernet cable.
Step 5. Navigate to the device’s firmware update dialog.
Step 6. Follow instructions to update firmware.
Physical Security
In a SOHO network environment, physical security refers to preventing unauthorized use of the network. Copper-based cabling is susceptible to eavesdropping, wiretapping, crosstalk, EMI, and RFI. One way to defend against these is to use shielded twisted pair (STP) cable. Another is to use fiber-optic cable, which is the most resistant to all of these because it uses light instead of electricity to send data.
Also watch out for visible network wires and unused network jacks. Network cables should be routed in the walls and ceiling out of sight. If they are not visible, it cuts down on the chances of someone tapping into the network. RJ-45 jacks that currently don’t have a computer connected to them should be noted. In the wiring closet, disconnect those network drops at the patch panel by removing the patch cable that leads to the switch. This way, a person can’t just sit down, plug in to a network jack, and attempt to hack the network. On some switches you can also disable ports within the firmware.
Exam Preparation Tasks
Review All the Key Topics
Review the most important topics in the chapter, noted with the Key Topic icon in the outer margin of the page. Table 21-1 lists a reference of these key topics and the page numbers on which each is found.

Complete the Tables and Lists from Memory
Print a copy of Appendix B, “Memory Tables” (found on the companion website), or at least the section for this chapter, and complete the tables and lists from memory. Appendix C, “Answers to Memory Tables,” also on the companion website, includes completed tables and lists to check your work.
Define Key Terms
Define the following key terms from this chapter, and check your answers in the glossary.
violations of security best practices
trusted/untrusted software sources
failed login attempt restrictions
low level format
permission propagation
inheritance
remote backup
antivirus
anti-malware
content filtering
parental controls.
Complete Hands-On Labs
Complete the hands-on labs, and then see the answers and explanations at the end of the chapter.
Lab 21-1: Physical, Operating System, Email, and Password Security
![]() Run Belarc Advisor on a Windows computer to determine if it has all security updates installed.
Run Belarc Advisor on a Windows computer to determine if it has all security updates installed.
![]() Check your junk or spam e-mail folders for phishing messages. Note patterns such as misspelled words, poor grammar, lack of personalization, and unnecessary attachments.
Check your junk or spam e-mail folders for phishing messages. Note patterns such as misspelled words, poor grammar, lack of personalization, and unnecessary attachments.
![]() Look over the laptops, external hard disks, displays, and other equipment for security lock slots. How many of these items are actually locked? Create a sample budget for locking these items to prevent theft or loss.
Look over the laptops, external hard disks, displays, and other equipment for security lock slots. How many of these items are actually locked? Create a sample budget for locking these items to prevent theft or loss.
![]() Evaluate your own passwords. Do they qualify as strong? If not, visit a website such as the Norton Identity Safe Password Generator (https://identitysafe.norton.com/password-generator) to generate replacements.
Evaluate your own passwords. Do they qualify as strong? If not, visit a website such as the Norton Identity Safe Password Generator (https://identitysafe.norton.com/password-generator) to generate replacements.
Lab 21-2: Protecting Against Autorun, Wiping Disks, and Securing a SOHO Network
![]() Use one of the methods listed in this chapter to disable autorun/autoplay. Does disabling this feature cause any problems for you in your day-to-day work?
Use one of the methods listed in this chapter to disable autorun/autoplay. Does disabling this feature cause any problems for you in your day-to-day work?
![]() Use a disk-wiping program to wipe a hard disk that is no longer in use (make sure any useful data is backed up first!). If you don’t have a utility, you can choose one from the list at http://www.techrepublic.com/blog/five-apps/five-hard-disk-cleaning-and-erasing-tools/.
Use a disk-wiping program to wipe a hard disk that is no longer in use (make sure any useful data is backed up first!). If you don’t have a utility, you can choose one from the list at http://www.techrepublic.com/blog/five-apps/five-hard-disk-cleaning-and-erasing-tools/.
![]() Review the configuration for a SOHO router at your home or place of employment. Implement some of the changes advocated in this chapter. Be sure to record the new settings!
Review the configuration for a SOHO router at your home or place of employment. Implement some of the changes advocated in this chapter. Be sure to record the new settings!
Answer Review Questions
1. Match the type malware to its description.

Answer Options:
1. Spyware
2. Virus
3. Worm
4. Rootkit
5. Ransomware
2. Which of the following statements best describes phishing?
A. A hacker pretends to be a co-worker or IT professional to gain network access
B. A bogus website that tricks user into revealing personal or financial information.
C. An attempt to physically view information such as passwords or PINs.
D. A computer that has been taken over for the purpose of distributing malware.
3. A brute-force attack can be thwarted by implementing which security policy?
A. Account lockout at logon
B. Digital passwords
C. Physically locking doors to server room
D. Strong encryption
4. As an IT professional, you should be sure to employ best security practices. Which of the following is not a best practice?
A. Strong passwords for user accounts
B. Antivirus/malware protection
C. SSL for websites
D. WEP encryption
5. Which of the following is generally the most difficult form of security for an intruder to overcome?
A. Firewall
B. Encryption
C. Biometrics
D. Physical lock and key
6. Biometrics includes the use of which of the following? (Choose all that apply.)
A. Fingerprint scan
B. RFID
C. Retinal scan
D. Token
7. Which of the following is not a type of token?
A. Key fob
B. Cable lock
C. RFID card
D. Smart card
8. Which of the following is a program that either blocks or allows data packets to be delivered to network addresses?
A. DHCP server
B. Key fob
C. Firewall
D. Network server
9. Which of the following is a characteristic of a strong password? (Choose all that apply.)
A. No more than six characters
B. Lowercase only
D. Use of numbers
10. In OS X and Linux, which of the following are directory permissions that are available? (Choose three.)
A. Full control
B. Modify
C. Read
D. Read and Execute
E. Write
F. List folder contents
G. Execute
11. Which of the following is a private secure network that is used to communicate over an unsecured public network?
A. Proxy server
B. VPN
C. Firewall
D. ACL
12. When you copy a folder to a different volume, which of the following statements best describes what happens to the folder’s permissions?
A. The folder retains its original permissions.
B. The folder inherits permissions from the new location’s parent folder.
C. The user selects the permissions option during the file copy process.
D. The user must manually set up permissions after the file copy process.
13. Which of the following statements best describes how to view and change the attributes of a file? (Choose two.)
A. Right-click the file, select Properties, and then click the General tab.
B. Right-click the file and select Sharing.
C. Type attrib at the command line.
D. In Administrative Tools, open the Shares folder and select Attributes.
14. Which of the following statements best describes how to turn on or off file inheritance?
A. Right-click the file, select Properties, and then click the Security tab.
B. Right-click the file, select Properties, and then click the General tab.
C. Right-click the file and select Sharing.
D. In Administrative Tools, open the Shares folder.
15. The computer’s system files are not normally displayed. Which of the following statements best describes how to make them visible?
A. Open Administrative Tools and select Computer Management.
B. Right-click Computer or This PC and select Properties.
C. Open Device Manager and select Disk Drives.
D. Open Control Panel > Folder Options > View > Show hidden files, folders, and drives.
Answers and Explanations to Hands-On Labs
Lab 21-1: Physical, Operating System, Email, and Password Security
If Belarc Advisor detects missing security updates, run Windows Update to update your system. In some cases, you might need to install some updates manually.
In addition to the patterns mentioned in the lab as telltale signs of phishing e-mails, did you see any other clues? Share these with your supervisor.
How many cable locks would be needed to lock all lockable equipment in your office? Consider proposing a phased method for adding locks, starting with the most vulnerable equipment.
Lab 21-2: Protecting Against Autorun, Wiping Disks, and Securing a SOHO Network
If disabling autorun/autoplay doesn’t cause any problems, consider suggesting this as a standard configuration option.
How long did it take the utility to overwrite the drive? Were you able to find any data on the drive? Were you able to use the drive as new (repartition, reformat, etc.)? If you used more than one, consider recommending your favorite to be the standard repurposing program in your organization.
Answers and Explanations to Review Questions
1.

2. B. Phishing is a technique that involves tricking a user into revealing confidential information, such as a Social Security Number or credit card information. The technique might involve a bogus security alert in the form of an e-mail or a telephone warning that includes an offer of assistance. In social engineering, the hacker pretends to be a co-worker or IT professional in order to gain network access. Shoulder surfing is an attempt to physically view confidential information (such as passwords or PINs) by looking over a user’s shoulder. A zombie or botnet is a program that takes over a computer for the purpose of distributing malware, such as a denial of service attack.
3. A. A brute-force attack tries to guess the password by trying combinations of letters, numbers, and symbols until it comes upon the correct combination. This type of attack can be stopped by using an account-lockout policy to lock the computer after a specified number of incorrect attempts to log on.
4. D. WEP encryption is a weak type of encryption. Use WPA (better) or WPA2 (best) instead.
5. D. A physical lock and key might be the most difficult form of security to overcome because it cannot be bypassed electronically and cannot be done remotely. An intruder must be in possession of a physical key and he must be physically present at the site.
6. A, C. Fingerprint scan, retinal or iris scan, facial recognition, and voice recognition are all types of biometric security methods.
7. B. A cable lock is used to secure a laptop to an immovable object, such as a post. A token is any physical object used to gain access to a secure system. Key fobs, RFID cards, and smart cards are all types of tokens.
8. C. A firewall examines data packets being received by a network to determine whether they should be delivered to a network location or whether delivery should be blocked. Data packets can be allowed or blocked depending upon the threat level that is determined by the firewall programming.
9. C, D. A strong password should consist of eight or more characters, a combination of upper- and lowercase letters, symbols, and numbers. In addition, a strong password should not use real names or real words.
10. C, E, G. Read, Write and Execute are the directory permissions for both OS X and Linux. The Windows version of file and folder permissions on an NTFS drive includes Full Control, Modify, Read and Execute, List, Read, and Write.
11. B. The Internet is an insecure communication network. A Virtual Private Network (VPN) is a private network that provides a secure method for sending and receiving data across the Internet.
12. B. When you copy a folder to a different folder on either the same or a different volume, the folder inherits the permissions of the current location’s parent folder.
13. A, C. To change the attributes of a file, right-click the file and select Properties. File attributes can be changed on the General tab. Alternately, use the attrib command on the command line.
14. A. To turn the file inheritance on or off, right-click the file and select Properties. Go to the Security tab, click the Advanced button, and follow the procedures for the version of Windows in use.
15. D. Open Control Panel > Folder Options > View > Show hidden files, folders, and drives.