
Component
 Services Microsoft Management Console
The Component Services Microsoft Management Console
![]() provides you with a way to monitor and manage your components and their properties. Figure
provides you with a way to monitor and manage your components and their properties. Figure
![]() 15.1 shows where the different roles can be managed for each component. For the TradingApp
15.1 shows where the different roles can be managed for each component. For the TradingApp
![]() , we have defined two roles that the user will fall under.
, we have defined two roles that the user will fall under.
Figure 15.1. Component services roles for
TradingApp.
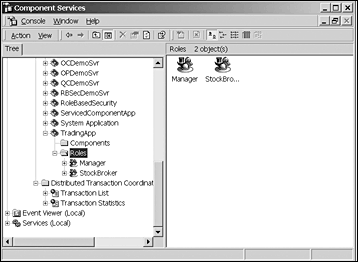
The roles are basically containers and are not useful unless you add specific
![]() users to those roles. In Figure 15.2, you can see that we have added Everyone to the
users to those roles. In Figure 15.2, you can see that we have added Everyone to the
![]() StockBroker role, but no one has been assigned to the Manager role.
StockBroker role, but no one has been assigned to the Manager role.
Figure 15.2. StockBroker role.

When setting up roles, make sure that the users within those roles are appropriate. For
![]() instance, Bob the stock broker might have an assistant who needs to get in the system and
instance, Bob the stock broker might have an assistant who needs to get in the system and
![]() enter data for him. But Bob does not want to give his password and login ID to his
enter data for him. But Bob does not want to give his password and login ID to his
![]() assistant because this would allow his assistant to place trades, which the assistant is
assistant because this would allow his assistant to place trades, which the assistant is
![]() not licensed to do.
not licensed to do.
One way to solve this problem is to create another role called
![]() Assistants. In this role, you could restrict the type of actions that assistants are
Assistants. In this role, you could restrict the type of actions that assistants are
![]() allowed to perform.
allowed to perform.
If you want to exercise more control over your component, you can
![]() change the way the component behaves by simply changing the settings in the Security tab
change the way the component behaves by simply changing the settings in the Security tab
![]() of the Properties dialog box (see Figure 15.3).
of the Properties dialog box (see Figure 15.3).
Figure 15.3. Application Properties Security tab.

If
![]() you want to force the components to run under a specific login, you can set the user
you want to force the components to run under a specific login, you can set the user
![]() identity in the Application Properties Identity tab, as shown in Figure 15.4.
identity in the Application Properties Identity tab, as shown in Figure 15.4.
Figure 15.4. Application
Properties Identity tab.

If you want the component to run under a specific login, you can
![]() enter that information here. If the screen is disabled and grayed out, as it appears here,
enter that information here. If the screen is disabled and grayed out, as it appears here,
![]() you will need to make sure that the activation type is set to Server Application; this can
you will need to make sure that the activation type is set to Server Application; this can
![]() be found under the Activation tab.
be found under the Activation tab.
If you are having problems making changes or deleting
![]() the component, check the Advanced tab in the Properties dialog box (see Figure 15.5). If
the component, check the Advanced tab in the Properties dialog box (see Figure 15.5). If
![]() the Disable Deletion box is checked, you will not be able to delete the component until
the Disable Deletion box is checked, you will not be able to delete the component until
![]() you uncheck it.
you uncheck it.
Figure 15.5. Advanced tab in the Properties dialog box.
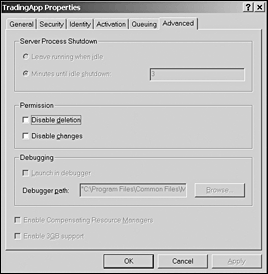
If you check the Disable Changes property and then try to add a new user to a role, you will be able to do so. The Disable Changes property applies only to the properties being altered.
If the SetEveryoneAccess property is set to true, the role Everyone is added as a member. The default is false, which means that no users are assigned to a role. Instead, you must configure them manually. This technique is best used for the role of Administrator, which has exclusive control over the system.