Open Source Examination Platform
Information in this Chapter
Preparing the Examination System
Before using many of the open source forensics tools explored in the chapters to come, you will need to ensure that your system is prepared to build said tools. As they are “open source,” the bulk of these tools are distributed primarily in source form, that is, you’ll need to generate the executable code yourself. In other cases, the tools will be scripts that require a specific interpreter to run. This chapter deals with the setup required to perform examinations with open source tools using Linux and Windows hosts.
For each platform we will go through the following steps.
Building Software
Because we are going to be working with open source software, we are going to need to be able to take that source code and convert it into usable form. At a high level this is known as building, and we will need to have one or more working build environments on the systems we are planning to use open source applications on. This chapter sets up a generic development environment that can be used to build open source applications written in the C and C++ languages and to build (or install) any libraries these applications require.
Installing Interpreters
Some of the open source applications we will be using are written in interpreted (or “scripting”) languages, such as Perl, Python, or Ruby. To run these programs we will need the appropriate interpreter, and usually we will need some means to install prerequisite modules that the applications rely upon.
Working with Image Files
A key part of forensic examination is working with image files—forensic copies of media. This is easier on some platforms, but is necessary on all—if we can’t open the container, we can’t get at the contents. An important part of setting up an examination system is ensuring that you can access work with image files directly. While the forensic tools worked with in later chapters can access image files directly, having multiple means to access them is an effective means of verifying the operation of our tools. Having this capability also serves as a hedge in case our forensic tools fail to process a given image file properly.
There are two general classes of image files we will be working with: raw images and forensic containers. Raw image files are exactly what they sound like—a pure bit-for-bit copy of source media. Forensic containers are special file formats designed with forensic use in mind. Generally these will contain equivalent data found in a raw image and will also contain checksum information or metadata about the container. In addition, forensic container formats may allow for compression and encryption.
Working with File Systems
Finally, there will be times when we as examiners will need to interact with the file systems contained in image files using native system functionality (but still in a forensically sound manner). For example, to examine an Ext4 file system we’ll need to use native system capabilities rather than a forensic utility simply because (at the time of writing) there are no open source forensic utilities that can interpret Ext4 file systems.
Using Linux as the Host
Using Linux as the base is the most common way to set up an open source forensics platform, and throughout the book will be our “supported” use case. In the examples we are using Ubuntu, but if you have a different distribution you prefer using already it’s entirely possible to do so. We will use the Ubuntu package manager apt to install software throughout the book; however, none of the software we are installing is Ubuntu-specific, and most of the packages we install should be available via the package manger in your distribution of choice.
Extracting Software
Linux source code is usually distributed in compressed archives known as tarballs. To extract these we will use the tar command along with a handful of flags.
To extract tarballs with tgz or tar.gz extensions (GZippped tarballs), use the command:
tar xzf {filename}
To extract tarballs with tbz, tbz2, tar.bz2, or tar.bz extensions (BZipped tarballs), use this command:
tar xjf {filename}
In either case you can add the -v option for verbose mode, which will display the name and path of extracted files to the console as the command progresses.
We’ll need to install a few pieces of software before we can begin building programs from source code. On Ubuntu, the “build-essential” meta-package will get us started. Build-essential is basically a grouping of packages essential for building software. To install this package we’ll used the apt-get command. The apt-get command is part of the “Advanced Packaging Tool,” the main method for installing precompiled software packages on Debian-derived Linux distributions (including Ubuntu). Because installing packages is a system administration function, on Linux systems we will need to act with super-user or root privileges in order to do so. We will use the sudo command to run apt-get with super-user privileges.
user@ubuntu:~$ sudo apt-get install build-essential
[sudo] password for user:
The following extra packages will be installed:
dpkg-dev fakeroot g++ g++-4.4 libstdc++6-4.4-dev patch xz-utils
Suggested packages:
debian-keyring debian-maintainers g++-multilib g++-4.4-multilib gcc-4.4-doc
libstdc++6-4.4-dbg libstdc++6-4.4-doc diffutils-doc
The following NEW packages will be installed:
build-essential dpkg-dev fakeroot g++ g++-4.4 libstdc++6-4.4-dev patch xz-utils
0 upgraded, 8 newly installed, 0 to remove and 0 not upgraded.
Need to get 7571kB of archives.
After this operation, 24.6MB of additional disk space will be used.
Do you want to continue [Y/n]? Y
While we now have the basics of our build environment installed, we will come back to the apt-get command to install development libraries required by many of the applications we will be installing later. Most open source applications will come with a README or INSTALL document that will contain information regarding what additional libraries. Be sure to reference this prior to attempting to build software.
For more information on installing software on Ubuntu, please see the Ubuntu Help Guide [1].
GNU Build System
The majority of the software we will be building uses the “GNU Autotools” system to prepare and execute a build [2]. Building software that uses this system generally consists of running three commands, in sequence:
Configure
If the application being built has any configurable options, the included configure script is the method we will use to set them. Generally the configure script will respond to the --help flag by displaying all the available configuration options. We can use the configure script from LibEWF library as an example. We will discuss the operation of this library in detail shortly—for now it’s enough to know that it is a prerequisite for the operation of our forensic platform. We have truncated the output that follows due to space considerations—most configure scripts will allow you to tune many options related to the building and subsequent installation of the software.
user@ubuntu:~/src/libewf-20100226$ ./configure --help
’configure’ configures libewf 20100226 to adapt to many kinds of systems.
Usage: ./configure [OPTION]... [VAR=VALUE]...
...
Optional Features:
...
--enable-wide-character-type
enable wide character type support (default is no)
--enable-static-executables
build the ewftools as static executables (default is
no)
--enable-low-level-functions
use libewf’s low level read and write functions in
the ewftools (default is no)
--enable-low-memory-usage
enable low memory usage (default is no)
--enable-verbose-output enable verbose output (default is no)
--enable-debug-output enable debug output (default is no)
--enable-python build python bindings (pyewf) (default is no)
--enable-v2-api enable experimental version 2 API (default is no)
...
Here we can see handful of libewf-specific configuration options that may be of interest to us. Referencing the included README file tells us that libewf relies on zlib (the deflate/zip compression library) and libcrypto (the OpenSSL library). Different distributions will have these libraries packaged under different names, but in general these can be located fairly easily by searching for the development name of the libraries at hand using the apt-cache search command or equivalent command for your distribution.
user@ubuntu:~$ apt-cache search openssl | grep dev
libssl-ocaml-dev - OCaml bindings for OpenSSL
libcurl4-openssl-dev - Development files and documentation for libcurl (OpenSSL)
libssl-dev - SSL development libraries, header files and documentation
user@ubuntu:~$ apt-cache search zlib | grep dev
lib32z1-dev - compression library - 32 bit development
libmng-dev - M-N-G library (Development headers)
libzlcore-dev - zlibrary core - development files
libzltext-dev - zlibrary text model/viewer - development files
zlib1g-dbg - compression library - development
zlib1g-dev - compression library - development
libcryptokit-ocaml-dev - cryptographic algorithm library for OCaml - development
libniftiio1-dev - IO libraries for the NIfTI-1 data format
libtrf-tcl-dev - Tcl data transformations - development files
libzzip-dev - library providing read access on ZIP-archives - development
From the results, we see that we need the “zlib1g-dev” and “libssl-dev” libraries, which can be installed using the following command:
user@ubuntu:~$ sudo apt-get install zlib1g-dev libssl-dev
...
Setting up libssl-dev (0.9.8k-7ubuntu8) ...
With our libraries installed, we are ready to execute the configure script. Upon execution, the configure script will check the build system to ensure that all the libraries required to build (and subsequently execute) the program are present, functional, and of the correct version.
user@ubuntu:~/src/libewf-20100226$ ./configure --enable-wide-character-type --enable-low-level-functions
checking for a BSD-compatible install... /usr/bin/install -c
checking whether build environment is sane... yes
...
config.status: executing libtool commands
configure:
Building:
libuna support: local
libbfio support: local
libcrypto EVP support: yes
libcrypto MD5 support: evp
libcrypto SHA1 support: evp
guid support: libuuid
Features:
Wide character type support: yes
ewftools are build as static executables: no
ewftools use low level read and write functions: yes
Python (pyewf) support: no
Verbose output: no
Debug output: no
Experimental version 2 API: no
Note that this particular configuration script provides the name of the library providing the included functionality: “guid support: libuuid.” If the README or INSTALL documentation is missing, incomplete, or simply incorrect, simply attempting to run the configure script is a trial-and-error method that may provide more information about what libraries you need to complete the build.
A successful execution of the configure script will generate a “makefile”—a build script read by the make command, which brings us to the next step in the build process.
Make
The make command reads through the “makefile” generated by the configure script, and proceeds to compile and link each of the executable files and libraries that make up the program at hand. This can take some time and will generate a lot of output while it is executing. A highly edited sample of what you can expect from a typical make execution appears here:
user@ubuntu:~/src/libewf-20100226$ make
Making all in include
make[1]: Entering directory ’/home/user/src/libewf-20100226/include’
...
make[1]: Entering directory ’/home/user/src/libewf-20100226/liberror’
/bin/bash ../libtool --tag=CC -- mode=compile gcc -DHAVE_CONFIG_H -I. -I../common -I../include -I../common- g -O2 -Wall -MT liberror_error.lo -MD -MP -MF .deps/liberror_error.Tpo -c -o liberror_error.lo liberror_error.c
libtool: compile: gcc -DHAVE_CONFIG_H -I. -I../common -I../include -I../common -g -O2 -Wall -MT liberror_error.lo -MD -MP -MF .deps/liberror_error.Tpo -c liberror_error.c -fPIC -DPIC -o .libs/liberror_error.o
...
make[1]: Leaving directory ’/home/user/src/libewf-20100226’
Once the “make” completes, the final step is to actually install the application. Executing
sudo make install
will copy the finished executables, libraries, documentation (if present), and any additional materials to their configured locations—generally under the “/usr/local/” directory.
Version Control Systems
In addition to packaged tarballs of source code, many open source projects are available via version control systems. These services enable tracking of code changes among a distributed group of participants. Version control systems offer many capabilities geared toward ensuring clean and easy collaboration on development; however, for our use, we will only be “checking out” code—retrieving a copy of the source code from the repository. The end result will be a directory tree of code similar to what we would have after extracting a tarball.
Sometimes, code that is still under active development may only be available via a source checkout from a version control system; in other cases, the development version of an application may have capabilities required to perform a successful examination. As always, validate that any tools you use perform the functions they are designed for in a verifiable, repeatable manner, but above all work on copies or extracted data rather than original data.
Popular open source version control systems include
We will discuss the operation of these tools to perform source code checkouts when we build tools that require this.
Installing Interpreters
In addition to compiling executable code, we will need to be able to execute programs written in interpreted languages. To do so, we will need to install the appropriate interpreters—Perl, Python, and Ruby. On most Linux distributions the Perl and Python interpreters (and a handful of modules) will be already be installed. We’ll want to install the Python 3 interpreter in addition to our currently installed version, and we’ll need to install the Ruby interpreter. We will also explore how to install various modules in each of the interpreters.
Perl
Perl is one of the older nonshell scripting languages still in common use. Its longevity is one of its core strengths—over many years of use Perl has built up an impressive number of open source libraries and modules available for reuse.
To check our installed version of perl we can issue the following command:
user@ubuntu:~$ perl -v
This is perl, v5.10.1 built for x86_64-linux-gnu-thread-multi
The core repository for Perl modules is known as CPAN (the Comprehensive Perl Archive Network). Packages in CPAN can be installed from the terminal using the -MCPAN option to perl. Upon executing this command for the first time your CPAN preferences will be set up—defaults are fine for our usage so hit enter when prompted to accept them.
user@ubuntu:~$ perl -MCPAN -e shell
...
cpan[1]> help
Display Information (ver 1.9402)
command argument description
cpan [n] quit
...
Python
Like Perl, Python will be present on most Linux distributions by default. We can check the python version we have installed with the -V flag:
user@ubuntu:~$ python -V
Python 2.6.5
In addition to the Python 2.6 interpreter we want a parallel installation of the Python 3 interpreter. Python 3 represents a major change from the 2.x series and as such is not directly backward compatible with existing programs written for Python 2.x. Because we will be using a few programs targeted for the newer Python, we will need both. We can install Python 3 directly using the following command:
user@ubuntu:~$ sudo apt-get install python3-minimal
[sudo] password for user:
Reading package lists... Done
Building dependency tree
Reading state information... Done
The following extra packages will be installed:
python3.1 python3.1-minimal
Suggested packages:
python3.1-doc python3.1-profiler
The following NEW packages will be installed:
python3-minimal python3.1 python3.1-minimal
0 upgraded, 3 newly installed, 0 to remove and 0 not upgraded.
Need to get 4,995kB of archives.
After this operation, 17.7MB of additional disk space will be used.
Do you want to continue [Y/n]?
Unlike Perl and Ruby, Python doesn’t have a “standard” package management system. Python modules are instead expected to be handled by the operating system’s package manager or installed by the user manually. As we use programs that need specific packages we will install using both methods. That said, Python does have a centralized packaged repository, and there are several unofficial package managers available that leverage this repository. The most widely used is easy_install, provided by the “python-setuptools” package. We can install this for Python 2.x and 3.x using the following command:
user@ubuntu:~$ sudo apt-get install python-setuptools python3-setuptools
Ruby
Ruby is the third scripting language we will need to ensure is installed. As a younger language, it is not present by default on our Ubuntu installation:
user@ubuntu:~$ ruby -v
The program ’ruby’ is currently not installed. You can install it by typing:
sudo apt-get install ruby
As just shown, we can install via apt-get. Once this is completed, we can verify the install and check the version with the -v option.
user@ubuntu:~$ ruby -v
ruby 1.8.7 (2010-01-10 patchlevel 249) [i486-linux]
Ruby packages are managed via RubyGems. This needs to be installed separately:
user@ubuntu:~$ sudo apt-get install rubygems
The package manager is invoked via the gem command:
user@ubuntu:~$ gem
RubyGems is a sophisticated package manager for Ruby. This is a
basic help message containing pointers to more information.
Usage:
gem -h/--help
gem -v/--version
gem command [arguments...] [options...]
Examples:
gem install rake
gem list --local
gem build package.gemspec
gem help install ...
We will use tools that require each of these interpreters more throughout the book. For now, ensuring that we have them installed, operational, and can install packages is sufficient.
Working with Images
Although we will be using forensic utilities that can interpret the file system on a raw image, it is in our interest to ensure that we can work with image files using native system functionality as well. This enables us to test our forensic tools for accuracy, provides us a much needed “safety net” in the event our tools don’t function properly, and, in some cases, may be the most useful way to access data of interest.
Any given Linux distribution should have the capability to work with raw image files natively. We will use the losetup command to create a “loop device” associated with our disk image. A loop device is a virtual device that allows a disk image to be treated as if it were an actual disk.
user@ubuntu:~$ losetup
Usage:
losetup loop_device # give info
losetup -a | --all # list all used
losetup -d | --detach loop_device # delete
losetup -f | --find # find unused
losetup [ options ] {-f|--find|loop_device} file # setup
Options:
-e | --encryption <type> enable data encryption with specified <name/num>
-h | --help this help
-o | --offset <num> start at offset <num> into file
-p | --pass-fd <num> read passphrase from file descriptor <num>
-r | --read-only setup read-only loop device
-s | --show print device name (with -f <file>)
-N | --nohashpass Do not hash the given password (Debian hashes)
-k | --keybits <num> specify number of bits in the hashed key given
to the cipher. Some ciphers support several key
sizes and might be more efficient with a smaller
key size. Key sizes < 128 are generally not
recommended
-v | --verbose verbose mode
To determine the appropriate offset we will use the mmls command from the Sleuth Kit to read the partition table from a sample image. We will examine this command and the rest of the Sleuth Kit at length in Chapter 3.
user@ubuntu:~$ mmls /mnt/forensic/testimg/testimg.img
DOS Partition Table
Offset Sector: 0
Units are in 512-byte sectors
Slot Start End Length Description
00: Meta 0000000000 0000000000 0000000001 Primary Table (#0)
01: ----- 0000000000 0000016064 0000016065 Unallocated
02: 00:00 0000016065 0312496379 0312480315 NTFS (0x07)
03: ----- 0312496380 0312499999 0000003620 Unallocated
We want to associate the loop device with the partition, not the disk, as this will allow us to mount the file system. To do this we provide losetup with an offset into the image file where we would like the loop device to begin. The output of mmls is measured in sectors, and losetup expects an offset in bytes, so multiplying 16065 by the default sector size of 512 gives us an offset of 8225280. We also want the device to be read-only (-r).
user@ubuntu:~$ sudo losetup -r -o 8225280 /dev/loop0 /mnt/forensic/testimg/testimg.img
We can test our math by checking for a valid file system at the beginning of the loop device. Using dd and the file command is one way to do this:
user@ubuntu:~$ sudo dd if=/dev/loop0 bs=512 count=1 | file -
1+0 records in
1+0 records out
512 bytes (512 B) copied, 0.0778169 s, 6.6 kB/s
/dev/stdin: x86 boot sector, code offset 0x52, OEM-ID "NTFS ", sectors/cluster 8, reserved sectors 0, Media descriptor 0xf8, heads 255, hidden sectors 16065, dos < 4.0 BootSector (0x80)
The file command confirms that we have a valid file system at the beginning of our loop device. Now we can create a directory to serve as a mount point and mount the loop device.
user@ubuntu:~$ sudo mkdir /mnt/testimg
user@ubuntu:~$ sudo mount -o ro /dev/loop0 /mnt/testimg/
user@ubuntu:~$ ls /mnt/testimg/
CONFIG.SYS IO.SYS MSOCache Program Files System Volume Information Windows ntldr python
AUTOEXEC.BAT Documents and Settings I386 MSDOS.SYS NTDETECT.COM RECYCLER boot.ini pagefile.sys
Unfortunately, this only lets us access volumes contained in raw disk images. To access volumes inside forensic containers we will need to use software that understands these containers. The two forensic container formats we will need to be able to work with are EWF and AFF. EWF (Expert Witness Format) is the native format generated by Guidance Software’s EnCase software. AFF is the Advanced Forensics Format and is an open source forensic container format that provides many benefits over traditional “raw” images. These containers are discussed in more detail in Chapter 3—for now, being able to mount volumes inside the containers is all we’re after.
FUSE
FUSE is a Linux kernel module that allows for “File Systems In User Space.” In addition to interpreting file systems, various FUSE modules will also interpret volumes or containers and allow for access to their contents. There are many FUSE modules implementing everything from cloud-based file systems to encrypted local file systems to Wikipedia as a file system. We can install a few FUSE modules (and prerequisites for additional FUSE modules) using the following command:
user@ubuntu:~$ sudo apt-get install zfs-fuse python-fuse fuse-zip sshfs
The following extra packages will be installed:
libaio1 libewf1 libzip1
The following NEW packages will be installed:
fuse-zip ifuse libaio1 libzip1 python-fuse sshfs zfs-fuse
0 upgraded, 7 newly installed, 0 to remove and 0 not upgraded.
Need to get 1,917kB of archives.
After this operation, 5,759kB of additional disk space will be used.
Do you want to continue [Y/n]?
This will install:
MountEWF
MountEWF is a program that presents an Expert Witness Format forensic image as a raw image. It does this by leveraging the FUSE system via Python. It is not included with libewf directly but can be retrieved from the LibEWF project site [3]. Like a disk, the forensic container can hold multiple mountable file systems, so simply “mounting” the container is not desirable or even feasible. Instead, MountEWF provides a view of raw streams contained in the EWF container at the provided mount point. The raw streams can then be accessed directly using the losetup technique discussed previously.
MountEWF is a python script so it does not need to be compiled before running. We can copy it into our path to allow for easier execution:
user@ubuntu:~/src/afflib-3.5.12$ sudo cp /home/user/src/mount_ewf-20090113.py /usr/local/bin/mount_ewf.py
Executing the command with no arguments will provide usage instructions:
user@ubuntu:~/src/afflib-3.5.12$ mount_ewf.py
Using libewf-20100226. Tested with libewf-20080501.
Usage:
mount_ewf.py [options] <filename(s)> <mountpoint>
Note: This utility allows EWF files to be mounted as a filesystem containing a flat disk image. <filename> can be any segment of the EWF file. To be identified, all files need to be in the same directory, have the same root file name, and have the same first character of file extension. Alternatively, multiple filenames can be specified in different locations in the order to be reassembled.
ewf segment filename(s) required.
To test mount_ewf without creating an Expert Witness formatted image, we can use the image provided by Lance Mueller for his first forensic practical [4].
user@ubuntu:~/images$ mount_ewf.py WinXP2.E01 ~/mount_points/ewf/
Using libewf-20100226. Tested with libewf-20080501.
user@ubuntu:~/images$ ls -lath /home/user/mount_points/ewf/
total 2.0G
drwxr-xr-x 5 user user 4.0K 2010-08-20 23:52 ..
dr-xr-xr-x 2 root root 0 1969-12-31 16:00 .
-r--r--r-- 1 root root 2.0G 1969-12-31 16:00 WinXP2
-r--r--r-- 1 root root 293 1969-12-31 16:00 WinXP2.txt
The text file listed is the case metadata. The other file is the raw image.
user@ubuntu:~/images$ cat /home/user/mount_points/ewf/WinXP2.txt
# Description: WinXP
# Case number: Case 1
# Examiner name: Mueller
# Evidence number: WinXP
# Acquiry date: 2008-01-17T17:05:46
# System date: 2008-01-17T17:05:46
# Operating system used: Vista
# Software version used: 6.8
ce2211114a461a96bb2c4409b272dbee */home/user/mount_points/ewf/WinXP2
The last line of the text file is the MD5 hash of the content. We can verify this using the md5sum command.
user@ubuntu:~/images$ md5sum /home/user/mount_points/ewf/WinXP2
ce2211114a461a96bb2c4409b272dbee /home/user/mount_points/ewf/WinXP2
We can verify access to the raw content using the file command:
user@ubuntu:~/images$ file /home/user/mount_points/ewf/WinXP2
/home/user/mount_points/ewf/WinXP2: x86 boot sector, code offset 0x52, OEM-ID "NTFS ", sectors/cluster 4, reserved sectors 0, Media descriptor 0xf8, heads 128, hidden sectors 63, dos < 4.0 BootSector (0x80)
AFFuse
AFFuse is a FUSE-based program that gives the examiner access to Advanced Forensic Format containers. From an examiner’s perspective, AFFuse operates in much the same manner as MountEWF—the forensic container is “mounted” to a directory provided by the examiner. This directory will have a file for each stream inside the AFF container, which can then be accessed as “raw” images via losetup.
AFFuse is part of the AFF library, available at www.afflib.org.
AFFuse requires the FUSE development library, and AFF itself requires the expat library for signature verification. On Ubuntu we can install these with the following command:
sudo apt-get install libfuse-dev libexpat1-dev
A simple “./configure” should eventually yield the following result:
configure: *****************************************
configure: AFFLIB 3.5.12 configuration
configure: Amazon S3 Support: no
configure: LZMA Compression: yes
configure: LIBEWF: yes (requires uuid-dev on Linux)
configure: PYTHON Bindings: no
configure: QEMU Image Drivers: yes
configure: FUSE: yes
configure: LIBEXPAT: yes (needed for AFF signatures)
configure:
configure: CFLAGS: -g -O2 -D_FORTIFY_SOURCE=2 -Wall
configure: CPPFLAGS: -D_FILE_OFFSET_BITS=64 -DFUSE_USE_VERSION=26 -I/usr/local/include
configure: CXXFLAGS: -g -O2 -D_FORTIFY_SOURCE=2 -Wall
configure: LIBS: -lssl -lcrypto -lexpat -lrt -lz -lewf
configure: LDFLAGS: -L/usr/local/lib
We can complete the install with make and finally sudo make install.
Once again, executing the command with no options gives us usage instructions. In this case, the usage instructions are quite verbose as AFFuse is also displaying options that can be passed to the FUSE library and are not AFF specific. We won’t be using any of these at the moment so trimming them gives us the following usage:
user@ubuntu:~/src/afflib-3.5.12$ affuse
affuse version 3.5.12
Usage: affuse [<FUSE library options>] af_image mount_point
...
Use fusermount -u mount_point, to unmount
We can test out AFFuse using an image from Digital Corpora (http://www.digitalcorpora.com). Ubnist1.casper-rw.gen3.aff is an AFF image taken from a Ubuntu 8.10 thumbdrive. We can mount the AFF container with the following affuse command:
user@ubuntu:~/images$ mkdir ~/mount_points/
user@ubuntu:~/images$ mkdir ~/mount_points/aff/
user@ubuntu:~/images$ affuse ubnist1.casper-rw.gen3.aff ~/mount_points/aff/
user@ubuntu:~/images$ ls -lath /home/user/mount_points/aff/
total 4.0K
drwxr-xr-x 4 user user 4.0K 2010-08-20 23:47 ..
drwxr-xr-x 2 root root 0 1969-12-31 16:00 .
-r--r--r-- 1 root root 600M 1969-12-31 16:00 ubnist1.casper-rw.gen3.aff.raw
Listing the contents of the mount point displays a single raw image inside. We can use the file command to confirm that we have access to the raw content.
user@ubuntu:~/images$ file ~/mount_points/aff/ubnist1.casper-rw.gen3.aff.raw
/home/user/mount_points/aff/ubnist1.casper-rw.gen3.aff.raw: Linux rev 1.0 ext3 filesystem data, UUID=8717883b-0b7b-4149-8b76-d97117813599 (needs journal recovery) (large files)
XMount
XMount is similar to both MountEWF and AFFuse in that it provides the examiner “raw” access to container files. Where it differs is that rather than simply presenting a raw “dd” style image, XMount can also present the contents of the container as a VirtualBox or VMWare format disk image. It converts on the fly via FUSE and is tremendously useful for a Linux-based examiner who wishes to boot a virtual instance of an imaged system. XMount will redirect any writes to a cache file in a directory specified by the examiner. XMount is available from https://www.pinguin.lu/index.php. To install XMount, execute the basic “./configure; make; sudo make install” sequence described previously.
user@ubuntu:~$ uname -a
Linux ubuntu 2.6.32-21-generic #32-Ubuntu SMP Fri Apr 16 08:10:02 UTC 2010 i686 GNU/Linux
Next, we can change directories to “/lib/modules/2.6.32-21-generic/kernel/fs”—this is the subdirectory where file system kernel modules for our running kernel are located.
user@ubuntu:/lib/modules/2.6.32-21-generic/kernel/fs$ ls
9p affs autofs befs binfmt_aout.ko btrfs cifs configfs dlm exofs fat fscache gfs2 hfsplus isofs jfs minix nfs nfsd nls ocfs2 qnx4 reiserfs smbfs sysv udf xfs
adfs afs autofs4 bfs binfmt_misc.ko cachefiles coda cramfs efs exportfs freevxfs fuse hfs hpfs jffs2 lockd ncpfs nfs_common nilfs2 ntfs omfs quota romfs squashfs ubifs ufs
Another way to check file system support in our current kernel is to browse through the kernel’s configuration (“/boot/config-2.6.32-21-generic”, for example) until we see the section entitled “File systems.”
#
# File systems
#
CONFIG_EXT2_FS=y
CONFIG_EXT2_FS_XATTR=y
CONFIG_EXT2_FS_POSIX_ACL=y
CONFIG_EXT2_FS_SECURITY=y
# CONFIG_EXT2_FS_XIP is not set
CONFIG_EXT3_FS=y
CONFIG_EXT3_DEFAULTS_TO_ORDERED=y
CONFIG_EXT3_FS_XATTR=y
CONFIG_EXT3_FS_POSIX_ACL=y
CONFIG_EXT3_FS_SECURITY=y
CONFIG_EXT4_FS=y
CONFIG_EXT4_FS_XATTR=y
CONFIG_EXT4_FS_POSIX_ACL=y
CONFIG_EXT4_FS_SECURITY=y
# CONFIG_EXT4_DEBUG is not set
CONFIG_JBD=y
# CONFIG_JBD_DEBUG is not set
CONFIG_JBD2=y
# CONFIG_JBD2_DEBUG is not set
CONFIG_FS_MBCACHE=y
CONFIG_REISERFS_FS=m
...
Using Windows as the Host
Setting up a working build environment on a Windows system is a bit more complex than on Linux or OS X. Many of the items we take for granted on a Linux system aren’t present on a default Windows system. An out-of-the-box Windows system doesn’t have a compiler or any of the interpreters we will need. It doesn’t have native capability to mount or examine image files and only supports a handful of file systems. Luckily, we can set up a reasonable development environment suitable for building open source forensics tools without too much trouble. That said, we can turn a Windows host into a capable open source forensics platform; better, stronger, faster. We have the technology.
Building Software
There are a couple different methods for building software on Windows, and they each have advantages and disadvantages regarding different use cases. For our purposes the best approach is going to be implementation of a Unix-like environment on our Windows system via Cygwin. Per www.cygwin.com, “Cygwin is a Linux-like environment for Windows.” Cygwin provides this environment through cygwin1.dll, a Linux-emulation layer between Linux tools and the Windows operating system. Through Cygwin we can compile and use Linux-targeted source code on our Windows examination workstation. Using a Cygwin environment ensures that we have the highest available compatibility with the bulk of open source forensics utilities, as these are usually written and tested on Unix-like systems.
To install Cygwin, download and execute the installer (setup.exe).
Using the Cygwin installer, we will install the following packages, which can be located using the search box at the top of the package installer window, seen in Figure 2.1.

Figure 2.1 Cygwin setup.
This will give us a working Unix-like development environment. We should be able to use the majority of the utilities discussed in later chapters, barring any utilities that require native Linux functionality to work—for example, any FUSE-based utilities will not function under Cygwin.
Installing Interpreters
We already installed the perl, python, and ruby interpreters via the Cygwin installer. We can verify the versions of each of the interpreters installed by opening up the mintty terminal emulator from the Start Menu and passing the appropriate “version” flag to each interpreter (see Figure 2.2). These installations will serve us well when working in Cygwin environment but we will need “native” interpreters for some of the code we will be running later.

Figure 2.2 Verifying the Cygwin installs of Perl, Python, and Ruby.
Perl—ActiveState
ActiveState’s Perl distribution [5] is the de facto Windows Perl in use today. It provides the Perl interpreter in an easy-to-use and easy-to-manage installer and includes a graphical package manger (shown in Figure 2.3) to handle modules. Installation is the straightforward “Click next/Accept defaults” until the installer exits.

Figure 2.3 The Perl Package Manager installed with ActiveState Perl.
Python
Installing Python on Windows isn’t quite as obvious of a proposition as installing Perl. While ActiveState provides its own Windows Python distribution, there are also “native” Windows installers that provide functional basic Python installations. At the time of this writing the consensus seems to be that if you are going to be doing Windows-specific python development, the ActiveState installer provides some nice benefits. That said, the official Windows installer (shown in Figure 2.4) will be sufficient to run any of the python scripts covered in this book. You can choose to install either or both, as you can have multiple installations in different directories.

Figure 2.4 The Windows native installer for Python 2.6.5.
At the time of this writing, Python 2.x and Python 3.x are both in active parallel development and use. Python 3 is not directly backward compatible with Python 2—Python 2 scripts need to be rewritten for 3. Given this, there is a lot of existing Python 2 code, so we will definitely need at least a Python 2 installation. There is also a growing set of Python 3 code, so it is in our best interest to have a parallel Python 3 environment installed as well. Given this, the current newest versions at the time of writing of Python are 2.6.5 and 3.1.2.
Ruby
Getting Ruby on Windows is trivial using the installer from www.rubyinstaller.org. During installation, ensure that both checkboxes shown in Figure 2.5 are checked—this will let you run command-line ruby scripts without specifying the path of the interpreter and will ensure that ruby programs launched from Explorer are associated with this ruby installation.

Figure 2.5 Ruby installer configuration options.
Working with Images
Windows doesn’t have any native equivalent to the losetup command we used to access image files as disks. Fortunately, Olof Lagerkvist has written the open source ImDisk, which brings much of the same functionality to the Windows world. After downloading and running the ImDisk installer(http://www.ltr-data.se/opencode.html/#ImDisk), we need to manually start the ImDisk service the first time and configure it to automatically start in the future. To do so, we’ll need to start a command prompt with administrator access (see Figure 2.6).

Figure 2.6 Starting an administrator shell—Windows 7.
Entering these lines shown in Figure 2.7 in the administrator shell will set the ImDisk service to start automatically in the future and will start it now manually.

Figure 2.7 Starting ImDisk service manually.
The ImDisk service is located in the Control Panel, as shown in Figure 2.8. Upon launching the application and selecting “Mount New,” you should be greeted with a screen similar to Figure 2.9.

Figure 2.8 Locating the IMDisk entry in the Control Panel.

Figure 2.9 Mounting an NTFS volume image.
There are many options to experiment with here, but for our purposes the most important are the path to the image file and the “Read-only media” checkbox. Checking this will ensure that we don’t make any inadvertent writes to our image file. Figure 2.10 shows the ImDisk service after successfully mounting a test NTFS image from the Digital Forensic Tool Testing collection. http://dftt.sourceforge.net/.

Figure 2.10 ImDisk displaying the mounted image.
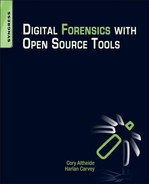
Figures 2.11 and 2.12 show that the image file now appears exactly like a normal volume.

Figure 2.11 ImDisk mounted volume as shown in Explorer.
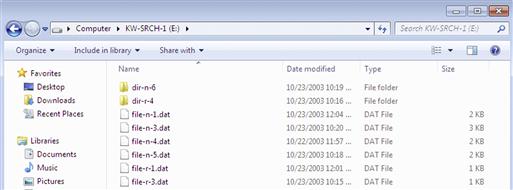
Figure 2.12 Browsing the contents of an ImDisk mounted volume.
Working with File Systems
While Windows doesn’t have the breadth of file system support our Ubuntu examination system has by default, there are some open source programs that allow Windows to access some commonly encountered non-Windows file systems. It’s important to note that in both cases, the forensic software we will be using is capable of interpreting both of these file systems directly.
Ext2Fsd is an open source Ext2 file system driver for Windows systems available from http://www.ext2fsd.com/. Using this we can examine Ext 2 (and Extended 3, minus the journal) file systems directly. Note that during installation we have the option to enable write support on Ext2/3 volumes as well—this is not recommended but depending on your use case this may be necessary (see Figure 2.13). When completing the installation, you will have the option to assign drive letters to any connected Ext2 and 3 volumes—deselect this (Figure 2.14).

Figure 2.13 Deselecting all options during Ext2Fsd configuration.
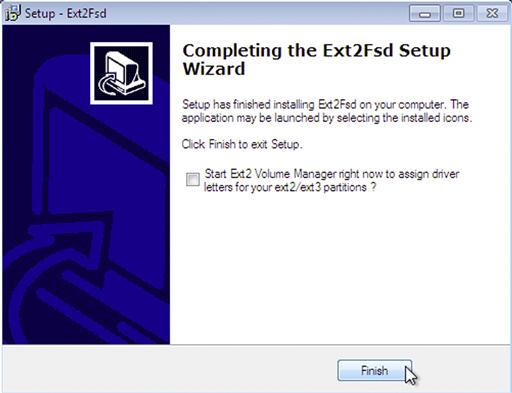
Figure 2.14 Finishing Ext2Fsd installation.
HFS Explorer (available from http://www.catacombae.org/hfsx.html) is an application that can read the HFS and HFS+ file systems used on Mac OS X disks (including some CDs/DVDs and the DMG container files used frequently on Macs). On installation, it will associate itself with DMG containers by default (Figure 2.15). This is generally a safe option, as we have no other means of accessing these files.

Figure 2.15 HFS Explorer installation.
Figure 2.16 shows HFS Explorer being used to examine a DMG container. Individual files can be extracted out for examination using the “Extract” button. The “Info” button will display detailed information about the currently highlighted file or directory, including time stamps and ownership information. Under the “Tools” menu, the “File System Info” option provides a plethora of detailed information about the file system.
Figure 2.16 Navigating a DMG file with HFSExplorer.
Summary
While using open source forensic tools has certain advantages, preparing the platform to build and execute these tools can be daunting to a newcomer. In this chapter we have gone through the process of building a development workstation that we will use to compile and run tools going forward. Additionally, we discussed the installation of various utilities that allow examiners utilizing Windows systems to use many of the tools and scripts we will be working with throughout the book.
References
1. InstallingSoftware—Community Ubuntu Documentation. https://help.ubuntu.com/community/InstallingSoftware, (accessed 24.08.10).
2. GNU Build System—automake. http://www.gnu.org/software/hello/manual/automake/GNU-Build-System.html, (accessed 24.08.10).
3. libewf—Browse /mount_ewf at SourceForge.net. http://sourceforge.net/projects/libewf/files/mount_ewf/, (accessed 24.08.10).
4. Computer Forensics, Malware Analysis & Digital Investigations: Forensic Practical. http://www.forensickb.com/2008/01/forensic-practical.html, (accessed 24.08.10).
5. ActivePerl Downloads—Perl Binaries for Windows, Linux and Mac|ActiveState. http://www.activestate.com/activeperl/downloads, (accessed 24.08.10).