

We do not photograph many captive animals, but we enjoy photographing the gray wolves at the Grizzly and Wolf Discovery Center (www.grizzlydiscoveryctr.com) in West Yellowstone. We especially like photographing them during winter because their fur coats are immaculate and the snow “cleans up” their enclosure and makes the image appear wilder. Nikon D4, Nikon 200–400mm f/4 lens at 400mm, ISO 640, f/7.1, 1/500 second, Cloudy WB, manual exposure and AF-C autofocus on the back-button.
Cameras and Accessories
CAMERA SYSTEM CHOICES
All of the popular camera companies—Nikon, Canon, Sony, Olympus, Pentax, and Sigma—make excellent products. You can’t go wrong with any of these brands. However, Nikon and Canon produce two of the largest product lines. They offer various camera models, lens choices, and other accessories. Though having just the right equipment is important to achieving your photo goals, all of those options can bewilder a beginner. Let me shed some light on the available choices.
Barbara shoots all Nikon cameras and lenses and has done so throughout her entire career. I began with Canon in 1971, switched to Nikon ten years later, and then switched back to Canon in the late 1980s to use their newly introduced tilt/shift lenses. Today, I mostly shoot Canon equipment, but I did sometimes borrow Barbara’s fantastic Nikon 200–400mm lens when I photographed wildlife! In the spring of 2014, I bought Canon’s 200–400mm lens, so I no longer need to borrow hers. Barbara sometimes borrows my Canon camera to use Canon’s tilt/shift lenses or the fabulous Canon 65mm macro for high magnification focus stacking work. We shoot both Canon and Nikon because we genuinely like both. Knowing both systems thoroughly helps us tremendously in teaching field workshops because 90 percent of our workshop clients are shooting either Canon or Nikon.
Most likely you already have a camera and perhaps a few lenses. It makes sense to stay with your chosen system because it is expensive to switch. However, if you are deciding on a system, we suggest you look at the Canon and Nikon systems closely for four reasons:
1. Nikon and Canon offer a wide variety of cameras, lenses, and flash options.
2. Plenty of instructional materials—e-books, third-party books on the system, books on individual cameras, and websites devoted to these systems—are available.
3. Most photo instructors shoot one of these two systems. If you are shooting the same camera system as your photo instructor, they should be able to help you more.
4. If you are on a photo trip—Antarctica, for example—and your lens or camera malfunctions, the chances are much greater you can borrow what you need from another passenger if you are shooting a system that many of the other passengers are shooting.

The lesser flamingo is filtering the water for blue and green algae at Kenya’s Lake Nakuru. The flamingo is simple to photograph well if your technique is flawless. Compose the flamingo feeding on the left side to give it space to walk into the image. Be sure to include the reflection of the bird to add interest. Focus by selecting a single AF point that corresponds to the head of the bird. Set the autofocus to continuous focus to keep the bird in focus, select a fast shutter speed, and shoot many images. Having a large buffer in the camera allows you to keep shooting as the bird walks by in front of you. Nikon D200, Nikon 200–400mm f/4 lens, ISO 200, f/8, 1/500 second, Sun WB, shutter-priority at +.7 EC and AF-C autofocus on the back-button control.
KEY CAMERA FEATURES
HIGH MEGAPIXEL COUNT
The cameras sold today offer plenty of megapixels. If your camera can capture 12MP RAW files or larger, then you have enough. Having more megapixels means you can make large prints that are sharp or crop the image more while retaining satisfactory resolution.
FAST SHOOTING SPEED
Being able to shoot six or more images per second is crucial for action photography. If you tend to shoot still subjects—portraits, landscapes, still-life—then shooting speed is far less critical.
LARGE BUFFER
Most cameras can shoot images faster than they can be written to the storage media such as a Compact Flash (CF) card. Therefore, the camera has a built-in buffer where the image data are temporarily stored while waiting to be written to the card. When the buffer is full, the camera stops shooting until enough data are written to the storage media and removed from the buffer.
Photographers who tend to shoot many images quickly benefit from having a large buffer.
ADJUSTABLE SELF-TIMER
Most cameras offer an adjustable self-timer. Pressing the shutter button with the self-timer invoked gives you time to get in the picture before the camera shoots the image.
You can use the self-timer to fire the camera without touching it, which effectively produces sharper images. Gently press the shutter button with your finger. This causes the camera to shake a little, but it dissipates in a second or two. Then the camera shoots the image when the camera is perfectly still. The typical self-timer runs down in about 10 seconds. That time interval is fine if you want to be in the picture, but far too long for merely firing the camera.
Being able to set a 2-second self-timer interval is more convenient.
CABLE OR WIRELESS REMOTE RELEASE
To shoot sharper images when the camera is mounted on a tripod, fire the camera without touching it by using a cable release that attaches to the camera or a wireless release. Make sure your camera offers these options—most do.
RGB HISTOGRAM
The histogram display provides a way to more accurately determine the optimum exposure, especially when a single color in the subject dominates or the light is highly biased to a single colorcast, such as the red light at sunset or the blue light in the shade. Of course, the worst situation is a dominant color that is illuminated with light of that color. A red fox bathed in the red light of sunset is an example in which the reds are likely to be overexposed with the averaging histogram. The red channel of the RGB histogram immediately shows there is a problem with the red light that is easy to overcome by reducing the exposure.
BACK-BUTTON FOCUSING
Your camera has this feature if there is a designated AF-On button on the rear of your camera near the right side of the viewfinder. Even if you don’t have this button, most cameras offer a way to take autofocus off the shutter button and move it to a button on the rear of the camera.
Having a camera that can do this is absolutely essential as back-button focusing is an enormously precise and efficient way to hit sharp focus with autofocus!
MIRROR LOCK-UP
This mechanism allows you to lock the mirror in the upright position before shooting the image.
This produces sharper images when shooting on a tripod, especially in the shutter speed range of 1/4 to 1/30 of a second. Without mirror lock-up the camera moves slightly when you shoot because the mirror has to move out of the way to allow the light to strike the sensor.

Dew-laden dragonflies are plentiful on cool mornings in northern Michigan meadows. They roost on top of flowers and grasses and become soaked with dew by dawn. Your shooting technique is crucial for making the finest possible image. Tripping the shutter with your finger jars the camera and creates camera-shake. Instead, trip the shutter with a cable release or a wireless remote release to eliminate the image-softening effects of vibration. Canon 1D Mark III, Canon 180mm f/3.5 macro lens, ISO 200, f/8, 1/6 second, Daylight WB, manual metering and focus.
LIVE VIEW
With live view activated, you can see the image that will be captured on the LCD display before firing the camera. On many cameras, a live histogram is offered. Using a magnified live view focus is the best way to achieve critical sharp focus on all close-up and macro images.
BUILT-IN WIRELESS FLASH CONTROL
Most Nikons, some Canons, and many other camera brands that have a built-in pop-up flash on top of the camera allow the pop-up flash to be the Commander or Master controller. This means the pop-up flash can control another dedicated flash that is not attached to the camera.
This feature provides enormously useful wireless flash control.

Cannon Beach is a spectacular place to photograph sunset in northwestern Oregon. Sea stacks are amazing when silhouetted against the amber sky. After making this image of 235-foot Haystack Rock, I noticed the moon hovering in the sky. The moon was too high to compose into the scene in a single shot, but no worries. I set my camera to multiple exposure and used a 105mm focal length and the Mooney 11 rule to add the moon to the scene. I kept the moon small for a more natural size. Canon 5D Mark III, Canon 24–105mm f/4 lens at 105mm, ISO 400, f/10, 1/50 second, 10,000K WB, manual exposure and continuous autofocus on the back-button control, the second exposure for the moon is 1/800 at f/8.
MULTIPLE EXPOSURE CAPABILITY
This feature allows the photographer to shoot two or more images that are assembled into a single image directly in the camera. Until recently, few cameras offered it (Canon has been a laggard in this regard), but it is now becoming more widely available. Multiple exposures are generally used for creative effects by adding an element such as a flower or the moon to an image. It is incredibly useful for lighting up more than one object with flash or extending the reach of a flash by allowing it to be fired at full power multiple times.
SENSOR SIZE
Your camera has an imaging sensor that is made up of filtered photosites that measure photons of light. The size of the sensor is either full frame or some predetermined smaller ratio size. A full-frame sensor is 36 x 24mm in size. If the sensor is smaller than full-size, then it is said to have a crop factor or magnification factor. For example, a Canon 7D has a sensor size of 22.3 x 14.9mm. Relative to a full-frame sensor, it has a crop factor of 1.6x. I prefer not to call it a magnification factor because nothing is really being magnified. The small-sensor camera is merely cropping the image one gets with the full-frame sensor.
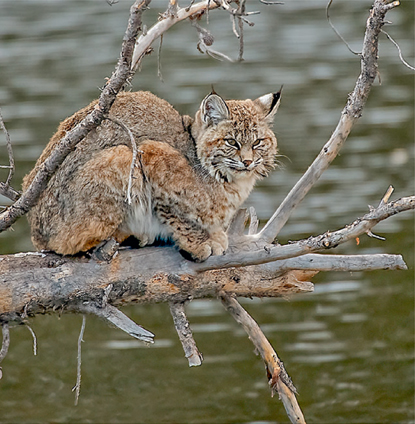
Bobcats relish duck dinners and this cat is quietly waiting for a hapless mallard to float within striking range on the Madison River in Yellowstone National Park. The cloudy late evening light forced the use of ISO 1600. We favor cameras with full-frame sensors because the sensor tends to be less noisy at high ISOs because the photosites are larger. Nikon D4, Nikon 200–400mm lens with 1.4x teleconverter at 560mm, ISO 1600, f/5.6, 1/500 second, Shade WB, manual exposure and AF-C on the back-button.
FULL-FRAME SENSOR ADVANTAGES
• More megapixels.
• Produce images with less noise.
• Wide field of view with wide-angle lens.
• Bigger in the viewfinder.
SMALL SENSOR ADVANTAGES
• Considerably less expensive to produce.
• Usually can shoot more images per second because the files are smaller.
• Smaller file size so it takes longer to fill the buffer and memory card.
• The more lightweight camera can use lighter and less expensive lenses.
• Faster flash sync speed because the shutter curtains don’t have to move across a large sensor.
• Smaller field of view so the lens seems longer and makes the background easier to simplify.
THE RIGHT CHOICE ON SENSOR SIZE
Shooting a camera with a full-sized sensor or a smaller one is entirely up to the individual.
There is no wrong answer. Barbara and I tend to use full-sized sensor cameras—Nikon D4, Canon 5D Mark III—only because we commonly wish to photograph night scenes where the larger photosites of the full-size sensors tend to shine because they are less noisy.
In all honesty, we could easily shoot every image in this book with a bottom-of-the-line Canon or Nikon camera, though you would not know it from the picture quality. However, you might notice more noise artifacts in the night scenes. The top-of-the-line full-sensor pro cameras are more rugged, resist rain and snow better, and offer far more custom functions and menu choices that we enjoy using.
CAMERA BATTERIES AND CHARGERS
Your new camera probably came with a rechargeable battery and charger. These items sometimes malfunction at inopportune times. Always have an additional battery charger and at least two extra fully-charged batteries. Modern rechargeable batteries don’t have a memory, so top them off by charging them after each photo session. Batteries will degrade over time, however. If you have a battery that is a few years old and seems to lose its charge quickly, it is probably time to replace it.
Many cameras offer a power pack (this adds weight to the camera) that can be attached to the camera, which makes it possible to shoot more images before changing the batteries.
However, because we always keep extra charged batteries with us, we have never bought an additional power pack for our cameras, so perhaps you don’t need one either.
MEMORY OPTIONS
TYPES OF CARDS
Your camera is designed to accept one or possibly two types of memory cards. The most common choices used by camera makers include Compact Flash (CF) and Secure Digital High Capacity (SD HC), along with a few others. Check the camera’s instruction book to see what type is needed.
CARD MAKERS
We personally avoid any card when we do not recognize the manufacturer’s name. We have always used SanDisk, Delkin, and Lexar cards without any problems.
CARD SPEED
Any photographer who shoots many images quickly or video will benefit from a fast card because it is better able to accept data from the camera’s buffer, which allows faster shooting.
If you tend to photograph still objects at a much slower shooting speed, then inexpensive slow cards will work fine for you.
CARD CAPACITY
The more memory capacity your card has, the more images it can hold. A 32GB card will hold twice as many images as a 16GB card. Memory is cheap, so it makes sense to use larger capacity cards to avoid losing important images because the card filled at the worst possible time. As I write this in 2014, we prefer 32GB and 64GB Compact Flash cards in our cameras.
AVOIDING MEMORY CARD PROBLEMS
After our photo shoot, we turn off the camera and remove the Compact Flash card. We immediately download the images to an external hard drive using our computer. If you use your computer’s hard drive, it will soon be filled. Once these images are successfully downloaded—we check for this—we put the card back in the camera we intend to use it in and format the card. Formatting the card, rather than deleting images from the card, prepares the card properly for receiving more images. If we shoot images on multiple cards, these are formatted and put into a plastic card wallet to protect them. Many card wallets are available.
We happen to use a SanDisk card wallet that holds four Compact Flash cards. If the card is formatted and contains no images, we put the card in the wallet facing up. If the card is full of images, then we store it in the wallet face down to remind us to download the images ASAP.
To avoid corruption problems, never wash your cards, don’t let them get dirty, and never turn the camera off when it is writing to the card.
PROTECT THE CAMERA
WATER PROBLEMS
Cameras are not waterproof! Avoid letting your camera get wet. If you must shoot in the rain or when the snow is wet and melts on contact, cover the camera with a plastic bag or a protection device designed for this purpose. Even holding an umbrella above the camera while shooting can work wonders. Always remember that electronics and water don’t mesh very well. On cold winter days, snow isn’t a problem because snowflakes are easily brushed off the camera.
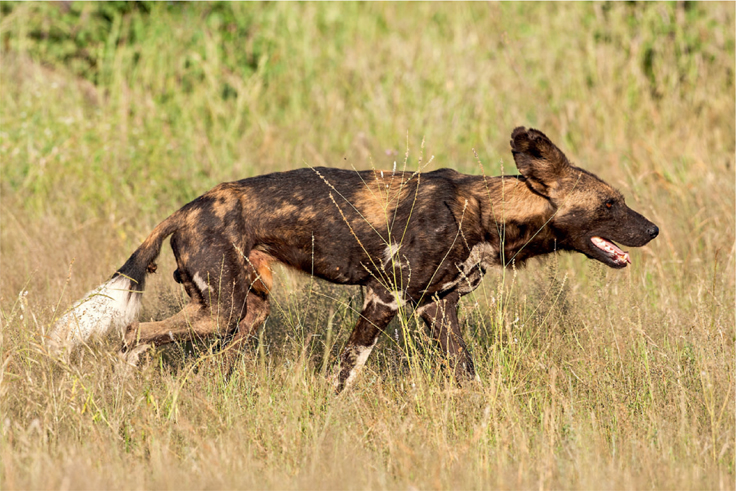
We have led more than forty wildlife photography tours to East Africa. We have seen wild dogs only once in that time. We were in Kenya’s Samburu National Park when a pack unexpectedly showed up and trotted around our Land Rovers for a few minutes. When the shooting is fast and furious, being able to shoot several images per second and having a memory card in the camera that accepts many images is crucial. Canon 1D Mark III, Canon 500mm f/4 lens, ISO 400, f/7, 1/1000 second, Cloudy WB, AI Servo on the back-button focus controller.
Avoid condensation, too. If you are shooting outside on a cold day, put the camera in a small plastic bag, squeeze the air out of it, seal the bag, and take it inside and allow it to warm up for a couple of hours. On the other hand, if you are in an air-conditioned room and the outside air is warm and humid, to avoid condensation put the camera in a plastic bag and allow it to warm up to the outside temperature first before removing it. This is a common problem on Galapagos Islands photo safaris where clients stay in air-conditioned cabins.
Should you accidently drop your camera in a river or lake, remove it immediately and take the batteries out of it. Dry the camera out by putting it in a warm and dry spot. Using the heater in the car can start the drying process. Putting the camera in an oven set for about 80 degrees might help it out or use a hair dryer. Send the camera to the repair shop right away and hope for the best!

Do not allow water to condense on your camera and lenses. Water is especially harmful to camera equipment because the gear has so many electrical circuits in it. Condensation happens most often when shooting outdoors on cold days and then taking the camera equipment into a warm room. The moisture in the room condenses on the gear. It also happens, though, when photographing in warm humid environments. On a Galapagos tour you might photograph a red-footed booby; taking your camera gear outdoors from an air-conditioned room on the boat creates the same problem. In both cases, the solution is to put your gear in an air-tight plastic bag and keep it sealed until the camera gear warms up. Nikon D3, Nikon 200–400mm f/4 lens at 270mm, ISO 3200, f/4, 1/250 second, Cloudy WB, manual exposure and AF-C autofocus on the back-button.
SHOCK
Never drop camera gear, especially on anything hard like rocks and concrete. If you are prone to dropping things, then using a strap on your camera might save it. Although we never use protection filters on our lenses because they will degrade the quality of the image and tend to cause more flare problems, we always use a lens hood. Should you drop your camera and it hits on the lens hood, the cushion the hood offers might save it if you are lucky.
CAMERA STRAP, CABLE RELEASE, AND ATTACHED LENS CAP
We call this spaghetti. Although we just mentioned using your camera strap might save your camera someday, we seldom use camera straps. We find photography is far easier if we are not constantly moving the camera strap out of the way of the viewfinder or LCD display. For still subjects, we prefer to use the 2-second self-timer to fire the camera rather than a cable release to avoid the nuisance factor. Some photographers give us the shakes when we see them using a camera strap, cable release, and a string to attach their lens cap to the lens.
Having three straps hanging down to get in the way, blow in the breeze, and perhaps strike your close-up subject just isn’t an efficient or convenient way to shoot images. Some photographers compound the problem by putting the camera strap around their neck while shooting on a tripod. Tying yourself to the tripod with a short leash is a difficult way to work. I am trying to be diplomatic so I won’t say what I really think of the idea.
YOUR CAMERA SYSTEM
The choices you must make in equipment depend on budget, equipment you already own, and your ambitions as a photographer. Carefully consider which camera system you want to shoot with for the long haul because it is expensive to switch later on if you already have a lot of camera gear. For now let us consider some of the most effective ways to use that equipment.