
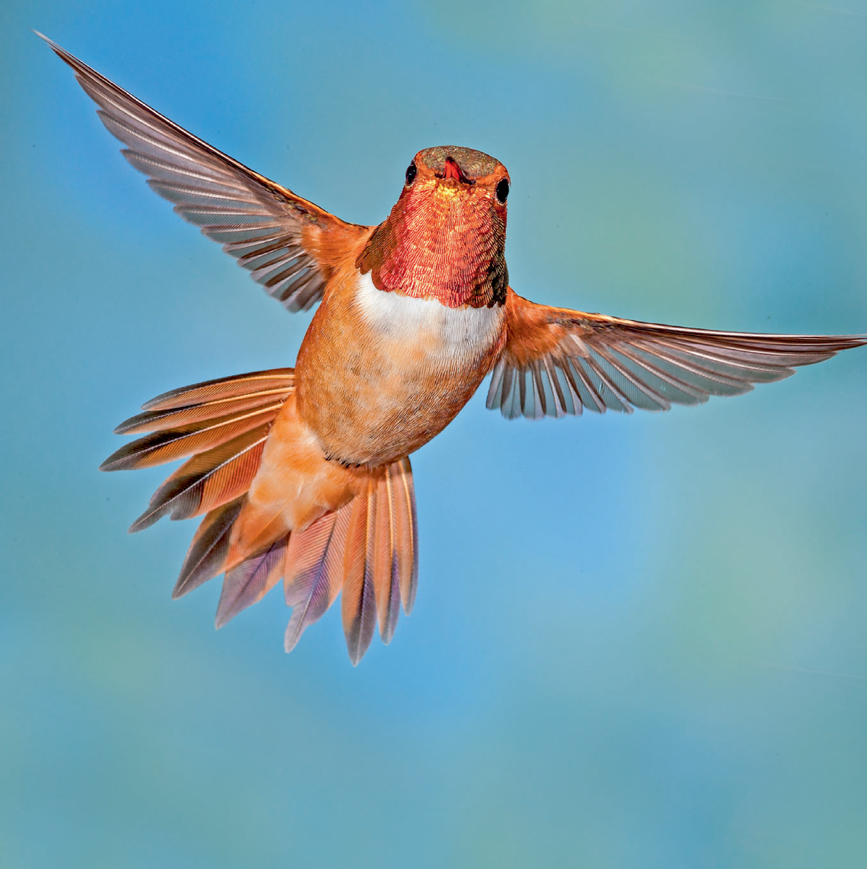
Three Nikon SB-800 flash units froze the wings of this male rufous hummingbird. The bird was enticed to a sugar-water feeder hanging under a dark tent at the Bull River Guest Ranch located in Cranbrook, British Columbia. The camera shutter speed had nothing to do with stopping the wings’ movement. Instead, the flashes were manually set to 1/16 power, which generates a flash duration around 1/10,000 of a second. Since no ambient light was bright enough to appear in the image, the flash duration acts as the shutter speed. Nikon D300, Nikon 200–400mm lens at 320mm, ISO 200, f/18, 1/200 second, Flash WB.
The Power of Flash
Cameras come equipped with a built-in pop-up flash or a hot shoe for mounting a flash on top of the camera. They are convenient and useful features that too many shutterbugs ignore. Using a flash efficiently and wisely is a skill every photographer must master. Flash is incredibly helpful in lighting many subjects better. Unhappily, many shutterbugs are afraid to use flash, either because it seems complicated or they do not perceive the need for it. We use flash in at least 50 percent of our images because it solves many lighting problems, helps to create stunning light, improves the colors, and makes it easier to capture sharp images. If you belong in the camp where you feel flash is intimidating or unnecessary, it is time to get over that misguided notion and master flash techniques. Everyone’s images can benefit markedly when flash is used wisely!
FLASH ADVANTAGES
1. Ambient light is fickle. Sometimes you have enough of it to shoot, but sometimes you do not. Flash is ready to serve you whenever you need it and the correct amount is always available.
2. Ambient light can fluctuate with little notice. Flash does not vary if you let it fully charge, and it is easy to control its output with the flash exposure compensation (FEC) control.
3. With a little practice, flash is simple to mix with ambient light to effectively light objects.
4. It is elementary to point the flash head precisely at the spot where light is needed.
5. The color of the light emitted by an unfiltered flash head is similar to midday sunshine. Using flash will reduce the colorcasts in the ambient light. For example, the green colorcast that appears in a white mushroom when photographed in a green forest is significantly reduced when flash is added to the light mixture.
6. The short duration of a typical flash burst tends to freeze subject and camera motion—producing an overall sharper image.
7. Using off-camera flash so it strikes the subject from the side is a superb way to reveal texture.
8. Make the subject more prominent by using flash as the main or primary light, which also darkens the background.
9. When the ambient light is quite diffused and shadowless, sometimes it helps to use flash to increase the contrast.
10. Flash works exceptionally well as a backlight to rim a subject with a bright edge of light.
11. With the ready availability of wireless flash controls, it is simple to fire more than one flash simultaneously to create spectacular light.

Attractive light is crucial for making awesome images. This Western White butterfly was underexposed by two-thirds of a stop and a flash was aimed at the splendid butterfly from behind to backlight it. Canon 5D Mark III, Canon 180mm f/3.5 macro lens, ISO 100, f/20, 1/5 second, Daylight WB, manual metering and focusing using a magnified live view image.
FLASH BASICS
Although flash appears complex and provides many features, it is actually a pretty simple device. The flash has a capacitor that stores energy that is drawn from batteries or sometimes AC current. When the flash is fired, the energy is dumped into a gas-filled tube and the gas ionizes, which creates a very brief but tremendously bright flash of light. At full power the flash emits the most light, and the amount of time the flash lasts varies from one flash to another, but a typical flash duration falls in the 1/700 to 1/1000 second range. Essentially, the flash burst is instantaneous. The amount of light from the flash striking the subject is primarily controlled with the aperture and ISO selection, along with the flash exposure compensation control, which is found on the camera, the flash, or sometimes both.
When the flash fires, there is no way to have a small “burn.” The gas ionizes all at once. However, the flash can reduce its output by turning the “burn” off sooner, which shortens the time the flash emits light. The length of time is called the flash duration. Many flashes have power ratio controls that allow you to manually set the flash to full, 1/2, 1/4, 1/8, 1/16, 1/32, 1/64, and 1/128 power. With the Nikon 910 flash, for example, here are the power level flash durations (in seconds):
Full Power 1/800
1/2 1/1100
1/4 1/2550
1/8 1/5000
1/16 1/10,000
1/32 1/20,000
1/64 1/35,700
1/128 1/38,500
Other flash units tend to have similar—though not identical—flash durations at these power levels.
THROUGH-THE-LENS FLASH METERING
The camera has two internal exposure mechanisms, one for ambient light and another for light from a flash. These systems operate independently of each other. When you use the exposure compensation control to adjust the ambient light exposure, it affects only the ambient light and not the flash exposure. Through-the-lens flash metering is similar to ambient light exposure. When using the flash on automatic with through-the-lens flash metering, the camera fires the flash and turns off automatically when the flash makes the subject middle tone in reflectance. Therefore, if you are photographing a light-toned subject, the flash system will underexpose it to make it middle tonality. To compensate for this, set the flash exposure compensation (FEC) control to a positive choice—such as +1—and then the flash will increase its output to make the subject one stop brighter.
SYNC SPEED
Your camera has a sync speed for flash. It varies among cameras, but a typical sync speed is 1/200, 1/250, or 1/320 second. Consult your camera manual for the exact speed. Attaching a flash to the camera or raising the pop-up flash, if the camera has one, to determine the sync speed usually works. Cameras are quite sophisticated these days. When they detect a flash is being used, they typically change the shutter speed to the sync speed automatically.
Don’t be confused by the sync speed! It exists only because the camera has two shutter curtains. Quite often the camera sync speed for flash is 1/200 second. At that shutter speed and all slower shutter speeds, a shutter curtain opens all of the way, which exposes the entire sensor to the light passing through the lens. The flash unit waits for the shutter to fully open and fires the flash as soon as it opens. Then a second shutter closes to prevent any more light from striking the sensor. The flash works perfectly with the camera at the sync speed and all slower shutter speeds, but not shutter speeds faster than sync speed.

The camera’s sync speed is the fastest shutter speed that can be used with flash (unless high speed sync is invoked) to properly expose the entire image. Most of the time the camera detects when a flash is being used and automatically defaults to the sync speed if the shutter is set too fast. However, in this case, PC cords were used to wire the three flashes together and the camera does not recognize these cords. The bottom half of the female calliope hummingbird image is dark because the shutter curtain was closing when the flash fired as the shutter speed was set faster than the sync speed. Canon 1DS Mark II, Canon 300mm f/4 lens, ISO 125, f/18, 1/640 second, Flash WB, manual metering and continuous autofocus on the back-button.
Why does the normal flash not work with shutter speeds faster than the sync speed? When the shutter speed is 1/1000 second—for instance—the first curtain begins to open and expose some of the sensor. Shortly after the first curtain starts to move and before it fully uncovers the sensor, the second curtain “chases” after it to obtain a fast shutter speed. Essentially, there is a rapidly traveling opening that is much smaller than the sensor. At no point in time is the entire sensor fully exposed. Since flash is almost instantaneous, only that part of the sensor that is exposed when the flash fires receives the light. Any part of the sensor that is covered by the following second shutter curtain receives no light from the flash. With continuous ambient light the entire sensor is exposed as the opening between the shutter curtains passes over it, but it is a problem for flash because the light isn’t continuous. Fortunately, modern cameras automatically default to the sync speed whenever they detect a flash is being used.
Did you notice only the trailing second shutter curtain can block a portion of the sensor from being exposed? Why does the first shutter curtain not cause the problem? In the normal camera setup for flash, the camera fires the flash only when the first shutter curtain fully completes its journey. There are a few other simple sync concepts to learn, which will be discussed later.
GETTING STARTED WITH FLASH
THE POP-UP FLASH
Most cameras include a pop-up flash found conveniently on top of the camera. This is appropriate because you cannot forget the flash, and it is always ready to be used. Unfortunately, the top of the camera is one of the least favorable locations for effective lighting. When you use the pop-up flash or a separate flash mounted in the hot shoe as the only light source, it produces unflattering light with no shadows, and the background tends to become black. Nevertheless, the pop-up flash can be quite useful for filling in the harsh shadows that are created by strong ambient light, and it works well for controlling an off-camera flash if it can be programmed to be the flash controller. Start by learning to use the pop-up flash, but plan to soon move on to using off-camera flash for best results.
THE INVERSE-SQUARE LAW
This law describes how light from a point source—such as a flash—spreads out and diminishes over distance. It states, “The intensity of the light from a point source (the flash) is inversely proportional to the square of the distance from the source.” If you are a normal person, that statement is completely nebulous. Here’s how it works. Assume you are photographing a person and the optimum flash exposure is f/8. The person stands 10 feet from the flash. The background is a brick wall 20 feet from the flash. The wall is twice as far away as the flash. The light from the flash spreads out over distance. How much weaker is the light from the flash on the wall? Since the wall is twice as far as the person, many photographers think the flash is one stop weaker, or said another way, half as powerful. Naturally, that is the wrong answer. The light from the flash is two stops weaker because the continually spreading light from the flash must cover four times as much area—a two stop loss of light. In other words, the light on the wall is only 1/4 as strong as that on the person. The background appears dark because it is two stops underexposed, but not yet black. A dark background is assured—unless you take countermeasures, some of which I will soon describe. If the background is more than 40 feet away, the light spreads out so much that it fails to light the background and it appears black in the image. Let’s do the math. The background is now four times as far as the subject. Four squared equals sixteen and the inverse of that is 1/16. The background is now four stops darker than the person.
FILL FLASH
Any time you photograph a subject that is backlit or sidelit, or when the light is high above the subject, you usually create harsh shadows. Use the pop-up flash to reduce the contrast by allowing it to add light (open up) the shadows. It is simple to do. When using flash, first decide what you want the ambient light to do. In this case, determine the optimum ambient light exposure in the normal way by using the histogram’s rightmost data as a guide. Once you have the optimum ambient light exposure, notice all of the harsh shadows in the subject. You want the pop-up flash to add light to the dark shadows, but not overpower the ambient light. Set the flash exposure compensation (FEC) to a negative value such as −1.3. The through-the-lens flash metering system will turn the flash off automatically when its portion of the entire exposure is 1.3 stops underexposed. Filling the shadows with more light makes them less dark. If the fill flash makes the shadows too light, decrease the amount of light emitted by the flash by merely setting a more negative FEC amount of –2 FEC. If more fill flash is needed, then add more light from the flash by setting –.7 FEC, which increases the fill flash by two-thirds of a stop from a –1.3 FEC setting. With most systems, FEC is easily set on the camera, but some flash units allow it to be set on the flash. With my Canon Speedlites, I prefer to set it on the flash since I am usually holding the flash in my hand to aim it at the precise spot where I need light.

Flash is nearly always beneficial when photographing people. This rugged cowboy is adept at cooking on a wood fire, but you would never know how handsome he is with the deep black shadows obscuring his face. Canon 5D Mark III, Canon 24–105mm f/4 lens at 47mm, ISO 400, f/10, 1/80 second, Daylight WB.

Using a flash makes it painless to conquer the shadow dilemma. First I manually set the ambient light exposure for the background. Next I set my flash to a plus one stop flash exposure compensation to make the flash nicely illuminate the cowboy’s face and delicious breakfast he was cooking. Canon 5D Mark III, Canon 24–105mm f/4 lens at 47mm, ISO 400, f/10, 1/60 second, Daylight WB, Canon 600 EX flash mounted on the camera at +1 FEC.

The incredible tulip fields at the Wooden Shoe tulip farm will delight any photographer. Fortunately, the owners are photo friendly and allow photographers to be in the fields at first light and stay until after dark. Barbara set her ambient light exposure to produce nice colors and detail in the sky. Of course, the windmill was too dark, but no worries. She used her Nikon SB-800 flash and the flash exposure compensation control to beautifully illuminate the structure. Then she added the full moon that was floating overhead to the image by double exposing it into the scene. She used a Nikon 200–400mm lens zoomed quite far out to make the moon large and used the always reliable Mooney 11 rule to expose it, which is 1/ISO at f/11 or any equivalent exposure. She used a shorter lens to expose the windmill. This is a perfect example of balanced flash where the windmill is lit by the flash and the sky is illuminated with ambient light exclusively. Nikon D4, Nikon 24–85mm lens, ISO 400, f/10, 1/15 second, Cloudy WB, manual metering and back-button autofocus, Nikon SB-800 flash.
Fill flash is well-named, which makes it easy to remember what it does. When you use fill flash, the ambient light is always the primary or main light illuminating the subject. The flash is the minor or secondary light that is weaker than the ambient. The flash fills in the dark portions of the image with its light, but does little to the highlights that are brightly lit with the ambient light.
MAIN FLASH
A pop-up flash, or a separate flash mounted in the camera’s hot shoe, isn’t the best location for a pleasing main flash because the light strikes the subject directly and produces few shadows. Shadowless light is flat. The subject lacks the suggestion of depth. Nevertheless, let’s consider it to illustrate the importance of using main flash.
Once again, start by determining the optimum ambient light exposure in the usual way. Perhaps the best exposure occurs using ISO 200, f/11, and 1/125 second. In this case, though, let’s underexpose the ambient light to darken the background and make the person being photographed stand out from a slightly darker background. How do you darken the background? If you are using manual exposure, there are three ways to do it with camera settings. If the sync speed is 1/250 second for the camera, you can increase the shutter speed to 1/250 second from 1/125 second, stop down the lens from f/11 to f/16, or lower the ISO one stop to ISO 100. All three ways darken the ambient exposure by one stop.
Let’s bring in the flash. Activate the flash, set a positive +1 flash exposure compensation, and shoot. If the setting produces an excellent exposure, you have the optimum settings. If the flash exposure is not enough, set a higher positive FEC (+1.7 perhaps) and shoot another image and again check it. Should the +1 FEC be too much, then set a less positive FEC (+.3 FEC for example) and shoot another image to check the effect it has on the subject. Usually, after a couple of tries, you determine the optimum amount. After you do this a few times, it all becomes second-nature and natural to do.
If you prefer to use an automatic exposure mode such as aperture-priority or shutter-priority, here’s how to use main flash. Set the ambient exposure compensation control to make the overall image one stop underexposed. Now, activate the flash, set positive FEC, shoot the image, check the histogram. Continue to check the histogram and adjust the FEC until the optimum exposure is achieved.
Watch out for a common problem with aperture-priority, however. When using aperture-priority with either fill flash or main flash and the subject suddenly becomes overexposed, what is the likely cause of the overexposure problem? If the ambient light exposure is 1/500 second at f/11, and then you turn the flash on, the camera detects a flash is being used and defaults to the sync speed of 1/250 second in this example. The camera cannot adjust the aperture when using aperture-priority because that exposure mode gives priority to the aperture, so the shutter speed drops to the 1/250 sync speed—a plus one stop increase in the ambient light. The overexposure is from the excessive amount of ambient light. Solve the problem by stopping down the aperture one stop to f/16. Now the ambient light exposure is f/16 at 1/250 second.
Let’s recap main flash because it is so important. Main flash is exactly what it is called. The flash is the main light on the subject while the ambient light is now relegated to fill light status.
Main flash is an incredibly powerful technique, especially when using off-camera flash—but it’s one that most photographers never learn. Do not be one of them. Using a flash to highlight key objects in the scene is an outstanding way to emphasize them, and using it produces many exceptional images. Some photographers call it “killing the ambient.” Flash nicely exposes the key objects in the scene while the ambient light is somewhat underexposed.
SELECTING YOUR OFF-CAMERA FLASH SYSTEM
DEDICATED FLASH CORD
Every camera system offers a dedicated cord that attaches to both the camera hot shoe and a flash made by your camera maker. Dedicated cords permit the same automatic flash controls that you would usually have when the flash is mounted in the camera’s hot shoe. The dedicated cord allows you to move the flash to a more favorable position, which produces more pleasing light. Dedicated cords come in various lengths with longer cords being more useful than shorter ones. However, these cords do not work as well for backlighting the subject because the cord usually isn’t long enough and it gets in the way.
WIRELESS FLASH
Wireless is easily the preeminent way to go for nearly all flash applications. It is straightforward to use, so don’t be intimidated. Fortunately, your camera system offers excellent flash units that are fully dedicated to your camera, with wireless controls for using them. Wireless controls offered by your camera maker are reasonably priced. Indeed, if your camera has a pop-up flash, you may already have it. Check the camera manual to see whether the pop-up flash can be programmed to be a Master or Commander flash control. Nikon has made it possible to program the pop-up flash to be the Commander flash controller for quite a few of its models. Most other companies do the same. Canon has been a laggard in this regard, so only a few of its models—the EOS 7D, 60D, and 70D are three examples—offer built-in wireless flash control.

We strongly suggest using wireless flash control because it makes using one or more flash units considerably easier. Every camera system has a way to control its flash wirelessly and some third-party companies build them as well. Here are three examples. From left to right is the Nikon SU-800, PocketWizard Plus III, and Canon ST-E3-RT. Research the options carefully. Many Nikon cameras don’t need the SU-800 because their pop-up flash can be programmed to be the flash Commander. The PocketWizard device requires two units to transmit and receive the signal, which increases the cost considerably. The Canon ST-E3-RT only offers radio control signals for their 600EX-RT flash and doesn’t work with the other Canon flashes.
Options for Wireless Flash
1. Program the camera’s built-in pop-up flash to be the controller. Pop-up is the simplest and least expensive option if your camera offers it. It does work well with both our Nikon and Canon cameras that have the feature. Of course, some top-of-the-line cameras do not have a pop-up flash and some models that do are not programmed for it.
2. Use two flashes at once. Usually, the more advanced flash units allow them to be set to either a Commander (Nikon) or Master (Canon) controller or a Remote (Nikon term) or Slave (Canon). Mount the flash set to be the controller in the hot shoe and use the other one remotely and off-camera.
3. A separate flash controller is a common accessory among camera companies. Currently, Canon offers two of them: the Speedlite Transmitter ST-E2 (optical controls) and the ST-E3-RT (radio control only) with the new Canon EOS 600EX-RT Speedlite. Nikon offers the Nikon SU-800 Wireless Speedlight Commander Unit that Barbara uses on her Nikon D4 with excellent success.
4. Many third-party camera accessory makers build wireless flash controls for most current camera systems. These can work well, but often they are cheaply made and don’t work perfectly. Many of our clients buy an inexpensive wireless flash control prior to attending our workshop only to discover there is no through-the-lens metering, which is a significant shortcoming. Others are made so poorly that they break down quickly.
Good systems are expensive. The PocketWizard system is highly regarded but is expensive. If you already have this or another wireless flash system, then go ahead and use it. If you are buying a wireless system, always consider getting the equipment made by your camera maker first!
WIRELESS FLASH TECHNIQUES
Fill Flash
Using the off-camera flash to fill in dark shadows created by ambient light is quite similar to having the flash mounted on top of the camera. Keep the flash near the lens and fire it directly at the subject to open up the shadows and reduce the contrast. Use some negative FEC to avoid overfilling the shadows. After you shoot the first image, check the shadows on the camera’s LCD monitor and adjust the FEC as needed to get what you desire.
Main Flash
Off-camera flash offers excellent benefits when the flash is fired while held away from the camera using wireless controls. Use the flash to add contrast when the ambient light is too low in contrast. It is particularly effective for photographing animals, portraits of humans, and flowers. Remember that main flash means the flash is the strongest light source and the ambient light is the weaker fill light. Here’s how to highlight a subject with main flash techniques:
1. Forget the flash initially. Underexpose the ambient light exposure by about one stop.
Getting this exposure is straightforward. Using the ETTR guidelines for JPEG or RAW, determine the optimum ambient light exposure by setting the exposure to make the histogram’s rightmost data approach (JPEG) the right wall of the histogram or touch the right wall if shooting RAW. Now decrease the exposure by one stop of light. If using an automatic exposure mode—aperture or shutter-priority for example—set the exposure compensation control to deliver one stop less light to the sensor. For example, if the exposure compensation (EC) is set to +2/3 stop, setting the EC to –1/3 stop does the trick. If the EC is originally set to zero EC, then setting it to minus one stop underexposes the ambient light by one stop of light.
2. Now turn on the flash, set the flash exposure compensation control (FEC) to zero and place the flash at an angle to the subject to create some slight shadows that suggest depth and avoid the dreaded red-eye effect that on-camera flash so often creates. Shoot the image and check the histogram. If the histogram’s rightmost data move back to the right wall, then you have achieved the optimum exposure from the flash. More likely, the rightmost data are shy of the histogram’s right wall, so increase the flash output by setting a positive FEC so use plus one stop FEC, for example. Shoot another image and check the histogram. Keep adjusting the FEC value until the rightmost data that represent the significant highlights follow the ETTR guidelines. Should the rightmost data climb the right wall, then reduce the FEC by setting a less positive value or even a negative value if need be.
3. With a little practice, this entire procedure only takes a minute or two and a couple of shots to get both the ambient light and the flash light set to produce the lighting contrast desired. The finished image shows the subject nicely highlighted with a flash while a more subdued ambient light serves as the fill light and prevents the background from appearing black.

Michigan’s famous White Birch Forest is located in Pictured Rocks National Lakeshore. Peak color usually develops plus and minus a few days around October 15. This picturesque group of birch trunks makes an outstanding vertical image on a calm overcast afternoon. Canon 5D Mark III, Canon 24–105mm f/4 lens at 105mm, ISO 400, f/20, 1/20 second, Cloudy WB, manual metering and AI Servo back-button focusing.

To make this group of birch trunks stand out more from the background and to increase the saturation of the colorful leaves, underexpose the ambient light by about one stop of light and then use automatic flash with the exposure compensation control to properly light the birch tree trunks in the foreground. Canon 5D Mark III, Canon 24–105mm lens at 105mm, ISO 400, f/20, 1/20 second, Cloudy WB, manual metering and AI Servo back-button focusing, Canon 600EX flash with ST-E3-RT radio control in the camera’s hot shoe with +1 FEC.
Backlighting
An excellent way to use flash is to beautifully backlight the subject. It is especially effective for all subjects that are hairy or fuzzy because flash nicely highlights the edges of the subject with a magical rim light. If the subject is translucent—fern leaf, many light-toned butterflies, flowers—always use either ambient light or flash to light it from behind. This accentuates the most details in the subject.
Many photographers fail to use backlight to their advantage. When it works and the contrast is not too extreme, backlight will produce many memorable images. Let’s describe how to use backlight in two different ways.
Flash Produces the Backlight
Determine the optimum ambient light exposure for the subject. Now position the wireless controlled flash behind the subject. Make sure the flash unit itself does not appear in the image—only the light from it. Sometimes a flash can be concealed behind the subject. More often, though, the flash must be held slightly off to one side behind the subject to keep it from appearing in the image. The flash is being used to rim the subject with light. It also reveals details in a translucent subject. Set the flash to +1 FEC as a starting point and shoot the image.
Now view the image on the camera’s LCD monitor to see if you like the results. If the flash is not strong enough, then increase the FEC to +2 FEC and try again. Should the flash be too strong, then reduce the FEC value. Keep adjusting the FEC and shooting the image to check the result until you obtain what you want.
Ambient Light Creates the Backlight
Choose a shooting angle that allows the ambient light to nicely backlight the subject. Set the ambient light exposure to make the light rim the subject. Although tastes vary, most photographers want the backlight to elegantly highlight the subject’s edge. The ambient light exposure must be bright enough to show the rim light, but not so strong that the edges of the subject are grossly overexposed. Especially when the ambient light is quite bright, the side of a non-translucent subject facing the camera will be significantly underexposed. Place the off-camera flash to light the side of the subject facing the camera, but keep it to one side of the camera to allow the flash to create some tiny shadows that suggest depth. Adjust the FEC until you get the desired effect. In this case, the flash nicely illuminates the side of the subject facing the camera while the ambient light gorgeously backlights it at the same time.
Cross lighting
These two uses of flash for backlighting describe an incredibly effective lighting strategy we call cross light. When flash creates the backlight, the ambient light nicely illuminates the side of the subject facing the camera. The light from the flash and the ambient light cross at the same time and place at the subject’s location. If ambient light is the backlight, the flash is used to nicely expose the side of the subject facing the camera. Once again, the two light sources cross right at the subject. In both cases, cross light splendidly illuminates the subject on the side facing the camera and simultaneously rims it stunningly with backlight. Learn to use cross lighting and use it frequently. Your images will benefit substantially when you do!
GETTING IN SYNC WITH FLASH SYNC
SYNC SPEED
Earlier we explained the reason your camera has a sync speed for flash. You’ll remember that the camera has two shutters. At the sync speed the shutter opens, and, when fully open, the flash instantly fires. Then, at the end of the exposure, the second shutter curtain closes to seal the imaging sensor into complete darkness once again. You can use flash at the sync speed or any slower shutter speed. Read that last sentence again! Remember, you can use flash at any shutter speed that is the sync speed or slower. That includes shutter speeds of 1/4, 1/15, 2, 4, and even 30 seconds! You can set the camera to Bulb and shoot a 4-minute exposure if you wish and fire the flash one or more times during that exposure. It is often necessary to use shutter speeds slower than sync speed to allow the ambient light to illuminate the background. As a reminder, you cannot use a shutter speed faster than the sync speed because the two moving shutter curtains create a slit that makes it impossible for the entire sensor to be exposed by the instantaneous light from the flash.

The interesting branches of this maple tree make a first-rate pattern against the rosy dawn sky. Expose to make the red channel histogram’s data touch the right wall. Autofocusing is quick and accurate by pointing a single activated AF point at the maple tree’s trunk so the AF point “sees” part of the trunk and part of the sky—a contrast edge—and press the back-button focus controller in to hit sharp focus. Then let up on the button to lock the focus, recompose and shoot. Canon 5D Mark III, Canon 24–105mm f/4 lens, ISO 100, f/13, 1/2.5 seconds, Cloudy WB, manual exposure with AI Servo AF on the backbutton control.

The backlight from the eastern sky leaves the side facing the camera in complete darkness. To obtain more detail in the leaves and branches, I fired a flash to light up this area by setting the flash exposure compensation control (FEC) to +1/3 stop. I used a Canon 600EX flash and the ST-E3-RT flash controller to accomplish this. However, any pop-up flash could also add light to the foreground. Be alert to avoid over flashing the foreground, which will make the light look unnatural.
SLOW SPEED SYNC
This is a fancy name for merely using flash with a shutter speed that is slower than the sync speed of the camera. Most cameras do not offer it as an option because it is always available when you use manual exposure. In the manual exposure metering mode, set the aperture and the shutter speed slower than the sync speed and the flash works nicely. Of course, the slower shutter speed allows the ambient light to expose parts of your image more. On some cameras, when using an automatic exposure mode it is necessary to set slow speed sync to enable the choice of slow shutter speeds. Otherwise, the camera defaults to the sync speed or perhaps a range of shutter speeds. For example, the Canon 5D Mark III camera offers three options when using aperture-priority that include: Auto, 1/200–1/60 sec., and 1/200 sec. (Fixed). The Auto setting allows the camera to automatically set any shutter speed between 30 seconds and 1/200 second—the sync speed for this camera. The 1/200–1/60 sec. option keeps the shutter speed within this range to help prevent subject blur and camera-shake. The third option—1/200 sec.—keeps the shutter speed at the 1/200 sync speed. This more effectively helps to reduce camera-shake and subject motion that might be recorded by the ambient light, but often the background goes black.
Most cameras use menu choices to set the range of shutter speeds you want to use with flash and do not provide for a slow speed sync option. In the manual exposure mode, we can deftly set any shutter speed without any difficulty. However, if you own a camera that offers slow speed sync, then you probably have to use it to allow a slower shutter speed.
HIGH SPEED SYNC (HSS)
Admittedly, until now, I lied by omission. Your camera probably allows successful flash use when using shutter speeds faster than the sync speed. What happened to the small slit between the shutters? How can this be? Depending on the camera maker, this important tool is referred to by different names. Canon dubs it High speed Sync and Nikon refers to it as Auto FP High speed Sync. When the camera is set to high speed sync (HSS), any shutter speed can be used with the flash—including the fastest shutter speed on the camera. If you set the shutter speed to 1/1000 second—for example—the camera changes the way flash works.
Rather than firing a single large burst of light, the flash fires a rapid series of low powered flashes during the fast shutter speed to effectively expose the entire sensor as the small slit between the two shutter curtains passes over the sensor. Why not use high speed sync all of the time? The flash must fire a series of flashes very quickly on one charge of the capacitor. Therefore, the power of the flash diminishes so that it cannot illuminate objects very far away. The faster the shutter speed used, the less powerful the flash becomes.
Use high speed sync when it is desirable to limit the depth of field by shooting with large apertures such as f/4 or f/5.6. Often, the ambient light is clearly too much to properly expose the subject if the shutter speed cannot be faster than the sync speed. For instance, suppose the optimum exposure is 1/500 second at f/4 with ISO 200. If you wish to use flash as a fill light to open up the harsh shadows created by direct sunshine, you cannot if you are restricted to the sync speed for flash. However, with high speed sync, you can shoot with the faster 1/500 second shutter speed and the flash can fill in the shadows. You could even underexpose the ambient light and make flash the main light.

Clouds of Mormon fritillaries fed on the flowers in our field. They were too active to use a tripod, so I slowly stalked them to approach within camera range and shot handheld. By using f/4.5 and ISO 400, a fast 1/400 second shutter speed was obtained. The ambient light was underexposed by one stop and flash was used as the main light to properly expose the butterfly. To allow the flash to successfully light the entire subject at this shutter speed, I set high speed sync on the flash controller. Canon 5D Mark III, Canon 180mm f/3.5 macro lens, ISO 400, f/4.5, 1/400 second, Flash WB, handheld using high speed sync with the Canon 600EX flash and Speedlite Transmitter ST-E3-RT.
REAR-CURTAIN SYNC
Flash can be beneficial for improving the light on a moving object. Perhaps you want to mix ambient light to show the motion of your running dog while using the flash to freeze the dog at the same time. If you use the default sync speed on your camera, you may find the results are weird. The flash fires as soon as the shutter is fully open, which means the flash freezes the running dog at the beginning of the ambient light exposure. As you continue to pan with the scampering dog during the remainder of the ambient light portion of the exposure, the blurry dog appears in front of the frozen flash image of the dog. The image appears quite unnatural. Would it not be more pleasing to have the blurry ambient light exposure of the dog behind the sharp image of it?
Set the camera or flash to second-curtain sync. It is another fancy term to denote a very simple flash control. Setting the camera on second-curtain sync changes the time when the flash fires.
Rather than the flash firing as soon as the shutter fully opens, the flash fires immediately prior to the second shutter’s closing. The ambient light portion of the exposure is recorded first. The sharp flash image is captured at the end of the ambient exposure. The dog is captured sharply by the flash. The blurry ambient exposure that shows the motion appears behind the dog—not in front of it.
MULTIPLE FLASH
Mixing a single flash with ambient light works exceedingly well to stunningly light a wide variety of subjects. Nevertheless, there are times when it is necessary to use multiple flash because the lighting control it provides is highly desirable. Multiple flash is necessary in cases when a single flash as the sole light source would produce extremely contrasty light. Multiple flash is fairly uncomplicated to use when using wireless dedicated flashes that permit through-the-lens flash metering. However, because multiple flash provides many assorted options, it is an immense topic that is beyond the scope of this book. Still, it is worthwhile to get you jump started using two flashes at one time.
SELECTING YOUR MULTIPLE FLASH SYSTEM
When looking for flash equipment, always consider first every item your own camera maker offers. Canon shooters are wise to consider Canon products first, Nikon shooters should look at Nikon flash gear, and so forth. Because I shoot Canon and Barbara shoots Nikon it is no surprise I use Canon flash gear when I use up to seven flashes at once to photograph hummingbirds, and Barbara does the same with her Nikon choices. Some third-party flash makers offer quality flash gear. However, proprietary gear is superior to use and it makes little sense to go any other way. Be cautious of inexpensive third-party equipment. You get what you pay for. Inexpensive flash gear is inexpensive for a good reason. Quite often it fails at precisely the wrong time and often the equipment is difficult to use.
FIRING TWO OR MORE FLASHES SIMULTANEOUSLY
Wireless
The beauty of using wireless flash is that not only is it extremely convenient but also easy to fire two or more flashes simultaneously. Whether you use a camera’s pop-up flash, a hot shoe mounted flash to send out a signal, or a dedicated flash controller in the hot shoe such as the Canon ST-E2 or Nikon SU-800, a wireless signal will fire one flash or fifty flashes if they are set to receive the wireless signal and the signal is not blocked. If the wireless system is dedicated to your flashes, then you can control the flash output from the camera and maintain through-the-lens flash metering—both enormous advantages that you do not want to be without.
Other Wireless Choices
Be cautious of the inexpensive wireless controls available. Typically, a controller (transmitter) is mounted in the hot shoe and the receiver is attached to the flash. When the shutter is tripped, the transmitter sends a signal to the receiver on the flash to fire now and the flash instantly fires. Low cost systems typically do not provide for through-the-lens flash metering or allow adjusting the flash light output from the camera. The system merely tells the flash to fire and offers nothing more. Is it worth the savings? We say NO!!!
Optical devices called “slaves” can be attached to the flash either by attaching them to the hot shoe mount on the flash or wired into the PC terminal if the flash has one. They are simple to use. If you are using three flashes to light the subject, attach a slave to each. Then use your pop-up flash to fire all three of the remote flashes at one time. When a slave device “sees” the instantaneous flash of light from the pop-up flash, it fires the flash to which it is attached. During the first twenty years of my career, I used slaves regularly in multiple flash photography. Now that dedicated wireless controls are so readily available, I see little reason to use them. Slaves are inexpensive, but they don’t offer through-the-lens flash metering or any other control either. They merely fire the flash.
Multiple flash can be used in numerous creative ways. You will need two light stands to support the flashes. It is best to use small ball heads on the flash stands to allow you to easily change the angle of the flash. Use fully-charged batteries in the flash. It is always ideal to use rechargeable batteries, which are far less expensive than disposable batteries when you consider how many times they can be recharged. Let’s describe two of the most common ways to use two flashes efficiently. Then we talk about the two ways to adjust the output right after that.
Flash as the main and fill Light
The form of the subject is revealed by the shadows the light creates. When flash is the main light, it is desirable to put it at an angle to create some shadows in the subject to show form and texture. Placing the main flash slightly above the subject and off to the side at about a 30 degree angle to a line connecting the lens and the subject is a good place to start. However, a single flash produces extremely dark shadows. To reduce the contrast to a more desirable level, use a second flash close to the lens, but make it two stops weaker in light output. The main flash still creates shadows, but the fill flash makes it less severe by “filling in” the shadows so they are only about two stops darker than the bright side of the subject. Consider next the way to control the flash output. Let us look at the two easiest ways to adjust the light output between the two flashes.
Adjust the Distance between the Flashes
An easy way to make the fill flash two stops less powerful is to double the flash-to-subject distance. If both the main flash and fill flash are identically set, the fill flash will be two stops weaker when twice as far from the subject as the main flash due to the Inverse-square Law. If you want the fill flash to be only one stop weaker, then multiply the flash-to-subject distance of the main flash by 1.4 and put the fill flash at that distance. To make the fill flash three stops weaker, multiply by 2.8.
Here’s a simple chart to follow. If the main flash is 6 feet from the subject, use the following distance factors to reduce the fill flash.
| Fill flash | Multiply distance of main flash by this factor | Fill flash distance: |
| 1 stop weaker | 1.4 | 8.4 feet |
| 2 stops weaker | 2 | 12 feet |
| 3 stops weaker | 2.8 | 16.8 feet |
| 4 stops weaker | 4 | 24 feet |
Use Flash Ratios
Most likely your dedicated flash recommends the “dreaded and scary” flash ratio controls. Beginners find flash ratios next to impossible to understand, but they are quite uncomplicated once you start using them. Using the dedicated wireless controls in your camera or on the wireless controller mounted in the camera’s hot shoe, use flash ratios to control the light output. Before doing this, set the main flash to Group A and the fill flash to Group B. Set the Group A flash that is mounted on a light stand 6 feet from the subject, slightly above it, and 30 degrees to the right of the imaginary line that connects the subject to the camera. Now set the fill flash 6 feet from the subject but close to the line connecting the subject to the camera. Put it on the left side and at the same height as the camera. Notice both the main flash and the fill flash are the same distances from the subject.
To explain the ratio control, let’s use two Canon 580 Speedlites and the ST-E2 flash controller mounted on top of the camera. Notice the A:B symbol at the top of the controller. Just because A is on the left does not mean the Group A flash must be left of the camera. It can be placed anywhere. The B Group flash does not have to be to the right of the camera either. In this example, I have them on the opposite sides to emphasize this point. Now using the ratio controls, set the main flash (A) to be two stops stronger than the fill flash (B). Look at the ratio scale that appears just below the A:B on the ST-E2. The 1:1 ratio means both flashes will contribute equally to the exposure. Look to the left on the scale and notice the 2:1 ratio. The A flash emits twice as much light as the B flash. It is one stop stronger. Now select the 4:1 ratio on the left side of the scale. The main flash (A) is four times as strong as the fill flash (B). That is a two stop difference—exactly what we want. If you require the fill flash to be three stops weaker than the main flash, set the flash ratio to 8:1. The main flash is now eight times stronger than the fill flash—a difference of three stops.

When using more than one flash, this Canon wireless flash controller will allow you to vary the output between the flash units. Notice the ratio control on the rear of the ST-E2. Do not be confused by these numbers. In the middle of the scale, notice where it shows 1:1. Try using two flashes and assign one to Group A and the other to Group B. With the flash ratio control set to 1:1, both flashes emit the same amount of light. If you change this ratio by moving to the left and selecting the 2:1 ratio, the A flash emits twice as much light as the B flash. Move left to 4:1 and the A flash emits two stops more light or four times as much light as the B flash. Finally, going all the way left to 8:1 means the A flash now emits three stops or eight times more light than the B flash. The ratio control can be moved to the right to enable the B flash to emit more light than the A flash.
CONCLUSION
The best way to use automatic flash with flash ratios is to get familiar with them. Once you use ratios a few times, it all becomes intuitive and second-nature. Flash is an amazing tool for upgrading and improving your images. Do not be fearful to use flash. Once you understand the basics, the opportunities for using flash to make exquisite images explode and continue to expand as you gain experience. No longer are you restricted by whatever the ambient light offers you. Flash makes it uncomplicated to create a spectacular light that solves most lighting problems. We think of our flash as a “sun in the box” that we completely control. Mastering flash has opened up a whole new world of possibilities for us. We know it will for you as well!

Booted racket-tails are spectacular hummingbirds that are frequent visitors to the Tandayapa Bird Lodge near Quito, Ecuador. Here they were attracted to a hummingbird feeder that is disguised with a flower; Barbara used four Nikon SB-800 flash units set to manual and 1/16 power to use the short flash duration to freeze the wings. The background is a photo of an out of focus forest. Nikon D3, Nikon 200–400mm f/4 lens at 350mm, ISO 200, f/20, 1/200 second, Flash WB, continuous autofocus with the backbutton control, and SU-800 flash controller to fire all of the flashes simultaneously.