

It is difficult to describe being in a Yellowstone geyser basin on a sunny day in January. The clash of hot water and frigid air temperature creates a mesmerizing scene. We have led over one hundred week-long photo tours in Yellowstone over the years and despite that still enjoy photographing these mystical scenes. This image was made a few years ago. Today Barbara would use manual exposure and focus stack the scene to achieve the ultimate in sharpness. Nikon D300, Nikon 24–70mm lens at 28mm, ISO 400, f/18, 1/250 second, Sun WB, aperture-priority, autofocus using back-button control.
Compose Pleasing Images
LET’S BE HONEST
All too often we hear photography enthusiasts say, “I have trouble with the technical side of photography, but I have a naturally great eye for composing fine images.” It is true that some folks tend to see excellent images quicker than others, but most of us (nearly everyone) has to work hard to see pleasing compositions effortlessly and quickly. Beginning and intermediate photographers often overestimate their natural compositional abilities. Why? The technical material is either excellent or terrible. Exposure is either optimum or it is not. Focus is either precise or it is not. Depth of field for the subject is either suitable or it is not. It is easy to decide whether the technical aspects are well done or not.
Composition is clearly a matter of personal preference. If you like horizons passing through the head of the subject, distracting backgrounds, unappealing foregrounds, ugly subjects, crooked horizons, and other problems that most successful photographers strive to avoid, who am I to say that this choice of “seeing” should be avoided? The same goes for composition. Barbara and I feel the technical photo information is straightforward, but seeing excellent compositions is far more difficult. During our forty-year careers, we never assumed we had a naturally good “eye” for successful images. Instead, we worked diligently to develop our compositional style and ability to see and perceive the possibilities. This process continues to evolve. Our abilities to see desirable images constantly improve from week to week, even after all of these years of doing photography full-time as a passion and to earn a living. Here are a few things we have learned.

Kenya’s Masai Mara is famous for the tremendous number and variety of mammals effortlessly photographed in the rolling grasslands. While making this simple portrait of a Burchell’s zebra, the image suddenly became far more interesting with the arrival of a red-billed oxpecker hunting for insects to eat. This simple clean composition is our goal that we strive for. Nikon D300, Nikon 200–400mm lens with a 1.4x teleconverter at 650mm, ISO 400, f/10, 1/800 second, Cloudy WB, manual exposure with autofocus on the back-button control.
COMPOSITIONAL GUIDELINES
SIMPLIFY THE IMAGE
Beginning photographers tend to snap away at any subject that attracts them with little regard to all of the objects included in the image. Accomplished photographers are careful to select the best shooting viewpoint and use proper equipment to eliminate unnecessary elements from the image. If the background is busy with distractions, they figure out a way to prevent or at least reduce this problem. If the foreground is especially attractive, they choose a lens and shooting angle to beautifully accentuate the foreground. In most cases, it is best to simplify and isolate the main subject that drew your attention initially while at the same time eliminating or minimizing other elements competing for your attention. Look at the images that appear in this book. Notice the way all are well-illuminated strong images that are clean and simple. The key subject is never hard to discern in any of the images.
COMPOSE HANDHELD
When shooting landscape images with short focal length lenses, it is effective to choose the lens you think works best. Then walk around and look closely and often through the camera’s viewfinder before mounting the camera on the tripod to find the strongest composition. The tripod makes it more difficult to attempt a variety of different compositions because it is clumsy and takes too long to adjust the legs. Handholding is fast and convenient. Once you see an outstanding composition in the viewfinder, mount the camera on the tripod and fine-tune the composition. Composing handheld and subsequently bringing the tripod in works especially well when photographing large subjects with short lenses. It’s just the opposite when using big and heavy lenses that are difficult to handhold, or shooting close-ups where precision is crucial. Then it is best to compose with the camera already attached to the tripod.
Attaching an L-bracket to the bottom of the camera that provides a quick release plate in two places works extremely well. If the lens being used has its own tripod collar, then be sure to buy a quick release plate custom made for the lens’s tripod collar. Using a tripod head that accepts these quick release plates makes it simple to attach or remove the camera from the tripod head. This may seem like a small point, but the convenience is immense and greatly appreciated once you have it.

Our autumn photo workshop clients are initially overwhelmed and struggle with photographing Pictured Rocks National Lakeshore’s magnificent White Birch Forest when it is at peak color. How does one make sense out of all of the white birch trunks amid the intense yellow and red colors? This is a perfect time to handhold the camera and walk through the forest looking for the best color patterns and groups of tree trunks. Once an exciting image is spotted in the viewfinder, mount the camera on a tripod and use the best technique possible to shoot an impressive image. Nikon D2X, Nikon 28–200mm lens at 78mm, ISO 200, f/16, 1/2.5 second, Cloudy WB, manual exposure mode with AF-C autofocus using back-button control.
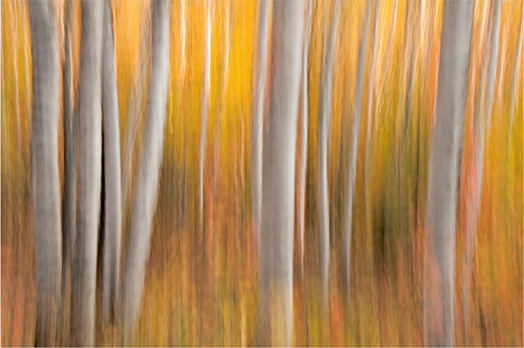
We use a sturdy Gitzo tripod to make more than 90 percent of our images. However, there are times when blur is our goal. We love the blurry pattern created by the white birch trunks and yellow maple leaves. Barbara focused on the nearest tree trunks and panned her camera slowly up to emphasize the vertical tree trunks. She shot numerous images because her results varied with the shutter speed in use and how quickly she panned the camera. This is one occasion where there is no reason to use a tripod! Nikon D300, Nikon 24–70mm lens at 38mm, ISO 200, f/11, 1/1.6 seconds, aperture-priority, Cloudy WB, autofocus using AF-C and back-button control.

Anytime action is implied or real, it is compositionally successful to compose the subject to allow it to move into the image. Barbara and her two horses—Bandit and Joker—are too centered with equal amounts of room in front of and behind the two horses. I used ISO 800 to reach a shutter speed of 1/800 second to capture a sharp image. Canon 1D Mark III, Canon 70–200mm f/4 lens at 160mm, ISO 800, f/5.6, 1/320 second, Cloudy WB, manual exposure, AI Servo AF on the shutter button.
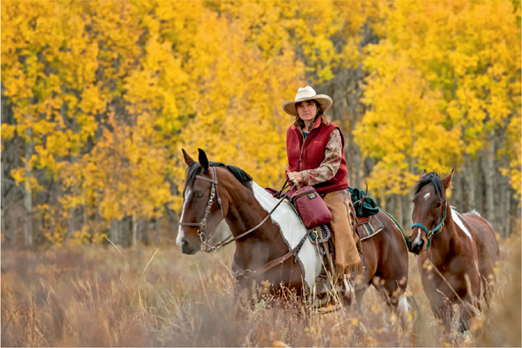
Cropping the image on the right side leaves additional space on the left to allow this exceptional pair of horses and gorgeous rider (I hope to win points here) to canter into the image. In most cases, be sure to avoid removing any portion of the main center of interest—Barbara and the two horses—when cropping the image.
KEEP THE HORIZON LEVEL
To eliminate crooked horizons, avoid tilting down to one side of the image. A lake should be level in the image, not tilted down to one side. A duck swimming on calm water should be level with the surface of the water. It isn’t easy to determine when things are perfectly level by just eye-balling it. Use the level in the camera—if your camera offers it—or attach a level to the hot shoe and level the camera with that. Some cameras let you insert another viewing screen in the camera that offers lines to keep things level. This works so well that many cameras now enable you to turn on built-in grid lines in the viewfinder. Even with the leveling aids, many images are not perfectly level. Fortunately, image processing software offers leveling tools that make it a breeze to level the image later. Don’t overdo it, though. Often a portion of the image must be eliminated to make things level. If you hope to produce a large print, you don’t want to lose too many photosites and reduce the resolution.
SUBJECT PLACEMENT
Don’t Center the Subject
Beginners tend to place a dominant subject squarely in the center of the image. In the old days before multiple autofocus points, this happened a lot because the only focusing point or focusing aid was in the middle of the viewfinder. Now that cameras have multiple autofocus points, it is a mystery why the practice continues. Perhaps it is just human nature to center the subject. A dead center (bull’s-eye) composition tends to be boring and becomes monotonous when nearly every subject is centrally situated in the image. Usually, the natural lines in the image suggest placing the main subject somewhere else. Always look for a reason to place the subject off-center because that entices everyone who views the image to visually wander through it.
There are exceptions when a dead center composition is desirable. Placing a snarling African Lion big and dead center in the image grabs your attention immediately. When photographing an animal or human in action, if it is running from left to right, place the subject on the left side of the image to give it room to visually “run” into the image. Do the opposite when the subject is running right to left. The problem is that composing a moving target is quite difficult. All too often if you try to put the subject on one side of the image or the other, you accidently cut off part of the subject. To reduce the problem of cutting off legs and tails—the two parts most likely to be cut off—put the subject dead center in the image. Now crop the image a little to allow the subject to appear to be moving into the image. This tactic works tremendously well for flying birds and airplanes. If the birds are flying to the right, focus them in the image by shooting a little looser than you might otherwise if they were still stationary, and then crop some of the image behind them. Don’t overdo making the subject smaller to allow for cropping. If you make the subject too small in the image, you might not have enough photosites on the primary subject to make a large print due to the resolution being inadequate.
The Rule of Thirds
This well-known “rule” for composing a more pleasing composition is a useful guideline that works most of the time. It is uncomplicated to follow. Divide the image into thirds both horizontally and vertically. The lines intersect in four spots called power points. These points suggest a suitable place to put the main subject in the image, rather than in the middle of the image. This does not mean all four power points work for most images, because they don’t. You still must identify the natural flow in the image. For example, if you compose a river scene that includes a waterfall in the top left corner, the waterfall is the dominant subject. Placing it on the upper left power point while letting the river meander diagonally toward the lower right power point makes the most sense. In the case of animals, the natural flow is nearly always in the direction the animal is looking. If a bird is looking to the left, then the two most obvious power points to consider for placing it would be on the lower right and the upper right. This allows the bird to look through the composition.

It makes perfect sense to compose this coastal brown bear by allowing more space behind it even though the animal’s face is pointing out of the image and the bear’s head is close to the edge. The frothy splashes reveal the energy being exerted as the bear attempts to run down a salmon that is desperately trying to avoid a “dinner date” with this ravenous bruin. Nikon D4, Nikon 200–400mm lens at 240mm, ISO 800, f/8, 1/400 second, Cloudy WB, AF-C using back-button focus control.
An excellent way to use this power point guideline is putting Polaris (North Star) on one of the power points when shooting star trails. Polaris remains stationary while all of the other stars rotate around it—a very pleasing effect.
Remember this “rule” divides things up into thirds. It works for landscapes, too. If the sky is the most dramatic part of the image, then compose the scene so the sky occupies two-thirds of the image and the foreground fills one-third, which would produce a pleasing composition. Should the foreground be more interesting than the sky, let the foreground occupy approximately two-thirds of the image and let the sky fill the remainder. Don’t get too hung up on percentages, though. We commonly allow the foreground to fill 70–90 percent of the image and use little sky when it isn’t especially attractive. When the sky is boring, we compose it out of the image altogether.
LANDSCAPE OR PORTRAIT ORIENTATION?
The landscape orientation is a horizontal composition. Most photographers shoot far more horizontals than verticals because the camera naturally fits our faces better when it is held horizontally and the camera controls are easier to use. A vertical image is routinely called a portrait orientation and works best when the subject is taller than it is wide. A tall giraffe is an obvious vertical whereas a short and wide white rhino usually fills the image nicely as a horizontal or landscape image. This is only a guideline! A lofty giraffe could make a fine horizontal if composed loosely enough to avoid cutting off any of the giraffe while allowing the animal to look into the landscape scene. An equally fine image could be a tight vertical portrait of a rhino peering directly at you.

Divide the image into thirds both horizontally and vertically with imaginary lines. These lines intersect at four points that are commonly called power points. Often placing the main subject on one of these points makes a stronger composition than placing the primary subject dead center in the image. The dominant object in this scene—the famous Balanced Rock in the southern Idaho desert—is effectively placed on the lower left power point. The power point concept is not a rule, but when used, it at least keeps you from putting the main subject in the center of the image, which is considered the dreaded “bull’s-eye” composition. Nikon D4, Nikon 14–24mm f/2.8 lens at 14mm, ISO 3200, f/2.8, 20 seconds, Incandescent WB, manual exposure mode and manual focus. Ninety images were merged to produce this image using StarStaX software.

The four lines illustrate the power point composition guideline. Using it works well to keep you from positioning too many subjects in the middle of the image. This guideline doesn’t say “all of the power points work at the same time” because they almost never do. If you had a ground squirrel standing upright and looking to the right, use the left power points to allow the squirrel to peer into the image.
Many subjects—especially landscapes—work splendidly as both landscape and portrait oriented images. Indeed, an attribute of a skilled photographer is the ability to find horizontal and vertical compositions of the same subject. Highly experienced photographers accomplish successful images using different focal lengths, too. Shooting the scene in different ways allows you to select the more successful images later.
THE IDEAL NUMBER OF SUBJECTS
When I first began to shoot images in 1972, a well-meaning photo friend gave me an article that listed and explained the “rules” of composition. One of the rules stated that the number of subjects should be odd numbers. One, three, five, seven, and so on work as the correct number of subjects. Even numbers—two, four, six, etc.—did not. When I asked the reason why, it was that you could visually divide a group of two deer into one and one and four blossoms into two and two. Of course, I countered that I could easily divide a group of three mushrooms into two and one or five apple blossoms into three and two or four and one. This “rule” never really made sense to me. However, I do agree that an odd number of subjects often appears to fill the image more pleasingly than an even number, so now I notice odd numbers of attractive subjects quickly. Nevertheless, when I find an attractive even number group of subjects, I shoot them anyway and they still make appealing images.

The rising sun creates a pink colorcast in the fog drifting over Pete’s Lake in northern Michigan. The horizontal composition emphasizes the far eastern shoreline that comprises white pine trees and fog. Canon 5D Mark III, Canon 24–105mm f/4 lens at 34mm, ISO 200, f/18, 1/50 second, 10,000K WB, manual exposure mode, AI Servo AF using back-button control.
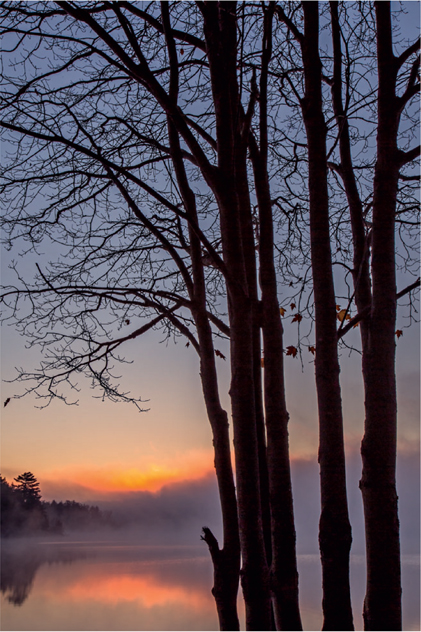
Many scenes can be successfully composed horizontally and vertically. In the previous image, the horizontal composition emphasizes the white pine trees and the foggy shoreline. The vertical composition emphasizes the sky and the upright trunks of the red maple trees in the foreground. Canon 5D Mark III, Canon 24–105mm f/4 lens at 45mm, ISO 200, f/20, 1/30 second, 10,000K WB, manual exposure mode, AI Servo AF using back-button control.
LINES
Horizontal lines are everywhere in our world. The flat horizontal line of the far horizon is a common one. Horizontal lines tend to be quiet and provide a solid base to support the main subject. They are not good for suggesting movement, but do work as a solid anchor. If you find overlapping horizontal lines—perhaps a series of sand dune ridges—then these lines definitely add significant interest to the image.
Vertical lines suggest rapid movement and help subjects to “tower” in the image. Vertical images of the vertical lines towering trees produce or the walls of buildings are quite effective in well-composed images. Look for vertical lines and use them whenever it makes sense. Diagonal lines suggest strong movement and are quite pleasing in a first-rate composition. River scenes work well as a diagonal with the river flowing from the upper part of one corner of the image down to the opposite lower corner. Always consider using diagonals when you find them in the scene. Usually choosing the appropriate viewpoint allows you to use them to best advantage. The well-known “S curve” composition for a river is effective when the river is diagonal in one portion of the image and then turns back the other way to make another diagonal line that appears similar to the letter “S” in shape.

The boiling water discharged from the hot springs carves twisting patterns in the snow. The strong diagonal line beginning in the lower right corner that meanders to the upper left corner drew Barbara’s attention. The steam from the hot pool and the trees in the background complete the composition. Nikon D300, Nikon 18–200mm lens, ISO 200, f/13, 1/60 second, Sun WB, manual exposure and back-button autofocus.
EFFECTIVE VIEWPOINTS
Selecting the optimum spot to shoot the image is essential for producing desirable images consistently. Sadly, most shutterbugs photograph everything from eye level while standing. Others always shoot close to the ground, even when it makes no sense. Skilled photographers are quick to react and adjust their viewpoint for the situation.
A high viewpoint from an airplane, hill, or even from a step-ladder is terrific when you want to emphasize the landscape in front of you. Shooting down on a huge field of tulips, cracked mud, or autumn-colored leaves floating on a pond is effective. For example, sections of Grand Prismatic Spring in Yellowstone National Park photograph best from a high hill on the south side of this colorful thermal feature. Use a polarizer to remove the glare and make the stunning colors truly pop. Aerial images of the spring are incredibly spectacular, although it’s costly to rent an airplane and you must also obtain special permission from the park to fly close enough to shoot it properly.

A high hill on the south side of Grand Prismatic Spring in Yellowstone National Park is a superb vantage point in the late afternoon sun. The swirls of color in the spring and the patterns are nicely captured by shooting down at it. Quite often it is possible to choose the viewpoint. At times an eye-level standing viewpoint works best. Occasionally being low to the ground is the best choice and frequently a high viewpoint, especially for landscapes, produces the best images. A polarizer is necessary to remove most of the glare from the hot spring in order to reveal its color. Canon 20D, Canon 300mm f/4 lens, ISO 200, f/22, 1/45 second, Cloudy WB, manual exposure and autofocusing using back-button focus.
The viewpoint you obtain if you stand will still work for many situations. If you don’t have a nearby strong foreground, then there isn’t much of a reason to get down lower. Of course, if you are silhouetting a tree against the sunrise and getting lower puts more of the tree trunk up against the sky, then get lower. Standing up is a suitable viewpoint when you have a strong foreground and are using a wide-angle lens. By shooting down on the foreground, more of the foreground can be seen in the image. Many photographers immediately get down low with a wide-angle lens, but if you are too low, you lose much of the foreground.

Too many photographers go on a once-in-a-lifetime safari to Kenya and photograph everything from the roof hatch of their safari vehicle. This high viewpoint works fine for the larger animals like elephants and giraffes, but the smaller animals and birds on the ground aren’t nearly as appealing when this high aerial viewpoint is used. When photographing the smaller animals like this Kirk’s dik-dik, use the lowest vehicle window to bring you closer to the animal’s height to produce a more intimate image. Nikon D300, Nikon 200–400mm lens at 340mm, ISO 1600, f/4, 1/1000 second, Cloudy WB, aperture-priority.
Shooting close to the ground is worthwhile for many scenes and subjects. It is incredibly effective for photographing a waterfall where the shooter can be in the river. We love the viewpoint we get with a 16mm lens that is only about 1 foot from a rock in the river that leads the viewer’s eye up to the waterfall in the background. Many enchanting subjects— salamanders, frogs, mushrooms, snails, flowers, lichens, etc.—are found living on the ground or close to it. Often the low on the ground viewpoint is the best shooting viewpoint. A common mistake we see many Kenya wildlife safari shooters make is photographing everything from the roof hatch on top of the safari vehicle. This high viewpoint works for a tall African elephant, reticulated giraffe, and a hooded vulture that perches in a tree, but makes little sense for a bat-eared fox, dwarf mongoose, or black-bellied bustard that is most likely on or close to the ground.
For wildlife photography, the optimum shooting angle is typically at the level of the animal’s eyes or slightly below. It makes the animal more dominant in the image. It is easier to get the low viewpoint by using a telephoto lens because by increasing the shooting distance, you do not have to be as physically close to the ground.
SELECT A SUITABLE BACKGROUND
Images are most pleasing when the background is uncluttered and doesn’t compete with the subject for the viewer’s attention. Distracting backgrounds are enormous problems in the images of beginning photographers and occasionally even those of more experienced shooters. Normally, it is best to seek a background that is a homogeneous color and is slightly darker than the subject. A bright background behind the subject is distracting and unappealing. Naturally, there are exceptions. A tree or animal silhouetted against a spectacular rosy sunset makes an outstanding image, and the sky is clearly the brightest portion of the image. An appropriate background is often an out of focus meadow, forest, blue sky, or water. Avoid backgrounds where the horizon line passes through the subject. I’ve seen far too many images of animals where the horizon line cuts through the head or neck. Try for all sky or all meadow backgrounds. Controlling the background is crucial for capturing compelling images with ease as well as consistency. Let’s look at several key tricks for controlling the background.
1.Select a shooting angle in which the background is a uniform color and evenly lit.
2.Use a longer focal length lens. The angle of view, and thus the field of view, diminishes as the focal length increases. It can be difficult to capture a photogenic background with a 50mm lens because the angle of view is wide, but a 500mm lens has such a small angle of view that you have to work hard to make the background look horrible.
3.Shoot using apertures in the range of f/2.8 to f/5.6 to allow the shallow depth of field obtained with these apertures to keep the background out of focus.
4.When shooting close-up images, it is easy to insert an out of focus background behind the subject. Shoot some images of flower groups that are completely out of focus, make a print of the unfocused flowers, and insert the print behind the subject. The background remains out of focus even when you stop down to f/22 to photograph the subject.
5.Find a subject where the background is farther away. If you have two equally good flower blossoms but one has other objects 1 foot behind it and the other has nothing behind it for 20 feet, the second one with the more distant background will have a more diffused background at all apertures.
6.Use focus stacking to minimize background distractions. Selective focus is a popular technique for isolating a single subject—a flower blossom for example—amid other flowers that may be in both the foreground and the background. It requires you to shoot using the f/stops on your lens that have the shallowest depth of field. The maximum aperture on the lens—f/2.8 or f/4 in most cases—provides the least amount of depth of field. Of course, even when you shoot using the maximum lens aperture, the depth of field most likely still will not cover the single blossom either. If you want the primary subject to be completely sharp while keeping the foreground and background as unfocused as possible, use focus stacking. Set the lens to the maximum aperture. Now focus on the leading edge of the flower and shoot the image. Focus slightly deeper into the flower and shoot another image. Keep this up until you shoot the final image in which the rear of the blossom is sharply in focus. Take this stack of images and run it through focus stacking software. The blossom will be completely sharp while the foreground and background remain out of focus.
7.When you have an opportunity to select a more suitable background, be sure to take advantage of it. When I am directing my driver in Kenya, I determine the location to stop by taking existing light into consideration, the clear open path to the animal in mind, closeness to the subject, and the available background choices. If you move the subject around—perhaps a potted flower, horse or child—always pick a spot where the background is pleasing. When photographing a wildflower, often a Plamp can be used to slightly bend the stem forward or backward without harming the flower to achieve a more pleasing background because it allows a different shooting angle.

Calypso orchids grow on damp hillsides in the forest during June near Island Park, Idaho. Since they stand only about 7 inches tall and live amid many other plants, the small orchids are usually photographed with a chaotic background. This would have been the case here, too. Fortunately, a photographic background that I deliberately shot out of focus for hummingbird photography doubled nicely to use as a clean background about 6 inches behind this gorgeous group of orchids. I focus stacked this group of blossoms by shooting nine images to achieve the ultimate in depth of field and overall image sharpness. Canon 5D Mark III, Canon 180mm macro lens, ISO 100, f/8, 1/10 second, Cloudy WB, manual focus and exposure, Helicon Focus software merged the images.

Yellow-bellied marmots commonly rest on rocks near the summit of Mt. Evans in Colorado during late June. Once when I found an individual marmot who did not mind being approached closely, I selected a shooting viewpoint that would produce an uncluttered background. Canon 5D Mark III, Canon 800mm f/5.6 lens, ISO 400, f/11, 1/400 second, shutter-priority, autofocus using the back-button control.
Obviously, there are many ways to control the background. It is important to prevent the background from ruining the image. Once you find a potential subject, always consider the background and do what is necessary to subdue it. Your images will benefit from your foresight!
AVOID EDGE CLUTTER
Once you have controlled the background, always scan the edges, especially all four corners, of the image for unsightly distractions. Chaotic lines and bright blobs—whether in focus or not—are common distractions that are never beneficial to the image. Try to eliminate them by selecting a different shooting angle or by physically removing them from the image, which is often called gardening. In close-up photography, removing offending distractions is easy and quick. Admittedly, cleaning up a less than desirable background can be done with software such as Photoshop. When photographing larger objects, moving the shooting viewpoint is usually necessary.
DEPTH ADDS DRAMA TO THE IMAGE
The images you capture in the camera are two-dimensional. There is a width and height, but no depth. Fortunately, depth can be suggested in many images with the wise use of lenses and light. Use a wide-angle lens close to the subject to create a large looming foreground that quickly diminishes the size of the objects in the background. Sidelight and backlight also suggest depth because the shadows these light directions create reveal textures and shapes.

Beginning with the near shoreline, the rock starts the viewer’s journey into the image of Bow Lake in the Canadian Rockies. Having interesting objects in the near foreground is an excellent way to convey depth. The contrast in the light on this scene is significant, so seven exposures were shot by varying the shutter speed one stop. Nikon D300, Nikon 18–200mm lens, ISO 200, f/18, shutter speeds of 1/1.3, 1/2.5, 1/5, 1/10, 1/20, 1/40, and 1/80, Cloudy WB, manual exposure and AF-C using the back-button focus control.
Changing the perspective suggests depth, as well. If you photograph a subject up close with a wide-angle lens, the object will appear to be much larger relative to other objects in the background. This change in perspective suggests there is considerable depth between the foreground and background. Conversely, if you stay further away from the subject in the foreground and use a longer focal length lens, the background appears larger relative to the foreground.
MORE ON PERSPECTIVE
In photography, perspective refers to the relative size of the foreground and background objects. If you stay further away from the foreground and use a longer focal length lens, the objects in the foreground appear to be smaller relative to the background objects. If you move in close to the foreground and use a wide-angle lens and make the foreground object the same size as it was in the other image, the perspective changes because the background objects appear smaller.
A common assumption is that different focal length lenses change the perspective. They do not. Perspective is changed only by changing the shooting distance. Using a real world example, staying further away from an old rustic cabin and shooting it with a longer focal length lens makes the mountains in the background tower above the cabin. If you move in close to the cabin and use a short focal length lens, the cabin appears much larger than the mountains behind it, even though in both images the cabin is composed exactly the same size and in the same position. Perspective is only changed by adjusting the shooting distance. It cannot be altered by staying in one spot and using different focal lengths.
SHOOT STUNNING PANORAMAS
A panorama is a tall or, more often, an extremely wide scene that is appealing over its entire length. Most scenes are not good panorama prospects, but some subjects demand the panorama treatment. Examples of ideal panorama themes include autumn colors perfectly reflected in a still lake, rolling sand dunes, the red rock canyons of Utah’s Bryce Canyon National Park, a gorgeous raging mountain stream that leads up to a waterfall, a series of buildings in a well-preserved ghost town, meadows abounding with a kaleidoscope of multi-hued wildflowers, rolling prairies, or coastal beach scenes. A panorama could be wildlife, too. A huge flock of snow geese roosting on a pond or a flock of shorebirds resting on the beach could work as a panorama, but only if their movement is minimal.

This old farm house in central Texas is meticulously framed with the tree in the foreground. Nikon D3, Nikon 28–200mm lens at 56mm, ISO 200, f/16, 1/80 second, aperture-priority, Cloudy WB, manual focus and metering.

Notice the tree appears larger compared to the size of the house in this image. What you are seeing is a change in perspective in which the size of the foreground and the size of the background alter relative to each other. To make this image, Barbara moved closer to the tree and shot the scene with a 32mm focal length. To change the perspective, move the shooting position closer or further away from the foreground. To make the background larger relative to the foreground, stay back and use a longer focal length. To enlarge the foreground relative to the background, move closer to the foreground and use a shorter focal length. Nikon D3, Nikon 28–200mm lens at 56mm, ISO 200, f/16, 1/80 second, aperture-priority, Cloudy WB, manual focus and metering.
Panoramas work whenever interesting elements occupy the length of the scene and everything is close to the same distance from the camera and illuminated with attractive light. Advanced photographers may consider combining HDR and focus stacking techniques to create a panorama.

Au Train falls is a series of cascades over a 200 yard section of a river near Au Train, Michigan. This cascade shot was taken with a 24mm wide-angle lens placed close to the foreground to emphasize it while nicely composing the falling water in the background to impart a strong sense of depth to the image. This cascade is extremely wide, so Barbara shot eight vertical images from left to right and overlapped each by 30 percent. She combined them into one panoramic image with the Photomerge feature in Photoshop CS6. Nikon D300, Nikon 24mm lens, ISO 200, f/16, 1/1.3 seconds, Shade WB, manual exposure and autofocusing with the back-button technique.
How to Shoot a Panorama
1. Level the Tripod
A successful panorama requires the photographer to shoot two or more images to cover the scene. It is important to make certain the camera is level. The tripod must be level on the ground, so use a tripod with a built-in bubble level. Carefully adjust each of the three legs until the bubble is centered in the level. Leveling takes a little while to do as slight changes in the legs greatly affect the bubble level. Take your time and move the legs in small increments.
When panoramas became popular several years ago and easy to shoot with digital capture, some tripod head makers began building leveling heads for the tripod. These devices make it easy to level the mount that supports the tripod head in only a few seconds. If you plan to shoot a lot of panoramas, be sure to get a leveling head (also called leveling base) that works on your tripod legs. For example, Gitzo, Acratech, Manfrotto, and others all build devices to aid in quickly leveling the tripod head. Since products come and go, search the Internet for “leveling base” and “leveling head” and many current choices will appear that fit all budgets.
2. Level the Camera on the Tripod
Shooting on a level tripod does not automatically mean the series of images will be level when you shoot. The camera on the tripod head also must be level. We use and recommend sturdy ball heads. Therefore, the camera must be level on the ball head or any other tripod head you use. Leveling the tripod head is easier to do than leveling the tripod legs. Loosen the tripod head and then use a Double Spirit Level from Hama mounted in the camera’s hot shoe. Level the bubble to make the camera level from right to left. It is helpful to level the camera from the front to back as well, but often the composition requires the camera to be tilted forward or backward slightly to accommodate the composition. If so, then don’t worry about leveling this direction and the results should be fine. Some cameras offer a built-in horizon level. If your camera offers this feature, then activate the level to make it appear on the camera’s rear LCD display. Now adjust the angle of the camera until it is level as shown by the built-in leveler.
3. Use Manual Exposure
Do not allow the exposure to change in any of the images that will be part of the final panorama image. It is best to do this by using the manual exposure mode. In this mode, the camera cannot automatically change the exposure, unlike all the automatic exposure modes.
Should you use aperture-priority, for example, the camera might use f/16 (the aperture you set) and 1/30 second for the exposure when the camera is pointed at the darkest side of the scene.
Perhaps it is darker because deep-green pine trees occupy this area. As you shoot images and pan the camera to fully photograph the expansive scene, the subjects change to bright yellow aspen trees ablaze in their autumn glory and all of the trees are reflected in still water. Now the camera is “looking” at a larger percentage of light tones. It automatically adjusts the exposure to compensate for this, creating an underexposure problem. The sky becomes considerably darker above the aspens. In the final panorama image, the brightness of the sky will vary tremendously from dark to light across the image and look unnatural. Determine one exposure for the entire scene. Remember the worst exposure sin you can commit with the digital image is to overexpose important highlights with detail—the yellow aspen leaves in this example—because you lose all detail in the leaves. Therefore, set the exposure for the brightest part of the scene where highlight detail must be kept using the ETTR guidelines. Use that exposure for all of the images.
4. Don’t change the ISO, Exposure, White Balance, and Focus
While shooting the set of images that will make up the final panorama, keep all of these options the same. However, we sometimes change the focus slightly when one side of the scene is significantly closer than the other side and we obtain favorable results. It is possible to combine focus stacking with a panorama image. If you are shooting three images to encompass the entire scene, determine where the first image begins, using focus stacking to cover the depth of field, then move the camera over and overlap the first image by about 30 percent and focus stack the next image. Do the same for the third shot. Combine the left, middle, and right sets of focus stacked images separately. Then take the three focus stacked images that represent the left, middle, and right portion of the scene and stitch them together with software.
Lock in the white balance. If one part of the image is primarily yellow in the golden sunshine and the other is blue water in the shade, keep the same white balance setting for both. That requires using a preset WB value such as Cloudy, Shade, or Sun. In this example with sun on the aspens, use the Sun WB. Auto WB automatically varies so it will change the colors from one side of the image to the other. Therefore, avoid Auto WB for pans.

Barbara shot nine vertical images to cover the wide expanse of the Milky Way as seen from Lake Ha Hand in the Lee Metcalf Wilderness. She overlapped each image about 30 percent—more or less—because this judging overlap is difficult to do in the dark. She stitched the nine images together using Photomerge in Photoshop CS6. Did you notice we use 3700K as a white balance choice for our star shots? If your camera has the K white balance option, select it and then dial in 3700K. If not, try the tungsten white balance option. Nikon D4, Nikon 14–24mm 2.8 lens at 14mm, ISO 5000, f/2.8, 20 seconds, 3700K WB, manual exposure and focus.
5. Focusing
We use back-button focusing, but manual focus works fine, too. Back-button focusing is quick and prevents the lens from focusing on the wrong spot when the shutter is tripped with a cable release. If you use manual focus, it is best to use a magnified live view image to determine precise focus.
6. Shooting the Images
It does not matter if you start on the left or right side of the scene. Pick whichever side works best for you. Composing the scene is a little counterintuitive. For a horizontal panoramic image, set the camera on the tripod to the vertical (portrait) orientation. That seems odd because you want to cover the horizontal expanse of the scene. Use the portrait orientation and don’t compose too tightly to give you more room above and below the part of the scene that will occupy your final image. If you shoot horizontal images or compose too tightly as a vertical, often one side of the image is slightly cut off if the camera and tripod are not perfectly level. For example, you do not want the top edge of the image to cut into your spectacular trees on one side of your panorama. Do exactly the reverse of this if you are shooting a vertical pan.
An image shot to be part of a multi-image panorama usually makes a silly composition. To avoid deleting it later because the composition makes no sense and you forgot you were shooting a pan, shoot a quick out of focus image of your hand in front of the lens to mark the start of a pan series. Then shoot the first image. Pan the camera over so the second shot overlaps the first by about one-third and shoot another image. Overlapping allows the software to align the elements in the image to create one continuous image where everything lines up properly. Keep overlapping shots until you capture the final image. Then photograph your hand again to mark the end of the set.
This entire process might sound like a lot of work with scores of things to remember, but once you do it a few times, it is uncomplicated and regularly yields satisfying images that will make you happy, look excellent on your web page or print on the wall, and add variety to your portfolio.
Assembling the Panoramic Image with Software
There are plenty of ways to do it. Although Photoshop can do it, the software is expensive and the learning curve is high. Barbara excels at Photoshop and easily makes it dance to her commands. I can proudly state that I am one of the best Photoshop launchers around because I can double-click on the program icon as well as anyone, but, after that, what happens next is and will most likely remain a total mystery to me. I prefer to use dedicated stitching software that is easily understood to make my own panoramas.
Canon Photo Professional
Every new Canon camera comes with the latest version of Canon’s proprietary software called Canon Photo Professional. It offers a way to assemble panoramas with JPEG images, so it is limited in what it can do, but it is a place to start.
Other Software Choices
Search the Internet for “panorama software” and you’ll find plenty of options, including free software. Although we have not tried any of these, well-known software includes www.arcsoft.com, www.ptgui.com, and www.panavue.com. Free stitching is available at www.thefreecountry.com. If running computer programs makes you nervous, I can sympathize with you. Fortunately, stitching images together to produce a panoramic image is one of the simpler processes. Even I can do it!
THERE ARE NO RULES!
This chapter presented a set of guidelines that will help you compose more compelling images and do it consistently. I made many suggestions here, but, remember, there are always valid exceptions. Avoid making photo composition too scientific. Composition is the way the elements in a scene are arranged to make a pleasing image. It is subjective! You like what you like, everyone will develop their own vision, and it constantly changes over time as we all gain experience and new photo techniques become available.
As I write this, my interest in reshooting the geysers in Yellowstone has been rekindled because now I can easily photograph geysers erupting against the stars in the night sky while using a radio-controlled flash or a strong flashlight to illuminate the geyser from the side or behind. I now look forward to returning to Bryce Canyon to focus stack the incredible rock structures while using HDR techniques at the same time. Perhaps I will combine HDR, focus stacking, and a panorama all in one image. The opportunities to compose and shoot exceptional images that were virtually impossible only a few years ago are now readily available.
Always carefully think about what makes the best composition. Be willing to change how you view things and consider new angles. Keep things simple. Find attractive subjects in a favorable situation. Use excellent technique to capture memorable well-composed images. And most of all, do not assume you are naturally good at composing. Most of us need to refine our “photographic vision” in the beginning. The process is ongoing throughout our photo careers. For many—if not most photographers—composition is more challenging than all of the technical aspects in photography. Look at the many excellent photos that appear in books, magazines, and on the Web. When you find an image you like, ask yourself why you like it. Is it the subject, viewpoint, lighting, technique, sharpness, or softness, or is it something else? Most likely, the images that appeal to you are a combination of these and other factors. It is a fact that some people are naturally more gifted at seeing a fine image and making a strong composition. Barbara is naturally better than I am, but I’ve improved tremendously over the years and continue to do so. Here’s the best news! Everyone can learn to compose dramatic images, as with the more technical aspects of photography, you must continually strive to improve—and you will. It is a fun and rewarding learning process!

Sharply focusing on this African white pelican as it glides over Lake Nakuru while simultaneously composing it nicely to include the reflection is not an easy task, especially when handholding a 500mm lens. Notice the 1/2000 second shutter speed that was used to make the image sharp. Fortunately, dozens of pelicans flew the same flight path for ten minutes providing numerous opportunities to get it right! Canon 7D, Canon 500mm f/4.0 lens, ISO 400, f/5.6, 1/2000 second, shutter-priority with +.3 exposure compensation, continuous autofocus on the back-button.