
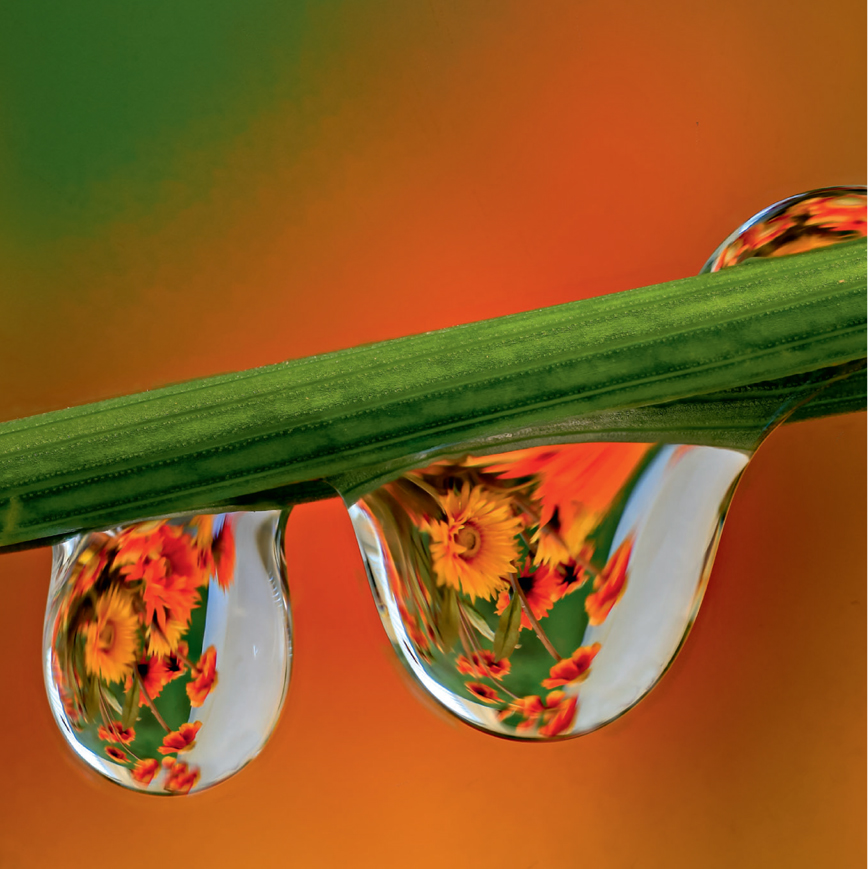
Barbara spent hours wrangling water drops and placing flowers to manipulate them to appear in the water drops. She did this indoors to eliminate all breezes, shot by window light, and used a photo background. Thirteen images were shot to cover the depth of field and these were combined with Zerene Stacker software. Canon 5D Mark III, Canon 65mm macro, ISO 500, f/8, 1.6 seconds, Cloudy WB, manual focus with a Kirk focusing rail and manual exposure.
Focus Stack for more depth of field and Sharper Images
Photographers constantly have the problem of simultaneously obtaining depth of field and image sharpness because it is always a trade-off. The sharpest aperture on the lens is typically two to three stops down from the maximum (largest) aperture on the lens. With a 200mm f/4 lens, for example, the sharpest apertures are in the f/8–f/11 range. Due to the laws of physics, though, the greatest depth of field is always at the smallest aperture (largest f/stop number), which is f/22 or perhaps f/32. In simple terms, these f/stops refer to a tiny hole in a lens that is called the aperture. As the hole the light passes through gets smaller, a larger percentage of the light touches the edge of the hole and bends. This bending of light is referred to as diffraction and causes a loss of sharpness. Diffraction is a far more serious problem than most photographers realize!
I recently tested the diffraction on my Canon 180mm macro lens for a new book—Close Up Photography in Nature. I was horrified by how bad it is at f/32. Even f/22 produced underwhelming results. Although the depth of field is optically greater at f/32, the image sharpness is far less than f/11 due to diffraction. Although photographer opinions vary, I feel that the f/32 stop is worthless on this lens and probably most other lenses as well. I am critical about sharp images, perhaps more so than most, so others may find f/32 acceptable. While it is undemanding for a lens maker to build this lens with an even smaller aperture, they do not do so because at f/45 everyone agrees the image is mush due to diffraction. I just happen to think “mush” happens long before that.
Stopping the lens all the way down creates other problems. Shooting at f/32 requires a shutter speed three stops slower than f/11. Instead of being able to use 1/4 second at f/11, f/32 would require the use of 2 full seconds to produce the same exposure. This slower shutter speed becomes a problem when photographing handheld or fighting a persistent breeze blowing the subject. Smaller apertures have yet another serious problem, too. A small aperture not only increases the depth of field covering the subject that is often desirable, but a small aperture will bring background details that often cause unsightly distractions more in focus. And do not forget about flash. Stopping the lens down makes it more difficult for the flash to illuminate distant objects. Far-off subjects are not a problem in close-up photography, but it is a recurrent problem in landscape photography.
TILT/SHIFT LENSES
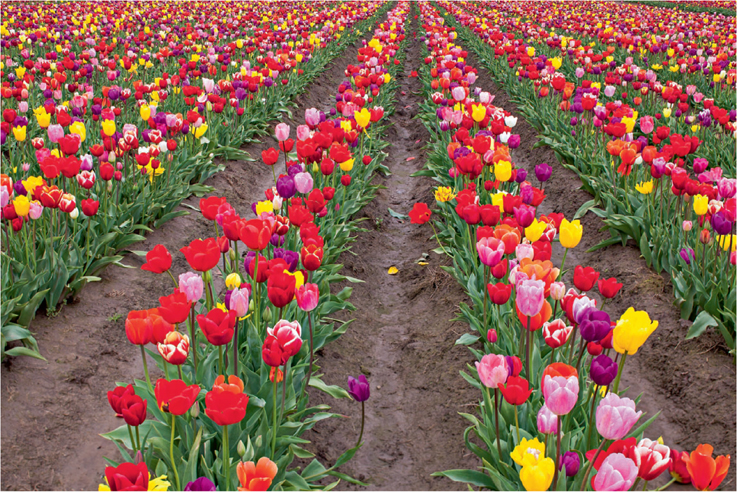
In addition to using impeccable technique, you would typically align the most important plane of the subject with the plane of the camera’s sensor in order to achieve greatest sharpness. However, certain special lenses make aligning the plane unnecessary. Canon and Nikon offer several lenses that bend and shift. Lenses that bend are frequently called tilt lenses and they do amazing things. When the lens is tilted the precise amount and in the proper direction, it is possible to make the plane of focus align perfectly with the plane of the subject without having both of them parallel to each other. For example, it is simple to make a tilt lens sharply focus a field of tulips or wildflowers. Tilt lenses are incredibly effective for adjusting the plane of focus when the angle is not too extreme. We have used tilt/shift lenses for decades with excellent results.

The tulip fields at the Wooden Shoe tulip farm (www.woodenshoe.com) near Woodburn, Oregon, were exciting to photograph when the ideal weather conditions of bright overcast and calm winds prevailed. A Canon 24mm tilt and shift lens was used, but the lens was not tilted to coincide with the plane of the blossoms. Notice how the flowers in the rear quickly go completely out of focus. Canon 5D Mark II, Canon 24mm f/2.8 T/S lens, ISO 400, f/2.8, 1/2000 second, Shade WB, manual exposure and focus.
Tilt/shift lenses, also referred to as perspective control lenses, are not meant for all photographers. Not only are they expensive, but also there is a learning curve to master to properly use them. The written instructions that come with the lens are difficult to comprehend because the instructions use too much math and diagrams. However, we find it is simple to show workshop clients how to use these lenses. Another problem is that focal length choices are limited and tilt lenses only help increase sharpness in one plane. If you align the plane of focus with the flowers in a field, it is easier to get all of the blossoms sharply focused, but their stems are now more out of focus because the stems are in a plane that is nearly at right angles to the plane of the blossoms.
The Canon 24mm T/S lens was tilted a few degrees downward to make the plane of focus on the sensor coincide with the plane of the blossoms. By also stopping down to a modest f/13, instead of f/22, to keep the shutter speed fast, all of the blossoms are now in focus. Tilt and shift lenses are terrific for obtaining better depth of field. Because new focus stacking techniques are now used, T/S lenses are less necessary. Canon 5D Mark II, Canon 24mm T/S lens, ISO 400, f/13, 1/100 second, Shade WB, manual exposure and focus.
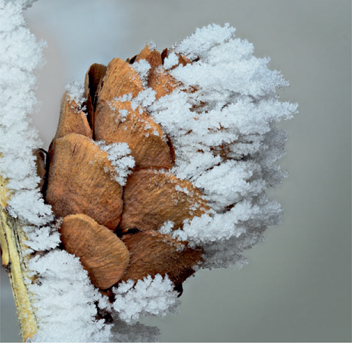
Thick frost crusted this cone and everything else in our yard on one frigid February morning. To get all parts of the tiny cone in sharp focus, Barbara shot twenty-four images by varying the focus distance and used Zerene Stacker to combine the images into one super-sharp image. Canon 7D, Canon 65mm macro, ISO 200, f/8, 1/4 second, Shade WB, Kirk focusing rail to change the focus between shots, manual focus and exposure.

Remember a total of twenty-four images were shot to create the focus stacked image. This is the first one in the series where the closest point—the frost on the twig—is sharply focused. Notice f/8 does not capture a great deal of sharpness.

The focus is midway through the stack and only a small area at the top of the cone is sharply focused.

The final shot of the stack where the frost furthest away on the cone is sharply focused.
FOCUS STACKING TO THE RESCUE
Focus stacking enables you to achieve unlimited depths of field in all planes when using the sharpest apertures on your lens. For simplicity, remember that focus stacking requires you to shoot a series of images in which the focus slightly overlaps from one image to the next. The set or stack of images, in which a small slice of the subject is sharply focused in at least one of the images, is combined with focus stacking software. Specific stacking software aligns the images, selects the sharp portions in each image, and merges them into a single image so that everything that was in focus in at least one of the images is now pleasingly sharp.
This technique is beginning to become more widely known while the software for processing stacks of images continues to improve as photographers gain experience with it and offer feedback to the software gurus who create it. Focus stacking does not produce unrealistic images. It actually does what our eyes do when you view a scene. We see things in focus because our eyes instantly refocus on where we are looking. Unless you have vision problems, you live in a focused world. Your eyes are not limited to a single snapshot in time at a given aperture. Focus stacking solves the problem all cameras have because they must be focused on a certain spot with only a set amount of depth of field to cover it. By shooting a series of images where the focus is changed slightly between them, this wonderful technique enables us to capture unlimited depth of field.
FOCUS STACKING ADVANTAGES AND DISADVANTAGES
Major advantages:
• Easy to do
• Relatively inexpensive
• Offers unlimited depths of field
• Works with any lens that can be manually focused
• Sharply focuses all planes
• Enables keeping the background completely out of focus while the subject is entirely in focus
• Enables faster shutter speeds
• Helps distant objects to be lit by flash
• Produces images that are unique
• Fun to do.
Minor disadvantages:
• Important elements must remain motionless
• Works best on a solid tripod
• More time needed to shoot images
• Software required to combine images
• Focus rail recommended for higher magnifications.
SOFTWARE CHOICES
Several software programs perform focus stacking. The more recognized programs include Photoshop, CombineZM, Zerene Stacker (zerenesystems.com), and Helicon Focus (www.heliconsoft.com). We use Zerene Stacker and Helicon Focus and are partial to both. We process our focus stacks through both programs and then select the result we like best. Sometimes we like Zerene Stacker the best and sometimes Helicon Focus best, but most of the time we cannot see the difference, so we do not favor one over the other. Each software program offers ways to customize how it works to suit your specific needs.
THE FOCUS STACKING PROCESS
SELECT THE SUBJECT
A completely motionless subject is always best for this technique. Subjects that move, such as creeping caterpillars and flowers swaying in the breeze, do not work. Flowers, mushrooms, frost, lichens, frogs, or naturally chilled insects photographed on cool mornings all make excellent prospects. We regularly use a Plamp to hold the subject as still as possible in case the air is moving the least little bit. The Plamp is attached to a small tripod (we use a $30 tripod lawn sprinkler) and the other end is attached to the object supporting the subject. Sometimes a little movement in the subject is not a problem. While Barbara was photographing a jumping spider on a rock outdoors on a cool morning, the spider raised a couple of its front legs. It wasn’t a problem because she had already shot twenty-five images to cover most of the spider and was now focusing on its rear legs. The focus stacking software selects the sharp areas in each image. Since the legs that moved during the series of exposures were completely out of focus, the software ignored them and no leg movement was visible in the final result.

Jumping spiders are plentiful residents inside and outside our winter home near Twin Falls, Idaho. They are active even on cold winter days. Around freezing most spiders become sluggish. We spotted this jumping spider perched on some tree bark. Because the bark wasn’t photogenic, we moved it carefully—they do bite—to this colorful stone. The spider held still for a few minutes, which allowed a focus stack of forty-eight images to be shot. Zerene Stacker and Helicon Focus both did an outstanding job combining these images. Nikon D4, Nikon 200mm micro lens, ISO 200, f/8, 1/2 second, Cloudy WB, manual focus and metering.
While focus stacking is outstanding for close-up and macro images, it also works for any subject that holds still. If you have a motionless animal—even an elephant or a flock of shorebirds resting on the beach—focus stacking works. Landscapes lend themselves to this marvelous technique, too. Imagine shooting in a slot canyon with a near foreground and more distant background. You are able to focus stack all of the way through the depth that needs capturing. You could even shoot HDR and focus stacking sets simultaneously and use focus stacking technique for panoramas. The possibilities are endless.
Focus stacking is incredibly useful in low light photography. If you are trying to shoot a sharp image of Delicate Arch in Arches National Park, eastern Utah, at dusk when the light is dim, a single exposure using f/22 (to get the near foreground in focus as well as the arch) at 8 seconds will be difficult. It is easier to shoot a focus stacked set of images using the sharpest aperture on the lens—f/8 for instance—because the image will have less noise at 1 second and f/8, than at 8 seconds at f/22.
Focus stacking empowers you to solve the depth of field problems in the landscape that cannot be solved either by stopping down or using the tilt mechanism found on some perspective control lenses. I still vividly remember trying to photograph the reflection of Yosemite’s El Capitan in a park valley meadow three decades ago. If I focused on the reflection, the flowers surrounding the pool of water were severely out of focus. If I focused on the flowers, the reflection became completely out of focus. I was never able to shoot them both as sharp as I wanted because the flowers and El Capitan are so far apart in distance that the depth of field from a single exposure could not cover it. Today, with focus stacking, it would be simple to capture. Focus on the flowers in the near foreground, select f/11, meter, and shoot. Next focus a little bit further away, perhaps on the far side of the pool, and shoot another image. Finally focus on the reflection in the pool and shoot another image. Run the focus stack of images through the software program to get both the flowers around the pool and the reflection perfectly sharp. It works like magic!
For years, I wanted to shoot lily pad patterns when they are surrounded by fall color reflections. If I focus on the lily pads and stop down to get all of them sharply focused (and they still are not perfectly in focus), the colorful reflections also show more detail and become distracting. My goal is to focus the lily pads sharply, but keep the reflections as out of focus swirls of color. If I shoot wide open, I get the swirls of color, but only some of the lily pads are in sharp focus because the depth of field is too limited. I have done some shots like those I envisioned by using a Canon 90mm tilt and shift lens. By tilting the lens and making the plane of focus coincide with the plane of the lily pads while shooting wide open, I was able to get the image I was seeking. Unfortunately, most of the lily pads require a longer focal length lens optically to reach them—since I can’t walk on water. With focus stacking, you are able to use any lens— even a 300mm or 500mm—and shoot wide open. First, focus on the nearest spot you want in focus, and shoot. Then focus a little further in and shoot another image. Continue the process until the farthest spot that you want in sharp focus is in focus. Process the stack and all of the lily pads are in focus while the color reflections remain unfocused swirls of color!
EXPOSURE
Use manual exposure when shooting multiple images that will be combined into one. Do not allow the exposure to change in any way within the set of images. The ambient light or light from a flash must also stay the same. Set ISO 100 or 200 to minimize noise. What about the aperture or f/stop? Set the aperture somewhere between f/8 and f/11. This sounds counterintuitive because you might think you should stop down to f/22. Since the goal is to extend the depth of field, why not use f/22 or f/32? A good question—with a crucial answer! There is no point in stopping down to a small aperture to gain depth of field that will be covered in the stack of images only to suffer the image-softening effects of diffraction. The sharpest apertures on your lens are probably around f/8 to f/11. These “crisp” apertures produce excellent sharpness so they are the ones to use. Finally, adjust the shutter speed until achieving the optimum exposure as shown by the histogram and highlight alert.

The eroding sandstone on the east side of Miner’s Beach at Pictured Rocks National Lakeshore is incredibly attractive, especially when a wide-angle lens is used close to the ground. Since the depth of field isn’t capable of covering this scene when the lens is only a foot away from the foreground, two images were shot in which the focus was varied between the two. These images were combined with Zerene Stacker software. Canon 5D Mark III, Canon 16–35mm f/2.8 lens at 21mm, ISO 100, f/8, 1/6 second, Daylight WB, polarizer, manual focus and exposure.

Focus stacking is far more effective than a tilt lens when photographing the landscape because most landscapes have multiple planes that must be sharply focused. Tilting a lens only helps the sharpness in one plane. Focus stacking sharply captures all planes. This is a two-image focus stack. Munising Fall cascades over a cliff face, which is sharply focused. In the second shot, the tree is sharply focused and the waterfall isn’t. To bring out detail in the maple tree in the foreground, I fired a flash to brighten it. Helicon Focus combined these two images to make the one shown here. Canon 5D Mark III, Canon 24–105mm lens, ISO 400, f/11, 1/6 second, Cloudy WB, manual focus and exposure, Canon 600EX flash with ST-E3-RT flash controller.

Use a polarizing filter to darken the blue sky and remove glare from the yellow aspen leaves. First determine the exposure. Second, focus on the aspens using continuous autofocus on the back-button by pointing the single activated AF point at the trees. Press down on the button to make the lens focus on the aspens. When it does, then release the button to lock the focus. Next compose the image and make certain the horizon line is level horizontally. Shoot the first image. Now activate an AF point that corresponds to the rocks and press the AF control button to focus on the rocks. Shoot the second image. Now merge both images together with Helicon Focus or Zerene Stacker and everything is sharp. Canon 5D Mark III, Canon 24–105mm f/4 lens at 84mm, ISO 100, f/11, 1/15 second, Daylight WB, Polarizer, manual exposure and AF-Servo on the back-button control.
FOCUS
Use manual focus. Autofocus modes are difficult to work with when you need a small focus change. Decide the spot where you want the sharp focus to begin. For example, suppose a jumping spider is quietly perching on a stone. Do you want all of the stone in the foreground to be sharp or only the stone slightly in front of the spider? It is your choice. You do not have to make everything sharp in the image—only those portions in which you want sharp focus. When you have determined the starting point for sharp focus, shoot the image using excellent technique—tripod, remote release, and mirror lock-up. Focus the lens a little deeper into the scene and shoot another image. Remember, the increment changes do not have to be exactly the same, but you do want some overlapping sharp areas between consecutive images. You may be wondering how we shoot it. We manually change the focus only enough until we see it change and then we shoot another image. Keep focusing and shooting deeper into the scene until you capture the furthest spot in which you want sharp focus. Some subjects with limited depth only require a few images and some demand fifty or more. We commonly shoot stacks of thirty to forty images when we photograph a small jumping spider or tiny flower blossom where we need magnification greater than life-size. Larger objects need fewer images to cover the desired depth of field. Remember that at any given aperture, the greater the magnification, the shallower the depth of field. This requires a larger image stack to sharply cover the depth.
FOCUSING STRATEGIES
We primarily use two methods to change the focus. Here’s the first way. With our 100mm, 180mm, and 200mm macro lenses, we typically turn the focusing ring on the lens a little at a time between shots. It is quite natural to do and works well. Just be careful to avoid bumping the tripod-supported camera because it may cause a change in the composition and then the images will not align well—although most focus stacking software programs can align images if they are not too far out of alignment.
A focusing rail is a second and perhaps a better way to accomplish the focus changes. Mount the camera on the rail. Turn the knob to move the camera back and forth in as tiny an increment as needed. The focusing rail is by far the best way to work when you approach and exceed life-size (1x or 1:1) magnification. Indeed, with my favorite lens for high magnification images—the Canon 65mm macro—the focus rail must be used because this lens has no focus ring. Instead, the ring changes the magnification to cover the range of 1x to 5x. Some stack shooters think that one focusing method is better than the other. However, we have not yet found a reason to use one focusing method over the other as they both seem to work equally well. Making the focus changes is straightforward on the focus rail, but you must have one. It does take time to mount it on the tripod head and then attach the camera to it. We honestly like the Kirk FR-2 focus rail ($300) for being precise. Please go to www.kirkphoto.com for information. To summarize, there are two ways to change the focus:
1. Turn the focus ring manually on the lens.
2. Mount the camera or the lens’s tripod collar, if it has one, on a focusing rail and change focus by moving both the lens and the camera back and forth along the rail.
LENS CHOICES
Focus stacking works with any lens for landscape as well as close-up photography. You could take a 70mm lens and focus on an arch in California’s Alabama Hills and then focus on the Sierra Nevada Mountains far behind it and merge the two together. In close-up photography, any macro lens works nicely. To shoot especially high magnifications that are greater than life-size, use a shorter macro lens and focus it all the way out to 1x. Now add extension tubes to the optical system to reach magnifications greater than life-size. Some of you who have read our books and articles may be surprised that we do not automatically go to our long focal length macro lenses. Short macros are efficient at high magnification. The wide angle of view of a 50mm macro isn’t that much of a problem because the depth of field at f/11 or any aperture is so tiny at life-size and greater that no object distractions will appear in the background because everything is completely diffused from being so far out of focus. The main problem might be bright spots from the sky. Find a shooting angle that allows you to capture a uniform color in the background.

We have been leading photography workshops inside Yellowstone National Park since 1995. During that time we have been to Artist Point at least one hundred times. Until 2013, we photographed this view of Lower Falls by stopping the lens down to f/18 and focusing on a tree in the foreground. The depth of field did not fully cover the scene and the sharpness was diminished by stopping down to f/18. We now use focus stacking to completely cover the depth of field and to make an overall sharper image. Wow, so much has changed! Six images were shot. The focus is varied from foreground to background and then merged into one final image with Helicon Focus to produce tremendous overall sharpness. Canon 5D Mark III, Canon 24–105mm lens at 98mm, ISO 200, f/11, 1/250 second, Cloudy WB, manual focus and exposure.
PROCESSING THE STACK OF IMAGES
HELICON FOCUS
Using PhotoMechanic, I download the images from my CF card to a 1.5TB external hard drive. Next I open the Helicon Focus 5.3 software program. When the window opens, on the right side of the screen under Run, press the Browse Folder Tree icon. Find the stack of images that you want to process. When you select them, the images will appear in the window. If you shoot RAW and JPEG simultaneously as we do, then select all of the JPEGs or all of the RAW images by checking the box. Helicon Focus works easily with RAW or JPEG files. Press the Run button and the software takes a minute or two to process the images and this depends on how many images there are. Eventually, the image will appear that incorporates all of the sharp portions of each image in the stack into a single image showing tremendous depth of field. Name this file and then save it.
Under the Parameters button, there are three methods one can use to process the stack.
These methods include:
A. w.average
B. depth map
C. pyramid.
Some methods work best with certain images. For example, jumping spiders have lots of detail and method C will work best. I always run every stack through the depth map and pyramid options and decide from there. I tried the w.average option, but always preferred one of the other two, so I no longer use the A option. Options are available for adjusting some processing controls.
ZERENE STACKER
There are many excellent articles and tutorials about this software and image stacking on the Zerene Stacker website. We do not have space to go into detail in this book, but included here is a short description about how to process images. The images that make up your focus stack are your Source images. When you open the program, add the Source images to the list of Input Files. You can drag-and-drop the images with Windows Explorer or Macintosh Finder. Alternatively, you can add the images with File > Add File(s) in the Zerene Stacker menus. Now make a stacked image with Stack > Align & Stack All (PMax). Last, save the result by clicking on File > Save Output Image.
Zerene Stacker offers another method to combine the images called DMap, so you can process the images both ways. PMax is very good at preserving fine detail, but it tends to increase noise and contrast and alters the colors somewhat. DMap does a better job of keeping the original smoothness and colors, but it isn’t as good at finding and preserving detail.
Which software program is best?
We cannot declare a favorite because both programs give us excellent results. We did an abundance of focus stacking for our new book—Close Up Photography in Nature—and used processed stacked images from each program. The worst part for us is viewing all of the images we have taken in the past that could have benefited tremendously from focus stacking had we only been using it sooner!
CONCLUSION
Focus stacking facilitates your ability to obtain far more depth of field and overall sharper images than previously possible. It is simply astonishing to have such enormous control over the depth of field. Although photographers tend to use focus stacking to get everything sharp, it also works the other way. Now you can use focus stacking to photograph a flower with lots of depth and get everything sharp. But, if you stop shooting the stack at the back edge of the flower, the background remains completely out of focus, which is usually just what you want. Indeed, the background is far more out of focus than it would be if the flower were shot with a single exposure at f/22.
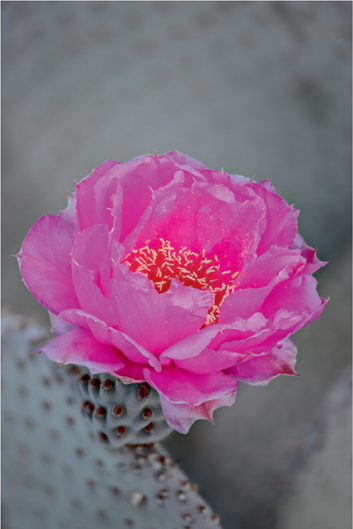
Focus stacking is effective for limiting the depth of field, too. To isolate this blossom against the cactus pad immediately behind it, Barbara shot using f/4.5 for a shallow depth of field. The background is nicely blurred, but a single shot at f/4.5 does not sharply record the entire blossom. Therefore, she shot a six-image stack of images at f/4.5 and changed the focus slightly between images to fully cover only the blossom. Using Zerene Stacker, she merged the six images together to make a sharp overall image of only the blossom while leaving the background pleasingly out of focus. Nikon D4, Nikon 200mm f/4 micro lens, ISO 400, f/4.5, 1/8 second, Cloudy WB, manual metering and focusing.
Although most photographers use focus stacking primarily for close-up photography, it is incredibly useful in all types of photography anytime it is possible to shoot multiple images of a still object. We frequently use focus stacking for landscapes. And we can visualize situations in which it is possible to use it in wildlife photography when the animal is motionless. Hopefully, future cameras will offer built-in focus stacking and allow you to program the camera to automatically shoot stacked sets of images. It would be phenomenal if the number of images and the incremental changes in focusing could be set as well. Focus stacking does work with our tilt/shift lenses as well. Consider a field of tulips. Tilt the lens so the plane of focus coincides with the plane of the flower blossoms. The stems go more out of focus because the plane of focus of the stems is nearly at right angles to the plane of the flower blossoms. Now focus stack your way through the stems to record them sharply up and down. Finally, merge all of the images together for the ultimate in overall sharpness.
Over time, new uses for focus stacking will surely surface. Focus stacking is one of the most useful techniques that have become available during our forty-year photography careers. Do not be left out! Go to the Zerene Stacker and Helicon Focus websites, view the tutorials and download the free trial software. Search the Internet for “focus stacking” articles, tutorials, and picture examples. Get started now and you will surely have fun!

Winter brings snow and ice to our home. We still enjoy photographing plants, so Barbara bought this poinsettia to use as a subject and photographed it indoors with soft window light. To capture all of the depth in the subject and achieve the ultimate in image sharpness, thirty-one images were shot where the focus was varied slightly between them. This series of images (stack) was assembled into one with Helicon Focus software. Nikon D4S, Nikon 200mm f/4.0 micro, ISO 100, f/18, 1/2 second, Cloudy WB, manual focus for thirty-one images and the manual exposure mode.