
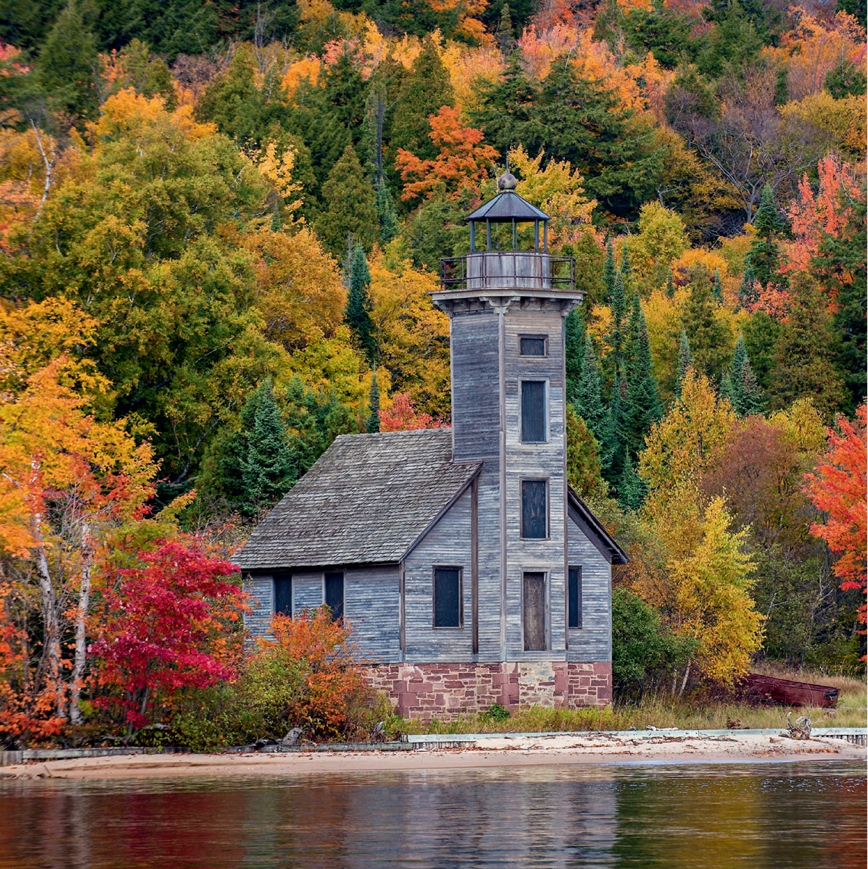
We highly recommend using a tripod to shoot sharp images whenever possible. We almost always shoot on a sturdy tripod, but one exception is when we photograph the East Channel Lighthouse in Munising Bay. Anytime you are shooting in or on a boat rocking in swells makes tripod use pointless. Instead, we used the best handholding technique we know. This technique includes using higher ISO than normal and opening up the lens to allow a faster shutter speed, activate the image-stabilization on our cameras, use autofocus carefully to stay locked on to the lighthouse, and shoot plenty of images to increase the chances of getting some really sharp ones. Nikon D4, Nikon 28–200mm lens at 110mm, ISO 400, f/8, 1/125 second, Cloudy WB, manual metering and autofocus with the back-button control.
Shoot Sharp Images
It is simple to shoot soft images. Flawed shooting technique prevents many shutterbugs from taking full advantage of their quality lenses. Let’s describe George, a fictional photographer who is doing everything wrong. Because George thought he could get a deal he bought a 28–200mm lens from an unheard-of company that makes third-party equipment. George then mounted a cheap UV filter on the lens to protect it and lost the hood because he never intended to use it. He never cleans the lens with either a cloth or blower because he doesn’t worry about dirt accumulating on the UV filter. George uses aperture-priority and never considers using a tripod because he “knows” he is steady. He keeps the autofocus on the shutter button and keeps all of the twenty-one autofocus points active. Although George loves his images and his friends say they are great, when carefully scrutinized, not one of the images is tack sharp because his shooting practices are dreadful.
Is it actually necessary to devote an entire chapter to shooting sharp images? Sadly, in reality, most images are not as sharp as they could be. Lenses are excellent today, but they do have optical problems that limit sharpness. That said, few photographers see the flaws in their lenses because their shooting technique is by far the most consequential limiting factor. Make it a goal to acquire super shooting methods that allow you to capture sharp images. Although there is a lot to be aware of, once you acquire superb shooting habits, you will simply and consistently shoot tack-sharp images.
START WITH A CLEAN LENS
The lens focuses the light onto the imaging sensor. If there is any debris—dust, hair, water spots—the light that should pass through the lens can’t at that spot, and the image loses a little color and sharpness. You should always keep the glass surfaces of the lens clean. When not using the lens and it is not attached to the camera, keep the front and rear protective caps on the lens. Covering a lens helps to keep dirt off the glass surfaces and protects the lens from scratches. When the lens is mounted on the camera and you are not shooting, put the front cap on the lens.
No matter how careful you might be there is often a bit of dust on the lens. When this happens, take the front and rear caps off, and blow the dust off both ends with a Giotto Rocket blower. If the lens looks clean, then mount the lens on the camera and install the lens hood to reduce flare problems and protect the lens. If blowing the debris off with the blower does not work, then gently rub the lens with a clean microfiber cloth to loosen the debris. Blow the lens off again. That usually works, but if it doesn’t, then put lens cleaning fluid on lens cleaning tissue paper and rub the lens again. Be gentle doing it. Begin in the middle of the lens and slowly move to the outer edge by rubbing in a circular motion. Then rub the lens with a microfiber cloth, and always blow off any debris that might remain with the blower. Following this procedure always works for us. If you get something truly sticky on the lens, then you might have to take it to a repair facility.
Making sure the glass surfaces of your lens—front and rear elements—are clean will produce better quality images. Lens cleaning equipment is inexpensive and simple to use. There is simply no excuse for shooting with dirty lenses. Make it a habit to keep the lenses clean at all times.
HANDHELD PHOTOGRAPHY TECHNIQUES
Barbara and I hope you want the highest quality images possible. These qualities include excellent light, effective composition, optimum exposure, and super image sharpness. At the beginning of our photo careers, we were keenly aware we were competing against the best photographers in the world. We knew we could not cut quality corners and still succeed in such a competitive business. We never cut corners and hope you will not either.
We use a sturdy tripod for all images we shoot whenever it is feasible to use one. We shoot 95 percent of our images on a tripod, but there are certain instances when a tripod or even a monopod do not work. Photographing from a bobbing boat requires handheld shooting because you are better off using your body to absorb some of the rocking motion. That said, it is lazy to shoot handheld when it is easy to use a tripod. Too many photographers do that and, as a result, their images suffer. When you must shoot handheld, though, use these strategies to shoot sharp images. Although regular tripod use is crucial, there are situations where handheld shooting is necessary. Many places—butterfly houses, museums, and archeological sites—do not allow tripod use because it is a tripping hazard to other visitors or they think using a tripod means you are a professional photographer. Some places do not want you to sell images shot at their facility. Tripods are essentially not usable on boats that are either under sail or bobbing to and fro. There are times when a large boat is at anchor in quiet waters and a tripod could be usable, however. I have paddled my kayak into the mud to increase the stability and used a tripod effectively. Plenty of viewing platforms do not accommodate tripod use. Especially when shooting wide-angle lenses, it is challenging to get the tripod-mounted camera in a spot to exclude the railing, such as the Lower Falls in Yellowstone National Park from the brink viewpoint. When you must shoot handheld, though, use these strategies to shoot sharp images.
THE 1/FOCAL LENGTH RULE
Some of us are naturally steadier than others. The very fact that your heart is beating means your body is never completely still. You wiggle, and this causes camera-shake anytime shooting handheld. This formula provides a widely used guideline (we are not at all fond of rules) that says, “the shutter speed should be equivalent to 1/Focal Length to ensure sharp images when handholding the camera.” Translated to a 15mm lens, it indicates a shutter speed of 1/15 second, a 100mm lens needs 1/100 of a second shutter speed, and a 300mm lens needs a shutter speed equal to 1/300 of a second. Longer focal length lenses require more shutter speed because they magnify the image still more, which also in turn magnifies camera-shake. The understanding is that as long as you keep the shutter speed up to the 1/focal length equivalent, camera-shake will not cause unsharp images.

The viewing platform has limited space where the Lower Falls leaps off the cliff in Yellowstone National Park. It is nearly impossible to shoot straight down the falls with the camera mounted on a tripod. I shot handheld with my left hand on the fence. I used my right hand to hold the camera so it rested on my left hand to reduce camera-shake and to shoot a sharper image. Canon 1Ds Mark II, Canon 17–40mm f/4, ISO 200, f/8, 1/100 second, Cloudy WB, manual exposure and autofocus using the back-button.
Please keep in mind this guideline is meant for camera-shake problems only. It does not apply for arresting subject motion. Flying birds, galloping horses, racing cars and runners will all require shutter speeds much faster than this guideline suggests.
CROP FACTOR
This guideline is often modified for cameras with a small sensor. If you have a 1.6x crop factor camera, a 100mm lens behaves more like a 160mm lens (1.6 x 100mm = 160mm). Then a shutter speed of 1/160 second is warranted. Crop factor cameras do not change the focal length, and they do not give you greater magnification. The smaller sensor merely crops in-camera what would have been captured with a full-frame sensor. The crop factor changes the angle of view of the lens but doesn’t actually magnify the subject. Nevertheless, you must adjust the effective focal length for small-sensor cameras when using the guideline.
With a background in competitive rifle shooting where steadiness is crucial, I am probably more steady than most—as long as I have not just consumed three cups of coffee. I have tested this 1/focal length shutter speed guideline and find it indeed works quite well for me. Nevertheless, for my quality needs and to err on the side of sharp images, I increase my shutter speed at least one stop faster than the guideline suggests. When handholding a 30mm focal length, for instance, I use at least 1/60 second. If using a faster shutter speed for small-sensor cameras truly does matter, this modified guideline takes care of it.
WATCH OUT FOR ZOOM LENSES
If you are using the 1/focal length guideline, be careful when using a zoom lens. Be aware that when you have a 28–200mm zoom, for example, a shutter speed of 1/28 second works at the 28mm setting, but you need 1/100 second at 100mm and 1/200 second at 200mm.
BRACE THE CAMERA
Miner’s Castle is the most photographed rock in Michigan. From the elevated viewing platform, the rock makes a pleasing image when isolated against the dark gray stormy waters of Lake Superior. An exceptional 24mm image is easy to capture by handholding the camera and composing the shoreline to lead up to Miner’s Castle with a vertical composition. What amazes us is the percentage of photographers who shoot handheld and lean over the railing a little to compose the shot. We agree you can’t use a tripod because it is nearly impossible to set it up on the platform in the required position. But wait! There is a convenient railing to rest your hand on. Then stabilize the camera by resting it on your hand and shoot the image. Using your hand as a convenient and always available “beanbag” eliminates nearly all of the camera-shake! When handholding, always use a fixed solid object to stabilize the camera whenever possible!

Using a wide-angle lens is a popular way to compose the Lake Superior shoreline with Miner’s Castle—the most photographed rock in Michigan—at the top left of the image. To make this composition, you must use the railing to steady the camera and shoot handheld, because it is not possible to get a tripod-mounted camera into the optimum position. Most shutterbugs merely lean over the railing a little and shoot handheld without steadying their camera and therefore their images are not nearly as sharp as they should be. Canon 5D Mark III, Canon 16–35mm f/2.8 lens at 18mm, ISO 400, f/11, 1/25 second, Shade WB, manual exposure and autofocus using back-button control and polarizer to reduce glare on the water.
FAVOR HIGH SHUTTER SPEEDS
Be willing to use a little higher ISO, perhaps ISO 400, and don’t stop the lens down quite as much to allow the use of a faster shutter speed when handholding. Image sharpness will noticeably improve.
IMAGE-STABILIZATION
Many wildlife species are easily photographed from a boat because they don’t fear danger coming from the water. If you ever visit the Galapagos or Antarctica, you will surely need to photograph from small Zodiacs at times. For these and similar situations where handheld photography is necessary, using lenses or cameras that have built-in image-stabilization can be incredibly helpful. Depending on the system, most stabilize the lens by moving glass elements in the lens to counteract camera-shake. Others use a different method in which the sensor moves to reduce camera-shake. We regularly use Canon and Nikon lenses that offer image-stabilization (IS) when handholding. It is excellent new technology that continues to improve. Makers claim that their image-stabilization equipment allows the use of two to four stops lower shutter speeds. If they claim four stops, it suggests you can use a shutter speed of 1/25 second with a 400mm lens. Here’s the math. A 400mm shutter speed, when reduced four stops becomes, 400 – 200 – 100 – 50 – 25. Because equipment makers tend to be optimistic, please do not believe these claims. Believe me though, image-stabilization does work and it helps considerably. With my Canon image-stabilized lenses, I routinely use 1/24 second with my image-stabilized 24–105mm lens when zoomed to 24mm. In other words, with IS, I feel confident of literally using the 1/focal length guideline. And remember, image-stabilization is similar to the 1/focal length guideline in that it only applies to camera-shake. It does nothing to arrest subject motion when only faster shutter speeds or short flash durations help the situation.
WHEN YOU DO NOT NEED A TRIPOD
Wide-angle lenses reduce magnification, which allows the use of slower shutter speeds while handholding. A favorite winter subject are the “ghost trees” on Two Top Mountain near West Yellowstone, Montana. In late January and early February, these trees are entirely encased in snow and ice. It is an awesome sight and a spectacular photo subject. The Canon 24–105mm zoom lens with image-stabilization is ideal for photographing these trees handheld. A tripod could be used in the soft snow by packing it down, but why bother? On a favorable morning, it is likely to be below zero and tripods get cold and are slow to use in deep soft snow. The morning sun is bright, so there is plenty of shutter speed to even use f/16 for depth of field. A few years ago, I tested and compared shooting on a tripod and shooting handheld and could find no difference in image sharpness. When shooting at f/16 with a shutter speed of 1/250 second and an image-stabilized lens at 24mm, it is pointless to use a tripod to obtain sharpness. Of course, if you are shooting multiple images for a panorama, focus stacking, or HDR, then using a tripod is best.
TRIPODS
A bewildering variety of tripods are available. How do you decide which one is best for you? There is no easy answer because the answer depends on the kind of images you shoot, how much weight you are willing to carry, and how much you are able to spend. Here’s a list of guidelines to consider:
•If the tripod legs are not long enough to support the camera at eye level when standing, you will detest having to stoop over every time you shoot on it. When the legs are fully extended it does not hurt to have the camera supported a little higher than eye level. If you are shooting on a slope, the downhill leg must reach further, so the camera will be lower than eye level. If the legs are extra-long, you can avoid this occasional problem.
•You will find many delightful subjects on or near the surface of the ground. If you are photographing a mushroom, frog, salamander, or many wildflowers, you will need to put the camera near the ground. Therefore, it is crucial to have a tripod that is specifically made to allow the legs to splay out flat. Most tripods do not permit spreading legs all the way out, so check this closely.
•The legs must splay out at different angles independently of each other. You do not want a tripod that does not permit this independent setting because it makes it difficult to use on a slope.
•Avoid tripods with a long center column. The column is used to elevate the camera. That sounds like a good idea, but the camera is not stable when mounted on top of a long center column. Also, the center post column can make it difficult or impossible to shoot near the ground when you splay the legs, because the column strikes the ground before the camera is low enough.

The entire forest on Two Top Mountain near West Yellowstone, Montana, becomes encased in ice and snow by late January. These trees photograph best with short lenses against a bright blue sky. Since the sun is shining and the lenses are short, there is no need to use a tripod because the shutter speed needed is quite fast. Nikon D4, Nikon 14–24mm lens at 20mm, ISO 200, f/11, 1/400 second, Sun WB, manual exposure and autofocusing using back-button control.
TRIPOD SUGGESTIONS
Tripod models constantly change. That is good and bad news. It is advantageous that the tripod makers are continually working to build better products. It is not so good for me because it makes it difficult to suggest models when a favorable model is discontinued so quickly. For the record, we use Gitzo tripod legs—models 1340 and 1325—but both are now discontinued. The most similar current models to the ones we use are the GT3532S (Systematic Series 3 carbon fiber tripod, 3-section compact level) and the GT3542LS (Systematic Series 3 carbon fiber tripod, long 4-section, eye level). If you are looking for a tripod, go to www.gitzo/tripods and look at the Systematic tripod line. These tripods are well made, come in different sizes, and do not have a center column. Current models we find appealing include the two just mentioned and the GT3330LS, GT25325, GT2542LS, and GT25425. Gitzo makes Mountaineer tripods and the lighter-weight, smaller Traveler series. These tripods are not inexpensive, but they are well made and will last a lifetime. We have used our current tripods for at least ten years and they continue to operate flawlessly.

A tripod must be able to spread its legs widely to easily allow photographing the many attractive subjects that live on or are found near the ground, such as this dew-laden damselfly. The ambient light is underexposed by about 2/3 of a stop and the Canon 600EX flash is used with the ST-E3-RT radio controller. The FEC is set to +.7 stops to optimally expose the damselfly with the flash. Canon 5D Mark III, 180mm f/3.5 macro, ISO 160, f/18, 1/10 second, Cloudy WB, manual ambient exposure and manual focusing.
Manufacturers make most tripods out of aluminum and they work adequately. We still prefer the more expensive ones made of basalt or carbon. These are not only a little lighter and stronger and more rigid, but also the legs slide in and out a little more smoothly. Really Right Stuff (RRS) makes quality tripods, so please consider their products. They are well made and carefully designed to meet the needs of outdoor photographers. Once again, you only get what you pay for. All quality tripods are expensive. Manfrotto builds a line of tripods that are less expensive as do many other companies attempting to fit the needs and budgets of all photographers. We see a lot of different tripods in our field workshops and most are quite functional. Still, for our work and personal reasons, we continue to prefer our Gitzo tripods.
TRIPOD LEG COVERINGS
Many photographers buy specially made leg covers to make the legs easier to carry and to separate your warm hands from cold tripod legs on chilly days. Some leg covers are made in camouflage fabric to attempt to hide tripods from skittish wildlife or human onlookers. Barbara uses leg covers on her tripod, but I prefer not to do so mainly because it adds extra mass and weight and makes it more difficult to access the leg locks. If warmer and softer tripod legs sound good to you, search the Internet for “tripod leg covers” to find an abundance of products.
TRIPOD HEADS
There is a bewildering variety of heads made for your tripod. We have seen hundreds of different tripod heads over the years and dislike nearly all of them. Many are flimsy, poorly designed, difficult to use, or simply don’t do what photographers need them to do. Your images will suffer when you try to shoot with a lousy tripod or inadequate head mounted on a good tripod. The vast majority of serious photographers use sturdy ball heads for everyday shooting and the Wimberley Gimbal head for photographing action when panning is necessary, especially when using super-telephoto lenses. Rather than trying to discuss a huge variety of tripod heads that possibly might work, let’s narrow it down to a few of the very best choices.
A ball head is a very simple head that is sturdy and allows you to comfortably and quickly reposition the camera. Most heads have only three controls. One control loosens the head to allow the camera to pan in all directions. A second control sets the tension on the ball. With added tension the ball head does not move quite as easily, which helps some photographers hold their camera when the ball is not tightly locked. I have no difficulty holding the camera on a loose ball head, so I always keep my tension control knob set to no tension. The third control lets the ball head pan horizontally. I don’t use this feature a lot either because it is easy enough to pan the camera by loosening the ball and panning the ball. However, if you are shooting a panorama image and must keep the images level, or if you use a Gimbal style head for panning with a telephoto lens, then it is crucial to have the pan control.
We use the fabulous Kirk BH-1 ball heads (www.kirkphoto.com) and have done so for decades. They are solid, reliable, and simple to use. The BH-1 ball head weighs 32 ounces and costs $385. The smaller BH-3 model is 20 ounces, costs $285, and can support up to 15 pounds. If you don’t use any lenses larger than a 300/2.8 lens, then the Kirk BH-3 model is all you need.
Another line of excellent ball heads is made by Really Right Stuff. Though slightly more expensive than Kirk’s, the BH-55 and BH-40 are excellent. All of the ball heads mentioned here are enormously popular with serious photographers who want good equipment that will be reliable to use forever. As a starting point, look first at the offerings by Kirk Enterprise Solutions and Really Right Stuff. There is another good reason to use these particular ball heads. A number of accessories that assist you in shooting excellent images are made to work with these ball heads. Kirk, Really Right Stuff, and Wimberley all make L-brackets, camera plates, and lens plates that precisely fit the quick release mechanism on these ball heads. Do not buy any tripod head where its quick release mechanism only works with a few items made by the tripod head builder. You do not want to lock yourself out of being able to use the fine products of these three companies.

We use Kirk ball heads (www.kirkphoto.com) with exemplary success. Kirk ball heads always work well for us and we never have trouble with them. The smaller one on the left is the BH-3 model ($285) and the larger one is the BH-1 ($385). If you do not have mammoth lenses—500mm f/4 for instance—then the smaller and less expensive BH-3 is the one you need.
WIMBERLEY HEAD
Wimberley (www.tripodhead.com) originated their world famous head that excels at allowing a photographer to easily pan with moving subjects. Their unique head is designed to balance the lens perfectly. When set up properly, the head does not need to be locked in place. It allows the photographer to pan the camera with a big lens up, down, left, or right, and keep it perfectly stable. If you let go of the camera, the equipment remains suspended in place. Panning with moving subjects is now extremely easy. There is no better head for panning than the Gimbal style head, but they are a little bulky for immobile objects—landscapes and close-ups for instance—where the ball head still works best.

left: The Wimberley Sidekick ($250 – www.tripodhead.com) conveniently and quickly converts the Kirk BH-1 ball head into a Gimbal head. Once the lens and camera are balanced, it is effortless to pan in any direction with the touch of a finger. If you let go of the equipment, the camera and lens remain in perfect balance. Every serious shooter we know uses some sort of Gimbal head to make action photography much easier!

top: Many top-of-the-line telephoto lenses have two image-stabilizing modes. When handholding and you want to stabilize the lens in all directions, select Mode 1. If you are panning, then select Mode 2. In this case the duck is swimming to the right, so you would pan from left to right. In Mode 2, the camera doesn’t attempt to stabilize the image in the horizontal direction, but it does stabilize the image to reduce vertical camera-shake.
The Wimberley Head Version II ($595) is the ultimate for panning images shot with telephoto lenses. To save a little money, the lighter and more compact Sidemount Wimberley Head ($495) is quite effective. If we used telephoto lenses most of the time, we would always use the Wimberley Head Version II. Instead, we both like the Sidekick ($250), which quickly and easily converts our Kirk BH-1 ball heads into a Gimbal style head. It is very efficient, even for our heavy 200–400mm zoom lenses.
TRIPOD HEAD ACCESSORIES
L-BRACKETS
These brackets are indispensable. L-brackets are made for all of the popular cameras. The bracket screws into the bottom of the camera. It provides two quick release attachment points, one on each side of the “L.” To mount the camera horizontally on the tripod head, slide the plate that provides a horizontal orientation into the ball head’s clamping mechanism. To shoot a vertical composition, take the camera off the tripod head and mount it on the other side of the L. Now the camera is mounted vertically on top of the tripod head. No longer is it necessary to take the tripod head and flop it over to compose a vertical shot. Doing that destabilizes the camera and is incredibly inconvenient. It is far preferable to mount the camera either horizontally or vertically on top of the tripod head.


L-brackets are incredibly useful for supporting the camera both horizontally and vertically on a suitable tripod head that is built to accept them. Kirk Photo makes outstanding ball heads and exceptional L-brackets that are custom designed for your camera. Rather than flopping the camera over to the side to shoot a vertical on a tripod and destabilizing the whole setup, merely mount the camera vertically on top of the tripod and keep the center of gravity over the tripod legs. It seems like such a simple thing, but none of the serious photographers we know would photograph without using L-brackets! Essentially, the L-bracket has a quick release plate on two sides.
Mount the camera horizontally as shown in the top image or vertically as seen in the bottom image.
QUICK RELEASE PLATES
If you don’t use the L-bracket, then at least get a quick release plate that is made for your camera. These plates are solid. When properly attached, nothing wiggles, and they don’t come loose. You must use an Allen wrench (key) to remove them. Using a generic quick release plate that doesn’t fit snugly and comes loose by itself is a continual nuisance and a major reason for unsharp images! Some lenses come with a built-in tripod mount (collar). Collars are commonly found on large zoom and telephoto lenses. If the lens has a tripod mount, always attach the tripod mount to the tripod head and not the camera body. This arrangement balances the lens and camera on the tripod head more appropriately. Plus, the lens is easily rotated from horizontal to vertical compositions and every angle in-between by loosening the tripod mount, rotating the lens, and then locking the mount again. The quick release plates made for a specific lens’s tripod mount are by far the most convenient way to change camera positions.
Wimberley, Kirk Enterprises, and Really Right Stuff offer a wide assortment of L-brackets and quick release plates that work well with the ball heads discussed. Visit their websites for product and purchasing details.
SHARP SHOOTING TECHNIQUES
AVOID EXTRA GLASS AND USE THE LENS HOOD
The lens is built to provide the finest quality with the lens hood installed on it. Adding any extra glass elements will degrade the image quality slightly. The image will be less sharp and the colors may be less saturated due to increased flare. Using a lens hood reduces the flare problem considerably, but it still exists. Adding more glass surfaces only makes the flare problem worse. To obtain best results, avoid adding extra glass to the optical path. Do not use UV or skylight protection filters unless absolutely necessary. Perhaps when shooting in salt spray it might be an appropriate place to use a protection filter. Do not use teleconverters or any other filter unless the reason to do so outweighs the small loss of image quality. Of course, the excellent benefits of polarizing filters for reducing glare and darkening a blue sky are routinely desirable. If you must use a teleconverter to make the subject larger in the viewfinder and find no other way to get that magnification, then teleconverter use outweighs the negatives. Sadly, too many photographers always have a “protection” filter mounted on their lens, don’t use their lens hood, and use a teleconverter even when not needed. Do not be one of them!
IMAGE-STABILIZATION
For sharper images when you must shoot handheld, use image-stabilized lenses or, in some cases, cameras that have a stabilized image sensor. Many image-stabilized lenses have more than one mode. Be certain to use it correctly. For example, some of my Canon lenses have Mode 1 and Mode 2. Mode 1 stabilizes the image by reducing camera-shake in both horizontal and vertical directions and is the mode to use for still objects. If you are panning with the subject left to right, for example, then use Mode 2. The lens doesn’t stabilize the image in the horizontal direction but does help reduce vertical camera-shake. Should one be panning vertically—not a common occurrence—the image is stabilized in the horizontal direction.
It usually is best to turn off image-stabilization when shooting on a tripod. If the camera is perfectly still on a tripod and the image-stabilization is turned on, it may activate to try to reduce non-existent camera-shake and actually create the problem image-stabilization is trying to eliminate. However, when you are shooting a big lens on a tripod, or shooting in the wind, then camera-shake may still be present and image-stabilization helps. Some of the new lenses detect when they are tripod-mounted and deactivate automatically. Just to be certain, you might test your lenses on a tripod and compare your results with the image-stabilization turned on and off.
The camera battery is used more quickly when using image-stabilization. If you want to keep shooting and don’t have a spare battery, turn image-stabilization off when it isn’t needed to conserve battery power.
NO WIGGLES
L-brackets, lens and camera quick release plates, and tripod heads must be tight and stay tight. If any of these devices have any wiggle in them, find out the reason why and fix the problem. It is critically important to avoid all wiggles or your images will be less sharp than they could be. It is worthwhile to put all of your gear together at home and check for loose connections before shooting images. There should be no loose connections! If there are, find a way to tighten them.
ENVIRONMENTAL PROBLEMS
Wind, soft ground, and tripods used in rapidly flowing water or crashing waves can easily create camera-shake. We like shooting in rivers, too, but always find a place where the tripod legs are out of the water or at least anchored in relatively quiet water. The soft ground in a bog requires you to hold perfectly still when shooting, and even shifting your weight can cause the earth to tremble and shift your tripod, causing a change in focus. And many photographers are oblivious to the enormous problems wind can cause even with heavy tripods. When you must shoot in the wind, hold on to your tripod-mounted camera in order to add the mass of your body to the system. It helps steady the tripod and tame the wind. Then use a faster shutter speed to arrest the camera-shake caused by both the breeze and your “quivering” body. When in doubt, use faster shutter speeds.
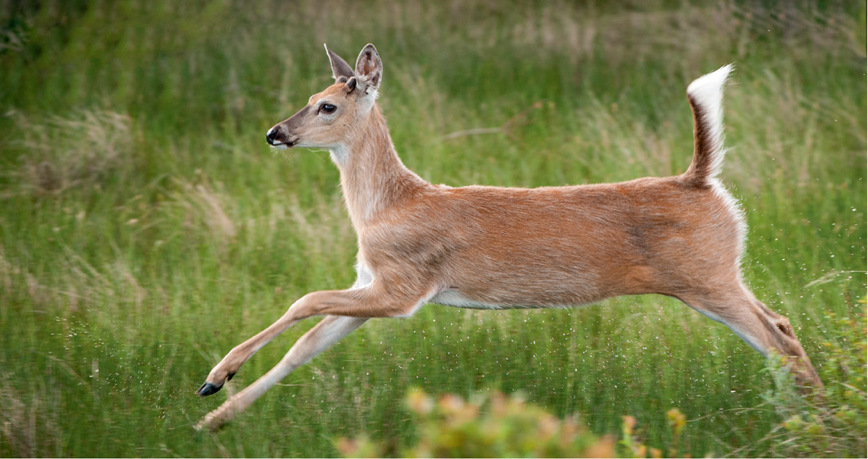
Shooting sharp images of animals such as this bounding white-tail deer with lenses longer than 200mm requires three key factors. You must shoot using superb technique, focus precisely on the animal’s face, and use fast shutter speeds to minimize camera-shake and overcome subject movement. You will shoot many unsharp images if any one of these factors is compromised. Remember the acronym TFS, which stands for technique, face, and shutter speed. Nikon D3, Nikon 200–400mm f/4 lens at 360mm, ISO 1000, f/5.6, 1/1000 second, Cloudy WB, manual metering and continuous autofocus on the back-button.
OPTIMUM APERTURES
Most of your lenses include the apertures of f/4, f/5.6, f/8, f/11, f/16, and f/22. You will remember the largest f/stop numbers—f/16 and f/22—are the smallest aperture in size and provide the most depth of field. F/4 and f/5.6 produce shallow depth of field, but the apertures are the largest. There are optical problems at both ends of the f/stop range, but the worst problem is diffraction, which is most severe at the smallest apertures—f/22 and f/32 are the culprits. The best quality for most lenses is two to three f/stops down from their maximum (“fastest”) aperture—f/8 to f/11. Therefore, it makes sense to use these apertures any time it is feasible. Naturally, if you want to limit the depth of field or need more shutter speed, feel free to shoot “wide-open” at f/4.
Diffraction happens when light strikes the very edge of a solid object. Due to the wave nature of light, it bends a little when it strikes an edge. Since f/22 is a tiny aperture, a relatively high percentage of the light passing through the aperture hole strikes the edge of the opening and is diffracted, which causes a loss of sharpness. Although technically f/22 produces more depth of field than f/8, the overall image will be less sharp at f/22 due to the deleterious effects of diffraction. Surprisingly enough, using f/22 and even f/32 is widely practiced by many photographers. To be honest, if you only shoot at f/22 and nothing else, the images look good. But had you used f/11 and compared the result against f/22, the sharpness differences would be considerable even when using excellent technique. By the way, we compare our images for sharpness by viewing them on the computer and enlarging by 100 percent the spot where the sharpest focus should be.
The problem of diffraction really hit home when I was working on our book, Close Up Photography in Nature. Using the best technique I know, I ran a test by photographing a lichen growing on a rock. I shot images at f/11, f/22, and f/32. I also shot a set of four images at f/11 where the focus was varied slightly to allow it to be assembled with focus stacking software. The results: F/32 was terribly soft due to diffraction. F/22 was sharper but still suffered from too much diffraction. F/11 was wonderfully sharp, but the depth of field didn’t cover the relatively flat lichen completely enough. The focus stacked image had superior depth of field and incredible sharpness. It was the clear sharpness winner and we will explain focus stacking in Chapter 6. The bottom line is that there is a trade-off between image sharpness and depth of field. Stopping the lens down to f/22 produces more depth of field, but the image is less sharp overall. If the lens stops down to f/32, don’t use it, stop at f/22. If the lens stops down to f/22, then use f/16 as the smallest aperture. It is simple for lens makers to produce lenses with smaller apertures. This means if your lens stops down to f/22, the only reason the lens maker did not also include f/32 is because the quality is so appalling due to diffraction that everyone would complain and demand their money back.
Use a long lens to successfully photograph the backlit mountain goats on Mt. Evans, about 50 miles west of Denver, Colorado, while they are perched on a sheer cliff enjoying the morning sunshine. With a long lens especially, even on a tripod, keep the shutter speed fast, focus carefully, and shoot plenty of images. Canon 5D Mark III, Canon 800mm f/5.6 lens, IS activated even on a tripod due to wind vibration, ISO 400, f/8, 1/1000 second, Sun WB, manual metering and automatic back-button focusing.
FIRING THE CAMERA
Never jab the shutter button to fire the camera. A quick jarring movement will surely cause a loss of image sharpness no matter whether shooting handheld or using on a tripod. Always be gentle when pressing the shutter button and avoid all jerky movements. Firing the tripod-mounted camera presents many strategies. Let’s look at the most suitable options.
KEEP THE SHUTTER SPEED FAST
Outdoor photographers commonly photograph wildlife and outdoor sports with long lenses that are mounted on a tripod. Since camera-handling speed is essential and panning with the action is often required, shooters hang on to the camera while they press the shutter button to shoot the images. It is true that the shooter’s body will cause the camera to vibrate slightly if they are touching the camera or tripod. However, sharp images are still achieved without difficulty if the focus is accurate and the shutter speed sufficient. My guideline for shooting sharp images of still objects when touching the camera on a tripod where subject motion doesn’t need to be frozen is to use the 1/focal length guideline for the shutter speed. With a 500mm lens, we consistently shoot sharp images even when hanging on to a tripod-supported camera by using 1/500 of a second shutter speed. If you are extremely careful about pressing the shutter button gently and shoot many images, even 1/250 second will produce suitable results. Essentially, the fast shutter speed freezes the minuscule camera-shake that occurs when you fire the camera using your finger.
A CABLE OR REMOTE RELEASE
Using a fast shutter speed isn’t usually an option when shooting landscapes and close-up images. Due to the need for the depth of field at f/16 or thereabouts, shutter speeds slower than 1/60 second are usually necessary. In this case, don’t touch the tripod, lens, or camera to avoid causing camera vibration. Instead, use a cable release that attaches to the camera with a push button trigger on the other end. Hold the cable release gently and do not pull on it, which could put tension on the camera. Gently push the button to fire the camera. We have done it this way for most of our careers.
Lately, many wireless devices are available to trigger the camera without being connected directly to it. Remote releases use radio or optical signals to trip the camera—even from a distance. They are incredibly handy and our preferred way to work now. Check the products offered by your camera maker to see if they sell one. Most likely they do. Third-party camera equipment makers such as PocketWizard also make controls for all of the popular camera lines.
TWO-SECOND SELF-TIMER
Every camera has a self-timer. Set the self-timer, press the shutter button, and do not touch the camera or tripod while the camera counts down 10 seconds and fires the camera. Using the timer allows you to support the camera on a tripod, trip the camera, and run over to get in the image. The self-timer is an effective way to trip the camera. But, having to wait 10 seconds for the shutter to fire to make an image you do not wish to be in wastes a lot of time.
Hopefully, for merely firing the camera without touching it at the moment of exposure, the self-timer on most cameras can be set to 2 seconds. With the 2-second self-timer in use, gently push the shutter button and remove your finger, any vibration caused by pushing the shutter dissipates over the 2-second wait, and the camera fires to produce a sharp image.
The timer is an efficient and convenient way to trip the camera. However, when the goal is to catch the peak of the action, such as a wave crashing into a rock, then the timer works ineffectively because it is almost impossible to time the action and trip the shutter precisely 2 seconds before peak action. For the same reason, when you are bedeviled with wind-induced motion in a wildflower, then you must use a cable or remote release to fire the camera as soon as the subject becomes immobile. There is no way to know if the subject will still be motionless 2 seconds later if you use the self-timer.
MIRROR LOCK-UP
Another source of unsharp images is the movement of the camera’s mirror. The mirror allows you to see the image properly oriented in the camera’s viewfinder. The mirror is quite heavy and clunks when you release the shutter. Mirror movement causes a little camera vibration that is most deleterious at shutter speeds in the range of 1/4 to 1/30 second. Usually, 1/15 second is the most problematic shutter speed. Therefore, numerous cameras provide a way to lock the mirror in the upright position prior to shooting the exposure. When you do this, the exposure, composition, and focus must be set ahead of time because you cannot see through the viewfinder. Locking the mirror up ahead of time is simple to do and indeed yields sharper images.
However, if you are using a shutter speed faster than 1/30 second or slower than 1/4 second, you probably won’t gain anything by using mirror lock-up. Why? I tested shutter speeds for the mirror slap problem decades ago and came up with these results. If the movement of the mirror causes the camera to vibrate for 1/15 second, then the camera is vibrating for 100 percent of the exposure at 1/15 second. When the shutter speed is one second, then the camera still vibrates, but only for 1/15 second and the other 14/15 of the exposure burns in a sharp image because the mirror slap vibrations have dissipated. At faster shutter speeds, the rapid shutter speed tends to freeze the minuscule camera motion caused by the mirror, so once again the image is sharper. We routinely lock the mirror up anytime we are shooting between 1/4 second and 1/30 second.
Another way to eliminate the mirror slap problem is to use live view. When live view is activated, the image appears on the LCD display on the back of the camera. To do this, the mirror is raised, so it is already up at the moment of exposure, thus eliminating the mirror slap problem. Therefore, if you don’t have mirror lock-up in your camera, use live view to achieve the same result.
FOCUS ACCURATELY
MANUAL FOCUS
Focusing the lens manually was standard procedure when I started in photography in 1970. Cameras had focusing aids built in the viewfinder to help find the optimum focus. We used manual focus and the results were fairly acceptable. When autofocusing lenses began to appear, it seemed like autofocus was an answer in search of a problem. Many photographers still believe in manual focus, especially for still subjects. However, few photographers over forty have the eyesight they did at twenty years old. It is naive to think you can manually focus the lens quickly and accurately because most cannot in reality.
We still use manual focus to sharply focus the lens for many subjects, but do wholeheartedly embrace autofocus technology. Still, there are occasions when manual focus is the only answer, so it must be practiced and perfected. When possible, use live view, scroll the focusing box over to the spot where you want the sharpest focus, magnify that box, and manually focus on the precise spot that must be in sharp focus. Using a magnified live view image is clearly the best way to focus the lens manually and accurately. Manual focus is necessary in the following situations:
•Heavy snow: falling snow confuses the autofocus system causing the focus to jump back and forth.
•Tilt/shift lenses: these and some specific other lenses (Canon 65mm macro) do not have autofocus.
•Dim ambient light: if the light becomes too dark, autofocus becomes inaccurate and may stop working altogether.
•Focus stacking: any time a series of images is shot when the focus is changed a little between them, manual focus is by far the best way to go.
•Panoramas: focus should not change between images making up the pan, so use manual focus to lock the focus.
•HDR: use manual focus and do not change the focus between the HDR set of images.
•Close-up and macro: high magnification images require the precise focus on the most important part of the subject and manual focus does this best.
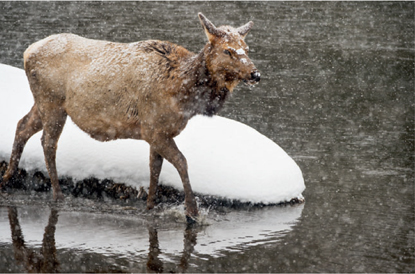
Autofocus may “see” the heavily falling snow instead of the Elk and tends to jump back and forth without locking on the subject. When the snow is falling, if the focus hunts, switch to manual focus. If the subject is still, it is helpful to use a magnified live view image to make it easier to manually focus in a snowstorm. Nikon D4, Nikon 200–400mm f/4 lens, ISO 1000, f/8, 1/125 second, Cloudy WB, manual metering and focusing.
Tilt and shift lenses and the Canon 65mm macro do not have autofocus capability either. To make this pattern of a Pale Tiger Swallowtail, Barb manually focused on the subject. She manually focused seventeen different times because this is a focus stack. Canon 5D Mark III, Canon 65mm macro, ISO 100, f/8, 1/3 second, Cloudy WB, manual exposure and focus, processed with Helicon Focus.
AUTOFOCUS
Autofocus technology is absolutely amazing. Autofocus is fast, convenient, and incredibly accurate when used correctly. Unfortunately, countless photographers fail to take advantage of their camera’s autofocus controls because they don’t realize how many useful options are available in their camera.
MULTIPLE AF POINTS
Your camera has many AF points in the viewfinder. While that is good it can also lead to poorly focused images if you don’t use the AF points properly. When you make only one AF point active, this affords great precision. The default setting most likely activates all of the points and that is what most use. If your camera has twenty-one AF points, it covers a wider area but the camera usually focuses on the closest object, which may not be the spot you want in sharp focus. If you use multiple AF points and photograph a person standing with their shoulder pointed at you, their shoulder is closer to the camera than their face and the camera focuses on the shoulder, which produces a face that is not as sharp as it could and should be! Fortunately, when the camera is set up so that only a single AF point can be selected, having multiple AF points to choose from is helpful because it is more likely there will be a single AF point that corresponds to the spot where sharp focus is needed, especially when photographing action.
FOCUSING MODES
Single-shot AF
Camera makers use different names but single-shot AF means the same thing. Point the camera at the subject, press the shutter button down halfway, which allows the camera to focus on a spot in the image, and then press the shutter down all of the way to shoot the image. This focus mode is perfect for motionless subjects because the focus stays locked when the shutter is held down halfway. In turn, you can lock the focus, change the composition a little without the camera refocusing on the background, and then shoot the image.
The technique of locking the focus works precisely in single-shot AF when you are handholding the camera and holding the shutter button down halfway. It doesn’t work well at all when shooting on a tripod. Most cameras refocus if you fire using either a 2-second self-timer or a cable/remote release. The shot rapidly turns into a focusing disaster because when you focus on a rock in the foreground and recompose, the focus spot changes. Some photographers notice this problem, and once they achieve sharp focus, they spend the time to turn the autofocus off, but that quickly becomes a nuisance. Yet another problem with the one-shot autofocus is that the default setting on many cameras is set for focus-priority. If you focus on that rock, recompose and lock the focus and the AF points are not on an object in focus, the camera may refuse to shoot. Focus-priority only allows the camera to shoot when the objects that coincide with the activated AF points that appear in the viewfinder are in focus.
Fortunately, all of the cameras we see in our field workshops can be set to shooting-priority and that setting allows the camera to fire without any regard to the focus. This is precisely the setting you need!
Continuous Focus
One-shot focusing does not track moving subjects. Canon calls the second focusing mode AI Servo, while other camera systems use the term “continuous focus” to track action. If the activated AF points are on a moving subject, the camera automatically changes the focus to keep the subject in focus—more or less. If the action is too fast, you may not stay on the target, or if an obstacle appears between the subject and the camera, you will lose focus. Still, continuous autofocus is helping photographers sharply focus action. Continuous focus is the reason for seeing so many great action images today. Continuous autofocus is terrific and continues to improve with each new camera introduction.
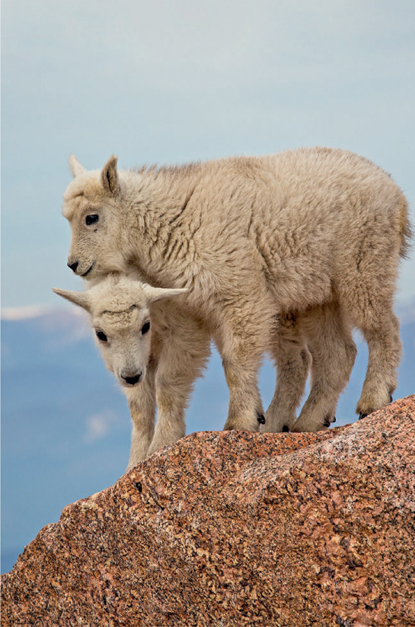
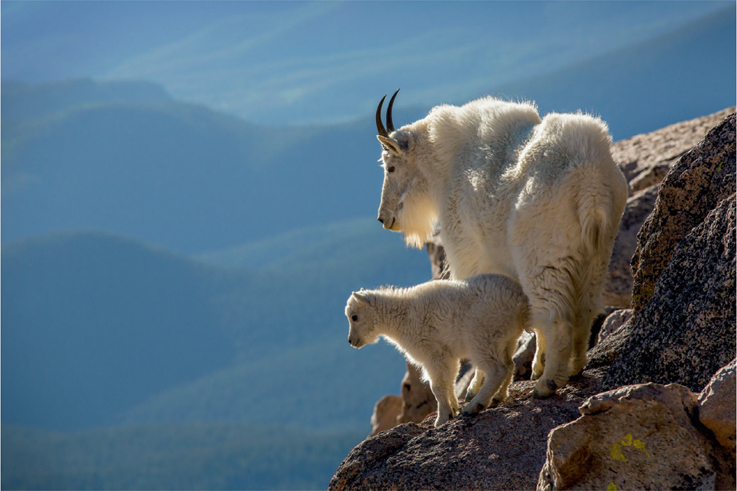
Mountain goat kids actively play together. An excellent way to hit sharp focus is to use back-button focus and select a single AF point in the middle of the image. Point the AF point at the face of the lower baby goat, press the AF control button in to focus, let up on the button to lock the focus, recompose and quickly fire off a burst of images. This may sound like a lot to do, but, with practice, it takes 2 seconds or less. The focus stays precisely on the face if the subject doesn’t move and neither do you. If the focus control is on the shutter button, the camera will refocus the lens when you recompose, and the focus will change to the middle of the image where the top youngster’s shoulder is found, and not the face where you certainly want the sharpest focus. Canon 5D Mark III, Canon 200–400mm f/4 lens at 300mm, ISO 400, f/14, 1/400 second, Cloudy WB, shutter-priority with a +1/3 exposure compensation set.

The seabird exhibit at Oregon’s Newport Beach Aquarium is a delightful place to photograph a few species of seabirds. Comical tufted puffins swam by us frequently at close range. When the subject is constantly moving, be certain to keep the camera set to continuous autofocus to allow the camera to automatically change the focus as the subject’s distance changes. Nikon D4, Nikon 200–400mm f/4 lens, ISO 800, f/7.1, 1/640 second, manual exposure and continuous autofocus on the back-button.
Set the camera to continuous autofocus, point the activated AF point (or points if more than one is enabled) at the subject, and hold the shutter button down halfway, which initiates continuous autofocus. Simply hold the shutter button down and pan with the subject while shooting a burst of images. You will get plenty of sharp images if you pan smoothly and the shutter speed is fast enough. This focusing mode will be a problem when the subject stops, however.
Jungle Jim is in Kenya photographing a handsome male African lion that is slowly walking toward the safari vehicle. Using continuous autofocus, Jim selects a single AF point or perhaps a small group of points that coincide with the lion’s face as he shoots. The lens continually stays focused on the eyes. Then the lion stops walking, Jim recomposes and shoots, but the AF points are now on the lion’s chest. The lion’s chest is in focus, but the eyes are slightly soft because the depth of field at f/5.6 is not adequate. In almost all cases, the animal’s eyes should be tack sharp because viewers tend to look at the face first. Of course, Jungle Jim might have noticed the AF points were no longer on the face. He could have switched to other AF points at that moment that did coincide with the face, but, like most photographers, Jim forgets in the excitement of the moment.
Had he been using one-shot focus, Jim could have focused on the eyes, held the shutter button down halfway to lock the focus, recomposed while still holding the shutter button down, and shot the images. The focus stays locked on the eyes. But, what happens if the lion begins to walk again? One-shot focus doesn’t track moving targets, so he must quickly change the focusing mode to continuous autofocus. Unfortunately, there is never enough time to switch between these focusing modes and still have the subject available to photograph. Surely there must be a better way to handle the autofocus!
BACK-BUTTON FOCUSING
For decades we have used a technique that we dubbed back-button focusing in order to describe it. Most cameras allow the user to change the autofocus control from the shutter button to a dedicated autofocus button located on the rear of the camera typically approximately an inch just to the right of the viewfinder. Some cameras now have a designated AF-On button. Back-button focusing is incredibly efficient to use, once you get used to it, plus it is extraordinarily precise. Unfortunately, your camera manual does not name it that and may not use any term that you can recognize, but cameras of all brands have it. The quickest way to find back-button focus will be to go to any Internet forum for your camera system and ask the followers if the camera model (be sure to say what model it is) has the option of back-button or thumb focusing. The camera probably has. Hopefully someone will tell you how to activate the feature. Back-button focusing is normally set with a custom function or menu option. If your camera has a designated AF button on the rear of the camera, you probably must use a menu item to turn the autofocus off on the shutter button.
If at any time you find the camera refuses to shoot the image when using back-button focusing, search for a focus-priority setting that can be changed to shooting-priority. This option may or may not be on your camera. If the camera has this feature it can be located in many places, but look first in any custom functions or menu choices that involve focusing.
Activate back-button focusing, put the focus mode on continuous, and leave it there. You don’t need one-shot or single focus anymore. Select a single AF point in the viewfinder or perhaps a small cluster of AF points. When a subject is still, point the AF point at the most important area where sharp focus is desired, press the button on the rear of the camera that controls the autofocus to make the lens focus on that spot. Let up on the button to lock the focus, recompose, and shoot the image. The focus will remain where you want it. Should the subject unexpectedly begin to move and you need continuous focus—it is no problem. Point the AF point at the subject, press the AF control button down, and hold it down, to make the autofocus track the subject while shooting images at the same time. Read the following carefully.
Hold the back-button down when you are tracking action while shooting. Let up on the button anytime you wish to lock the focus. Now you have a single focus or continuous focus any time you want it by using your right thumb to hold the button down or let up on it. That is the reason some shooters call it thumb focusing. The right thumb controls the focus. Back-button focusing takes a little time to get used to and your brain has to accept that your right thumb controls the focus, but once it does, you will wonder how you ever focused images before.
With some practice, back-button focusing offers tremendous control that is fast and precise. This is an actual example of the way I used back-button focusing to photograph the extremely rare Brewer’s Duck—a bird John James Audubon painted from the only specimen he ever found. The Brewer’s Duck was living at a pond east of San Diego, California. It had become habituated to humans. With my camera set to a single active AF spot, continuous focus, and autofocus activation on the back-button (AF-On button) of my Canon 5D Mark III, I panned with the swimming duck with my Canon 200–400mm lens and selected the AF point that corresponded with its head. With the back-button held down to activate focus, I fired off a burst of images every time the composition was appealing. Occasionally, the duck stopped swimming. When this happened, I pointed the active AF point at its head and pressed the AF-On button in to make the lens focus on the head. Then I let up on the button to lock the focus, recomposed to make a more pleasing composition, and fired numerous shots to capture many pleasing images of this rare bird. Why is the bird so rare? Although Audubon couldn’t prove it at the time, a Brewer’s Duck isn’t a true species. Occasionally mallards and gadwalls hybridize in the wild and produce an oddly colored duck called the Brewer’s Duck. Audubon named the duck after his friend, Thomas Brewer of Boston.

The problem with using many active AF points in the camera is clearly demonstrated. Autofocus tends to focus on the closest object, so the leaves are sharply focused and the Shoebill Stork at the San Diego Safari Park is ridiculously out of focus. Canon 5D Mark III, Canon 200–400mm f/4 lens, ISO 400, f/8, 1/250 second, shutter-priority and autofocus.

To avoid focusing on objects in the foreground, many photographers use manual focus. However, there is a better way, called back-button focusing. With the focus control only on a button on the rear of the camera and not on the shutter button, select only one AF point to be active. Then point that AF point at the forehead of the Shoebill Stork, press in the back-button control to make the lens focus on that spot, and, when it does, let up on the button to lock the focus. Now recompose and shoot a sharp image because pressing the shutter button does not cause the lens to focus on the grass in the center of the frame.

Even John James Audubon saw only one Brewer’s Duck during his lifetime. We were thrilled to find this one at Santee Lakes in California. At the time, Audubon wondered why the bird that he named after his friend was so rare. He did not know for certain if it was a distinct species or not. It turns out this duck is a naturally occurring cross between a mallard and a gadwall. Nikon D4, Nikon 200–400mm f/4 lens, ISO 400, f/11, 1/800 second, Sun WB, manual metering and back-button continuous focusing.
When photographing fast action that is somewhat erratic, it is difficult to keep a single AF point on the head or body of the target. Activate a single AF point and the surrounding AF points to have more active AF points, which help you stay focused precisely on the spot in which sharp focus is desired. If the background is blue sky or all white clouds with little contrast, often it is possible to activate all of the AF points and the lens will focus on the subject—more or less—and not focus on the background. Should the background have contrast in it—the water in an ocean or lake, white clouds in a blue sky, forest—then most cameras will focus the lens on the background if the active AF points don’t stay on the subject. With a little experience, you’ll find out what works best for you.
Let’s summarize how to use back-button focusing. No matter what term your camera manual uses to refer to it, be sure to track it down and set it. Activate a single AF point in the viewfinder. Normally the middle point is the most accurate one. Set the camera to continuous autofocus. With a motionless object, direct the AF point at the spot where you want the sharpest focus and press in the back-button focus control. When the spot is focused, lift your thumb off the AF button to lock focus, recompose if desired, and shoot the image. To focus an active subject, select an AF point that corresponds to the spot where you want the sharpest focus, which is usually the face of a human or animal, hold the back-button AF control down and keep it held down to maintain focus tracking, and shoot a burst of images with the camera set to shoot as many images per second as possible.
Your camera provides numerous ways to control autofocus precisely. Be sure to examine each one of them thoroughly. The options vary from camera to camera, but specific options are crucially important to use! Always remember the key to sharp images is to use excellent shooting technique, favor faster shutter speeds, and focus precisely on the spot where you desire tack-sharp focus.

I was photographing black-capped and mountain chickadees that were darting in and out of the sunflower feeder. Due to their speed, I shot handheld to keep up with the energetic little birds. Suddenly, all of the chickadees froze in place as a northern pygmy owl landed on the branch next to me. I slowly moved the camera over to frame this bird-eating owl and shot several images before the owl flew off. Canon 7D, Canon 300mm f/4.0 lens with image-stabilization turned on, ISO 400, f/5.6, 1/500 second, Cloudy WB, manual exposure with continuous autofocus on the back-button.