

The sparkling dew drops hanging in a spider web create an appealing pattern. To shoot a sharp image, conditions must be perfect—heavy dew and no breeze—and superb technique is mandatory. Normally we avoid f/32 due to diffraction, but here Barbara is using the small aperture to turn the dew drop highlights into a starburst! Nikon D4S, Nikon 200mm f/4 micro lens, ISO 200, f/32, 1/60, Cloudy WB, manual exposure and focusing.
Choosing and Using Lenses
LENS MAKERS
Major camera lines—Nikon, Canon, Olympus, Sony, etc.—build lenses specifically for their own cameras. It is reasonable to assume these lenses can deliver high quality images if or when you do your part and use excellent technique. Since lenses are built specifically for a camera system, it is likely they will perform flawlessly. Metering and focusing problems should be minimal. We use Nikon lenses on our Nikon cameras and Canon lenses on our Canon cameras at least 99 percent of the time, and we accept paying a premium price to acquire them.
THIRD-PARTY LENSES
We realize the price of camera gear has grown much faster than most people’s income.
Affording quality camera gear is problematic for many. Fortunately, third-party lens makers, especially Tokina, Tamron, and Sigma, offer quality optics for far less money because they build their lenses with various mounts so they can be sold to multiple camera systems. This increases their market share and distributes the cost of production and engineering over far more lenses, which reduces their cost. We have tested a few third-party lenses, and the results were satisfactory. Most of our photo workshop clients use some third-party lenses with excellent success. Don’t be afraid to buy lenses from Tokina, Tamron, or Sigma to save money.
HOW LENSES WORK
The lens is a cylindrical plastic or metal tube that houses multiple glass elements that focus the light on the sensor. Some lenses, the Canon L lenses for example, include special glass elements that are expensive to make but improve performance. Modern lenses have special lens coatings to reduce flare and improve contrast. Lenses are described by listing their focal length and lens speed and perhaps a few other things. Three examples include the Canon 180/3.5 USM Macro, Nikon 300/4.0 ED-IF, and the Olympus 18–180/3.5–6.3 ED. What do these numbers mean? The Canon lens has a focal length of 180mm. The maximum aperture is f/3.5, and it has a built-in Ultra Sonic Motor (USM) to speed up autofocusing. This particular lens is built to focus extra close, and it can reach life-size (1x) magnification. It is commonly known as a macro lens. The Nikon lens has a 300mm focal length, maximum aperture of f/4, ED designates that special extra-low dispersion glass is used, and IF means the lens has internal focusing. Finally, the Olympus lens is called a zoom lens because the focal length varies between 18mm and 180mm. The maximum aperture slows down from f/3.5 at the 18mm setting to f/6.3 when it approaches 180mm. Once again, ED stands for high quality glass that produces sharper images.
MAXIMUM APERTURE
A lens that has a maximum aperture of f/2.8 is said to be fast because it allows for good exposure at fast shutter speeds. A lens with an f/5.6 aperture is considered slow because it requires a relatively slow shutter speed to achieve a good exposure. In this example, f/2.8 is two stops faster than a lens with a maximum aperture of f/5.6. Fast lenses with large maximum apertures are heavier and far more expensive than slower lenses. For instance, the Canon 300/2.8 lens costs thousands of dollars more than the Canon 300/4.0 model, which is one stop slower and a couple pounds lighter. Are fast lenses worth it? It depends on how you want to use them.

Wildlife and people photographers prefer fast lenses that have maximum apertures of f/4 or larger. Faster lenses cost more and weigh more than slower lenses, but faster lenses permit faster focus and more accurate focus in dim light. They also allow limiting the depth of field more when selective focus is desirable. Barbara’s fast Nikon 200–400mm f/4 lens proved valuable when this sow coastal brown bear suddenly stood up to identify an approaching bear. Nikon D4S, Nikon 200–400mm f/4 lens at 380mm, ISO 1600, f/10, 1/800 second, Sun WB, manual exposure and AF-C on the back-button focus control.
FAST LENS ADVANTAGES
EASIER TO SHOOT IN DIM LIGHT
Imagine photographing a leopard at twilight with a 300mm f/4 lens. Using a beanbag while shooting from a Land Rover in Kenya, you believe you will be able to capture a sharp image with a shutter speed of 1/125 second at ISO 400. If the optimum exposure at ISO 400 is f/4 at 1/60 second, then you don’t have enough lens speed. If you had a faster 300mm lens that opened up to f/2.8, then you could use 1/125 second at f/2.8. The chances of capturing a sharp image using 1/125 of a second shutter speed improve considerably.
FOCUSING IS QUICKER AND MORE ACCURATE
Automatic focus is more accurate and faster when more light strikes the focusing mechanism. An f/2.8 lens allows twice the amount of light to enter the lens as an f/4 lens. Even when focusing manually, it is far easier to focus with a brighter viewfinder image and less depth of field.
SELECTIVE FOCUS
Depth of field is greatly influenced by the f/stop. F/2.8 provides a shallower depth of field than f/4, which allows the foreground and the background to be rendered more out of focus.
MORE SUITED FOR TELECONVERTERS
These optical devices fit between the lens and the camera. They multiply the focal length by the power of the teleconverter. Common powers include 1.4, 1.7, and 2x. For example, putting a 1.4x teleconverter behind a 300/2.8 lens converts it into a 420mm lens. The 1.4x teleconverter costs one stop of light, so the 300/2.8 lens is now equivalent to a 420mm f/4 lens. If you started with a slow 300mm/5.6 lens, then it would be a really slow 420mm f/8 lens, and you might lose autofocus capability altogether.
EASIER TO REACH FAST SHUTTER SPEEDS
Imagine photographing flying Snow Geese or a downhill racer handheld with a 300/4 lens.
You decide to use ISO 400 and set your f/4 lens wide open. On a bright overcast day, the optimum exposure might be 1/800 second at f/4. That is pretty fast, but handholding and panning often require a faster shutter speed. If you had an f/2.8 lens, you would gain one more stop of shutter speed when the lens is set to f/2.8. Now you could use an exposure of ISO 400, f/2.8, and a whopping 1/1600-second shutter speed!
FLASH IS EFFECTIVE AT GREATER DISTANCES
Flash is an enormously useful tool to use in outdoor photography. Wildlife and landscape photographers often require a flash to light up a distant object. The amount of light a flash can emit is limited. Being able to use f/2.8 over f/5.6—a two stop change in the lens speed—allows the flash to light an object twice as far!
FOCAL LENGTH
Focal length is a key consideration when buying a lens. A 50mm lens is said to approximate the angle of view of human vision. Focal lengths shorter than 50mm have a wider angle of view, and longer focal lengths have a narrower angle of view. The angle of view of a lens determines what will be included in the background. If you have a gorgeous sky background that is huge, then a short focal length lens is usually what you need to include it. If you want to minimize the background and eliminate unsightly distractions, then a longer focal length lens works best.
Most outdoor photographers find at a minimum they need every focal length between 24mm and 300mm. In my case, I use everything from 16mm to 800mm.
Working distance is the distance between the front of the lens shade and the subject. Longer focal length lenses provide more working distance, and this is crucially important if you wish to approach a subject without frightening it or you need the extra distance to keep you safe. If you ever photograph a scorpion, rattlesnake, or poison ivy, you will know what I mean.

This multi-colored hot spring is rarely photographed by serious photographers because it is several miles from the nearest trailhead in the southwest corner of Yellowstone National Park. We have visited this spring—our favorite—several times by riding our Tennessee Walking horses to it. A wide-angle lens captures the spectacular colors and the puffy clouds floating overhead. Canon 1D Mark III, Canon 24–105mm f/4 lens at 35mm, ISO 100, f/18, 1/15 second, Daylight WB, polarizer, manual exposure and metering.
IMAGE-STABILIZATION
Some lenses have a built-in stabilizer that helps you capture sharper images at slower shutter speeds when shooting handheld. The optical elements in the lens move to compensate for camera-shake, thus producing a sharper image. In some camera systems, the image-stabilization is in the camera and works for all lenses mounted on the camera.
Image-stabilization is the term Canon uses. Nikon calls it Vibration Reduction and other companies use different names, but they all mean essentially the same thing. No matter what it is called, it does produce sharper images when you must shoot handheld or perhaps work on or shoot from a beanbag. The handheld rule of thumb for sharp images states the shutter speed should be equivalent to 1/focal length. This means a 300mm lens can be handheld successfully at 1/300 second and a 30mm lens needs only a 1/30 second shutter speed. Naturally, this depends a lot on the photographer since some are steadier and more conscientious about being still than others.
Camera makers often claim that image-stabilization offers three to four shutter speed gains in your ability to handhold the camera and still shoot sharp images. Thus, with a three stop gain in shutter speed, it might be possible to shoot sharp images handheld with a 200mm lens at 1/25 of a second. However, I tested this and find these guidelines to be optimistic. I am a steady photographer, and the best I can do is one shutter speed slower than the handheld guideline for focal length suggests. We all vary in our ability to hold still, so it is best to test image-stabilization for yourself. By the way, image-stabilization only helps reduce the problem of a shaking camera and does not in any way help to reduce the problem of subject motion. When photographing moving subjects, you still need higher shutter speeds to capture sharp images.
Image-stabilization is an asset and does help when you really must shoot handheld. But, don’t use it as a crutch to avoid using a tripod for image sharpness. Normally, you are better off using a sturdy tripod. However, for those times when a tripod doesn’t work well—deep snow or shooting on a boat—then image-stabilization is well worth having, though it does increase the cost of your equipment.

There was a time when we avoided shooting from boats because it was so difficult to shoot sharp images. All of this is now changed. In order to photograph Kicker Rock in the Galapagos, we used our best handheld shooting strategy: using a higher ISO and not stopping down as much, which allowed a faster shutter speed, using an image-stabilized lens, holding the camera as steady as possible, and shooting plenty of images to increase the chances of getting some super-sharp images.
LENS CHOICES
ZOOM AND PRIME LENSES
A zoom lens contains every focal length in its range. For example, a 70–200mm lens can be set to 70mm, 200mm, or anything in-between those two focal lengths. Most zoom lenses have a variable maximum aperture to keep the size and price of the lens down. A 75–300mm f/4–5.6 lens starts with f/4 at 75mm and gradually slows down to f/5.6 around 300mm—a one stop loss in lens speed. A 70–200 f/4 lens has a fixed maximum aperture at all focal lengths. We prefer zooms with a fixed maximum aperture, but this again makes the lens more expensive and heavier than its variable zoom counterparts.
A prime lens has a fixed focal length. Common examples include 300mm f/4, 180mm f/3.5 macro, and a 24mm f/2.8.
Prime Lens Advantages
• They usually have a faster maximum aperture. A 300mm f/2.8 lens is two stops faster than a 75–300mm f/4–f/5.6 zoom at the 300mm setting.
• They have fewer optical elements, which makes them less prone to lens flare, and they may be slightly sharper, but the difference is negligible.
• They are usually smaller and lighter than a zoom if the lens speed is the same.
Zoom Lens Advantages
• Many more focal lengths are contained in one lens. You don’t need to buy and carry so many lenses.
• Much quicker to change the composition by zooming in (zooming from 75 to 150mm for example) or zooming out to a shorter focal length.
• The image quality is superb with modern lenses, especially if they are built with the best optical glass.
• A single filter, such as a 77mm polarizing filter, works for every focal length on a lens that has a 77mm filter size.
• When used with a close-up filter for close-up photography, zooming the lens makes it easy to change the image size of the subject without forcing you to move the tripod.
WE PREFER ZOOM LENSES
We both use high quality zoom lenses for most of our photography. Years ago, we tried to do everything with prime lenses and it did not work well. I once owned 24, 35, 50, 85, and 105mm prime lenses. When I tried to photograph a waterfall from the viewing platform, my composition invariably needed something else—like 72mm. Today we primarily use a few zoom lenses that cover the 16mm to 300mm focal lengths. Most of our prime lenses are dedicated macro lenses or super-telephotos. Even long prime lenses are a huge problem when it isn’t possible to change the shooting distance. Once, while photographing greater prairie chickens in a photo blind, I had a 300mm f/4 and a 500mm f/4 lens. Often the chickens were too far away for the 300mm, but too close for the 500mm lens. In the blind beside me, Barbara had no problem with her Nikon 200–400mm f/4 lens no matter where the chickens were dancing. Choosing high quality zoom lenses for most of your photography is unquestionably the best way to go for most photographers.

Zoom lenses have more lens elements and are more complicated to build than a prime or fixed focal length lens. A prime lens is slightly sharper than a zoom lens, but the difference is small. We don’t believe in cutting corners if it produces poorer quality, but using zoom lenses—especially the high quality ones—is necessary regularly. Using a zoom lens from a boat makes it manageable to shoot these two vastly different compositions within seconds of each other as the boat motored past this colorful cliff face along Pictured Rocks National Lakeshore. Canon 5D Mark III, Canon 24–105mm f/4 lens at 70mm, ISO 500, f/7, 1/1000 second, Cloudy WB, shutter-priority with +.7 EC, AI Servo continuous autofocus on the back-button control.
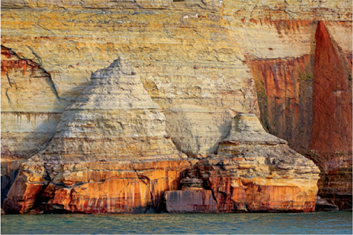
Seconds after shooting the previous image, I zoomed out to 94mm to compose these two rocks. The boat continued to motor closer so continuous autofocus is used to make the camera change focus as the subject-to-camera distance changes.

Wide-angle lenses can be difficult for photographers to use successfully because the angle of view is so wide that distractions tend to appear around the edges of the image. We had trouble with them at first, but now we watch all four sides and corners and shoot close to an attractive foreground like the small cascade at the bottom of the image that grabs your attention and starts you on your visual journey to the larger cascade in the background of Au Train falls. Nikon D4, Nikon 14–24mm f/2.8 lens at 14mm, ISO 100, f/18, 1/10 second, Shade WB, manual metering and AF-C autofocus with the back-button controller.
WIDE-ANGLE LENSES
This group includes all lenses that are wider than 35mm. Excellent examples include the Canon 16–35/2.8 and Nikon 14–24/2.8. Wide-angles lenses tend to be the most difficult group to learn to use well because the angle of view is so wide that distractions around the edges of the image become common problems. If the main subject is too far away from the lens, its resulting size in the image makes it appear insignificant.
Wide-angle lenses are incredibly useful and provide a wonderful perspective to many landscape images. The secret to using them well is to shoot close—sometimes as close as one foot—to a foreground that leads the viewer into the scene. Successful examples include getting close to a nice arrangement of colorful wildflowers while including the mountains behind them or shooting from a low viewpoint in a river that leads your eye to the waterfall a little further upriver.
STANDARD LENSES
While there is no precise breaking point between lens groups, think of standard lenses as falling in the 35mm to 70mm range. These lenses approximate the angle of view of our vision. They work well for many subjects. All of these focal lengths should be included in your lens arsenal.
TELEPHOTO LENSES
This group includes lenses in the 70mm to 400mm focal lengths. As the focal length increases, five key concepts must be considered.
1. The angle of view diminishes: It is far easier to prevent distractions from appearing in the background with a narrow angle of view.
2. Working distance increases: Having more distance between the subject and the photographer is frequently advantageous. Many animals are skittish if they are approached too closely. Other subjects—rattlesnakes, running horses, lions—are dangerous if the photographer is close to them. In close-up photography, having more working distance gives you more space for modifying the light with a flash, reflector, or diffuser.
3. Perspective changes: If you stay farther away from a subject, the relative sizes of the subject and the background change. The size of the background increases with greater working distance. If you shoot closer to the foreground subject, the background objects diminish in size.
4. Longer lenses magnify the size of the subject: From the same shooting distance, a 200mm lens will magnify the size of a subject by 4x over a 50mm lens. Divide 50mm into the focal length of any lens to determine the magnification factor.
5. Photo technique must be superb: Longer focal length lenses not only magnify the subject, but they magnify any imperfections in your shooting technique. If you are wiggling the camera when you shoot, this camera-shake will become worse with increasing focal length.
SUPER-TELEPHOTO LENSES
Any lens with a focal length of 400mm and greater belongs to this group. These lenses tend to be expensive, big, heavy, and demand excellent photo technique to achieve outstanding images. Super-telephoto lenses are widely used by wildlife and sports photographers because shooting distances are often great. A sharp-tailed grouse at 25 yards, a surfer at 50 yards, or a ski jumper at 70 yards all require a super-telephoto lens to capture an image where the subject fills much of the frame. Popular lenses in this group include the Canon 500/4.0, 600/4.0, and 800/5.6, Nikon 400/2.8 and 500/4.0, and Sigma 150–500 f/5–6.3.
We have used super-telephoto lenses for at least thirty years. Currently, Barbara has a Nikon 200–400mm f/4, Nikon 500mm f/4, and an old manual focus Nikon 800mm f/5.6 lens. I use a Canon 800mm f/5.6 lens and, frequently, a Canon 200–400mm f/4 with the built-in 1.4x teleconverter.
TILT/SHIFT LENSES
These are specialized lenses that solve certain problems unlike any other lens. Landscape and architectural photographers commonly use them, but for largely different reasons. Only a few companies make them. Canon offers four fixed focal length manual focus versions that include 17, 24, 45, and 90mm. Nikon has 24, 45, and 85mm models. We own and use the Canon 45 and 90mm tilt and shift lenses.
TILT ADVANTAGES
Tilt lenses are designed to “bend” in the middle of the lens. This allows the use of Scheimpflug’s geometric rule, which describes how it is possible to make the primary plane of the subject coincide with the plane of the camera’s sensor—even when they are at a 45 degree angle. Tilting makes it far easier to sharply focus the ripple patterns in a sand dune, a field of flowers, or a landscape with a nice foreground and mountains in the distance. Imagine being able to focus precisely on the blossoms in a tulip field and get them all sharp using only f/8. By stopping down to f/8 instead of f/22 for more depth of field, the image is sharper because f/8 is a sharper aperture than f/22 as it has less diffraction. Also helpful is being able to use a shutter speed that is three stops faster to arrest any motion in the flowers caused by a breeze.
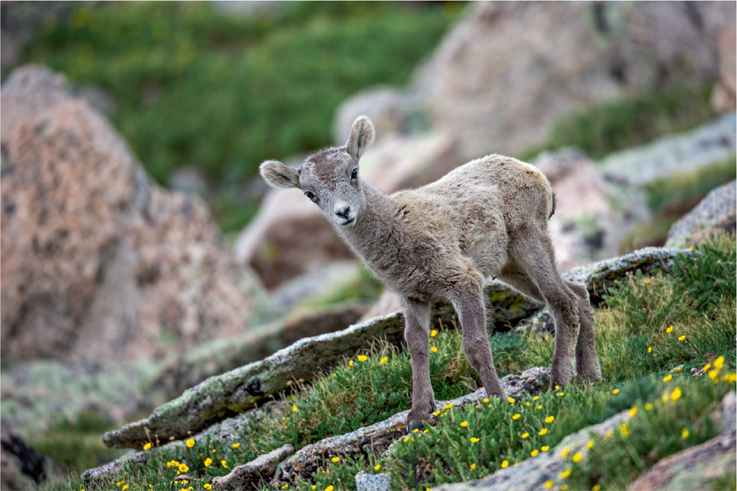
Yellow-bellied marmots, mountain goats, and rocky mountain bighorns are all accustomed to seeing humans and simple to approach on Mt. Evans, Colorado. However, bighorn lambs were wary and kept their distance. I used a huge Canon 800mm f/5.6 lens to provide the working distance needed to fill the viewfinder with this suspicious lamb. Canon 5D Mark III, Canon 800mm f/5.6 lens, ISO 1600, f/6.3, 1/1000 second, Cloudy WB, shutter-priority at +.7 EC (exposure compensation for ambient light), and Auto ISO.
We use the 45 and 90mm Canon tilt/shift lenses quite often. Though Barbara shoots Nikon, she uses one of my Canon cameras to use the Canon tilt and shift lenses. Unfortunately, these lenses are expensive, and it is difficult to describe in print precisely how to use them—but it is simple to demonstrate how to use because you can see the effects right in the viewfinder. A simple description follows explaining how to set the tilt. Once you do it a few times, there is nothing to it. Let’s use a 90mm tilt and shift lens in this example. Point the lens at a field of tulips and focus on the closest blossom. Notice the far side of the image—the top of the picture—is most likely way out of focus as you view it through the viewfinder. Tilt the lens down a degree or two and refocus on the closest blossom. Look at the background and it should be more in focus. Keep adjusting the tilt down, refocus on the foreground and keep checking the sharpness of the background. When you set the proper amount of tilt, every blossom from the foreground to the distant background will be in sharp focus. If you tilt the lens too much, the background will start going out of focus again, so you know you have gone too far. Beginners tend to tilt the lens too much. Usually 2 to 6 degrees of tilt does the trick!

Look what a tilt lens can do. To photograph these Texas Bluebonnets, the Canon 90mm tilt/shift lens is not tilted and the aperture is set wide open. The depth of field only covers a few of the blossoms—pretty unimpressive. Canon 7D, Canon 90mm f/2.8 T/S lens, ISO 100, f/2.8, 1/160 second, Cloudy WB, manual exposure and focusing.

When the lens is tilted down a few degrees it makes the plane of focus correspond to the plane that passes through all of the bluebonnet blossoms. The lens is tilted, but the aperture remains at f/2.8. Notice the flowers are far more sharply focused, but the stems that are perpendicular to the plane of the flowers are way out of focus. Canon 7D, Canon 90mm f/2.8 T/S lens, ISO 100, f/2.8, 1/160 second, Cloudy WB, manual exposure and focusing.
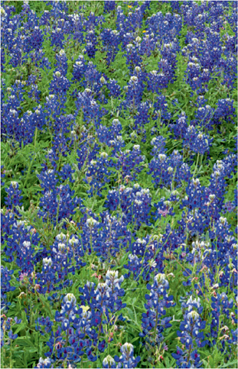
To achieve the best overall sharpness, keep the lens tilted and stop down to f/16. The tilt lens does not give you more depth of field, but you do get far more control over what plane you want in focus. We love to use tilt/shift lenses, but focus stacking often is more effective and it is far less expensive to shoot since focus stacking works with any lens you own. Canon 7D, Canon 90mm f/2.8 T/S lens, ISO 100, f/16, 1/5 second, Cloudy WB, manual exposure and focusing.
SHIFT
This is a second and distinct control that solves a completely different problem. Have you ever noticed that when you point a camera upward to photograph a building, lighthouse, or even a group of trees, that the vertical lines lean inward? This makes the building appear to fall over backward. If you keep the optical axis of the lens parallel to the ground, then the vertical lines remain vertical, but you probably cut off the top of the subject. A lens with a shift mechanism can readily solve this problem. Keep the optical axis of the lens parallel to the ground when you compose the image. If the top of the subject is cut off, use the shift mechanism built in to the lens to shift the lens to include the top of the subject. The optical axis is still parallel with the ground. Now the entire subject is nicely composed in the image.
Over the twenty-five years we have used these lenses, they have helped us effectively capture the images we seek. Be warned that they are expensive. Most photographers can get along quite fine without them. The digital age has changed things. Software is effective for straightening tilted lines that should be vertical. In addition, a fantastic new technique called focus stacking, which we will cover in Chapter 6, allows you to capture incredible sharpness and extreme depth of field in any situation in which the subject remains still. Therefore, software solutions have further lessened the need for tilt and shift lenses.
MACRO LENSES
These lenses are made to allow extremely close focus, which makes it possible to fill the viewfinder with a small subject. These are popular lenses designed for close-up photography, but they do work well for portraits, landscapes, and other subjects. Popular lenses include the Canon 50, 65, 100, and 180mm macros. Nikon calls them micro lenses. Nikon choices include 60, 105, and 200mm. Most camera systems build dedicated macro lenses for their cameras.
The most important decision to make is the focal length of your macro lens. In most cases, if lens weight and price are not problems for you, then we recommend the longer focal lengths. The Canon 180/3.5, Nikon 200/4.0, Tamron 180/3.5, and Sigma 180/2.8 macro lenses are all superb. Both Tamron and Sigma build their macro lenses with different mounts so they can be sold to different camera systems. This increases their market and allows them to charge less. We see these lenses in our field workshops, and they are perfectly capable of producing excellent results. Nevertheless, I still prefer my Canon 180mm macro and Barbara wouldn’t part with her Nikon 200mm micro lens.

Barbara chose to shoot this web at an angle and focused on the tiny spider. She wanted the spider to be sharp, but not the dew drops. Shooting at an angle and using f/8 to reduce the depth of field accomplished her goal. We like how the dew drops become larger the more out of focus they are. Nikon D4S, Nikon 200mm f/4 micro lens, ISO 1000, f/8, 1/160 second, Cloudy WB, manual exposure and focusing.
TELECONVERTERS
These are optical devices that fit between the lens and the camera. Since they contain optical glass, they absorb some of the light passing through the lens and the sharpness of the captured images may be slightly less. They come in various powers with 1.4, 1.7, and 2x being the most common. A teleconverter multiplies the focal length of the lens by the power of the converter. For example, a 2x teleconverter changes a 300mm f/4 lens into a 600mm f/8 lens. Notice the focal length doubles, which provides much more magnification for increasing the size of the subject in the image. That is all good, but the 2x teleconverter also costs two stops of light and the lens slows to only f/8. This means you lose two shutter speeds, which can make it difficult to capture a sharp image. With many cameras, the autofocus doesn’t work at f/8 either. Teleconverters are effective for increasing the size of the subject when there is no other way to do it—such as moving closer to the subject. However, use them only when you really need to do so. The quality will be best if you buy the lens maker’s teleconverter, use it on a lens that has the best glass, and always use superb shooting technique. Do not buy inexpensive teleconverters because the quality is dismal. Be aware teleconverters don’t work with all lenses. Sometimes they cannot be connected to the lens. Always check with the salesperson to make sure the teleconverter and the lens you plan to use it on are compatible.
Just for the record, Barbara uses Nikon’s 1.4x and 1.7x teleconverters when she needs to and I use the latest version of Canon’s 1.4x teleconverter. My Canon 200–400mm f/4 lens even has a convenient 1.4x teleconverter built in to the lens! With the simple flip of a switch, I can choose to use the built-in 1.4x teleconverter or not. Now that is convenience! With the 1.4x teleconverter in use, the lens becomes a 280–560mm f/5.6. Let’s hope many lenses in the future offer the built-in teleconverter.
LENS ACCESSORIES
HOODS
Hopefully, your new lens came with a hood that is easy to fasten to the front of the lens. If not, buy one made for your lens forthwith and always use it. The hood blocks stray light from striking the front glass surface of the lens, which reduces the problem of flare. Equally important, the hood helps to keep snowflakes or raindrops off the lens and protects the lens from wayward twigs or other obstacles. Should you drop your lens, the hood might save the camera if the hood hits first. Every outstanding photographer we know considers the proper use of a lens hood to be indispensable. Make it a habit to use the lens hood. Sadly, too many shutterbugs fail to use the lens hood and their images needlessly suffer from this oversight.
FILTERS
In the film age, filters frequently were used to modify the color in the light. Now that digital software and camera white balance choices make this so easy to do, most filters are no longer necessary. Currently, there is no need to buy, carry, attach or clean filters. A few types of filters are still useful because they enable some desirable options that cannot be done easily with software—at least not yet.
UV Protection Filters
Save your money and don’t buy these. Adding any glass to the lens’s optical path will degrade the image quality. Putting a cheap “protection” filter on your expensive lens really doesn’t make any sense. The “protection filter” probably won’t save your lens if you drop it. You are far less likely to damage the lens if you are careful and use the lens hood!
Polarizing Filter
This filter is incredibly useful for darkening a blue sky and removing or reducing glare from shiny and wet objects. Even on a cloudy day, the wet rocks in a stream or along a waterfall reflect a lot of glare that hides color and detail. Using a quality polarizing filter, such as those made by Hoya or B + W, can greatly improve your images. Indeed, the filter does cost a slight loss of sharpness, but the positive effects of managing glare and darkening the sky make this trade-off worthwhile.
Using the Polarizing Filters
Many beginning photographers mount the polarizing filter on their lens but don’t use it properly. The polarizer is mounted in a double ring so that it can be rotated when mounted on the lens. Mount the polarizer on the lens. Now look at the blue sky to be darkened or the glare to be removed and turn the polarizer until you see the desired effect. Now shoot the image in the normal way. You must be aware, if the first composition is a horizontal (landscape mode) and you switch to a vertical (portrait) composition, you must rotate the polarizer again to get the desired results.
Many photographers have trouble seeing the effect. If glare is the problem, look at the glare intently through the viewfinder while you rotate the polarizer. When you see the glare diminish and that area darken, that is the polarizer position you want. The same goes for the blue sky. Some crafty shooters find it is easier to use live view and look at the live image on the LCD display on the back of the camera while they rotate the filter.
Split ND (Neutral Density) Filter
The contrast in a scene, such as a dark foreground that is in the shadows with white clouds in a sunlit sky might be too high to capture in a single exposure. A variety of split ND filters are made to solve the contrast problem. Some ND filters have a sharp division between the clear and dark part, others are gradual splits, and they come in different strengths to conquer various contrast problems. They were enormously popular—and many photographers continue to use them—but advances in High Dynamic Range software and shooting methods work far better than these filters. We no longer use them, preferring to use Photomatix Pro, which is a dedicated HDR software program instead. We will cover HDR in Chapter 4.
Variable ND Filter
The waves crash heavily on the sunlit rocky shoreline. It is easy to use plenty of shutter speed in the sunshine to freeze the motion of the waves and produce many fine images of the frozen waves. Is there any way to use a long shutter speed to allow the waves to blur during a long 4-second exposure? Try using the lowest ISO on the camera—perhaps it is ISO 100. Stop the lens down to f/22 to reduce the light by one more stop. Will that do it? According to the old “Sunny 16 rule,” proper exposure for ISO 100 in bright sunlight is about 1/100 of a second at f/16. Round it off to 1/125 second to make the stops easier to figure. Using f/22 is one stop darker. Now the shutter speed is 1/60 second and still freezes the waves too much. How can you get to a 4-second shutter speed? You could wait around until sunset. Sometime after sunset it will naturally become dark enough to allow the 4-second exposure time, but the color of the light will be vastly different. A sure-fire way to allow the long shutter speed is to use a variable ND filter. When you rotate this filter, you can select a variable amount of neutral density. For example, the Singh-Ray Vari-ND filter can be adjusted to absorb two to eight stops of light, and that includes all values in-between these two. Dial the Vari-ND filter to absorb eight stops of light. Now the shutter speed can be slowed down eight stops to 4 seconds. The optimum exposure with the Vari-ND filters now becomes ISO 100, f/22 and 4 seconds. Even though the sun is bright, the long shutter speed allows the crashing waves to blur nicely during the exposure.
CONSIDER YOUR LENS NEEDS CAREFULLY
Having a logical assortment of lenses to achieve your shooting needs requires some thought. Take your time and enjoy the process. Consider the types of lenses we use, but you do not need to duplicate our choices. A few high quality zoom lenses and a macro lens should cover most of the subjects you wish to photograph. You can photograph most subjects splendidly if you cover the 24–300mm range with a couple of zoom lenses.