

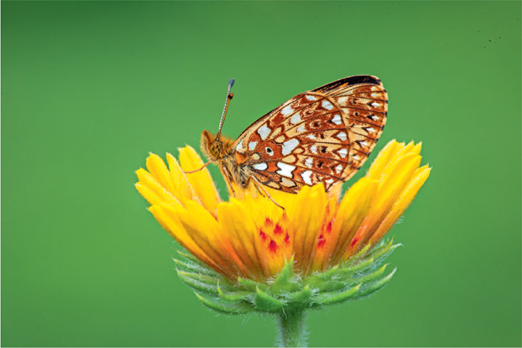
Sulfur butterflies are readily attracted to flower blossoms. We think their tall antennae and bulbous compound eyes make them look comical and we speculate over what they think of us, Nikon D4, Nikon 200mm micro lens, ISO 200, f/32, 1/5 second, Cloudy WB, manual focus and exposure.
Close-up and Macro
A close-up image can be many things. A tight shot of the face of a horse is certainly a close-up image, but its face covers quite a large area. Generally, photographers consider close-up photography to be frame-filling images of fairly small subjects. Close-up photography is loosely considered to be photographing anything between one-tenth and life-size magnification, which is also written as 1:1 or 1x. When the magnification is greater than life-size, most photographers use a special name for this range: macro photography. However, this distinction is arbitrary and seems unnecessary to us as the techniques and equipment used to do both are essentially identical. Perhaps the reason there is a dividing point at life-size is most macro lenses stop at life-size magnification. To shoot greater than 1x, additional equipment is needed.
MAGNIFICATION DEFINITION
Magnification is the ratio between the subject and its image size on the sensor. It is equal to the image size divided by the subject size. If the subject is 10 inches wide in real life, but its size on the camera’s sensor is only 1 inch, the magnification is 1 inch/10 inches = 1/10x. If the subject is 1 inch wide in real life, and. 5 inch on the sensor, it means the magnification is the image size/subject size =. 5 inch/1 inch = 1/2x or half life-size. Anytime the size of the subject equals the size of its image on the sensor, the magnification is life-size. Should the image of the subject on the camera’s sensor be twice as large as the subject, then image size/subject size = 2x or twice life-size. Let’s not get too specific about the numbers. You rarely need to know the precise magnification you are using.

This sleeping Pearl Crescent butterfly allowed me to demonstrate magnification. Neither image was cropped in the printing process. The butterfly was photographed with the macro lens set precisely to 1/2x or half life-size magnification. This indicates the image of the butterfly on the camera’s sensor is one-half the size of the actual butterfly. Canon 5D Mark III, Canon 180mm f/3.5 macro, ISO 100, f/16, 1/2 second, Cloudy WB, manual focus and metering.

Now the Pearl Crescent butterfly is shot at precisely life-size, 1:1, or 1x magnification—utilizing three different ways to write it. The image of the butterfly on the sensor and the actual butterfly are exactly the same size. Notice the butterfly fills the frame far more when shot at 1x magnification, showing that the size difference between 1/2x and 1x is greater than you might expect. A Canon 580 II flash was used with FEC +.7 stops to optimally expose the butterfly and leave the background darker. Canon 5D Mark III, Canon 180mm f/3.5 macro, ISO 100, f/16, 1/2 second, Cloudy WB, manual focus and metering, Canon 580II flash and ST-E2 flash controller.
WAYS TO FOCUS CLOSER
Lenses have a focusing ring that allows you to focus between infinity and some closer distance. This distance varies from lens to lens. For example, the Canon 200–400mm lens focuses down to 6.56 feet—the minimum focusing distance—and no closer. The magnification at 400mm at 6.56 feet is only. 15x, which simply means you cannot fill the frame with a 2-inch wide butterfly. All lenses have a minimum focusing distance, so how do you focus closer to achieve higher magnification? Fortunately, there are a multitude of ways to enter the realm of close-up photography. Let’s look at them.
MACRO LENSES
Camera makers offer specially made lenses that focus closer than most regular lenses and reach a magnification up to 1x by merely focusing closer. They are specially made to be optically super sharp when used at close focusing distances. These lenses are ideal for close-ups and with accessories they can easily reach the macro range, which is greater than life-size magnification. Here is a short list of current macro lenses from which to choose:
| Canon 50mm/2.5 | Pentax 50mm/2.8 |
| Canon 65mm/2.8 | Pentax 100mm/2.8 |
| Canon 100mm/2.8 | Sony 50mm/2.8 |
| Canon 180mm/3.5 | Sony 100mm/2.8 |
| Nikon 60mm/2.8 | Tamron 90mm/2.8 |
| Nikon 105mm/2.8 | Tamron 180mm/3.5 |
| Nikon 200mm/4.0 | Tokina 100mm/2.8 |
| Olympus 50mm/2.0 | Sigma 180mm/2.8 |
Scan the list carefully. Notice there are many macros in the 50mm, 100mm, and 180mm focal length range. Which one do you choose? The longer focal length macros in the 180–200mm range are heavier, more expensive, and bulkier than the shorter macros. Therefore, it is not surprising that many photographers choose a macro in the 50–100mm range. Is that a good idea?

The angle of view determines how much of the background is covered by the lens. The short focal length used here captures the yard, wooden fence, aspen forest, and the sky all at the same time. Including the chaotic background, draws attention away from this handsome silver- bordered fritillary butterfly. Therefore, we think the background and focal length are undesirable. Canon 5D Mark III, Canon 24–105mm f/4 lens at 45mm, ISO 200, f/16, 1/4 second, Cloudy WB, manual focus and exposure.
The Canon 180mm macro lens “sees” far less background than a shorter focal length. The 180mm lens isolates the butterfly against an uncluttered green background. Having details in the background isn’t always undesirable, but in most cases a background free of distractions is desirable. For this reason, we shoot the bulk of our close-ups with the Canon 180mm macro or the Nikon 200mm f/4 micro lens. Canon 5D Mark III, Canon 180mm f/3.5 macro lens, ISO 200, f/16, 1/2.5 second, Cloudy WB, manual focus and exposure.
Long Macro Lenses
For serious close-up photography, the longer 180mm and 200mm macro lenses are far superior for most applications. The 180mm and 200mm macros offer a narrow angle that captures a small field of view. These macros make it effortless to isolate a stunning subject against an uncluttered homogeneous background without distractions. Longer lenses provide more working distance defined as the distance between the front of the lens hood and the subject.
Extra working distance helps to avoid scaring a nervous subject, keeps you safer if photographing a potentially dangerous creature like a scorpion or spider, and provides more room to set up the tripod without bumping the subject. Finally, all of the longer macro lenses have a built-in tripod collar (lens mount), which makes it easier to shoot horizontal and vertical images on a tripod.
100mm Macros
For serious close-up photography, the longer 180mm and 200mm macro lens advantages of greater working distance, smaller angle of view, and a tripod mount make them the best choice by far for most subjects. Many photographers still cannot afford the high cost and/or don’t wish to carry the weight of the larger lenses. The next best option is a macro in the 100mm focal length range. If you are very careful with the 100mm macro, you can avoid busy backgrounds that often are marred with unsightly distractions. Always pick a shooting angle so that the background is far away and uniformly lit and colored. Although the working distance is only half of what you would get with a 200mm macro, most of the time it is enough to allow excellent photography if you are attentive.
Though we don’t know of any 100mm macros that have a built-in tripod mount, using an L-bracket on the camera makes it simple to change composition from horizontal to vertical or vice versa, so not having a tripod mount is not a serious problem with the shorter macros. And should you be using a camera with a small sensor, the crop factor changes the angle of view to approximate that of a longer lens. For example, a 100mm macro used with a camera that has a 1.6x crop factor has the same angle of view as a 160mm lens—which is approaching that of the longer macros. That said, our first choice remains the 180mm and 200mm option for serious photography.
50mm Macros
These are the least expensive and lightest of the true macro lenses. Like all of the others, it probably can focus close enough to achieve life-size (1x) magnification. These lenses are terrible choices for most close-up photography because the angle of view is so wide that it is nearly impossible to avoid distractions in the background and the working distance is far too little. These short macros are truly despicable for most close-up shooting. They are suitable for copy work and photographing small objects in the studio where it is easy to control the background. They also do work for high magnifications around life-size and greater. Why high magnification? Once you reach life-size magnification or greater, the depth of field is minuscule, even at f/16. The background becomes a homogeneous color in which everything in it is completely out of focus. When the subject allows a close approach with the 50mm macro, then it can work. If you already have a 50mm macro—keep it for focus stacking use at high magnification. If used with a focusing rail and extension tubes, it does a fine job when shooting at magnifications of 1x and greater.
Canon 65mm Macro
This unique macro lens is specially made to achieve super-high magnifications. It begins with a magnification of life-size (1x), and by turning a ring, the lens steadily increases its magnification from 1x all the way to five times life size (5x). If your goal is to fill the viewfinder with a mosquito, dew drop, the eyes of a horsefly, or any other tiny object, this is the perfect lens for doing it. The lens really has no focusing mechanism of its own. Turning the ring changes the magnification instead. Therefore, mount the lens on the camera and then attach the camera to a focusing rail. With the rail firmly mounted on a tripod, move the tripod until the lens is nearly focused on the subject when the desired magnification is set. Use the geared focusing knob to move the entire lens/camera assembly back and forth until sharp focus is achieved. We are attracted to subjects that require magnifications greater than life-size, so we commonly use this lens with great success. For high magnification images where focus stacking is the best way to acquire the necessary depth of field and image sharpness, the 65mm macro on a focusing rail is a superb combination. I’ll say more about focus stacking later in the chapter.
This lens is dedicated to Canon cameras. No other camera makers build anything similar. Therefore, even users of Nikon, Sony, and others often buy the Canon 65mm macro and an inexpensive Canon Digital Rebel camera just to use this fine lens for their high magnification close-ups! You might consider contacting your camera maker to suggest they build a similar lens that reaches magnifications greater than life-size. If they get enough feedback, perhaps other camera makers will consider making a lens similar to the Canon 65mm macro.

Barbara is a dedicated Nikon shooter, nonetheless she borrowed my Canon 7D in order to use my Canon 65mm macro lens because it is impressive for high magnification images. Twenty-one images were shot where the focus was changed slightly. The stack of images was combined into a single sharp image with Helicon Focus. At magnifications of life-size and greater, it is easiest using a focusing rail to change the focus in tiny increments. Canon 7D, Canon 65mm 1–5x macro, ISO 400, f/8, 1/15 second, manual exposure and metering, and a Kirk focusing rail FR-2.
EXTENSION TUBES
Macro lenses are specially made to focus from infinity to life-size magnification. Since the greatest built-in magnification is 1x, how is it possible to shoot using magnifications greater than life-size? Inserting one or more extension tubes into the optical path between the lens and the camera is the answer. Extension tubes can be purchased individually or in sets. Canon offers a 12mm and 25mm extension tube that preserves autofocus and automatic metering. Nikon offers several tubes, but they do not preserve autofocus—a serious problem at times. A third-party extension tube maker, Kenko, builds extension tubes for Canon, Nikon, Sony, Minolta, and other camera systems. The set of Kenko tubes includes 36mm, 20mm, and 12mm tubes. They can be used singly or combined to reach greater magnification.

Extension tubes and teleconverters are placed between the lens and the camera. Extension tubes are a mechanical spacer with no glass within them, which enable the lens to focus closer to increase magnification without significantly undermining the optical quality of the lens. Teleconverters contain glass and they work by increasing the magnification by the power of the converter. The magnification is greater, but image quality is reduced slightly because glass is added to the optical path. Teleconverters and extension tubes can be used together to achieve even higher magnifications. For the greatest magnification, put the teleconverter on the camera first and then add the extension tube and finally the lens.
Extension tubes are hollow metal tubes that are light-tight when inserted between the lens and the camera. The tube adds extra lens extension in the optical path, which enables the lens to focus closer than normal. Being able to focus closer while maintaining the focal length is what increases the magnification. There is little loss of image quality because no extra glass is added to the optical path. The quality is superb! Of course, with an extension tube in use, it is impossible for the lens to focus to infinity. But that is okay because you are shooting a close-up anyway. The more extension that is added, the greater the magnification that can be reached. Extension tubes cost some light, but even that is not a huge problem. Just for reference, a 50mm extension tube used behind a 100mm lens costs one stop of light. This same amount of extension behind a 50mm lens costs two stops of light. However, shooting on a tripod and using higher ISOs largely negates this small light-loss problem.
To reach magnifications greater than life-size, focus the macro lens out to life-size and then add an extension tube or multiple tubes to reach greater than life-size magnifications. The more extension tubes added, the greater the magnification. Don’t overdo it, though. Combining three or more extension tubes can make the whole system unstable. Sometimes the metering connection among all of the tubes fails, which causes a loss of accurate metering.
CLOSE-UP LENSES
Another way to reach greater magnifications is to add specially made close-up lenses to the front of a macro lens. These close-up lenses screw on to the front of the lens, just like any other filter. They optically shorten the focal length, which is undesirable, but they do enable greater magnification. Avoid using the cheap ones. Canon offers the double-element 500D series in 52mm, 58mm, 72mm, and 77mm sizes. If your lens has any of these four filter sizes, then buying the one that fits will work fine on any lens, including non-Canon lenses. If the filter’s thread size doesn’t fit any of these filters, buy a filter adapter to make it fit. For example, if the close-up lens filter size is 77mm and the lens filter threads are 72mm, you can use an adapter that has 72mm threads on one side and 77mm threads on the other. This adapter ring allows you to attach a larger filter to the front of the lens. Never attach a smaller filter as you may encounter severe problems with dark corners in the image because the filter ring appears in the field of view of the lens.
These close-up lenses work especially well on zoom lenses that include 300mm in their focal length range. Optically, a close-up lens shortens the effective focal length. For example, a 75–300mm zoom might become only a 220mm focal length when zoomed to 300mm with a close-up lens attached. Still, it gives much greater magnification while retaining the narrow angle of view of a 220mm lens and the working distance is quite convenient. Close-up lenses do not work well on short zoom lenses—such as a 24–105mm—because the angle of view is too wide and the working distance is minuscule. One nice advantage of using a close-up lens on a zoom lens is that once the subject is focused, the lens magnification can be changed without moving the tripod. Zoom the lens to change the composition, touch up the focus, and you are good to go. With any fixed focal length lens, changing the magnification requires moving the tripod forward or backward a little.

Close-up lenses are clear filters that attach to the front of the lens. They have a focal length and increase the magnification of any lens on which they are used. The longer the focal length, the greater the magnification. High quality close-up lenses don’t cost you any light and the image sharpness remains quite good. Canon offers the 500D series of close-up lenses in four sizes and Nikon has the 3T, 4T, 5T, and 6T. Both Canon’s and Nikon’s produce acceptable results. Beware of the many inexpensive close-up lenses that are sold, because they do not produce sharp images.

Barbara used a Nikon 5T close-up lens on the front of her Nikon 200mm micro lens to help her fill the frame with the tiny Western Green Hairstreak butterfly. The 5T has 62mm threads, which makes it suitable for her micro lens that accepts 62mm filters. The 5T close-up lens is high quality. Join that combination with Barbara’s excellent shooting habits in order to produce a sharp image. She underexposed the ambient light by one stop and used a Nikon SB-800 with the SU-800 flash controller mounted in the camera’s hot shoe to optimally expose the miniature butterfly. We call this technique main flash. Nikon D4, Nikon 200mm micro lens, ISO 100, f/22, 1.3 seconds, Flash WB, and Nikon 5T.
SHOOTING SHARP IMAGES
The greater magnifications that close-up images require make it mandatory that your shooting technique is flawless or your images will not be as sharp as they could and should be. Making the following shooting strategies a habit will help considerably.
FOCUS MANUALLY WITH A MAGNIFIED LIVE VIEW
Autofocus is effective for many subjects, especially when a button on the rear of the camera is used to control it, but it fails miserably in close-up situations. Autofocus works by detecting contrast and sharply focusing it. However, many small subjects exhibit little contrast. A tulip’s uniform yellow blossom has little contrast. Autofocus will have a difficult time “seeing” it. Because depth of field is so extremely limited in close-up photography—even at f/16—precise focus must fall on the most important part of the subject. If photographing a frog, focus precisely on the frog’s eye, not on its nose or throat. If the eyes are not tack sharp, the image suffers. By focusing manually, you have precise control over what is in sharpest focus.
STOP DOWN TO F/16
Stopping the lens down to f/16 is a reasonable compromise between achieving depth of field with the smaller aperture while minimizing the serious problem of diffraction that does occur at f/16, but becomes steadily worse with smaller apertures.
AVOID F/2 AND F/32
“Diffraction” is the term used to describe the deleterious effects on image sharpness when light passes through a tiny aperture. The more light that grazes the edge of the small aperture hole, the more light that is diffracted, which causes a loss of sharpness. The sharpest apertures on the lens are typically two to three stops down from the maximum aperture. If the lens is a 200mm f/4 lens, for example, expect the sharpest apertures to be f/8 to f/11.
USE A SELF-TIMER, CABLE RELEASE, OR REMOTE RELEASE
Shooting the camera handheld or touching the camera while tripping a tripod-mounted camera will cause a slight loss of sharpness due to camera-shake. Camera-shake is especially likely when using shutter speeds slower than 1/125 second, although shorter lenses don’t suffer as much at this shutter speed. Shooting on a tripod, using a self-timer, cable release, or a remote release separates your trembling body from the camera, which, in turn, produces sharp images. That said, we generally shoot lenses longer than 200mm on a tripod while holding on to the camera with both hands when photographing animal action because we need to change the composition quickly or pan with the subject. Sharp images are obtained by always favoring high shutter speeds—usually 1/250 second or faster—to freeze the slight camera-shake. However, when shutter speeds fall below 1/60 second, we never trip the camera while touching it or the tripod.

Please believe that quality is not a matter of running around photographing everything that moves handheld with a short focal length lens in bright sun. Close-ups demand the ultimate in precision and care. Notice Barbara is using a tripod, tripping the camera with a cable release, using a Plamp to support the flower, adding highlights with a flash, and using many camera settings that allow her to capture sharp and well-exposed images.
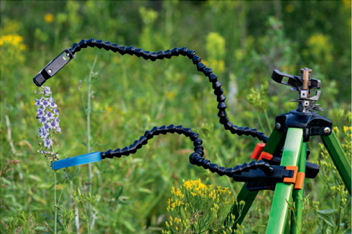
Using an inexpensive tripod lawn sprinkler, two Plamps are attached to it and then to the delphinium flower both above and below the area to be photographed. The Plamps solidly secure the blossom without hurting it, to prevent the slight breeze from wiggling the blossom too much.
AVOID RUSHING WATER AND WIND
Setting up a tripod in rushing water or where buffeted by high winds will surely cause camera-shake and produce unsharp images. Avoid running water and wind. If you must shoot in such conditions, hang on to the camera and tripod to add your body mass to the whole system to reduce vibrations, use faster shutter speeds, and turn image-stabilization on.
USE MIRROR LOCK-UP OR LIVE VIEW
The mirror is placed in the optical path to send the light reflected from the scene upward to allow you to see it in the viewfinder. The mirror must move out of the way at the moment of exposure. This motion can cause the camera to quiver. The problem is especially troublesome when using shutter speeds in the 1/4 to 1/30 second range.
USE A PLAMP TO HOLD THE SUBJECT STILL
Wimberley makes an incredibly useful device called the Plamp. Attach this plastic clamping device to a simple tripod to support it. Attach the other end to a small subject to brace it and hold it still. We generally use a Plamp by fastening it to the stem of a flower just outside the image where it holds the flower motionless. Plamps are incredibly useful. We don’t see how any serious close-up shooter can do without having at least one Plamp. We often use two Plamps at one time. If the flower blossoms are blooming up and down a flower stalk, we attach a Plamp below and above the blossoms we want to photograph. At other times, we attach one Plamp to the flower stem and another Plamp to a differently colored flower behind the subject to move it over a little (without picking the flower) to add a splash of color in the background.
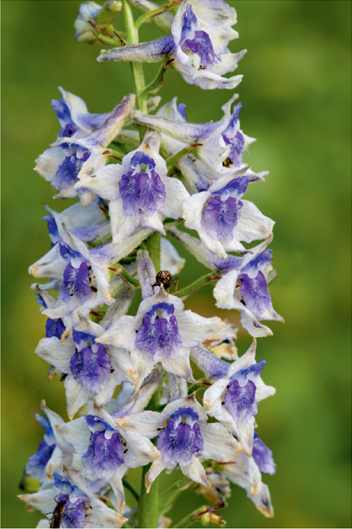
Here’s the delphinium flower that was stabilized with the two Plamps. Canon 5D Mark III, Canon 180mm macro f/3.5 lens, ISO 100, f/22, 1/1.6 second, Cloudy WB, fill flash with Canon 600 EX flash and ST-E3-RT radio controller.
Do not attach the Plamp to the tripod supporting the camera. If you do and then quickly move the tripod, you will jerk the subject and possibly harm it. Moreover, you will certainly ruin the image. Inexpensive tripods that are too flimsy to support a camera work perfectly as a Plamp holder. We use inexpensive lawn sprinkler tripods as Plamp supporters!
USE FLASH TO FREEZE CAMERA AND SUBJECT MOTION
Electronic flash emits an easily controlled light that has a very short duration. Even when the flash is used at full power, the flash duration might only be 1/700 second or perhaps even less. Of course, these short flash durations vary among flash models, but all of them are rather short. Short flash durations freeze subject motion and camera-shake, no matter what shutter speed is being used. Obviously, if you are mixing ambient light and flash together with a long shutter speed—1/30 second for example—you will get a sharp image of the subject from the flash exposure and could get a blurry second image from the ambient light exposure should the subject be moving too much.
SHOOT WHEN THE AIR IS CALM
It helps to plan your photo outing for those times when the breezes are minimal. Wind rarely occurs at dawn and dusk, but windless times can occur any time, especially on a cloudy day. We shoot most of our close-up images early and late in the day. We frequently use our 6- by 10-foot greenhouse to photograph flowers during breezy weather because all air movement and light are controlled without difficulty. In the greenhouse we photograph plants that we buy from garden nurseries or we pick in our garden.
USE FOCUS STACKING AND SHOOT AT F/11
When using a tripod-mounted camera to photograph a subject, the best way we know to capture the sharpest possible image is to shoot using an aperture of f/8 to f/11. These are the sharpest apertures on the lens. Of course, the depth of field is less at f/11 than f/22 and probably will not completely cover the subject. The best way to handle this is to shoot a set of images in which the focus is changed slightly from the front of the subject to the rear. Change the focus in tiny increments from front to back. Combine all of these images into a single image with focus stacking software. Focus stacking is remarkable for achieving the ultimate in sharpness.
IDEAL CLOSE-UP LIGHT
Perhaps it is less complicated to describe what is not considered terrific light for close-ups. Bright, direct sunshine is great for suntans, but appalling for lighting close-up images because it creates too many black shadows that obscure subject details. When the exposure is lightened to reveal shadow details, consequently the highlights are overexposed and lost. The soft low contrast light found on bright cloudy days is perfect for most close-up images. Even if the day is rather dark, the dim light still works fine because you can use higher ISOs to keep shutter speeds reasonable. Cloudy skies produce light that is low in contrast, which is especially ideal for small subjects. Even if the day is sunny, find subjects in the shade or under a canopy of trees to use low contrast light.
Our weather preference for nearly all close-up subjects is bright overcast light and no breeze. Flowers, butterflies, amphibians, mushrooms, and reptiles all photograph well in these conditions.
GOLDEN SUNLIGHT AT DAWN AND DUSK
The golden sunshine early and late in the day is well known for producing outstanding landscape and wildlife images. It also works for many small subjects where the golden-colored light enhances the subject. This is true for all warm-colored subjects such as orange butterflies, brown mushrooms, or red flowers. Golden light is effective for most colors, but not all. Blue flowers may look oddly colored when bathed with yellow light.
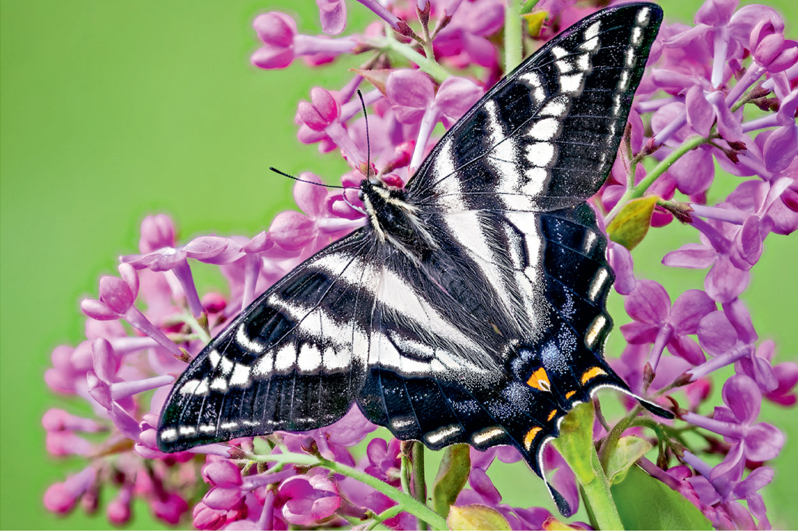
Butterflies were sitting still on a cool spring day in British Columbia. The pale tiger swallowtail flew in to the lilac bushes where we were photographing hummingbirds. When dense clouds covered the sun, the butterfly became dormant. Nine shots were taken to produce a focus stack set of images that were then processed with Zerene Stacker software. Nikon D4, Nikon 200mm micro lens, ISO 100, f/4, 1/60 second, Cloudy WB, manual focus and exposure.
Of course, even the red light at dawn and dusk remains high in contrast, but it is easy to use light modifiers to reduce the contrast. A very successful strategy is to use a gold-colored reflector to bounce light into the shadows. Use a technique we call cross lighting to light the subject beautifully. Photograph the subject with the golden sunshine backlighting it. The warm light nicely rims the subject, separating it dramatically from the background. Of course, the side of the subject facing the camera is dark because backlight causes the shadows to face the camera. Now hold a reflector with a gold-colored side near the camera. Carefully adjust the angle of the reflector to bounce the sunshine back to the subject. This effectively opens up the shadows to reveal detail, yet the natural backlight still produces a wonderful rim light. We call this cross lighting because the golden sunshine and the bounced light from the reflector travel in opposite directions and cross at the subject’s location.
REFLECTORS
Buy some gold-colored aluminum foil, crinkle it up, spread it out again, and paste it to stiff cardboard. A homemade light modifier is quite suitable for reflecting sunlight back to the subject to reduce contrast by adding light to the shadows. Although it worked perfectly for years, we now prefer to use a Photoflex 7-in-1 Multidisc in the 32-inch size. It is round with a steel frame that pops open easily. Zippered fabrics can be changed to different colors to produce a variety of light-modifying effects. The colors include white, silver, gold, soft gold, translucent, SunLite, and black. White reflects light with the most natural results because it does not add a colorcast. Silver increases specular highlights and increases contrast, so we rarely use it. Gold greatly warms up the colorcast on the subject. It can be pleasing, but often it is too much. Soft gold combines gold and silver in a zigzag pattern to produce a warmer overall look, but not as strong as only the gold surface. Translucent serves as a wonderful diffuser that reduces contrast. SunLite has a less reflective surface than soft gold to prevent it from being too directional and powerful. Black, which is sometimes referred to as negative fill light, may be used to reduce the light on the background.
DIFFUSERS
Any white piece of cloth can be a diffuser if it isn’t too thin or thick. You want the cloth to reduce the light by two to three stops. The translucent side of the Photoflex 7-in-1 Multidisc works well for this purpose. Diffusing the light changes the colorcast a little. Since the white balance is so easy to control with digital cameras, merely shading the subject and its background is effective on a sunny day. Of course, with the subject shaded, much of the light on the subject is reflected blue light from the blue sky, but to avoid the excessively blue colorcast, simply set the camera to the Shade WB. The camera adds yellow to the image and minimizes the blue colorcast.
FLASH
Electronic flash is exceptionally useful in close-up photography. The use of flash includes the following:
• Reduce contrast
• Increase contrast
• Improve the color
• Highlight the subject against a darker background
• Balance out the light between the foreground and the background
• Freeze subject and camera motion.
Consider each one of these ways to use flash because it is crucially important to master flash.
We use flash in the vast majority of our close-up images. Flash is easiest to use if you avail yourself of the wireless off-camera flash equipment all camera systems offer. Using the flash off-camera—meaning it is not mounted on top of the camera in the hot shoe—is the best way for creative freedom and ease of use. For most images, it is best to mix ambient light with flash, which is a straightforward process. First decide what the ambient light should do. Should the ambient light properly expose the subject, or should it underexpose the subject? Once the role of the ambient light is determined, bring in a flash and use the flash exposure compensation control (FEC) to make the flash do what is necessary.
Reduce Contrast
Perhaps this is the most uncomplicated use of flash to understand. Determine the optimum ambient light exposure in the normal way by using the rightmost data of the histogram and the highlight alert. As a starting point, set the flash exposure compensation to –1.3 stops. All cameras have an FEC somewhere, but some flash units allow you to set it directly on the flash, also. Keep the flash close to the lens and point it at the subject. Shoot the image. View the resulting image on the LCD monitor to see if the shadows are filled enough and the image looks first-rate. If so, you are done. If the shadows are filled too much, reduce the fill light from the flash by setting the FEC to a more negative number—perhaps minus two stops—and try again. Keep adjusting the amount of fill light from the flash with the FEC until you get the shadow density you desire. If the fill light from the flash is not enough, increase the fill flash by setting a less negative FEC. In other words, if –1.3 FEC does not fill the shadows enough, increase the fill flash by setting –.7 FEC, which is a two-thirds stop increase in fill light from the flash.
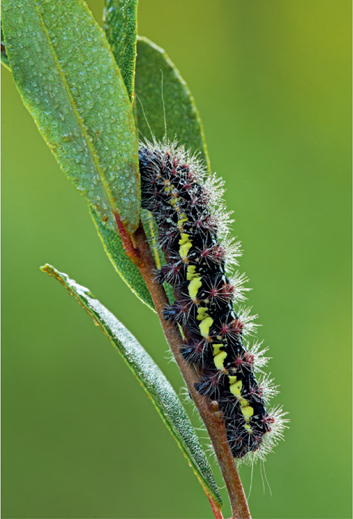
The cool morning enticed this caterpillar to slumber on the twig of a leatherleaf bush in a dewy northern Michigan bog. A Plamp was used to steady the twig occupied by the caterpillar. By carefully adjusting the shooting viewpoint, it was possible to shoot toward the rising sun, which was diffused by a thin cloud layer to backlight the caterpillar and highlight its tufts of hair. Canon 5D Mark III, Canon 180mm f/3.5 macro, ISO 100, f/16, 1/2 second, Shade WB.

To bring out more color in the caterpillar and open up the shadows created by the backlight, a gold reflector was used to bounce the light from the sun back to the subject. We call this cross lighting and use it frequently with considerable success. The light from the eastern sky and the reflected light from the gold-toned reflector cross right at the subject’s location. Cross light provides the look of backlight while retaining detail and color in the side of the subject facing the camera. Canon 5D Mark III, Canon 180mm f/3.5 macro, ISO 100, f/16, 1/2 second, Shade WB, and gold-toned reflector.
Increase Contrast
Although contrast is often a problem for photographers, a little contrast can easily add impact to the image and help separate the subject from the background. We use flash a lot to add a rim light from the side or behind the subject. On a dark cloudy day, the light is indeed low in contrast. Determine the optimum exposure for the ambient light. Now set the flash to zero FEC and angle the flash to make it sidelight, or, better yet in most cases, backlight the subject. Shoot the image and check the results on the camera’s LCD display. If the flash is too strong and creates too much contrast, reduce its output by setting more negative compensation, such as minus one stop, and try again. Keep adjusting it until you arrive at the result you want. If the flash does not add enough contrast, then try a plus compensation, such as +1 FEC, to increase the amount of light from the flash. In all cases, be sure to use automatic through-the-lens metering for the flash portion of the exposure. Then, should you unknowingly change the distance between the subject and the flash by a few inches, the flash will automatically compensate for this change in distance. By the way, for nearly all of our mixing flash with ambient light in close-up photography, we use manual ambient light exposure in conjunction with automatic flash exposure. They are two different systems and quite independent of each other.
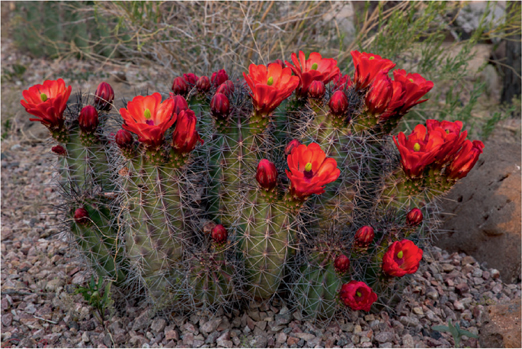
This attractive group of claret cup cactus were growing in the Sonoran Desert south of Tucson, Arizona. The bright overcast light produced soft shadows, but the large blossoms still created objectionable shadows below them. Canon 5D Mark III, Canon 24–105mm f/4 lens, ISO 200, f/18, 1/4 second, Shade WB.

Flash opened up the shadows. In this case, the ambient light remains the primary light source because the flash is only set to +1/3 FEC exposure compensation. The weaker light from the flash merely opens up the shadows to reveal the color and detail already contained within. Canon 5D Mark III, Canon 24–105mm f/4 lens, ISO 200, f/18, 1/4 second, Shade WB, Canon 600EX flash controlled with the ST-E3-RT radio controller.

These two fritillary butterflies make a fine composition as they perch on the lupine. Canon 5D Mark III, Canon 180mm f/3.5 macro lens, ISO 200, f/18, 1/4 second, Shade WB, manual exposure and focusing.

A flash was held to backlight the butterflies, but not appear in the image itself. We love how the backlighting from the flash that is set to FEC +1 nicely rim lights the delicate creatures and bleeds through the wings. Canon 5D Mark III, Canon 180mm f/3.5 macro lens, ISO 200, f/18, 1/8 second to darken the background, Shade WB, Canon 600EX flash with ST-E3-RT flash controller, manual ambient light exposure and focusing with automatic TTL flash metering at the same time.
Improve the Color
Although image colors are easy to adjust with software or the white balance settings in the camera, flash is useful for changing the color as well. Flash emits a light that is similar to direct sunshine or a little bit bluer. If you are photographing in a green forest that is reflecting a preponderance of green light from the leaves, a little flash can reduce the green colorcast. It is also possible to tape gelatin filters over the flash head to create desirable colorcasts. Taping a red gel over the flash will make its light have a far redder colorcast.
Balance the Light between the Foreground and the Background
We often use flash in landscape photography, but we need it frequently for close-ups. A flower is growing in the shade and the background is a sunlit meadow or blue sky. The difference between the shaded subject and sunlit background is at least three stops of light and in all probability more. Expose for the subject in the shade and the background becomes overexposed. Expose for the bright background and the subject becomes underexposed. What to do? You could shoot a series of images where the exposure is varied by changing the shutter speed and merging these images together with HDR software. However, due to breezes or subject movement, shooting sharp HDR images can be challenging.
The easiest way to balance out a dark foreground with a bright background, or sometimes vice versa, is to use flash to light one portion of the image. If the subject is shaded and the background is bright—the most common situation—set the ambient exposure for the background and use flash to optimally illuminate the foreground. If the background is dark and the foreground light, set the ambient light to nicely expose the foreground, and use the off-camera wireless flash to light the background. Naturally, if the background is huge, then a single flash isn’t able to emit enough light. However, often in close-up photography the background is small enough that it is possible to light it agreeably with a single flash.
Freeze Subject and Camera-shake
Short flash durations make it easier to shoot sharp images. Although you have to use the flash sync speed, which might only be 1/200 second (this varies a little among camera models), if the bulk of the light illuminating the subject is from the light from the flash, and its flash duration is only 1/1000 second, that is similar to using a shutter speed of 1/1000 second. Using flash tends to eliminate or reduce the image-softening effects of both camera-shake and subject motion. Of course, if a large percentage of the total exposure is from the ambient light, then you can get a secondary soft image from the continuous light source that makes the image less sharp overall.
Since close-up subjects are close to the camera, and therefore the flash, it is possible to use shutter speeds that are faster than sync speed when using flash. Set high speed flash sync and then you can use any shutter speed in conjunction with the flash. High speed sync works by having the flash emit a series of tiny flashes to effectively light the entire image as the shutter operates. Since this series of flashes must be accomplished with a single charge in the flash’s capacitor, the overall output is less, but the close flash-to-subject distance allows this to work. Check your flash manual to see how to set high speed flash sync.
SUMMARY
Close-up photography is incredibly enjoyable and straightforward to do. Gorgeous subjects are everywhere. While not everyone can afford an expensive safari to Kenya to photograph wildlife, anyone can find and photograph fields full of wildflowers, butterflies, and other insects in the garden, and numerous other attractive subjects are easily and inexpensively discovered.
I intended this chapter to hit the highlights to get you started. Our Close Up Photography in Nature book is entirely devoted to photographing small subjects, so you might wish to obtain a copy.
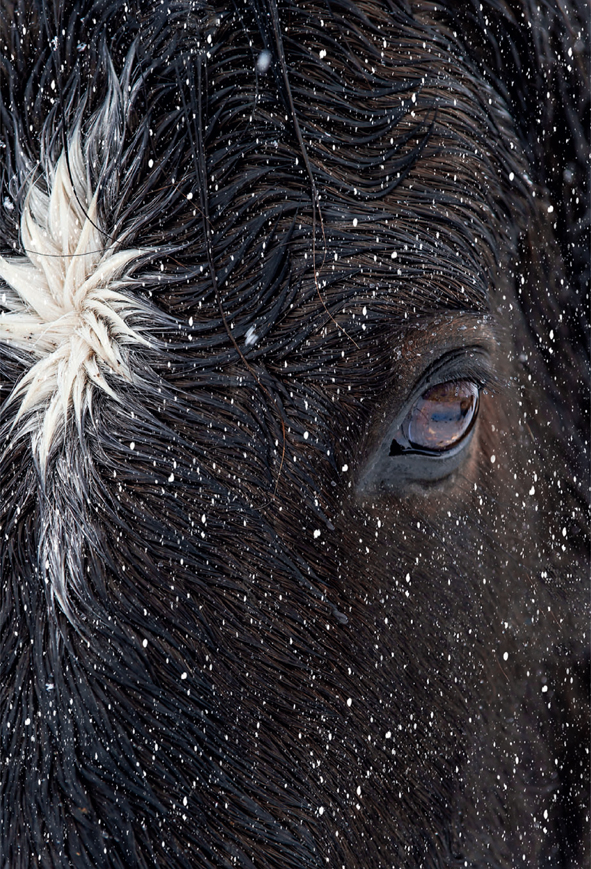
Teton Max is my large Tennessee walking horse who is always looking for his next meal. This makes him easy to photograph because he readily approaches people and hangs around hoping for a handout. During a heavy snowstorm, Barbara shot handheld to make a tight close-up image of a big subject. Nikon D4S, Nikon 70–200mm f/2.8 lens at 200mm, ISO 800, f/8.0, 1/400 second, Cloudy WB, manual metering and AF-C autofocus on the back-button