
3. Animations
It’s hard to find anyone under 65 who didn’t grow up watching cartoons on television. Kids have fun watching cartoon characters run, jump, and fly around the screen. It’s the same creating animations for presentations and displays. Images and text can magically appear and disappear on the screen. Objects can jump up and down for emphasis. Illustrations can come to life.
Even if you’ve never created any sort of video or animation, it’s easy to apply motion effects to InDesign elements. We like this much better than trying to work with Adobe Flash Professional. You use the familiar tools in InDesign but export SWF videos, which can then be incorporated into presentations and web graphics.
Basic Animation Settings
Most of our favorite animations simply move a text frame or image onto a page. You can apply animations only to whole frames. You can’t have just a single paragraph, such as a bullet point, move onto the page; each bullet point in the text would have to be in its own frame. However, as you will see, there are a wealth of ways to move objects around the page.
Objects can be animated to fade into view as they move onto a page.
Applying motion presets
The easiest way to animate objects is to use the animation presets that ship with InDesign. After you have applied a preset, you can then modify the actions of the animation. The primary controls for animations are applied using the Animation panel.
To open the Animation panel, choose Window > Interactive > Animation. Select the object or group that you want to animate. The object can be on or off the page.
You can select more than one object to animate. However, the animation preset will be applied individually to each object. You can group the objects so they animate as a single object. This is not the same as having two separate objects animate together, which we’ll cover on page 83.
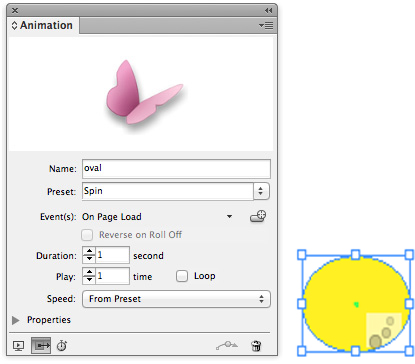
The Animation panel and an object with the animation icon visible.
With the object selected, choose one of the animation presets from the Preset list. This applies an animation to the object, as indicated by the animation icon.
Most of the presets are well described by their names. For example, Fade-in applies the effect of the object fading into view. But the effect of a preset such as Pulse may not be immediately understood. You can preview its effect by applying the preset to the animated object. The picture of the butterfly in the Animation panel then animates according to that effect.
Naming the animation
When you apply a preset to an object, the object’s Name field fills in with a generic description of the object. An empty rectangle frame is called rectangle. A text frame is named with the first few words of text. A graphics frame contains the name of the placed image. If you work with many animated objects, you will most likely want to change these generic names to something more explanatory.
Select the text in the Name field and replace it with a more descriptive name. We like to name animations with their appearance as well as the type of animation applied, such as “Flower moving from right.”
Setting the duration and speed
The Duration field controls how long (in seconds) the animation plays. The motion presets apply a default setting that you may find too short. You can lengthen the animation by increasing this setting.
The Speed menu controls whether the animation accelerates or decelerates as it plays. Applying these settings makes the animation look more realistic. (Think of a car that starts, builds up speed, slows down, and then stops.) You can choose from the following options:
• From Preset uses the speed control that is applied by default to the animation preset.
• None keeps a constant speed throughout the animation. This is useful for animations that move in a single place, such as rotations.
• Ease In starts slowly and speeds up. This is most useful for animations where the object moves off the page.
• Ease Out starts at a constant speed and slows down at the end. This is most useful when the object starts off the page and then moves into view.
• Ease In and Out starts slowly, remains constant for a period of time, and then slows down. This is most useful when the object is visible throughout the duration of the animation.
Playing the animation multiple times
Use the Play field to choose how many times the animation repeats. For most animations that move onto a page, you will want to set them to play only once. But for presets such as Gallop, which moves the object up and down, setting the Play field to more than 1 causes the object to jump several times.
Select Loop to repeat the animation endlessly. Setting an animation to endlessly play on a page is distracting. But that doesn’t mean you can’t loop objects such as the wheels on a car that moves across a page. The wheels should loop in that situation.
Playing Animations
Animations are like movies on a page. They need some sort of prompt to start the show.
Setting events to play animations
The Events list lets you choose which mouse or page actions trigger the animation. The default is to have the animation play when the page comes into view, or is loaded.
Choose a trigger option from the Events list. A check mark appears next to its name. You’re not limited to just one event prompting an animation. For instance, you can have an animation play automatically when the page loads but also play when the viewer clicks the animated object. To add a second event for an animation, open the Events list again and choose another event. A second check mark appears next to that name. This indicates that two separate events can start the animation.
• On Page Load starts the animation when the page is visible. This can be when the viewer moves either forward or backward to view the page.
• On Page Click starts the animation when the user clicks anywhere on the page.
• On Click (Self) starts the animation when the object is clicked.
• On Roll Over (Self) starts the animation when the mouse moves over the area of the object.
• If you choose On Roll Over (Self), you can select Reverse on Roll Off to play the animation backwards when the mouse moves away from the object.
Creating a button to play an animation
You can also create a button to play an animation. The InDesign team figured (rightly) that people would want to quickly make buttons to play animated objects. So they made it very easy.
Start by applying a motion preset to the object. Then create the object that you want to use to trigger the animation. You don’t have to turn this object into a button. That will happen automatically as you follow these steps.
Select the animation object, and then click the Create Button Trigger icon in the Animation panel. A tool tip instructs you to click the object that you want to start (trigger) the animation. This converts the object into a button and also applies the action to play the animation. You now have a button that will play the animation. You can also click a button that is already on the page to add playing the animation to the actions for that button.
When you set a button to play an animation, On Button Event appears in the Events list for the animation, indicating that the animation can be triggered by a button.
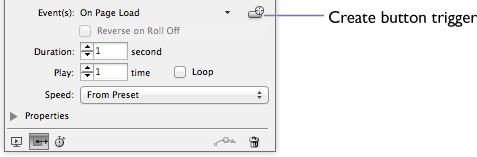
Click the Create Button Trigger icon and then an object to convert that object into a button that plays the animation.
The default event, Play on Page Load, will most likely still be applied to the animation. If you want only the button to prompt the animation, deselect Play on Page Load in the Events list.
Animation Properties
The changes to the animation settings we’ve discussed so far are pretty basic. You can further refine animations by using the Properties controls in the Animation panel. (This part of the Animation panel is hidden by default; Adobe doesn’t want to overwhelm you with options.) Click the Properties triangle (officially called a twistie) to open the Properties area of the Animation panel.

The Properties controls in the Animation panel.
Setting the animation appearance and location
You can customize how the animation starts or ends. From the Animate list, choose one of the following:
• From Current Appearance uses the object’s current position and appearance as the start of the animation. The object animates to match the properties set in the panel. This is the most common setting. It allows you to use the Properties panel to set the final appearance of the object.

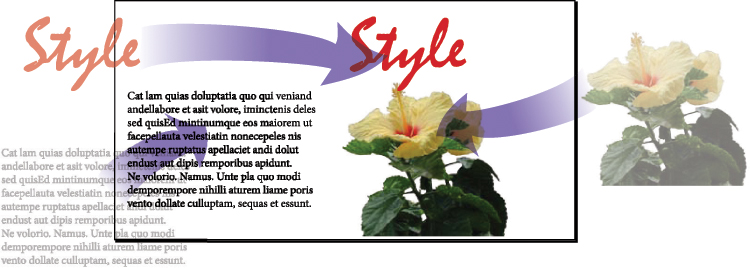
An object set to animate From Current Appearance in the Properties area. Notice how the motion path indicates that the object will move to the right into a new position.
• To Current Appearance uses the object’s current properties as the end of the animation. This allows you to set a specific end point for the animation; this setting is helpful when you want an object to animate onto a page but need the object to be visible when printing the page. If you don’t select this setting, the object will be off the page when not animated.
An object set to animate To Current Appearance in the Properties area. Notice how the motion path indicates that the object will move to the left into its current position.
• To Current Location uses the object’s current properties as the start of the animation and the object’s position as the end of the animation. This option is similar to From Current Appearance, but the object finishes in its current location and the motion path is offset. Adobe recommends using this option for certain presets, such as blurs and fades, to prevent the object from appearing in an undesirable state at the end of the animation.
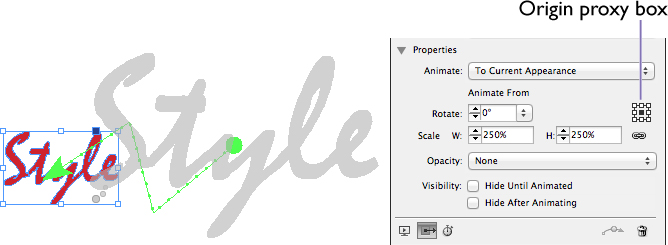
Setting the Rotate controls
Use the Rotate controls to specify the rotation degrees that the object completes during the animation.
Use the Origin proxy box to specify the origin point of the motion path on the animated object.
Scaling an object during an animation
Use the Scale fields to specify the percentage by which the object size increases or decreases during the animation. For instance, the Size animation preset increases the object size from 25% to 100%.
The default for this setting maintains a uniform scale for both horizontal and vertical scaling, but you can unlock the link setting to have the object scale disproportionally. We’ve created a very primitive animation of a bird flapping its wings by using a Scale setting that decreases horizontally only. Use the proxy box to choose at which point on the object the scaling will occur. Our bird scales from its center.

A simple horizontal scale can create the effect of a bird flapping its wings.
Setting the opacity for an animation
There are two animation presets, Fade In and Fade Out, that set an object to slowly appear or disappear on the page. But what if you want the object to appear or disappear as part of a move across the page? The Opacity menu is a separate setting that can be applied as part of other animation presets. Choose one of the following from the Opacity list:
• None uses no opacity setting, so there is no change in the visibility of the object.
• Fade In causes the object to gradually become visible.
• Fade Out causes the object to gradually become invisible.
Setting the Visibility options
You may want to control whether an object is visible before it starts its animation or remains visible on the page after it finishes its animation. These settings are very useful when you want multiple objects to follow the same animation path but disappear to let the next object be seen. There are two visibility options:
• Hide Until Animated keeps the object invisible until it starts the animation.
• Hide After Animating makes the object invisible after it finishes the animation.
Using the animation proxy
Without actual motion on the page, it can be difficult to imagine how the animation will appear. The animation proxy is a gray shadow that shows where the actual object will move from or to as part of the animation. Turning on the animation proxy creates a gray box or outline of the shape that indicates the start or end of the animation.

The gray animation proxy helps you see how the actual animation will appear.
Click the Show Animation Proxy button in the Animation panel so it is highlighted. This turns on the display of the animation proxy. Click again to hide the proxy.

Click the Show Animation Proxy button to display a gray shadow that shows the first or final position of an object along a motion path.
Saving custom settings
Most likely, you’re going to spend time customizing the motion presets. If you have put in all that time and hard work, you will want to save the preset for future work.
With the object selected, choose Save from the Animation panel menu. This opens the Save Preset dialog box. Name the preset and click OK. The custom preset appears in the Preset list in the Animation panel for all InDesign documents.
Motion Paths
When you apply an animation that involves motion, a green motion preset line appears when you click the object with the Selection tool. This line controls the position and direction of the object’s motion. A circle indicates the starting position of the animation; an arrow indicates the direction and the ending position. You can edit this motion preset line to customize the move. For instance, you can lengthen the line to have the object move along a longer path.
Most of the preset motion paths are straight lines. To create a more natural effect, we like to add curves to these paths so they move slightly up or down into position.
Editing the motion path
Select the animated object. The motion preset line appears as a green line. An arrow indicates the direction of the animation.
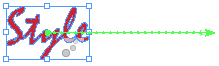
The green line indicates the direction and length of the object’s path.
Click the motion preset line. The line changes from a motion path to a regular InDesign path. Use the Direct Selection tool to modify the points on the path. Use the Pen tool, the Pencil tool, or the Smooth tool to add, delete, or modify the points on the path. Deselect the object to apply the changes.
Creating a custom motion path
Instead of modifying the built-in motion paths, you can draw your own motion paths for an animated object. Start by using the Pen tool or the Line tool to draw the open path that you want to use as a motion path. Select both the path and the object you want to animate. Click the Convert to Motion Path icon in the Animation panel. This converts the path into a motion path and opens the animation controls for the object.
You can also swap an external motion path for one already applied to an animation object. Select both the open path and the animation object. Click the Convert to Motion Path icon. The new path is applied as the motion path to the animation. The original motion path is deleted.
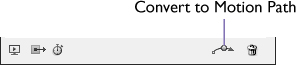
The Convert to Motion Path icon allows you to use your own paths as the motion paths for animations.
Importing presets from Flash
In addition to creating animation presets in InDesign, you can export a preset from Adobe Flash and then import it into InDesign. These effects can be much more sophisticated than those created in InDesign.
The presets that ship with InDesign are actually the same as the default Flash presets. Use this technique to import the new presets you create in Flash.
In Flash, select a motion preset and choose Export from the Motion Preset panel. Name the XML file.
In InDesign, choose Manage Presets from the Animation panel to open the Manage Presets dialog box. Click the Load button and navigate to the XML file you previously saved. Click OK. The preset is added to the InDesign Preset menu.
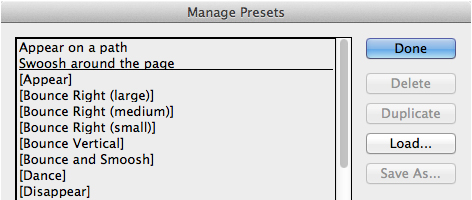
The Manage Presets dialog box allows you to import and work with custom presets. Your own saved presets appear at the top of the list.
Removing animations
If you no longer want an object to be animated, you can convert it back into an ordinary object. Select the animated object, and in the Animation panel click the Remove Animation icon.
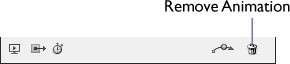
The Remove Animation icon converts an animated object into an ordinary object.
Timing
Just as in comedy, when working with animation, timing is everything. So in addition to the duration controls in the Animation panel, you can use the Timing panel to control how an animation plays. The Timing panel has three important features. The first allows you to delay the start of an animation. The second changes the order in which objects are animated. The third causes animations on different objects to start at the same time.
Setting the delay for animated objects
Open the Timing panel (Window > Interactive > Timing). All the animated objects for that spread are listed.
You don’t add items to the Timing panel. They appear automatically when you create animated objects.
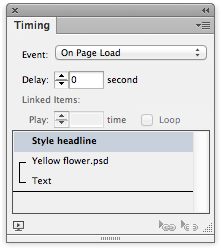
The Timing panel lets you refine how animations play.
In the Timing panel, not on the page itself, click the name of the object you want to control. Use the Delay field to set the length of time (in seconds) that the object’s animation will be delayed.
Your animation may be triggered by more than one event, such as On Page Load as well as On Button Event. You can set different delays for each event. For instance, you might want a slight delay after the page loads to give the user a moment to get accustomed to the look of the page before the start of the animation. But you might want no delay if the user clicks a button to start the animation, assuming that the user will want a prompt response to his or her action.
Changing the order in which objects are animated
The Timing panel also lets you control the order in which objects are animated. Drag the name of the object up or down in the list in the Timing panel. Objects are played from the top of the list down, and are added to the panel in the order in which you create them on the spread.
Playing objects together
Each object in the Timing panel plays individually. However, you can link objects so they play at the same time. This is very helpful when you have two objects with separate motion paths or presets that you want to animate together.
Select the names of the objects in the Timing panel. Click the Play Together icon in the Timing panel. A bracket appears around the selected items, indicating that they will play together.
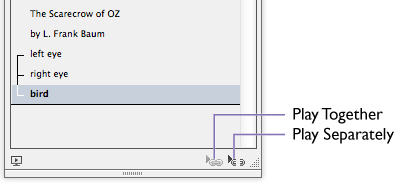
Use the Play Together icon to set separate animations to play at the same time. Brackets indicate that those objects that will play together.
If you have items linked to play together, you can use the Play field and the Loop control to control how many times they play.
Previewing Animations
Applying motion presets and modifying animations may feel like working in the dark, because animated objects don’t move around the InDesign page. So you may feel a little lost as to whether or not the settings are working properly. Use the SWF Preview panel to see if your animations are set correctly.
You can also use the SWF Preview panel to preview interactive and multimedia elements such as buttons, movies, and hyperlinks (covered in Chapter 2). However, the SWF Preview panel doesn’t preview PDF-only interactivity such as filling in forms or certain button actions. When you want to preview PDF interactivity, you need to open the PDF in Acrobat.
Using the SWF Preview panel
Choose Window > Interactive > SWF Preview to open the SWF Preview panel. The default size of the panel is much too small! Drag the corners or edges of the panel to increase the size of the preview area. This makes it easier to view animations and click interactive items.
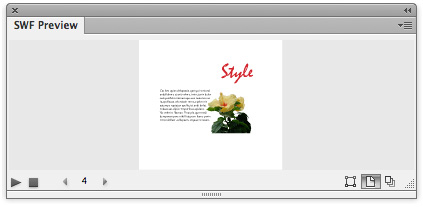
The SWF Preview panel lets you preview animations as well as interactive and multimedia elements.
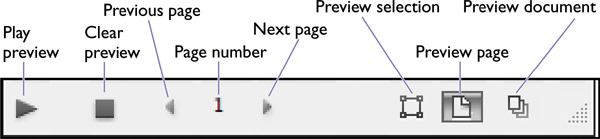
Click one of the preview selection mode buttons:
• Preview Selection mode sets the SWF Preview panel to display only the selected object. Use this when you have many interactive elements on a page and need to test just one or two elements. This helps the preview play faster.
• Preview Page mode sets the SWF Preview panel to display the currently selected spread. Use this when you need to preview a single spread.
• Preview Document mode sets the SWF Preview panel to display the entire document.
You’ll probably want to preview your work constantly as you create animations. You’ll work faster if you use keyboard shortcuts. To preview the current spread, hold the keyboard shortcut Cmd/Ctrl-Shift and press the Return/Enter key. To preview the entire document, hold Cmd-Shift-Opt (Mac) or (Ctrl-Shift-Alt) (Windows) and press the Return/Enter key.
The SWF Preview panel controls.
Click the Play Preview button to display the page with the animation objects. If there are any animations set to play on page load, they will play automatically.
If you edit the document, use the Clear Preview button to delete the previous version of the document from the SWF Preview panel. Then click the Play Preview button again to see the new version of the page.
Use the Go to Next Page and Go to Previous Page buttons to move through the document.
Move your mouse over the preview area of the SWF Preview panel and click your animated objects. Interactive elements react to the mouse as they would in an exported SWF.
The SWF Preview panel displays the interactive elements as they would appear using the current settings in the SWF Export dialog. Conversely, if you change settings in the SWF Preview panel, these changes are reflected in the SWF Export dialog box.
To edit the SWF Preview panel settings
Choose Edit Preview Settings from the SWF Preview panel menu. The Preview Settings dialog box appears.
This dialog box is the same as the Export SWF dialog box. For details on these settings, see “Setting the General SWF options” on page 239 and “Setting the Advanced SWF options” on page 242.
Make whatever adjustments you want in the Preview Settings dialog box. Click Save Settings to apply the changes to the SWF Preview panel.
To test the export in a browser
While the SWF Preview panel is very good at showing the interactivity on your page, you also need to test the files in an actual browser. Rather than littering your hard disk with test files, you can use the Test in Browser command.
Choose Test in Browser from the SWF Preview panel menu. The file opens in your computer’s default browser. The animation automatically plays. If you want to test the file in a different browser, you need to change the default browser using your computer’s controls. On the Mac, you change the browser by changing the preferences in Safari. On Windows, use the Control panel Default Programs to associate the new browser with web files.
To use the SWF Preview panel from other panels
Once you start refining animations, you’ll want to preview the results. The InDesign team has made it more convenient to invoke the SWF Preview panel command by adding Preview icons at the bottom of the Animation panel, the Buttons panel, and the Timing panel. Click the Preview icon at the bottom of those panels to open the SWF Preview panel.

Look for the Preview icon in the Animation panel, the Buttons panel, or the Timing panel.