
7. Exporting PDF and SWF
Setting Accessibility Controls for PDF Files
Setting the General SWF Options
Setting the Advanced SWF Options
Exporting Animations into a PDF
Think about how often you open or send a PDF file. It’s such a simple idea: You create a document in one application and then convert it into a file format that can be opened by anyone using a free reader application.
As PDF technology has grown, it has been fascinating to watch how various groups use PDF files. Print houses use them as a prepress format. Editorial departments use them for marking up proofs of files. And publishers and design firms use the interactive features to create dynamic digital publications.
PDFs have been around a long time, and they’re not considered terribly sexy anymore. But we’ve seen some incredible interactivity included within PDF documents. One author used PDF documents with embedded video files to create a college course on movie editing. A developer created an interactive Jeopardy-style game show with categories and questions in a table. Corporations have created annual reports with movie introductions featuring the company’s CEO.
Like PDF, the SWF (Shockwave Flash) format can be used to create presentations and interactive documents. In fact, many of the SWF export controls are identical to the PDF controls. However, there are some important differences that you should understand before deciding which format to use.
PDF Workflow
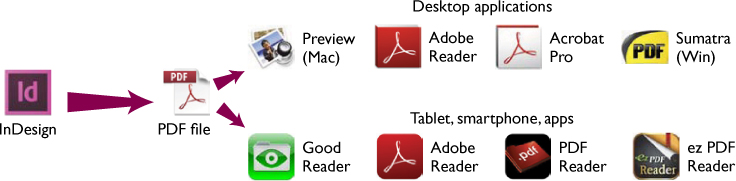
The InDesign workflow for creating and viewing PDF files.
It’s simple to create a PDF file using InDesign. Once you create the file, just choose Adobe PDF (Interactive) and set the options in the dialog box. (We cover setting the options for the document on page 226.) Your readers then view the PDF file using a desktop application or a tablet app.
Viewing PDF documents on Adobe readers
Almost all of the interactive features in InDesign are usable in PDF documents. However, a few are not. The following table shows which features you can use in PDF documents when viewed on computers running Adobe Acrobat Pro or Adobe Reader or on tablets using Adobe Reader.

Third-party PDF readers for computers
In 2007, PDF became an open source standard. This means that companies other than Adobe can create and distribute their own versions of PDF creators and readers. They just have to follow the open source standards. They do not, however, have to follow the standards exactly.
This has been a mixed blessing. It has made it possible to download free or cheap PDF applications, but it also means that not every PDF reader supports all the features that are included in interactive PDF files. And you won’t know which reader your audience is using!
For example, Macintosh computers come with a PDF reader application called Preview. Unless the Mac user downloads the Adobe Reader program and makes it the default application for PDF files, they will open your interactive PDF documents in Preview. Preview opens PDF files as “flat” documents. The image for a button, movie, or hyperlink may appear on the screen, but there will be no interactivity. The objects are still in the PDF, but they can’t be used interactively.
Windows users may be using Adobe Reader or one of many third-party PDF readers. The problem with these third-party readers, such as the open source application Sumatra, is that they don’t support any interactive features.
Your only solution is to firmly emphasize to those who open your PDF files that they should (must!) view it on Adobe Reader. You can send them to http://get.adobe.com/reader/ to download the software. The link looks at the computer’s operating system and opens the correct download page. It’s free, easy to install, and the most advanced reader for computers.
Third-party PDF readers for tablets
It’s really the wild, wild west if you’re trying to find the best PDF reader for a tablet or smartphone. You would expect that Adobe Reader (from Adobe!) would be the best. Unfortunately, this is not the case.
At the time of this writing, Adobe Reader supports hyperlinks but ignores buttons. The third-party product GoodReader supports some button actions but not others. Adobe Reader supports bookmarks, but GoodReader doesn’t. The best third-party tablet reader we’ve found so far is PDF Expert, but it costs $9.99 in the Apple App Store. You can’t expect your readers to purchase a product in order to enjoy your document.
PDF Export
Once you’ve finished your InDesign document, it’s time to export it as a PDF file. To do so, choose File > Export. You then have to choose between the Adobe PDF (Print) and Adobe PDF (Interactive) formats.
Interactive or print?
Why did Adobe separate the PDF export into two dialog boxes? Our best guess is that with only one export dialog box, users would inadvertently create PDF files for print that included interactive elements such as buttons and movies. Print prepress houses complained when they got PDF files filled with elements that screwed up their prepress workflow. By creating a separate export dialog box for interactive documents, Adobe avoids mixing interactive elements into a PDF designed for print.
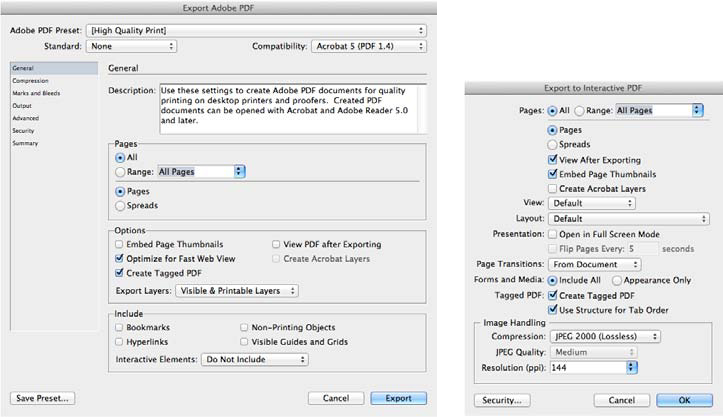
The Export Adobe PDF dialog box for print (left) and the Export to Interactive PDF dialog box (right). Notice that there are seven sections for the print dialog box.
Here are the features and controls in each dialog box.
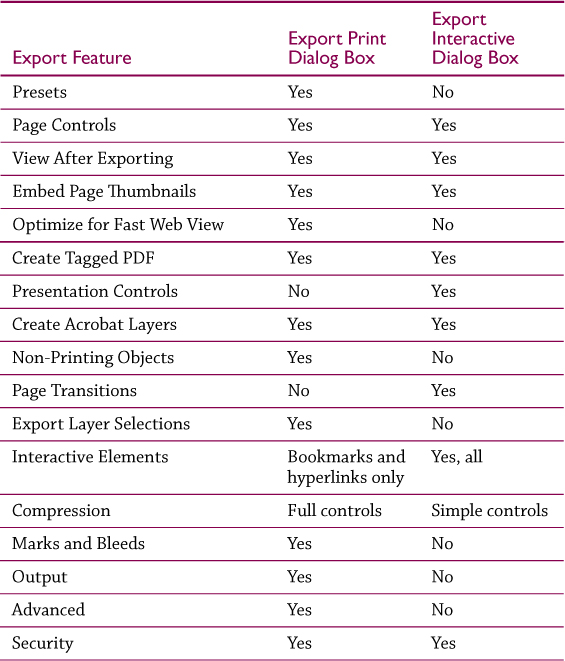
We feel there are features in the print dialog box that would be helpful if added to the interactive settings.
• The Export Layers controls in the print dialog box allow you to choose which layers are included in the final PDF even if they are hidden or set to not print. The interactive controls export only the layers that are visible and set to print.
• Saving and applying Presets allows you to easily apply various controls to the dialog box. This is a real time-saver.
• The advanced Compression options in the print dialog box give you more control over how images are displayed in the PDF. The interactive dialog box has only simple controls.
If you only need hyperlinks and bookmarks in your interactive document, you can use the export print dialog box. This gives you more compression options and allows you to use the saved presets.
Targeting pages
Most of the time you’ll want to export all the pages in your document. In that case, just click the All selection.
Specifying pages and page ranges
If you want only certain pages to print, you can designate those pages in the Range field of the dialog box. Enter a comma to separate pages, such as 5, 7, 9. Use a hyphen to select a range of pages, such as 3–6. You can even mix hyphens and commas to select ranges and individual pages, such as 3, 5, 7–9.
Specifying pages in sections
It gets a little complicated when you have alternate layouts in the document. Each alternate layout starts a new section and then restarts the page numbering. In that case, you can have two pages with the same page number. If you enter that page number in the dialog box, InDesign shows an alert that explains you need to be more specific.
To export a specific page, you can type the alternate layout name with a colon in front of the page number. For example, if you have an alternate layout called “iPad H,” you would enter iPad H:1 to export page 1 from that alternate layout. You can also type a plus sign (+) followed by the absolute page number in the document. So, for instance, if the page is the fourth actual page in the document, you would type +4 to export that page.

When you have alternate layouts in a document, you can insert the name of the alternate layout to specify which pages should be exported.
Creating pages or spreads
You can choose to export the PDF in single pages or to maintain the spreads in the document. For interactive documents, we usually deselect the spread option and break the document into single pages. This makes it easier to view all the information on the page without having to zoom in or out on a spread.
Viewing after exporting
The View After Exporting command may seem a trivial thing. But we firmly suggest turning this on, especially if you’re going to be exporting and previewing your PDF over and over. You really want to immediately view the PDF without having to navigate to open it.
Embedding page thumbnails
The Embed Page Thumbnails option creates a thumbnail preview for each page being exported, or one thumbnail for each spread if the Spreads option is selected. These thumbnail images are then displayed in the PDF Pages pane as a preview of the document.
This option was important in the past, when it took longer to see the previews in the Pages pane. It is not as important now, when the page thumbnails are automatically created on the fly. We can’t think of a situation where it is necessary.
Creating Acrobat layers
Select the option Create Acrobat Layers to convert the layers in the InDesign document into layers in the PDF file. This allows your viewers to show or hide layers using the Layers pane in Acrobat Pro or Adobe Reader.
However, instructing viewers where the Layers panel is and how to use it can be confusing. Fortunately, you can create buttons that will show or hide the layers in the document. Unfortunately, the Show Layers and Hide Layers actions are missing from InDesign’s Buttons and Forms panel. You need to wait until you open the file in Acrobat Pro and then create the button action there.
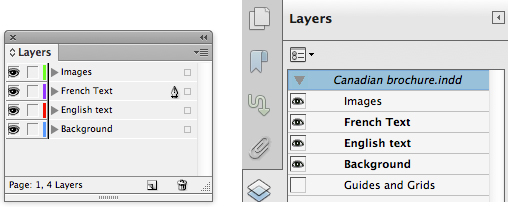
The layers in an InDesign document (left) can be converted into layers in a PDF document (right).
Setting the View controls
You can control the magnification for the PDF when it is first opened. This is very helpful if you want to ensure that the first page opens in the best magnification. Choose one of the following from the View menu:
• Default sets the magnification to whatever setting has been chosen on the viewer’s machine. This can cause your document to open too large to be seen completely or too small to be read. Change this to have the document open to the setting you want.
• Actual Size sets the magnification to 100%.
• Fit Page forces the width and height of the page to fit within the document window. This allows the user to see the entire PDF page at once.
• Fit Width makes the width of the page fill the width of the document window. This setting is helpful for documents set in the landscape orientation.
• Fit Height makes the height of the page fill the height of the document window. This setting is helpful for documents set in the portrait orientation.
• Fit Visible displays the items on the page and tries to exclude whitespace in the margins. This is similar to the Fit Page setting except it zooms in a little closer on the active area of the page.
• The percentage settings (25%, 50%, 75%, 100%) let you specify the exact zoom level for a PDF.
Setting the Layout controls
You can also control how the pages appear within the document window. Choose one of the following from the Layout menu:
• Default sets the layout to whatever setting has been chosen on the viewer’s machine.
• Single Page displays only one page in the document window. When you scroll up or down, the next page jumps into position.
• Single Page Continuous displays a single page in the document window, with the previous and next pages slightly visible. As you scroll, the previous pages disappear and new ones roll into view.
• Two-Up (Facing) displays a two-page spread in the document window.
• Two-Up Continuous (Facing) displays a continuous band of the two-page spreads in the document window. As you scroll, the previous spreads disappear and new ones appear in the display.
• Two-Up (Cover Page) is the same as Two-Up (Facing), but the first page is displayed alone. This is useful for any facing-page document with a cover page in the InDesign file.
• Two-Up Continuous (Cover Page) is the same as Two-Up Continuous (Facing), but the first page is displayed alone.
Presentation controls
You can set the PDF to open as a presentation. Select the Open in Full Screen Mode check box. This opens the PDF with a black background and no document window or screen controls. Instead of using Microsoft PowerPoint, you can convert your InDesign documents into PDF presentations. With a PDF, readers can use the left and right arrow keys to move from page to page. Press the ESC (escape) key to switch out of Full Screen mode.
Once you have set the document to open in Full Screen mode, you can select the Flip Pages Every x Seconds check box to automatically change pages every certain number of seconds.
You can also apply page transitions to the PDF document. Page transitions are covered on page 247, later in this chapter.
The Presentation controls can be overridden by changing the settings in Acrobat Pro or Adobe Reader.

The Presentation settings for opening the PDF in Full Screen mode and for moving from page to page.
Including forms and media
You can also choose the Forms and Media controls Include All or Appearance Only. Include All exports the document with the interactive objects.
Appearance Only omits exporting those objects and includes only the object’s image. You may find this setting useful if you want a PDF developer to create the interactive forms and elements within Acrobat itself, which offers more advanced form field options, such as summing values or counting check boxes. This is a way to use the advanced appearances of InDesign objects with Acrobat’s specialized buttons and form fields.
Setting Accessibility Controls for PDF Files
You can’t assume that the information on your pages is always consumed by sighted users. You should consider the needs of sight-impaired users who may be listening to the content of the PDF on a screen reader device.
You need to set the order in which the text and the descriptions of the images will be read. You also need to set the order in which the user will tab through forms and buttons on the page.
You can listen to a PDF by opening it in Acrobat Pro or Adobe Reader and choosing View > Read Out Loud > Activate Read Out Loud. You can then select the commands to Read, Stop, and Pause the document. We use this to check that we’ve set the correct reading order of our documents.
Applying descriptions
Web page designers are familiar with the <alt> tag, which applies a description to visuals on the page. These alt tags are the text that is read aloud by screen readers. This is much more useful than listening to the drone of “image 1 JPEG, image 2 JPEG” and so on down the page. In a PDF, these are the PDF descriptions, or alt text, of the objects.
The descriptions for buttons and forms are placed in the PDF Options Description field in the Buttons and Forms panel. (See Chapter 2, “Interactive Tools,” for how to set these descriptions.) You don’t set descriptions for text frames. The text in the frame is the text that is read by the screen reader — from top to bottom.
But what about images? They have neither text nor description fields. What do you do for those objects?
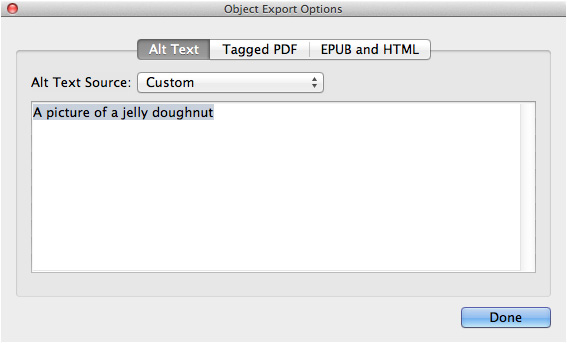
The Object Export Options dialog box set to the Alt Text area. This is where you can enter the text for descriptions of placed graphics.
Choose Object > Object Export Options to open the Object Export Options dialog box. (This dialog box is also used to control objects for ePub export.) Click the Alt Text tab of the dialog box. Choose Custom from the Alt Text Source menu and then type the description in the field. You can type as much as you want to describe the image.
Setting the reading order
Without adjustments, the reading order for a page comes from the settings in Acrobat Pro or Adobe Reader. This can cause strange text flow. So what should you do if you want your items to be read in a specific order? That’s where the Articles panel comes in.
An example of the default reading order for a page.
Using the Articles panel
Use the Articles panel to drag items into the order in which you want them to be read by screen readers. Open the Articles panel (Window > Articles). The panel contains instructions for how to add items. Select the objects on the page and drag them into the panel. The New Article dialog box appears. Name the article and make sure Include When Exporting is selected.

The New Article dialog box appears when you add items to the Articles panel.
If you add several items to the Articles panel at once, they appear in the order in which you created them on the page. Text frames are labeled with the first few words of their contents. Graphics are labeled with their image names. Buttons and forms are named with their names in the Buttons and Forms panel (this shows you the importance of creating clear names for buttons and forms — you won’t know which object is which if you’ve kept the generic names).
The order in which objects appear in the panel is almost certainly not the order in which you want listeners to hear them. To put them in the desired order, simply drag each item to the correct position.
You may not want all items to be added to the Articles panel. For instance, if you have a label that explains that the user should click a button, the button itself may have a description that contains the same information. You don’t want the screen reader to speak the same information twice, so don’t drag that object into the panel.
You can also use the XML structure pane of the document to set the reading order of PDF files. But the Articles panel was added to InDesign specifically for those who do not want to work with XML code.
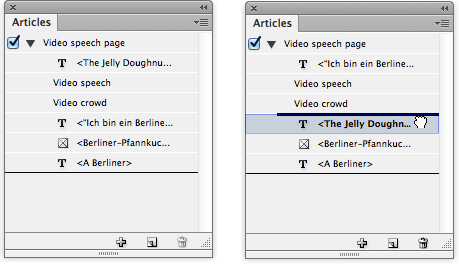
The Articles panel shows the order in which items will be read in the PDF. Drag the items to new positions to change their reading order.

Using the Articles panel, the reading order for the page is adjusted to make better sense. In addition, two objects on the page are omitted to skip redundant elements.
Setting the tab order
Reading aloud is just one part of accessibility. You also need to set the tab order for buttons and forms in your document. The tab order is the order in which the buttons and forms are chosen when the user taps the Tab or Shift-Tab keys. This is important not just for sight-impaired users but also for those “power users” who want to jump quickly from object to object. This is the order that puts the focus on interactive elements such as buttons and forms using the Tab key or Shift-Tab. The tab order comes from the order in which the objects are listed in the Articles panel.
Setting the tagged PDF export options
Once you have placed the items in the Articles panel, make sure that Use For Reading Order in Tagged PDF is selected in the Articles panel menu. This applies the order of the objects to the tab order in the PDF. Finally, when you export the document as an interactive PDF, make sure that the Create Tagged PDF check box and the Use Structure for Tab Order check box are selected.
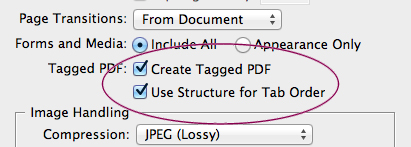
Use the Tagged PDF options in the Export to Interactive PDF dialog box to set the correct reading and tab order.
Image Handling
Most of the time, your InDesign files will contain images. You need to set the controls for how they are converted in the exported document. These settings are found in the Image Handling area of the Export to Interactive PDF dialog box.

The Image Handling area lets you control how images are converted in the exported PDF.
Compression
PDF files embed images within the file. This adds to the size of the file. Compression allow you to reduce the size of the PDF by ever-so-slightly changing the pixels within the images. There are three options in the Compression menu. The higher the compression, the smaller the final file size, but this has to be balanced with image quality.
• JPEG (Lossy) creates the smallest file size but can cause visible changes in images. If you choose JPEG (Lossy), you need to select an option from the JPEG Quality menu.
• JPEG 2000 (Lossless) compresses the images in the file without any visible changes.
• Automatic leaves it up to InDesign to choose the best output format for images.
JPEG quality
If you have chosen the JPEG (Lossy) option, you can choose an option from the JPEG Quality menu. Your choices range from Minimum (smallest file size) to Maximum (largest file size). Choose Maximum if you want your images to look their best. Choose Minimum if you don’t mind some distortion in the image and want to reduce the file size.
Resolution
There are four options in the Resolution menu — 72, 96, 144, and 300 pixels per inch (ppi) — but you can enter any number in the field. You only need to set a number higher than 96 ppi if you expect people to zoom in on your images. For instance, you might have a map that people will want to magnify. Setting a resolution of 144 ppi or 300 ppi ensures that there will still be details in the image at higher magnifications.
Security
If you’re going to send your precious PDF out into the world, you’ll often need to control how people use the document. Can they print it? Can they edit it? Can they extract pages from it? This is when you need to set the security options. Click the Security button at the bottom of the Export to Interactive PDF dialog box. This opens the Security dialog box.
There are two parts to the Security settings: Document Open Password and Permissions. Each one is a totally separate security option.
Locking the document front door
You may want to specify that your PDF can be opened only by people who have permission to open the file. The Document Open Password area is the lock that keeps just anyone from opening the document. Only those with the password can open the file.
Select the option “Require a password to open the document” and then type the password in the field. You will need to type the password again to confirm you’ve typed it correctly. If you’re going to send the PDF to someone in an email, send the password in a separate email. It’s far less likely that both emails would be hijacked by people who you don’t want to open the file.
Make sure you write down the password or work on a copy of the file. We can’t help you open the document if you forget the password.
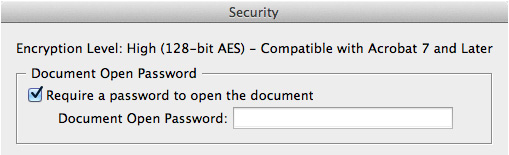
The Document Open Password area sets the security to prevent the document from being opened without a password.
Permissions password
The Permissions password controls what people are allowed to do once they gain access to the document. What’s confusing about this password is that it can be set without setting the Document Open password. This is the equivalent of leaving the front door open but locking certain rooms in the house.

The Permissions password controls what actions someone can take once the document has been opened.
Once you have chosen to have a Permissions password, you have options as to what the person can do within the document.
Printing Allowed controls
There are three options for how the document can be printed:
• None makes the option for printing unavailable.
• Low Resolution (150 dpi) limits printing of the document to only low-resolution printers. This keeps people from printing your document as part of professional output. Ordinarily, this would limit printing to only office printers, but there are some laser printers with resolutions higher than 150 dpi.
• High Resolution allows any type of printing to any device. We usually choose this setting.
You might want to limit printing to low resolution if you have images or illustrations that you don’t want others using in their own documents. For instance, we’ve gotten a resort community PDF map that was set for low-resolution printing.
Changes Allowed settings
There are five options for controlling what changes a user is allowed to apply to the document:
• None locks the document down, with no ability to change any items. This is the most secure setting.
• Inserting, deleting, and rotating pages allows someone to add new pages to the document, delete pages from the PDF, and rotate pages in the PDF. It basically allows page-level changes only.
• Filling in form fields and signing allows someone to enter information in form fields and use the digital signature to sign the document, but other changes are not allowed.
• Commenting, filling in form fields, and signing adds using the comment tools to the previous setting. Other changes are not allowed.
• Any except extracting pages allows anything within the document except sending pages to new documents.
Allowed features
When you take away some features, you may want to re-enable others:
• Enable copying of text, images, and other content allows someone to highlight text or select an image and save it to another document. It also allows someone to use the Save As menu items to extract text, images, or both.
• Enable text access of screen reader devices for the visually impaired is automatically selected if the enable copying option is turned on. However, when enable copying is turned off, you have the choice to turn this option on or off. Leave it on to keep your document in compliance with Section 508 (covered on page 232).
• Enable plaintext metadata encrypts the document but allows search engines to see the contents of the file.
Setting the General SWF Options
SWF (pronounced swiff) is a format that, like PDF, can be used for the presentation of the entire InDesign file, with transitions from page to page.
In addition to the movies, sounds, and buttons found in PDF files, SWF files (commonly called Flash files) can contain the animations of page items from InDesign. (See Chapter 3, “Animations,” for how to create these motion graphics.) SWF files cannot, however, contain PDF forms. As easy as it is to create these SWF animations and pages, you are somewhat limited as to where you can use them.
• The native animation effects won’t play in exported PDF files.
• Apple doesn’t support the SWF format for its iOS devices, such as the iPad and iPhone.
• As of August 2012, Adobe no longer makes the Flash Player that runs SWF files on Android devices.
• SWF animations need to be converted to HTML5 in order to be used in DPS apps.
Despite these limitations, there are still legitimate reasons to convert InDesign documents to SWF files.
• They are very easy to create, without the need to learn any code.
• They are great for web pages, adding small-file-size motion graphics.
• They create exciting presentations that can be played on a desktop computer or on a website. Diane worked with a client who created a private URL for a SWF presentation pitch to a client. The presentation used InDesign’s animation effects with great success.
• They can be output from InDesign to SWF files, which can then be imported into an InDesign file (covered on page 250).
To export an InDesign document as a SWF file, choose File > Export and then choose the Flash Player (SWF) format; note that this is not the same as the Flash CS6 Professional (FLA) format (covered on page 246). The Export SWF dialog box appears.

The Export SWF dialog box.
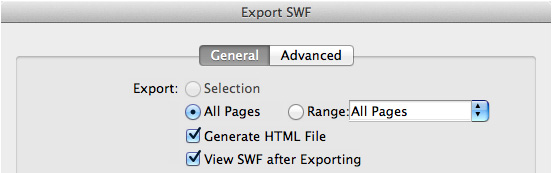
Controlling pages
You can export all the pages in the document or just some of the pages. You also can choose the alternate pages for the file from the Range menu. These are the same options as for PDF documents (see page 227).
In addition to exporting pages, you can convert just the selected objects on a page into a SWF file by clicking the Selection button.
The Export SWF dialog box’s Export controls for selections or pages.
Generating an HTML file
As mentioned, SWF files are great for web pages. However, in order to be seen within a computer’s web browser, they need to be inserted into an HTML page. The Generate HTML File command creates a separate HTML file that contains the code necessary to insert the SWF into a web page.
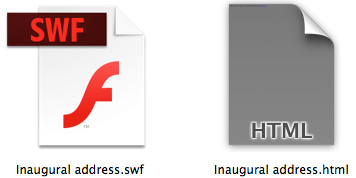
The SWF and HTML files generated from the Export SWF dialog box.
View after exporting
Once you choose to generate the HTML file, you can then select the option View SWF after Exporting. You can’t select that option without generating the HTML file. The HTML file will always be used to open the SWF in the default browser on your computer. (Your default browser is whatever browser you selected in your computer or browser settings.)
The browser must have the Flash Player extension installed to play the SWF file. If you have trouble playing SWF files, go to http://get.adobe.com/flashplayer/. That page will read your operating system and browser and display the correct download for your computer.
The Flash Player extension is built into the Google Chrome browser for computers and is updated automatically when the browser is updated. That way, you don’t have to update the Flash Player separately from the browser.
Viewing with Flash Player
You don’t have to view SWF content through your web browser. Go to www.adobe.com/support/flashplayer/downloads.html and download the standalone Flash Player application. This application lets you view a SWF file within its own window. Unfortunately, this application doesn’t display page transitions.
You can use the Flash Player application to create a self-contained SWF presentation (also called a projector) that doesn’t require that Flash Player be on the user’s computer. You need to create one project using Windows and another using the Mac. These files can then be distributed on a CD or DVD for presentations.
Setting the size
The Size area lets you change the dimensions of the SWF file. You can choose to scale the animation by a percentage, such as 200% or 50%, or you can use the Fit To menu to choose from some of the more common monitor dimensions, such as 1024 × 768 or 1280 × 800. You can also use the Width and Height controls to pick a specific size. Changing the dimensions of the SWF is very helpful when you need a presentation to fit precisely in a specific monitor resolution.

The Size controls let you change the dimensions of the SWF file.
Background color
The Background settings let you control what is behind the elements of the SWF file. Paper Color uses the color Paper from InDesign’s settings. Use this setting when you want the animation to be easiest to read or to stand out from the browser. Transparent allows the color of the web page to show in the empty areas of the animation. Choose this when you want the animation to blend in to the rest of a web page.
Including interactivity
The Interactivity and Media setting is like the one for exporting a PDF. Select Include All to keep hyperlinks, buttons, and media active in the SWF. Choose Appearance Only to keep only the graphics for those items, without the interactivity.
Setting the Advanced SWF Options
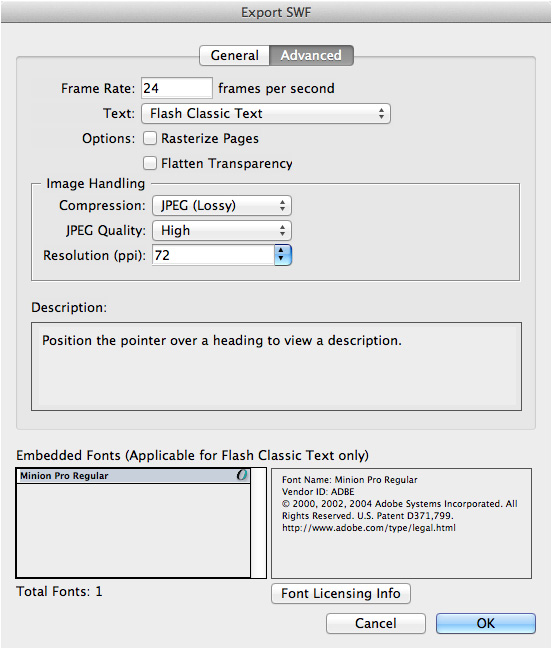
The Advanced tab of the Export SWF dialog box lets you control additional options, including timing, text conversion, image resolution and compression, and font embedding.
As you move your cursor over the different controls in the dialog box, the Description field displays tips that help you apply the settings.
The Advanced tab of the Export SWF dialog box.
Frames per second
The Frame Rate field controls the smoothness of the animation. The higher the number, the more smoothly the animation will play. Changing the frame rate can be tricky to understand.

The Frame Rate field for setting the smoothness of the animation.
Let’s say you have an object with a duration of 2 seconds moving onto a page at the default frame rate of 24 frames per second (fps). This creates an animation with 48 distinct steps. You see those steps as 46 green dots along the motion path. The start point is one step and the end point is another step for a total of 48 steps. If you increase the duration to 4 seconds, there will be 94 dots along the path plus the start and end points.
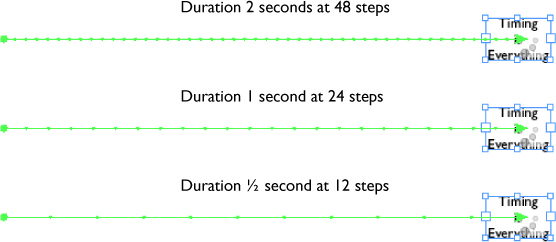
The green dots along the motion path indicate the number of steps for an animation. The higher the number of steps, the slower the object moves.
However, if you decrease the frame rate to 6 fps, the duration of the animation stays constant. The lower frame rate changes the smoothness of the motion. It’s as if the number of green dots had been decreased to eight steps although you won’t see any change in the number of dots displayed on the page. This creates an animation in which the object visibly jumps from one point to another along the path. (See Chapter 3 for information on applying animations to objects.)
Set the lowest frame rate that still makes your animation run smoothly. Some animations look good at 12 fps; others require 24 fps. Although raising the number may make the animation look smoother, it will also increase the size of the file. This can cause download speed issues if the file is viewed online.
Handling text and fonts
One of the reasons that SWF files became so popular on the web is that they keep the file size small by using vector objects in the animation (some people say that SWF stands for Small Web Files). Text is also kept as font (vector) information, which makes the file size small. However, there may be times when the font information doesn’t translate correctly to the exported SWF. This causes certain characters to be dropped from the text or to be converted to glyphs.
The Text menu controls the treatment of text in the exported SWF.
In those situations, you need to change the Text setting in the Export SWF dialog box. Your choices are as follows:
• Flash Classic Text maintains the text as fonts, for the smallest file size. This is your best option for exporting a SWF.
• Convert to Outlines converts the fonts to their vector shapes. This option increases the file size.
• Convert to Pixels changes the text to a bitmapped image, which results in a larger file. This option should only be used as a last resort, when converting to outlines doesn’t work correctly.
When you maintain the text as Flash Classic text, you’ll see a list of the fonts that have been embedded in the file. Most of the time, this will be a complete list of all the fonts in your document. However, some font publishers put code in their fonts that prevents them from being embedded in a file for export in a streaming animation. If that happens to your text, you need to change the font or convert it to pixels. Check the licenses of the fonts you are using for more information on what you can and cannot do with the font.
Click the Font Licensing Info button to go to an Adobe web page that provides more information on font licensing.
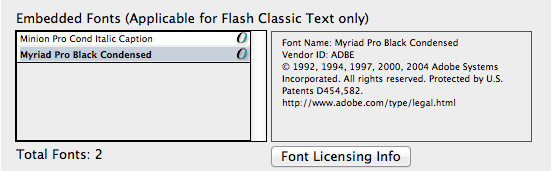
The Embedded Fonts area for an exported SWF. Check this list to make sure that you haven’t used a font that can’t be embedded in the exported file.
Rasterizing and flattening pages
If you want a bitmapped picture of your animation that doesn’t move, doesn’t respond to mouse clicks, and basically just sits there like a bump on a log, select Rasterize Pages. The option removes all interactivity from your exported SWF. So why is it included?

The Rasterize Pages and Flatten Transparency options. These options should only be chosen for multi-page SWF presentations that can’t be exported any other way.
Rasterize Pages should be used only for multi-page documents that are going to be presented using Flash Player. And even then, you should only apply the setting if you can’t get the SWF to work correctly without the option applied. Basically, it’s a last-resort measure to get the SWF to export. Because the option converts vector objects into bitmapped images, the option also increases the file size of the SWF.
The same warnings apply to the Flatten Transparency option. This setting removes all motion and interactivity from the document. It should be used only if the transparency effects, such as drop shadows or transparency PSD files, aren’t exporting correctly in the SWF. It can’t be used for motion animations, but it can be used for multi-page presentations.
A yellow alert symbol in the Export SWF dialog box indicates that the setting will remove all interactivity from the SWF.
Image handling
The Image Handling options for exported SWF files are the same as the options for exporting images in a PDF. (See page 235 for more information on image handling.)
Previewing without exporting
You may want to check the result of various options as you apply them in the Export SWF dialog box. If you export a file each time, you will constantly have to go through the steps to create a SWF, and you may also litter your desktop with files as you test the export settings.
Instead of creating extra files, you can use the SWF Preview panel to preview animations or presentations (see page 85). Choose Window > Interactive > SWF Preview to access the panel. In addition, you can change the export settings without actually exporting the document. You can edit the preview settings by choosing Edit Preview Settings from the SWF Preview panel menu. The Preview Settings dialog box contains the same settings as the Export SWF dialog box. Change the settings, and then use the SWF Preview panel to see how the file will export.
You can also choose Test in Browser from the SWF Preview panel menu. This opens your default browser and displays the animation without creating a file.
Exporting FLA Files
There is one more option for working with animation files. Instead of exporting as a SWF that is ready to be placed into a web page or PDF, you can export the document as a native Flash (FLA) file. Choose File > Export > Flash CS6 Professional (FLA). The Export Flash CS6 Professional (FLA) dialog box appears.
Now before you get too excited about this option, be aware that the presets, timing, and actions for the animation are not imported as expected. Each spread is mapped to a new keyframe, and animations are visible in the Flash Library only as movie files that are set to loop continuously. This makes the file extremely complicated to edit.
The thought behind this export option is that you can send the native FLA file to a Flash developer, who can then integrate it into their own Flash project. We’ve been told, however, that the file is extremely primitive and hard to work with.
Setting the FLA options
Many of the options for exporting FLA files are the same as the options for exporting SWF files. The options for page ranges, size, including interactivity and media, and image handling are all the same.
The Text menu adds one option: Flash TLF Text. This lets the Flash developer use the Text Layout Framework options in Flash Professional. If Flash TLF Text is selected, select the Insert Discretionary Hyphenation Points check box to allow hyphenation of the text.

The Export Flash CS6 Professional (FLA) dialog box lets you convert your InDesign files into native Flash documents.
Page Transitions
You have the choice to add transitions or effects that control how one page changes to another. You can set these transitions as you’re working in the InDesign document or in the Export to Interactive PDF dialog box. These transitions are also used for the effects in multi-page SWF documents.
Using the Page Transistions panel
Use the Page Transitions panel (Window > Interactive > Page Transitions) to apply transitions to pages. Select the page or pages in the Pages panel and then choose the effect from the Transition menu. As you choose each one, the effect is displayed in the preview area.
Some of the transitions give you additional settings for the direction of the effect: down, left, left down, left up, right, right down, right up, and up.
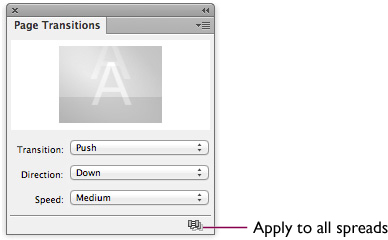
The Page Transitions panel lets you preview and apply effects to page changes.
You can also apply transitions to pages by choosing Page Attributes > Page Transitions > Choose from the Pages panel menu. This opens the Page Transitions dialog box, where you can preview and apply all the transitions together. You can’t, however, change the direction and speed controls of the transitions.

The Page Transitions dialog box lets you preview the animations for all the transitions together.
Using the Export to Interactive PDF dialog box
You can also use the Page Transitions menu in the Export to Interactive PDF dialog box. Choose From Document to maintain the settings applied in the file. Choose None to delete any settings. Choose one of the transitions to override the settings applied in the file.
Previewing transitions on the page
You don’t have to wait until your file is exported to preview the transitions applied to pages. Open the SWF Preview panel and click the Set Preview Document Mode option. You can then click the forward and backward controls. The transitions are displayed in the preview panel as the pages change. (For more information on using the SWF Preview panel, see Chapter 3.)
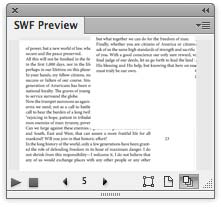
Use the SWF Preview panel to see the transitions applied to pages.
The page turn and the page curl
There is a lot of confusion about the page turn and the page curl. These effects are only available for SWF output. They look alike but are invoked differently in the exported SWF.
The Page Turn transition and the Page Curl interactive hotspot create the effect of a page flipping on the screen.
When you choose Page Turn, moving from one page to another displays the effect of a page being flipped over to the next. It’s a very cool look and is duplicated in many electronic applications.
Page Curl can be applied to a document together with a page transition or alone as an option in the Export SW F dialog box. It creates interactive hotspot areas on the corners of the page that let the viewer pull the pages forward or back. It’s a fun experience but can quickly lose its appeal.
The important thing to remember is that Page Turn is a transition that can be prompted with a button or click; Page Curl is a hotspot area that must be physically activated with a mouse.
Exporting Animations into a PDF
An mentioned in Chapter 3, animations are supported only in exported SWF files. They don’t work if the InDesign file is exported as a PDF. However, we do have some tricks that can help you display animations in PDF files.
Single pages
Our favorite thing to do with animations in interactive PDF files is to use them on a cover page. For example, picture an annual report whose front page has a brief animation that fades in to the image of the company headquarters. Since PDF files don’t support animations, we need to make some adjustments to achieve this effect.
1. Start on the page that contains the animation. We like to put the page elements on their own layer.
2. Open the Export SWF dialog box and enter just that page in the Range field. Export with whatever settings you want for the SWF.
Don’t select just some elements on the page and export them. They won’t interact correctly with other elements on the page.
3. Once the SWF has been exported, go back to the original page and hide the animation elements on that layer.
4. On a new layer, place the SWF as you would any image. You can now export the PDF with the animation on the page.
Multiple pages
You might also want the Page Turn transition to work in a PDF. In that case, export the entire PDF as a SWF with the transition applied. Then, delete all the information on the InDesign pages, leaving only a blank first page. Place the exported PDF on the page. You now have a SWF that contains the Page Turn transition to move from page to page.
SWFPresenter
We have come across a situation where someone needed each page of the SWF to be on its own corresponding InDesign page in order to use Acrobat’s timed slideshow feature. While it would be possible to export and place each page manually and then set the timing between each page in Acrobat, Martinho da Gloria of Automatication created a script, SWFPresenter, that automates the process.
SWFPresenter exports each page of your InDesign document to a SWF file and then places the SWF files on their own layer, making a tedious process easy. Once SWFPresenter has done its job, you just have to turn off the original design layers, export your InDesign document as an interactive PDF, and make the appropriate settings in Acrobat.