
6. ePubs and HTML
Preparing Files: Creating Reading Order
Preparing Files: Managing Graphics
Preparing Files for HTML Export
One of the most profound changes in our digital world has been the rapid rise in the acceptance and embrace of eBooks by the general reading public. Those stacks and shelves of beloved volumes, with their dog-eared pages, have been replaced by a single, sleek eReader that can contain hundreds of books and takes up almost no shelf space at all.
You can see the change anywhere you go — on airplanes and subways, in waiting rooms, and even at the beach. You’re as likely to see a Kindle or Nook as you are a paperback or hardcover book. And as the weeks and months go by, eBooks make up an increasing percentage of publishers’ sales. (Are you reading this book on paper or a screen?)
Many of us remain nostalgic about paper books, and they are not likely to completely disappear any time soon. But the convenience and environmental benefits of eBooks ensure that they, too, are here to stay.
It turns out that another aspect of our digital world — viewing information on websites coded with HTML — has a lot in common with ePub, the standard format for eBooks. Under the hood of every ePub is actually HTML and CSS code. In fact, many of the options for exporting InDesign files to ePub are the same as those for HTML. There are, of course, some significant differences, including the way in which the files are ultimately viewed, but understanding one format will help you understand the other.
Understanding ePub
An eBook is an electronic book — any book that can be read on a desktop or laptop computer, a tablet device, or a smartphone. Technically, when we talk about an eBook, we’re referring to all kinds of electronic books in different formats, which could include PDF or HTML files. But ePub is a format for eBooks, and in this chapter we’ll specifically explore the features of the ePub format.
The ePub file format is an open eBook standard developed by the International Digital Publishing Forum (IDPF). It was established in 2007 and replaced the Open eBook standard.
An ePub file can be read on a variety of hardware ePub readers, like the Amazon Kindle, the Barnes & Noble Nook, and the Sony Reader. It can also be read by software running on many platforms: the iBooks application on an iPad or iPhone; Adobe Digital Editions, Nook, or Kindle readers on OS X or Windows; Aldiko Book Reader on Android devices; and dozens more.
What distinguishes ePub files is that they are designed for reflowable content, whereas a print layout is considered a fixed layout. The way an ePub will be viewed on different devices varies greatly, because it adjusts to the screen size available. Furthermore, most ePub readers allow the user to adjust the font family and size of the text (see the illustration on page 181).
Reflowable content can display only one stream of text and anchored graphics, so it can be a mind-blower seeing your carefully laid out fixed-layout page seemingly fall apart the first time you export an ePub file from InDesign!
Because an ePub file is so different from the fixed format you create in InDesign, it requires a steeper learning curve than does a file format like interactive PDF, where the layout is maintained. You’ll need to learn what information you’ll lose when you export an ePub file, along with how to prepare your file in InDesign before exporting.
You may also be surprised to know that many of InDesign’s interactive features cannot currently be used in ePubs. That will change over time, but for now it’s important to know the limitations.

Like creating a mini website
When you create an ePub file, it’s helpful to visualize the process as being similar to creating a mini website (see “Going Under the Hood,” later in this chapter, on page 204). In fact, the settings in the EPUB Export Options dialog box are very similar to those in the HTML Export Options dialog box. That’s because an ePub file is a compressed package (a ZIP file) that consists of HTML or XHTML files, CSS (Cascading Style Sheets), and some XML files. As on a website, the HTML indicates the structure, such as identifying a top-level heading. The CSS formats the heading to a particular size and weight and indicates how much spacing will appear on all sides of it. We’ll give you an introduction to the structure of an ePub file, and a few basics about working with CSS, later in the chapter.
When InDesign creates an ePub file, it performs a conversion. It exports the objects in your document (text and graphics primarily) in a particular order. It translates the formatting that you have applied to text and graphics into a CSS style sheet. Other information you have added to the document, like a table of contents and metadata (information about the book), is exported as well.

Readers of ePub files can change the font family and size of the text. These are the settings in the iBooks application on an iPad.
Losing information when exporting
Because you’re converting from a fixed layout to a reflowable one and translating InDesign styles into CSS styles, you’ll lose much of the InDesign document’s formatting in the process. Much of it can be retained by carefully preparing your InDesign file before ePub export.
Only the text and graphics on your document pages are exported. Any objects on your master pages, including headers, footers, and page numbers, are skipped during the export. (Since the pages of an ePub file will flow very differently on a laptop than on a smartphone, your fixed-layout page numbers won’t be useful.)
In a print book, you might start each part of your front matter (title page, acknowledgments page, and so on) on a separate page. Because page breaks in your fixed layout will be discarded, they must be re-created in a different way when exporting an ePub.
The exact positions of unanchored images or sidebars will be lost. To be retained, they need to be anchored in the text.
And some kinds of InDesign formatting are lost altogether. Any InDesign-created objects (lines, frames with no content, and so on) will be ignored. Paragraph rules are discarded.
ePub workflow
Creating an ePub requires following a workflow to capture the maximum amount of information from the InDesign document. This requires you to format your text with styles. You also need to establish the export order of the text and anchor any graphics or sidebar text. You may need to make adjustments to graphics formatting and add information such as a table of contents or metadata.
After making the correct settings in the EPUB Export Options dialog box, you’ll view your ePub file in an ePub reader. For example, you can download and use the free Adobe Digital Editions ePub reader.
It’s a good idea at this point to do an initial validation of the ePub, which means running a version of EpubCheck. This ensures that it meets the requirements of the ePub specification required for your eBook to be published. We’ll tell you about this at the end of the chapter.

Creating an ePub file from InDesign requires following a series of steps. These include preparing your InDesign file and proofing, editing, and validating the ePub before publication.
Often, you’ll discover that corrections need to be made in the InDesign file. For example, you may discover that some of your images aren’t named correctly, whch will cause validation to fail. Images need to be named as they would be in a website, so exclude spaces and certain special characters.
Other changes or corrections may need to be made in an HTML editor. Some formatting, for example, may not come through correctly when viewed in an ePub reader. Not all readers will display your ePub in the same way. It’s much like the early days of web development, where every browser created its own display. Other formatting — for example, paragraph rules — has to be added to the CSS style.
The last step is the final validation of your file. Once it passes, you’ll be ready to publish your ePub, either through a bookstore or on your own website.
Preparing Files: Creating Reading Order
As we described, you can’t just use the ePub export function in InDesign and expect that it will instantly produce a perfect ePub. You have to set the order of export, style your text carefully, work with your images, and add some additional information to your document.
InDesign uses its own export order, which is rarely what you want! It looks at the objects in the document, starting with those closest to the left edge and beginning at the top, and then it exports objects farther down at the same vertical position. It then moves to the right, adding other objects from top to bottom.
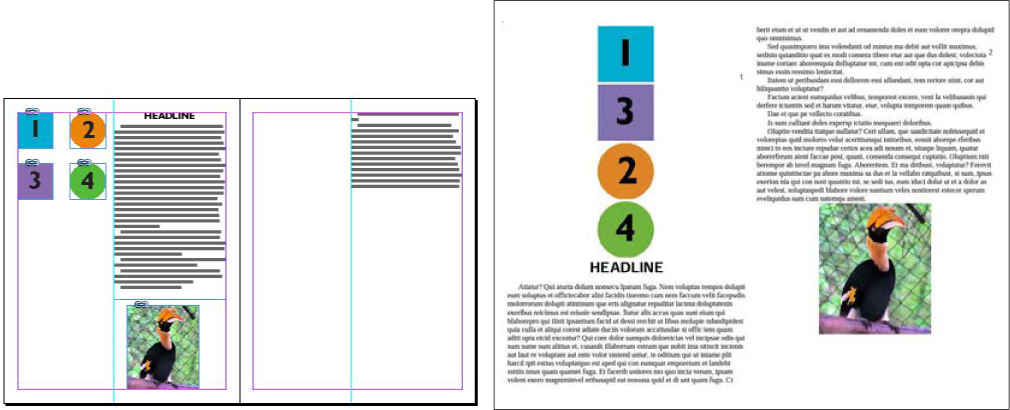
When the InDesign layout (left) was exported to ePub, InDesign’s default export order kicked in, top to bottom and left to right. The results are shown in the Adobe Digital Editions ePub reader (right).
A story is considered a single object, and all text in the story is exported before going to the next object — even if this means going all the way to the last page of the document and then back to an earlier page. There can be only one text flow, so any sidebar objects or graphics that aren’t anchored would be dumped at the bottom.
Layout order
The most basic way to create a proper reading order when exporting to ePub is to use layout order. If you are building a very simple document, like a novel, you can simply create the objects (such as text frames) in the document in the order in which you want them exported.
This is the only method to use when the text in your document flows as a long story in one thread. The key is to anchor images and other blocks of text in the main story flow so they will appear in the anchored location. Anchoring objects is simple: Simply drag the blue icon on the object’s frame to the location at which you want it to appear in the text. You may want to create an extra paragraph return so the object is anchored on its own line, depending on how you want the final object to be positioned.
In the EPUB Export Options tab of the General panel, choose Based on Page Layout from the Content Order menu. The document will be exported with the images and other anchored objects positioned in the main text flow.
XML structure
A second method uses InDesign’s somewhat obscure XML structure panel. Select the Same as XML Structure option in the Content Order menu. Creating XML is beyond the scope of this book, but Cari Jansen describes this method in a blog post: http://carijansen.com/2010/09/18/moving-print-publications-to-epub/.
Articles panel
For complex documents with many elements, an easier and more intuitive method for ordering the content is to use InDesign’s Articles panel (Window > Articles).
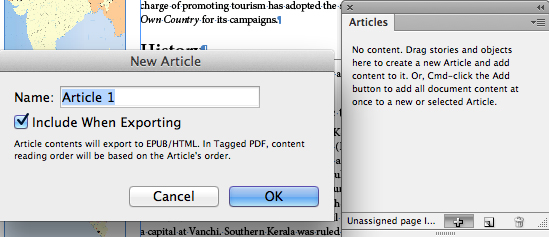
The empty Articles panel will give you instructions for what to do. Drag your first object onto the Articles panel, and you’ll be prompted to name your article.
To set the export order, reposition the objects in the Articles panel in the order in which you want them to appear. This overrides InDesign’s left-to-right, top-to-bottom order. You don’t have to move any objects around on your pages to set the order. When you export, choose Same as Articles Panel in the Content Order menu.
Drag one or more objects onto the Articles panel to begin establishing the export order for the article.
You can create a new article by clicking the New Article button at the bottom of the panel. Having multiple articles makes it easier to move large groups of objects up or down the list. Any article that has Include When Exporting selected will be exported to the ePub file in the order in which it is listed on the panel.
You can also hold down Cmd/Ctrl and click the + button at the bottom of the panel to add all objects in the document to the current article.
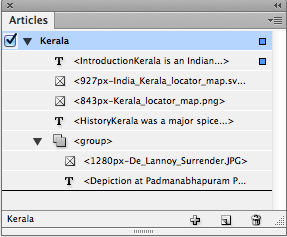
Once you have added text frames, graphics, images, and groups to an article, you can drag them up and down to rearrange them. You can delete an object by selecting it and clicking the Delete All Items (trash can) button.
Preparing Files: Using Styles
Another important process in preparing your document for ePub export is consistently applying styles. While styles are always important in formatting text and objects consistently and quickly in InDesign, it turns out they are essential for ePub export! Creating and applying styles is a basic skill that we don’t cover in this book, but if you need to learn how to work with styles, we recommend Sandee’s InDesign CS6 Visual QuickStart Guide.
Paragraph and character styles
When you export a document as an ePub file, InDesign’s paragraph and character styles are converted into CSS. The relative size and weight of a heading will be retained, as well as the space around it (indent, space after), but other information is discarded. For example, if you have a Heading1 style that is defined as Minion Pro Bold 18/19 with 12 points of space before and 5 points of space after, all that information — except space before — is converted into the CSS. However, if you also have a paragraph rule defined to appear below the headline, that information will be discarded. (Space before may be included in a future InDesign update.)

When InDesign converts the Heading1 style definition into CSS that is applied to h1 elements with the class heading1, the font family, size, leading, and color become CSS properties. Space after is converted into a margin setting, but the paragraph rule in the InDesign style is not included.
If you have used local overrides instead of styles, select the Preserve Local Overrides option on the Advanced panel of the EPUB Export Options dialog box, and InDesign will attempt to write CSS attributes to reflect the relative sizes, weights, and spacing. It will even try to retain the spacing provided by multiple paragraph returns. However, this will create very messy and difficult-to-edit CSS code and is not recommended. Using paragraph and character styles consistently is definitely the way to go.
If you’re converting an InDesign-created ePub file to Kindle format, be aware that the Kindle may discard the formatting of paragraphs with local formatting. Using styles in this case is critical.
Object styles
When you are including frames containing graphics or sidebars in an exported ePub, InDesign designates each of them with an HTML <div> tag. A <div> tag simply divides the HTML code into a section that controls more than one attribute for the elements and applies CSS styles to many elements at once. InDesign will attempt to include the frame formatting (background color; border weight, color, and style; and the spacing inside and outside the frame) into the CSS for the particular <div> tag.
However, InDesign gives each <div> a generic name, which makes it difficult to identify them. By applying an object style with a descriptive name, you can better identify it in the HTML code.
For example, you can define the Sidebar object style with a background color, a stroke width, and a stroke type and color and then apply it to the sidebar frame. When you look at the HMTL code in an HTML editor, you can more easily identify the <div> because it contains the style name. The CSS reflects the size of the frame as well as the border style and width, the fill color, the padding (inset on text frame), and the margin (on text wrap).
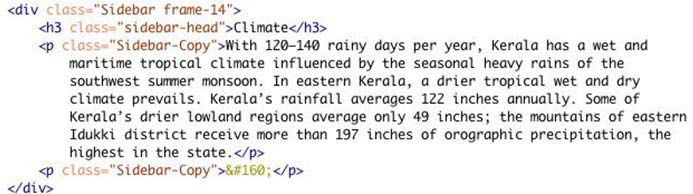
Creating and applying a Sidebar object style makes it easier to identify the HTML <div> code after the file is exported.
Table and cell styles
Table and cell styles applied to a table are converted into HTML table tags and CSS. Border color, border style, border width, and background color are retained. It’s important to use table and cell styles, because if you just apply table formatting locally, it will not carry over to the CSS.
Mapping styles to tags
By default, InDesign maps all paragraph styles to HTML <p> (paragraph) tags. But HTML is designed to give semantic meaning to content. It’s a good idea to leave the <p> tags for body copy, but you should map headers to HTML header tags — <h1>, <h2>, and so on.
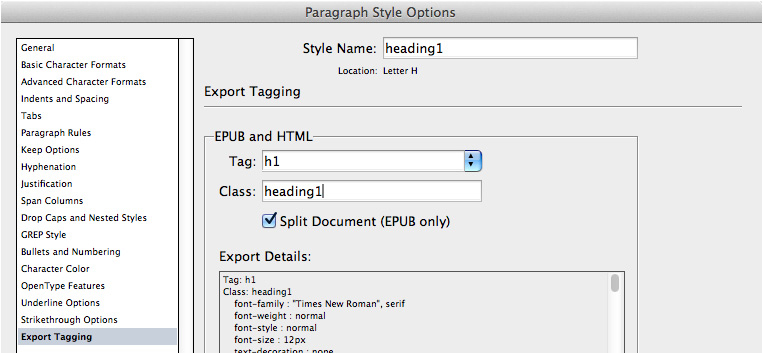
You can map styles in the Export Tagging pane of the Paragraph Style Options dialog box. Choose the paragraph style you’d like to tag (for example, Heading1), and choose Style Options from the Paragraph Style Options panel menu. In the Export Tagging pane, select between <p> and heading tags; for example, for a Heading1 (first-level head), apply an <h1> tag.
It’s also helpful to apply the name of the paragraph style (with hyphens instead of spaces) to the class name. A class helps pinpoint which elements the CSS is being applied to. A tag can be associated with several different classes, each applied to different elements.
Similarly, character styles can be mapped to tags in the Character Style Options dialog box. For italic, you would usually apply an <em> (emphasis) tag; for bold, you would apply the <strong> tag. Although entering a class name of italic or bold is not required, it creates clearer CSS. These are applied as classes in an HTML <span> tag to a range of words inside another tag.

Mapping paragraph and character styles to HTML tags creates better code, making it easier to edit and more likely to be read correctly by ePub readers.
You can edit the mapping of all your paragraph and character styles at once by choosing Edit All Export Tags from the Paragraph Styles panel menu.

Use the Edit All Export Tags dialog box to set tags and classes for all the paragraph styles in your document at once.
Preparing Files: Managing Graphics
Exactly how a graphic will appear in an eBook very much depends on the device on which you’re viewing it. eBook readers vary widely in their device resolution and size of display, and some may not display in color. The traditional Kindle with the E Ink display will show the graphic only in grayscale. Other readers, such as the Kindle Fire and the iPad, can display beautiful color at full resolution.
The good news is that you don’t have to prepare your graphics differently for different devices. Instead, format your graphics for the highest-quality device and let the other readers display them as best they can.
As mentioned, you should usually place your graphics in the text stream. But the Articles panel won’t let you place a graphic within a story. There are two methods to do so: create an inline graphic or anchor the graphic.
Placing an inline graphic
To create an inline graphic, start by creating a paragraph style (we’ll call it Inline Graphic). You’ll usually set its leading to Auto so the paragraph will expand as the graphic is resized. Often you’ll add centering, space before, and space after attributes.
Add a new paragraph where you’d like your graphic anchored, and style it with the Inline Graphic style. Copy your graphic to the clipboard, and then click to place the insertion point inside the paragraph. Paste. The graphic appears within the text flow. When you export your ePub file, the graphic will appear inline, with the text before and after. You can adjust the spacing before and after by modifying the Inline Graphic paragraph style.

The Inline Graphic paragraph style holding an imported image.
Anchoring a graphic in text
The alternative method, anchoring a graphic, is even easier. In fact, if you have a graphic that is already positioned in your layout, you don’t even have to move it. This is also the method to use if you want text wrap around the graphic.
When viewed with frame edges turned on, every frame that is not inline or anchored has a little blue square (called an adornment) in the upper-right corner of the frame. To anchor a frame, drag that square to the location in the story where you’d like the frame to be anchored.
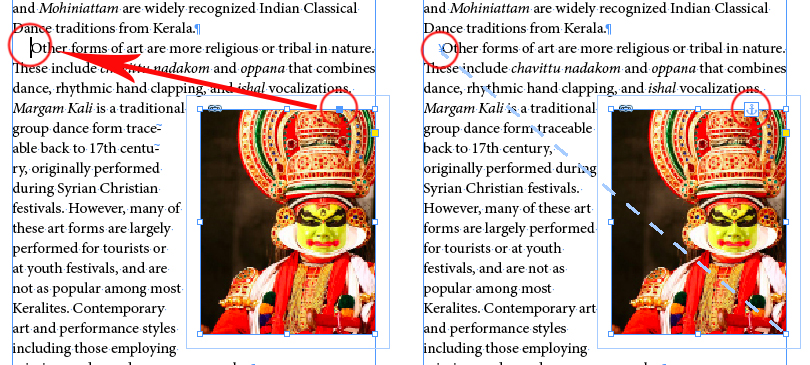
To anchor the graphic, drag the square to the location in the story where you want to anchor it (left). You can tell that a graphic has been anchored when it displays the anchor adornment. Choose View > Extras > Show Text Threads to display a line connecting the bounding box of the frame and its anchor location (right).
If you have trouble moving the object anchor point to a specific position, view the text in the Story Editor. The anchored graphic is represented by an anchor icon, and you easily drag it to reposition it.
You can use the Object Export Options dialog box (discussed next) to set the alignment, space before and after, and other attributes of the anchored graphic.
Object Export Options dialog box: The EPUB and HTML tab of the Object Export Options dialog box lets you set custom rasterization options, alignment, and spacing for text and graphics; most of its settings are duplicated on the Images panel of the EPUB Export Options dialog box. The Export dialog box sets the default settings for all of the graphics in the ePub file. The Object Export Options dialog box lets you customize those settings for each graphic.
Here are a few reasons why you might need to customize the graphics settings:
• Some graphics may require custom alignment, spacing, or resolution.
• If you use text in a callout or a cover, you may want to rasterize it at a higher resolution for better appearance
• While InDesign recognizes much table and cell style formatting, tables that are too wide for eBook readers may work better if they are rasterized.
The Object Export Options dialog box is non-modal. That means you can leave it open as you apply custom settings to images — a great timesaver!
Converting InDesign-created objects to images: Earlier in this chapter, we said that InDesign-created objects (lines, empty frames, and so on) are ignored during export to ePub. There are a couple of ways to overcome this limitation.
When you use the Articles panel to select the export order for page objects, any InDesign-created objects you include in an article will automatically be rasterized. They are turned into images at the default image resolution in the EPUB Export Options dialog box. If you group these objects before adding them to the Articles panel, they will be rasterized and included in the ePub as one object.
If you choose instead to anchor an InDesign-created object, you can use the Object Export Options dialog box to choose settings to rasterize the object.
Using the Float options to create text wrap: To wrap text around a graphic on the left or right, apply a custom Float Left or Float Right setting in the Object Export Options dialog box. The command places the graphic where you have anchored it and maintains the text wrap you have applied.
Start by selecting an anchored graphic. Use the Text Wrap panel to apply the Wrap Around Bounding Box setting, with an offset from the text. In the EPUB and HTML tab of the Object Export Options dialog box, select the Custom Layout check box and choose Float Right or Float Left from the menu on the right.
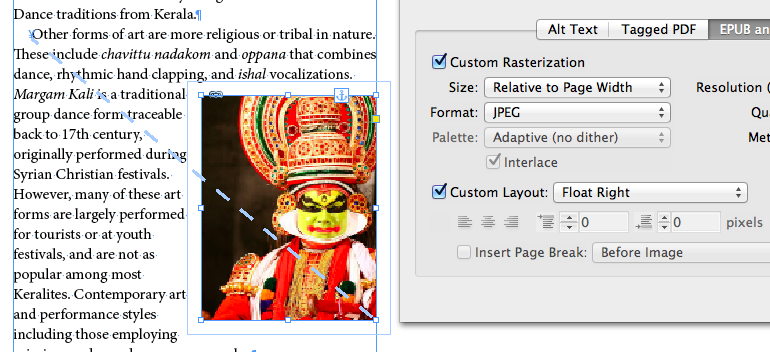
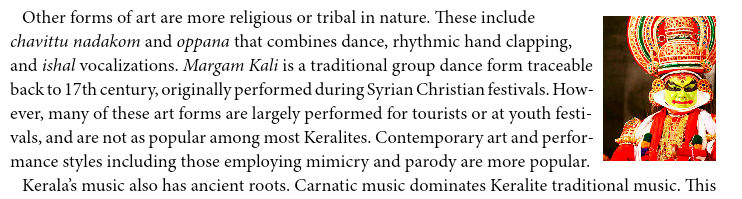
The Custom Layout option Float Right (top) creates a text wrap object in the ePub, as seen in Adobe Digital Editions (below).
Managing Document Pages
All ePub files must have a navigational table of contents (TOC). Each eReader displays the TOC differently.
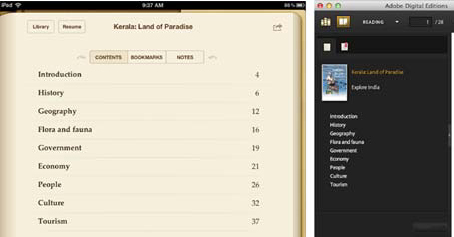
Each eBook reader displays the navigational TOC in a different way. Left: the iBooks application on an iPad. Right: the Adobe Digital Editions application.
In the iBooks application on an iPad, the TOC is displayed when you select the TOC icon at the top left of the page. In the Adobe Digital Editions application, the TOC is automatically displayed in the navigation pane on the left, although it can be turned off.
Creating a navigational TOC
To create a navigational TOC, you need to create a TOC style. You can learn how to do this in the “Creating a Table of Contents (TOC)” section of Chapter 2.
When you export from InDesign, in the General panel of the EPUB Export Options dialog box, select the name of your TOC style from the TOC Style menu. If you have created a book file, the TOC style must be defined in the style source document (see page 196).
Many ePub files also include an internal TOC, which looks like the TOC in a printed book. In a printed book, it would include page references that tell you where a section or chapter begins. In an ePub file, this is not required, but it provides readers with another way to find content if the navigational TOC is not visible.
Because there are no fixed-size pages in an ePub file, the internal TOC will not contain page numbers; instead, it will have hyperlinks to sections or chapters. You create an internal TOC by placing the TOC you have created for your book onto a page of your document (see Chapter 2). If you include page numbers in your document, they will not be included in the ePub file, but hyperlinks will be created that lead to the referenced section or chapter.
An internal TOC is not required in an ePub file. However, if you later convert your ePub into a Kindle file, an internal TOC is required.
Creating a cover
Every ePub file needs a cover. Whether potential customers are viewing your ePub in the iBookstore, the Amazon bookstore, or an eBook reader, you want them to see a good cover image.
When you’re designing a cover image, keep in mind that it’s just a thumbnail. Avoid small type and images that can’t be displayed well.
Whether an ePub file or a Kindle file, the cover image has to be a single flat image in a supported format, like JPEG or PNG. Generally, 600 pixels wide by 800 pixels tall are the recommended dimensions, at 72–300 ppi.
When you’re exporting your ePub file, in the General panel of the EPUB Export Options dialog box you can choose between None, Rasterize First Page, or Select Image.
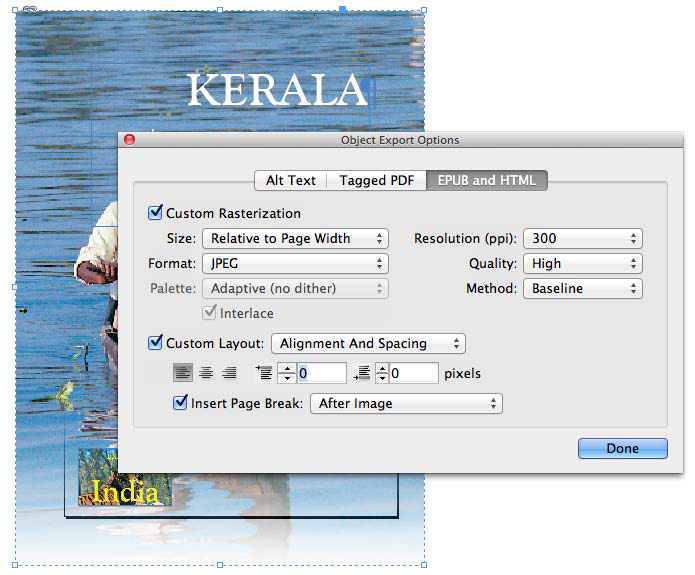
The Rasterize First Page option both creates a correctly sized cover image and displays the cover as the first page in the ePub file. If you have created your cover art from multiple objects, group them first. Then choose Object > Object Export Options. On the EPUB and HTML tab, select the Custom Rasterization check box. If the cover includes text, set the resolution to 300 ppi. Since you want this image on a separate page in the ePub, also select the Custom Layout check box and choose Alignment and Spacing from the menu, and select the Insert Page Break check box and choose After Image from the menu.
If you choose Select Image, you can navigate to a properly sized file in the correct file format, such as JPEG or PNG. In this case, the file doesn’t have to be in your InDesign document, or even created in InDesign.
The Object Export Options dialog box allows you to convert an InDesign page into artwork that can be used as a cover page.
Making page breaks
Just because you have started a chapter or a book title on a new page of your InDesign layout doesn’t mean that those page breaks will export as separate pages in your ePub file. Most likely, they won’t. To create a page break that will display in an ePub reader, you need to break your document into separate HTML files. There are several ways to accomplish this.
Creating paragraph style-based page breaks: You can use paragraph styles to create page or section breaks in the ePub file. You can select as many paragraph styles as you like to create new page or section breaks in an ePub file. You can do it for an individual paragraph style by choosing the style in the Paragraph Styles panel and selecting Style Options. In the Export Tagging panel, select the Split Document (EPUB only) check box. When you export, in the Advanced panel of the EPUB Export Options dialog box, choose Split Document > Based on Paragraph Style Export Tags.
If you’re selecting more than one style to apply a break to, choose Edit All Export Tags from the Paragraph Styles menu. This shows you a list of all the paragraph styles in the document. You can then select the Split EPUB check box beside each paragraph style for which the break should occur.
Use the Paragraph Style Options dialog box to specify that a paragraph style automatically start a new page wherever it occurs.
Creating image-based breaks: If you want all the images in your document to start on a new page (such as illustrations at the start of each chapter), select the Insert Page Break check box in the Image pane of the EPUB Export Options dialog box. Then choose Before Image, After Image, or Before and After Image from the menu.
If you want an single image to be on a separate page, select it and open the Object Export Options dialog box. Select the Custom Layout check box and choose Alignment and Spacing from the menu. Then select the Insert Page Break check box and choose Before Image, After Image, or Before and After Image from the menu.
Working with book files: Breaks work differently in book files, as you’re about to learn. When you export an ePub from a book file, each chapter will automatically start on a new page by default.
Working with book files
When creating an ePub file from an InDesign document, you can either place your chapters in one document or organize your chapters in a book file. Create a book file by choosing File > New > Book. Use the + button at the bottom of the Book panel to add chapter files to your book. Place the chapters in the order you desire by dragging their names up or down in the book file list.
Click the column to the left of a file’s name to make that file the style source. The style source is the file that contains the styles, swatches, TOC style, and other attributes that you want your chapters to share. You can synchronize your book’s styles by deselecting all the chapter names (click in the gray area at the bottom of the panel) and choosing Synchronize Book. When the sync is finished, InDesign may display a message that the synchronization was successful and files may have changed. Save the individual files and choose Save Book from the Book panel menu.

A book file can be used to number pages and coordinate the styles between documents. A book file can also be used to divide an ePub into separate sections.
When using book files, you should place your TOC style and any metadata associated with the book in the style source document. Otherwise, it won’t appear in the ePub file.
Adding metadata
It’s important to include your book’s metadata. Most eBook readers use information contained in the ePub file to display the book’s title and author. You don’t want the filename of the ePub to appear in a library as the book’s title, which is what happens when there is no metadata. In some online eBook libraries, other metadata may be displayed as well.
To add metadata, choose File > File Info to open the File Information dialog box.
At minimum, enter the book title, the author, a description, keywords, and copyright information. We’ve experienced problems when the book title was missing from a document. But feel free to add other information as well.
In addition, two pieces of metadata should be added in the Advanced panel of the EPUB Export Options dialog box: Publisher and Unique ID. These are described in the next section.
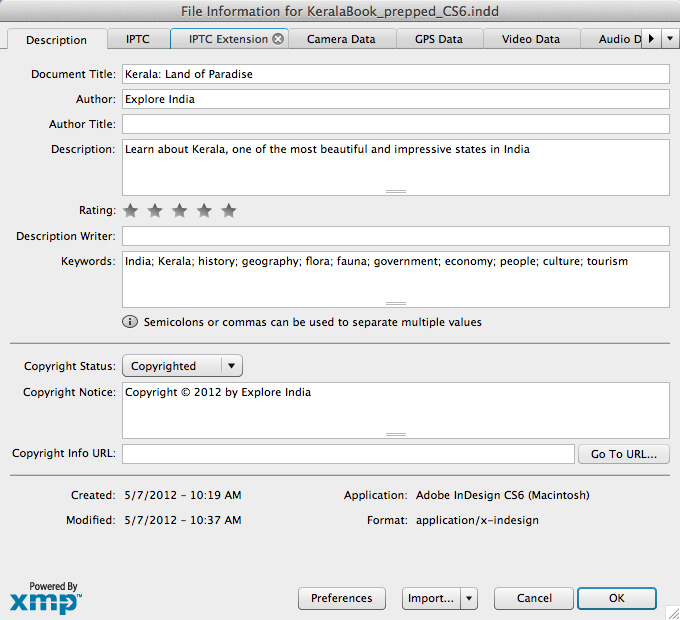
The File Information dialog box lets you enter metadata for the ePub.
Export Options for ePub
After doing the preparation work of specifying export order, styling, and other information, you’re ready to look at a rough proof of your ePub. You choose the settings to accomplish this in the three panels of the EPUB Export Options dialog box.
General pane
The General pane allows you to set the ePub version and choose settings for the cover image, the TOC style, eBook reader margins, export order, and some text formatting options.
Version: There are three choices in the Version menu. The version of the ePub standard that is used by most ePub readers is EPUB 2.0.1. This is the version that was ratified in 2007 by the International Digital Publishing Forum (the IDPF is the organization that develops and maintains the standards for the ePub format). Usually, you’ll choose EPUB 2.0.1.
A second standard, EPUB 3.0, was approved by the IDPF in 2011. ePub 3.0 adds extra features for including video and audio, exporting placed HTML and Adobe Edge HTML animations, and including external JavaScript. At the time of this writing, EPUB 3.0 is just starting to be adopted by ePub booksellers such as iBooks. You may have difficulty finding desktop software that supports EPUB 3.0 files. The third option, EPUB 3.0 with Layout, is an experimental format developed by Adobe Systems.

The General pane of the EPUB Export Options dialog box is where you can set the ePub version and some text features.
Setup: If you have followed the workflow we described, the decisions about the Cover, TOC Style, and Content Order settings have already been addressed.
Margins refers to the space that appears at the edge of the reader window in the eReader. In many eReaders, this setting is not necessary, because the eReader provides its own margin around the page and ignores the Margin setting. In the eReaders that do not provide their own margins, such as Adobe Digital Editions, this setting specifies the margin on each side.
Text Options: The Place Footnote After Paragraph check box determines where footnotes in an ePub appear: If the check box is selected, footnotes display at the end of the paragraph in which they appear; if it is deselected, footnotes appear at the end of the current HTML file (the end of the chapter or the end of the ePub).
Select Remove Forced Line Breaks to remove all soft returns from the document. Each is converted to a single space.
In the Bullets menu, choosing the default option, Map to Unordered Lists, converts bullets created using InDesign’s bulleted list feature into lists formatted with the HTML <ul> tag. Choose Convert to Text to format using the <p> tag, with bullet characters converted to text. This may work better when you’re using custom glyphs.
The Numbers menu works similarly to InDesign’s numbered list feature. Map to Ordered List is the default and converts to formatting with the HTML <ol> tag. Map to Static Order List creates list items using the <ol> tag but assigns a <value> attribute based on the paragraph’s current number in InDesign. Convert to Text uses the <p> tag and converts the number into text.
View EPUB After Exporting: Selecting this check box launches the ePub reader for your hardware device so you can view a proof of the ePub file. This will usually be Adobe Digital Editions, if you have it installed.
Image pane
The Image pane controls the default settings for the ePub export of all of the graphics in the document. These settings can be overridden, graphic by graphic, by using the Object Export Options dialog box, as described in “Object Export Options dialog box” on page 191.
Preserve Appearance from Layout: This is a good default to leave selected. It preserves all transformations or effects you have applied to your graphic in InDesign. If you deselect this, the graphic appears in the ePub as if you had just placed the image fresh into InDesign.
Resolution (ppi): Choose an image resolution of 72, 96, 150, or 300 ppi for your graphics. 150 ppi is a good average choice.
Image Size: Specify whether images must remain fixed or will resize relative to the page. On some ePub readers, you change the width of the display window or change between portrait and landscape mode on the hardware device. If you choose Relative to Page Size, images rescale as the display changes.
Image Alignment and Spacing: These settings apply only to independent graphics, not to inline graphics. Whether they apply to anchored graphics depends on whether you select Settings Apply to Anchored Objects.
You can set the default alignment for images to left, centered, or right, and you can set the size (in pixels) of the space before and after an image. Select Insert Page Break to set a page break before, after, or before and after the image. (In the Object Export Options dialog box, you also have the option to float the graphics to the left or right of the text, which will preserve the text wrap attributes you’ve set in InDesign.)
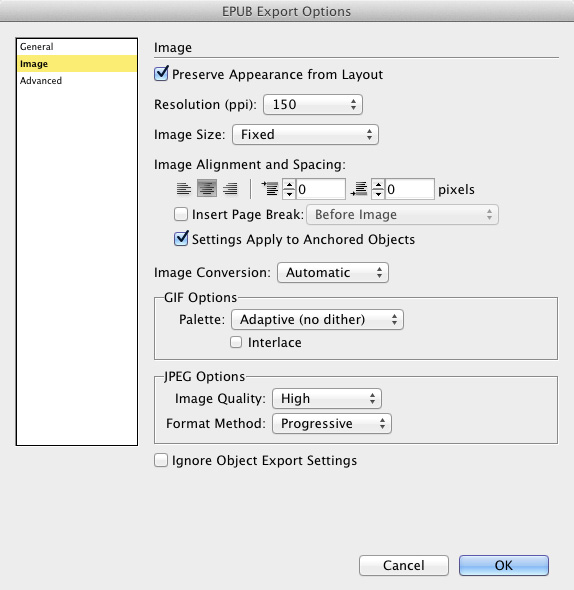
Use the Image pane of the EPUB Export Options dialog box to choose default settings for the export of graphics in the document.
Image Conversion: Your choices are Automatic, GIF, JPEG, and PNG. If you choose GIF, you can select from the Palette menu. If you choose JPEG, you can select from the Image Quality and Format Method menus. InDesign’s default is JPEG at the High setting, which is usually a good compromise between quality and file size. The JPEG format is a lossy format that compresses images to reduce the file size. The JPEG format supports millions of colors in the file. The GIF format is restricted to 256 colors.
The PNG format is a lossless format that supports transparency. Choosing PNG for all your images could make your ePub file very large.
Ignore Object Export Options: If you have customized any of the settings for images in the Object Export Options dialog box, selecting this check box overrides those settings.
Advanced pane
The Advanced pane controls how a document is split (that is, how many HTML files will be created), what metadata is included, and some CSS and JavaScript options.
Split Document: The choices are Do Not Split, Based on Paragraph Export Options, or a single paragraph style. This menu is described in “Making page breaks,” on page 195.

Use the Advanced pane of the EPUB Export Options dialog box to split a document, include metadata, and set CSS and JavaScript options.
EPUB Metadata: If you’ve followed the recommended workflow, much of the InDesign file’s metadata has been included. In this section, you can also add publisher information and a unique ID, which will normally be the ISBN number of your book. If you don’t have an ISBN, you can add any unique number, or InDesign will automatically generate a unique number (this is not the same as an ISBN number).
CSS Options: At the beginning of the chapter, you learned that an ePub file consists of HTML and CSS. InDesign CS6 will always generate its own CSS file to create formatting for the ePub. The choices you make here determine what InDesign will include in its CSS file. In addition, you can select one or more additional CSS files to specify the formatting. You might do this, for example, if you have a series of ePub files that will share formatting. After you have optimized the CSS code, you save it as an external file. You can then load this CSS for each ePub in the series.
You may want to hire a CSS expert to define a custom CSS style sheet. A custom style sheet will give you maximum control over how the ePub file displays. Any custom attributes will override matching attributes in the InDesign-created CSS file.
Choose Include Style Definitions to write CSS for all InDesign styles that the user defines and applies. If you choose Preserve Local Overrides, any local attributes you’ve applied (such as italic or bold) will be included in the CSS. (But remember that using styles rather than local overrides creates cleaner, more editable code.)
If you choose Include Embeddable Fonts, InDesign will include encrypted fonts in the ePub file. It is quite likely, however, that they will not be usable on many ePub readers without additional tweaking. At this stage of the ePub standard, including fonts is a very complex issue. For more information on this issue, see this video overview “Embedding unencrypted fonts into an EPUB” (http://www.youtube.com/watch?v=_bWXfFsdSYw).
If you want to use one or more external CSS files, click the Add Style Sheet button, then navigate to the CSS file.
The JavaScript Options area works only with EPUB 3.0 files. Click Add Script to select one or more JavaScript files to use on export.
Proofing and Validating ePubs
After changing the settings in the EPUB Export Options dialog box, click OK. If you have installed a default ePub reader, such as Adobe Digital Editions, you can begin the next step in the ePub workflow: proofing and validating your ePub file.
Proofing ePubs
To proof your ePub file, you should view it in one or more ePub readers. Initially, you may choose to view it in the free Adobe Digital Editions. It can be installed on both Mac and Windows computers. Download it from www.adobe.com/products/digitaleditions/.
It’s best to proof in two or more programs, because they may display somewhat differently. Here are some commonly used ePub readers:
• Calibre is a multipurpose program that can be used for managing eBooks, reading ePubs, and converting eBooks to different formats (http://calibre-ebook.com/).
• EPUBReader is an add-on that allows you to view ePubs in the Firefox browser. Go to https://addons.mozilla.org and search for EPUBReader.
• iBooks is Apple’s ePub reader app for the iPad and iPhone. Download it from the App Store. You can then install ePubs by opening iTunes, choosing File > Add to Library, and selecting the ePub file. Open iBooks to read the ePub file.
• Ibis Reader is a web-based reader you can use to view your ePub in a web browser. After creating an account, upload your ePub to your Ibis Reader library or just drag and drop an ePub to your browser (www.ibisreader.com/).
Validating ePubs
The EPUB 2.0.1 and 3.0 standards were developed and are maintained by the International Digital Publishing Forum (IDPF). These standards are sets of rules for how an ePub should be interpreted so it can be viewed consistently by different ePub readers. As of this writing, you’ll need to validate for EPUB 2.0.1 because that’s the standard that will be enforced if you want to upload your eBook to Apple’s iBookstore or to the Amazon or Barnes & Noble bookstores.
The actual specifications are detailed on the IDPF website (http://idpf.org), but they are a bit complex to read and understand. The rules are also built into an open source application hosted by Google (http://code.google.com/p/epubcheck/), but you must be able to run Java from the command line and be familiar with command-line tools to use this tool effectively.
For the less technically inclined, a much easier way to validate files that are 10 MB or less is the IDPF’s online ePub Validator (http://validator.idpf.org/). Just click Choose File, browse to select your ePub, and click Validate. If it passes, you’ll get the message “Congratulations! No problems were found in <name of ePub>.” If there are errors, they will be listed by file and line number in the code, which can help you identify the problem.
It’s a good idea to validate your ePub after you export from InDesign but before you start monkeying with the HTML or CSS in a text editor. That way, you can fix any problems before you introduce new errors in your editing. For example, you might discover that some of the filenames of the graphics you’ve placed don’t follow the ePub standard because they include spaces or special characters not allowed in the HTML.
Going Under the Hood
Now it’s time to get our hands a little dirty and go under the hood to view an ePub file. Inevitably, the ePub that is generated by InDesign will be lacking in some way, and you’ll need to modify the CSS to fix a problem or enhance the file in a way that can’t be done in InDesign.
Cracking open the ePub
The first step is to uncompress the ePub file, which is really just a special form of ZIP archive. This process is quite easy in Windows. On a Mac, it is a bit more challenging but can be accomplished with the right tools.
In Windows
On a Windows computer, start by putting your ePub file into its own folder. (You do this because you’ll end up with several files, which you don’t want loose on your Desktop.) Then change the file extension from .epub to .zip, and extract the file using any ZIP archive utility.
After viewing or editing the resulting set of files (discussed in the next section), you can use the same utility to recompress the folder into a ZIP archive. Then change the extension back to .epub.
On a Mac
On a Mac, the problem isn’t in unzipping the archive, it’s in correctly re-creating the ePub again after opening it. Because the Mac adds hidden data that makes the ePub invalid, you need to use a Mac-specific method. If you zipped the file, it wouldn’t validate.
One method is to use the OS X Terminal commands to unzip and zip the ePub file. A much easier way is to use two free AppleScripts, EPUB UnZip and EPUB Zip. Anne-Marie Concepcion has described this method in a blog post (http://indesignsecrets.com/unzip-and-zip-epub-files-safely-with-these-applescripts.php). The method uses one script to unzip the ePub and a second to zip it again in a way that meets the ePub specification.
Understanding ePub structure
What do we see when we crack open the ePub? A structure of folders and files, including XML, HTML (or XHTML), and CSS files. You’ll find the ePub’s images in the Image folder.
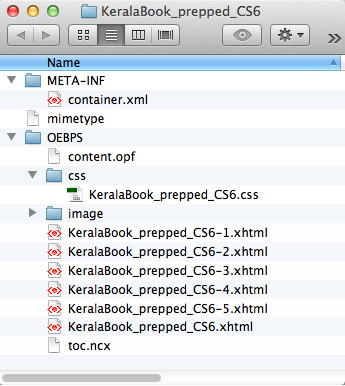
After unzipping the ePub file, you find a structure of folders and XML, HTML (or XHTML), and CSS files. Images are in the Image folder.
As mentioned at the beginning of the chapter, the ePub is like a mini website. Here’s a short rundown on what the folders and files are used for, and whether you’d have any need to edit them.
META-INF folder: This usually contains only the container.xml file. It could also contain an encryption.xml file if you’ve embedded fonts. You won’t need to edit the contents of this folder.
Mimetype: This is a single XML file that identifies the package as an ePub file. You won’t edit this.
OEBPS folder: This acronym stands for Open eBook Publication Structure. This is where the good stuff lives. It contains the XHTML (or HTML) files that make up the text contents of the book: the CSS folder, which contains Cascading Style Sheets; the Image folder; and two XML files, content.opf and toc.ncx.
<chaptername>.xhtml: These files are like the body of the ePub file. They contain the structured XHTML code containing the content of your chapters or sections. You might edit these to change the content if necessary.
Image folder: This folder contains the optimized images exported by InDesign. You can view these in an image editor, such as Adobe Photoshop.
CSS folder: This folder contains the CSS files generated by InDesign as well as other CSS files you might have chosen to include when exporting the ePub. You’ll edit these to change the formatting of your book.
TOC.ncx: This XML file is the navigational TOC that we described in the “Creating a navigational TOC” section on page 194. It displays in every ePub reader. Normally, you won’t need to edit this.
Content.opf: This XML file could be considered the control center of the ePub file. It has three required parts and one optional part: The metadata contains information about your book, which we discussed in the section “Adding metadata” on page 197; behind the scenes, InDesign adds the required “date” attribute to this part. The manifest is a list of the files contained within the ePub. The spine lists the order in which the text files should appear in the eBook. The optional guide describes the role that each XHTML file plays in the eBook. For example, roles could include title page, dedication, and so on. Apple iBookstore requires this section for ePub files submitted to it. Kindle files require changes to the guide section.
Working with an ePub editor
To work with the files described in the previous section, you’ll need to use an ePub editor. You could use any text editor, but it’s better to use one specialized for working with code. (Don’t use Microsoft Word, which saves files in a proprietary format. You want to save files in plain text format.) A good ePub editor will include the ability to search and replace code, will display tags with color coding, and will show the code in a structured way.
If you work with ePub files frequently, you may want to purchase a more powerful editor, like BBEdit for the Mac or Oxygen for Windows or Mac. These applications let you edit the ePub file without having to manually uncompress and recompress the file; the application takes care of that behind the scenes.
There are many ePub editors, and no agreement about which is best:
• TextWrangler (Mac) is the free version of BBEdit. It supports soft wrap of lines, multifile search, and GREP pattern matching (www.barebones.com/products/textwrangler/).

TextWrangler for the Mac is an excellent ePub editor. Notice that it adds color to the HTML tags and indents the text to make it more readable. It also has panels that show open files and recent documents.
• Notepad++ is the Windows equivalent of TextWrangler. It’s a free, open source application that has similar attributes (http://notepad-plus-plus.org/).
• Sigil runs on Windows, OS X, and Linux. It’s free, open source software that offers multiple views: Book view, Code view, and Split view (http://code.google.com/p/sigil/).
• Adobe Dreamweaver (Mac and Windows) opens XML, HTML, and CSS files. It makes it easy to jump between related files. It has a Code view and a Split view, and it quickly previews in a browser (www.adobe.com/products/dreamweaver.html).
• Oxygen XML Author (Mac and Windows) has all the characteristics of a good editor, but it also has some unique capabilities: It can open an ePub file on the fly, make changes to any of its files, validate it, and then just as easily save it as an archive again (www.oxygenxml.com/xml_author.html).
Editing the ePub CSS
While you may use your ePub editor to edit any of the component files of an ePub, the ones you’re most likely to need to edit are the CSS files. We can cover only a few basics about Cascading Styles Sheets and give a few examples. We’ll point to a couple of resources at the end of this section.
CSS basics: As an InDesign user, you have an advantage because you’re already familiar with using styles.
In CSS, a style is a rule that describes how to format a particular piece of HTML. In the CSS generated by InDesign, this HTML is most commonly a paragraph <p> tag; a heading tag, like <h1>; or a <div> or <img> tag for a sidebar frame or graphic.
For a <p> or heading tag, you set properties such as color, font-family, font-style, font-weight, and so on. For a <div> tag, you set properties such as margin, padding, text-align, height, and so on.
Types of styles: A tag style applies globally to an individual tag that has a particular semantic meaning (like the top level, <h1>).
A class style is attached to text or a tag. A class helps to pinpoint to which elements the CSS is being applied to. A tag can be associated with several different classes, each applied to different elements. Class styles are most similar to InDesign’s paragraph or character styles.
The box model: A web browser thinks of an <img> tag or a <div> tag as a box. To a browser, any tag is a box with something inside it — for example, an image or text.
Surrounding the content are the properties that make up the box:
• Padding is the space between the content and the content’s border. The InDesign equivalent is inset spacing.
• Border is a line that’s drawn around each edge of the box. This is like the stroke on a frame in InDesign.
Unlike InDesign’s stroke, you can choose on which sides the border will appear in CSS. If you select the top or bottom edge, you would create what InDesign calls a paragraph rule.
• Background-color is what InDesign would call the fill. It extends to the border.
• Margin is what separates a one tag from another. It’s the space around the <img> or <div> tag. The closest InDesign equivalent is the space before or space after attribute.
Correcting a problem in CSS
Let’s examine an example of how to edit the CSS. In the example book we’re using, the print version was set up with sidebar frames that were placed away from the spine of the book.

When the original print book was created, sidebar frames were anchored to the main text flow and an object style was applied to the frame.
When preparing the document for creating an ePub, we anchored the sidebar frame to the main text flow, as described in the “Anchoring a graphic in text” section on page 191. We then applied the Sidebar object style to the frame.
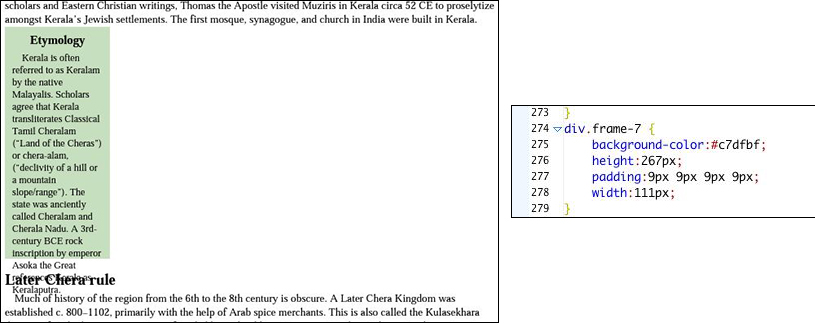
The frame dimensions from the book were preserved, but this no longer worked in our ePub document (left). InDesign exported the CSS for the Sidebar frame style (right).
When InDesign converted the document to ePub, it attempted to export as many attributes as possible. For the sidebar frame, it exported the background color, frame height and width, and inset spacing (padding).
However, because it included the frame’s height and width properties, the sidebar doesn’t display well in the ePub. It’s too narrow and overwrites some of the following tag.
This is a case where you need to edit the CSS. The box model doesn’t require including the height and width properties in the style. By removing these properties, the sidebar frame extends across the width of the screen. In addition, adding a margin property for the frame added space between it and the tags before and after.

Removing the tag’s height and width properties and adding a margin property improves the appearance of the ePub.
Adding new properties to the CSS
Because InDesign doesn’t export all style attributes, sometimes you have to add properties to the CSS with an ePub editor.
In the original print document, the Heading1 style included a paragraph rule below the head. This is an attribute that InDesign doesn’t export.
In the CSS, you can edit the h1.heading1 style to add other properties. To create a paragraph rule, you can add the border-color, border-style, and padding properties, as well as individual border-width properties for the four sides.

Adding several properties to the h1.heading1 style restored the paragraph rule.
Learning more about CSS
There are many sources of information to learn more about CSS. Elizabeth Castro has written several excellent books about creating eBooks. One of them — EPUB Straight to the Point — goes into great depth on CSS (www.elizabethcastro.com/epub).
Converting to Kindle files
Many of us wish that Amazon would adopt the EPUB standard, but so far they have insisted on staying with their Kindle file format. It was enhanced somewhat with the release of the Kindle Fire, but it still doesn’t follow the EPUB specification. This means that if you want to offer your ePub on Amazon’s Kindle Store, you’ll need to convert your file to the Kindle format.
Visit the Kindle Publishing Programs page: Amazon provides a tremendous amount of information about creating Kindle files on their Kindle Publishing Programs page. There you can download the Kindle publishing guidelines and the applications mentioned below (www.amazon.com/gp/feature.html?docId=1000234621).
Converting to Kindle: There are three primary ways to create a Kindle file from an InDesign file. The easiest and most powerful way is to download and install Kindle Previewer, which you can use to preview and save the conversion from ePub to Kindle. The second method is to install the Kindle plug-in for InDesign. You then have a menu within InDesign that lets you save a MOBI file from InDesign (though it doesn’t have quite as many options as InDesign’s export controls). A third method is to download the free KindleGen application (available for Mac and Windows), which you can run from the command line to convert an ePub to a Kindle file. We don’t use it, because we’re not very adept at using command-line controls.
Preparing your files: The details for how to prepare your file and edit the ePub file’s CSS are provided in the Kindle publishing guidelines, but here are the main points:
• It’s a good idea to create separate InDesign and ePub files for converting to Kindle. That way, your ePub files can retain formatting that is not allowed in the Kindle.
• While Amazon recommends creating a separate 600 × 800 pixel JPEG image for the cover, if you use the Rasterize First Page method (described in the “Creating a cover” section), this image will work when converted with KindleGen or Kindle Previewer.
• You’ll need both a navigational TOC and an internal TOC (without page numbers), as we describe in the “Creating a navigational TOC” section on page 194. The internal TOC should be the first text of the ePub file.
• Remove InDesign drop caps or they will be formatted badly on a Kindle.
Edit the ePub file: You’ll need to make two edits in the ePub file with an ePub editor. First, open the CSS file created by InDesign (it’s in the CSS folder). When you export the ePub file, InDesign writes an entry for Margin (in the Margins panel of the EPUB Export Options dialog box) even if you set the margins to 0 (zero). You must remove this entry from the CSS:
@page {
margin : 0px 0px 0px 0px;
}
You must edit the Content.opf file to add a guide section. This appears after the spine section and will look similar to the example below. It must reference the image that InDesign generates for the cover and places in the Image folder. It must also reference the first HTML file in the ePub, which is where the internal TOC resides. You can see both of these references in the manifest section of the Content.opf file.

Use Kindle Previewer: Open Kindle Previewer. Select the ePub file you specifically edited for Kindle conversion. Click OK, and Kindle Previewer will automatically open and convert the ePub file and then show it in the Previewer window. It will save the Kindle file in a new folder. From the Devices menu, choose among the Kindle, Kindle Fire, and other Kindles (including those running on an iPhone or iPad).
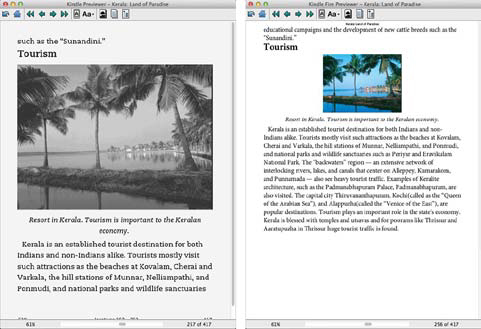
After converting the ePub file to Kindle format, Kindle Previewer allows you to select which Kindle device to preview it in. Shown are the E Ink Kindle (left) and the Kindle Fire (right).
Evolving ePubs
The world of eBooks is changing and growing with great speed. What was true last week may have changed this week with new devices, evolving ePub standards, and even new forms of ePub files. Here’s a glimpse of the changes coming to ePub files.
Changing standards
Since the ePub file format is controlled by the IDPF, their site is the best place to read about the EPUB 3.0 specification approved in 2011 (http://idpf.org/epub/30/spec/epub30-overview.html).
Switching to this new standard will probably be a slow process. There are already some EPUB 3.0 test files available, along with the beta versions of EpubCheck and ePub Validator. But the standard needs to be implemented on different ePub readers before you can use the new features.
Fixed-layout ePub
The EPUB 2.0.1 and 3.0 specifications are both for reflowable ePub, the kind described in this chapter. But there are books for which a reflowable format doesn’t work such as children’s books with lots of illustrations, or coffee table art books. These require eBooks in which the pages are static and objects have a fixed position.
To get around this limitation, individual ePub readers (including iBooks, Kobo, and Nook) have initiated the creation of what is being called a fixed-layout ePub. This is a fast-developing area. Check out Elizabeth Castro’s eBook Fixed Layout EPUBs for iPad and iPhone (www.elizabethcastro.com/epub/).
Enhanced or multimedia ePub
When the IDPF was developing the EPUB 3.o specification, some authors and vendors didn’t want to wait to add multimedia (video and audio) and interactivity (using JavaScript). Apple took the lead by adding these capabilities to the iBooks application. Elizabeth Castro writes about this in the eBooks Audio and Video in EPUB and Read Aloud EPUB for iBooks.
InDesign and HTML Export
Exporting InDesign files to ePub can be a pretty satisfying endeavor. With the right file preparation beforehand and some massaging afterward, the ePub export controls in InDesign produce a result that, well, looks like an ePub.
With HTML export, the result that most of us would like is a web page (or pages) that looks much like our print layout, with columns, colors, and images in at least roughly the same position. Unfortunately, this is not what happens, and if you’re reading this section hoping to learn about one-click conversion from your print document to a web page, read no further. It simply doesn’t exist.
InDesign’s HTML export feature is not designed to give you instant web pages. It is designed to extract content, not page geometry.
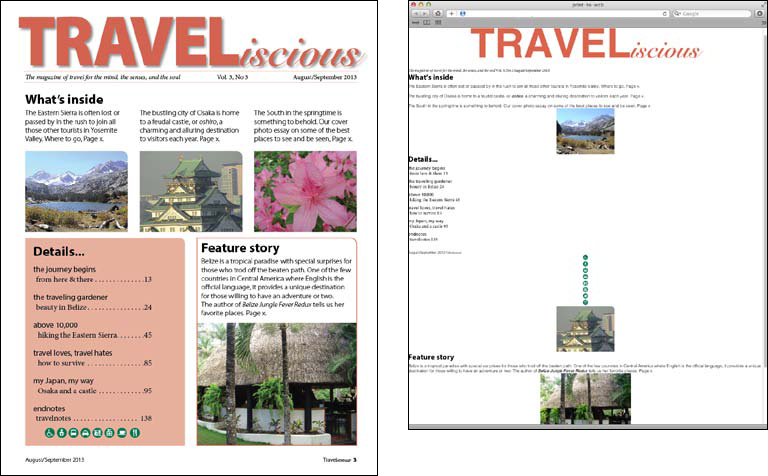
A print layout (left) and the resulting HTML export (right), with default export option settings.
But just because you can’t create a finished web page, that doesn’t mean HTML export from InDesign isn’t useful. After all, moving the content from a print document to a web page is important, because so much information in print also appears on the web. And much of what we read in print today was created in InDesign.
How (and whether) you’ll use InDesign’s HTML export options really depends on your workflow and the skill level of your resources. You will almost never get a result that you can use on a website without extensive work on the code. So the question becomes, who will do the coding? Will you do it? Or are you part of a workgroup or organization that has designers to massage the basic files you provide?
In order to export content from InDesign to HTML, you should have at least a basic understanding of CSS and HTML code, even if you are not coding the final website yourself.
Preparing Files for HTML Export
If you plan to export your content to HTML, there are a few things you can do to prepare your InDesign document. They are similar, though not identical, to the steps required for ePub export.
First, if you are exporting your entire InDesign document, you need to establish the order in which the objects in your file will be exported. If your document consists of one long story thread, you will need to anchor all the images in position. If your document consists of many different stories and images, you’ll probably want to use the Articles panel to order your document (see “Preparing Files: Creating Reading Order,” on page 183).
One of the most important things you can do is use styles in your document. Paragraph and character styles are absolutely essential; object styles and table and cell styles can be helpful because they export code that can be used to format the HTML. It’s also significant that InDesign allows you not only to style text, but to assign HTML tags to that text via the export tags that can be applied to paragraph and character styles. This helps form the content for use in a web page.
In organizations that have separate groups for print production and web production, simply adding export tags to existing InDesign styles is perhaps the single most useful thing a designer can do to create usable HTML code. The nice thing is that it does not burden the print designer with extra work, because once the tags are assigned to styles, the workflow for the designer is unchanged. For more information on using styles, see “Preparing Files: Using Styles,” on page 186.
Images may need to be made part of the export order by anchoring them in text or by adding them to the Articles panel. In terms of optimizing them for use on a website, you can let InDesign convert them on export. However, most web designers strongly prefer to process images by using programs designed for the task of web optimization, such as Adobe Photoshop or Adobe Fireworks.
If you have just a few simple images or don’t know how to use other programs to prepare images for the web, you can let InDesign convert the images for you. For more information on positioning graphics for export and using InDesign’s image conversion, see “Preparing Files: Managing Graphics,” on page 190.
Export Options for HTML
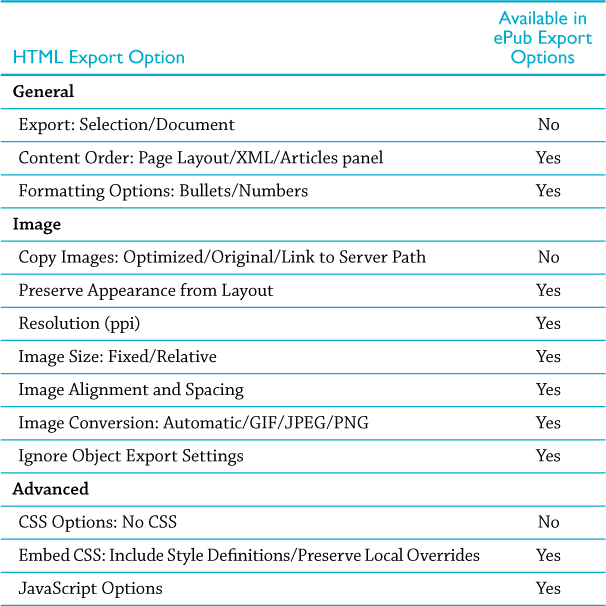
Although ePub export and HTML export produce quite different results, their export options are nearly identical. This section discusses the few export options that are unique to HTML.
General pane
The General pane of the HTML Export Options dialog box contains settings for choosing the export content and format options.
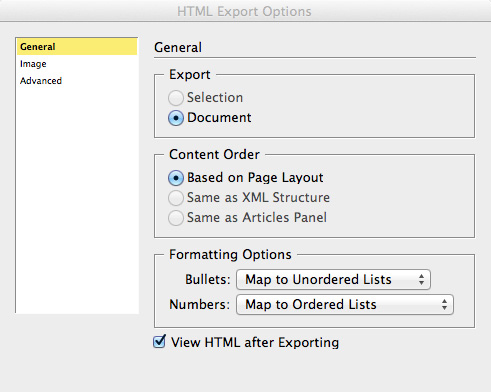
The General pane of the HTML Export Options dialog box.
The Export area allows you to export either a Selection of your InDesign document or the entire Document. To export a selection of your document, click the objects or frames you wish to export first, then choose Selection. This option is not available for ePub export; you can export only your entire document to ePub.
The Content Order options control the order in which the objects in your InDesign file or selection are exported to the HTML file. These are the same options that appear on the Content Order menu in the EPUB Export Options dialog box. Based on Page Layout will export objects in the order in which they appear in your layout, using the same top-down, left-to-right order used for ePub export. If your document uses XML markup, choose Same as XML Structure. You can also add objects to the Articles panel and use that for the export order by selecting Same as Articles panel. (For more information on using the Articles panel, see the section “Articles panel” on page 184.)
The Formatting Options area lets you control how bullet lists and number list will be formatted. These options work identically to those in the EPUB Export Options dialog box (see the section “General pane” on page 198).
Image pane
The Image pane controls are, for the most part, identical to the image export options for ePub.
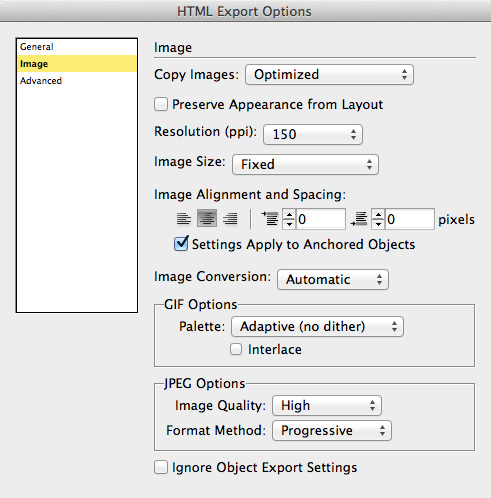
The Image pane of the HTML Export Options dialog box.
The Copy Images menu options, however, are not available for ePub export, but they are very useful for workflows that include HTML export.
Choose Original to simply copy your original images into their own Images subfolder on export. The Images folder will be included in the <document name>-web-resources folder. You can then use a program such as Photoshop or Fireworks to optimize the images. When you choose this option, all other options in the dialog box are dimmed.
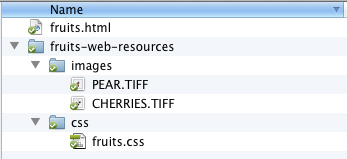
The Copy Images: Original option creates a folder that includes all the images in your InDesign document.
Link to Server Path lets you enter a local URL (such as “/images”) that will appear in front of the image file in the exported HTML code, with the link attribute displaying the path and extension you specify. This makes it easy to keep your images in a subfolder and optimize them in a program such as Photoshop or Fireworks.

Link to Server Path lets you specify a path that will be written in the HTML code to point to your images.
If you choose Optimized, InDesign will optimize the images on export. All of the options in the dialog box become available, and they are identical to those for ePub export (see the section “Image pane” on page 200).
Advanced pane
The Advanced pane controls the settings related to the CSS code that will be generated on export. Again, the options found here are also found in the EPUB Export Options dialog box, with one important exception: By selecting No CSS, you specify that InDesign will not write any CSS code for you and that you will attach your own CSS file. For those who know HTML and CSS, this is a very good option, because a programmer can create much cleaner code than InDesign can.
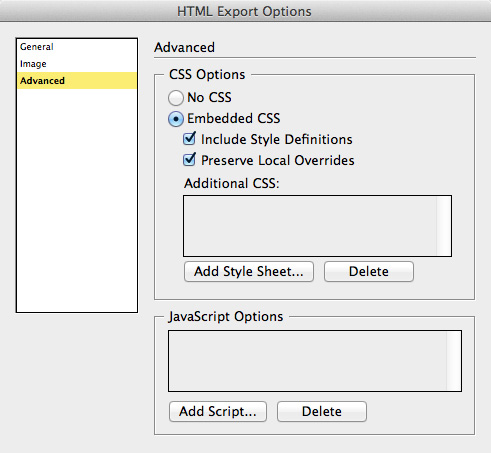
The Advanced pane of the HTML Export Options dialog box.
If you want to instead include InDesign’s CSS, choose Embedded CSS. You then have the options Include Style Definitions and Preserve Local Overrides. Click Add Style Sheet to link to an external CSS file. JavaScript can be added by clicking Add Script under JavaScript Options. These options are the same as those for ePub export (see “Advanced pane” on page 202).