Half bull and half man, the Minotaur was a savage, carnivorous monster born of King Minos’s wife and a bull that Minos stole from the sea god Poseidon. To punish Minos, Poseidon made Minos’s wife fall in love with the bull, which resulted in the birth of the Minotaur. The monster caused so much destruction on the island of Crete that Minos had the architect Daedalus build an elaborate labyrinth to contain the beast, who was ultimately slain by the Greek hero Theseus. In contemporary fiction and games, minotaurs are usually cast as villains, but they are also considered very intelligent and sometimes play the role of the hero.

Creating the Feet and Legs My favorite method of drawing minotaur feet is to draw human feet that end in bovine hooves. Instead of a human heel I draw the hock, which leads down into the canon bone and split hoof. Minotaurs still have very human thighs, and their shins are somewhere in between. The end result is usually a bent-legged stance.

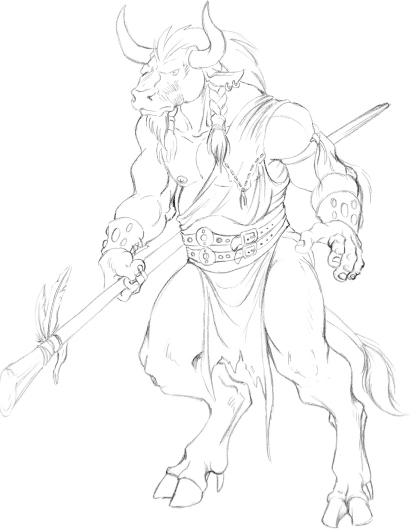
Step 1 I start by drawing the line of action with an HB pencil; then I roughly sketch the rest of the figure. I want the figure to be slightly stooped over, so I indicate this in my sketch. I also indicate a long staff with a straight line.

Step 2 Still using my HB pencil, I start to develop the forms using simple shapes. Note that I give the minotaur a considerable paunch although he’s muscular; this is because bulls are powerful yet stocky creatures. Another typical characteristic of hoofed animals is the pair of vestigial dew-claws behind the two main halves of the hoof, which gives the animal the appearance of having four toes. In this vein, I give the minotaur four fingers on his open hand.

Step 3 I go back over the basic shapes, refining them into more specific details such as the muscles, knees, ankles, nose, mouth, and brow. I also rough in the hair and clothing, which consists of a broad belt over a loincloth and a draped shirt. Next I make the staff thicker at one end, tapering it down to a point at the other end. I also add a tuft of long hair to the end of the tail. Then I develop the hooves, keeping in mind the four-toed appearance of hoofed animals.

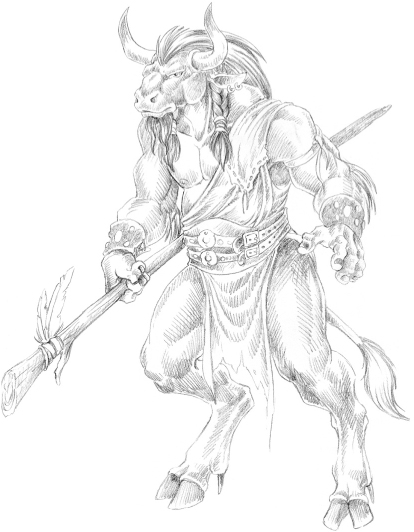
Step 4 Now that I have the basic form down, I launch a full assault on the details, including the scraggly hair and beard, tattered clothing, and accessories such as the studded wrist bracers, belt, and earrings. I also add the wrapping around the top of his staff, which includes two feathers and strings of beads.
Because a minotaur is half bull and half man, it’s important that the different features blend cohesively; otherwise your creature will look like he’s been cut and pasted. One trick I like to use is placing the eyes closer together on the head instead of placing them far apart as you’d see on a cow; this makes the face appear more human. I also draw the lips so they’re fuller and more fleshy, making them look capable of speech and expression. Adding long hair on the head can help too.

Step 5 Once I’ve worked out all the details, I use a light table to help me transfer my drawing to a clean sheet of paper. As I trace the lines, I refine the knuckles a bit. I also omit the beads hanging from the staff—they felt like an afterthought in my sketch, so I leave them out of the final drawing.
Step 6 I use the HB pencil to lay down some shading with quick hatching. I work over the entire drawing to plan my light and dark areas. At this point I change the beard a little, splitting it into two “tails.” Pairs and split objects are a theme in this composition—the staff and hooves are split; there are two feathers, two braids, two belts, and two earrings; and so on.
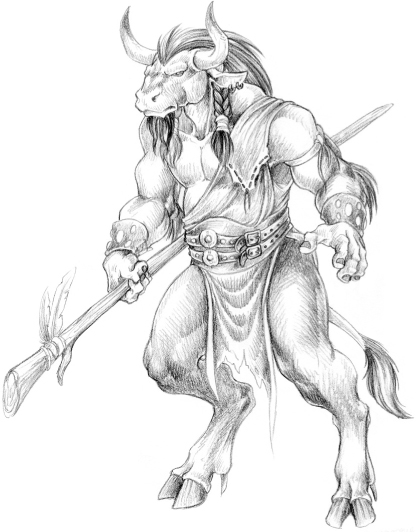
Step 7 When I’m satisfied with my plan for the shading, I use a softer 2B pencil to darken the areas of deepest shadow and the HB pencil to blend the shadowed areas into the lighter areas. I still use hatching to lay down general areas of shadow, and I use softer, smoother strokes for blending. Note, however, that I don’t totally eliminate my hatching, leaving some of it to imply the texture of the skin and clothes.
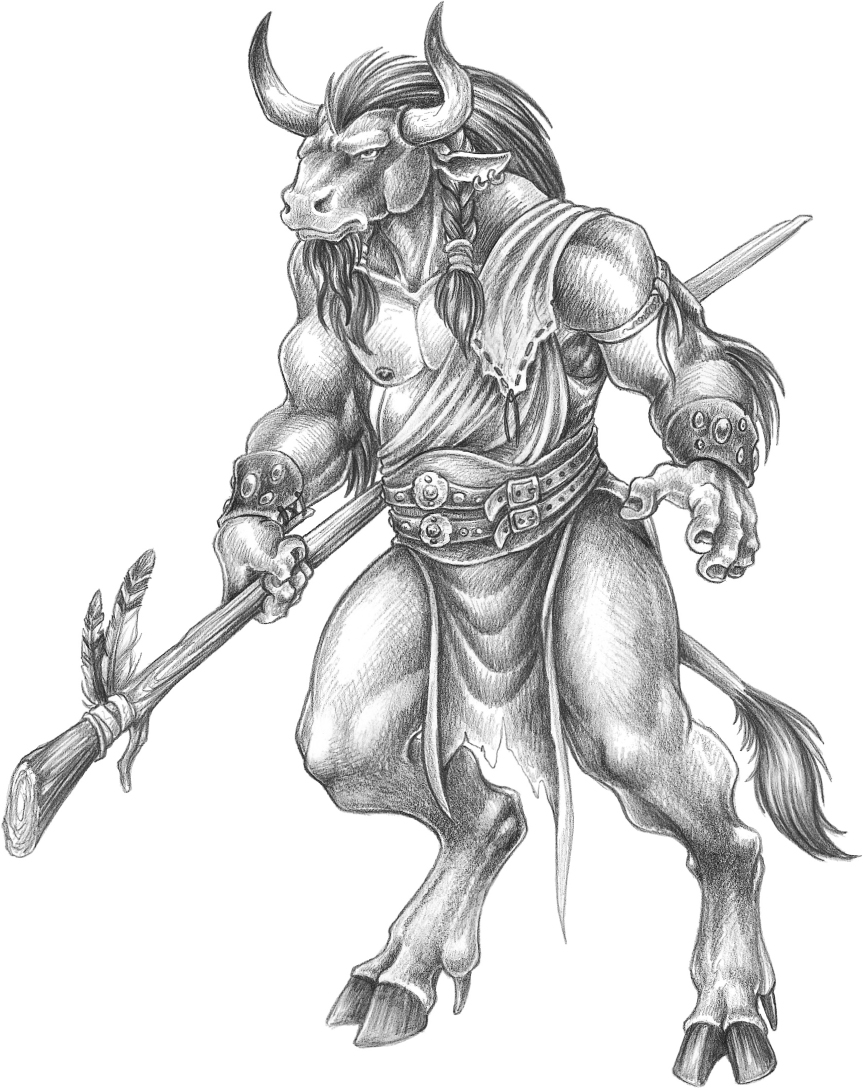
Step 8 I continue shading, still using the 2B pencil for darks and the HB for blending the darks into the lighter areas. I also pay more attention to the clothing, darkening the stitching on the shirt so it stands out against the lighter fabric. I layer deeper values in the hair and beard to make them look even darker. I use vertical strokes on the hooves to make them look slick and smooth but also ridged. I draw tight scribbles on the armband to suggest a tooled or embroidered design. Finally, I create dark tips and bands on the feathers to complement the dark areas on the figure.