One of the most archetypal creatures of myth, legend, and contemporary fantasy, the dragon has terrified and fascinated humankind throughout history. Classical literature and myths of old will provide you with some of the most standard descriptions of a dragon’s appearance: broad wings, spiky horns, fearsome teeth, rending claws, long tails, and thick skin or dense, armored scales. But there are as many different types of dragons as your imagination can conjure up, so once you have the hang of drawing a classic dragon, experiment with different looks and features to make your own unique creatures.

Unusual Expressions There’s more to dragons than blind savagery and ferocity. They can be silly too! Try experimenting with different moods and situations, including the unusual. This dragon makes an action as mundane as yawning seem impressive.

Eyes Like humans, a dragon’s eyes can speak volumes about its personality. Slanted reptilian eyes suggest a cold, savage personality; large, thoughtful eyes produce an intelligent or kindly look.

Horns and Whiskers Features like horns and whiskers can help suggest a dragon’s age and personality. An older dragon might have a broken or cracked horn, and a dragon with vast treasures might don an earring or two. Long, drooping whiskers suggest old age.
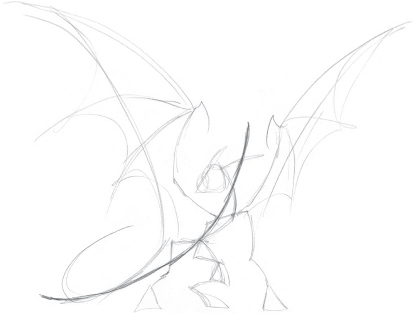
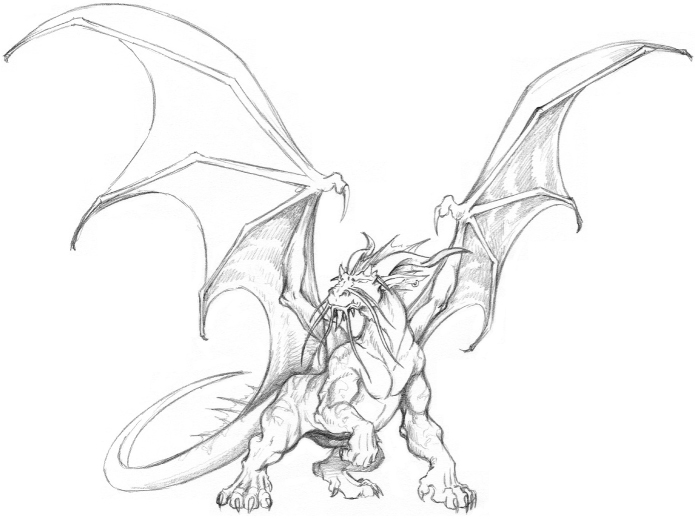
Step 1 I begin all of my drawings on a sheet of sketch paper. With an HB pencil, I establish the line of action, which is usually a single line that indicates the general flow of the figure. Then I use quick lines to rough in the shapes of the dragon’s body and wings, remembering that the wingspan should appear to be about twice the dragon’s length. Starting with a rough sketch like this helps me determine the placement of the figure on the page and work out the composition before I get too involved. I don’t worry about details at this point—just the general shapes.
Step 2 Once I’m happy with the pose and placement of my dragon, I start developing the figure with basic shapes: ovals and circles for the cranium and ribcage, cylinders for the limbs, and triangular wedges for the feet. When limbs or body masses overlap, I sketch the farther limb through the one in front of it—this is called “drawing through.” Note that my lines are very sketchy and loose at this stage.
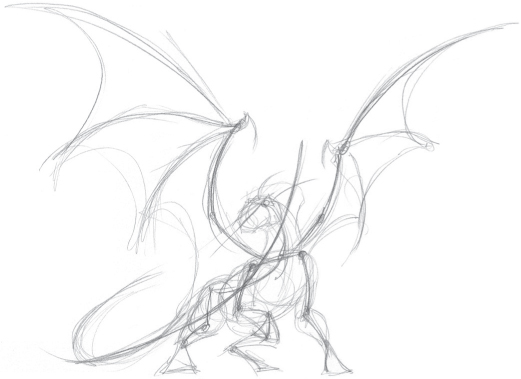
Step 3 Now I start building up specific muscle masses and adding a little more detail, still drawing very loose sketch lines with the HB pencil. At this stage, I start to flesh out the wings, adding more definition to the joints and sketching the wing membrane, making the edges curve between the “fingers” of the wing to suggest tension. Note how the wings join the body—they connect along the length of the back to the base of the tail, much like bat wings. This makes the wing surface appear greater.

Step 4 At this point, I erase any unneeded lines and emphasize those I want to keep. I use the HB pencil to start adding more details, such as the face, ears (including an earring), whiskers, horns, and claws. I switch to a slightly harder H pencil for the smaller details.
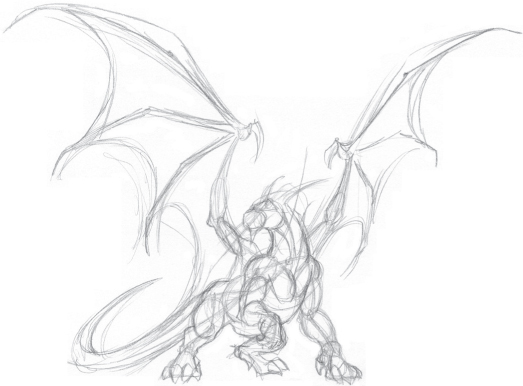
Step 5 This is the stage in the drawing process where I transfer my drawing from the sketch paper to a sheet of art paper (usually Bristol paper). I do this by tracing the image with the help of a light table and an HB pencil. This allows me to ignore all the lines I don’t want and make the lines I do want as clean and neat as possible. After my sketch is transferred, I use HB and H pencils to begin adding light tone to areas of the wings and body by layering soft strokes and some hatching—especially in the wings. I make the dragon’s lower belly and hind leg the darkest, as they are in shadow. I also add a few new details, such as the claws at the tips of the wing “fingers” and the spiky crest that extends from the back of the dragon’s head to the base of the tail. Then I lightly indicate areas where I want to place markings on the dragon’s legs, back, and tail.

Step 6 I am completely satisfied with my lines, so I continue using the HB pencil and a 2B to shade the wings, body, and face, using more pressure for the deepest shadows. I prefer to shade all over the drawing, building up from light to dark, rather than work on separate areas until they’re finished. I find that this results in a more unified drawing. Next I add the iris and pupil, and I shade the horns and crest. I also deepen the shading in the wings to suggest folds. I don’t want the wings to look too deeply creased, however, as this dragon’s wings are spread open. It’s helpful to study bat wings when adding form and volume to dragon wings.

Step 7 I’m on the home stretch now! With 3B and 4B pencils, I build up the shadows in layers, making the darkest areas even darker and adding more definition in the details, such as the facial features, horns, claws, and the markings on the body. I keep the shading on the end of the tail and the hind foot lighter and flatter, using atmospheric perspective—the tendency of receding objects to appear lighter and less detailed—to suggest distance.

Step 8 To finish the drawing, I emphasize the dark areas with a softer 6B pencil and blend some of the shadows by layering and building up more strokes with harder HB and B pencils. I use a kneaded eraser to lift out highlights in the folds of the wings, on the horns and claws, and within the dragon’s skin markings. When I’m satisfied with the range of values and areas of contrast, my dragon is ready to take flight.