There are many types of tools and materials available for an artist to use. On the other hand, sometimes walking into a large art supply store can result in sensory overload, and you’re left wondering if you really need all of the amazing things on the shelves. All of these tools have potential and can be a lot of fun, but let’s start with the basics. Experiment as much as you can to discover which tools work best for you.

Pencils Wood-cased drawing pencils are available in varying degrees of hardness, from very hard (9H) to very soft (9B); HB pencils are used for middle grades. The higher the number that accompanies the letter, the harder or softer the lead. (For example, a 4H is harder than a 2H, and a 4B is softer than a 2B.) You can buy woodless pencils, which also come in varying degrees and are great for covering large areas with tone or for making quick sketches. My favorite sketching tool is a mechanical pencil, which can be loaded with graphite leads of different sizes. I almost never heave home without my .5 mm and .7 mm HB mechanical pencils. Clutch pencils are similar to mechanical pencils but hold only one thicker 2 mm lead, which is ideal for broad strokes. Know that tones vary among manufacturers—one brand’s HB may look very different from another brand’s, so try to stick with one brand for consistency.

Paper Drawing paper comes in different sizes and textures. Some textures are better suited to certain materials than others: When working in graphite, a paper that has some texture (tooth) is preferable, because the graphite adheres better; when working with pen and ink, smoother paper is usually better. Experiment with different kinds of paper to see how your drawing materials react. Just make sure your paper is acid free, as this paper will last for a long time and won’t yellow with age.

Blending Tools These tools can be used to help blend the graphite on the page. Blending stumps (above left) are sticks of highly compressed paper pulp. Like pencils, they wear down as they are used, but you can restore a blunt point by carefully sanding the point with fine-grain sandpaper. Tortillons (above right) function much the same as blending stumps, but they are made of tightly rolled paper. For large areas, blend with a chamois cloth (above center). You can wrap the chamois around your finger for best results. Never use just your finger to blend as the natural oils in your skin can damage the paper.

Light Table A light table (also called a “light box”) is a great tool for transferring a messy sketch to good paper. Tape your sketch to the surface of the light table, cover the sketch with a clean sheet of drawing paper, and flip the switch—the fluorescent bulb illuminates your drawing and will help you accurately trace the lines of the sketch onto a nice sheet of drawing paper. You can get the same effect by taping your sketch and drawing paper to a bright window, but this will only work during the day.
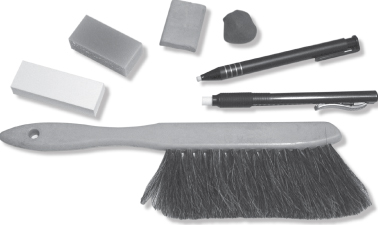
Erasers Erasers can be used to correct mistakes, create visual effects, and even draw! The white plastic eraser (above left) is smooth, simple, and more or less all-purpose. The next eraser, a gum eraser, is softer but has a tendency to crumble and leave a mess if used too roughly. The next two are kneaded erasers—these can be molded into different shapes and sizes, as shown. Instead of rubbing the eraser on the page as you would with a plastic or gum eraser, gently dab the kneaded eraser on the page to lift the graphite. The last two stick erasers are similar to clutch pencils in that they each hold a single white plastic eraser “stick.” The soft brush pictured here is useful for brushing away eraser crumbs. You can smear the graphite or damage the paper if you use your hand, and you might end up with a wet drawing if you try to blow away the crumbs.
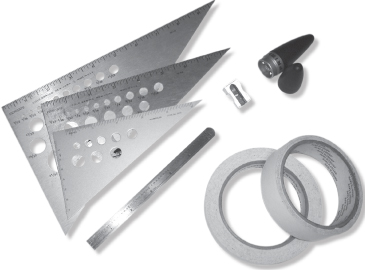
Other Tools Drawing isn’t just about pencils and erasers. I use artists’ triangles for measuring and drawing borders; I also like to keep a small ruler on hand for drawing straight lines in smaller areas. Pencil sharpeners are essential if you are using wood-cased or woodless pencils. You can purchase special sharpeners for mechanical leads. A traditional hand-held sharpener is pictured here, along with a sharpener that has a reservoir to catch pencil shavings. This particular sharpener also has a cap that keeps smaller pencil shavings and graphite dust from escaping and making a mess. You might also find it helpful to keep artist’s tape on hand for securing your drawings to a surface or creating clean borders and edges (see page 62). Artist’s tape is easy to peel off and won’t leave a sticky residue when you remove it like masking tape does.

Easel I don’t have the luxury of a large workspace. To make up for this, I have a small, adjustable tabletop easel. This particular easel has a drawer incorporated into the base, which is great for storing tools. My easel is about the size of a briefcase and has a carrying handle and wood brackets for holding paper in place.

Drawing Board I also have a drawing board, which I use as a drawing surface for my easel. You can use any smooth, hard, flat surface as a drawing board, but this store-bought one is my favorite because it fits nicely on the easel and accommodates the smaller size of paper I prefer to work with.