Usually portrayed as huge brutes with more brawn than brains, ogres have been terrorizing humans in folklore and fantasy for quite some time. They’re often depicted with a large head, abundant hair, bulging muscles, and a portly belly (probably full of human parts). Although ogres are thought of as large humanoids, there’s more to drawing one than enlarging a human and giving it a club. Read on to find out what you can do to make your ogre drawings truly terrifying!

Ogre-fying the Face Try giving your ogre a square, heavy jaw with fangs that protrude over the upper lip. Also try including pointy ears, tufted eyebrows, long facial hair, and angular cheekbones. When drawing the teeth, you may want to make the fangs curve upward and out to enhance the ferociousness. A little drool never hurts, either.

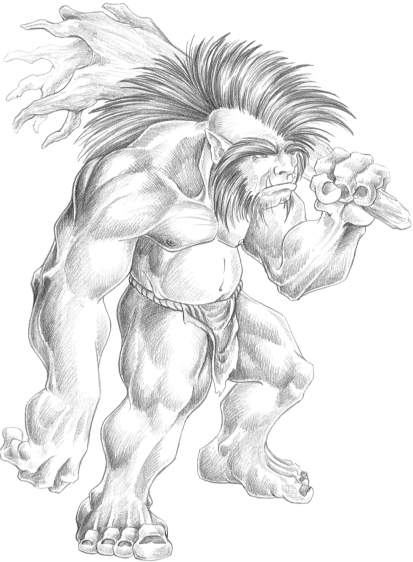
Step 1 I start with the usual line of action. Even though I plan for this ogre to be standing upright, the line of action curves slightly forward to show his stooped posture. When I sketch the figure, I keep in mind how much bigger the ogre’s proportions are than the average human’s, so I allow more room for the heaviness of the limbs. I want this character to hold a huge club, so I indicate its placement with a single line.

Step 2 Now I start to rough in the figure and the club with basic shapes. Note how much different the proportions are from those of an average human: The head is set low, the torso is quite short, and the arms are long and ape-like with enormous hands. The short, somewhat stubby legs help give the impression of considerable size and weight.

Step 3 Now I start adding details like the facial features, fingers, toes, and loincloth. I also add some details to the club, making it look like the ogre ripped a tree out of the ground to use as a weapon. Instead of giving him a full head of hair, I adorn his head with a row of stiff, spiked hair to make him look more savage. Then I define the muscles and pot belly.

Step 4 I refine the shapes, defining the muscles and adding details such as fingernails, toenails, shaggy facial hair that extends from the eyebrows to the cheeks, and scraggly hair all over the body. I also fill in the beady eyes underneath his heavy eyebrows and add tusklike teeth that jut out over his upper lip. Then I refine his mouth, turning it into a grumpy frown.
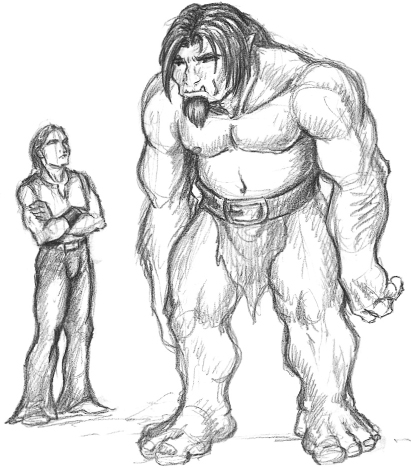
When looking at this drawing of a human next to an ogre, size is the most obvious difference. But take a look at the proportions—the human is about six heads tall but the ogre is only about four and a half heads tall, which makes him look incredibly stocky. Like a human, his elbows fall at the waist, but his long forearms and hunched-over stance place his hands near his knees, rather than at mid thigh. Overall, the basic parts of a human are all there, but they’re sized differently, which makes all the difference. Your ogres don’t need to follow these proportions exactly—use this as a starting place and experiment until you find a look that suits your own vision of an ogre.
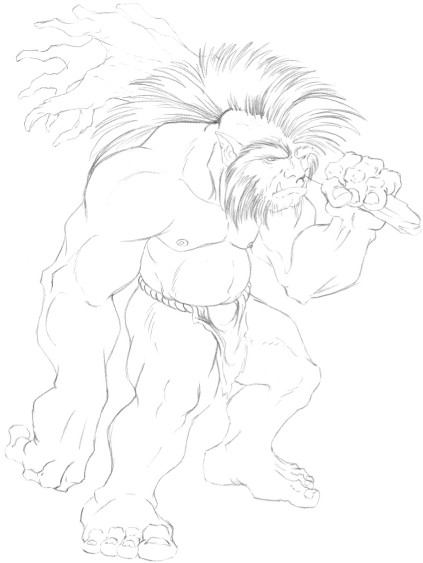
Step 5 When I’m happy with my drawing, I use a light table to transfer the lines onto a clean sheet of drawing paper. When transferring, I keep most of the outlines and details from my sketch, but I omit most of the body hair I added in the last step because I want to shade the entire body before adding the short, bristly hairs. I can reference my sketch later when it’s time to place the hair. Next I refine the face a little more and add detail to the twisted rope that’s holding up his tattered loincloth.
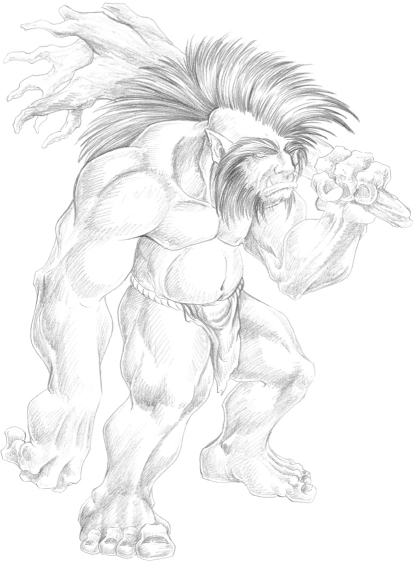
Step 6 With an HB pencil, I start establishing the basic shadow areas across the figure, including the club. I keep the shading on the club quite sketchy, making the strokes mostly parallel to the length of the club to suggest bark. Making the hair on the head and face the darkest areas helps keep the club and body separate.
Step 7 I use a 2B pencil to add darker shadows to the figure, blending these darker areas with the lighter shadows using an HB pencil. I use quite a bit of hatching and crosshatching on the figure, which makes the skin look a bit rough. I also use the 2B pencil to darken the hair even more, using strokes that follow the direction of the hair growth to make it look smooth and shiny. Still using the 2B pencil, I darken the pupils, fingernails, toenails, loincloth, and belt, increasing the contrast for visual interest.
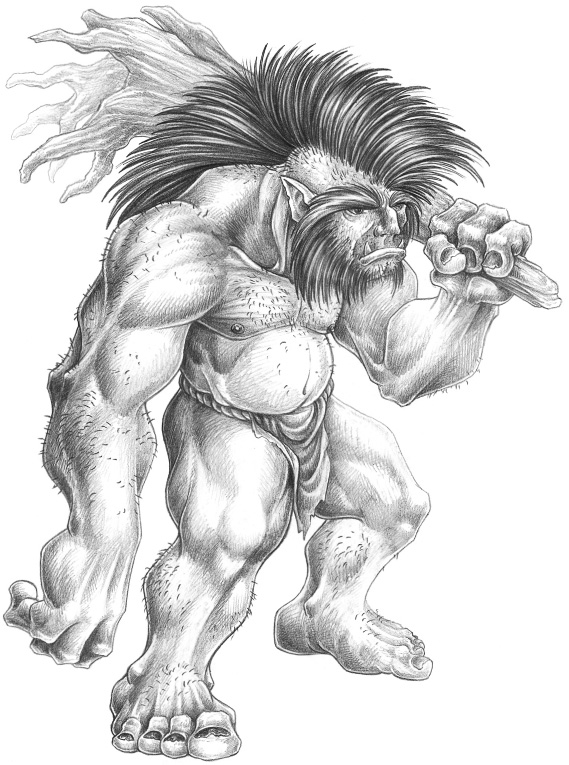
Step 8 To make the hair look really dark and black, I go over the strokes with a 4B pencil. Then I use the 2B and HB pencils to finish the club, using hatching and crosshatching around the roots to help the bark look rough. I lift out some tone on the farthest roots with a kneaded eraser to make them look more distant (must be a really big club!). I also erase some of the tone on the ogre’s left foot to push it back a bit more. After blending and smoothing the shading all over the body with HB and 2B pencils, I sharpen my 2B pencil and start adding the short, bristly hair on the chest, arms, shoulders, legs, and feet. I make his scalp a little more stubbly as well, and I add some bristles to the back of his neck. I sure wouldn’t want to run into this guy on a dark mountain trail, that’s for sure!