[A.11.1–A.11.4] At some point in every project, you must actually put your plan into action and subsequently manage the results of your implementation. As with the planning and design phases, it is always good to know the options and the various components of your deployment and ongoing administration before moving forward. Understanding all of the different pieces will help you avoid snags in your deployment—and, more importantly, to manage your user expectations better.
One of the fundamentals of effective ClearQuest usage involves managing your databases. Understanding the different types of databases used in ClearQuest and the nuances of working with each of the major database vendors will help you in your planning efforts.
There are three basic types of databases.
User database : While there is not really a separate user data-base—user data is stored in the schema repository and replicated in the production/test database—it is important to identify this piece as it does usually exist separately. It contains all of the users and groups with permissions and access rights for ClearQuest. You'll use the ClearQuest User Administration tool to manage this database.
Schema repository : This contains the schemas for the production databases; you manage it using the ClearQuest Designer tool. The database keeps versions of all of the schemas in use.
Production database : This contains the actual data for production use, including all of the items defined by the records in the schema repository. This database is populated and used by all ClearQuest users.
In addition to these databases, we also recommend with any deployment the use of test, user acceptance testing, and training databases, as required for your organization.
ClearQuest allows you to create collections, or groupings, of the three basic databases. Each grouping is referred to as a connection.
You create a connection by using the ClearQuest Maintenance Tool. In order to use ClearQuest, you must have at least one connection created. When you install ClearQuest for the first time, it will create a connection for you by default.
Of course, depending on your ClearQuest architecture and company needs, you can have more than one connection per ClearQuest install. Why would you need to create multiple connections? Well, for one, the connections can use different back-end databases to store the three databases defined earlier. Again, it all depends on what database vendors your company might be using at various sites; ClearQuest provides some flexibility in how you architect your solution.
[A.11.5] Let’s walk through the creation of a connection using the ClearQuest Maintenance Tool. First, open the ClearQuest Maintenance Tool. You will see the dialog box shown in Figure 11-1.

If you have not added connections beyond the default, you will see the one connection, as shown in the figure. If you've already added more than one connection, they should all show up here.
You can create two basic types of artifacts using this dialog: connections and schema repositories. (The latter includes connections.) Connections are basically references to a schema repository. If you create a connection using the Connection → Create menu item, ClearQuest will prompt you for a database in which to connect (Figure 11-2).

You must enter a valid schema repository for the connection. If you don't, you'll receive an error.
Creating a schema repository does a couple of things: It will create a new schema repository, and it will also connect the repository to a database and create a connection containing all of the necessary information. To do this, go to the menu item Schema Repository → Create, which will bring up the window shown in Figure 11-3.

This will result in a new schema repository database.
Now click the Next button and choose which code page you want to use. In most cases, the default settings should meet your needs. Click Next once again. A new dialog will appear (Figure 11-4).

The ClearQuest Wizard will set up a sample database and populate it with some data based on the schema that you choose. Of course, you don't have to create this database at this time. In fact, if you're planning to create your own schema, we suggest avoiding the step at this time. You can always create a sample database later by using Clear-Quest Designer. If you do decide to create the sample database now, ClearQuest will prompt you for the database information after you click the Next button.
In order to use the schemas to create production databases, you will need to create a user database. This database contains user and group information for all of the databases, including access and permissions settings.
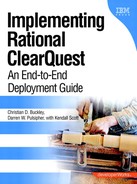
To create a user database, open the ClearQuest Designer tool. You will probably see the Open Schema dialog box. Just click Cancel. Now you can create a user database by using the Database → New Database menu item, which opens the window shown in Figure 11-5.
The logical database name is limited to five characters, so be creative.
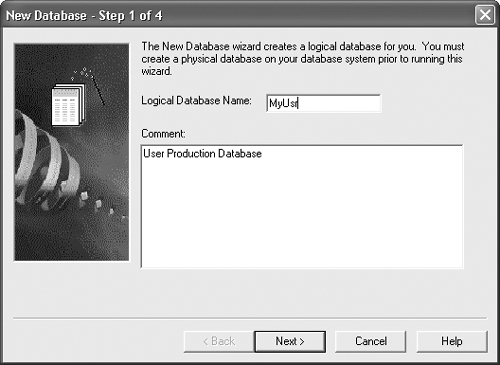
Now, click the Next button. ClearQuest will prompt you with database configuration options for each of the various vendors that it supports. In the example shown in Figure 11-6, we have selected MS_ACCESS for simplicity.
Because we're going to create a production database, not a test database, we selected the Production Database radio button.
Now click the Next button again. You will see timing information for the database. Just leave these at the default settings at this time. (See Creating New Schemas and Databases in Chapter 7 for a discussion of timing information.) Click the Next button again. The dialog shown in Figure 11-7 will appear.

Select the schema with which the user database will be associated. Remember: This should be the same as the schema you will use in production. In this case, we are going to choose the AcmeDefectTracking schema, so we'll select it and click the Finish button.
You now have a user database to which you can add users. Pat yourself on the back.
Redundancy is always a good rule of thumb. It's important to use the backup tools available with your chosen database. Many commercial databases have a backup scheme that is easy to use. Also, it is critical that you back up all of the ClearQuest databases at the same time. This includes the user, schema, and any working databases. If you don't, you run the risk of your databases getting out of sync, which will make ClearQuest unusable. So, you need to make sure that you establish—and stick to—some kind of backup procedure.
You need to decide how your users are going to access the ClearQuest client. You have basically two options: ClearQuest client or ClearQuest Web client.
The web client is a good option if you have individuals who travel a lot or are often remote and prefer to access your system through the web. If you don't think you will need the web interface now, think about the future growth and development of your team and projects; many organizations at least include the web interface in their planning, which allows them to provide some flexibility to their users later.
If you decide to go with the web client, you need to decide which web installation works best for your deployment. Four installation configurations are recommended by the ClearQuest manual for the web client: simple, extended, optimized, and hybrid. In all of these cases, you will need two components: the ClearQuest Web component and the ClearQuest Server component.
The simple configuration is the easiest to install and maintain. Most small to mid-size organizations stick with the simple configuration and typically use a Windows server as the single machine on which everything is installed. Figure 11-8 illustrates how this selection is configured.

The extended configuration, as shown in Figure 11-9, uses another computer to handle failover and load balancing.

This configuration works best for larger organizations where the installation is used heavily. It requires more setup and management, so before moving to this type of installation, make sure you understand the time and effort involved in maintaining this configuration.
The optimized configuration, as shown in Figure 11-10, involves each component running on its own machine.

This configuration is for very large organizations or organizations that have performance issues with the web client. Again, having more machines means more installation setup and maintenance.
The hybrid configuration involves using both UNIX and Windows in your configurations. The most likely combination is UNIX for the client and Windows for the servers.
Once you have chosen what configuration you want to use, you now need to figure out what web servers, databases, operating systems, and other tools you might integrate are supported by ClearQuest.
The best place to find this information is in the ClearQuest Web Installation guide.
We don’t include this information here because it can change too often to be practical, and you’re better served by getting the latest information on the IBM Rational website. Chapter 10 provides some links that you may find useful. Make sure that you have specifications for all of the required components and for both Windows and UNIX configurations, as necessary.
Now that you have confirmed the configuration and versioned components requirements, you can proceed with the following preinstallation steps.
Install a web browser . You need to have both JavaScript and plug-ins enabled on the browser.
Install ClearQuest Administration tools . This is part of the main ClearQuest installation.
Install ClearQuest MultiSite Administration tools . If you are working with a multisite installation, you must install this; if not, don't install this toolset.
Install database client software. If your selected database requires specific client software, then it must be installed so the ClearQuest server can access the database.
After the preinstalls are done, you can install ClearQuest Web from either the web or from CD. Remember that you will need to install the software as the administrator, and make sure you select the ClearQuest Web components. Follow the installation, as it will guide you through the setup process step-by-step.
There are several postinstallation steps; which ones you take depends on the platform and database type. However, the basic steps are the same for both UNIX and Windows. For details on these steps, see the ClearQuest Web Installation guide. In the meantime, prepare by doing the following.
If you are using a DB2 database, you must create a database alias on the ClearQuest Web and ClearQuest server machines.
You must set up a schema repository and user databases (see Chapter 7).
If you are going to support a language other than English, you need to set up the code pages for the ClearQuest installation.
You need to create a connection on the ClearQuest Server host to the databases. You can do this with the ClearQuest Maintenance Tool. (If you have everything on one machine, you can probably skip this step.)
If you are using multihost configuration, you must modify the jtl.properties files on the hosts where the ClearQuest Web application and ClearQuest servers are installed. For more information on modifying this, see the ClearQuest Web Interface manual.
After you have completed the installation of ClearQuest for the web, you should make sure that things are working. It is very easy to check the installation; simply type http:/<host>/cqweb (where <host> is the name of the host where you installed the ClearQuest Web application).
ClearQuest should prompt you to type in a user name and password. Use the ClearQuest user name and password. It will then prompt you for a database connection. Select the database connection that you set up in the previous steps. Next, the system will ask you to indicate the database with which to connect. Select any of the databases that have already been set up. Now you should have the complete Clear-Quest Web client in your browser, with the same general functionality in the web as in the native ClearQuest client.
One quick best practice for this stage: It's always a good idea, if you're using the ClearQuest Web client, for your users to validate all of your schemas. Using your test databases, validate the schema using both the ClearQuest Web server and the ClearQuest client applications. It never hurts to double-check.
Once you have set up your installation and defined all of your schemas, you can tell your boss that you now have plenty of time on your hands and can move to the next project. Not really. We can joke about this, and yet—unfortunately—far too often, this is exactly what happens at this stage.
One of the key elements missing in these deployments is good training. Without proper training, your newly minted ClearQuest deployment will never be properly embraced by your users, and it will not have full management support.
Your next comment to your boss should be that it's now time to train all of the users on how to navigate and use the tool. Of course, the boss's knee-jerk reaction will be to call IBM Rational and arrange for some training. However, you should really think through your training needs before making any decisions. First off, you don't want to waste your money on ClearQuest training for all of the users of your system. Why? It's your system, not IBM's. You designed the schema, you know the workflow, and you know how you want people to use it. Why would you hand that training over to a stranger?
There are plenty of training materials available on the web, but the most critical aspect of your training is not how to use the tool itself—the users will pick up on that quickly enough. The most critical part is to walk through the workflow and handoffs between teams.
Remember to keep the training focused on what you want the users to accomplish with the tool. If you don't want the users to create their own schemas and databases, then don’t teach them how to do those things. Instead, teach them how to use the records, actions, and states that you designed for them to use. Teach them how to use reports, how to create their own reports, and how to give you feedback on making ClearQuest better.
If you are using one of the standard schemas, the ClearQuest documentation is a good place to start developing your training materials. You also need to make sure that you include any other tools with which the users will be interacting during training. For example, if you are using the ClearQuest UCM integration, you should include some of the UCM concepts in your training.
Remember to tailor your training to the different types and levels of users. Some of your software engineers may want to jump quickly into the advanced topics; you should create a small training session for those power users. You may have some other developers who don't need such in-depth training; you can show them only the minimum necessary for them to report their bugs and enhancements.
Once you've decided on your best training approach, go back to your boss and let him or her know what your plans are and how you can save the company money on training. Illustrate how the entire software development team will be more productive if the effort is driven internally. Then ask for that 30 percent raise that you know you deserve. Good luck.
[A.11.6] In an ideal world, you start a new software development project with all of the change management tools we've talked about already in place. Rumor has it that one person out there has had this luxury—just once. Even when all the tools are in place at the beginning, however, there will inevitably be changes later. So keep your head in reality! Most deployments typically involve some kind of legacy defect-tracking system that the company has been using for 10 years, which may or may not have been developed by the CEO’s 16-year-old son. Whatever its origin, everyone has become accustomed to its many nuances and pitfalls, and countless scripts have been written to help the team move around the system.
Now you have designed and implemented a new state-of-the-art defect-tracking system, using ClearQuest with integrations into all of the latest and greatest tools. You have already sold management on moving to the new system, with promises of productivity increases of 40 percent over the next year. So how do you make this change happen without causing any major problems with current development? This is a difficult question to answer. You might consider a couple of approaches, each with its own pros and cons. We explore these approaches in the following subsections.
This approach involves putting a date on a calendar and telling everyone that the new system is going online on this date and that all of the old data will be available only in the old system—which will be shut down soon. Only new data can be entered into the system.
This approach can be used for groups that are starting new versions of their products and will no longer support old versions. This is good for new products or for groups working as skunk works. The downside is that you will be losing all of the historical data—unless you keep the old system available, port the data over to a reporting tool, or just make it available in database form. Of course, this can make users very frustrated if they are constantly moving back and forth between the two systems or have to dig up data on Access every time they need to reference something. The upside is you don't have to do as much work. You can just focus on the new implementation and let the old system die a miserable death.
A modification to the previous strategy involves including a stage or specific date in which data from the old system will be migrated to the new system. At that point, everyone will begin using the new system. The big question is: What data will you migrate?
Some will argue that all that's needed is to migrate just the open defects from the old system, with all of the historical data left on the old system. This is a valid approach, but you might as well go with the dual-system solution (see the next subsection), as people will still have to go back and forth between the two systems. So there is very little gain if you don't, at some planned point in time, cut off the old tool.
Migrating all of the data is the best option, but it can take a long time. So, you need to make a decision. Everyone wants all of the old historical data, but this is sometimes just not reasonable. Instead, put a date on the calendar and let everyone know that data will not be available on the old system after that time.
The downside of this option is that it takes lots of planning and coding from your perspective. You need to be able to migrate all of the data, plan around everyone's product releases, and try to keep management from being scared that everything is going to be accidentally erased.
To mitigate risk and allay some of the fears that are likely to be floating around, you can run your deployment in what people call "shadow mode." The best approach for shadow mode is to select a small group on which to try out the new system you've developed, preferably on a new project. This will help you work out any bugs or use model issues before you go live.
At the same time, you'll need to work on the migration script to move data from the old system to the new system. You should test this script several times to make sure that everything is working; this will give you some inkling of how long the complete migration will take. If your conversion is going to take longer than management is comfortable with, due to users not being able to access any data, then you’ll need to consider using a phased approach. Of course, if you can avoid a phased approach, you will be in better shape. Phased migration of data can be very problematic. It's better to make the time to switch everything at once.
Finally, stock up on plenty of soda and pizza because you will be spending some late nights and weekends making sure that everything is working properly.
We would prefer not to even mention this method, but it is often the reality of how organizations move forward with new tools. It shows that your company may not have bought into your vision for configuration management or your role as change agent. When you decide to not make waves and to design a system that will use the same interface the users are used to using (try saying that ten times quickly), opting to just replace the back end, you will run into problems and, ultimately, cause more work for yourself.
Maybe your current interface is sufficient and your company is just used to it, so why change things, right? With ClearQuest, you can make the forms look basically like anything you have now—except with more up-to-date technology and integrations on the back end. So, the status quo is a lame excuse for not improving your change management systems.
You may be thinking, "But the engineers have written all of these custom scripts to increase their productivity, and they don't want to change all of them." If you did a proper analysis, you will have already identified their use models and incorporated them into your design. If not, then you need to ask the engineers why they are still doing things the way you already determined was not efficient. Remember, your job is to help everyone do his or her work more effectively.
[A.11.7] The last reason to keep things the same is you are afraid of ruffling the CEO, whose teenage son, if you recall, wrote the original system. Well, this is a valid concern—of course, you don't want to offend your CEO. Well, actually, you do. Remember that you already received executive buy-in to do this project, so stand up for what you believe in. And make sure that you are actually improving things, not just acquiescing to please the ego of someone in upper management. Politics do play an important role in making changes, but if you do your homework and show how the new system will increase productivity—and how applying more bandages to the old system will continue to perpetuate the same ineffective mode of operation—you'll find that people will buy into and support the new deployment very quickly.