2. Applications
WE EACH HAVE our own definition of what an application is; my favorite is “a piece of software whose primary function is to communicate with a human.” Windows Presentation Foundation is fundamentally about presenting information to humans, so it shouldn’t be a surprise that I believe the right place to start digging into this enormous platform is at the application level.
WPF tries to walk a fine line with its application model, providing a set of flexible services for building applications without introducing such rigid rules that new solutions cannot be built. The model was to provide a set of integrated services that developers could take advantage of incrementally.
WPF applications consist of various pieces of user interface, resources, connections to services and data, and configuration information. In looking at the structure of an application, it is useful to understand the top-level building blocks of the user interface (windows, pages, and user controls), as well as the application-level services (navigation, resources, configuration, and hosting). We will cover all of these in this chapter.
Application Principles
When building WPF, we wanted to create a very light application model. We knew that the core platform should be as flexible as possible; however, we wanted to adhere to a few fundamental principles. We believed we should build a system that extended from lightweight Web applications up to full-blown desktop applications. Not only did we want this scalability, but we wanted to take the best features from Web- and desktop-style development and make them available regardless of the type of application being created.
Scalable Applications
One of the core principles of WPF was to offer scalability, making it possible for people to build a broad spectrum of application types—from lightweight applications that run in a browser, to applications that easily deploy to desktops, all the way to full-blown client applications that can install. So even though an Application object is created and eventually Run is called on that object, a simple WPF application can be written in a simple markup file.
Create a new file called HelloWorld.xaml, and put the following markup in it:

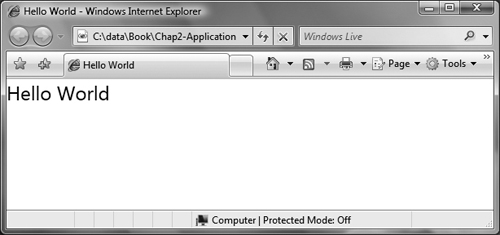
To run this application, we double-click the XAML file, and we see something like Figure 2.1. This very simple application is fairly limited; there is no code. We can create simple interaction using animation and data binding, but for real application logic we need to be able to put some code in the application.
Figure 2.1. A very simple application in a browser
To write some code to the page, we need to give the page a name in the CLR world, by adding the x:Class attribute. We can also add the x:Name attribute to TextBlock so that we can programmatically change it:

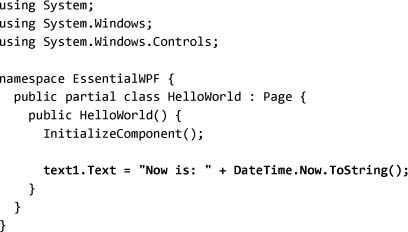
We can now write some code behind the page. Any .NET programming language can be used; in this case we’ll use C#. We’ll set the text to announce the current time:
Because we want to include code, we must compile the project. In any compiled project that we want to be executable (like our application), it is generally a good idea to include an application definition. To define our application, we will use the basic WPF Application object, and set StartupUri to be our XAML file:
![]()
The final step in converting from a markup-only application to an application with code is to compile the project. For this we need a project file to instruct MSBuild how to compile the project. Most of the content of the project file[1] is boilerplate code (and will actually be generated automatically by a tool like Visual Studio); however, we need to include our three files:

When we build the project, a file called HelloWorld.xbap will be created. Double-clicking the XBAP (XAML Browser Application) file, will result in something like Figure 2.2.
Figure 2.2. XAML Browser Application running in a browser

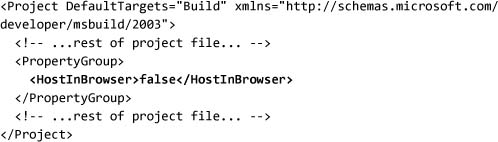
XBAPs allow a great deal more functionality than traditional HTML-based applications. They allow us to communicate with Web servers, access secure local storage, and leverage much of the power of the .NET Framework.[2] If a program needs more functionality than is available to browser applications, we can convert this program to a desktop application by changing the HostInBrowser attribute in the project file:
If we rebuild the project, we can now run HelloWorld.exe and we’ll see something like Figure 2.3.
Figure 2.3. Desktop application

This design principle of scalable applications has several interesting aspects. For one thing, the deployment mechanism is scalable. Markup applications are deployed by a simple HTTP request, browser applications are temporarily deployed[3] using a form of ClickOnce, and desktop applications can use ClickOnce or MSI (Microsoft Installer) installation.
In addition to scalable deployment, scalable applications have scalable hosting. The application user interface can be hosted in the browser or a desktop window. A close look at Figure 2.3 shows that, even in a desktop window, navigation is supported. This brings up another core principle of the application model: the integration of Web concepts into desktop applications.
Web Style
A big push for the application model in WPF was to integrate the best of desktop programming with the best of Web programming. We’ve already seen some examples of this integration: browser hosting and Web deployment. WPF’s application model goes deeper and has an integrated notion of navigation.
Whether an application is hosted in the browser or in a desktop window, we can easily add navigation. Building on the previous example, we can create a second page called second-page.xaml:

Using the Hyperlink control, we can add a link from the first page:

Running this program (Figure 2.4) reveals that, even in a desktop window, we get the full power of a navigation system.
Figure 2.4. Desktop navigation-based application

Notice that the URI for navigation was second-page.xaml. How was that URI determined? Web-style applications use URIs to reference any resources. In addition, Web-style applications have the the application root as a base; that is, relative URIs are relative to the application.
The WPF model for resource referencing borrows heavily from the Web style and takes it one step further, integrating compiled types (like the compiled version of the XAML files), loose resources (images on disk, Internet locations, etc.), and package resources (like resources embedded in an application).
For example, we can add an image to our second page and reference an image from an Internet site using a URI:

Running this code will show something like Figure 2.5, after the image is downloaded.
Figure 2.5. Referencing a resource from the Internet

Web-based applications are becoming a bigger and bigger part of programming. WPF embraces this model by offering many of the advantages of the Web model for building rich desktop applications. However, one of the core principles of WPF is to incorporate the best attributes of desktop programming as well.
Desktop Style
Most of the concepts of desktop programming—multiple windows, tool tips, Start menu integration, clipboard control, offline support, file system integration, and so on—are so ingrained in developers that they don’t even think about them.
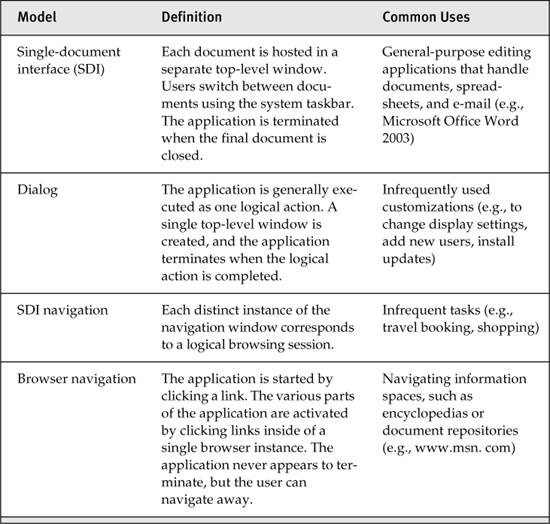
One of the most visible stylistic elements of any desktop application is its windowing model. User32-based applications can easily implement single-document interface (SDI), multiple-document interface (MDI), dialogs, and wizard models (Table 2.1). Microsoft Office Word 2003 provides an SDI model: Each document is opened in a separate top-level window, and when the final document is closed the application shuts down. Adobe Photoshop CS uses an MDI model: there is a single top-level window, and multiple child windows represent views on an open document. Photoshop is terminated when the top-level window is closed.
As the Internet has evolved, we have seen a new application platform emerge: the browser. Browser-based applications have really only one windowing model option: navigation. A few examples of Web-based applications have implemented dialog, SDI, or even MDI models; however, they have had to re-create many of the platform services normally associated with these models.
WPF strives to unify these windowing models, allowing developers to easily mix and match models and create new models. Given the flexibility offered by WPF, the key is to understand when a given windowing model is appropriate.
MDI was intentionally omitted from WPF’s windowing-model support. When WPF was started (late in 2000), there was a move away from MDI-based applications. Implementing MDI support is a lot of work, and the WPF team decided it wasn’t worth the investment, given the desire for new styles of applications (tabbed MDI as in Visual Studio 2005, navigation as in Internet Explorer, etc.). When the first preview of WPF was released in 2003, people started asking for MDI support, but at that point it was too late to integrate it into the product. There are two options for working around this problem: The first is to use the implementation of MDI offered by Windows Forms. The second is to write our own child window manager, which does not involve too much code but doesn’t always yield a completely functional window manager (it’s really easy to write 80 percent of the window manager, very hard to get to 100 percent). I would recommend using Windows Forms if your application needs MDI support.
Application authors do not have to limit themselves to a single model for their entire application. For example, an e-mail program might use browser or SDI navigation for browsing, but then switch to SDI for composing new messages. A shopping application might start as an SDI navigation application, letting a customer window-shop an online store; then at checkout time, a dialog might guide the customer through the final payment and shipping options.
These three principles—scalable applications, Web style, and desktop style—are integrated into most aspects of the application model. Now that we’ve reviewed the three core principles, we can start digging into some of the details that make it all work.
Application
The Application object is responsible for managing the lifetime of the application, tracking the visible windows, dispensing resources, and managing the global state of the application. A WPF application logically starts executing when the Run method is invoked on an instance of the Application object:

In our simple Hello World example, we can see the application object get created and start running. The call to Run is normally the last line of the entry-point function.[4] Run starts sending events and messages to components in the WPF application.[5] Run will exit until the application is shutting down. Only one Application object at a time may be running (in fact, once an application has started, no new ones can be created). Using the Application.Current static property, we can access the current application from anywhere in the program.
Definition
To encapsulate startup logic, most WPF applications create a subclass of Application:

One of the goals of WPF is to reduce the amount of boilerplate code that must be written. Another goal is to allow declarative programming wherever possible. When writing an application using WPF, we must always have a certain set of code in the Main function: setting the STAThread attribute, creating the Application object, and calling Run.
Rather than requiring this code to be rewritten for each application, WPF allows us to define the application in markup. Finally, we need to add two new files to the project file:
The build system takes this markup and generates the boilerplate code that we previously wrote. A snippet of the generated code is shown here:

Note that the generated code replaces the handwritten Main function with a generated Main.[6]
Lifetime
The last line of our Main function was a call to Application.Run. At some point that method must return, or the application will run forever. One of the primary roles of the Application object is to control the lifetime of the process. The construction of the Application object signals the start of the application, and the completion of the Run method marks the end of the application. Between these two is where everything happens in the application. All WPF applications follow the same general pattern:
Applicationobject is constructed.Runmethod is called.Application.Startupevent is raised.- User code constructs one or more
Windowobjects. Application.Shutdownmethod is called.Application.Exitevent is raised.Runmethod completes.
We can initialize the application in one of two ways: (1) from the constructor of the Application object, or (2) by handling the Startup event. The Startup event is generally preferred, because Application has completed its internal initialization at this point (e.g., Application.Current will be not be set inside of the constructor):

Eventually the Run method must return, and that happens only when Application.Shutdown is called. However, Shutdown can be made to work automatically, as we’ll learn in a few pages, when we talk about Window.
In the general pattern of an application lifetime, you may have noticed something missing. As the saying goes, into each lifetime a little rain must fall. Most developers will eventually see an error occur—because the code contains a bug, a user is doing something weird, or (gasp!) the underlying platform has a bug. For this reason, we should always include code to handle any errors that are likely crop up.
Error Handling
Dealing with errors and exceptions in an application is a rich enough topic to fill an entire book. Application authors need to figure out how to deal with errors when they occur, and understanding the philosophy that guided the design and building of WPF might provide help on this front.
WPF attempts to be hardened to any type of recoverable exception. That is a bit of a circular argument, since recoverable limits the types of exceptions to something we are hardened against! The issue here is that there are certain types of exceptions from which we cannot recover; StackOverflowException, OutOfMemoryException, and ThreadAbortException are the best examples.
A thread is aborted only when application code calls Thread.Abort, so if we don’t call Thread.Abort we won’t ever see ThreadAbortException. Stacks overflow most often when code is infinitely recursive, so StackOverflowException is also a bad bug. OutOfMemoryException is probably the most interesting of the gang. When the system runs low on memory—truly low—so few resources may be available that the CLR cannot allocate even a single byte more.[7] In such a case, no just-in-time code can be implemented, no variables can be boxed, and no objects can be allocated.
Except with these three special exceptions, in the WPF all code returns to a consistent state after an exception occurs. This means that developers can perform their own application recovery logic when an exception occurs, and can assume that the underlying platform is consistent.
When calling a method, it is simple to write exception-handling code. Using a try/catch/finally pattern, we can easily write code to handle any error condition. The problem is what happens when no one handles an exception—because either it happened asynchronously or it simply wasn’t caught. WPF’s default is that the application will fail if any asynchronous or uncaught exception occurs.
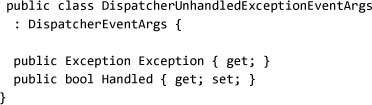
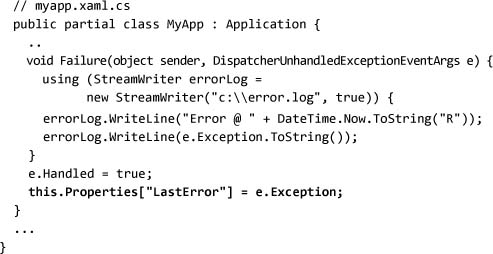
The Application object offers an event, DispatcherUnhandledException,[8] that corresponds to these circumstances. By listening to this event, an application can implement any policy for dealing with exceptions that bubble up to the application:

The dispatcher is the part of the system that sends events and messages to components. This event is raised when the dispatcher sees an exception bubble up. DispatcherUnhandledExceptionEventArgs contains the exception that occurred, as well as a Handled flag that can be set to true to indicate that the exception should be ignored and the application should continue to run:
Here we can implement a policy that any failure will be ignored but written out to a log, and request that the user submit the error to the system administrator:

By the time an exception has percolated up to the DispatcherUnhandledException event, an application author has few options; very little is known about the context of what happened (besides the exception object), and the operation can’t really be retried (unless an internal state identifies what was being attempted). Basically, the application can report the exception somehow, ignore it, fail, or perform a combination of these three options.
Error handling is a sometimes forgotten part of the application life cycle, but a critical part. During all phases of the life cycle, state will accumulate and need to be dealt with.
Managing State
State commonly spans top-level UI components; for example, we may want to track the current list of open documents in an application, or the current state of a network connection. The Application object is a convenient place to store state because it is available globally (through the Application.Current static property) for the entire lifetime of the application.
The simplest way to store state on the application is using the Properties property available on Application. Properties is typed as System.Collections.IDictionary, which allows us to store any object in it, keyed by any other object; the most common key type is a string.
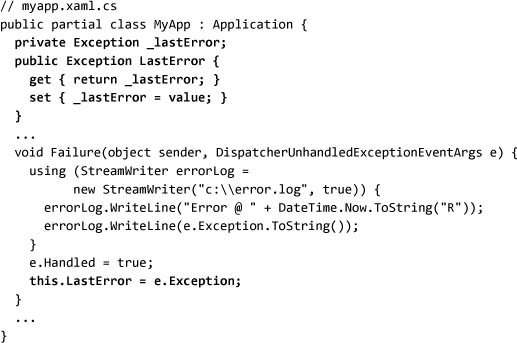
We can extend our error-handling example to cache the last error seen on the application:
Because Properties is a simple object/object dictionary, we need to continually cast the data we store there. Alternatively, we can define a property or field on the application Application object:
As we add more state to the application, some patterns will emerge. Is the state persistent across runs of the application? Is the state scoped per user? Is the state determined only at compile time (like an image)? Properties on the Application object will take us only so far; for many of these types of state, we need to leverage the available resources and configuration services.
Resources and Configuration
There are a dozen different ways to categorize application state, but I like to look at it as divided into three main categories: configuration, content, and document. .NET has support for all three of these models.
Configuration State
Configuration state consists of settings associated with a user or machine and can generally be modified by a user or administrator at runtime or deployment. The configuration runtime from .NET has been evolving since .NET 1.0, and we can look at how to integrate that into our WPF application.
For managing most of the persistent settings of an application, the System.Configuration APIs are the right thing to use. An in-depth review of the configuration system isn’t the right subject for this book, but understanding how to plumb configuration into an Application object is.
To start using the configuration system, we need to define the object model for our settings. We can do this either using the Visual Studio 2005 settings designer, or by authoring the class in any .NET language. Here we will define the object model in C#, which we will use to track the number of times we run the program:
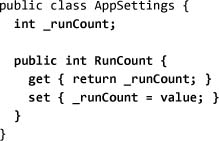
This initial code creates a property to track state information. To plug this into the configuration system, we need to derive our settings class from SettingsBase (or ApplicationSettingsBase) and provide some metadata about the property. Instead of using a local field to store the value, we must use the storage built into the SettingsBase type so that the system can track changes to the value:
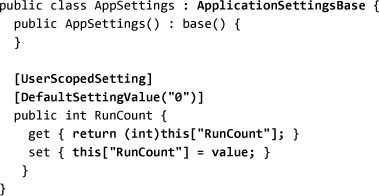
Settings can be either tailored to each user (user-scoped) or shared (application-scoped). In this case we made RunCount user-scoped by applying the UserScopedSetting attribute to the property.
Once we’ve defined the object model, we have two more things to do: set up the configuration file bindings and expose the settings through the Application object. The configuration file bindings provide the information to the configuration system about how to map from the configuration file to the object model that we just defined.
To set up the configuration file bindings, we need to register the AppSettings class with the configuration system by adding a section in the app.config file. The app.config file is a part of .NET that provides a common place for configuration information about an application. To include app.config in our project, we should add it as a None action (I know, very confusing):
![]()
The build system automatically converts app.config into <OurProgramName>.exe.config when we compile. The configuration file will look something like this after it is compiled:

At this point we can compile the application and use the new settings object. However, we like simpler access from within the application. To use the settings object, we only need to instantiate it. To expose it on the application object, we can create a public instance property:

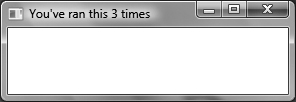
Running the application several times will produce a display similar to Figure 2.6. If we expose the settings directly from the Application object, any WPF object can easily access the settings. Calling the Settings.Save method from the Exit event makes the settings persist every time the application is exited. We can call Settings.Save at any time; applications like Microsoft OneNote persist settings while the application is running, ensuring that even if the application crashes, the state will be saved.
Figure 2.6. Running an application using configuration settings
Content State
Content state, also commonly called resources (links to images, media, documents, etc.), is determined at authoring time. WPF has a set of resource-loading APIs that allow us to access content associated with an application.
Using the configuration system, we are able to access state that persists and can be modified at runtime. For state that is determined at author time, such as images and user interface definitions, we use the resource system. In its simplest form, we can reference resources by using a fully qualified file path or HTTP URI (shown in Figure 2.7):

Figure 2.7. Images loaded using a fully qualified path or URI

This works great when we need to reference only things that we can guarantee are on the user’s machine or at a URL on the Web. In most cases we want to reference something either relative to the application or actually embedded in the application binary.
When adding an image (or other application resource) to an application, we have no shortage of options. Inside of the MSBuild project file[9] we can configure a resource[10] to be Content, Resource, or EmbeddedResource.[11] EmbeddedResource items are compiled into the .NET assembly as a manifest resource. Content is largely ignored by the build system, unless we set the CopyToOutputDirectory option to be either PreserveNewest or Always. When CopyToOutputDirectory is set, the resource is copied to the output directory mirroring the source structure. Resource items are embedded in the application as a named item inside of a generated resources file (Table 2.2).
Table 2.2. Types of Resources and How They Can Be Used

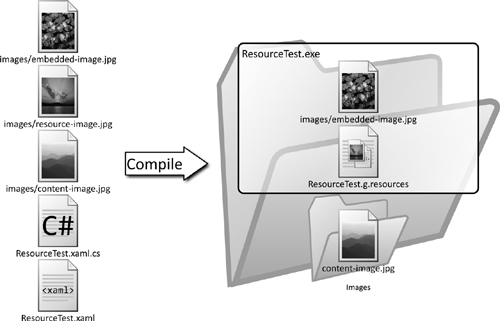
To understand this better, let’s look at an example. Suppose we have a simple project called ResourceTest that contains a program.cs file and three images: content-image.jpg, resource-image.jpg, and embedded-image.jpg:

Compiling this code using MSBuild will result in the following directory structure:

What happened here is that embedded-image.jpg was embedded[12] in ResourceTest.exe, resource-image.jpg was placed inside of an embedded resource called ResourceTest.g.resources, and content-image.jpg was copied as a loose file into the debug directory. For all of these scenarios the directory name, images, was preserved in the name. Figure 2.8 shows this structure.
Figure 2.8. Structure of an application with various types of resources
Now that we have followed this diversion down the road of resources, how would you use all of these resources inside of our WPF application?

For either a resource or copied content, we can simply refer to the resource from markup as a relative path. EmbeddedResource items are not accessible directly through markup. From within code, most WPF components natively support URI referencing:

All of these higher-level APIs eventually call into the Application resource APIs. Using a relative URI, we can access resources associated with the application:

The three APIs for accessing resources from the application map to three different logical stores:
GetContentStreammaps to resources that are known to the application manifest, which we specify using the MSBuildContentoption. These resources are loose files on the disk.GetResourceStreammaps to resources embedded inside of the executable, which we specify using the MSBuildResourceoption.GetRemoteStreammaps to any arbitrary content available on the site of origin for the application. The site of origin is the directory or Web server from which the application was started. Typically this is used for larger resources, or resources that are decoupled from the application itself.
Open Packaging Conventions
Content and resources both use an underlying mechanism called packages. To understand this better, you may want to look into the Open Packaging Conventions, or OPC. The COM world contained a notion of structure storage, exposed through a set of interfaces, of which IStorage and IStream are the most fundamental types. Through .NET 2.0 there was no successor to this technology. At its heart, structured storage enabled the consistent access of a structured file system. The structure storage interfaces could be implemented on top of any packaging model, the most popular of which was a binary file format commonly referred to as OLE compound files, which was Microsoft Office’s native file format.
.NET 3.0 contains the logical successor to structured storage and the OLE compound file format. In the same way that IStorage and IStream provided a set of interfaces that could be implemented on any packaging format, the System.IO.Packaging namespace defines a set of interfaces and types that can be used to access any packaging format. And in the same way that OLE compound files provided a reference implementation of structured storage, ZipPackage provides a reference implementation of an OPC package (using ZIP compression with XML metadata).
It is important to understand OPC only in that it provides an abstract way to access a structured file system, regardless of packaging model. All WPF resource references effectively become OPC part references.
The OPC model provides for three main concepts: package, parts, and relationships. A single package consists of multiple parts that have relationships with each other. The relationships are encoded in a specially named part. This entire model is well documented in the OPC specification, available from www.microsoft.com/whdc/xps/downloads.mspx.
In addition to resource loading, the Application object provides direct access to loading components defined in markup:
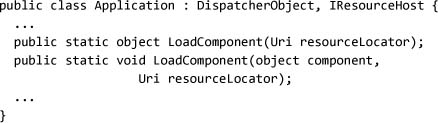
The two overloads of LoadComponent are used for loading and parsing XAML-authored components. The first overload uses GetResourceStream and loads the embedded XAML into an object. Probably the most common use of LoadComponent is to load a piece of user interface.
Any component authored in XAML has two names: a URI and a CLR-type name. When we instantiate a type defined with markup using new, the constructor for that type calls InitializeComponent, which in turn loads the XAML. Up to now InitializeComponent has been a little magical; let’s take a few seconds to peer under the covers at how this function actually works.
We will start with a basic UI definition of a button in a window that, when run, looks like Figure 2.9:

Figure 2.9. Simple display: a window with a button

What happens if we comment out InitializeComponent? Go ahead and try; I’ll wait.
An empty window is shown, right? The issue is that, inside of its implementation, InitializeComponent calls LoadComponent, which does the work of loading the XAML and generating the visuals. We can simulate the situation by calling LoadComponent ourselves:

InitializeComponent also defines member variables and hooks up events, so generally I wouldn’t recommend skipping calling it, but it’s good to understand what’s going on.
The other overload of LoadComponent is identical to calling new on the CLR type. The two overloads of LoadComponent are very different, so it is unfortunate that they have the same name. Both of the following lines will produce exactly the same result:

The two names for LoadTest—the URI and the CLR type—are clear here.
Document State
Document state is the set of data associated with a user document (like a Microsoft Word document or image file). Although .NET has some services for creating and manipulating documents, WPF provides no default framework for managing document state. This is something that application authors must integrate on their own.
Now that we’ve covered the basics of the Application object, we can start venturing into putting some pixels on the screen. At the top level of an application are three types of building blocks: windows, user controls, and pages.
Windows
User32 called it HWND, Microsoft Foundation Classes (MFC) called it CWnd, and Windows Forms called it Form. No matter what it’s called, most UI frameworks eventually want to create a top-level visual element that end users can manipulate. In WPF we call it Window.
The base type for all windows in WPF is System.Windows.Window. Window is generally used for SDI windows and dialogs. Window is really nothing more than a control designed for hosting top-level content in an application. Typically we define a window using a combination of markup and code:

Running this code will produce the boring window in Figure 2.10.

Note that even the life of a boring window like this has many phases, the most important of which are outlined here:
- Constructor is called.
Window.Initializedevent is raised.Window.Activatedevent is raised.[13]
Window.Loadedevent is raised.Window.ContentRenderedevent is raised.- User interacts with the window.
Window.Closingevent is raised.Window.Unloadedevent is raised.Window.Closedevent is raised.
Activated and Deactivated occur many times over the life of a window as the user switches between multiple windows running on the system. The ContentRendered event maps to the first time that the window is completely rendered. To make something happen immediately before anything is displayed to the user, we use Loaded; to make something happen immediately after something is displayed to the user, we use ContentRendered.
Probably the three most commonly used events are Loaded, Closing, and Closed. Loaded is generally where we initialize the default state of the window. Here we set the title of the window; running this code shows that the title of the window is always set before the window is visible:

The Closing event is raised before the window is actually closed. Because this event can be canceled, we can prevent the window from closing. Often this capability is used to implement features like user confirmation:

This window will close only if the user selects Yes when prompted by the message box on the screen.
Finally, the Closed event will fire only when the window is, in fact, closed (no longer visible to the user). I won’t show an example, however, because only rarely should this event be used. If we try to save the document that a user is editing in the Closed event, what happens if we can’t save the file? The window is already closed. It’s best to save all work in the Closing event, so that if there’s a problem it might be possible to stop the window from closing.
Displaying a Window
There are three primary methods for displaying a window: Show, ShowDialog, and the Visibility property. Calling Show and setting the Visibility property to Visible have exactly the same result: to display a window without mode.[14] People wanting to programmatically display a window expect a Show method, but for data binding and declarative programming people expect a property, so the WPF team provided both. Modeless windows are the best method for implementing the SDI windowing model.
We call ShowDialog to display the dialog modally. Modal dialogs allow us to implement the dialog windowing model:
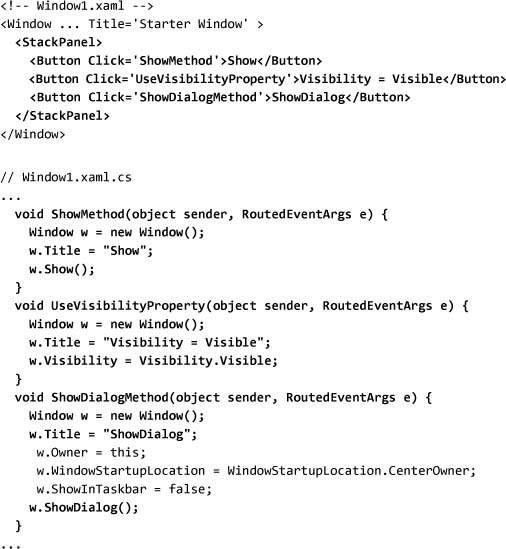
Clicking either of the first two buttons will yield the same result, including the ability to select the original window and create any number of windows. Clicking the third button will block the ability to select the original window (Figure 2.11). The purpose of modal dialogs is to prohibit users from selecting other windows, although this behavior is often frustrating for people using the software because users want to be in control of the application, not be controlled by the application! Generally we try to limit modal dialogs to only the things that absolutely must be modal. (Yes, I know this is circular reasoning.)
Figure 2.11. Showing a window using multiple methods

Besides these normal ways of displaying a window, we want to be able to create a window that floats in front of another window while still allowing the user to select the parent window. Generally this feature would be used for modeless dialogs or floating tool windows. We can implement such a floating window by using the Show method but setting the Owner property (Figure 2.12). Owned windows are always displayed in front of their owner; however, they don’t prevent the user from selecting the owner:
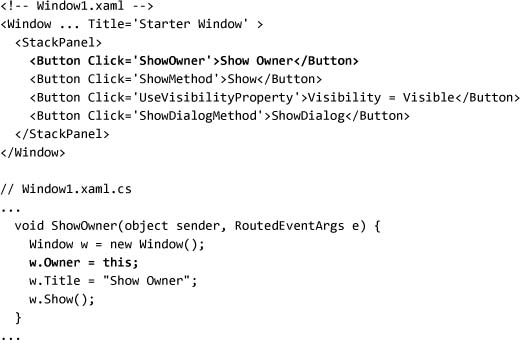
Figure 2.12. Showing a window with the Owner property

Owned windows have a couple other specific behaviors. They don’t appear in the Alt+Tab window list, although they can optionally appear in the taskbar. In addition, they are automatically closed when the owning window is closed, and hidden when the owner is minimized.
Sizing and Position
Now that we know how to display a window, let’s look at how to control where it is on the screen. There are three main types of control that we can exert on a window’s size and position: startup behavior, user interactivity, and current values.
Startup behavior can be divided into two parts: where will the window be placed, and how big will it be? To determine where it will be, we use the WindowStartupLocation property, combined with the Top and Left properties. To determine how big it will be, we use the SizeToContent property in combination with the Width and Height properties. SizeToContent works as long as Width and Height are set to Double.NaN (auto) and the user has not resized the window.
After the desired location and dimensions for the window have been determined, what can the user do with the window? User interactivity is dictated by the ResizeMode property, which determines whether the user is allowed to resize the window at all. In addition, we can use the MinWidth, MaxWidth, MinHeight, and MaxHeight properties to control the amount by which the user can resize the window. Using the constraints and size modes, we can create windows that provide boundaries. In the following example, the window cannot be made smaller than 500 pixels, so all the content will remain readable:

Finally, the current values of the window’s position and size can be accessed with the Width, Height, Top, and Left properties. We can update the size or position of the window (or query what the current size or position is) at any time using these properties. Window sizing is strongly related to layout, which we will cover in Chapter 4.
Users have different expectations about the behavior—sizing, startup location, and ownership—of different window styles. For example, a dialog is expected to be displayed with code something like this:

This code ensures that the dialog is centered on the owner, does not appear in the taskbar, and resizes automatically to fit the content.
Window and Application
Once we have a window (or windows) up and running, visible, positioned, and sized, we often want to find all the open windows. Most applications that allow multiple top-level windows (such as Microsoft Office Word 2003) provide a Window menu to navigate to the other open documents. One way to implement this feature is to create a global variable to which each window is added as it is shown and closed. The WPF team, however, chose to build this feature into the Application object, so in WPF the Application object is automatically notified whenever a window is created or closed.
Because the Application object is informed about all windows, it can automatically shut down when the last window is closed (or for other reasons). The call to Shutdown is often performed automatically in response to the value of the ShutdownMode property on the Application object. Table 2.3 lists the possible values.

We can also enumerate all the currently open windows using the Application.Windows property. To demonstrate, we can create a window with two buttons. The first button will create a new window; the second will display a list of all the open windows:

To make it obvious that we’re creating several windows, we will use a static variable and increment it so that each window has a different caption. In the NewWindowClicked event handler we can simply create a new window and show it:
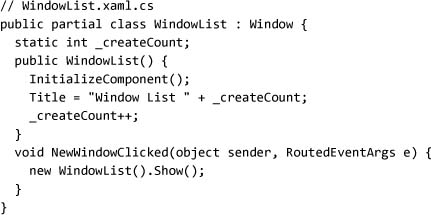
Finally, to implement the ListOpenWindows event handler, we can simply iterate through the windows collection on our Application object and build a string with all the titles. When we run this code, we end up with something like Figure 2.13:

Figure 2.13. Displaying the list of open windows
User Controls
In the previous section we learned how to create windows. An interesting aspect of defining windows is that they define an encapsulated set of functionality. Windows are also isolated, both because a new CLR type is defined and because a top-level window that is visually isolated is created. Often we want to break our UI definition down into smaller chunks that are encapsulated, but we don’t necessarily want each of these to be a new window. This is the role that user controls play.
There are two primary kinds of control developers: user controls and custom controls. The names are slightly arbitrary—they date back to Visual Basic 5.0, which introduced a simple way to build controls—but they are used to convey the two different scenarios. My definition is that user controls are used as a way of encapsulating parts of the UI, and custom controls are used as a way to build reusable controls for other applications to consume. The gray area between the two is the source of much debate.
Defining a user control is exactly like defining a new window, except that the base class can be any class. In reality, creating a window is like creating a user control. The typical base class for a user control is ContentControl:

Just as we do with windows, we can put logic in a code-behind file:

Now we can use the new control anywhere in an application, but first we must create an XML namespace for the application. Using the clr-namespace scheme, we can associate any CLR namespace with an XML namespace in XAML:

Voilà! Now we can use the user control in our window (Figure 2.14):

Figure 2.14. A window with two instances of a newly defined user control

What’s happening here is that the two custom tags <l:MyUserControl /> are referring to a component defined in MyUserControl.xaml (Figure 2.15). If we update the definition in MyUserControl.xaml, both uses will be updated.
Figure 2.15. Logical model of how referencing a user control works

User controls are designed to be used as a way of dividing an application into components. When we want to move into the realm of creating a complete custom control (defining a theme, supporting content, etc.), we should think about building a custom control. Building a custom control requires a deeper understanding of the control model in WPF, and that depth is beyond the scope of this book.
Looking back at this section, notice that creating a custom window is really just a special case of creating a user control. Another way of factoring an application into manageable chunks is to use pages, which are part of the WPF navigation framework.
Navigation and Pages
HTML is often credited with introducing navigation into applications, but lots of examples of navigation date much further back in history. Every wizard, gopher screen, or bulletin board system is an example of early navigation. HTML popularized the notion of navigation through a series of pages connected through hyperlinks. Because of the popularity of the Web, almost every user immediately understands how to use links to navigate through information or an application.
To make it easy to build applications that leverage this navigation model, WPF has a built-in navigation framework. The three basic concepts are navigation hosts (NavigationWindow), navigable content (Page), and the journal (Figure 2.16).[15] The journal is responsible for tracking the navigation actions for the application, but it is not a public class in the framework.
Figure 2.16. Logical model for navigation

NavigationWindow is the default host for navigation in WPF. NavigationWindow derives from Window and adds a default navigation UI (back button, etc.) and the necessary infrastructure to enable navigation. NavigationWindow has access to all the same application-level features as Window. Using NavigationWindow, we can implement the SDI navigation windowing model.
In WPF we can navigate to any content: data objects, primitive types like strings, or pages. Page is nothing more than a convenient class that has helper methods for making content easier to navigate.
Before we jump into a complete markup-based solution for navigation, let’s look at a simple example of navigation that uses only code, to make it clear how things fit together. To start, we will create a new window. Because we want to support navigation, we will derive this window from NavigationWindow instead of Window:
![]()
NavigationWindow is a navigation host, which means it can host navigable content. We can define a new piece of navigable content by deriving from Page. Creating a new page is just like defining a Window or user control:
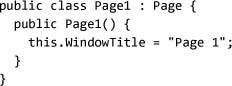
Now we need to tell NavigationWindow to display our first page (Page1):

Fabulous! We have a navigation host displaying some navigable content. However, it isn’t very interesting yet, because we don’t have the user navigating to anything. In fact, running this code as it stands produces a blank window. Let’s define a second page:

Then we can make the first page more interesting by adding some content, including a hyperlink:[16]
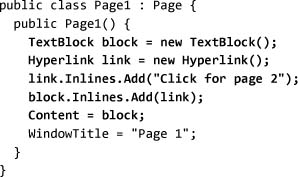
The final step is to handle the Click event on Hyperlink to navigate to the next page. The NavigationService object provides host-independent access to navigation operations. NavigationService will work for navigation regardless of whether the page is hosted in the browser or in NavigationWindow:

Running this code will produce something like Figure 2.17. Clicking the link should bring up the second page, which is blank except for the caption change in the window (Figure 2.18).
Figure 2.17. Initial navigation display

Figure 2.18. After navigating to page 2

All the basics of navigation are here now. We have a host, some content, a journal tracking everything, and even a basic UI for moving forward and back. Clicking the link enables the back button, which takes the user back to the previous page, after which the forward button becomes enabled.
All of this is provided by the journal. NavigationWindow provides the default navigation UI (back button, title bar, etc.) and automatically hooks up the journal.
If we convert this example to markup, it should look like possibly familiar HTML. We can leverage the fact that Hyperlink natively supports navigation to a URI-based component, which lets us replace all of the code we saw previously with this markup:

NavigationWindow’s Source property can be set to the URI-based name of the first page—Page1.xaml—to avoid having to create an instance of the type. Hyperlink’s NavigateUri property likewise can be set to the URI Page2.xaml, which is the URI-based name of the second page, so that no code has to be written to handle the Click event.
When we don’t want to customize the look of the basic navigation window, as is often the case, we can skip defining it altogether. Using the StartupUri property on Application, we can launch the page directly:

Passing State Between Pages
What we’ve accomplished so far is all fine and good when we have just one page or the second page doesn’t do anything, but once we start doing more, we need to be able to transfer data between pages. In HTML we transfer data typically by storing state on the server, or possibly using a cookie on the client. One simple option for transferring data in WPF is to leverage the Properties dictionary on Application.
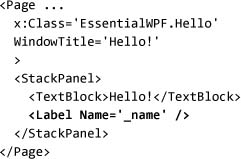
For this example, let’s write two pages: the first will accept a user’s name, and the second will greet that person. The first page will have a text box to accept user input and a hyperlink to navigate to the next page:

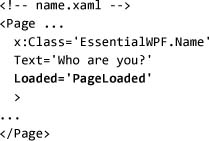
The second page will simply have a label that should display the name the user entered:
The first step is to copy the data out of the text box on the name page and push it into the application. Then we can update the navigation logic to use the property to store the necessary data. By hooking the RequestNavigate event, we can stuff the name into the application object right before the navigation occurs (Figure 2.19):
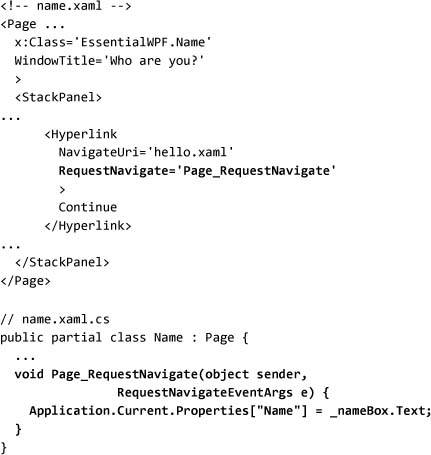
Figure 2.19. Entering data in name.xaml

On the second page we need to hook the Loaded event, grab the data from the application, and display it (Figure 2.20):
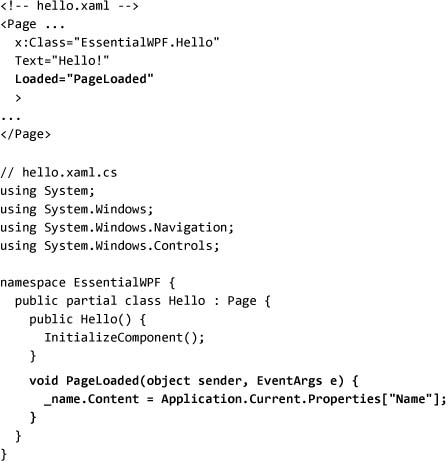
Figure 2.20. Consuming the data from name.xaml

This approach works great for simple scenarios, but in the end, using the Application object like this is really nothing more than using a global variable. My object-oriented spider sense tingles when I see code using global variables. Remember that we don’t always have to navigate via URI; instead we can create the second page programmatically and set properties just as we do for any other object. Thus we can keep the communication between the two pages isolated:

A promising option for passing state between pages is the navigationState argument on Navigate:
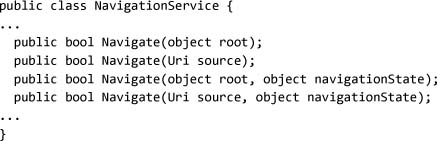
It’s a little tricky to get to, but we can capture the data by using the LoadCompleted event on NavigationService. First we can change the caller to put the extra data in the Navigate call:

In our “hello” page, we can listen to the LoadCompleted event. NavigationService for a page has a null value until the Loaded event is raised, so we must do the hookup for the LoadCompleted event[17] in the event handler for the Loaded event (I said it was slightly tricky):
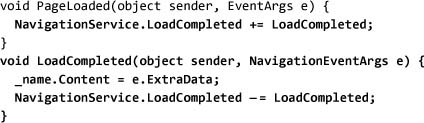
There are a lot of ways to hook up the LoadCompleted event, and they all have pros and cons. Using the Application object introduces some global state that can often be tricky to deal with in larger applications. Setting properties on pages removes the ability to declare navigation in XAML. Using the navigationState argument on Navigate has the same problem.
The method that I found works best for pages with parameters is to create a command for the navigation (because commands support parameters) and style a button (which supports commands) to look like a hyperlink.[18] It’s not particularly elegant, but it works.
Controlling Navigation
One problem with the previous example is that the user can navigate away without filling out the name field. When working with a Window object, to prevent the user from dismissing a dialog without completing the required fields, we can use the Closing event (or any other validation to determine if we want to close the window).
The equivalent functionality is found on NavigationService:

Using Navigating, we can cancel navigation in the same way that we cancel the closing of a window. Because there isn’t a simple event like Window.Closing on Page, we have to do a little bit of work. The reason is subtle, but important. When we add a listener to the Navigating event, we are putting a pointer to our object in NavigationService, which is part of the navigation host. If we don’t sever this link, the page will be kept in memory forever. This gets a bit more complicated because once the navigation is completed, we no longer have access to NavigationService, so we must cache it.
Let’s walk through the code for adding validation to our page. First we will hook the Loaded event on Page. Loaded will be raised every time a user navigates to the page:
Now, in Loaded we need to do two things: attach listeners to the correct events, and cache NavigationService:

We have hooked the Navigated event simply to do the needed unhooking of the events and clearing of our references to prevent the leak:

Finally we get to the Navigating event handler, where we can perform the actual validation:

This code will prevent navigation unless the name is filled in. If you try this out, try clicking the forward button in the navigation window after clicking back from the “hello” page. When you click back, the name is empty, at which point clicking forward on the navigation bar won’t work. Because we want the forward button to move to the page where you were, we shouldn’t do our validation. With a slight change, we can catch this case:

Controlling the Journal
We have navigation under control now; we can choose when to navigate and where to go. The next problem that application authors typically face with navigation applications is controlling the journal. Because the journal is the service responsible for tracking where a user has been, and for populating the back and forward buttons, there are many scenarios for how it should be controlled. Probably the two most common scenarios are shopping-cart applications (once the purchase has been completed, removing all the entries from the journal that were part of the purchase process to prevent people from accidentally resubmitting the same order) and login pages (once the user has logged in, having the back button return to the home page, not the login screen) (Figure 2.21).
Figure 2.21. The navigation flow that we want after the user has logged into our program

To see how to control the journal, let’s update the example from the previous section to include a home page:

Next we want to update our login page (name.xaml) to remove itself from the journal once it has succeeded in getting the user’s name. The entire API for working with the journal is on NavigationService:

Looking back at Figure 2.21, notice that we don’t want name.xaml to be put into the journal, because we want to make sure that the back button from the “hello” page goes back to the home page. To remove the entry, we simply call RemoveBackEntry after the navigation is completed:

In addition to controlling the journal, we may want to simply query the journal. The most common reason for wanting to do this is to put a custom back button on the page. This is a trivial task: the CanGoBack property is used to enable or disable the button, and the GoBack method is used to perform the operation.
Functional Navigation and Page Functions
Traditional navigation today is unstructured. It is much like programming in BASIC in the 1960s: arbitrary goto statements jumping between parts of an application, global variables tracking state, and line numbers needing to be fixed whenever something is changed. Today we call them hyperlinks, session states or cookies, and URIs, but the same problems are still there. Web sites are brittle, difficult to change in terms of flow, and hard to encapsulate functionality.
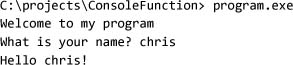
WPF introduces a new, more functional form of navigation, in which navigation is modeled much more like a function call. To understand what I mean by functional navigation, let’s walk through a simple example. Suppose we want to create a program that greets the user, asks the user’s name, and says hello. Figure 2.22 shows the rough flow of logic.
Figure 2.22. Logic flow of a console application

Implementing this as a standard console application is trivial. Obviously this is a simple example, but by encapsulating the functionality in methods, we could reuse it in later parts of the application:

Running this code produces a simple user experience:
The nice thing about the console application is that everything is synchronous. When we ask the user for a piece of information, we sit and wait for it. In a GUI application we could implement the same model using a series of modal dialogs, but that doesn’t fit in the context of a navigation application.
To translate this to a navigation model, we need to embrace asynchronicity. Navigating to a new page may take any amount of time, and we can’t block the application while we wait for the user to respond (remember, this is a single-threaded application, so if we block on the UI thread, the user won’t even be able type into a text box!).
To start, we can build our welcome page as a PageFunction object. Every instance of PageFunction has a return type; in this case we aren’t really returning anything from our welcome page, so we don’t care what type it is. We’ll use Object:
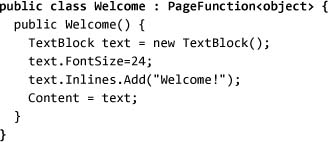
We will then need to create a UI to display to the user. The details of how to program the UI will be covered in Chapter 3.
PageFunction derives from Page, so anywhere that we can navigate to Page we can also navigate to PageFunction. To display our welcome page, we need to create a navigation window and navigate to it (Figure 2.23):
Figure 2.23. Our first page function: displaying “Welcome!”

In our original logic flow and the console program, the welcome was followed with a call to SayHello. Encapsulation of logic is one of the big benefits of functional programming, so we don’t want the welcome page to have any knowledge of how SayHello will be implemented. We need to do two things then: first, create the new PageFunction for SayHello; and second, put a link between Welcome and SayHello:
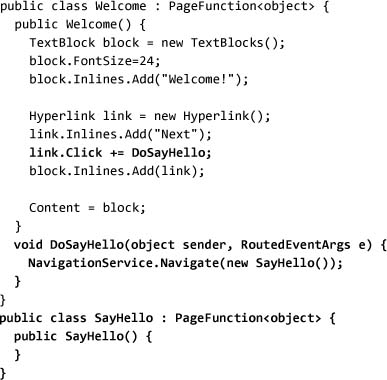
Our first method call is completed. So far, this is exactly the same model that we would expect for traditional navigation: In response to a click, we navigate to the next page. GetName is more interesting; it has a return parameter. We know that the first thing that SayHello needs to do is get the name from the user. However, we’ve already navigated to SayHello.
There are two important things to note about how to call PageFunction with a return value. First, because of the asynchronous nature of navigation, the completion of the function is modeled as an event. We attach a listener to the GetName.Return event to perform actions after the function is complete. Second, when we navigate to PageFunction, we are navigating away from the current object. That may seem obvious, but if you think about it, it means that SayHello must be unloaded for GetName to display. To make this simple to implement, we can use the KeepAlive property to keep the instance of SayHello alive in memory, so that when GetName is completed the exact same instance of SayHello will be activated. KeepAlive can be used for any page.
Figure 2.24 illustrates this navigation flow. The Welcome object is created, and then we navigate to SayHello. At this point the Welcome object is destroyed. When we navigate to SayHello, the first thing it does is navigate to GetName, but because KeepAlive is set to true, the instance of SayHello is kept in the journal (not just the URI, which is what the journal normally keeps). When GetName returns, SayHello is displayed again.
Figure 2.24. Flow of navigation with page functions

To implement this navigation flow in code, we will update SayHello to call GetName. The call to NavigationService.Navigate must be made after the object is initialized; during the constructor call there is no NavigationService:
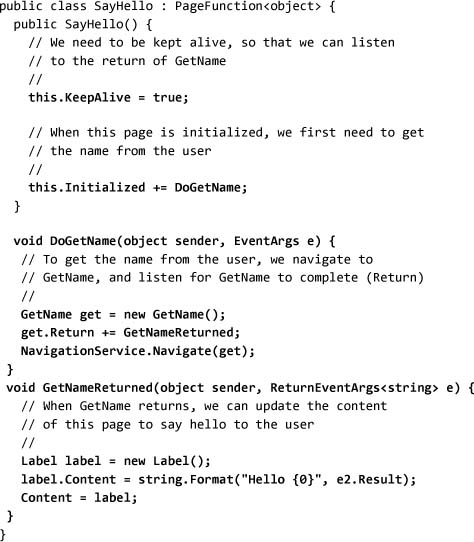
Finally, we need to implement GetName. Since GetName returns a string, we will define it as PageFunction<string>. We will add a label to prompt the user, a text box for the user to enter a name, and finally a button to click to finish. If we call OnReturn, the page function framework will automatically raise the Return event and navigate back to the caller of this function:
Note that, in the implementation of GetName, there is no mention of SayHello. GetName is just like a function in any programming language, it can be called from any number of pages, and it will always return to the correct page.
Page functions are by far the biggest navigation innovation that WPF introduces. Once we have shifted to thinking about method calls as navigation and we are returning results as events, we can begin to approach building navigation-based applications using many of the same models as in writing object-oriented code. Sometimes simple page links are adequate, but for many programming tasks, using a function-oriented model for navigation is far more productive.
Hosting Applications in a Browser
When people think about navigation, typically they think of an application hosted inside of the Web browser, such as www.msn.com. WPF applications support running either in a stand-alone window or inside the browser. XAML Browser Applications (XBAPs) allow us to run an application inside the browser frame; they have no permanent presence on the user’s machine, and they normally run in a .NET-enforced partial-trust sandbox.
There is no cut-and-dried answer to the question of when it’s preferable to write an XBAP instead of creating a standard application. First there’s the issue of the user model. Browser applications tend to be a lighter experience for the user (the user navigates to and away from them, instead of launching a separate application), and they tend to be more integrated into the user’s workflow (the user decides when to navigate to and away from an application). Traditional applications generally have a more modal feeling (the user is either running the application or not) and tend to put the application more in control (an explicit exit action is typically required from the user).
In addition to the user model question is the question of whether the application can function properly with the restrictions of running in a browser. Browser applications cannot put icons in the start menu, install file extension handlers, or in any other way leave a permanent mark on the user’s machine. In addition, they normally run in a partial-trust environment, where only a subset of the functionality of .NET Framework is available.[19] For example, when running in an XBAP, we can’t use the latest Web service protocols provided by the Windows Communication Foundation, but rather are limited to the Web service support offering in .NET 2.0.
As a general recommendation, users prefer browser-based applications for applications they use occasionally, and stand-alone applications for applications they use every day. Luckily, it is relatively easy to switch between the two, so you can try both.
HelloBrowser
An application that is hosted in a browser must have at least one page, must have Application.StartupUri set, and must have the HostInBrowser property set in the project file. One of the restrictions of partial trust is that new windows cannot be created and displayed; all visuals must be displayed in pages:

If only it were this easy, but that’s not the case. Unfortunately, we must sign the application manifest[20] to create a browser-hosted application; I hope this limitation will be removed in the future (we don’t have to sign HTML and JavaScript files, after all!). If you happen to be using Visual Studio, it is relatively straightforward to create a test signature:

Once we set the manifest to be signed, we can compile the application. Now a new output file will be created with the extension XBAP. Figure 2.25 (on page 106) shows all the files.
Figure 2.25. Compiling an XBAP application: inputs and outputs

The XBAP file is an XML file containing deployment information, exactly the same as the deployment manifest[21] used for desktop applications.
The two most important pieces of information here are the deployment and assemblyIdentity tags:

The deployment tag specifies that the application will not be installed, which prevents the creation of a start menu icon for the application or entries in add/remove programs. The only evidence left on a machine that a user navigated to a Web browser application will be the entry in the browser’s history, any cookies sent down from a Web server, files in the user’s temporary Internet files directory, and possibly some data in the CLR’s isolated store—all of which are automatically purged from the machine periodically, using the same OS features as Web sites use.
The assemblyIdentity tag tells the system where the implementation of the program is—something important for actually running it!
The most common way that a Web browser application is launched is that a user clicks a link. In this case, let’s create a small HTML page with a link to the XBAP file. We will put it in the same directory as the XBAP file:
![]()
Navigating the browser to this HTML file will display a standard HTML view (Figure 2.26 on page 107).
Figure 2.26. Internet Explorer displaying an HTML page

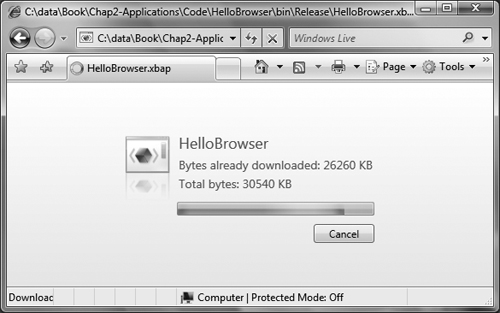
When the user clicks the link, the browser navigates to the XBAP, which causes the application to run inside of the browser. Depending on whether the application is already cached, the downloading page may be visible (Figure 2.27).
Figure 2.27. Internet Explorer displaying the download dialog[22] for a XAML Browser Application
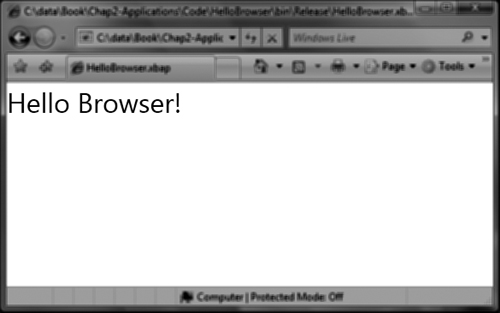
Once the application is downloaded, you should see the UI in Figure 2.28. The goal is a seamless user experience with no additional windows being created, dialogs being displayed, or any other interruption to the flow.
Figure 2.28. Internet Explorer displaying a XAML Browser Application

Under the Covers
WPF hosts applications by implementing an ActiveX DocObject (or OLE DocObject, depending on when you learned about this stuff). Any application that supports hosting DocObjects can host WPF applications. When the .NET Framework 3.0 runtime is installed, a mime handler is registered for the XBAP extension, which loads up WPF. WPF runs all browser-hosted applications out of process, using a host application called PresentationHost.
From a high-level view, the rendering is split between two applications: Internet Explorer and PresentationHost.[23] All of the Internet Explorer UI (address bar, toolbar, title, etc.) is rendered in the iexplore.exe process. Those UI elements are controlled by IE and can be customized only using the existing COM-based interfaces (IHtmlWindow, etc.).
Figure 2.29 shows the UI provided by WPF. When running inside the browser, a special top-level window, called the root browser window, is created to host the pages navigated to. Remember that, when we talked about creating a browser-hosted application, we said that we must set Application.StartupUri to point to a page; that’s because the navigation framework will automatically create this special navigation window and navigate it to the specified page.
Figure 2.29. Browser hosting: PresentationHost view
When an application is hosted in older browsers, a second row of navigation buttons is sometimes present. If the browser doesn’t support the new navigation APIs, the root browser window will automatically display a navigation UI.
Any WPF content viewed in the browser uses this same underlying mechanism. Several different types of content can be viewed in this way: XBAPs, XML Paper Specification (XPS) documents, and just plain XAML text files.
Loose Markup
In addition to compiling an application into an XBAP to run in the browser, we can take loose XAML files and view them in the browser. We are restricted to using the same set of elements that would be allowed in an XBAP, and we cannot have code behind. For publishing small documents or simple navigation-based content, however, we can use this technique to produce a very simple no-compile development model.
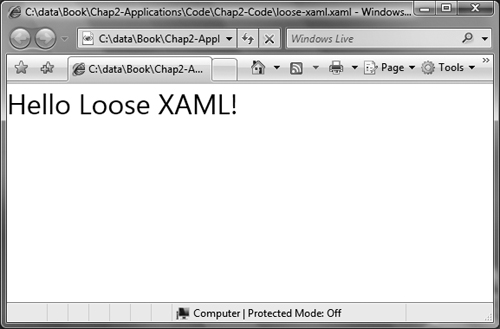
Because loose XAML doesn’t support code behind, we cannot use the x:Class tag that we had in our page for the XBAP, but otherwise we can just take the same page and save it as a XAML file, double-click on it, and see it appear in the browser (Figure 2.30):

Figure 2.30. Loose XAML hosted in the browser
Where Are We?
In this chapter we’ve looked at the center object of an application—the Application object—and the main components that make up an application: windows, pages, and user controls. Using Windows, we can implement a variety of windowing models, and by leveraging pages and the navigation framework, we can easily build applications that support traditional or functional navigation. Managing state throughout any type of application is made easier with the services provided by the WPF application model. WPF attempts to have a lightweight application model that is flexible enough to build most types of applications, while still offering enough services to make it easy to build them.