Chapter 2. Performance, Versions, Security, and Deployment
As Access developers, we love creating elegant user interfaces and solving tough problems with ingenious code. But the evil Borgs who manage people like us know that most of the work goes into an Access application after it’s written. The most effort and the biggest headaches arise during the unglamorous tasks of deployment and maintenance.
In this chapter we’ll delve into the good, the bad, and the ugly of deploying a finished Access application. To start with, we’ll look at how to diagnose and fix various performance issues. We’ll show you how to avoid the embarrassment of having your beautifully crafted user interface become unusable because it can’t handle a measly 10,000 records, and where to look for performance bottle-necks. Next, we’ll step you through the delicacies of coping with multiple versions of Access. Then, since most projects require some form of security, we’ll guide you through the stupefying maze of Access security—and give you the lowdown on just how (in)secure it really is. Finally, we’ll show you how to move a multiuser application onto a network without the corruption that dogs so many projects, discuss best network practices and how to avoid the tedium of manual DSN setup on every user’s machine, and maybe make replication a little less scary.
PERFORMANCE
Database Bloat from Images or OLE Objects
THE ANNOYANCE: We have a tiny employees database, and I thought it would be handy to store our ID photos with the rest of the employee data. These are small JPGs, no bigger than 100 KB each, and I only added five of them—but my database has gone from 400 KB to about 24 MB! What the heck happened?
THE FIX: Access provides an OLE data type that accepts objects such as pictures, sound files, spreadsheets, or Word documents, so you can do the kind of thing you tried to do. Don’t do it. Even tiny objects will cause your database to bloat like a dead hog on a Texas highway. That’s because Access is storing not only the object, but all the rendering (display) information, too. Rendering information can easily be larger than the object itself (see MSKB 123151 for more information).
Instead of storing pictures in your tables, link to them using the image control, which knows how to display them when the time comes. You’ll find the image control in the standard toolbox. After you place it on your form or report, it’ll prompt you for the location of the picture file to be displayed.

This solution is fine for simple applications, but it doesn’t let you store and manage the picture locations as data within your database, which is often what you really want to do. If your image collection grows or moves, you don’t want the file paths hardcoded in a control somewhere. Instead, set up the image control, then clear the Picture property, which is found on the Format tab of the image control’s properties sheet. Next, add a dab of VB code to the Current event of your form that lets it read the picture location from a table (as in Figure 2-1), and set the image control to display it. The code might look like this:
	Me![myImageControl].Picture = "fullPathToImageFile"
	Me![myImageControl].Visible = True
	Me.PaintPalette = Me![myImageControl].ObjectPalette
You may want to store your images with file paths relative to the location of your MDB file, which makes it easy to move the MDB and images without changing the code or data in your tables. The trick is constructing the full path for each image in your VB code, using the CurrentProject.Path property to look up where the MDB is currently stored.
For example, if your images were stored in an “images” folder in the same directory as your MDB, and you stored only the filenames in your database, you’d replace "fullPathToImageFile" in the previously shown code with this: CurrentProject.Path & "images" & strNextFile. In a real application, you’d probably want to add code to hide the image control if the picture doesn’t exist, and so on. (Check out the code in the Current event of the Employees form in the sample Northwind database that comes with Access.) If you’re doing a lot of work with images, you might consider using a commercial image control such as DBPix ($99; http://www.ammara.com). Also check out the web sites of Access MVPs Stephen Lebans (http://www.lebans.com) and Larry Linson (http://members.tripod.com/accdevel/imaging.htm) for more information and various approaches to working with images in Access.
To display non-image objects—such as Word docs, PDFs, Excel files, and so on—the best approach is actually to not display them within Access at all. Instead, use VB’s
Shell function to open the appropriate application for that file. For instance, here’s a one-liner that you could put in the Click event of a button that will send a PDF file to Adobe Acrobat:
Shell "FullPathToAcrobatReader FullPathToPDFFile", vbNormalFocus
Why Is My Database So Slow?
THE ANNOYANCE: My database is running slower…and slower…and slower. There are only 10,000 records in the database. Is that more than Access can handle?
THE FIX: In the database world, 10,000 records is a drop in a teacup. We’ll give you some tricks for improving Access performance, but first, let’s check the basics. We’ll assume that you’re up-to-date on basic system maintenance (defragging your hard drive, installing sufficient RAM, and so on) and that you’ve been through the “Installation Checklist” section in the Appendix. Having your service packs up to date can make a big difference. Finally, we’ll assume that you’ve manually set up the appropriate indexes for your tables (see “Speed Up Slow Queries” in Chapter 4).
Note
If you’re running a split database, also see the next Annoyance, “Why Is My Split Database So Slow?”
The Jet database engine upon which Access is built can easily handle tables with 10,000+ records, as long as the database is well designed. But of course, it’s all a question of what you’re trying to do with those records. If you want your application to perform well even as the amount of data grows, you must minimize data transfer by loading (or otherwise processing) only the records that are actually needed.
The following presents some useful tweaks to help you avoid the worst bottlenecks.
Note
Access Help also includes an extensive list of useful tips in an article entitled “Improve Performance of an Access Database.” You can find it by doing an Answer Wizard search on “optimize performance.”
Name AutoCorrect and Subdatasheet Name
If you haven’t already turned off Name AutoCorrect, do so (see “Access’s Bad Defaults” in Chapter 1 for details). Similarly, by default all your tables have their Subdatasheet Name properties set to “Auto,” which can cause performance problems. Set it to “None.” If you want to adjust this setting on all your tables at once, try the code in MSKB 261000.
Queries
If
SELECT queries are running slowly, make sure that you’re indexing the criteria and sort fields. In other words, any fields in your query that have criteria in the Criteria line, or have their Sort lines set, can benefit from being indexed (see Figure 2-2).

If
UPDATE queries are bogging down, make sure you’re not indexing any unnecessary fields. (Go to Tools → Options, click the Tables/Queries tab, and clear the AutoIndex field.) See “Speed Up Slow Queries” in Chapter 4 for more information about indexes.
In a
UNION query, use
UNION ALL instead of UNION; UNION checks for and eliminates duplicate rows, which takes time.
Finally, it is much faster to sort on fields rather than expressions. For example, use ORDER BY LastName, FirstName instead of ORDER BY LastName & ", " & FirstName.
Reports
As with queries, index the fields on which you sort or group, and avoid sorting and grouping on expressions. (To see if you are, open the report in Design View and go to View → Sorting and Grouping.) Avoid domain aggregate functions (such as
DLookup)—instead, add the tables or queries you need directly to the report’s underlying query.
Subreports (reports that are nested inside another report and linked on a specific field) can drastically slow down opening and printing a report. That’s because a subreport gets opened anew every time it is called. You must either optimize your subreports or eliminate them. To optimize subreports, index the fields by which they’re linked to the main report (see the link fields on the Data tab of the report’s subcontrol). Also, base them on queries rather than tables, and don’t include unnecessary fields in the queries; your table might have 25 fields, but if you need only 3 for the report, create a query that just has those 3 fields. If the subreport is still too slow, you may be able to eliminate it by pulling its data into your main report.
Finally, filter the main report to reduce the number of pages that must be printed or viewed at any one time. You’ll speed up performance if you restrict your report to a narrower date range, a particular company, or some other relevant variable.
Forms
Forms, subforms, combo boxes, and list boxes—anything with a recordset or row source—will “scale” poorly—(that is, performance will degrade more and more as the amount of data grows) if bound directly to a table or query. For instance, if you set up a form to display all the Zip Codes in the U.S., by default Access loads the entire set of records at the outset. (And if your form has controls such as combo and list boxes, the data may actually load several times every time the form is opened.) To avoid this glut of record loading, follow these guidelines:
- Limit recordsets.
Your forms will hop through recordsets of arbitrary size if they only load one record at a time. For example, you can open the form with a single record displayed, and then allow users to select other records to display using a combo box (see “Find Records Faster” in Chapter 5). Simply set the form’s Record Source property to an SQL statement such as this:
	Select * From tblCustomers Where CustomerID = DLast("CustomerID",
	"tblCustomers");
Alternatively, you can display a form that opens to a new (i.e., blank) record using an SQL statement such as the following, which returns no records:
Select * From tblCustomers Where False;
Place code in the Change event for the combo box to set the RecordSource property and show the selected record. Here’s the standard way to do that, using the example of a customers form that has a combo box to select the customer:
	Private Sub cboCustomer_Change()
	    If Not IsNull(Me![cboCustomer]) Then
	       Me.RecordSource = "SELECT * FROM tblCustomers WHERE " & _
	                          "customerId = " & Me![cboCustomer]
	    End If
	End Sub
This fix prevents your form from loading more than one record at a time. If the combo box you use for selecting records is still too slow, see “Speed Up Slow Combo Boxes” in Chapter 5.
This fix assumes that you’re comfortable constructing the appropriate SQL statement for your form’s Record Source. If you’re not, you can accomplish the same thing by referencing saved queries as your form’s Record Source. For example, create a query based on the customers table, and save it as qryCustomersEmpty. Then add * to the Field line of the query, and add
customerIdas a second field, with its Criteria line set to “False.” This query returns no records and can be used as your form’s preset Record Source. (To link it to the form, put the name of the query into your form’s Record Source property, on the Data tab of the form’s properties sheet.) Save a second version of the query as qryCustomerLookup, and in customerId’s Criteria line, putForms!frmCustomers!cboCustomer. This query will use the combo box value to find a single record in the customers table. Then use the following code in the combo box’s Change event to set the form’s record source to the query:Private Sub cboCustomer_Change() Me.RecordSource = "qryCustomerLookup" End Sub
- Load records on demand.
If a complex form has multiple subforms (or other controls) bound to large recordsets, chances are a user won’t need all of these controls at the same time. If so, place the controls on distinct pages of a tab control, and leave the record source unset until the user clicks that page. For example, here’s how you might set subform record sources for the second and third pages of a tab:
	Private Sub tabMain_Change()
	    If tabMain = 1 Then
	    'Second page
	       Me!sctlOrders.Form.RecordSource = "SELECT * " & _
	                "from tblOrders WHERE customerId = " & _
	                                      Me!cboCustomer
	    ElseIf tabMain = 2 Then
	    'Third page
	       Me!sctlSuppliers.Form.RecordSource = "SELECT * " _
	                                    "FROM tblSuppliers"
	    End If
	End Sub
Note that we skip the first page of the tab control, since it is visible immediately. Note that we don’t use the Click event of each tab page, because those events don’t fire when you click a tab; they fire when you click inside the page itself. Instead, we use the tab control’s Change event. To determine which page was clicked, we test the value of the tab control, which gives the page number. Pages are numbered sequentially from 0, so the second page has a value of 1.
- Hide, don’t close.
Once a form is loaded, never close it. Instead, simply hide the form. First, disable the standard close buttons. In the form’s properties sheet, click the Format tab and set Close Button and Control Box to “No.” Now add your own “Close” button to the form, and in its Click event, make your form invisible, like this:
	Forms!frmCustomers.Visible = False
	Forms!frmMyMainMenu.Visible = True
Now instead of closing, the form just hides itself. When the user tries to reopen it, the form will automatically make itself visible again. You’ll probably want to include the second line, as shown, which opens whatever switchboard or menu form you set.
A related trick is to open the most frequently used forms in hidden mode when the database itself is opened. Do this in two steps. First, open a single form at startup by going to Tools → Startup and selecting the form you want in the “Display Form/Page” box. Next, go to that form’s Open event and open the other forms, like so:
DoCmd.OpenForm "frmCustomers", , , , , acHidden
Both of these tricks will speed up performance, since users won’t have to wait for the forms to load when they “open” them. However, having lots of hidden forms open will rapidly use up RAM on your users’ machines, so you may want to employ these techniques sparingly.
Functions
Domain aggregate functions such as
DLookup, DSum, and so on are generally slower than the corresponding queries, which use the highly optimized Jet database engine. Domain functions simply perform calculations on sets of records (from tables or queries), and you can generally do the same calculations using a totals query. For example, if you’re using
DAvg in an expression in a query, instead you can create a separate totals query using the Avg function, add it to your first query (just like adding a table), and use the result. (For a complete list of these functions, see Table A-7 in the Appendix.)
Why Is My Split Database So Slow?
THE ANNOYANCE: We recently split our database and put the backend on a fast server. We have a moderate number of users and only 50,000 records, but it takes forever to do anything—open a form, find a record, and so on. This system is almost useless!
THE FIX: First, see the previous Annoyance for basic ways to optimize any Access database. In this fix, we’ll look at a few tricks that are specific to speeding up split databases on networks. In general, remember that there are three places to look for performance bottlenecks: the client, the network, and the server. If any one of these is not running optimally, everything drags.
Maintain a Persistent Connection to the Backend
Locking problems on the LDB file can cause significant connection delays. To avoid these delays, your frontend should be set up to maintain a connection whenever it is open. An easy way to do this is to create a simple form (frmStayAlive) bound to any small table with a few records in the backend. You’ll open this form at startup, hide it, and keep it open at all times. Put code such as the following in the On Open event of your startup form (or switchboard):
DoCmd.OpenForm "frmStayAlive", acNormal, , , , acHidden
This simple fix can make a big difference.
Make the Backend Easy to Get To
Use a short name for your backend, and place it on the root of a network share, rather than burying it deep in nested folders. Yes, this can make a difference.
XP Home Is Way Slow
THE ANNOYANCE: I recently deployed our database on some new Win XP Home Edition PCs, and the performance is much worse than on XP Pro systems. What’s going on?
THE FIX: Home Edition allows only workgroup (i.e., peer-to-peer) networking, rather than NT domain networking, so it supports far fewer open connections to your server. It’s not an Access problem, but Access does work better with more open connections. Of course, you should try all the performance optimizations discussed in this section, but in this case the most important fix is to update these PCs to XP Professional. The same applies to PCs running other flavors of Windows that only support workgroups, such as Windows 9x and Windows Me.
Access with SQL Server Is Still Slow
THE ANNOYANCE: We recently migrated an Access database with about 200,000 records to SQL Server, but we’re still using Access as our frontend. We expected to see a dramatic performance improvement, but if anything, the darn thing is running slower! What are we doing wrong?
THE FIX: Part of the problem may be your expectations. Moving up to an enterprise DBMS enables much stronger data protection, more concurrent users, fewer corruption problems, and the ability to scale to very large data sets. But with this relatively modest amount of data, SQL Server isn’t necessarily going to be faster than Access’s Jet engine. If it’s slower, the first thing to check is whether you’re maintaining a persistent connection (see “Why Is My Split Database So Slow?,” earlier in this chapter).
If your standard Access queries to the server are running slowly, try replacing them with pass-through queries. These queries are designed to be passed through to the server, rather than being processed in Access. When you use a standard query in a client/server setting, Access does try to pass the query to the server to be executed there. But in some situations (for instance, if you use native Access functions, or Access SQL that the SQL database can’t translate), Access can’t pass along the query. Instead, it must request the raw data from the server and process the query on the client PC. This works fine, but it’s usually far more efficient to have the server process the query.
To create a pass-through query in Access, start with a blank query grid and choose Query → SQL Specific → Pass-Through. Access will open a big, blank window for the SQL code you want to pass to the server (see Figure 2-3). Just enter the SQL code, save the query, and give it a name.

When constructing a pass-through query, remember to use SQL syntax appropriate for your server, rather than Access SQL. If you don’t know SQL, you can use the Query Designer GUI to create the query. Once your query is working, convert it to a pass-through query by invoking the same Pass-Through menu sequence as above. By default, the Query Designer generates Access SQL, which may differ from the SQL used by your server. For better results, go to Tools → Options → Tables/Queries, and check the “This database” box under “SQL Server Compatible Syntax (ANSI 92).” This gives you a more portable flavor of the SQL language. Note: you can’t convert a query that uses parameters; you’ll have to handle parameters in code.
Once you’ve created the pass-through query, you must tell it how to connect to your server. Open its properties sheet (View → Properties), and set the ODBC connection string using the builder. The builder lets you choose a DSN, but a DSN-less connection string will also work. Set the Return Records property to “Yes” for select queries and to “No” for all others. (Some developers prefer to handle edits, updates, deletes, and inserts by calling stored procedures on the server; pass-through queries can do this, too.) You’ll run the query like any other—double-click it or click on the Datasheet View.
Pass-through queries have two limitations:
They are never updatable (see the sidebar “Updatable Queries” in Chapter 4), so you cannot use them as the record source for a form that is used to edit data. Instead, use a linked table or a standard query that minimizes the number of records returned (see “Why Is My Database So Slow?,” earlier in this chapter).
Access will not allow a pass-through query to be used as the record source for a subform (or subreport) that uses the Linked Child and Linked Master fields. Instead, either use a standard query, or don’t use the linking fields.
VERSIONS, UPGRADES, AND CONVERSION
Access Works on One PC but Not Another
THE ANNOYANCE: The Access 2000 database I’ve been running for years on my Windows 98 PC craps out on my Windows XP Pro PC. It’s a simple application—a couple of macros and a few buttons on forms. Sometimes the buttons work fine, but other times the program crashes.
THE FIX: First, make sure your version of Access is compatible with XP (see the next Annoyance, “Access/Windows Compatibility Issues”). XP and Access 2000 are indeed supposedly compatible, but in many cases problems arise anyhow. Why?
Assuming that bad karma is not the problem (you never know), the most likely cause is that something (software, hardware, installed patch files) is different on the two machines. But what? With Microsoft’s elegant installation process, there are only a few thousand possibilities. That’s why we created the “Installation Checklist” in the Appendix—run through it to ensure that the problematic machine is up to date in all respects. If you’re running Access on a network, check your machine’s Network Interface Card (NIC) and connection as well (see “Best Practices for Access on Networks,” later in this chapter).
Access/Windows Compatibility Issues
THE ANNOYANCE: My boss wants me to install Access 2000 on our new Windows XP machines. Will this work? Why does Microsoft make it so hard to find out about compatibility?
THE FIX: What, you haven’t upgraded to the latest version of everything? (Doing so would spare you this grief and fatten Microsoft’s wallet—a win/win for everyone, no?) Well, you are right about one thing: Microsoft doesn’t make it easy to find out about version compatibility. Table 2-1 shows what we were able to dig up. The general rule is that it’s fine to run older versions of Access on newer versions of Windows, but don’t do the opposite.
|
Access version |
Compatible Windows versions |
|
Access 2003 |
Microsoft Windows 2000 with Service Pack 3 (SP3), Microsoft Windows XP |
|
Access 2002 (Access XP) |
Microsoft Windows NT 4.0 with Service Pack 6.0a (SP6a), Microsoft Windows XP, Microsoft Windows Millennium Edition (Me), Microsoft Windows 98 |
|
Access 2000 |
Microsoft Windows NT Workstation version 4.0, Service Pack 3 or later, Microsoft Windows 95 |
|
Access 97 |
Microsoft Windows NT Version 3.51 with Service Pack 5 (SP5), Microsoft Windows 95 |
Converting Old Databases
THE ANNOYANCE: We’re upgrading to Office 2003, but we have a lot of ancient databases running in equally ancient versions of Access. Do we have to convert all these old databases? It would be a nightmare!
THE FIX: Unfortunately, “legacy” databases put you between a rock and a hard place. Yes, conversion can be a pain. But if you don’t convert, you enter the pity trail of supporting the multiple versions of Office necessary to run those older versions of Access, which can break even the most hardened system administrator.
While it’s true that developers often run multiple versions of Access, this is not a good idea for end users. Best practice is to keep your users’ desktops up to date and convert their frontends as needed.
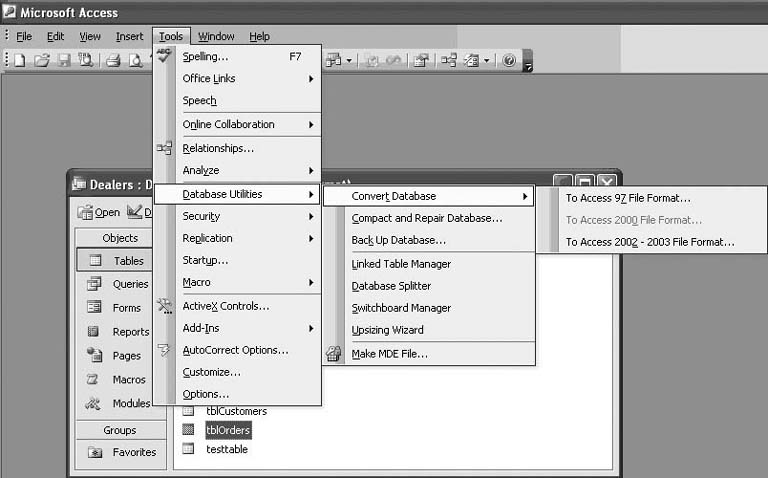
To convert an old database, here’s what to do. From your most recent version of Access, choose Tools → Database Utilities → Convert Database, and choose the file format you want to convert to (see Figure 2-4). If the version you want is not listed, that version is not compatible—it may just be too old. If the version you want is grayed out, you’re running that version right now. Access will then prompt you for a new name for the database.
Access’s conversion tool will get you most of the way. The main gotcha arises because more recent versions of Access default to using the ADO code library, while older versions used DAO. If you have any custom VB code, this can cause some variable declarations to become ambiguous. (See “DAO Versus ADO” in Chapter 0 for more information.) Microsoft has white papers to help with the conversion process:
For Access 97, see MSKB 151193.
For Access 2000, see MSKB 237313.
For Access 2002, see MSKB 319400.
In Access 2002 and later, there is a conversion errors table that you should check after each conversion; see MSKB 283849 for more information.
Running the Same Database in Multiple Versions of Access
THE ANNOYANCE: I have five users running five different versions of Access. I know this isn’t ideal, but I don’t want to upgrade all of them to the latest version.
THE FIX: They don’t have to upgrade, but if they don’t, they can’t take advantage of Access’s latest features, such as PivotCharts and PivotTables (both introduced in Access 2002).
If you need to support multiple versions of Access, split the database. (This recommendation is a no-brainer any time you’re in a multi-user environment; sharing an unsplit MDB across a network is a sure recipe for corruption.) The key to making this work is that the backend—the part that contains your tables—must be in the oldest format that you want to support. That’s because everybody uses the same backend, and you can’t open an MDB file created in a format more recent than your version of Access. So, if even one user is running Access 2000, your backend must be in Access 2000 format (or older).
The frontends—the queries, forms, and reports that run on each PC—must be compatible with whatever version of Access is installed on the PC, but they don’t all have to be the same version. Thus, the latest forms, reports, and such can be made available to those people running the latest version of Access, while those with older versions of Access can run the older frontends. The downside is that you’ll have to create and manage multiple versions of the frontend, which is a chore.
Running Different Versions of Access on the Same PC
THE ANNOYANCE: I recently upgraded to Office 2002. I want to keep Access 97 on my system because I have to support users who still run Office 97, but the new Office installation seems to have clobbered the old one, and now Access 97 won’t even start.
THE FIX: Given the compatibility issues between different Office versions, you’d think that Microsoft would acknowledge the need to keep older versions of Access around—and they do, sort of. The official stance is that running multiple versions of Access on the same machine is “not recommended,” but they tell you how to do it anyway (see MSKB 241141). Many people run three or four different versions of Access on the same machine (under the latest version of Office, of course). It works fine; you just need to know how to do it.
If your installation of Office 2002 clobbered Access 97, it’s probably because you accepted the default install directory. You must specify alternate directories for different versions. Uninstall both versions of Office and Access and start over.
If you’re starting from scratch, install the oldest version first and work forward to the newest. If you already have, say, Access 2002 on your system and you want to install Access 97, you can do so, but watch out for the Access 97 license bug (see “No Access License” in Chapter 1).
When installing additional versions of Access, pay attention during the install process. First, specify a different install directory. Second, you must tell the installer not to remove older versions. Depending on your Office version, you’ll see some variant of a Removing Previous Versions dialog. Select the “Keep these programs” option.
Running the Right Version of Access
THE ANNOYANCE: I mostly work in Access 2002, but I keep Access 97 on my computer because occasionally I develop reports for users who still run this older version. But after I’ve worked with an Access 97 MDB, the next time I try to open an Access 2002 MDB (by double-clicking it) Access 97 starts up, can’t recognize the newer format, and chokes.
THE FIX: By default, whatever version of Access ran last is the one that will be launched the next time you double-click an MDB or MDE file. This can be annoying, but fortunately there are easy workarounds. The simplest is to create a shortcut for each MDB file that specifies the full path to its appropriate executable. Create the shortcut, right-click it, select Properties, click the Shortcut tab, and in the Target field enter something like this:
	"C:Program FilesMicrosoft OfficeOffice10MSACCESS.EXE" "C:Projects
	Contactscontacts.mdb"
Your “Start in” field can be the same folder as the one in which your MDB file is located.
This technique works fine as long as you don’t have tons of MDB files, or their names don’t change frequently. If you do (or they do), you can turn to a helper utility that automatically checks the MDB version and opens the correct version of Access: check out Ezy Access Launcher (free; http://www.aadconsulting.com/addins.html) or AccVer ($15; http://www.aylott.com.au/accver.htm).
If you don’t want to install third-party software, use different file extensions for different versions of Access. (There’s no law forcing MDB files to use an .mdb suffix.) For instance, you could name Access 97 MDB files with an .a97 extension, Access 2000 files with an .a2000 extension, and so on. Then go to Windows Explorer, select one of these files, select Tools → Folder Options, click the File Types tab, click the New button, type in your new extension, and map it to the appropriate version of MSACCESS.EXE. Repeat for each type of file.
This Upgrade Is Killing Me!
THE ANNOYANCE: I recently upgraded to Access 2002, and now my database is broken. It worked fine in Access 97. What gives?
THE FIX: An upgrade should make your life easier, not harder. (Microsoft, are you listening?) So why does this one break your stable application? You may be running into a bug in the newer version of Access. As always, apply the usual safeguards (see the “Installation Checklist” section in the Appendix).
Also, make sure that references to VB code libraries haven’t gone missing (see “Missing References” in Chapter 1). Open the VB Editor, then click Tools → References (see Figure 2-5). In Access 2000 and later versions, only the ActiveX Data Objects (ADO) library is included by default. If your code relies on DAO, you must add that reference by hand. Just check the box next to the latest version of the Microsoft DAO object library in the References dialog.

Still having problems? You could be running into a compatibility problem between your old code and the new version of Access. The conversion from Access 97 to later versions causes the most problems, because of the switch from DAO to ADO. For example, every recordset must be declared as either a DAO.Recordset or ADODB.Recordset type—otherwise, your new version of Access won’t know which one you want it to use. To avoid stumbling over errors at runtime (when the code is interpreted line by line), compile your code so you can track down and fix all the problems in one sitting. Open the VB Editor, and choose Debug → Compile databasename. Then work through the error messages one at a time. Typically, you’ll need to add a reference to DAO and then change your Dim statements to make sure that your objects don’t have the same names in both ADO and DAO.
Tip
Why should you compile your Visual Basic code? Visual Basic normally runs as an interpreted language, meaning that the code you write is translated into machine instructions on the fly, at runtime. As a result, bugs won’t show up until a form (or some other object) calls the code. To avoid having your users stumble over these bugs, do an explicit compile using Debug → Compile. The compiler will flag errors one at a time—you can fix them (and recompile) until there are no more errors.
Many Offices, Many Library Incompatibilities
THE ANNOYANCE: My Access database uses Office automation to interact with Excel, mainly to create charts. Our sales data is in Access, but the top office prefers the charts and analytical tools in Excel. Most of our users run Excel 2002, but some are still using Excel 97. If I set a reference to the object library in Access for Excel 2002, my Access application won’t run on the systems using older versions of Excel. But if I use the older library, I can’t tap into the new features in Excel 2002. Help me escape this Catch-22!
THE FIX: Office automation definitely becomes a bit more complicated when you do it across multiple versions of Office. You have two options. If you can live with the feature set that’s available in Excel 97, just set a reference to the library that’s compatible with that version and go home.
But if you want to use newer features available in, say, Excel 2002, and fall back on older features as necessary, you must take a different approach. The standard approach—binding your code to a given library by setting a reference—is known as early binding or virtual table (VTBL) binding. It is compile-time binding, and you should use it whenever possible. It results in better performance and allows you to catch many programming errors at compile time. However, when you need to support different library versions, you can’t bind at compile time. In this case, you’ll have to use late binding (a.k.a. IDispatch). It is slower, and you give up compile-time error checking.
In terms of the code you write (for the Click event of a button, say, that creates an Excel chart), the only difference between early and late binding is in the way that you declare your automation object. To bind at compile time, make the declaration fully explicit, like this:
Dim objExcel As Excel.Application
To bind at runtime, declare the object this way:
Dim objExcel as Object
The rest of your code is the same. You can call any methods on an object of type “Object,” and you won’t get compile errors. For more information, see MSKB 244167.
Note
Most Microsoft development environments will auto-update your references to a VB code library used by your Access application. So, if you set a reference to an older library and later upgrade Office, the compiler will silently update the old reference to the new version the next time your code runs. If you don’t manually set it back, your app will fail on the older systems.
SECURITY
Access Security Is Weak
THE ANNOYANCE: I’ve heard that Access security sucks. Is it worth the trouble to master?
THE FIX: Access security is both weak (in a cryptographic sense) and poorly implemented. It’s derided in the crypto community, and it’s easy to crack with tools you can find on the Internet (see the "Database Lockout” Annoyance in this chapter). Still, it’s useful in some situations. For example, it can protect your data from accidents—that is, the unintended actions of users. That’s why it’s important to grant users only those permissions they really need. Assuming you set it up correctly, Access security works just fine—for this purpose. The login will also keep out casual mischief-makers.
Beyond this, Access’s security features are not enough to keep sensitive data safe. In addition to its security flaws, an even bigger vulnerability is that even read-only users must have write and delete permissions to the folder where the database is stored. A malicious user could easily delete the MDB file!
Upgrading Secured Databases
THE ANNOYANCE: We’re about to convert several Access 97 databases to Access 2002 format. We have fairly complex user-level security applied to these applications. Do we have to recreate security after each conversion?
THE FIX: Nope. As long as you use the built in Conversion tool (Tools → Database Utilities → Convert Database) Access will take care of migrating the security too. However, if you convert the application by importing all the objects into a database in the newer format, you will need to reapply security info; it does not import that way.
Database Lockout
THE ANNOYANCE: I’ve inherited a database that was created and maintained by an employee who has since left the company. I need to use this database, but the password I have doesn’t work. I’m getting desperate!
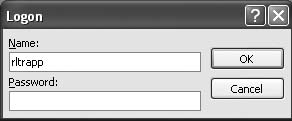
THE FIX: Getting locked out of your own database is a common situation, and this may be the only time you are grateful that Access security is hard to apply correctly. First, identify what type of security has been applied to the database. If you’re getting a password prompt with a single field (as in Figure 2-6), then you have simple security—one password for the entire database. If your prompt asks for both a name and a password (as in Figure 2-7), then you have user-level security, which is more complicated.

You may also run into database lockouts when you know the logins for your database but are being shut out because your workgroup file is either missing or corrupted. Fortunately, this too can usually be worked around.
Simple Security
If you’re fairly sure that you have the correct password but still can’t log in, your database is probably corrupted (see “Flaky or Corrupted Database” in Chapter 1). If you really have lost or forgotten the password, you’ll need to recover it. Access guru Michael Kaplan provides free code for Access 97 or earlier versions that does this very neatly (see http://www.trigeminal.com/lang/1033/codes.asp?ItemID=5#5). If you’re running a later version of Access, see below for information on commercial products/services that can break both simple and user-level security.
User-Level Security
To recover full control of a database protected with user-level security, you must log in as a user with administrator privileges. Assuming you don’t know the login, here are some of the common security loopholes you may be able to exploit—if security was not properly applied:
- Restore the original System.mdw.
If the database was originally secured using the default workgroup file (System.mdw), restore this original (unsecured) file, and you’ll be able to open the database without a login. Simply pluck System.mdw from your installation CD, rename the file you want to replace, and put the original unsecured copy in its place.
- Use the Admin login.
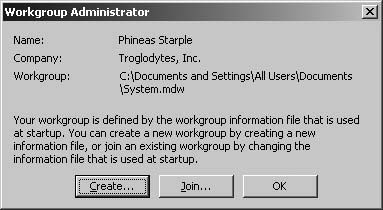
If the Admin user was not removed from the Admins group when the database was secured (see the next Annoyance, “Administering User-Level Security Correctly”), you can simply rejoin System.mdw (Tools → Security → Workgroup Administrator), or any workgroup for which you know the Admin login, and the database will accept it.
Missing or Corrupted Workgroup File
If you know the logins for your database but can’t use them because your workgroup file is missing or corrupted, you must repair or recreate the workgroup file. Since an MDW file is actually an Access database, you can repair it by running Tools → Database Utilities → Compact and Repair. First make a copy of the file, and store it in a different folder. Open Access without any database, and try repairing the copy. Then copy it back to the original folder and try to use it.
If this repair fails, or your MDW is missing, you’ll need to recreate it. This is not hard to do, assuming you saved all the necessary information when you created it (namely, the exact username, password, and personal ID of at least one user with administrative privileges). You must also have the workgroup ID used when the file was created. Select Tools → Security → Workgroup Administrator to create a new workgroup file using the exact same information and filename, and your MDB will accept it. If you didn’t write down all that information…well, now you know why you should have. Your only hope is a password-recovery app.
Third-Party Products/Services
A Google search on "Microsoft Access password recovery” will find numerous companies offering both software and services for password recovery for both simple and user-level security. Just remember that if you are missing the workgroup file that secured your database, the job is substantially harder; get a guarantee (and a price) before handing over your cash.
Administering User-Level Security Correctly
THE ANNOYANCE: We have multiple users sharing a networked Access database, and I want to be able to assign different access levels to each one. I tried the Security Wizard on a test database, and I locked myself out! How can I properly secure the database without getting a Ph.D. in cryptography?
THE FIX: Administering user-level security in Access is a pain in the neck. It’s complicated to set up, and if you miss one step, you can leave a gaping hole that will let users maliciously (or unintentionally) trample on your data. Follow the instructions below to the letter, and your security should be fine. If you’re securing a split database, follow these steps for the frontend, then see “Frontend Secure, Backend Unprotected,” later in this chapter for securing the backend.
Note
The “Bible” of Access security is Microsoft’s Security FAQ, which can be found at http://support.microsoft.com/support/access/content/secfaq.asp. This doesn’t cover Access 2002/2003, but it’s still the best source around.
Create a New Workgroup File
A workgroup is the set of users (and groups of users) for whom you will define permissions in your database. You can have multiple workgroups for different purposes. Each one is defined in a workgroup file, which stores the users, groups, and passwords in an encrypted format. To create a workgroup file, open Access without a database and follow these steps:
Create the file. Choose Tools → Security → Workgroup Administrator, then click the Create button.
Fill in the name, organization, and workgroup ID. You can use any name and organization that you want; these will be used along with the workgroup ID to uniquely identify the workgroup. (You’ll definitely want to change the defaults, which can easily be guessed by anyone using your computer.) The workgroup ID can be any random string of characters; it will be used to create a unique identifier for the file. Be sure to write down these three fields in a safe place. If your workgroup file is ever lost or corrupted you will need them to recreate it.
Create a New Database Administrator
By default, every database you create is owned by Admin. You must change this. No database owned by Admin can be properly secured, and once your database has been secured, ownership can’t easily be changed. Therefore, it’s essential to change ownership before you run the Security Wizard. Start Access without any database, and follow these steps:
Set up the login for Admin. Choose Tools → Security → User and Group Accounts and click the Change Logon Password tab. (Note that you are currently logged on as Admin.) Leave the Old Password field blank and enter a new password for Admin. You’re doing this because you can’t remove the Admin user, so you need to create a login for it. Doing this also activates the login procedure for other users.
Create a new database administrator. Choose Tools → Security → User and Group Accounts, click the Users tab, and hit the New button. Enter any name and personal ID you like, and click OK to confirm. (As with the workgroup ID, the personal ID can be any random string.) Write down the name and personal ID. Now add this new user to the Admins group, giving him administrative privileges.
Set the administrator login. Once you have created the new administrator, restart Access, this time opening a database. You will be prompted to log in. Log in with the name of the new administrator, leaving the password blank. Choose Tools → Security → User and Group Accounts, click the Change Logon Password tab, and set up a password.
Remove Admin from the Admins group. Choose Tools → Security → User and Group Accounts and click the Users tab. In the Name dropdown menu, make sure Admin is selected. In the Available Groups list box below, select the Admins group and click the Remove button (see Figure 2-8). This ensures that only accounts that you set up as administrators will have administrator privileges. (This step has to come last because the Admins group can never be empty.)

Create a New, Secured Database
Access’s Security Wizard can create a secured copy of your database, owned by the user that’s currently logged in. The Wizard will remove all permissions from the Admin user and the Users group, and also encrypts the database. Here’s how: open the database that you want to secure, logging in as the new administrator you just created. Choose Tools → Security → User-level Security Wizard and accept all of the Wizard’s defaults (modify current workgroup information file, secure all objects, use no pre-defined groups, grant no permissions to Users, and add no users to workgroup). The Wizard automatically closes the unsecured database and reopens the secured one.
Create Custom Groups
You already have an Admins group for database administrators. In a typical setup, you might also want a Writers group, for users with permission to add/modify data, and a Readers group, for users who only need to view data. (Putting a user in the Readers group doesn’t mean you don’t trust him; it just means there’s no risk of him inadvertently changing data.) Here’s the procedure: choose Tools → Security → User and Group Accounts, click the Groups tab, and click the New button. Once again, enter (and write down) name and personal ID information.
Assign Permissions to Groups
The Admins group already has its permissions set up correctly, but your new groups have no permissions. Here’s how to set them up:
Open the Permissions tab. Choose Tools → Security → User and Group Permissions, and click the Permissions tab. Change the view by selecting the Groups option button. You should now see a list that includes Admins and Users, plus the new groups you just created.
Assign permissions. Systematically work through all the objects in your database, assigning appropriate privileges to each group in turn (you can ignore Admins and Users). The interface is a bit clumsy, but here’s one approach. Select your first group, then set Object Type to “Table.” Under Object Name, select all the items (using Shift-click). Now check or uncheck permissions as needed (see Figure 2-9). Finally, hit the Apply button. Now, while that object type is still selected, go back and choose a different group, and set permissions for it the same way. Once you’ve done all your groups, go on to the next object type. Note that you cannot change permissions on the database object itself—just skip it.

Create Users
The last step is to create your user accounts—(that is, the login names that people will use):
Create users. Choose Tools → Security → User and Group Accounts and click the Users tab. Press the New button, and enter the name and personal ID for your first user. Then select the appropriate group(s), and click the Add button to add this user to those groups. If the user is in more than one group, she’ll be granted the highest permissions that each group has. (In other words, you can restrict a user only by removing her from a group, not by adding her to a group. Note that you can’t remove anyone from the Users group.) Repeat this procedure for all of your users.
Set logins for the new users. Close Access and restart it without a database. Choose Tools → Security → User and Group Accounts. You’ll be prompted for a login. Set the name to your first user, but leave the password blank. The User and Group Accounts tab will come up. Choose “Change Logon Password” and assign a new password, as in step 3 under “Create a new database administrator” earlier in this chapter. Close Access and repeat this process for each of your new users. We said this was going to be tedious!
Restore the Default Workgroup (Optional)
Once you’ve created your secured database, you may wish to restore the default workgroup. If you don’t, the workgroup and logins you just created will be applied by default to all Access databases, and users will be forced to log into every one. If that is not what you want, go back to Tools → Security → Workgroup Administrator, and use the Join button to restore System.mdw as your default. (In older versions, the file extension will be .mda, not .mdw.)
If you try to open a properly secured database with System.mdw, Access will refuse. A secured database must be opened with its own workgroup file. To do this, create a shortcut that specifies the workgroup file, using the Target property of the shortcut. The syntax for the shortcut target is "FullPathToMSAccess
.exe"
"FullPathToDatabase
.mdb"/wrkgrp
"FullPathToWorkgroup
.mdw".
Undo Botched Security
THE ANNOYANCE: Aargh! I just ran the Security Wizard and botched it. How do I undo it so I can start over? This time I promise I’ll follow your instructions….
THE FIX: Sure, that’s what they all say. The easiest thing to do is to find the backup file created by the Security Wizard. This is an unsecured copy of your database; by default it is named something like dbname_Backup.mdb. Now, open Access, choose Tools → Security → Workgroup Administrator, and use the Join button to restore the System.mdw workgroup as your default, if it isn’t already (see Figure 2-10). Discard the secured copy, rename the backup, and you’re back to where you started.
If for some reason you can’t use the unsecured backup (say, one of your underlings misplaced it), you can de-secure the secured version, but only if you can log in as a member of the Admins group, or a user with Administrator privileges. (Otherwise, see "Database Lockout,” earlier in this chapter.)
Once you’re logged in, follow these three steps:
Add the Admin user to the Admins group. Choose Tools → Security → User and Group Accounts, click the Users tab, and set the user to Admin. Then use the Add button to add Admins to the list of groups.
Grant the Users group full permissions to all objects in the database. Choose Tools → Security → User and Group Permissions and set the group to Users. (See “Assign Permissions to Groups” under “Administering User-Level Security Correctly,” earlier in this chapter.)
Clear the Admin user’s password. Choose Tools → Security → User and Group Accounts, set the username to Admin, and then press the Clear Password button.
Frontend Secure, Backend Unprotected
THE ANNOYANCE: I recently went through the hoopla of securing a split database. It required a lot of steps, but now I have groups of users with different levels of permission. This works fine as long as users go in through the frontend, but recently a temp in our office noticed that he could open the backend and do anything he wanted. This is security?
THE FIX: Yes, it is a bit disconcerting that when you apply security to the frontend of a split database, it has no effect on the backend. When you think you’re applying security to tables in the frontend, for example, you’re really just setting up permissions on links to the tables. In principle this makes sense, since it lets you set different permissions on multiple linked databases. Unfortunately, inexperienced administrators often set up security on the frontend and, thinking that they’re done, leave the backend completely unprotected.
Here’s how to secure the backend, assuming the frontend is already correctly secured. (Those steps are spelled out in “Administering User-Level Security Correctly,” earlier in this chapter.) These are basically the same steps you use to secure the frontend, except that most of the work is already done because the owner and workgroup have already been set up.
Open Access without any database. Use the Workgroup Administrator (Tools → Security → Workgroup Administrator) to join the same workgroup defined in the file that you used for the frontend.
Log in as a member of the Admins group, and create a blank database. Import all the tables from the backend into the new database. (This ensures that a member of the Admins group, and not the pesky Admin user, owns the database.) This new database becomes your new, secured backend; you can now delete or rename the old backend. Don’t forget to relink the tables from your frontend (Tools → Database Utilities → Linked Table Manager).
Set permissions in the new backend for each of your groups.
An optional final step is to rejoin your default workgroup, which is usually stored in C:Documents and Settings
usernameApplication DataMicrosoftAccessSystem.mdw, and create a shortcut to your frontend. (See “Restore the Default Workgroup (Optional)” under “Administering User-Level Security Correctly,” earlier in this chapter.)
First Login Fails After Securing Database
THE ANNOYANCE: I just used the Security Wizard to secure my database, and I can’t log in! I used the right password, but it doesn’t work!
THE FIX: Confused? We were too! One Access security “feature” is that each user’s very first login does not require a password. There’s no way to assign one in advance. You must log in with the correct username and leave the password field blank. (Some people try using the personal ID that’s entered while running the Security Wizard, as in Figure 2-11. This is not a password.) Once you’re logged in, go to Tools → Security → User and Group Accounts, click the Change Logon Password tab, and enter a password in the “New password” field. Leave the “Old password” field blank. The next time you open the database, you’ll be prompted for a password.

Too Many Logins
THE ANNOYANCE: I use about 20 different databases. Recently I set up security on one of them, and now they’re all prompting me for a login password. This is terrible. How do I turn it off?
THE FIX: When you set up security, you create a new workgroup file. This file stores the users, groups, and passwords that are used for setting permissions in your database. So far, so good. The maddening part is that when it creates this file, Access silently makes it your default workgroup. That means that when you open Access without specifying a workgroup file, that’s the one it uses. You need to restore the old default. Here’s how:
Reset your default workgroup. Choose Tools → Security → Workgroup Administrator and hit the Join button. Then browse to System.mdw (which is usually someplace like C:Documents and Settings
usernameApplication DataMicrosoftAccess), and accept it.Once you rejoin the old workgroup, it’s a good idea to test the security on your secured database. Try opening it directly, by double-clicking the MDB or choosing File → Open. If you succeed in opening it, it hasn’t been properly secured. The only way you should be able to open it is by going on to step two.
Create a shortcut to the secured database that specifies the new workgroup file as part of its target. The syntax is
"FullPathToMSAccess.exe""FullPathToDatabase.mdb" /wrkgrp"FullPathToWorkgroup.mdw". The only way to open this database should be via this shortcut.
See “Administering User-Level Security Correctly” for more information.
Splitting a Secured Database
THE ANNOYANCE: I assigned complex security permissions to my database. Then I split it, and when I opened it, I wasn’t even prompted to sign in! The backend is no longer secure!
THE FIX: Yes, this is pretty silly. If you use the Database Splitter Wizard to split your lovingly secured database, it will produce a backend that’s completely unsecured. Fortunately, doing it right is easy. Here are the steps:
Back up your MDB before you start.
Make a copy of your original, secured database, using Windows Explorer or the file manager of your choice. Name it something like databasename_be.mdb. In the copy, delete all objects except the tables. This will be your backend.
In your original copy, delete all the tables. This will be your frontend.
In the frontend, choose File → Get External Data → Link Tables, and choose your backend. Select all its tables.
Now you have both a frontend and a backend that are fully secured.
Security Fails on Network Deployment
THE ANNOYANCE: I created a secured database, and everything was fine until I moved it onto the network. Now either my users can’t get in, or they can get into stuff they’re not supposed to get into. What happened to my security?
THE FIX: Deploying a secured database in a multi-user environment is not that complicated—assuming your database has been secured correctly. But it’s easy to run into just about every security gotcha there is.
If your users can’t log in, this could indicate a problem with file permissions on the network share where the database is stored (see “Database Is Read-Only or File Is Already in Use” in Chapter 1). Or it might be due to a problem with deployment of the workgroup file where users, passwords, and so on get stored. Every user should be joined to the same copy of the MDW file that resides on the server. (You can check this by clicking Tools → Security → Workgroup Administrator on each workstation, as shown in Figure 2-12.) Finally, if users have permissions that they shouldn’t have, you haven’t secured the backend properly (see the previous Annoyance, “Splitting a Secured Database”).

“Unsafe Expressions” Warning
THE ANNOYANCE: We upgraded to Access 2003, and now everyone is getting these idiotic warnings saying “Unsafe expressions are not blocked.” It’s exactly the same database we’ve been running for the past year, and there are no unsafe expressions in it. We tried to change the security level, but the Tools → Macro → Security command seems to be missing from our version of Access.
THE FIX: Microsoft takes a lot of flak over the poor security implementation of Windows and Internet Explorer, so someone in marketing must have decided that it was time to lock down the Visual Basic functions that could be security threats. This is driving users crazy. As usual, you have a couple of options for fixing this problem.
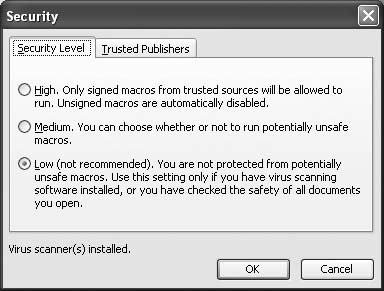
To disable these warnings entirely, choose Tools → Macro → Security and set Security Level to “Low” (see Figure 2-13). Of course, do this only if the macros and code you’re running come from a trusted source. (If you seem to be missing the Security option from your Tools → Macro menu, reset the menu: choose Tools → Customize, click the Toolbars tab, select “Menu Bar,” and press the Reset button.)
A safer alternative, especially if you sometimes run MDBs that you don’t know to be from a trusted source, is to install Jet 4.0 Service Pack 8 and run Access with medium or high security in “sandbox” mode. (In sandbox mode, Access evaluates only those expressions in field properties and controls that are safe.) Running in sandbox mode disables potentially harmful functions and expressions, so Access will stop bugging you. (See Microsoft’s FAQ at http://office.microsoft.com/assistance/preview.aspx?AssetID=HA011225981033&CTT=98.)
Finally, if you are distributing an application and don’t want your users to see this warning, digitally “sign” your application using a trusted certificate. (See “Creating Digital Signatures” below for more information.)
Creating Digital Signatures
THE ANNOYANCE: The new security warnings in Access 2003 practically force us to sign every app with a digital certificate. I’m supposed to shell out $400 for a certificate, tweak every frontend I’ve created, and go through the signing process again? Let me off this bus!
THE FIX: As you probably know, the idea behind the digital signature is a good one: it allows you to create an essentially “unforgeable” seal identifying yourself and proving that the code has not been tampered with after you signed it. Some day, the tools for generating certificates and signing applications will be integrated into Access, and using digital signatures will be as routine as using a key to open your front door.
Unfortunately, that day has not arrived. Right now, for example, if you make any modifications to your application, you must remember to re-sign it, or it won’t work. As usual, Microsoft has left us with a bit of a headache. One option is to disable security warnings entirely (see the previous Annoyance). But if you need to digitally sign your app, you don’t have a lot of choices. You can, however, save money by using a self-signed certificate.
To sign your own certificate, use the Selfcert.exe application that comes with Office 2000 and later versions. You may have to install it from the CD. Open the Add or Remove Programs control panel, find the Microsoft Office entry, and click the Change button. Then, in the Setup Wizard, locate “Digital Signature for VBA Projects” under Office Shared Features or Office Tools, and add this feature.
Your users will still see a warning message about trusting your certificate, but once they accept it they won’t be warned again. Of course, avoiding that warning is what you pay the certificate vendors for. Once you have your certificate, you can use it to sign your MDB by going to the VB Editor (Ctrl-G) and choosing Tools → Digital Signatures (see Figure 2-14). Either choose a new certificate or accept the one that’s previously been used.

ENTERPRISE DEPLOYMENT AND NETWORKED DATABASES
Keeping Access Running Smoothly
THE ANNOYANCE: I’m responsible for ensuring that our sales database is up, running, and as happy as possible. The problem is, I’m no database administrator. I know Access can get cranky; what can I do to take a proactive, preventive approach?
THE FIX: Your options will vary a bit depending on whether or not you’ve split your database. (For more information, see “Multi-User Databases and Split Design” in Chapter 0.)
In the unlikely case that you’re administering an unsplit single-user database, with all the tables, queries, and so on in one MDB, there’s not much to do. Some rules to live by:
Back up your data as often as possible. How often? Ask yourself, what’s the most data you can afford to lose forever?
Compact the database regularly (Tools → Database Utilities → Compact and Repair Database). How often? Compact once per week if your data changes daily. (See the sidebar “What Is Compacting?” in Chapter 1.)
To avoid headaches in the long run, it helps if you design your database properly in the first place. See “Table Design 101” in Chapter 3 for guidelines.
If you’re running a split, multi-user database over a network, there’s quite a bit more to be concerned about. One common error is putting the frontend (i.e., queries, reports, forms, and so on) on the server and having users open it across the network. This is never a good idea; it puts unneeded demands on the server, makes for poor performance, and increases the risk of database corruption. Instead, install a copy of the frontend on each user’s desktop machine. Only the backend (i.e., the tables) belongs on the server.
In multi-user environments, some form of record locking is essential to avoid having users overwrite each other’s data. Click Tools → Options, click the Advanced tab, and set “Default record locking” to “Edited record.” Be sure to leave the “Open databases using record-level locking” box checked. (For more information on these choices, see the discussion of record locking in the “Global Defaults” section of “Access’s Bad Defaults” in Chapter 1.)
If your database is being actively developed while users are entering data, separate the copy that’s in use from the copy where design changes are being made. And don’t write code or try out design changes on live data! Your developers should each have a copy of the backend on their own desktops, or on a development server. Only when design changes are finalized should you distribute the new frontend to users and (if needed) port backend changes to the production copy on the server. Remember to compact the MDB after making changes; if you make changes in the backend, remember to refresh the links on each frontend (Tools → Database Utilities → Linked Table Manager) and compact them, too.
In general, a complete database administration strategy will bring together various recommendations made elsewhere in this book:
- Backup and compacting
- Preventing corruption
See “That Darn Corruption” in Chapter 1.
- Installation maintenance
See the “Installation Checklist” section in the Appendix.
- Performance tuning
See the “Performance” section in this chapter.
Automating Maintenance Chores
THE ANNOYANCE: Every week I try to make backups of our patient visits database and compact both the frontend and backend. But sometimes the office gets really busy, and I forget. There must be some way to automate these chores, right?
THE FIX: What? You don’t have a 24/7 IT department dedicated to handling your maintenance chores? Automating backups is the easy part. If nothing else, you can use Windows’s built-in backup software to protect your MDB and MDW files—simply click Start → Programs → Accessories → System Tools → Backup. (On some flavors of Windows, the backup utility is not installed by default; MSKB 302894 and 152561 tell how to find and install it.)
Daily (or nightly) data backup should be standard operating procedure. Since your backups protect not only against database corruption but also against hard disk failure, back up to a network drive, a second internal hard drive, or removable media. You can use Windows’s built-in scheduler (Start → Programs → Accessories → System Tools → Scheduled Tasks) to automate the backup at a convenient time. Think about having some off-site storage for your data as well. When that meteorite hits your office building….
Warning
The Windows Scheduler will silently fail—i.e., scheduled tasks will not run—if you are not logged in when you schedule them. In other words, unless you have defined a login password on your PC (Start → Settings → Control Panel → User Accounts), you can’t use Scheduler.
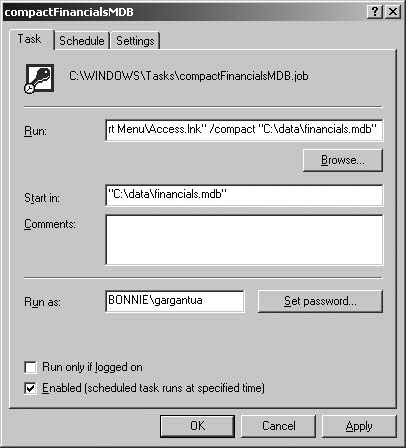
You can use the same approach to automate a compact and repair operation, with two small complications:
An MDB file can’t be compacted when it’s in use. If you can set Scheduler to perform the compact at a time when you’re certain no one will be using the database, you’re all set. Otherwise, you’ll need some way to notify your users to log off until the maintenance is done.
You’ll need to use a command-line switch when loading the Windows Scheduler. To do so, create the basic task using the Scheduled Tasks Wizard, then right-click the task’s icon and open its properties sheet. On the Task tab in the Run field, add
/compact fullpathtodatabaseafter the path to the LNK file that Scheduler generates (see Figure 2-15).
If these Windows utilities don’t meet your needs—perhaps you need to do backups while your database is running, or back up multiple databases at the same time—there are other options. For instance, if you’re an experienced VB programmer, you can compact from Visual Basic using DAO’s
CompactDatabase method. Be aware, however, that because of the way Access 2000 and later versions store system information, DAO’s CompactDatabase does not reclaim all unused space (although the built-in Access menu command still does).
If you’re interested in rolling your own solution, check out Access guru Michael Kaplan’s Compactor and SOON utilities (go to http://www.trigeminal.com and click the “TSI Utilities, Components, and Tools” link). There are also commercial maintenance utilities, such as Total Visual Agent ($299; http://www.fmsinc.com/products/Agent) and Access Autopilot ($129; http://www.access-autopilot.com). Both utilities offer flexible scheduling and easy handling of logged-on users, but since Autopilot relies on DAO’s CompactDatabase, it suffers from the same limitations noted above.
Finally, there’s one more chore that you may wish to automate: managing and distributing frontends. In a multi-user scenario with the backend on a server, it can be a hassle to distribute frontend updates and have users install them without your help. Access MVP Tony Toews has created a free utility, Auto FE Updater (http://www.granite.ab.ca/access/autofe.htm), that runs on your server and automatically updates client frontends. It works, it’s free, and Tony would love to get feedback and new feature requests.
Best Practices for Access on Networks
THE ANNOYANCE: Ever since we moved our Access 2002 database to the network, we’ve been plagued with sudden disconnects, corruption, and other errors. I thought Access was designed for a multi-user environment!
THE FIX: Access was originally a standalone desktop database system, and an MDB database is still just a single file that must be shared by all users; it’ll never take the hundred-requests-per-second pounding that true multi-user databases can handle without a hiccup. However, if properly designed and deployed, an Access database can scale well to fairly large amounts of data and serve a reasonable number of concurrent users. The following sections present several best practices tips that will help keep your networked database running smoothly.
Minimize Network Connections
Whenever your frontend reads data from or writes data to the backend (say, when a form loads and records are edited), it needs a network connection. Constantly opening and closing connections leaves you more vulnerable to data corruption than just leaving the connection continually open. To minimize stress on the network (and your database), minimize the number of distinct connections used by your frontend. If you’re writing VB code, you can either use a global variable to store a persistent connection or simply reuse a connection that’s already open. This will also speed up your application, because Jet enforces a five-second delay for successive read/write operations on the same data when a given frontend has multiple connections open.
Note
If you’re using ADO libraries, connect via the OLEDB driver rather than using Open DataBase Connectivity (ODBC). ODBC is not thread-safe—it isn’t stable in a multiuser environment and can cause data corruption. (For the specific, gnarly OLEDB syntax that lets you define a connection in code, look for “OLEDB Provider for Microsoft Jet” at Carl Prothmann’s site,
http://www.carlprothman.net/Default.aspx?tabid=81).
Optimize Your Design
A well-maintained and well-designed database will survive the hazards of network life far better than one that is overweight and out of shape. Remember, the frontend must reside on client PCs, not on the server. For proper design and deployment techniques, see “Keeping Access Running Smoothly” and “Why Is My Split Database So Slow?,” earlier in this chapter.
Hardware Considerations
It’s an inescapable fact that network instability causes database corruption—so keep your network hardware (NICs, cables, hubs, and so on) healthy, and don’t even consider using Access across a WAN or a modem connection. One phone-line dropout during a write operation, and your database can be corrupted. An overstressed server can also be a source of instability, especially since IT departments often stick databases on the oldest, tiredest server. Convince IT to install a database server that’s up to the job (if you can afford it).
Oplocks
To complicate matters, Windows networks may use a file-sharing protocol known as opportunistic locking (or oplocks) to improve performance. This protocol, which allows multiple users to share locks on a single file, is a prime source of network database corruption. The fix depends on what flavor of Windows you’re running; a Windows Service Pack update may do the trick, or you may need to disable oplocks entirely. See MSKB 300216 for more information.
Getting Around Jet’s 2-GB Limit
THE ANNOYANCE: Our inventory and sales records are stored in an Access database that has slowly grown to nearly two gigabytes. I know that Access’s Jet database engine tops out at 2 GB for any one MDB file. What can we do? This data is vital to us, and we have years of application development effort invested in our frontend.
THE FIX: Two gigabytes is a lot, but having that much data isn’t unheard of. To get around Jet’s 2-GB file size limit, there are a couple of options you can consider. The easiest is to break the backend into two smaller files. (We’ll assume that with a database of this size, you’ve already split it into front- and backends.)
To do this, create a blank database and import some of the tables from your original backend; this will be your second backend. Then delete those tables from the original. Use the Linked Table Manager (Tools → Database Utilities → Linked Table Manager) to redefine the links to the tables that you moved: simply select all of the tables, and press OK. You’ll be prompted for the new location, and the manager will do the rest. Voilà—more space!
There are a couple of limitations to this method, however. You can’t split a single table into two or more files, so if most of your data growth is in a single, huge table, this method won’t work. Also, you can only enforce referential integrity—that is, maintaining the ties between related records in different tables—within a single MDB file (see “Relationship Angst” in Chapter 3). Consequently, this method works best on table designs that can be split into two parts that don’t need to be related (e.g., if you had both your parts tables and your contacts tables in the same database).
A second approach is to archive any data beyond a certain age that is rarely used, thereby freeing up space in your database. (Of course, you can still access the archived data.)
To move data into “cold storage,” you must create a separate MDB file with tables identical to those whose data you want to archive. Then you connect these archival tables into your active MDB as linked tables. Once done, you can create an append query to copy data from the active tables to the archival tables, and follow it with a delete query that deletes the archived data from the active database. (Never heard of an append query or a delete query? See the sidebar “Types of Queries” in Chapter 4.) Obviously, this is an advanced exercise, not only because of the deletes, but because of the need to observe the referential-integrity rules.
In short, you can get around Jet’s 2-GB limit, but only to a limited extent. If you’ve accumulated a lot of data in a small number of related tables, and you need all of it in production, once you hit that 2-GB limit, you must migrate your data to an enterprise DBMS. Access has a built-in wizard for migrating to SQL Server (a process known as "upsizing”), via Tools → Database Utilities → Upsizing Wizard. As long as you’re only migrating data, the process is relatively painless. A good third-party export tool will even take care of indexes and relationships for you. Best of all, you can continue to use Access as your frontend to any DBMS via ODBC; it’s just like running a split database, except your backend is not an MDB file, but some other database system.
Avoiding Manual DSN Setup for ODBC
THE ANNOYANCE: We use Access as a frontend to an Oracle database via ODBC. We have hundreds of client machines, and each one needs its own Data Source Name (DSN) set up for the ODBC connection to work. This will take forever to do by hand (see Figure 2-16). Is there any way to automate the process?

THE FIX: One way is to create the DSN for each PC automatically, by using a bit of Visual Basic code. We won’t go into details here (see MSKB 184608 if you’re interested), because a far better solution is to automate a DSN-less connection. This solution is preferable because it’s more flexible and portable. You don’t have to create a DSN on everyone’s computer; instead, users just connect directly to the database.
There’s nothing magic about using a DSN-less connection. It’s what we used to do before there was DSN. Remember that DSN basically just hides the connection details from the developer and the application. That’s a boon, because you don’t have to worry about the details of the connection string; it “just works.” By contrast, to make a DSN-less connection, you must make the connection explicitly in your VB code. The upside? Instead of being stored on every machine, the connection information can be distributed in the frontend sitting on every PC. No more machine-by-machine DSN setup!
We’ll assume a typical scenario, where you want to deploy a frontend on each PC. This frontend would normally use linked tables, which link via a DSN to a backend stored on a server. And that’s how you’ll set it up when you’re developing it. But when it’s time to deploy your application, you’ll switch it to use DSN-less connections. All you need to do is run a little VB code that steps through your linked tables and rewrites their connection strings. (See the sidebar “A Guide to Connection Strings” for details on what they are and how to find the ones you need.) The following code sample uses an SQL Server-trusted connection rather than a username and password. It steps through all your table definitions, but it acts only on tables that already have connection strings—that is, your linked tables. Local tables on your PC won’t be affected by this code.
	Sub createDSNLess(strServerName As String, strDatabaseName As String)
	    Dim dbCurrent As DAO.Database
	    Dim tdfTable As DAO.TableDef
	    Dim strConnect As String

	    Set dbCurrent = DBEngine.Workspaces(0).Databases(0)
	    strConnect = "ODBC;DRIVER={sql server};" & _
	                     "SERVER=" & strServerName & ";" & _
	                     "DATABASE=" & strDatabaseName & ";" &_
	                     "Trusted_Connection=Yes;"

	    For Each tdfTable In dbCurrent.TableDefs
	            If Len(tdfTable.Connect) > 0 Then
	                     tdfTable.Connect = strConnect
	                     tdfTable.RefreshLink
	            End If
	    Next
	End Sub
To run this code, copy the code into any public module and call it from the Immediate window, like this: createDSNLess
"myServerName", "myDatabaseName".
If you’d like to delve further into the nuances of DSN-less connections, check Paul Litwin’s free DSNStripper add-in (http://www.mvps.org/access/modules/mdl0064.htm) and Doug Steele’s free DSN-less code (http://www.accessmvp.com/djsteele/DSNLessLinks.html).
VB Code Fails After Split
THE ANNOYANCE: I recently split an Access database that has some custom Visual Basic code, and now when I open a form, I get a “Current provider does not support the necessary interface for Index functionality” runtime error. Why didn’t anyone warn me that splitting would break my application?
THE FIX: There’s one major gotcha when splitting a database that has VB code: code that uses the
Seek method to locate records won’t work. That’s because Seek can only work with recordsets opened directly on tables (so-called
table-type recordsets)—but you can’t open table-type recordsets on linked tables, and linked tables are what you get when you split your database. Any code that tries to index a linked table using the Seek method will generate a runtime error. Here are two possible fixes:
Use
FindFirst(in DAO) orFind(in ADO) instead ofSeek—these work fine on non-table-type recordsets. The only drawback is that these functions are less efficient on large numbers of records.Use
Seek, but first open the backend database directly. In ADO, create a Connection object like this:Dim conn As ADODB.Connection conn.Open "Provider=Microsoft.Jet.OLEDB.4.0;" & _ "Data Source=
c:fullpathmyBackendDatabase.mdb;"Now, instead of opening your recordset using
CurrentProject.Connection, use the Connection object you just created, like this:rst.open "tblOrders", conn, adOpenStatic, adLockOptimistic
In DAO, call
OpenDatabaseinstead of usingCurrentDb:Dim db As DAO.Database Set db = DBEngine.Workspaces(0).OpenDatabase("c:fullpath myBackendDatabase.mdb")Then call
OpenRecordseton this database, instead of the local one.Directly opening the backend database enables you to use table-type recordsets as usual.
Merging Two Frontends
THE ANNOYANCE: Every six months, our company’s Access developers issue an updated frontend to our customer database, and I’m stuck with having to import all my custom queries and reports into the new version. There’s gotta be a better way.
THE FIX: The easiest option is to create your own frontend, and link it to the same backend everyone else uses. You can then use yours or theirs, according to what you’re doing. Of course, this assumes you don’t need to use your custom objects with the company’s standard frontend.
A better solution would be to automate the process of exporting your custom objects into the official frontend. Exporting a single object is a one-liner (put this code into the Click event of a button on any convenient form):
	DoCmd.TransferDatabase acExport, "Microsoft Access", _
	           "C:My DocumentsFrontEndLatestRelease.mdb", _
	          acReport, "MyCustomReport", "MyCustomReport"
Note that minor variations are needed for other types of objects. Instead of acReport, use acForm, acQuery, and so on.
If you’re serious about this, you’ll probably want to set up a table (see Figure 2-17) to track your custom objects. Record each object’s name and type, and write some code to loop through the table and export each one. It will look something like this:
	Sub MyExport()
	    Dim db As DAO.Database, rst As DAO.Recordset
	    Dim strObjName As String, strObjType As String
	    Dim intObjTypeConst As Integer
	    Dim varData As Variant, intI As Integer
	    'Open the table
	    Set db = CurrentDb()
	    Set rst = db.OpenRecordset("tblMyCustomObjects")
	    'Loop through table
	    Do Until rst.EOF
	        strObjName = rst![objectName]
	        strObjType = rst![objectType]
	        If Ucase(strObjType) = "REPORT" Then
	          intObjTypeConst = acReport
	        ElseIf Ucase(strObjType) = "FORM" Then
	          intObjTypeConst = acForm
	        ElseIf Ucase(strObjType) = "QUERY" Then
	          intObjTypeConst = acQuery
	        ElseIf Ucase(strObjType) = "MODULE" Then
	          intObjTypeConst = acModule
	        End If
	        DoCmd.TransferDatabase acExport, "Microsoft Access", _
	                "C:My DocumentsFrontEndLatestRelease.mdb", _
	                    intObjTypeConst, strObjName, strObjName
	        rst.MoveNext
	    Loop
	End Sub
This code just opens a recordset for the table of custom objects and loops through every row, exporting the objects one at a time. The only complication is that the
TransferDatabase method requires Visual Basic constants such as acQuery, acReport, and so on, which are inte-gers—so we translate the more user-friendly object type information in the table (“Query,” “Report,” and so on) into these constants.
Can’t Get Replication to Work
THE ANNOYANCE: We have several employees who need to take copies of our database with them when they travel. We implemented replication to synchronize all the data changes in those remote copies with the database on the server in the office, but when we actually try to do the synchronization (either over the Internet, or here at the office on the LAN) we keep getting “failed to synch” errors.
THE FIX: We feel your pain. Replication is arguably the single most difficult thing to implement in Access. (For more on replication, see the sidebar “What Is Replication?”) In fact, many pros regard the entire replication process as unworkable and won’t touch it. So first, ask yourself if you really need it. Full-blown replication requires sophisticated conflict resolution that can handle multiple users trying to update the same data. But in many cases, remote users aren’t updating the same data; they’re just adding different data, or perhaps updating their own data. In this case, all you need is code that merges each user’s records in any valid copies of the database. You can write code that does this, or turn to third-party software. (For example, FTI Data Replication Tools, available at http://www.ftisystems.com/MainFrame/ftidr_intro.html, implements a very simplified version of data sync for $40. These tools merge remote data into the master copy and sync the remotes against the master; they also perform conflict resolution.)
Another alternative is to create a web-based interface for your database (see “Putting Data on the Web” in Chapter 3), so both local and remote users can access it. After all, the optimal multi-user scenario is where every user talks directly to the same copy of the database. However, if only true replication suits your needs, and you can’t get Access replication to work, there are third-party solutions available (such as those from Progress Software, at http://www.progress.com/realtime/products/dataxtend_re/index.ssp).
Finally, if you decide replication is too big a pain, you can undo it. For more information, see MSKB 208394. Also check out Michael Kaplan’s free Un-Replicator utility (http://www.trigeminal.com/lang/1033/utility.asp?ItemID=7#7), which will convert your replicated database back to something anyone (not just a mother) could love, removing all the gunk (globally unique identifiers and so on) that the replication process adds.
Replication Fails on Frontend Objects
THE ANNOYANCE: I have a master database with two simple macros in it. I replicated the database, and I now get errors in my replicas saying they can’t find the macros. But they’re right there!
THE FIX: Although the Replication Manager lets you replicate all the objects in a database, you should never replicate forms, reports, or macros. You’re just asking for corruption problems. To have a prayer of getting replication to work right, you must split your MDB into front- and backends, and replicate the backend only. Replication is for data. Period. No exceptions.
Corrupted Replicas
THE ANNOYANCE: Our replicas get the error “The Search Key cannot be found.” We have installed all the Office 2003 patches and the latest Microsoft Data Access Components, and we compacted twice before the replication, yet the replicas still get corrupted.
THE FIX: You could be suffering from a bug that was fixed in Jet 4.0 Service Pack 5. It’s more likely, though, that you’re using local or anonymous replicas (see the sidebar “What Is Replication?,” and also Figure 2-18) that have been cut off from the replica set. Since local/anonymous replicas can synchronize only with the replica that created them (the parent), if anything happens to that parent, they are locked out—and since there’s no way to change the parent once they’ve been created, they are locked out forever. Alas, there is no good fix. For this reason, it is strongly recommended that you do not use local or anonymous replicas.