Chapter 11
Using SUSE Linux Enterprise Server Clustering Options
This book is about Novell Cluster Services (NCS), and that’s not the same as the native Linux clustering options included in SUSE Linux. Because, however, in some circumstances it may be useful to use these native Linux options anyway, this chapter provides a quick guide to the setup of such a cluster
Without any doubt, in large business environments NCS is the better choice to provide high availability for business-critical services. There are various advantages offered by NCS as compared to the Linux Heartbeat software. Among these advantages, one of the most important is the inclusion of the entire configuration in eDirectory; therefore, the administrator can manage the entire configuration of his cluster from one central point in the network. Another major advantage is that NCS offers support for up to 32 nodes, whereas at the moment this was written, support for more than 2 nodes was not stable yet in the Heartbeat software. Other advantages of NCS over Heartbeat are support for the NSS file system, support for mixed clusters to migrate from NetWare to Linux, and, of course, Novell’s strong support for this software by its worldwide support organization.
Despite of all these advantages, in some scenarios an administrator might want to choose native Linux clustering services. One reason to do this may be that high availability is needed for a service at a branch office where eDirectory is not used. In a pure Linux environment, Heartbeat may also be the better choice because it is free software that doesn’t require any licenses to install.
The Heartbeat package is a good choice to deliver such a high-availability solution. You should, however, be aware that Heartbeat is not the only option available for Linux clustering. It is, however, a very stable cluster solution that is included with SUSE Linux Enterprise Server by default, and for that reason it is covered in this chapter. The goal of this chapter is not to give a complete overview of all options available with the Heartbeat software, but to give the administrator who wants to implement it a quick start to set up such a cluster.
In SUSE Linux Enterprise Server, all software to create a two-node cluster is available by default. We will first cover how to install this software:
1. From the SUSE Linux Enterprise Server console, start YaST and enter the password of the root user.
2. Select Software, Install and Remove Software.
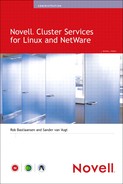
3. From the Filter option, choose Selections. Next, make sure that the option High-Availability is checked as shown in Figure 11.1. This will select all software modules to install and manage a cluster based on the Heartbeat packages.
4. Click Accept to install the required software.
For sure, you can run a Heartbeat cluster using a storage area network (SAN) or iSCSI as shared storage. For a simple setup, however, this may not be the most appropriate way to set up the shared storage, because expensive hardware is needed to configure the storage device. An easy yet stable method of providing a shared storage solution for the Heartbeat cluster is by configuring a Distributed Replicated Block Device (DRBD). The advantage is that no external storage device needs to be purchased, but a local partition or disk on the nodes in the cluster can be used for shared storage. Alternatively, if the service you want to cluster doesn’t need a shared storage solution, it is perfectly possible to configure the Heartbeat cluster without shared storage. In most cases, however, it is more practical to provide some shared storage solution, if only to make management of configuration files easier. This chapter discusses how to set up such a shared storage device. The only requirement for the setup of this shared storage is that both nodes be cluster nodes. If the service fails on the primary node, it will be activated on the other node. The Heartbeat load script will automatically mount the shared device in read-write mode if that happens.
Basically, the DRBD is a RAID 1 solution running over the network. In this configuration one node has read-write access to the DRBD device and the other node does not. For sure, it makes sense to give read-write access to the node that currently has the clustered service running. To use the DRBD device, a specific device has to be created. This involves using mknod to create the device, but also to create some configuration files. Finally, the DRBD service that gives access to the device has to be started, and one of the nodes needs to be assigned as the primary device. Here’s how to set up a DRBD device:
1. After installation, it is a good idea to copy the sample DRBD configuration file in /usr/share/doc/packages/drbd/drbd.conf to /etc/drbd.conf and edit this file. There is a lot of comment in this file that explains perfectly how to configure the DRBD device. Make sure that the configuration file has the same contents on both servers; otherwise, the DRBD device would be available from just one server.
2. For a simple setup to provide the DRBD device, the following parameters can be used. Note that this is just a workable example; your environment may require a different setup. Consult the drbd.conf man page for more information on how to set up the DRBD device. The following example includes some workable code you can use to set up a DRBD device:
resource rdbd0 {
protocol C;
startup {
wfc-timeout 0;
degr-wfc-timeout 120;
disk {
on-io-error detach;
}
syncer {
rate 100M;
group 1;
al-extents 257;
}
on server1 {
device /dev/drbd0;
disk /dev/sdb1;
address 192.168.0.201:7788;
meta-disk internal;
}
on server2 {
device /dev/drbd0;
disk /dev/sdb1;
address 192.168.0.202:7788;
meta-disk internal;
}
}
The foregoing script consists of two parts. In the first part, some generic DRBD settings are configured. These settings are applied to the device drbd0, which is specified from the resource drbd0 setting. Next the protocol that has to be used is defined. There are three choices here: protocols A, B, and C. Protocol A is the fastest, protocol C the most secure; so make your own choice as to which is more important to you: speed or security.
Note
When protocol A is used, write I/O is reported as completed, if it has reached the local disk and the local tcp-send buffer. Therefore, if after the I/O has reached the send buffer the network connection drops, data will get lost. With the protocol B setting, write I/O is reported as completed if it has reached the local disk and the remote buffer cache. This ensures that the data at least has reached the remote computer. If protocol C is used, write I/O is reported as completed if it has reached both the local and the remote disks; therefore, protocol C is considered the most secure protocol setting.
Next, some timeout values should be configured. The first parameter, wfc-timeout 0 specifies the amount of time that the init script blocks the boot process until the resources are connected. By default this value is set to 0, in which case the init script doesn’t care about the actual state of the DRBD device. Next, the degr-wfc-timeout parameter specifies how long to wait for connection timeout if this node was a degraded cluster. The default value specifies that it has to wait for two minutes. This allows the other node in the cluster to come back and hand over control to the device.
Next the disk parameter on-io-error detach specifies what has to happen if the DRDB device reports an error. The option detach specifies that the node drops the storage device and continues in diskless mode.
The syncer parameters are the last set of generic parameters, and not the least important. If you forget them, the performance of synchronization between nodes is worse than lousy, so use these parameters to specify how synchronization should take place. The synchronization parameters can be used to specify the amount of bandwidth that can be used by the DRBD process. The parameter rate 100M in the example sets the maximum amount of bandwidth for synchronization of the device to 100Mb. If you do have a 100Mb network and you want other traffic to happen as well, this is not a good choice; you should set it lower so that other processes have some bandwidth as well. The parameters group 1 and al-extents are used to define the number of physical extents that can be synchronized at the same time. Each physical extent is 4MB, so a total of 257 will allow synchronization of about 1GB at the same time. Basically, the value for the parameter al-extents should reflect the number of 4MB blocks needed to cover synchronization of your DRBD device; for 4GB a value of 1024 would be a good value, for example.
Next, there are the sections that define how both DRBD nodes should be configured. The first parameter specifies the name of the DRBD device. Then the next parameter specifies the name of the internal device on the server that should be used as a DRBD device. It makes life easier if the device names are similar on both nodes, but this is not a requirement. Next, the address and port numbers need to be specified. Last, the meta-disk parameter is used to specify where metadata should be written. Normally, the device specified with the disk parameter is used for this purpose. Be careful that nothing else is stored at the device mentioned because it will all be gone after the DRBD device starts writing metadata to this device.
After creating the drbd.conf file, you have to create the DRBD devices. For DRBD to work, you need a corresponding block device in the directory /dev; otherwise, it won’t work. Actually, there are two different devices that can be used for DRBD: One is the drbd device with major device ID 147, and the other is the NB device with device major number 43. In the current release, the DRDB devices are recommended for usage, so just forget about the NB devices. You can use the mknod command to create the DRBD devices. The command that can be used for that is shown here (be sure to execute this command as root, or else it will not work):
for i in $(seq 0 15); do mknod /dev/drbd$i b 147 $i; done
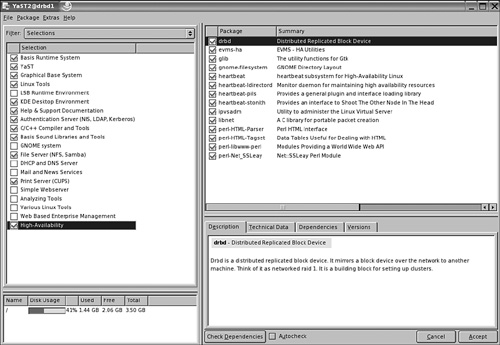
Make sure that this command is executed on both nodes where the DRBD device must be used; it will ensure that 16 DRBD device files are created. When this has happened, use the rcdrbd start command on both servers to start the DRBD services. If this happens without any obvious error messages, use the command cat /proc/drbd to monitor that the DRBD device is successfully created on both devices (see Figure 11.2). Sometimes there may be an error message when loading the DRBD device, stating that the device is currently busy. If that happens, we recommend that you try again in a few moments—most of the time that helps. For serious troubleshooting, use tail /var/log/messages for error messages that may indicate why the DRBD device cannot be started.
Now that you have verified that the service has started successfully, you need to make sure that it starts automatically the next time you boot your servers. To insert the service to all relevant runlevels on your servers so that it will be booted automatically, use the insserv drbd command on both servers. The current state of the DRBD service is that it will be started on both servers automatically. At this stage, however, it is not usable. To make it usable, you need to configure the Heartbeat software in such a way that one of the servers is configured as the primary server, while the other is used as the secondary. In the next section you’ll read how this needs to be done.
Note
We have covered DRBD as an easy storage solution in this chapter. As an alternative, the software from the iSCSI target project for shared storage can be used. Currently, the only thing preventing the use of this software is the requirement of the 2.6.13 kernel. This problem, however, will be fixed in the future. Consult Chapter 7, “iSCSI,” for more information about iSCSI configuration.
Basically, the configuration of a Heartbeat cluster is a five-step procedure:
1. Edit the sample configuration files.
2. Use the authentication keys to ensure secure communications.
3. Tune the main configuration file /etc/ha.d/ha.cf on both nodes.
4. Use the configuration file haresources to configure shared resources in the Heartbeat network.
5. Start the Heartbeat software on both nodes.
We will discuss the configuration of the Heartbeat software based on an example. In this example, the NFS server will be configured for high availability. The server will use the DRBD device as the shared storage device.
To make it easier for you to configure the Heartbeat software, some sample configuration files are provided. An easy way to get started is by copying these configuration files to the directory /etc/ha.d on both servers. You can find these files in the directory /usr/share/doc/ packages/heartbeat. Three of these files are of particular interest:
![]()
authkeys:This file is used to secure communications between nodes with authentication keys.
![]()
ha.cf:This is the main configuration file in which default behavior of the Heartbeat software is specified.
![]()
haresources:In this file, the shared resources are defined.
On a secure network, it is not of highest importance, but if traffic between nodes has to cross less secure links, an important option is the usage of authentication keys to secure the communication between both nodes. The structure of this file is really simple; just two lines of configuration are needed. In the first line, you specify which type of authentication needs to be used. For this purpose, you can choose from crc, sha1, and md5. Crc is the ideal solution for a network that has already been secured by other means; it doesn’t offer any real security and therefore is the fastest option for use on a secure network.
The other two options are sha1 and md5. Both are secure, so it doesn’t really matter which one is used. In the code listing that follows, you see all relevant lines that have to be created in /etc/ha.d/authkeys to ensure that authentication can take place in a secure manner:
#
auth 3
#1 crc
#2 sha1 secret
3 md5 novell
In this example, you can see that the type of authentication that has to be used is referred to on the line auth 3. The number 3 refers to the third line in the configuration file, where md5 authentication is configured for the use of a shared secret. After creating this file on one of the nodes, you can copy it to the other node. Use scp as in the following example to do this:
scp /etc/ha.d/authkeys othernode:/etc/ha.d
As a last step, you need to ensure that the permission mode for the files is set to 600 on both nodes. Use the following command to accomplish this task:
chmod 600 /etc/ha.d/authkeys
One of the major tasks in successfully configuring the Heartbeat cluster is to configure the main configuration file ha.cf. In this file the conduct of the Heartbeat software is defined. The file should be more or less the same on both nodes, although some parameters are node specific. The first parameters you have to enable look rather trivial, but will make you happy later; these are the parameters to enable logging. Use all logging mechanisms; it will make it easier for you later to troubleshoot why the software isn’t acting the way you would like it to. Be sure to remove the hash sign used to comment out some of the following three lines to enable full logging:
debugfile /var/log/ha-debug
logfile /var/log/ha-log
logfacility local0
Next, you need to specify how often heartbeat packages are sent across the network and when the other node will be considered dead. The following lines are used to specify this:
keepalive 2
deadtime 30
warntime 10
initdead 120
Of these parameters, the keepalive parameter specifies that a heartbeat message should be sent every 2 seconds. In some environments, this will absolutely be too long, so you could consider setting it lower, for example, to 500ms. The next parameter is very important as well: The deadtime parameter defines when a service will officially be considered dead and services will start to fail over to the other node. By default, this is only after 30 seconds. For some environments this absolutely is too long, so you should consider setting it lower. Then there is the warntime parameter, which specifies when the first warning about a service being not available is sent to the log files. Last, the initdead parameter specifies the timeout value used after the services are first started. The default value will give the other node 120 seconds to come up and activate its resources. If it hasn’t come up after this period, the other node will be considered dead and services will start on the remaining node. Because it can take some time for another node to come up, it is recommended to give this parameter a rather high value.
The last options that need to be set in ha.cf are the names of the cluster nodes. The names of the nodes included here should be exactly the same as the names of the nodes displayed when using the uname -a command on these nodes. These parameters could, for example, look like the following:
node server1
node server2
Apart from these required options, many other options can be used as well. For example, there are parameters to define the failover and failback behavior of resources in the network, and there are parameters to define how the heartbeat packets should be sent in the network. Consult the ha.cf man page for more information about these options.
After creating the ha.cf file on either one of the nodes in the cluster, be sure to copy it to the other node. You can do this using the scp command as shown here:
scp /etc/ha.d/ha.cf othernode:/etc/ha.d
Now that the generic parameters for the Heartbeat software have been configured, it is time to define the shared resources on the network. This is done in the configuration file /etc/ha.d/haresources. In this file the following tasks have to be accomplished:
![]() Define the name of the primary node where the resource should run
Define the name of the primary node where the resource should run
![]() Define the IP address on which the shared resource can be used
Define the IP address on which the shared resource can be used
![]() If used, specify the name of the shared device that should be used
If used, specify the name of the shared device that should be used
![]() Specify which service or services should be loaded as shared resources
Specify which service or services should be loaded as shared resources
Following is an example of a line used to load the nfsserver as a shared resource:
drbd1 192.168.0.23 datadisk::drbd0 Filesystem::/dev/drbd0::/data::reiserfs nfsserver
Each line where a cluster resource is defined starts with the name of the primary node. The resource will always try to load on this resource. If this primary node goes down and then comes up again, the default behavior is that the resource automatically fails back to this primary node.
The only mandatory element of all shared resources is the IP address of these resources. Each resource should have its own IP address on which it can be reached. This should be a unique IP address. The server hosting the resource will activate this IP address as one of its virtual IP addresses, as shown in Figure 11.3.

If a resource uses a shared device, all information should be present in /etc/ha.d/haresources to specify how this device should be loaded. For this purpose, two scripts can be used, which are both in the subdirectory /etc/ha.d/resource.d. First of these scripts is the datadisk script (which actually is a link to the drbddisk script). This script has an important task: It activates the DRBD device on the host where the resources will be loaded. While loading the DRBD device on this host, the datadisk script will make it the primary device on this host. In this way, the other host cannot write to the DRBD device and all data written to the device will be synchronized immediately to the other node. In the line where the shared resource is defined, you can see that the datadisk script takes one argument, which is the device name of the DRBD device. To separate the name of the script from the names of its arguments, two colons are used.
After specifying what device is used as the shared storage, next the resource load script needs to define how that device is to be activated. Note that this task has to be connected to the loading of the resource on a server and cannot occur in /etc/fstab; if it would be handled in /etc/fstab, it would be impossible to migrate the shared device from one node to the other. To mount the shared device, the Filesystem script that is in /etc/ha.d/resource.d is used.
This script takes three parameters: the complete device name of the shared device, the directory on which the shared device must be loaded, and finally the name of the file system that must be used to mount the device. Here also, the script is separated from its arguments by using two colons as can be seen in the example where the resource for the NFS server is created.
Last, you need to specify what service should be loaded as the clustered resource. Here you can specify the name of just one service, but it is possible as well to load more than one service from one line. By default, the Heartbeat software will try to locate the name of this script from /etc/init.d and /etc/ha.d/resource.d, so make sure that the script you refer to is present at one of these locations. This script will automatically be started with the start argument, and it will be stopped with the stop argument. Therefore, the script you refer to should listen to these arguments.
Note
You have just learned how to configure a complex resource for use in the Heartbeat cluster environment. Configuring a shared resource can be much easier. It is, for example, possible to configure just a secondary IP address as the cluster resource, or just the shared storage device without anything else, or just the service you want to cluster without using any shared storage. For example, the following line is perfectly legal (although not extremely useful):
server1 192.168.0.204
Also, the following can be used to configure a clustered resource that doesn’t need any shared storage because all configuration it requires is available on the local file system:
server1 192.168.0.204 dhcp
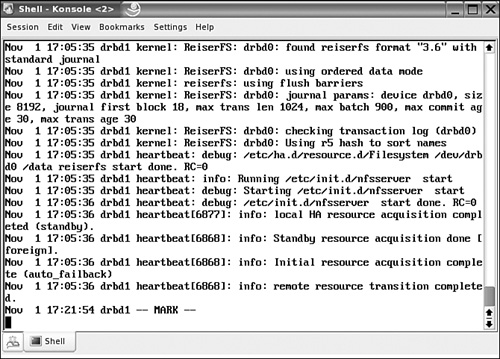
When all configuration has been done, it is time to start the Heartbeat software on both nodes. Use the rcheartbeat command to do this. We recommend while doing this to monitor /var/log/messages with the tail -f command. It will show in an excellent way whether loading of the Heartbeat software and the shared resource is successful. An example of this is shown in Figure 11.4.
The Heartbeat cluster is now configured the right way. To get the NFS server running properly, however, some minimal action is required. Most important is that the directory /var/lib/nfs, which is used by default for file locking by NFS, is replaced with a location on the shared disk. If you don’t do that, file locks can’t migrate when the NFS service is migrated. The best way to make information about file locks available at the other server is by making a symbolic link on the shared storage, pointing to the real location of the files in /var/lib/nfs. The following procedure shows how to do this if the shared disk is mounted on the /data directory:
1. Unload the Heartbeat services on both servers by using the rcheartbeat stop command.
2. Make sure that on the server that is supposed to act as primary in the cluster, the shared storage device is accessible and mounted on its mountpoint. You don’t need to mount it on the secondary server (even if you wanted to, you couldn’t, because only one server at a time can access the shared device).
3. On both servers, make a symbolic link from the location of the NFS lockfiles to the directory on the shared storage device where you want to make them accessible. If, for example, you want to store the lockfiles in /data/nfslock, use the following command on both servers to create the link:
ln -s /var/lib/nfs /data/nfslock
Make sure that when you do this the mount is not up. Otherwise, you risk that one of the servers will complain when you try to create a link because the link already exists on the mounted device.
4. Dismount the shared device.
5. Modify the haresources file to load the nfslock daemon as well. A line like the one in the following example will make sure that it is loaded properly:
server1 10.0.0.2 datadisk::drbd0![]() Filesystem::/dev/drbd0::/data::reiserfs nfsserver nfslock
Filesystem::/dev/drbd0::/data::reiserfs nfsserver nfslock
6. Start Heartbeat services on both servers.
Now that you have the Heartbeat cluster running, it is good to know that some commands are available for management and monitoring of the cluster and its resources. Don’t expect extensive management capabilities like you have them with NCS; some basic commands, however, are available. Most of them are used as a parameter from the cl_status command. Following is a summary of the most important options:
![]()
cl_status hbstatus:Shows whether the Heartbeat services are running on the local computer
![]()
cl_status listnodes:Shows all nodes currently in the cluster
![]()
cl_status rscstatus:Shows the state of clustered resources
Note
The Heartbeat package currently does not include software that actively monitors the current state of the clustered resource. For this purpose, you can write a shell script that monitors whether the service is still running and alerts if this is not the case. Alternatively, the mon utility can be used. This utility, which is not installed by default, uses SNMP to monitor the availability of services. Because it is beyond the scope of this book, the mon utility is not discussed in this chapter. For more information, we recommend Karl Kopper’s excellent book The Linux Enterprise Cluster.
One issue has not been dealt with so far. In a cluster environment, it can happen that more than one node in the cluster thinks that it has exclusive access to a cluster resource. Such a configuration is known as split brain. If this resource is the shared storage device, the results can be severe; if, for example, a database is stored on the shared disk device, the entire database may become corrupted. Therefore, in a serious clustered environment, precautionary measures must be taken to prevent such a situation. Some nice features are available with the Heartbeat clustering software to take care that the failing node is terminated when it fails.
One solution to cast off the failing node is to use a Stonith device. Stonith, which stands for Shoot the Other Node in the Head, refers to a technique that makes sure that the failing node is cast off efficiently. For Stonith configuration, a smart power device connected to both servers must be used. A serial cable or network cable running from both servers to this device allows the Heartbeat software to send commands to this device, which controls the power supply to the other server. If needed, the other node can reset a failing cluster node this way.
A Stonith device is used in the following way:
1. The remaining server doesn’t hear incoming heartbeat packages anymore and concludes that the other server fails.
2. The remaining server sends the Stonith reset command to the Stonith device.
3. The Stonith device turns off power on the failing server. This makes sure that a split brain situation is avoided.
4. All resources that were running on the other server are failed over automatically.
Because each Stonith device has its own unique set of commands, it is not possible to give a “one size fits all” description on how to configure the device.
Tip
In a production network, it is recommended that you use a Stonith device. Your uninterruptible power supply (UPS) manufacturer can inform you about UPS models that support Stonith. If, however, for some reason you cannot lay your hands on such a UPS, two other methods are available as well. First is the meatware device (a human being) that is alerted to a failing node in the cluster. Second is the option to use SSH to send a command to the other node in the cluster. The latter method, however, is not recommended because there are too many situations in which it can fail.
In this chapter, you have read about the way in which the Linux Heartbeat software can be used to make Linux services highly available. You have learned how to set up a shared storage device using a DRBD, and you have read how to create cluster resources. Finally, a short description has been provided on how Stonith can be used to avoid split brain situations on the cluster.