What is a cluster without applications? It’s not much use to your end users. So in this chapter we will discuss how to work with some common applications that typically run on Open Enterprise Server (OES) clusters, either NetWare or Linux. In this chapter you will find GroupWise, iFolder, Squid, and Samba as examples. Why not more? There are two reasons for that. One is that if you understand how clustered applications work and you grasp the concept behind them, you will be able to cluster-enable most of your own applications. The second reason is that there are too many applications out there to cover all of them. We should also point out that detailed descriptions for many Novell applications are available on Novell’s documentation website at www.novell.com/documentation.
Before diving into the configuration of applications on an Open Enterprise Server cluster, we first want to discuss why you sometimes do not want to cluster-enable applications. Or at least we want to make you think about which applications need the high availability a cluster can give you.
A simple example is a DNS server. You could configure it to load on different nodes with some sort of shared configuration. But does that make sense if you can already have two DNS servers configured on your workstations for fault tolerance? It could be useful in some scenarios, but at least keep the nature of the beast in mind when looking at high availability for an application.
As another example, we will look into ZENworks for Desktops. For a long time the documentation of that product stated that it could be run on a cluster. That was only partly true because files for application distribution could be installed on a cluster volume and thus could have high availability. The same is true for group policy files that can also be installed on the shared storage of a cluster. The part about not being able to cluster-enable ZENworks components was all about the server-side applications, such as Automatic Workstation Import (AWI) and the imaging server.
The reason we bring up this topic is that on too many occasions we have seen clusters becoming overloaded with resources when some of them did not necessarily need high availability. But it is so tempting to make everything available at all times, isn’t it?
To go back to our ZENworks example, let’s take a look at the AWI component. Why do we need high availability for that application? The basic question you should ask yourself is “What if this service is not available?” That is the reason for clustering in the first place: to keep services available to end users. With the AWI service not being online, what happens? Already imported workstations will just not be able to contact the import server and will not update the workstation’s information and logged-in user history list. The workstation object’s identifier is stored in the local registry and will be used to connect to eDirectory to read policies and applications that are assigned to the workstation object. So the first of the two problems that could arise is that when you check the user object, you would not see the latest logged-in workstation, possibly affecting remote control if you go there through the user object instead of the workstation object. And the second problem, which could be more serious, is that new workstations would not be imported into eDirectory, possibly resulting in policies and applications not being deployed.
So is that a problem? That is up to you to decide. Every environment is unique and the high availability level, the service level, and the daily activity will differ from site to site. We hope that with this example we gave you a fresh look at application high availability and the reasons to install applications in a clustered environment—or not.
Of all applications that run in clustered environments, GroupWise is definitely the one that is used the most. Why? Very simple: Email has become the number-one application in every office. Take away people’s email and they are unable to perform their jobs, or so they say.
We will look into configurations for GroupWise on NetWare and Linux in clustered environments. We expect that you have experience with GroupWise. We expect you to know what a POA is and what an MTA is, and how these components work on a non–cluster-enabled server.
The basics of clustering GroupWise on a NetWare or Linux server are the same, so we will first describe how clustering works for GroupWise in general.
Tip
For the most detailed information on clustering GroupWise on Open Enterprise Server, including clustering the GWIA and WebAccess, we suggest that you take a look at the GroupWise books from the Novell Press GroupWise expert, Tay Kratzer, at www.taykratzer.com.
All GroupWise components that you run on your servers are important, but when you look at high-availability concerns for your users, the Post Office Agent (POA) and, if applicable, the Webmail web server and agent are the most important. Without these components users will not be able to log in to their GroupWise environment at all. Other components, such as the GroupWise Internet Agent (GWIA), might be missed less. It could, for example, take longer before Internet email is delivered if the GWIA has been down. How high a level of high availability you will need to implement depends on the way your business works and how your users use their email application.
If we focus on the use of GroupWise within organizations on onsite desktops, clustering works like this: The POA is loaded on one of your cluster nodes, and the users are connected to the POA with their GroupWise client application. If a failover occurs on the cluster or when you migrate the POA to another node, the connection from the client to the POA is not available for a short period. When the POA is configured in the correct way with the setting that it runs in a clustered environment, the client software will use a longer timeout to contact the POA to give it time to fail over. After the POA is loaded on another node, the client reconnects to the POA without the user knowing that the failover has occurred.
Tip
The GroupWise client also has a caching mode. In that mode all email is also stored on the local hard disk and email delivery is processed in the background. With this mode users would never notice a failover, except that mail is not being delivered at that time, and they can start GroupWise without a POA being online. It might not be practical to enable this mode for all your users. Especially those who work on a different PC each day will not really benefit because it would have to cache their mailbox when they start GroupWise. Laptop users will benefit from using caching mode the most.
When you’re using WebAccess to access GroupWise, high availability is a totally different scenario if you would use the same clustering paradigm. In that case there is no client application that works for the user and could reconnect. It all happens in the browser and the session is kept alive on the server. This would mean that users will notice a failover because they would have to re-log in. A WebAccess high-availability scenario would consist of redundant or clustered WebAccess agents and high availability for the web servers through network load balancing. More on this topic can be found in specialized GroupWise clustering books, such as those mentioned in the beginning of this section from Tay Kratzer, at www.taykratzer.com.
The GroupWise components, such as the POA and Message Transfer Agent (MTA), run on a server that has access to the cluster shared storage. Therefore it is important that the software is loaded on the server where the shared storage is activated. If you have a separate resource for your cluster-enabled pool and another one for GroupWise, you can never make sure that they are active on the same node. There is no such thing as combining or chaining cluster resources to become dependent on each other.
The way to make sure that the GroupWise software is being loaded on the server where the shared storage is active is to add the GroupWise load commands to the load script of the cluster pool resource, where the NSS pool is activated and the volumes are mounted or where any other form of Linux storage is activated. And of course to add the unload commands to the unload script.
This also means that when you want post offices to be able to run on separate servers, for example to balance your load, you must create separate volumes where the post office directories can be located and from where the correct GroupWise agents can be loaded.
On a standalone server you could just install GroupWise with all the defaults on the server’s primary IP address and on all the default TCP ports. For a cluster you need at least secondary IP addresses that can be used with the cluster resource to load the agents. With older versions of GroupWise there were issues in which the Post Office Agents would bind to all available IP addresses on the default port (1677). That posed a problem when running multiple post offices on a single server trying to listen on the same port on all the same IP addresses. With newer versions of GroupWise, a new feature has been added that allows you to bind an agent to a specific IP address. That is great, of course, because then a post office uses only that address, and if you leave it at the default port it will not conflict with other agents because they have their own address, where they can use the same port.
It is, however, good practice to still use separate port numbers for the agents you have running that might ever run on the same server. By not only binding to the specific IP address but also specifying a unique port number to all agents, you prevent future problems when you bring an agent online without configuring the specific IP address binding.
Before the GroupWise installation is started on the cluster, the shared storage must be created. For the instructions in this section, we will install a GroupWise system with one domain and two post offices. The domain’s MTA will use a separate storage pool and volume for the domain data, and the two post offices each will also use a separate pool for the post office directory. Therefore we require three cluster resources to store the data. Table 8.1 shows an overview of the GroupWise system we will create in this section.
So the preparatory steps that need to be taken are to create the cluster resources for the three NSS pools with their volumes. How to do this is described in Chapter 5, “Creating Cluster Resources.”
Before starting the GroupWise installation, also make sure that the three resources are up and running and that you have access to all three shared disks. The best way to do this is to create a drive mapping to these three disks. With the three drive mappings available, you can make sure that the installation program can copy files to the volumes and create the directories for you.
Because installing GroupWise on a cluster is not too much different from installing on a real server, we expect that you understand the other necessary requirements needed for installing GroupWise, such as having rights to the tree root object to extend the schema if necessary.
In general, there are two ways to create a new GroupWise system. The first method is by the book: Start from the installation CD and follow directions. The second method starts halfway down the track and is preferred by most experienced GroupWise administrators. The step in the default installation that requires the most time is copying the software to the software distribution directory. Therefore many administrators just copy the GroupWise snap-ins to their ConsoleOne directory and select the option New System from the GroupWise Utilities menu under Tools. This is also the step where our installation starts. If you want to go by the book, just start the GroupWise installation from the CD-ROM, and when you reach the step where it starts ConsoleOne, pick up from this point onward.
Note
The steps in this book are based on a GroupWise 7 installation. If you need to set up a GroupWise 6.5 system, you can follow the same directions because the setup instructions are identical.
ConsoleOne will be started automatically from the GroupWise installer, or you can start ConsoleOne yourself and perform the following steps:
1. In ConsoleOne from the Tools menu under GroupWise Utilities, select New System.
2. Specify the path to the software distribution directory. In our case we kept it simple and just specified the path to the software CD-ROM in our CD-ROM drive, being F:. If you perform the full installation, the best choice is to install the software directory to a clustered resource to always have this directory available.
3. Specify the eDirectory tree where the GroupWise system is going to be installed.
4. Select to extend the eDirectory schema.
5. Provide a system name for your GroupWise system. This name cannot be changed later so select a general name, not using your company name or anything else that might change. We have often used GroupWiseSystem as a generic name.
6. Provide the name of the primary domain, in our case GWDOM1.
7. Specify the domain directory, in our case GWDOM1:GRPWISEGWDOM1. This is a directory in the shared pool that was created as the shared resource for the domain.
8. The next steps are general for GroupWise installations and not different for a cluster, so we only summarize the selections you need to make:
![]() Domain context
Domain context
![]() Domain language
Domain language
![]() Domain time zone
Domain time zone
9. Specify the name of the first post office to be created, in our case GWPO1.
10. Specify the path where the first post office will be created, in our case GWPO1:GRPWISEGWPO1.
11. The next steps are general for GroupWise installations and not different for a cluster, so we only summarize the selections you need to make:
![]() Post office context
Post office context
![]() Post office language
Post office language
![]() Post office time zone
Post office time zone
12. Next you must specify the type of link that will be used to access the post office from the MTA. In a clustered environment this must always be a TCP/IP link. In our case we link to IP address 10.0.0.61, client/server port 1677, message transfer port 7101, and HTTP port 7181. See Figure 8.1 for an example of the configuration of our setup.

13. For the Message Transfer Agent specify the IP address of the cluster resource where the domain directory is installed. In our case this is the GWDOM1 pool, which has IP address 10.0.0.60. The message transfer port we will use is 7100 and the HTTP port is 7180.
14. At this point you can add users to the GroupWise environment. This can also be performed when the system is up and running. But be sure to create at least one user at this point or at a later time to be able to test the GroupWise system after installation.
15. The GroupWise Setup Progress overview window will now show that it is ready to create the system. A summary of all information you have entered will be displayed. You can now start the creation process of the GroupWise system. If all components were successfully created, you can proceed to the next step.
16. The GroupWise Setup Progress overview window will display the next step: installing the agent software. Start this process by choosing Next. If you ever have to start this step manually, as we will do for the second post office later, you can start the agent installation with install.exe from the agent software directory on the CD-ROM or in the GroupWise software directory on your system.
17. After selecting NetWare as the platform for your agents, you must specify the system software installation directory. We advise you to install the software on the shared disk system. We start with creating a SYSTEM directory on the GroupWise domain pool resource GWDOM1. In our example in Figure 8.2 drive letter I: is mapped to the GWDOM1 volume.

18. At this time the GroupWise system is created on your NetWare cluster. There are still a few configuration steps that need to be performed. In the next paragraph we will explain what needs to be configured on the newly created system and provide short instructions on how to configure this in your environment.
One of the first steps to perform is to configure the load files that are going to be used to start the agents. The default load file is GRPWISE.NCF. This will be created in the default SYSTEM directory that was created in step 17 in the preceding instructions. Using this load file will not work because it would try to load the MTA and the POA from the same volume, but because we have split them on different pools and volumes, the agents would not be able to access their files.
The files we need to create are called GWDOM1UP.NCF and GWDOM1DN.NCF, and GWPO1UP.NCF and GWPO1DN.NCF. With these files we can start and stop the MTA and POA individually. We then add these NCF files to the cluster resource load and unload scripts. You could start by copying the GRPWISE.NCF to the four filenames we have just listed or creating them from scratch. The filenames we have selected here match pretty nicely with the files called GWDOM1.MTA and GWPO1.POA that were created for the agents.
Tip
Using these load and unload command files is better than adding the commands to the load scripts. Doing so allows you to stop and start GroupWise without accessing the cluster software; it allows you to delegate GroupWise administration and cluster administration to different administrators; and it keeps the load scripts short and simple.
The location of these files can be the SYSTEM directory on the shared volume, or the GroupWise domain and post office directory of the resource that the configuration files belong to. We choose the latter location because this will keep the SYSTEM directory generic and it will be very easy to find the correct files for every resource. If you choose to also do this, do not forget to copy the MTA and POA configuration files that were created to the same directory too.
Here are the paths and contents of the files in the setup we have created in this section:
![]() GWDOM1:GRPWISEGWDOM1GWDOM1.MTA
GWDOM1:GRPWISEGWDOM1GWDOM1.MTA
/home-GWDOM1:grpwiseGWDOM1
(This file contains more lines, but this is the only relevant one here.)
![]() GWDOM1:GRPWISEGWDOM1GWDOM1UP.NCF
GWDOM1:GRPWISEGWDOM1GWDOM1UP.NCF
LOAD Restart Address Space = GWDOM1 GWDOM1:SYSTEMGWMTA
![]() @GWDOM1:GRPWISEGWDOM1GWDOM1.MTA
@GWDOM1:GRPWISEGWDOM1GWDOM1.MTA
![]() GWDOM1:GRPWISEGWDOM1GWDOM1DN.NCF
GWDOM1:GRPWISEGWDOM1GWDOM1DN.NCF
UNLOAD Address Space=GWDOM1
![]() GWPO1:GRPWISEGWPO1GWPO1UP.NCF
GWPO1:GRPWISEGWPO1GWPO1UP.NCF
LOAD Restart Address Space = GWPO1 GWPO1:SYSTEMGWPOA
![]() @GWPO1:GRPWISEGWPO1GWPO1.POA
@GWPO1:GRPWISEGWPO1GWPO1.POA
![]() GWPO1:GRPWISEGWPO1GWPO1DN.NCF
GWPO1:GRPWISEGWPO1GWPO1DN.NCF
UNLOAD Address Space=GWPO1
If you look at the preceding listing of the files, you’ll notice that we use full pathnames throughout the entire setup. We do not like to be dependent on relative paths or search paths being available. It might take some more time to enter all paths, but it makes the system more robust.
The next step you need to take after creating all configuration and startup files is to copy the SYSTEM directory from the shared storage directory that you have specified during installation to the volumes of the other resources. You’ll do this first to the volume for post office 1, GWPO1, and also to GWPO2. We will configure the rest of that post office later.
After you’ve copied the SYSTEM directory, it is time to start the newly created GroupWise system. Execute the load scripts manually to start the MTA and the POA on the cluster node where the resources are loaded at that time:
GWDOM1:GRPWISEGWDOM1GWDOM1UP.NCF
GWPO1:GRPWISEGWPO1GWPO1UP.NCF
If the GroupWise agents run as expected and your GroupWise system works as you want it to, just as you are used to in a standalone environment, unload the modules again with the unload scripts:
GWDOM1:GRPWISEGWDOM1GWDOM1DN.NCF
GWPO1:GRPWISEGWPO1GWPO1DN.NCF
Be sure to stop the MTA and POA before configuring the load and unload scripts.
It is now time to add the load and unload command files to the load and unload scripts of the cluster resources:
1. In iManager open the Clusters role and select the Cluster Options task. Browse to the cluster object where the resources that need to be configured are located.
2. Select the domain resource object and click the Properties link.
3. In the Scripts tab add the load command file to the load script, as in the example in Figure 8.3. Add this to the end of the script.

4. Also add the unload command file (GWDOM1DN.NCF in this example) to the unload script. In that script the command must be added before any of the other lines because first the GroupWise software must be stopped and only after that can the IP address be unbound and the volume and pool deactivated.
5. Also configure the post office load and unload scripts.
After configuring all the cluster resources, you must bring them offline and back online again to start reading the new load and unload scripts. This is one of the advantages of using NCF files inside the cluster resource scripts: The scripts remain static. When you modify the NCS files on the file system, you can execute them manually or migrate the resource to another node. There is no reason to bring the resource offline for changes.
Now that all the files and the cluster resources have been configured, it is time to perform the final test. Perform a manual migration of the cluster resources from the first node where they are started to all other nodes where they are configured to run consecutively. Perform this test step by step, resource by resource, and keep track of how the agents are loading on all the nodes. Pay special attention to check whether they are loading without errors, and check their connectivity with the other GroupWise components.
In the previous paragraphs we explained in detail how to set up a default GroupWise system. A minimum system contains one domain and one post office. We will now describe how to add a post office to an existing GroupWise system in a NetWare cluster (for this step we expect that you have already created the shared Pool and volume resource where the data for this post office will be created):
1. In ConsoleOne select the container where the new post office object needs to be created. Select to create a new object and choose to create a GroupWise post office.
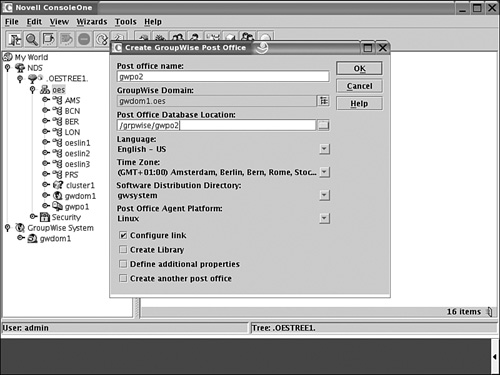
2. In the Create Post Office dialog box add the post office name and provide the path to the shared volume where the post office database will be installed. In our example in Figure 8.4, this will be GWPO2 in the GWPO2:GRPWISEGWPO2 directory.
3. In the next dialog box you must set up the link for the new post office. Just as with the first post office this must be a TCP/IP link. The IP address, as we planned in Table 8.1, will be 10.0.0.62 and the port numbers will be as shown here:
![]() Client/server port 1678
Client/server port 1678
![]() Message transfer port 7102
Message transfer port 7102
![]() HTTP port 7182
HTTP port 7182
4. Click Finish to create the new post office.
5. Copy the SYSTEM directory from one of the other GroupWise resource volumes to the volume for this new post office.
6. In the post office directory create the new post office load, unload, and configuration files. You could run through the installation process for the agents by running the install.exe. But if you just copy the configuration files from the first post office and modify them with the correct information for this second post office, that is much easier. Here are the contents of the files and their paths for the new post office:
![]() GWPO2:GRPWISEGWPO2GWPO2.POA
GWPO2:GRPWISEGWPO2GWPO2.POA
/home-GWPO2:GRPWISEGWPO1
/cluster
![]() GWPO2:GRPWISEGWPO2GWPO2UP.NCF
GWPO2:GRPWISEGWPO2GWPO2UP.NCF
LOAD Restart Address Space = GWPO2 GWPO2:SYSTEMGWPOA
![]() @GWPO2:GRPWISEGWPO2GWPO2.POA
@GWPO2:GRPWISEGWPO2GWPO2.POA
![]() GWPO2:GRPWISEGWPO2GWPO2DN.NCF
GWPO2:GRPWISEGWPO2GWPO2DN.NCF
UNLOAD Address Space=GWPO2
Note
The reason we have used the separate address space for the first and second post office is that you cannot unload the regular GWPOA.NLM for a specific post office. Running the unload script for a post office would effectively unload all post offices. By specifying an address space, we can now unload a specific post office.
7. After creating the files, test the new post office by running the new load and unload command files. Be sure to stop the Post Office Agent before configuring the load and unload scripts.
8. In iManager modify the second post office cluster resource load and unload scripts and add the load and unload command files the same way you did for the first post office.
9. Now bring the resource offline and back online again to start the second post office in the system.
Before you start the GroupWise installation, there are a few preparatory steps you must take. One of them, for example, is installing ConsoleOne to the system where you will be installing GroupWise. Other requirements for GroupWise 7, such as rights to the eDirectory tree to expand the schema, can be found in the GroupWise 7 documentation and are no different for installing GroupWise on a cluster (and thus are not covered here).
For the GroupWise 7 installation that we will walk you through in this section, we expect that you have configured your cluster with a shared resource to install your GroupWise systems databases. Also, you will need to have shared storage available, such as is displayed in Figure 8.5.

Note
Although Novell Cluster Services (NCS) depends on the Novell Storage Services (NSS) file system for services such as file sharing, there is no need to work with NSS for GroupWise. Because GroupWise is a true client/server application, there is no need for end user rights to be assigned to the file system. Other features, such as journaling, that NSS offers are important but are also offered by traditional Linux file systems, such as ReiserFS and ext3. Our opinion on using NSS is that you should do so only if you need the features offered by it and to use the other available file systems when those offer sufficient support. For our GroupWise cluster example we will use ReiserFS because this is SUSE Linux’s preferred file system and it performs better than ext3 when using many small files, which GroupWise does. One last remark here: Although NSS is not a requirement for GroupWise, you will still find that it is a software requirement for NCS that NSS be configured on the server, even though you might not be using it.
The GroupWise system we will be creating in this section is very much like the system we created in the preceding section for NetWare. The naming standards, locations, and IP addressing are listed in Table 8.2.
We start with preparatory steps on our cluster before installing GroupWise. We want to have the shared disks and resources configured so that the shared data store is online and tested.
For the system where we are installing GroupWise, we have already created EVMS volumes that can be mounted as /grpwise/gwdom1 and /grpwise/gwpo1. How to create a shared EVMS volume is explained in detail in Chapter 5. Perform the following steps to prepare your cluster for the GroupWise installation:
1. First create a cluster resource for the GroupWise domain and post office. This is where we will install the first GroupWise components during installation. How to create a resource is explained in detail in Chapter 5. We will give you only the quick tour here. In iManager under the cluster options for your Linux cluster, select New to create a new resource and select the Generic_IP_Service template to create a resource. We have used the names GWDOM1, GWPO1, and GWPO2 for our example. Figure 8.6 shows an example of the most important lines from the cluster load script. Change your load script and unload script lines accordingly. We will explain how some of the commands need to be interpreted to modify the scripts to meet your needs. Note that the mount command in iManager might not fit onto one line in the screenshot, but it is really all on one line.
One other thing to note is that you must uncomment the lines in the scripts that start and stop the cluster service. You will configure this later, and we will explain how, after GroupWise has been installed.
2. For each GroupWise component that will run on separate cluster nodes from other GroupWise components, you will need a separate cluster resource. The type of resource is different for a GroupWise Linux cluster as compared to the NetWare cluster that was configured earlier in this chapter. This is because on NetWare the GroupWise load scripts are executed from the cluster volume resources and on Linux we do not use those types of resources when using a Linux file system. Instead we use a generic resource, as explained in step 1, to mount the file system. Figure 8.7 shows an example of a Linux cluster with one GroupWise domain and two post offices. For each of these GroupWise components, there is a separate EVMS volume and a cluster resource.
When the volumes and resources are created, tested, and online on one of the nodes, it is time to start the GroupWise installation on that node. The full documentation of this installation is available from Novell’s documentation website at www.novell.com/documentation. Therefore we will discuss only the major installation steps. To start the installation, run the install script from the GroupWise CD-ROM, for example, with this command:
/media/cdrom/install
Tip
If ConsoleOne is not yet installed, decompress the ConsoleOne tar-archive from the ConsoleOne directory on the CD-ROM and run the c1-install script from the extracted Linux directory.
All these installation steps, including the steps for testing the agents, are performed on the cluster node where the GroupWise resources are loaded and thus where the volumes are mounted and IP addresses are bound. Only after the installation and configuration are finished will we expand the GroupWise system to the other cluster nodes. Perform the following steps to install GroupWise:
1. From the Novell GroupWise installation screen, select the option Create or Update a GroupWise System. Go through the mandatory steps of accepting the license agreement and such.
2. The choice you will have to make is for the location of the software distribution directory. The default path is /opt/novell/groupwise/software. We suggest that you place this directory on one of the shared disks. In our case we have chosen to place it in the /grpwise/gwdom1/software directory. This way it will always be available on a running cluster node. Install at least the GroupWise agents in the software distribution directory and select the remaining software that fits the needs of your installation.
3. After the file copy has finished, select to create a new system and let the installation start ConsoleOne to start the system creation utility. When asked for the Linux mount point, provide the path to the GroupWise installation CD-ROM for example, /media/cdrom.
4. In ConsoleOne log in to eDirectory and select to install a new system from the ConsoleOne Tools menu in the GroupWise Utilities submenu.
5. Go through the default GroupWise configuration steps for creating a new system. Provide the path to the software distribution directory and specify a GroupWise system name.
6. Provide the domain name and domain directory as specified in Table 8.2. For our example this is gwdom1 and /grpwise/gwdom1.
7. Provide other domain details such as the location of the domain objects, the domain language, and the time zone.
8. Next provide a name and path for the post office. In our example this is gwpo1 and /grpwise/gwpo1.
9. Provide other post office details such as the location of the post office objects, the post office language, and the time zone.
10. The next option is to configure the post office link. Select to use a TCP/IP link and provide the secondary IP address of the post office resource, in our case 10.0.0.67. Also specify the client/server port, message transfer port, and HTTP port. In our example these are, respectively, 1677, 7101, and 7181. (See Table 8.2.)
11. Next specify the domain’s MTA network address information. In our case the IP address is 10.0.0.66, the message transfer port is 7100, and the HTTP port is 7180.
12. Optionally add users to the new GroupWise post office. This can also be performed when the system is up and running. But be sure to create at least one user at this point or at a later time to be able to test the GroupWise system after installation.
After this step, a summary will be displayed from which you can review the information you have provided. If everything is okay, select Next to create the new GroupWise system. When the system is created, a message will be displayed that the system was successfully installed. Select Next to continue and start the agent installation.
Tip
If the agent software installation does not start automatically after you’ve created the GroupWise system, you can start that installation from the GroupWise installation screen by selecting the option Install Products. The installation can always be restarted with the install script from the software distribution directory.
Note
If you start the installation manually, do not forget to go through two steps: installing the agents and configuring the agents. This is different from what you were used to with GroupWise on NetWare.
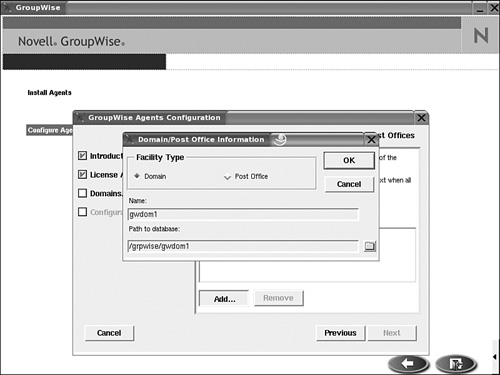
13. Go through the steps of configuring the GroupWise agents. If you have worked with GroupWise before, you can see in Figure 8.8 that the steps are identical to those in a GroupWise installation on NetWare. Add the first domain and post office to the configuration.
14. When the configuration is complete, the default setting is to let the agents be configured to load at system startup. Uncheck this check box because we want to have the agents loaded by the clustering software.
15. The configuration files for the MTA and POA are stored in this location: /opt/novell/groupwise/agents/share. The files are named with the name of your domain and post office and will have the mta and poa extensions.
It is now time to test the GroupWise agents to test whether they are working correctly. Start the agents with the --show parameter to display the window.
Later they will run as daemons without output and they can be accessed through the http interface. Start the agent software from the /opt/novell/groupwise/agents/bin directory and provide the names of the agent configuration files, for example, with these command lines:
/opt/novell/groupwise/agents/bin/gwmta --show @gwdom1.mta &
/opt/novell/groupwise/agents/bin/gwpoa --show @gwpo1.poa &
Tip
If the MTA shows the post office as closed, one of the most common problems is that the database version has not been set to version 7. You can check this in the post office object in ConsoleOne. If the database version shows as version 5.5, either just wait, or select the post office object and from the GroupWise Utilities menu select Mailbox/Library maintenance and run the default check. After that the database version should be listed as 7.
If the agents are working correctly, close them from the GUI.
It is now time to test the agents running as daemons. The main GroupWise script is called grpwise and is in the /etc/init.d directory. Check the status and start and stop all the agents with the following commands:
/etc/init.d/grpwise status
/etc/init.d/grpwise start
/etc/init.d/grpwise stop
Testing whether the agent daemons are working correctly can be done by accessing the HTTP port of the agent. Point your browser to the secondary IP address of the agent and add a colon and the port number. For our MTA listed in Table 8.2, this would be the following URL: http://10.0.0.66:7180.
At this point install the agents on each node in the cluster.
Note
On NetWare we can install the GroupWise software on the shared storage so that we have to install it only once. Because of the architecture of Linux, with its configuration files and daemons that the operating system and software itself expects to be in a default location local to the server, we cannot install the GroupWise software on the shared storage on a Linux cluster. Therefore, we have to install the software on each node.
Use the install script from the GroupWise CD-ROM or the one that can be found in the GroupWise software distribution directory. Follow these steps to perform a structured installation and configuration:
1. Migrate the cluster resources to the second node. This will mount the volumes on that node.
2. Start the GroupWise agent installation and also select Configure the Agents. Configure the agents for the domain and post office. Also do not forget to disable the check box to load the agents at system startup.
3. Migrate the resource to the third node and all other nodes, and install and configure the agents until they are installed and configured on each node where they need to run.
The next step is to further configure the cluster resources from iManager. We have already configured the resources to mount the volumes and IP addresses in the beginning of this section. The only step we need to perform is adding the agent load and unload commands to the respective scripts.
You may remember that for NetWare it was a problem to stop individual post offices because all the agents would be loaded with the same GWPOA.NLM. Therefore, we used a separate address space to load the agents that enabled us to unload that specific address space when migrating a resource to another node or when bringing it offline.
For Linux we can just provide the name of the GroupWise resource we want to stop or start as a parameter for the grpwise load script. For example:
/etc/init.d/grpwise start gwdom1
/etc/init.d/grpwise start gwpo1.gwdom1
Notice that for the Post Office Agent the name must be specified as PostOffice.Domain.
Tip
If you are running the first version of GroupWise 7 without service pack 1, modify the grpwise load script to resolve an error. You will find several lines with a startproc command that look like the following one, but one line will not have the -f parameter. Add the -f parameter as in this example:
startproc -u root -f -t ${agent[4]} -p ${pid_file} ${agent[1]}
"@${agent[3]}" >& /dev/null
To configure the load scripts in iManager, select Cluster Options and modify the properties of each individual GroupWise resource. The load script must be like this example (for simplicity we left out the comments):
. /opt/novell/ncs/lib/ncsfuncs
exit_on_error mount -t reiserfs /dev/evms/lvm/cluster1/gwdom1 /grpwise/gwdom1
exit_on_error add_secondary_ipaddress 10.0.0.66
exit_on_error /etc/init.d/grpwise start gwdom1
exit 0
The unload script must be like this example (again, for simplicity we left out the comments):
. /opt/novell/ncs/lib/ncsfuncs
ignore_error /etc/init.d/grpwise stop gwdom1
sleep 8
ignore_error fuser -mk /grpwise/gwdom1
ignore_error del_secondary_ipaddress 10.0.0.66
exit_on_error umount /grpwise/gwdom1
exit 0
Note
Add the m parameter, as we did in the example, to the command where the agents will be killed when they did unload correctly (the fuser -k command). This will help identify the processes accessing the mount point.
The configuration of the software, the volumes, the IP addressing, and the cluster load and unload scripts are now finished for the first node. It is now time to test the new cluster resources for the domain and post office on this node. Because you have changed the load and unload scripts, you must first bring the resource offline and then bring the resource back online on the same node. Test the agents with a browser by accessing the HTTP port.
Note
After bringing the resources offline, check whether the volumes are really unmounted (mount command) and whether the secondary IP addresses are released (ip address). If not, first check the cause of this. You may have misconfigured one of the unload scripts, or a volume was in use; for example, if ConsoleOne was still accessing the domain database.
When the agents can be brought online successfully on the first node, it is time to test migrating the resources to the other cluster nodes where the GroupWise agents must run.
Before testing this, make sure that these steps have been performed:
![]() The agent software is installed on each node.
The agent software is installed on each node.
![]() The agents are configured on each node.
The agents are configured on each node.
If this is all done, test the agent migration to the other nodes.
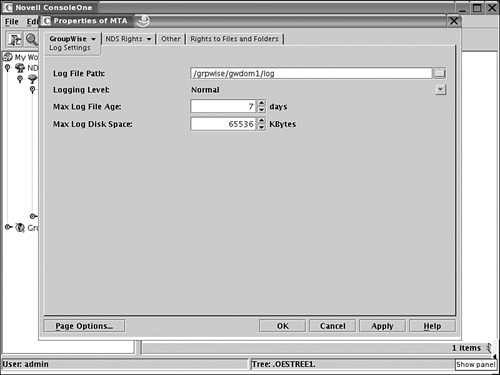
The default location for the MTA and POA log files and other paths will be pointing to the local file systems of the individual cluster nodes. By default, the log files are stored in /var/log/novell/groupwise. It is a good idea to create a log directory under the domain and post office directories and modify the log paths from ConsoleOne. Figure 8.9 shows the configuration of the log file path for the MTA of our system. For the MTA configure the typical log settings and also the message log settings.
In the previous paragraphs we explained in detail how to set up a default GroupWise system. A minimum system contains one domain and one post office. We will now describe how to add a post office to an existing GroupWise system in a Linux cluster.
For this step we expect that you have already created the shared EVMS volume where the data for this post office will be created and also the cluster resource derived from the Generic_IP_Service template. Perform the following steps to add a second post office:
1. Start ConsoleOne and log in to eDirectory. Select your GroupWise domain and from the GroupWise System Operations menu select Connect to connect to your GroupWise domain.
2. In ConsoleOne select the container where the new post office object needs to be created. Select to create a new object and choose to create a GroupWise post office.
3. In the Create Post Office dialog box add the post office name and provide the path to the shared volume where the post office database will be installed. In our example in Figure 8.10, this will be GWPO2 in the /grpwise/gwpo2 directory.
4. In the next dialog box you must set up the link for the new post office. Just as with the first post office, this must be a TCP/IP link. The IP address, as we planned in Table 8.2, will be 10.0.0.68, and the port numbers will be as listed here:
![]() Client/server port 1678
Client/server port 1678
![]() Message transfer port 7102
Message transfer port 7102
![]() HTTP port 7182
HTTP port 7182
5. Click Finish to create the new post office.
6. Start the GroupWise install script and configure the agent for this new post office. This will create a post office configuration file in the /opt/novell/groupwise/agents/share directory. Do not forget to disable the check box that would configure the agent to be launched at system startup.
7. Copy the new post office configuration file to the other cluster nodes. You can use SCP, FTP, or any other networking utility for this. For example, you might use this command:
scp /opt/novell/groupwise/agents/share/gwpo2.poa![]() admin@host:/opt/novell/groupwise/agents/share
admin@host:/opt/novell/groupwise/agents/share
8. Configure the cluster resource load script and unload script. Use the same command syntax that was used for the primary domain and post office.
9. Bring the resource offline and back online again to start the second post office in the system.
In this section we describe how to configure iFolder 3 on an OES Linux cluster. iFolder version 3 is not available for NetWare. It is based on Mono and that development environment is not available on NetWare. Novell does not have plans to port this software to NetWare. Because the software and online documentation for iFolder version 2.x on NetWare have been around for a while, we decided not to add that part to the book.
When installing the OES Linux servers that will become your cluster nodes, preferably do not configure iFolder 3 during initial installation. It is better to first configure the entire cluster, the shared storage for iFolder, and the cluster resources and then install the iFolder software on each node in the cluster.
We start our configuration at the point when the cluster is fully functional and a shared EVMS volume exists to be used by the iFolder server. In our example the shared partition is mounted at the root of the file system in /ifolder. Do not forget to create this mount point on all nodes. By preparing the volume up front, we can easily activate the installation volume on each of the wanted cluster nodes. We start the configuration of iFolder with the resource online on the first node, as displayed in Figure 8.11.

Note
There is no need to use NSS as a file system for iFolder. No rights are needed for end users to access the files directly. All operations are managed through the iFolder Apache server. So a traditional Linux file system is sufficient for this application.
Create a cluster resource based on the Generic_IP_Service template. Do not use the iFolder template because that is used for iFolder version 2.x. In the cluster load and unload scripts, configure only the mounting of the volume and the secondary IP address. The load script of the resource in Figure 8.11 is as follows (for simplicity we left out the comments):
. /opt/novell/ncs/lib/ncsfuncs
exit_on_error mount -t reiserfs /dev/evms/lvm/cluster1/ifolder /ifolder
exit_on_error add_secondary_ipaddress 10.0.0.70
#exit_on_error /etc/init.d/myservice start
exit 0
Notice that the command line where the service starts has been commented out. We use the resource only for setting up the disk and IP address.
What you need to plan is what secondary IP address will be used by the iFolder server. We will use address 10.0.0.70 in our example because our cluster servers are configured with 10.0.0.61 and 10.0.0.62 and the cluster master resource with 10.0.0.65.
Because iFolder works with a secure environment via HTTPS on the Apache web server, it is necessary to make sure that all nodes in the cluster use the same certificates for Secure Sockets Layer (SSL) communications. If you were to use the default server certificates, it would never point to the correct iFolder server when that service moves from node to node during its life cycle.
We therefore start with the configuration of these certificates. In a production environment where you have purchased a certificate from a trusted third party, such as VeriSign or Thawte, to be used for secure communications via the Internet, we suggest that you use that certificate. In the description that follows we create a certificate with OpenSSL that can be used for testing purposes. The certificates are as secure as those you buy, but they are just not verified and thus, for example, a browser would prompt the user with a message to say that the source of communications cannot be verified. Perform the following steps to configure your certificates:
1. Prepare a DNS name for your iFolder clustered server in the network, and make sure that each cluster node is able to resolve that name. In our example we use ifolder as the hostname.
2. On the host where the iFolder resource is online, open a terminal window and create a directory to store the certificate files on the shared volume; for example, with the command mkdir /ifolder/cert. Make this directory your current directory to ensure that all files are created in this directory and you do not need to provide full pathnames in your commands.
3. On the same host create a private key in a file with the following command: openssl genrsa -out private.key 1024
4. The generated private key file can now be used to request a certificate from the certificate authority (CA) on your host. For this we need to create a certificate signing request (CSR). Create such a request in a file with the following command:
openssl req -new -key private.key -out request.csr
Answer the questions with information that matches your environment. The most important answer is the Common Name to be used in the certificate. This must match the exact full qualified DNS name of your iFolder server. If your server, for example, can be reached at ifolder.OESCorp.com, that would be your Common Name.
5. Now create the certificate that will be used by Apache with the following command. This will actually use the private key and the certificate signing request and have it signed by your CA.
openssl x509 -req -days 30 -in request.csr -signkey private.key
-out ifolder.cert
6. Delete the certificate signing request rm request.csr.
7. On every cluster node where the iFolder server will run, configure the Apache SSL configuration file to point to the newly created certificates. This file is typically called vhost-ssl.conf and is stored in the /etc/apache2/vhosts.d directory. Modify the two lines in the file on every node as in the two lines in our example:
SSLCertificateFile=/ifolder/cert/ifolder.cert
SSLCertificateKeyFile=/ifolder/cert/private.key
Tip
If your iFolder server will use a different hostname than other services that you host on the same server, you might want to consider configuring it as an Apache virtual host. For example, this might apply when there already is webmail.company.com for this server with an SSL certificate and now you want to use ifolder.company.com. In that case add the previous SSL configuration to the Virtual Host section. In most cases this issue will not be a problem because iFolder is an alias configured as /ifolder for the server’s default URL. When setting up a virtual host, do not forget to copy the file inspection.wsil from /opt/novell/ifolder3/etc to the new document root directory, as described in the iFolder online documentation.
At this point the iFolder 3 software and optionally the iFolder 3 WebAccess software must be installed on each node in the cluster where the software will run. There is no need to bring the cluster resource with the volume and IP address online on the other nodes for this installation. Perform the following steps to install the software:
1. Start YaST and from the Software category select Install and Remove Software.
2. From the Filter drop-down box choose Selections.
3. In the Package Selection list select the iFolder 3 package and optionally the iFolder 3 Web Access package.
4. Click Accept to start the software installation. Change CD-ROMs as needed to finish the installation.
5. Go to the second and all other nodes and install the software.
When the software is installed, it is time to configure iFolder. We start with the first cluster node where the iFolder server resource is currently online and where the IP address is also bound.
Perform the following steps to configure iFolder on the first node:
1. Create the directory structure needed for iFolder on the shared volume. In our example the volume is mounted on /ifolder, so we create the directory with the following command:
mkdir -p /ifolder/.local/share/simias
(The -p parameter creates parent directories when needed.)
2. Change ownership for all directories in the iFolder shared volume to the wwwrun user and www group:
chown -R wwwrun:www /ifolder
(The -R parameter changes the ownership recursively in all child directories.)
3. Create a symbolic link for the newly created directory to the wwwrun user’s home directory. Use the following command:
ln -s /ifolder/.local /var/lib/wwwrun/
The creation of the symbolic link can be tested with the following command (the link should be reported in the file listing):
ll /var/lib/wwwrun/
4. Change ownership of the newly created symbolic link to the wwwrun user and www group with the following command:
chown -R wwwrun:www /var/lib/wwwrun/.local
The iFolder 3 software must further be configured from YaST. The full iFolder installation documentation is available from Novell’s documentation website at www.novell.com/documentation. So we will only walk you through the most important steps without unnecessary details. Just follow these steps:
1. From YaST, in the Network Services category select iFolder 3 to configure the server.
2. Authenticate to eDirectory through LDAP with a valid username and password. For the LDAP server address enter the IP address or hostname of the iFolder server cluster resource.
Note
It is very important that you do not leave the default address of the local server in place when specifying the LDAP server. If that node fails, the other nodes would try to contact that server for LDAP authentication. By specifying the iFolder server itself, you will always have a functional LDAP server when the iFolder server is running.
3. Enter a unique name for the iFolder server. In our example we will use iFolder1OESCorp as the system name. This name will appear in the end user’s web page, if you use Web Access.
4. For the system store path we will use a directory off the mount point of the shared volume that is currently mounted on this node, as displayed in Figure 8.12. In our example this is /ifolder/iFolder1OESCorp.

Note
Do not specify the root of the mount point, such as /ifolder, because the configuration script would try to delete it. It cannot because you cannot delete an actively mounted directory.
5. Specify the username and password for the iFolder Admin user. Also enter a Proxy Context. In this context a proxy user will be created with rights to LDAP.
6. When iFolder is configured, you will be prompted to restart Apache. Let YaST restart Apache for you.
At this point your iFolder server should be functioning correctly on this first node. Try to access your iFolder server by accessing it from a web browser. Use the following case-sensitive URL, with your own hostname or IP address, to access the server:
http://ifolder.OESCorp.com/simias10/Simias.asmx
If you are prompted to authenticate then the server is up and running.
7. If you have also installed iFolder Web Access, configure that service now from YaST in the same way as the iFolder software. You will be prompted for an alias; this is the URL suffix that will be used for accessing the server. Leave this at the default of /ifolder on all nodes. Also leave the iFolder Server URL to be localhost, but change the protocol from HTTP to HTTPS: https://localhost.
If you have configured iFolder Web Access, test it by pointing your browser to the Web Access URL of your server with the URL suffix you specified during configuration, for example, https://ifolder.oescorp.com/ifolder.
To manage iFolder version 3, you must install the plug-ins for iManager. The iFolder management task that is included by default is for iFolder version 2 only. To install the module, log in to iManager and go to the configuration panel. (This is with the administrator sitting behind his desk.) Under the Module Installation role you will find an entry named Available Novell Plug-in Modules. If you select this option, the iFolder 3 plug-in will be listed and can be installed from here. When the plug-in is installed, restart Tomcat with the following command:
/etc/init.d/novell-tomcat4 restart
Allow Tomcat some time to restart and reload all its modules. If you try to access iManager too soon after reloading, error messages will appear. If you now log in to iManager, there will be a new Novell iFolder 3 task where you can manage your server.
At this point the Apache server must be stopped and the iFolder cluster resources must be migrated to the second node where iFolder must be configured. Also configure Apache to no longer start at system startup. We want the cluster software to take care of that.
To stop Apache and prevent it from starting in the future at system boot, execute the following commands on the first node:
/etc/init.d/apache2 stop
chkconfig apache2 off
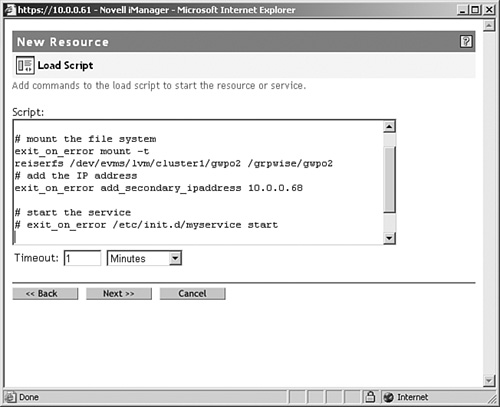
With the software configured, the next step is to configure the load and unload scripts for the iFolder resource. In iManager under Cluster Options, mark the Resource and Select properties to configure the scripts. Here is an example of our load script (we left out the comments for simplicity):
. /opt/novell/ncs/lib/ncsfuncs
exit_on_error mount -t reiserfs /dev/evms/lvm/cluster1/ifolder /ifolder
exit_on_error add_secondary_ipaddress 10.0.0.70
exit_on_error /etc/init.d/apache2 start
exit 0
Here is an example of our unload script (we left out the comments for simplicity):
. /opt/novell/ncs/lib/ncsfuncs
ignore_error /etc/init.d/apache2 stop
ignore_error del_secondary_ipaddress 10.0.0.70
exit_on_error umount /ifolder
exit 0
When you are using the unload script in this way, it will stop the entire Apache server. This means that other services that use Apache will stop working. This could also include iManager for cluster management, because even while iManager software runs in Tomcat, the HTTP traffic is handled by Apache. In such cases it is possible to leave Apache running and just stop the Mono processes of iFolder. To configure this, remove the line from the unload script that stops the apache2 daemon and replace it with these two lines that will terminate the running mono processes:
ignore_error mono /usr/lib/mono/1.0/mod-mono-server.exe![]() --filename /tmp/mod_mono_server_simias10 --terminate
--filename /tmp/mod_mono_server_simias10 --terminate
ignore_error mono /usr/lib/mono/1.0/mod-mono-server.exe![]() --filename /tmp/mod_mono_server_ifolder -terminate
--filename /tmp/mod_mono_server_ifolder -terminate
This will stop the iFolder software and leave Apache running. It is simple to check whether the software actually unloads. When running the fuser command with the -m parameter, you can easily find out what process is accessing the iFolder shared volume mount point. For example, you might use this command:
fuser -m /ifolder
This will display the process id (PID) of the mono process. After executing the two command lines shown previously, the process will be terminated and the fuser command will show that no processes are using the file system at the specified mount. Thus it is safe to unmount it and migrate the volume to another node.
This also means that Apache should probably start when the server comes online. And you probably remember that we disabled this service earlier in this section. So when you configure this feature, also enable the service again with this command:
chkconfig apache2 on
When you are adding this feature to the unload script and you encounter problems with loading Mono again when the resource comes back online, add an Apache2 stop command in the load script just before the line where you mount the file system:
exit_on_error /etc/init.d/apache2 stop
This will ensure that any previously loaded modules are stopped and that all modules can be successfully loaded.
After you have configured the cluster resource scripts, it is a good test to bring the service offline and back online at least two times on the first node to see whether everything works as planned. If you would start migrating it to another node right away and there would be a problem, it might be harder to track down what the cause is.
Not only stop and start the service, but also access it through the web browser if you have Web Access installed or through the iFolder Client from a workstation. Those tests will show that iFolder works as planned.
If everything is okay, it is time to configure the remaining nodes in the cluster and test a migrate.
When the first node is fully functional and the resource can be brought online and offline successfully, it is time to configure the other nodes. Remember that we already installed the software from YaST on all nodes earlier.
You perform the same configuration for iFolder 3 and optionally iFolder Web Access from YaST as you did for the first node. Do not forget that, as on the first node, the LDAP server you authenticate to must be the iFolder cluster server.
When being prompted for a system store path, enter a bogus name that will be replaced later. All other configuration steps, including those of the Web Access Service, are identical to those for the first node.
When the configuration is finished, do not let YaST restart Apache. The software will come online when we migrate the resource to this node.
There are a few manual post-configuration steps you must perform:
1. Copy the configuration file from the first node to all other nodes.
The file is named /opt/novell/ifolder3/etc/simias-server-bootstrap.config. It contains the configuration of the iFolder server that must be consistent through all cluster nodes.
2. Create a symbolic link for the .local directory of the wwwrun user. This link will show up in red as invalid after you create it because the shared resource will not be available at this time. But as soon as the volume is migrated to this node, it will work fine. Use the same command as when you configured the first node, for example:
ln -s /ifolder/.local /var/lib/wwwrun/
3. Change ownership for the newly created symbolic link to the wwwrun user and www group. Use the same command as when you configured the first node, for example:
chown -R wwwrun:www /ifolder
4. Finally, depending on whether you want to keep Apache running independent from iFolder, disable loading Apache at boot time. When you have modified the unload script to stop only Mono and leave Apache running, it is not necessary to disable Apache with this command. In all other cases use the following command to stop Apache from loading when the server comes online:
chkconfig apache2 off
When the second node is configured, migrate the resource to that node and test iFolder. When the server is working correctly, configure the possible third and other nodes and test them individually.
If you are using Open Enterprise Server Linux to run traditional Linux applications such as the Squid proxy server, Novell Cluster Services can be a good addition to increase the availability of those services. In this section you will learn how to set up the Squid server in an NCS environment. This is a description of a project we have realized at a large school in the Netherlands where the Squid proxy was used to provide access to the Internet for 12,000 students. Before realization of this project, Internet connectivity was often dropped because the proxy server was overloaded. Therefore, the customer wanted not only a high-availability solution in which there would always be a proxy to take over if one of the proxies failed, but also a load-balancing solution in which workload is divided among two operational proxies. Because load balancing is not something NCS can do, DNS round robin was used for this purpose. In order not to create a single point of failure, two DNS servers were installed: one as a master and the other as the slave.
To handle the load balancing, the following entries were added to the DNS database:
squid in A 10.0.0.10
squid in A 10.0.0.20
The advantage of this solution is that DNS will automatically apply round robin; client connections will be evenly distributed among 10.0.0.10 and 10.0.0.20. The disadvantage of a solution like this is characterized as “black holing”: If one of the nodes fails, the DNS server would never know and still forward clients to that server. In this scenario, however, packets are not forwarded to real servers, but to clusters where high availability has been taken care of. Therefore, this is no issue.
For a server that works with a large number of configuration files that need to be the same on all cluster nodes, shared storage is an important issue. If a traditional Linux service such as Squid is clustered, it would make sense to use an ext3 or Reiser file system for shared storage. If, however, the customer does not care about the availability of the cache files because they can always be built up anew when a server fails, we can configure the cluster solution without shared storage for the proxy cache. Another advantage in this configuration is that no additional workload is created for the SAN, which is already under heavy use. For the purpose of this environment, it is not really necessary to create a shared storage device. Only configuration files need to be synchronized because the Squid configuration does not change often, and in this environment they can be better synchronized manually. As an alternative, rsync can be used to configure automatic synchronization of a limited number of configuration files. The design scheme for the solution described in this chapter is shown in Figure 8.13.

Assuming that the NCS software is already installed and shared storage is available, the Squid cluster resource can be created. This involves a few general steps:
![]() Install the Squid software on both servers in the cluster.
Install the Squid software on both servers in the cluster.
![]() Prevent the Squid server from being loaded automatically.
Prevent the Squid server from being loaded automatically.
![]() Create a cluster resource for the Squid software.
Create a cluster resource for the Squid software.
The exact steps that have to be performed are described here:
1. Start YaST, log in as root, and select the option Install and Remove Software. Then select the drop-down list in the upper-left corner of the YaST screen and select the Search option. Next, enter the search text Squid. From the results screen, just select Squid and click Accept to proceed installing the software.
2. The next step is to prevent the Squid server from being started automatically when the server is booted; the reason for this step is that the cluster resource object will be responsible for starting Squid and not the Linux operating system itself. In YaST, select the runlevel editor from the System menu. Locate the Squid service and make sure that it is not selected.
3. Start iManager at https://yourserver/nps and authenticate as the admin user to your tree. Select Cluster, Cluster Options and next use the magnifying glass to locate the cluster object to which you want to add the proxy server as a resource. Select this object; this will display an overview of all resources currently in the cluster.
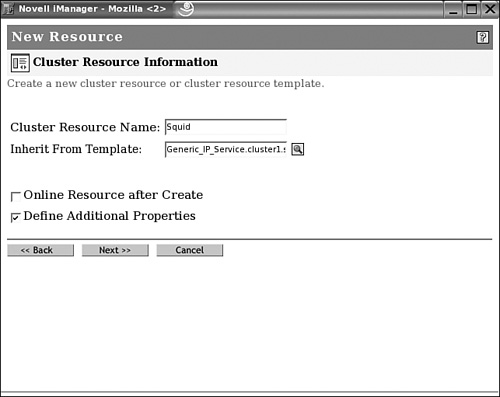
4. Click New under the Cluster Objects option to create a new cluster resource. You will now see a window where you can specify the type of object you want to create. Select Resource and then click Next to continue.
5. Enter the name you want to use for the cluster resource. Select the generic IP service (see Figure 8.14) to inherit properties from and then click Next to continue.
6. Now you can edit the sample load script to start the Squid service. The following load script will do fine:
#!/bin/bash
. /opt/novell/ncs/lib/ncsfuncs
exit_on_error add_secondary_ipaddress 10.0.0.31
exit_on_error /etc/init.d/squid start
exit 0
7. In addition to from the load script, you will also need an unload script for this cluster resource that makes sure that the service is unloaded properly. The following unload script will do fine:
#!/bin/bash
. /opt/novell/ncs/lib/ncsfuncs
ignore_error /etc/init.d/squid stop
ignore_error del_secondaray_ipaddress 10.0.0.31
exit 0
8. Next, you have to specify the failover and failback mode. You also need to specify all other parameters for your environment. For more details about these options, consult Chapter 6, “Cluster Management.”
The Samba server is rapidly becoming one of the most popular ways to share files in a Linux environment. Because the Samba server is available on OES Linux as well, we will discuss in this section how you can use it in combination with Novell Cluster Services. We recommend that you use Novell Cluster Services version 1.8 or later, which is included in OES, because it comes with a Samba resource template. The configuration of the Samba cluster resource involves the following steps:
1. Create a file system on the shared disk.
2. Create mount points to mount the shared file system on all servers.
3. Install Samba on all servers.
4. Configure the smb.conf file.
5. Create the Samba clustered resource.
The first step in the creation of the cluster is to create a shared file system. This involves two steps. First, you need to set up the EVMS volume manager because this is the only volume manager that works in a clustered environment.
Next, you need to create at least one Reiser volume on that. There are two tools you can use to create EVMS volumes: the evmsgui utility and YaST2. Both can be started from the console of an OES Linux server. In this procedure, we will use YaST2 to create the shared storage. On this shared storage device, we will create a directory for the Samba configuration as well as all shares that are used in the Samba environment.
The following procedure describes how to create a shared storage device:
1. From YaST, select System, Partitioner. Click Yes when a warning is displayed.
2. Click Create to create a new partition. When asked on which disk you want to create the partition, select the shared storage device and click OK. Then indicate the partition type you want to create. It doesn’t really matter what type you choose, but because in this example it will be the only partition on the shared storage device, primary will do fine.
3. In the properties window of the partition you want to create, select Do Not Format. Then from the drop-down list, select the File System ID 0x8E Linux LVM. Then click OK to continue.
4. Back in the main screen of the partitioner utility, click EVMS to start the EVMS volume creation program. Select the partition you have just created and then click Create Container to create an EVMS container object. You will always need an EVMS container if you want to create EVMS volumes.
5. Select the device where you want to create the container. Leave the default container name set to system and then click Add Volume. This will add the device /dev/evms/lvm/system to your server. Next, click OK to close the Create EVMS Container screen. This will bring you back to the EVMS configurator main screen shown in Figure 8.15, where you will see the empty EVMS volume you have just created. From there, click Add to create an EVMS volume in that container. This will bring you to the Create Logical Volume screen.

6. Give the EVMS volume the name samba and specify the size you want to give it. Lastly, specify the directory where you want to mount this volume. /media/samba might be a good choice. In fact, you don’t need to specify the mount point here because that is something you want to be handled by the NCS software, but YaST refuses to create the volume if you don’t give it a mount point. The default file system used for this volume is Reiser, which is a good choice. Click OK to accept all settings. This brings you back to the EVMS Configurator main screen, where you can see that a device with the name /dev/evms/lvm/system/samba has been created. Now click Next and then click Apply twice to create the volume. Then quit the partitioner utility and close YaST.
You have just created an EVMS volume on one of the servers in the cluster. As you might expect, this will cause the EVMS volume to be active at that server all the times it boots. The other server, however, still does not know about this EVMS volume. To teach it that there is something like an EVMS volume on the shared disk device, you need to start the boot.evms script with the boot.evms start command. To make sure that it is activated each time the server restarts, use the insserv boot.evms command. (Or use the YaST runlevel editor to perform these tasks.) Then before continuing, check that the EVMS device file for the Samba volume you have just created is present on all other nodes in the cluster as well.
After creating the EVMS volume, you have to make mount points on it. This way you make sure that from the cluster resource load script, data can be written to the shared volume. Creation of the mount points and associated directories involves the following steps:
1. Make sure that the mount point where the EVMS volume must be activated exists on all servers in your cluster. If on all servers in the cluster you want the shared volume to be mounted on /media/samba, make sure that the directory /media/samba exists. This is because the cluster load script will assume it is there when activating the shared volume. Create this directory manually with the mkdir /media/samba command on all servers. In the previous example, the mount point /mnt/samba was mentioned; use mkdir /mnt/samba on all servers to create it.
2. On one server only, log in as root and mount the EVMS volume on the mount point you have just created. For example, use mount /dev/evms/lvm/system/samba /mnt/samba to mount the volume.
3. On the EVMS volume, create all directories that are required. To store the configuration files, in /mnt/samba on the server where the EVMS volume is mounted, use mkdir -p etc/samba to create a subdirectory to store Samba configuration files. Also make sure that all shares that you want on the shared volume are created as directories as well, so that you can refer to them from the smb.conf configuration file.
Because it is important that the shared volume be loaded from the cluster resource load script and not from /etc/fstab, make sure that in /etc/fstab on the server where you have created the EVMS volume, all lines that refer to the volume are commented out. Of course, you can also remove the lines, but by commenting them out, at least you have one single place in which drive information is documented.
Next, you have to install Samba on all servers. Normally this shouldn’t be a problem because it is installed in a default installation of OES Linux. If it is not, use YaST to install the software.
By default, the smb.conf configuration file is read from /etc/samba/smb.conf. In a clustered environment, you should make sure that it is read from the shared storage device. Therefore, first you have to move it to the shared storage device, and then you have to make some modifications to the contents of the smb.conf file that will be used by the cluster resource:
1. Copy the /etc/samba/smb.conf file to the etc directory on your shared storage device. Then rename it to reflect the name of the Samba cluster resource. For example, use mv smb.conf cluster_smb.conf to rename it. For the remainder of this procedure, we will refer to the smb.conf file for the Samba clustered resource as cluster_smb.conf.
2. Open the cluster_smb.conf file with an editor and add the following lines to the [global] section:
bind interfaces only = yes
interfaces = cluster resource ip address
pid directory = $SAMBA_ROOT/share/locks
Of these lines, the first line will make sure that Samba connects to only the interfaces specified with the interfaces parameter. The interfaces parameter should be set to the unique IP address you will assign to the Samba cluster resource. Last, the pid directory setting will make sure that the PID files that are created by the Samba server are written to a directory on the shared disk as well. In this parameter, the SAMBA_ROOT variable is used; you will set this variable later when configuring the Samba cluster resource.
3. Next, also in cluster_smb.conf, modify the line netbios name = %h-W. Normally this line will use the name of your current host followed by -W as the NetBIOS name for the Samba server. Because the Samba server will be a clustered resource, this doesn’t really make sense. Therefore, change it to something that will be unique and recognizable as your Samba clustered resource. A name like SAMBACLUSTER would be a decent choice.
Now that all required modifications have been made to the smb.conf file, you still need to create the Samba cluster resource. Novell Cluster Services 1.8 comes with a template object to make creation of this resource easier. The following procedure describes how to create the Samba cluster resource:
1. Make sure that the shared disk you have created for the Samba server is unmounted.
2. Start iManager on https://yourserver/nps and log in as admin.
3. In iManager, activate Clusters, Cluster Options.
4. Specify the name of the cluster where you want to create the Samba resource, and then click New to create a new resource.
5. From the New Resource window, select the resource type and click Next to continue.
6. Use Samba as the cluster resource name, and in the Inherit from Template field, browse to the Samba_Template object. Make sure that the Define Additional Properties box is set and then click Next to continue.
Tip
If you don’t see a Samba resource template, make sure that you are using OES SP1 or later. The Samba resource template exists only from this OES version on.
7. You will now see the load script for the Samba resource that is created automatically based on the load script on the Samba resource template. Make sure that you adjust the load script to reflect your environment. Normally, the following parameters must be modified:
![]()
RESOURCE_IP:The IP address you want to assign to the Samba resource.
![]()
MOUNT_FS:The file system type you are using on the shared disk.
![]()
MOUNT_DEV:The name of the EVMS volume. If you have created the EVMS volume with YaST, the name will be something like /dev/evms/lvm/system/samba.
![]()
MOUNT_POINT:The name of the directory where you will mount the shared disk device. In this example we have used /mnt/samba for this directory name.
![]()
CONFIG_FILE:The name of the cluster_smb.conf configuration file you have created on the shared disk. Make sure that you include the complete pathname to this file as well.
8. After clicking Next, you will enter the screen where you can configure the unload script. Make the same modifications as mentioned in step 7 of this procedure, and click Next when finished.
9. Set the resource policies you want to use for this resource. Consult Chapter 6 for more information about these policies, and set the appropriate values. Then click Next to continue.
10. Make sure that the right nodes are assigned. If this is the case, click Finish to finish the configuration of the Samba cluster resource.
You have now configured the clustered resource. Depending on what is currently loaded on your server, it may not yet be available to load. If currently the shared volume is mounted anywhere or the Samba server is loaded on any node in the cluster, the Samba cluster resource cannot load successfully. Therefore, first make sure that the Samba server is not currently active on any server by using ps -ef | grep smb. If this command shows any active Samba servers, first use rcsmb stop to stop the server. Then use insserv -r smb to prevent the server from being started automatically. Next, make sure that the shared device that will be used by the Samba server is not mounted anywhere. If it is, unmount it by using umount /media/samba (which will work only if the device is mounted on /media/samba). If you get a “device busy” message, use fuser /media/samba to display a list of all processes that currently have files open on the shared device. Next, try to terminate these processes the proper way. If you are having problems doing this, you can use fuser -k /media/samba, which will force the device to be unmounted. The latter method, however, should be used only as a last resort.
You have now created a cluster resource for the Samba server. The Samba server, however, is not sharing anything so far. Here we will discuss how to share a directory on the shared resource with the Samba server:
1. On the shared disk device, use mkdir to create a directory. For example, use mkdir /media/samba/share to create a directory with the name share. Before issuing this command, use mount to make sure that the shared disk device is currently mounted.
2. To access a share, two things are needed: rights at the shared directory at the Linux filesystem level, and permissions to access the share granted by the Samba server. To get access to the share at a Linux file-system level, you need to create an eDirectory group that can be used as a trustee at the Linux file-system level as well. This is called a LUM (Linux User Management) enabled group. You can enable an eDirectory group as a LUM group from iManager, Linux User Management. When the eDirectory group has been granted rights at the Linux file system, you can use chmod from the command line to grant rights to the group. If you would use, for example, a scenario in which some Linux users need to be able to write to the shared directory at the Linux file-system level, you would need to make a LUM group, add these users as members to this group, and next use chmod g+rw yourgroup to provide the necessary rights.
3. As the next step, you have to configure the shared directory as a share from etc/cluster_smb.conf on your shared disk device. The entry to create this share would look like this example:
[share]
comment = shared directory
path = /mnt/samba/share
read only = no
inherit acls = yes
Of course, you should realize that this is a very basic example of how a share can be configured. For more details on the options you can use when configuring a Samba share, consult the man page of smb.conf.
4. The Samba share on the shared disk device is ready for use now. You can start the Samba server and access the share from any location you want.
In this section you learned how to configure Samba as a resource in an NCS clustered environment. In fact, the Samba server can be used as a blueprint for any other Linux service that needs to write files to a shared storage medium. When you are creating such an application, be sure to make arrangements for the following:
![]() Make sure that the configuration files of the service in question are on the shared medium.
Make sure that the configuration files of the service in question are on the shared medium.
![]() Make sure that all data stored on the shared medium is referred to in the correct way by the service or its cluster resource load script.
Make sure that all data stored on the shared medium is referred to in the correct way by the service or its cluster resource load script.
![]() Configure the cluster resource load script where the shared storage device is mounted on activation of the service. This will help you use your application in the clustered environment.
Configure the cluster resource load script where the shared storage device is mounted on activation of the service. This will help you use your application in the clustered environment.
In this chapter you learned how to configure some important services in an NCS environment. Only some of the more common services have been dealt with: Two of them are typical applications from the Novell world, and two others are applications from the Linux world. Both these kinds of applications can be used in the high-availability environment offered by Novell Cluster Services. We have not been able to deal with all possible applications in this section. For information about other applications, consult the NCS documentation at www.novell.com/documentation or do a search in the TIDs at http://support.novell.com.