Chapter 9
Advanced Clustering Topics, Maintenance, and Troubleshooting
In this chapter you will find the answers to many of the situations in which the normal configuration options from this book will not work. When something is broken or not working as it should, the answer could lie in this chapter. We have also added some maintenance tips and information on advanced topics, such as working with certificates in a cluster environment, and cluster backups.
Like every server environment, a cluster server environment is subject to change. Sometimes you initiate changes yourself and other times they come from a larger project. But in any case, there can be situations in which you have to perform maintenance on your cluster and change configuration options. This section will help you with that task.
For your NetWare or Linux servers you should already have common documentation in place. Without ever touching the server, you need to be able to find out from a paper source what the IP addressing scheme is, where in the network the servers are located, and even more detailed information, such as what the contents of your AUTOEXEC.NCF file are on NetWare.
For a cluster there is some extra documentation you should collect and add to your system documentation. The layout of cluster nodes, resources, resource priorities, and IP addresses used must be available not only from checking iManager.
The cluster master resource is one that is always available on the master node in the cluster. It can be your main access for managing the cluster because whatever nodes fail, this resource and its IP address will always be available as long as at least one node in the cluster is still alive.
If you ever have to change the IP addressing of the cluster, this address must also be changed. You cannot change it in the master resource itself. You will have to change the address in the cluster general properties. Be aware that you will have to bring down the entire cluster to change this address.
To change the address, perform the following steps:
1. In iManager select the Cluster Options task and select the cluster where you want to change the address.
2. Click the Properties button under the Cluster Selection text box.
3. In the General tab enter the new master IP address.
This IP address change will be in effect when the cluster is restarted. This requires that all resources and thus services will be unavailable. To bring the cluster down, issue the cluster down command on one of the nodes. When all nodes have left the cluster, restart the first node with the cluster join command and verify that it has loaded the master IP address. For this, use the display secondary ip address command on NetWare or the ip address command on Linux.
If your cluster nodes have only one network adapter, the IP address of that single adapter is used in the cluster for the heartbeat operation. If you had performed the installation on a server with more than one adapter, the installation program would have asked which IP address to use. Whenever you want to change the address your cluster nodes are using to communicate for the heartbeat process, follow the procedure given next.
Note
In Chapter 3, “Clustering Design,” we describe our idea about using, or rather not using, a dedicated heartbeat network. So if you are changing your addresses to set up such a network, we advise you to first read that section.
The cluster nodes must all be brought offline before implementing the new IP address scheme. Perform the following steps to change an IP address:
1. Unload the Cluster Services software on all nodes.
2. Configure the new IP addresses and, when necessary, the new network adapters on your servers.
3. From ConsoleOne or iManager browse to the cluster node object of each individual cluster node and open the properties page.
4. In the Cluster Node Identification tab enter the new IP address information for that node.
5. When all nodes have been configured with the new IP address information, load the cluster software again on all nodes.
Renaming a NetWare server is always a cumbersome task. Of course, the procedure is simple: Change the name in AUTOEXEC.NCF and reboot the server. After the reboot, the eDirectory Limber process takes care of renaming the server object, and the change is synchronized to the other servers in the tree. But then the work begins because there will be login scripts, other scripts, batch files, and application objects with UNC paths that need to be updated. So, if possible, never rename a NetWare server.
If you ever have to rename your server and it is an iSCSI initiator, an extra step is needed because the server name is used in the server’s registry for the name of the iSCSI initiator connection.
To change this name, you must edit the server’s registry manually. To allow for modifications to be made through Remote Manager, unload PORTAL.NLM and reload it with the /regedit parameter:
LOAD PORTAL.NLM /REGEDIT
The example in Figure 9.1 shows the registry key that needs to be modified:
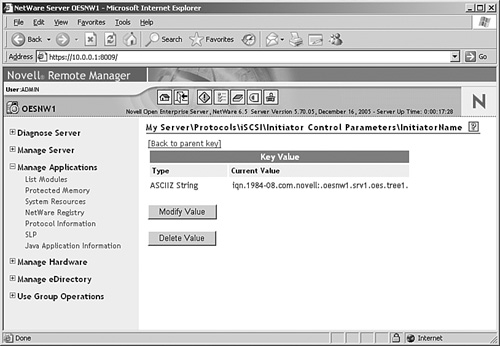
My ServerProtocolsiSCSIInitiator Control ParametersInitiator Name
Modify the name here and reload the iSCSI initiator software with the IOFF and ION commands.
First of all, an important remark: We can never be complete and up-to-date in a printed book. The most recent information for any troubleshooting issue can be found at Novell’s support website at www.novell.com/support.
Tip
If you can spare a few bucks, it is also interesting to get a subscription to Novell’s support knowledgebase on DVD. With a monthly update you get access to an integrated search engine on your own computer that will search through the TIDs, product documentation, application notes, and cool solutions.
For NetWare and Linux there are different locations where you can find information about the workings of your cluster. But there is a common denominator. We will introduce the generic troubleshooting first and the platform specifics thereafter.
Every event that occurs on your cluster—not only errors, but also resource migrate actions, cluster membership changes, and other such normal operations—will be present in the Event log. The Event log is available from every management application that provides access to the cluster:
![]() From iManager select the Cluster Event Log task from the Clusters role.
From iManager select the Cluster Event Log task from the Clusters role.
![]() In ConsoleOne (NetWare only) the Event log is accessible from the Cluster State view. It is the second tab in this view.
In ConsoleOne (NetWare only) the Event log is accessible from the Cluster State view. It is the second tab in this view.
![]() In Remote Manager (NetWare only) the Event log is accessible from the link in the Cluster Management section.
In Remote Manager (NetWare only) the Event log is accessible from the link in the Cluster Management section.
NetWare does not keep log files of all cluster activity on the file system. Instead it writes most of the information that you will ever need to the Logger Screen. This screen is always the second screen on a NetWare 6.x server if you access the screen list with the Ctrl+Esc key sequence. You can browse the Logger Screen to find information about previous activity. And if needed, you can write the contents of the Logger Screen to a file called C:NWSERVERLOGGER.TXT by pressing F2. If you cannot find the information you need when browsing the logging screen, it is also possible to search through the contents of the Logger Screen with the LSS command from the server console.
When your cluster is installed with a shared Split Brain Detector (SBD) partition, the cluster nodes will automatically try to access this shared disk when the cluster software is loaded. When this partition cannot be found, a cluster node that tries to join will not finish trying to join the cluster. When this happens, it is of course a good solution to first find out why the SBD partition is not available. It could be something as simple as a fiber-optic cable not being attached, or the connection to an iSCSI target not being available. In those cases resolve that problem and reload the cluster software.
When the problem with the SBD partition is of a more serious nature, for example when the Logical Unit (LUN) where it existed was deleted, you should create a new SBD partition.
To create a new SBD partition, regardless of what platform you need to perform this action on, you will need empty space on a shared disk to do so. So either create a new LUN, or use a new iSCSI target or some free space on another type of shared disk for this. If there is a problem with an existing SBD partition and you need to re-create it, delete the partition from NSSMU or the YaST Partitioner and perform the steps given in the next subsections for the required platform.
Note
In a mixed-cluster environment you can perform the actions from either operating system. When you’re performing this action on NetWare, it is necessary for the Linux nodes to be rebooted to detect the new partition being created. When you’re performing the action on Linux, the NetWare nodes must be rebooted.
To create a new SBD partition on a NetWare node, you must first unload the Cluster Services software on all nodes with the ULDNCS command. This will also unload the SBD and SBDLIB NetWare Loadable Modules (NLMs) that need to be reloaded to re-create the SBD partition. Perform this task on each cluster node. This will effectively stop all services in the cluster.
Before creating the SBD partition, check that every node has access to the shared disk where the partition will need to be created. Use Remote Manager, MONITOR.NLM, or the list devices command for this task. Also use NSSMU or iManager to verify that a partition of type Cluster does not exist already. If it exists and you need to create a new one, remove the partition from NSSMU of iManager first.
On one of the nodes, perform the following steps to create the SBD partition:
1. Load the necessary NLMs in this order: CLSTRLIB, SBDLIB, VLL, SBD.
2. Load SBD.NLM. This will report that there is no SBD partition.
3. Execute the SBD INSTALL command to start creating the partition.
4. You will be prompted as to whether you want to create a mirrored SBD partition. If you have prepared two shared disk partitions for this, answer Yes. Otherwise, answer No.
5. You will be prompted with a list of available devices to select the device where the partition needs to be created. (See Figure 9.2.) If you have selected to create a mirrored partition, a second prompt will ask for the device for that mirrored partition device.

6. After the partition is created, you can start the cluster with the LDNCS command. The already-loaded NLMs will be skipped, the remaining NLMs will be loaded, and the node will join the cluster. Verify that the node is using the SBD partition with the SBD VIEW ALL command. When everything works as desired, load the clustering software on the other nodes.
To create a new SBD partition on a Linux node, you must first stop the Cluster Services software on all nodes with the rcnovell-ncs stop command. This will effectively stop all services in the cluster.
Before creating the SBD partition, check that every node has access to the shared disk where the partition will need to be created. Use the sfdisk -l command for this. Use the sbdutil-f command to verify that a cluster partition does not exist already. If it exists and you need to create a new one, remove the partition from YaST Partitioner first.
On one of the nodes, perform the following steps to create the SBD partition:
1. Execute the following command, with the correct device specified as the parameter. In our example the partition will be created on the second SCSI device:
sbdutil -c -d /dev/sdb
To create a mirrored device, specify multiple devices with the -d parameter.
2. After creating the partition, verify that it has been created with the sbdutil -f command.
3. Next, restart the cluster software with the rcnovell-ncs start command.
4. Verify that the cluster node is using the SBD partition with the sbdutil -v command. When everything works as desired, restart the cluster software on the other nodes.
In this section we describe possible backup solutions for your Novell Cluster Services environment. When designing the contents of this book, we decided to limit this section to a description of Novell’s backup architecture (Storage Management Services [SMS]) and one third-party solution for backups, which has become Syncsort’s Backup Express. The reason for narrowing the topic down to these two technologies is that there are too many possible solutions to discuss without this becoming a book on backups. We found, however, that we could not leave backup out of this book. We think that by describing these two technologies, we can give you enough information about how to use backup software in your cluster environment, regardless of the actual solution you select.
After a short introduction to cluster backups, we start with a description of Novell Storage Management Services, and after that we explain how to use Syncsort’s Backup Express.
When you have experience with backup software on NetWare or Linux, you might ask yourself why it is such a big deal to spend time on backups in a book about clustering. Your backups are as important in a standalone environment as they are in a cluster environment. There is, however, a very important difference when performing backups of cluster nodes.
When you configure a backup on a standalone server, you define a backup job that creates a backup of, for example, volume SYS and VOL1 on server FS1. When you create a backup in a clustered environment, you could also create a backup job to do that, but what if server FS1 has failed before or even during the backup and server FS2 now has volume VOL1 mounted?
In older backup applications the documentation for performing backups in a cluster explained how to create backup jobs that would try to create backups of all volumes on all available servers. Surely one of them would actually have the volume active and run the backup job. This is really like shooting a mouse with a cannon: You can’t miss, but it is not really a refined method. And this type of backup does not survive a failover during the backup. Last but not least, every backup operation would by default show failures, so actual failures could easily be missed.
Newer backup applications, like the ones we discuss in this book, allow you to configure the cluster resources (pools and volumes) as individual entities that can be backed up independent of the server where they are active. And support for failover during a backup job is also supported.
Novell’s implementation of this backup architecture has been around for many years and is now still available on NetWare and on Open Enterprise Server (OES) for NetWare and Linux. Storage Management Services is a backup framework containing standardized components that Novell’s own backup application ties into and that third-party backup software vendors also use to back up data in a structured standardized way. Because of this setup with building blocks running on Open Enterprise Server for both NetWare and Linux, it is very easy for software developers to reuse the existing architecture and implement a solution. For example, when file-system data needs to be backed up, you only need to “talk” to the file system Target Service Agent (TSA), which provides access to the file system. When a new file system needs to be supported and a new TSA becomes available, the existing backup solutions can keep using the same modules for creating backups of the file system.
You can consider the SMS architecture as a tiered setup where the Storage Management Data Requester (SMDR) sits in the middle, as you can see in Figure 9.3. This software component plays a central role, providing third-party software developers with a means to communicate with the other components of the backup architecture and handling communications between servers.
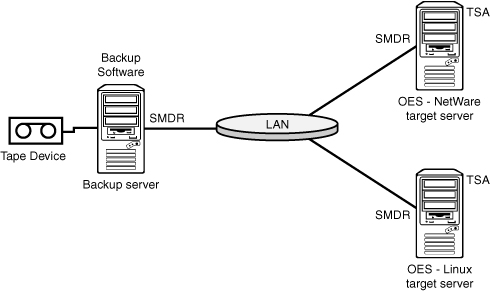
Another important component of SMS is the Target Service Agent. This is the software that SMDR communicates with to collect the actual data from the servers. There are several implementations of TSAs available, for example, the file-system TSA (TSAFS) to back up files and TSANDS to back up eDirectory objects. The actual data (files or eDirectory objects) are called targets in the SMS scheme. Table 9.1 contains an overview of targets that exist in NetWare and OES environments and the TSAs that are available to create backups.
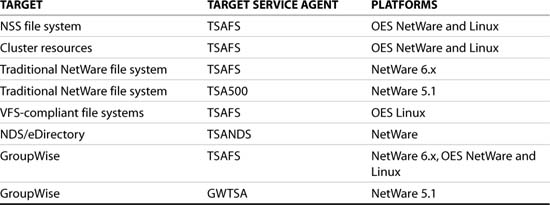
With the TSAs listed in Table 9.1, all resources on our servers can be secured by our backup applications. Novell provides two backup applications, one for NetWare and one for Linux, to use the SMS architecture to create backups. These applications do not provide the full feature set that we need in a backup solution. For things such as tape rotation and keeping track of data in incremental and differential backups, a third-party application is needed.
Before we can use any backup utility, SMDR must be configured and functional.
An installation of Open Enterprise Server for NetWare and Linux contains the SMS software by default. You can check whether the software is installed from the GUI Install application on NetWare or from the Software Management entry in YaST. If the SMS software is not installed, this is also the location where to install it as a post-installation task.
The SMS software on NetWare is automatically started when the server boots because the load file SMSSTART.NCF is added to AUTOEXEC.NCF during installation. Any configuration data will be stored in smdr.cfg and tsa.cfg, located in the sys:etcsms directory.
On an Open Enterprise Server Linux installation, the SMDR daemon is configured to automatically load in runlevels 3 and 5. The daemon startup script is /etc/init.d/novell-smdrd. The actual configuration data is stored in smdrd.conf and tsafs.conf in the /etc/opt/novell/sms directory. When changes are made to these files, the SMDR and TSA can be restarted with the respective commands rcnovell-smdrd refresh and smsconfig -r tsafs.
On both NetWare and Linux, SMS can be configured from iManager. Configuration options for the SMDR are for protocol settings—for example, which IP address the service will bind to, whether TCP/IP and/or IPX (NetWare only) will be used, and what mechanism will be used to discover services: SLP, SAP (NetWare only), or a HOSTS/DNS configuration. In a clustered environment SLP is the required discovery mechanism.
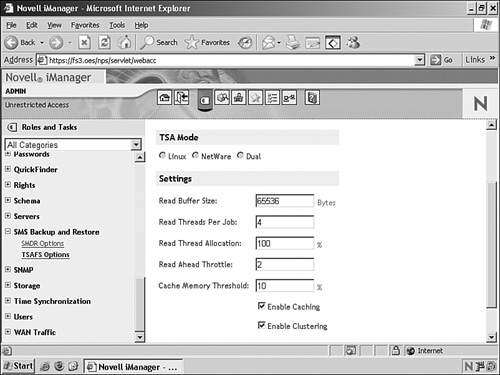
For the TSA most configuration options are for performance tuning, which, by the way, does not need any adjustments in most environments. The important setting for the cluster, as displayed in Figure 9.4, is that clustering must be enabled for the TSA when running in a cluster environment.
These are the two applications Novell provides in Open Enterprise Server to create backups:
![]() SBCON for OES NetWare
SBCON for OES NetWare
![]() nbackup for OES Linux
nbackup for OES Linux
The SBCON.NLM backup software for NetWare is a menu-based backup utility that runs on the server with local storage devices to create backups and restore data in a very simple way. We think that the menu, displayed in Figure 9.5, is self-explanatory. The only preparatory step you must take to run a backup is to have the correct TSA loaded. For example, load TSAFS.NLM or TSANDS.NLM.

On Open Enterprise Server Linux the available backup application is nbackup. This is a command-line utility that can be compared to the tar command. It allows for creating a backup archive on a linear device or in a file. The difference between this and other archiving solutions is that it is SMS-compliant and works with the TSAs to create backups. It also writes to a newer file format, specific for tape backups: System Independent Data Format (SIDF).
A typical command to create a backup follows:
nbackup -cvf backup.sidf -U backupadmin -target-type=linux /data1
This command creates a new backup file named backup.sidf of all files under the /data1 directory. The command connects to the Linux file-system TSA on localhost as user backupadmin.
A complete reference of parameters that can be used with nbackup can be found in the manual page of nbackup with the following command:
man nbackup
When selecting a third-party backup solution for our book, we investigated many products and vendors. Our selection was Syncsort’s Backup Express for a number of reasons:
![]() Syncsort is a well-known partner of Novell and works closely with it to develop its software. Backup Express therefore works with NetWare and Open Enterprise Server NetWare and Linux very well.
Syncsort is a well-known partner of Novell and works closely with it to develop its software. Backup Express therefore works with NetWare and Open Enterprise Server NetWare and Linux very well.
![]() Backup Express is the only software that comes up in a search for the keyword “cluster” in the database of Novell’s “Yes, Tested and Approved” program. You can check for yourself what the status is of this software and that of other vendors at the following URL: http://developer.novell.com/nss. Check for backup software under the category Backup/Restoration.
Backup Express is the only software that comes up in a search for the keyword “cluster” in the database of Novell’s “Yes, Tested and Approved” program. You can check for yourself what the status is of this software and that of other vendors at the following URL: http://developer.novell.com/nss. Check for backup software under the category Backup/Restoration.
In this section we describe the architecture of Syncsort’s Backup Express and how to get started with the software on Open Enterprise Server NetWare and Linux.
Like every backup solution, this one performs the basic operation you need: to be able to store your data in a safe place in case something happens to the original data. But there are a lot of differences between backup software applications, in manageability, in supported hardware and software, or just in features. Here is a list of Backup Express features that we think are important for OES administrators:
![]() Availability for UNIX/Linux, NetWare, and Windows. This gives you the flexibility to back up many platforms with one solution from one central location.
Availability for UNIX/Linux, NetWare, and Windows. This gives you the flexibility to back up many platforms with one solution from one central location.
![]() Support for clusters in Windows environments and for Open Enterprise Server Linux and NetWare. It also supports mixed-cluster environments.
Support for clusters in Windows environments and for Open Enterprise Server Linux and NetWare. It also supports mixed-cluster environments.
![]() Support for eDirectory and GroupWise databases through special database interfaces.
Support for eDirectory and GroupWise databases through special database interfaces.
![]() Support for NSS Snapshot technology. This enables you to make consistent backups in an environment with open files.
Support for NSS Snapshot technology. This enables you to make consistent backups in an environment with open files.
![]() A storage area network (SAN) resource sharing option. This allows the software to attach tape devices to any server in the Backup Express environment.
A storage area network (SAN) resource sharing option. This allows the software to attach tape devices to any server in the Backup Express environment.
![]() Support for NDMP (Network Data Management Protocol) for backup to network attached storage (NAS) devices that support this protocol.
Support for NDMP (Network Data Management Protocol) for backup to network attached storage (NAS) devices that support this protocol.
![]() A centrally located catalog for enterprisewide backup control.
A centrally located catalog for enterprisewide backup control.
![]() Browser-based management without the need to install a client application on a workstation.
Browser-based management without the need to install a client application on a workstation.
For the purpose of our book, the most important feature is that Backup Express natively supports Open Enterprise Server clusters, not only in a pure NetWare or Linux environment but also in a mixed-node environment. This allows organizations that work with a current version of Backup Express to migrate easily to an OES Linux environment. Support for OES clusters is available from version 2.35 of Backup Express. This is also the version that the material in this book is based on.
In a Backup Express environment there are three server roles that need to be present:
![]() Master server
Master server
![]() Device server
Device server
![]() Backup client
Backup client
Figure 9.6 shows these roles in a typical Backup Express environment.
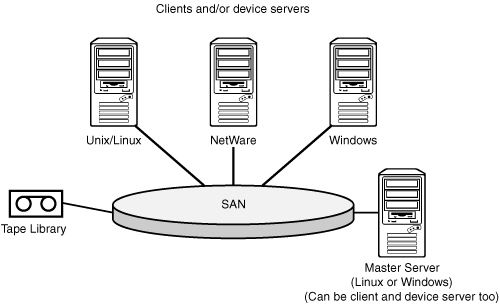
The master server can be either a Linux server or a Windows server. Its role is to initiate and control jobs. It also contains the catalog. The master server also runs the web server that can be used to manage Backup Express from a browser. This is the only way the backup system can be managed. The master server could be a cluster node, but we recommend that you use a separate server to play this role.
The device server takes care of writing to tape. This server does not have to be a dedicated server. It can also be an existing backup client. There can be more than one device server in a Backup Express environment. This allows for faster overall backups because data can be stored on more than one device at the same time. Tape devices can be attached to this device server via a SCSI connection, but they can also be attached to the storage area network through Fibre Channel. Backup Express also supports creating backups to a file system, which can be useful to test your backup solution or for creating backups of smaller clients to a central location.
The backup client is a server where the Backup Express CMAGENT software is loaded to provide access to back up the data. The backup client can be NetWare, Linux, and Windows.
The configuration described in the previous paragraphs is not different for a cluster than it is for standalone servers. In a cluster the same servers—master, device, and client—are needed. The only extra configuration step is to create virtual nodes that will be used to back up the cluster resources.
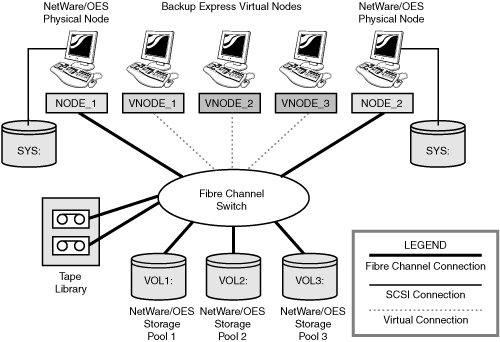
The use of virtual nodes allows Backup Express to keep track of resources to back up even when they fail over to another node during the backup. In the Backup Express management utility you define backups for local file systems, such as the SYS volume, for the physical servers. The backup of cluster resource file systems is defined at the virtual nodes. Figure 9.7 shows an example of a cluster with two physical nodes and three cluster volumes, for each of which a virtual node is created. The backup process of Backup Express runs through the standard Storage Management System SMDR and TSAs.
If the cluster is up and running and your tape device is attached to either a server or the SAN, the Backup Express software can be installed.
On both OES NetWare and OES Linux the software is installed through the graphical interface. Before starting the installation, you must meet these requirements:
![]() For the master server installation, make sure that you have the license key available for the product.
For the master server installation, make sure that you have the license key available for the product.
![]() For the installation of other Backup Express servers, make sure that the master server is running.
For the installation of other Backup Express servers, make sure that the master server is running.
The first installation for a Backup Express environment is the installation of a master server. This can be either a Windows server or a Linux server. Not surprisingly, we explain how to install a master server on Linux in this section.
The installation must be started in a graphical environment. To start the installation, mount the installation CD-ROM on your server (this usually is done automatically), and run the install.bin executable. For example, this may be done with the following command:
/media/cdrom/Linux-oes/install.bin
This will launch the graphical installation program that will guide you through the installation procedure:
1. After the installation is initiated, read and accept the license agreement to continue installation.
2. Provide the path to where the software will be installed. The default path is /opt/backupexpress.
3. Select the type of installation. This first installation will be a master installation.
4. In the next screen select to start Backup Express automatically after a reboot. This will add an S95BackEx link to the /etc/init.d/rc5.d and /etc/init.d/rc3.d directories.
5. When your master server is an Open Enterprise Server, the installation program will detect this and install the Backup Express OES modules.
6. At this point you can add the installation server to the Backup Express environment. Perform this step only if your master server is also a node that you want to add to your backup environment.
7. Provide passwords for your root user and your eDirectory administrative user account.
8. Provide the key for your Backup Express software. You can either provide the key from a file or enter it manually.
9. Select whether you want the system to accept tapes that are not yet labelled or that have a label from another system and automatically overwrite them. If you run only one system, we suggest that you always select Yes to make sure that your backup will always run. If you run multiple systems and someone could enter a wrong tape in your tape device, it is probably a better choice to select No to prevent the wrong tape from being overwritten.
10. The last step of your installation is to provide the password for the sysadmin user that will be used to log in to the Backup Express management environment.
11. An installation summary is displayed with an overview of your installation choices. Review them, and when everything is okay, select Install to start the installation.
12. When the installation has finished successfully, the software will automatically be started.
With the master server running, you can now add nodes to back up to the environment or log in to the management interface. Adding a Linux node requires that you perform the same steps as described before for the master server, except that you select to install a client.
The way the installation program for Backup Express can be started is different for the available versions of NetWare.
For NetWare 5.1 and 6 the installation is started from the graphical screen. If that is not running, execute the command startx to start the GUI. To perform the installation, follow these steps:
1. From the Novell menu select Install.
2. In the installation screen select Add.
3. In the installation path field provide the path to the installation CD-ROM to start the installation process.
For NetWare 6.5 and Open Enterprise Server the installation can be started from the installation CD-ROM with the following command (where cd2350nw is the CD-ROM volume name):
java -jar cd2350nw: etwareOESinstall.jar
This will start the graphical installation application that will guide you through the steps of installing a NetWare server as a client to back up:
1. Read and select the license agreement.
2. Provide the path to the installation directory. The default is SYS:BACKEX.
3. In the last screen select Install to start the installation.
4. Select to install the server to your Backup Express environment. If you select not to do this, you can add it later.
5. If you selected to install the node to the backup environment, provide the hostname or IP address of the master server.
6. The software will now be installed and started on the NetWare server. The installation will add the load command BEXNW to the server’s AUTOEXEC.NCF.
After the installation is complete, you can log in to the management console through an Internet Explorer browser. Other browsers are not supported with the current version (2.35) of Backup Express.
Open a browser window and enter the following URL:
http://hostname_or_ipaddress:6122
The Backup Express management software requires a running Java Virtual Machine (JVM) on your workstation. If the Java environment is not available, you can download the Microsoft JVM from the Backup Express server, where it is installed during installation of the master server. Both a URL to this download and one to download the JVM from Sun are available from the first screen after the management web page is loaded.
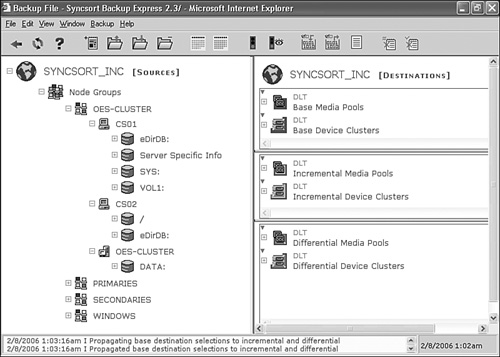
When the Java environment is running, a login dialog box will be displayed. Provide the sysadmin username and the password you specified during installation. The default password for the system is sysadmin. Figure 9.8 shows a default configuration of a cluster with both NetWare and Linux in the web-based administration utility.