The topic for this chapter is not one purely related to clustering. iSCSI is a storage-related protocol that can be used for many storage needs, including shared storage for clustering. In this book we do not cover other storage techniques in depth, such as storage area networks (SANs) and Direct Attached Storage. But because Novell ships Open Enterprise Server (OES) with support for iSCSI and because it is a really useful technique for use with clustering, we have decided to add a separate chapter on this topic. Another technology for sharing storage across the cluster is Distributed Replicated Block Device (DRBD). This technology is covered in Chapter 11, “Using SUSE Linux Enterprise Server Clustering Options.”
In this chapter we introduce what iSCSI is and we discuss some general concepts for this protocol. We also describe how to use the software with Open Enterprise Server for NetWare and Linux.
The iSCSI protocol offers a transport layer for Small Computer Systems Interface (SCSI) blocks over TCP/IP networks. Typically, local devices were and still are connected through SCSI . Such devices are disks and tape drives in the data center and, for example, scanners on the desktop. SCSI is a protocol that transports data by means of a communications channel called a bus, the SCSI-bus, where devices, including the host adapter in the computer, have a unique address and control blocks are being send back and forth between devices. For example, a server sends a disk write control block to a SCSI disk and the disk replies with a control block informing the server that the data has been written. iSCSI works as a wrapper around these control blocks called Command Descriptor Blocks (CDBs), encapsulating them inside iSCSI protocol packets, called Protocol Data Units (PDUs).
iSCSI originated in the late 1990s from research by mainly IBM and Cisco. The first proposal for the iSCSI standardization was RFC 3347 (Small Computer Systems Interface protocol over the Internet) from July 2002 that described the requirements and design considerations for iSCSI.
Many vendors have since worked on the standard, and a first draft of the iSCSI technical specifications was laid down in RFC 3720 (Internet Small Computer Systems Interface) from April 2004.
Tip
There are many RFCs that provide very good insight into the workings of iSCSI. The ones mentioned before are an example, but another one that provides very useful information is RFC 3721, which describes the naming guidelines for iSCSI. The easiest way to access RFCs is from the original RFC Editor’s website at www.rfc-editor.org. The website contains a search facility in which a search for the iSCSI keyword provides access to all iSCSI-related RFCs.
The original design guidelines describe the following usage scenarios for iSCSI:
![]() Local storage access, consolidation, clustering, and pooling (as in the data center)
Local storage access, consolidation, clustering, and pooling (as in the data center)
![]() Network client access to remote storage (for example, a “storage service provider”)
Network client access to remote storage (for example, a “storage service provider”)
![]() Local and remote synchronous and asynchronous mirroring between storage controllers
Local and remote synchronous and asynchronous mirroring between storage controllers
![]() Local and remote backup and recovery
Local and remote backup and recovery
For this book we focus on the use of iSCSI for local storage access, consolidation, and clustering. Let us define these terms before we go into more detail of how iSCSI is being used in the Open Enterprise Server environment. Figure 7.1 shows an example of a typical iSCSI storage network as we will describe it.

Local storage access refers to the replacement of Direct Attached Storage for servers. Typically, servers have locally attached disks. These do not necessarily have to be internal disks. It is also possible that a server accesses a dedicated storage enclosure with disks attached via SCSI or Fibre Channel. iSCSI can replace these types of storage connections. New technologies, such as Blade Servers, can greatly benefit from using iSCSI when SCSI and Fibre Channel connections are not available.
The consolidation part of the iSCSI usage scenario is about creating a single point of storage that can be accessed by many systems. This central storage point is called a target in iSCSI terminology. One central storage provider can be used from NetWare, Linux, Windows, and other operating systems.
Finally, the clustering part of the usage scenario is most important for us in this book. An iSCSI target allows more than one server to connect to its storage. Because of that, it is possible to create shared storage that can be used by Novell Cluster Services (NCS).
There are many benefits to using iSCSI in comparison to more traditional storage protocols and relatively new technologies such as Fibre Channel. The most important benefits are listed here:
![]() Low-cost hardware requirements: For an iSCSI implementation relatively inexpensive hardware can be used. With a server operating as an iSCSI target, its inexpensive IDE disks could be used to offer large amounts of storage to other servers. The network connections between the initiator and the target can be created with regular ethernet hardware. We do not imply that iSCSI is always a low-cost solution. For performance and reliability reasons, you can choose high-end SCSI disks, for example, or very fast network connections. The important thing about iSCSI is that you have the choice to use the hardware you want.
Low-cost hardware requirements: For an iSCSI implementation relatively inexpensive hardware can be used. With a server operating as an iSCSI target, its inexpensive IDE disks could be used to offer large amounts of storage to other servers. The network connections between the initiator and the target can be created with regular ethernet hardware. We do not imply that iSCSI is always a low-cost solution. For performance and reliability reasons, you can choose high-end SCSI disks, for example, or very fast network connections. The important thing about iSCSI is that you have the choice to use the hardware you want.
![]() Use of existing hardware: With iSCSI you can create a storage target from an existing NetWare server and provide the storage to other existing servers. With this approach you can even build a full cluster environment without the need to buy additional hardware.
Use of existing hardware: With iSCSI you can create a storage target from an existing NetWare server and provide the storage to other existing servers. With this approach you can even build a full cluster environment without the need to buy additional hardware.
![]() Easy, manageable storage solution: The entire implementation of iSCSI can be done with equipment and technologies that you are already familiar with: ethernet and TCP/IP. Compared to implementing a Fibre Channel SAN, iSCSI is like a walk in the park. The ease of use also makes it easier to learn how to work with your storage solution.
Easy, manageable storage solution: The entire implementation of iSCSI can be done with equipment and technologies that you are already familiar with: ethernet and TCP/IP. Compared to implementing a Fibre Channel SAN, iSCSI is like a walk in the park. The ease of use also makes it easier to learn how to work with your storage solution.
![]() Extended storage range support: With traditional SCSI you are limited to locating the storage equipment close to the servers. Fibre Channel can stretch that to a maximum of 6 miles or 10km. With iSCSI the sky is the limit. If you can reach your destination with TCP/IP, you can place a storage target there—theoretically, of course, because in real life your capabilities will be limited by factors such as bandwidth, amount of storage traffic, and network latency.
Extended storage range support: With traditional SCSI you are limited to locating the storage equipment close to the servers. Fibre Channel can stretch that to a maximum of 6 miles or 10km. With iSCSI the sky is the limit. If you can reach your destination with TCP/IP, you can place a storage target there—theoretically, of course, because in real life your capabilities will be limited by factors such as bandwidth, amount of storage traffic, and network latency.
![]() Flexibility in capacity planning and growth: Existing limits for SANs for the number of disks that can be used or the number of physical connections to a Fibre Channel switch do not apply to iSCSI. It is relatively easy to attach new iSCSI targets to an existing network and add the new storage to the existing servers. Because of the use of a network protocol (TCP/IP), there is no need to physically attach equipment, sometimes with the need to bring a server down.
Flexibility in capacity planning and growth: Existing limits for SANs for the number of disks that can be used or the number of physical connections to a Fibre Channel switch do not apply to iSCSI. It is relatively easy to attach new iSCSI targets to an existing network and add the new storage to the existing servers. Because of the use of a network protocol (TCP/IP), there is no need to physically attach equipment, sometimes with the need to bring a server down.
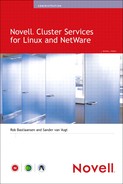
iSCSI is a technology that encapsulates SCSI blocks in TCP/IP packets. The way this is set up is that the original application that is using the device on the other side of the iSCSI connection is unaware of this extra layer.
Figure 7.2 displays the typical communication flow for an application or operating system call that reads or writes from or to a SCSI device. The application uses the OS-specific system calls for that, and the driver communicates with the disk with SCSI Command Descriptor Blocks.
When we add iSCSI to this setup, nothing changes on the application or operating system side. It still uses the regular operating system calls to communicate with a device, but instead of communicating with a SCSI device driver, it communicates with an iSCSI driver disguised as a SCSI driver. For NetWare this is the ISCSIHAM driver; for Linux it is a kernel module called iscsi (which you can check with the lsmod command). In other words, this new driver receives requests as a normal disk does, but sends them to a storage device through the network without the application knowing about that extension.
Figure 7.3 shows the communication flow for the iSCSI storage protocol. In this example an application writes to or reads from a disk that seems to be local. The iSCSI driver sends the request across the TCP/IP network, where the iSCSI target takes care of handling the request on behalf of the iSCSI initiator.
Note
In Figure 7.3 we have explicitly displayed a physical disk and not necessarily a SCSI disk. This is because an iSCSI target partition on a NetWare server can be created on both a SCSI disk and an IDE disk.
It is important to understand that the server holding the target partition does not have local access to the data on the iSCSI partition. iSCSI is a disk access protocol and has nothing to do with file systems. It is the iSCSI initiators that will create a file system on the target disk. If the server holding the physical disk needs to access the data, the only way for it to do that is by starting an iSCSI initiator session with itself. It is not recommended for permanent production environments to operate a server that accesses its target as a local initiator.
The iSCSI specification defines the naming rules being used for iSCSI targets and initiators. We will look into the way these iSCSI Qualified Names (IQNs), as they are called, are created in the Open Enterprise Server environment.
An iSCSI Qualified Name (IQN) is constructed of the following components:
iqn.date.organizational naming authority:string![]() defined by organization or local naming authority
defined by organization or local naming authority
Let us analyze this naming scheme with an example that will be used for an iSCSI target later in this chapter:
iqn.1984-08.com.novell:iscsi-0054c1d8-6241-da11-b2be-000c2921e430.oesnw3.srv.oes
The target can be identified as an iSCSI target by the IQN prefix. The next part is a date field. This is the date that the company, Novell in this case, has registered the name being used in the next part.
The organization name is the reversed DNS name of the company that provides the iSCSI target. It is possible for your own implementation of iSCSI solutions to use your own company naming, but everything you do in the OES environment will be named with Novell’s identifier.
In compliance with the naming standard, a colon (:) is being used to divide the DNS naming part from the unique string that identifies the iSCSI target. Novell has chosen to use iscsi as an extra prefix, followed by a unique identifier for the iSCSI target or initiator and the full distinguished name of the server where the target is hosted.
Now that we have looked at the story behind iSCSI, it is time to look into how we can use this protocol in the Open Enterprise Server environment. We will start with some usage scenarios for iSCSI, and later in this section we will discuss the technical requirements and limitations.
First and foremost, iSCSI is a storage protocol providing access to storage via a network. This is really the most simple implementation. A server with an iSCSI target or a hardware iSCSI target provides access to disk storage, and iSCSI initiators can be used on servers with different operating systems to connect to the storage. Figure 7.4 shows a diagram of the most basic of iSCSI solutions. In this example the target server would contain more than one target to which every initiator can connect individually.

The great thing about iSCSI is that it is available on many platforms. In this book we focus on NetWare as a target for iSCSI storage networks, but there is also iSCSI target software available for other platforms, and specific hardware can be used to provide an iSCSI target. On the other side, support for iSCSI initiators is even bigger. For all major operating systems, software exists to connect to an iSCSI target. Because of that, iSCSI is also very useful in building a cross-platform storage solution. NetWare can be used as the central location for storage, and all platforms, including NetWare, Linux, and Windows, can connect to the available storage. And not only can servers access storage across the network, but also client computers can be configured to access iSCSI targets.
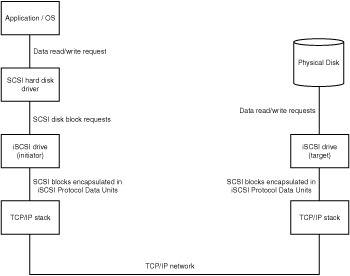
The preceding paragraph describes iSCSI as a storage platform for multiple operating systems. In that example the NetWare 6.5 server would be servicing multiple clients, but they would all access their own target. You can compare that to a SAN where there are Logical Units (LUNs) assigned to servers. But iSCSI can also be used to create a shared storage solution for clustering use. Figure 7.5 shows an example of a simple setup with three servers running Open Enterprise Server, either NetWare or Linux, or even mixed, that connect to a shared iSCSI target.
Building a cluster with shared storage via iSCSI can even be done with existing hardware. If your organization has the server hardware and networking equipment to build such a solution, the only things you would need to buy are clustering licenses. This is true if you are setting up a three-node cluster or larger because a two-node license is always included with Open Enterprise Server.
Many organizations have used the available maximum cable lengths of Fibre Channel to make storage from a central location available to servers on other sites. This can be on the same campus but also somewhere else in town. With iSCSI, doing this has become even simpler because the existing TCP/IP infrastructure can be used to set up the storage network—given, of course, that the bandwidth is sufficient for your storage needs. Figure 7.6 shows an example of the setup for storage on a remote site through the use of iSCSI.

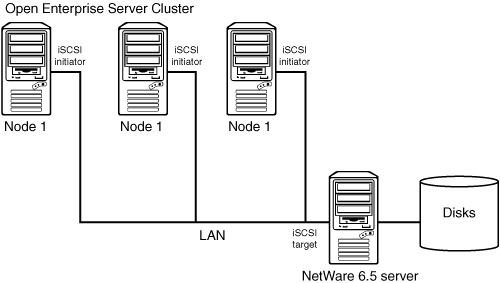
With iSCSI it is simple to access storage on remote sites. And if we combine that with the mirroring capabilities of Novell Storage Services (NSS), it becomes simple to have an offsite online copy of active data available on a server. Figure 7.7 shows how such a setup could look.
The mirroring part takes place at the NSS partition level. This means that the remote server that holds the target does not have access to the partition that holds the actual data. In case of a failure you could access the remote data from either the main site or the remote site by starting an iSCSI initiator connection to itself.
When the main site becomes available, the initiator connection that the remote server had with its own target can be stopped and the original server can be connected. The NSS mirroring will be activated to bring the disks to the same level.
In the most simple and less expensive configuration, the iSCSI traffic is transported via the existing local area network. For servers servicing a small number of clients or when the storage demands are not very high, this might be a workable scenario. For larger environments we recommend using a separate storage network. One of the major problems in a single-network environment is that the data you store from a client is sent out by the server on the same network to the storage. Effectively, all data travels via the network twice if you use one network, and that will consume valuable bandwidth and have a negative impact on performance. Figure 7.8 shows an example of a separate network for iSCSI storage.

Note
When you’re setting up a scenario like this, it is very important that IP routing be disabled on the servers. Clients should never be routed to a server through a server’s storage connection to another server.
When you’re choosing hardware for your storage network, we recommend that you use at least 1GB ethernet hardware.
Additionally, you can use netowrk interface card (NIC) teaming to have multiple network interface cards servicing the iSCSI storage connections. It is a rule of thumb to have 1GHz of processor power available for every 1GB of network throughput. So for a server with 2GB network adapters, you would need 2GHz of CPU power available on top of what you already need for your applications. Because the TCP/IP stack is SMP-aware, it is a good idea to have at least two CPUs of a minimum of 2GHz each available in your servers.
Something else that will help with improving the performance of your iSCSI storage network is to use a hardware iSCSI adapter. Such an adapter offloads the processing capacity needed from the regular processor because it uses its own dedicated special-purpose processor to handle the iSCSI communications. Host bus adapters (HBAs) that are supported on both NetWare and Linux are available from QLogic.
iSCSI targets can be NetWare 6.5 servers running iSCSI target software. Every NetWare 6.5 server comes with the iSCSI target software.
Note
For Linux there is no support from Novell for iSCSI targets on Open Enterprise Server. There are several projects available on the Internet that provide target software for Linux. For Linux kernels 2.4 and 2.6 there is a driver from the University of New Hampshire (www.sourceforge.net/projects/unh-iscsi). Another project is www.sourceforge.net/projects/iscsitarget. And as it goes with open-source projects, we suggest that you check the SourceForge website when you need to get started with the software from such a project.
There are also hardware devices available that can be used as an iSCSI target. They generally support LDAP and CHAP authentication, so they will work with NetWare and Linux initiators. When you are looking into purchasing such a device, we recommend that you check Novell’s “Yes, tested and approved” program. You can access the website at www.developer.novell.com/nss. From the drop-down list of available hardware to search for, select iSCSI Storage Area Network (SAN). This will allow you to search for all devices that have been tested and proven to work with Novell software.
Every server running NetWare 5.1 or above can be used as an iSCSI initiator. The software can be downloaded from http://download.novell.com and is available by default on servers running NetWare 6.5 or above.
For Linux the initiator software comes from Cisco and is shipped with Open Enterprise Server. Later in this chapter we will explain how to install the software.
Besides software requirements, there are no special hardware requirements, but as we mentioned in the section “iSCSI Design Guidelines,” it is a good idea to have multiple network adapters in your server and to use a separate LAN for the storage network. Also use 1GB ethernet to set up the storage connections.
NetWare servers can run as iSCSI targets in an Open Enterprise Server environment. Open Enterprise Server Linux servers, at the time of writing this book, cannot. In this section we will discuss how to install the software and set up an iSCSI target on Open Enterprise Server–NetWare.
To use a NetWare server as an iSCSI target, you must have the iSCSI target software installed.
Tip
The iSCSI initiator software is always installed with every NetWare server, starting with NetWare 6.5.
If you want to know whether the iSCSI software is already installed, you can check the installed products list from the GUI on the NetWare server console. Click Install from the Novell menu and a list of already installed products is displayed. If you would look at the file system, you would notice that the iSCSI target files (ISCSITAR.NLM) are always there. The iSCSI target installation really only creates the file with the credentials (LDAP Secret Store, being sys:etciscsi.lss) and adds the load file to AUTOECEC.NCF.
If you install the iSCSI target, you will see the TON.NCF file being listed in your AUTOEXEC.NCF. This will load the target when your server boots.
There are three methods for installing this software:
![]() You can select the component iSCSI Target during initial NetWare server installation with the custom installation method selected.
You can select the component iSCSI Target during initial NetWare server installation with the custom installation method selected.
![]() You can select a patterned deployment during NetWare server installation and select iSCSI Target as a possible deployment pattern. This will install only the necessary software for this server to function as an iSCSI target.
You can select a patterned deployment during NetWare server installation and select iSCSI Target as a possible deployment pattern. This will install only the necessary software for this server to function as an iSCSI target.
![]() Using NetWare Deployment Manager (
Using NetWare Deployment Manager (NWDEPLOY.EXE) from the NetWare operating system CD, you can add products, including the iSCSI Target software.
After installing the software, you must create an iSCSI target partition in the available disk space on your server. If you have never worked with iSCSI before, it is good to know that you cannot access the data in this iSCSI partition directly on the target server itself. It will be a real raw partition with no file system. Only after accessing the partition through the iSCSI initiator software can you create a file system and create and access data on the disk. There is no direct relation between your iSCSI target partition and the file system that will be created on it. For NetWare we will use NSS as the file system, but if you connect a Windows server to the iSCSI target, you can create an NTFS partition. So at this level of configuration, you should not think of the iSCSI partition as a file system but really as a raw disk partition.
You can create the iSCSI partition from the NSS Management Utility (NSSMU) at the server console. This configuration option is not available in iManager. Perform the following steps on the server that will hold the iSCSI target partition:
1. Start the NSSMU and select Partitions from the main menu.
2. Click Insert to add a partition on free space available. Browse to the disk with the free space where you want to create the partition and press Enter to select it.
Tip
If the disk is empty but no free space is displayed, you might need to initialize the disk. To do this, select Devices from the NSSMU main menu, select the device, and press F3 to initialize the disk.
3. In the Select Partition Type dialog box, select iSCSI.
4. Select the size you want to use for your iSCSI partition. Assigning a label is optional. We recommend that you assign a label if you are planning to create more than one target partition on this server. And because you never know what the future brings, always assign a label.
5. Pressing Escape will return you to the Partitions screen, where the new iSCSI partition will be listed.
6. Exit the NSS Management Utility.
You have now created the partition on the local hard disk that you want to share with iSCSI. It is now time to create the corresponding iSCSI target object in eDirectory. This object will be used to assign rights to initiators to allow them to access the target. The target object will automatically be created when the iSCSI target software is loaded. The command file that loads this software is in the AUTOEXEC.NCF file by default if the iSCSI target software is installed and is called TON.NCF. So we first unload the target software and reload it again to have the object automatically created.
Note
Keep in mind that stopping the target software will stop any running iSCSI sessions. So if this is an additional iSCSI partition, be sure to perform this task when iSCSI sessions can safely be interrupted.
Perform the following steps to create the iSCSI target object. We assume that the software was already loaded on this server so we start by unloading it:
1. At the server console, stop the iSCSI target software with the TOFF command.
2. Next, run the TON command to load the software. The object will now be automatically created.
The iSCSI target object will appear in eDirectory in the server container. You can see that in Figure 7.9. The object is named with the prefix iscsi followed by a global unique identifier. The last 6 bytes of the name, represented by 12 hexadecimal characters, is the MAC address of the server. In our example the name is iscsi-0054c1d8-6241-da11-b2be-000c2921e430 where 000c2921e430 is the server’s MAC address.

Note
If the object is not created, check the server’s Logger Screen. If there are error messages about failed LDAP connections, re-create the LDAP authentication details following the steps in the “Troubleshooting” section at the end of this chapter and try again.
Now that the target object has been created, we will first introduce the iSCSI commands that can be used on the server. After that we will discuss how to connect servers, as initiators, to this new iSCSI target.
You can manage iSCSI via the command prompt on the server or from Remote Manager. This section contains a listing of the most common commands. Remote Manager will be used in several parts of this chapter to show you how to work with that utility to manage your iSCSI environment. Table 7.1 lists ISCSINIT commands that can be used to create iSCSI connections; Table 7.2 contains ISCSI commands that can be used to configure the initiator itself; and Table 7.3 contains iSCSI target commands.


After the iSCSI target has been created on your NetWare server, you can configure the servers that will access the target. These “clients” are called initiators in iSCSI terminology.
The first step is to set up access rights for your initiators to be able to access the target. The easiest setup is when both the target and the initiator server are in the same tree. If they are not, you will need to set up LDAP authentication between them. Both methods are described in the text that follows. After configuring the security, we describe how to start the initiator connection.
Assigning access rights to an initiator in the same eDirectory tree is as easy as assigning the server as a trustee of the target object. It does not matter what rights you assign, just leave them as the defaults, as long as the object is listed as a trustee. To assign trustee rights from iManager, perform the following steps:
1. In iManager select Rights from the Roles and Tasks panel.
2. Select Modify Trustees and select the iSCSI target object.
3. Click the Add Trustee button and select the server object for the NetWare server that will operate as the initiator. In a clustered environment assign all nodes that will access the iSCSI target as trustees. In Figure 7.10 you can see that two NetWare cluster nodes are assigned to the iSCSI target object that was created earlier in this chapter.
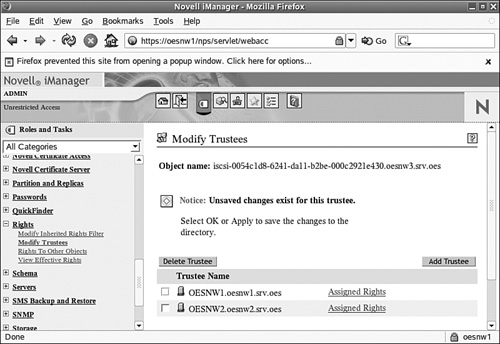
4. Leave the rights at the defaults and click OK to save the configuration.
Assigning rights to servers that are not in your tree is not possible with direct trustee rights because the servers do not have a local object you can assign as a trustee. Therefore, you must first create an object that references the iSCSI initiator to be used to assign the rights to allow access to the target.
Creating this object is not possible with iManager at the time of writing this book because that utility does not allow you to create objects for which it does not have a plug-in. ConsoleOne allows us to do this, so the following steps are based on using that utility. Any error messages about a snap-in not being available can be ignored because indeed there is no snap-in available. Here’s what to do:
1. Start ConsoleOne and browse to the iSCSI target container. We suggest that you create the initiator objects there.
2. From the File menu select to create a new object and select iscsiInitiator as the object type. The name to use is the name of the server that will be functioning as the iSCSI initiator.
3. From within ConsoleOne select the iSCSI target object and assign the newly created initiator as a trustee. When setting up a clustered environment, create an initiator object for every server that will become a cluster node and assign all initiator objects as trustees to the target object.
4. On the initiator server set the InitiatorName to reflect the newly created initiator object. Use the following command to do this (note that this set command is case sensitive):
iscsi set InitiatorName=baseIQN:initiator_objectdn
The following command is an example of a server called OESNW4. It connects as an initiator called OESNW4 located in the OES container in the OES-TREE:
iscsi set InitiatorName=iqn.1984-08.com.novell:.OESNW4.OES.OES-TREE
The initiator software is always available on every NetWare server starting with NetWare 6.5. Connections can be started from the command line or from Remote Manager. We will discuss the commands here first. If you want to set up persistent sessions that will be started when the server boots, you must add the commands to the server startup file. You cannot accomplish that through Remote Manager.
The iSCSI initiator connection can be started from the command line with the following commands:
1. Start the initiator software with the ION command.
2. Connect to the target with the ISCSINIT CONNECT command.
The syntax of the ISCSINIT CONNECT command is as follows:
ISCSINIT CONNECT IP address [target name]
The basic usage of the ISCSINIT CONNECT command is to connect to all targets available on a host. In that scenario there is no need to specify a name for the target. The IP address is sufficient.
Note
If more than one target exists but this initiator has rights to only a single target object, it will see only the single target.
If you are configuring access to a server that has a single target, there is no need to add additional parameters. If more than one iSCSI target exists on a host and you want to connect to only one target, use the ISCSINIT DISCOVER command to find which targets are available. The command will also show you their iSCSI Qualified Names. Here’s an example of an IQN:
iqn.1984-08.com.novell:iscsi-0054c1d8-6241-da11-b2be-000c2921e430.oesnw3.srv.oes
Specify this name to connect to the target with the discovered IQN.
If you want to use these commands to set up persistent connections, add them to your AUTOEXEC.NCF file. Also, do not forget to start the iSCSI initiator software from that file with the ION command.
Tip
It might be tempting to add your initiator commands to the ION.NCF file, but we suggest not doing that because these system-provided NetWare Control Files (NCFs) might be overwritten when you install an update to your server.
If you will be using iSCSI in a Novell Cluster Services installation, make sure that the initiator is loaded and sessions are started before the Cluster Services software is loaded. We suggest that you delay the loading of the clustering software for one to three minutes to let the server fully initialize. If your server is still very busy loading the operating system and has just set up an iSCSI connection to the storage, including the Split Brain Detector, the server could just be too busy to respond to cluster heartbeat packets and be thrown out of the cluster even before the party begins. Use the following commands to delay loading the cluster software after loading the iSCSI software:
ION.NCF
DELAY 60
LDNCS.NCF
iSCSI initiator connections can also be started from Remote Manager:
1. In Remote Manager expand the Storage Services link and select iSCSI Services. If this feature is not listed, the iSCSI software is most likely not loaded.
2. Click the Add Target icon to add a session to an iSCSI target.
3. Enter the IP address or hostname of the server that holds the target, and click Next.
Note
To be able to use the hostname here, the server that runs Remote Manager must be able to resolve that hostname, not the workstation that you use to access Remote Manager.
4. A list of available targets will be displayed. Click the next button that appears near the target for which you want to set up a connection.
After this session is configured, it will be displayed in the Remote Manager iSCSI Services panel.
It was mentioned before that Open Enterprise Server–Linux supports only iSCSI initiators and no targets. In this section we explain how to connect to NetWare iSCSI targets, such as the ones created previously in this chapter.
The iSCSI initiator software does not work with eDirectory natively, as it does on NetWare. We will therefore have to set up an LDAP configuration to control access to the target. But first we will walk you through installing the software.
To work with iSCSI, you must install the Cisco iSCSI software package on your Open Enterprise Server. It is shipped by default with the SLES9 installation CD-ROMs. You install the software from YaST by performing the following steps:
1. From YaST select the Software section.
2. Select Install and Remove Software.
3. For the filter type select Search from the drop-down list.
4. Type iscsi as the keyword to search for, and click Search.
5. The iSCSI package will be displayed in the panel on the right, as shown in Figure 7.11.
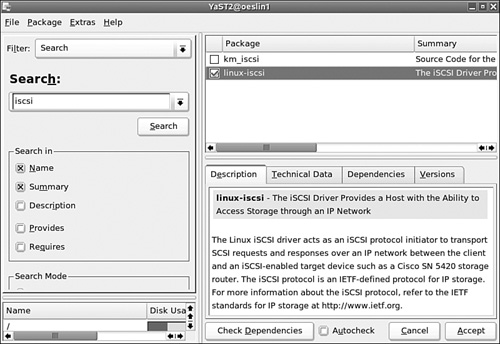
6. After selecting the iSCSI package, click Accept to install the package. Provide the SLES CD-ROMs when requested.
For a Linux initiator to connect to a NetWare iSCSI target, it uses an LDAP name to connect to eDirectory. For this to work, the Linux server connecting to the server must be a trustee of the target object. Perform the following steps to assign the server as a trustee:
1. In iManager select Rights from the Roles and Tasks panel.
2. Next, select Modify Trustees and select the iSCSI target object.
3. Click the Add Trustee button and select the Linux servers that will run as initiators. No special rights are needed. Just leave the default rights in place.
The server that will function as the initiator must be configured in the initiator configuration file. Open the /etc/initiatorname.iscsi file and modify the following line as we did for our example:
InitiatorName= iqn.1987-05.com.cisco:cn=oeslin1,ou=oeslin1,ou=srv,o=oes
Next you must configure the iSCSI software to connect to the target. Add the target information to the file /etc/iscsi.conf. Modify this line as for our example:
DiscoveryAddress=192.168.1.30
After the access control configuration and iSCSI software configuration have been completed, you can start the iSCSI session. Use the following command to start the session:
/etc/init.d/iscsi start
Ignore any messages to configure newly found hardware. Use the iscsi-ls command to verify the status of the connection:
iscsi-ls
This will display information about the connection to the target. To find information about the local device information that you will need when creating your Linux partitions or clustering configuration, use the sfdisk command:
sfdisk -l
With this command all local disks and their partitions are displayed, such as in the example displayed in Figure 7.12. In our example, device /dev/sdb is the one we will be using as the Split Brain Detector disk in an Open Enterprise Server solution.

For iSCSI sessions that will be used in a clustering or other permanent solution, it is important to start the software at boot time. Typically you want to do this for runlevels 3 and 5. These are the ones for which the ISCSI software will be enabled with the following command:
chkconfig iscsi on
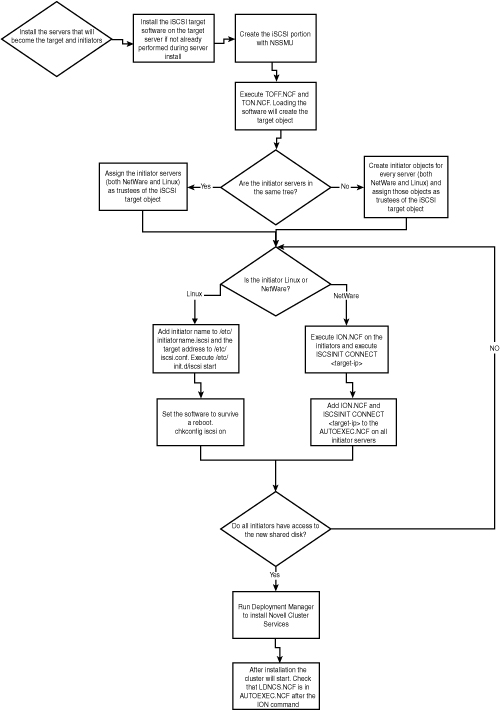
When you have gotten to this point in this chapter, you have read all there is to know about creating iSCSI connections. When you have your iSCSI connections in place, you can start the Novell Cluster Services installation. To help you keep the overview of what needs to be done, we have created a flowchart, displayed in Figure 7.13, that walks you through the configuration steps of setting up a cluster with shared iSCSI storage.
In this section we will cover some additional iSCSI topics to make working with iSCSI in daily life easier and to help you fix any problems you might have.
Active iSCSI sessions can be listed on the local server on both NetWare and Linux, but the most comprehensive view is available from Remote Manager. We will first show you two examples of how to view the information locally for both targets and initiators. Next we will look into using Remote Manager.
On the server console you can use the iscsitar command to retrieve information about the available targets and sessions with the following commands:
iscsitar targets
iscsitar sessions
On a NetWare server that functions as an iSCSI initiator, you can use the iscsinit command to collect information. Use the command with the following syntax to retrieve information about active sessions with iSCSI targets:
iscsinit info
On Linux servers you can display statistical information with the iscsi-ls command. No parameters are needed. Just executing the command will display the session information for active target connections:
iscsi-ls
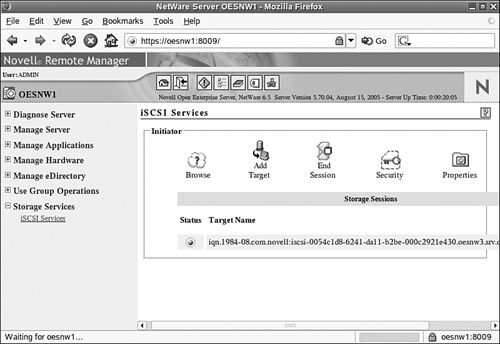
Figure 7.14 shows an example of an iSCSI listing to a target on a NetWare server.

For NetWare it is possible to collect information about active sessions for both the target and the initiator from Remote Manager. When you enable the advanced view, you can even see detailed information about network communications and iSCSI performance.
To display session information, start Remote Manager and select the Storage Services link. Next click the iSCSI Services link that is displayed. The frame on the right will display information about active sessions. Figure 7.15 shows an example of NetWare Server running a target. The session shows a green icon to the left, which means that it is an active session. Click this icon to collect more information about the iSCSI session.
To display statistical information about iSCSI sessions, perform the following steps from the iSCSI Services screen in Remote Manager:
1. Click the Properties icon from the session overview page.
2. The initiator properties screen allows you to select the following two check boxes that enable the controls on the main iSCSI session page:
![]() Performance and Trend Graphs
Performance and Trend Graphs
![]() Reports
Reports
3. After selecting these check boxes, click Apply.
4. Go back to the main iSCSI Services screen. Two new links will be displayed there that allow you to look at graphs of the iSCSI activity.
Creating the iSCSI target objects in your tree relies on secure communications being configured on the NetWare server. This is performed during the iSCSI target installation on the server. If the configuration is no longer valid, you can re-create the so-called LDAP Secret Store.
Tip
Doing this might also be necessary if you have created new server certificates. In that case, first export the server’s self-signed certificate from iManager or ConsoleOne to the file sys:publicRootCert.der before re-creating the LDAP Secret Store.
Reconfigure the LDAP security information on the target through Remote Manager by following these steps:
1. Make sure that the iSCSI target software is loaded. Even if it displays an error message, leave it loaded; otherwise, the iSCSI controls will not show up in Remote Manager.
2. In Remote Manager expand the Storage Services link and select iSCSI Services. If this feature is not listed, the iSCSI software is most likely not loaded.
3. Click the LDAP icon on the right panel and perform one of the following steps:
![]() If the LDAP Secret Store (sys:etciscsi.lss) does not already exist, you are prompted for a administrative username and password. Log in as the Admin user to create the LDAP Secret Store.
If the LDAP Secret Store (sys:etciscsi.lss) does not already exist, you are prompted for a administrative username and password. Log in as the Admin user to create the LDAP Secret Store.
![]() It can also be the case that the LDAP Secret Store does exist and you want to recreate the information because LDAP authentication does not function properly (for example, error messages are displayed on the Logger Screen when loading the iSCSI target software). In that case, click Remove LDAP Configuration from the iSCSI LDAP panel. (This is in effect the same as deleting the file
It can also be the case that the LDAP Secret Store does exist and you want to recreate the information because LDAP authentication does not function properly (for example, error messages are displayed on the Logger Screen when loading the iSCSI target software). In that case, click Remove LDAP Configuration from the iSCSI LDAP panel. (This is in effect the same as deleting the file sys:etciscsi.lss.) Next perform the step outlined in the preceding bullet point to create the LDAP Secret Store.
4. Stop and start the iSCSI target software with the TOFF and TON commands.
5. If you have created iSCSI partitions, the iSCSI target objects will now be created.