

IBM Tivoli Directory Server Distributed Administration
This chapter provides an overview of the new ITDS 5.x distributed management model including the application server that the Web administration tool runs on. We will also be covering ibmdiradm, ibmslapd, and management tools like ibmdirctl. We will describe how these tools can be used to manage a single server as well as multiple servers.
9.1 Web Administration Tool graphical user interface
The IBM Tivoli Directory Server Version 5.2 Web Administration Tool is installed on an application server, such as the embedded version of IBM WebSphere Application Server - Express (WAS) included with the IBM Tivoli Directory Server, and administered through a console. Or you can install it on a existing WebSphere Version 5.0 or later or supported application server. IBM Tivoli Directory Servers that have been added to the console can be managed through the Web Administration Tool without having to have the tool installed on each server. The preferred method of administering the server is by using the Web Administration Tool.
The Web Administration Tool enables an extremely wide range of tasks, such as:
•Basic server administration tasks, including:
– Starting and stopping the server
– Checking server status
– Managing server connections
– Managing connection properties
– Creating, managing, and removing an administrative group
– Creating, managing, and removing unique attributes
• Setting server properties, including:
– Changing server ports and enabling language tags
– Setting performance
– Setting and controlling searches
– Enabling and disabling transaction support
– Enabling and disabling event notification
– Adding and removing suffixes
– Creating and removing referrals
• Configuring security settings, including:
– Configuring TLS and SSL
– Setting the level of encryption
– Setting password encryption
– Setting password policy
– Setting password lockout
– Setting Kerberos
– Setting certificate revocation verification
– Configuring the DIGEST-MD5 mechanism
•Managing the IBM Directory schema, including:
Managing object classes and attributes
•Managing replication, including:
– Creating and modifying replication topology and replication agreements
– Monitoring replication status
• Managing logs, including:
– Viewing error, DB2, and administration daemon error logs
– Modifying the error, DB2, and administration daemon logging settings
– Viewing, enabling, and disabling the directory and administration daemon audit logs
•Managing directory entries, including:
– Browsing the tree
– Adding, copying, modifying, and deleting an entry
– Managing language tags
– Adding or deleting auxiliary object class
– Changing group membership
– Searching the directory entries with or without filters
•Managing Access Control Lists, including performing all functions described in previous sections
•Managing group, roles, and proxy authorization group
•Performing user-specific tasks, including managing realms, templates, groups, and users
9.2 Starting the Web Administration Tool
To start the Web Administration Tool, you must start the application server in which it was installed. For the embedded version of IBM WebSphere Application Server - Express go to the directory where you installed the IBM Tivoli Directory Server and issue one of the following commands:
•For UNIX-based platforms
<IDSinstalldir>/ldap/appsrv/bin/startServer.sh server1
|
Note: For Solaris this is:
opt/ibmldapc/appsrv/bin/startServer.sh server1
|
•For Windows-based platforms:
<IDSinstalldir>ldapappsrvinstartServer.bat server1
|
Note: If you have other application servers running, ensure that the application server where the Web Administration Tool is installed is not running on the same port as the other application servers.
|
9.3 Logging on to the console as the console administrator
Before you can start using the Web Administration Tool for the server you want to manage, ensure that you have the completed the following tasks during the configuration of that server:
•You must have set the admin DN and password to be able to start a given server.
•You must have configured a database to be able to start a given server in a state other than configuration only mode.
•You must have the administration daemon running to be able to start, stop, or restart a given server remotely.
To log on as the console administrator, refer to Figure 9-1 on page 197 and perform these steps:
1. Assuming you have installed and started the embedded version of WebSphere Application Server - Express V5.0.2 that ships with ITDS, change your login URL to the following:
http://<hostname>:9080/IDSWebApp/IDSjsp/Login.jsp
The login page should appear. At the IBM Tivoli Directory Server Web Administration login page log in as Console Admin, the default selection in the LDAP Hostname field.
2. In the Username field type: superadmin
3. In the Password field type: secret
4. Click Login. The IBM Tivoli Directory Server Web Administration Tool console is displayed.

Figure 9-1 Logging in as console administrator
|
Note: When using the Web Administration Tool, do not open additional login panels from the file options of the browser. Only one instance of the Web Administration can function on a single browser instance. They cannot share the same cookies. Additional login panels must be opened from new instances of the browser.
•For Unix-based systems:
Launch new windows from the command line using the & option. For example:
mozilla &
•For Windows-based systems:
Internet Explorer - Open additional Internet Explorer windows using the Start window or an Internet Explorer short cut from the desktop.
|
9.4 Logging on to the console as the server administrator
To log on as the server administrator perform these steps:
1. At the IBM Tivoli Directory Server Web Administration login page select the LDAP host name or IP address for your machine from the drop-down menu.
2. Enter the admin DN and the password for that server (you set these up during the server configuration process).
3. Click Login.
The IBM Tivoli Directory Server Web Administration Tool console is displayed with various server management tasks. The server management tasks vary depending upon the capabilities of the server.
|
Note: The Web Administration Tool does not support logging on to a given server using replication supplier credentials.
|
9.5 Logging on as member of administrative group or as LDAP user
To log on as a member of the administrative group or an LDAP user, perform these steps:
1. At the IBM Tivoli Directory Server Web Administration login page select the LDAP host name or IP address for your machine from the drop-down menu.
2. Enter the your username (in the form of a DN) and password for that server.
3. Click Login.
The IBM Tivoli Directory Server Web Administration Tool console is displayed with various server management tasks. The server management tasks vary depending upon your authority or the capabilities of the server or both.
|
Note: The Web Administration Tool does not support logging on to a given server using replication supplier credentials.
|
9.6 Logging off the console
To log off of the console, click Logout in the navigation area. The Logout successful panel displays the message:
If you have been accidentally logged out then you will need to re-login by clicking here.
Click the word here in this message to return to the IBM Tivoli Directory Server Web Administration login page.
9.7 Starting and stopping the server
The server can be started or stopped using either the Web Administration Tool or the command line.
9.7.1 Using Web Administration
|
Note: The administration daemon (ibmdiradm) must be running.
|
The current status of the server, either started, stopped, or started in configuration mode, is indicated by the icons in the upper left-hand corner of the server status area. The current status is also described in the first sentence of the work area, for example: The Directory Server is currently running.
To change the running state of the server, perform these steps:
1. Click Server Administration in the Web Administration navigation area and then click Start/Stop/Restart Server in the expanded list.
2. The message area displays the current state of the server (stopped, running, or running in configuration only mode). Depending on the state of the server, running or stopped, buttons are enabled for you to change the state of the server as shown in Table 9-1.
– If the server is running, you can click Stop to stop the server, or Restart to stop and then start the server.
– If the server is stopped, you can click Start to start the server.
– Click Close to return to the Introduction panel.
Table 9-1 Buttons available based on server status
|
Server status
|
Buttons available
|
|
Stopped
|
Start, Close
|
|
Running
|
Stop, Restart, Close
|
|
Running in configuration mode
|
Stop, Restart, Close
|
3. A message is displayed when the server successfully starts or stops. If you need to perform server configuration maintenance, select the Start / Restart in configuration only mode check box. In this mode only the system administrator can bind to the server. All other connections are refused until the server is restarted with the DB2 backends enabled (the Start / Restart in configuration only mode check box deselected).
|
Note: Configuration maintenance can be done while the server is running.
|
9.7.2 Using the command line or Windows Services icon
Use the following command to start and stop the server:
ibmdirctl [-h <hostname>] [-D <adminDN>] [-w <password>]
[-p <portnumber>] start|stop|restart|status -- [ibmslapd options]
|
Note: The administration daemon (ibmdiradm) must be running.
|
For Windows systems use the ibmdirctl command, or perform the following steps:
1. From the desktop, double-click the My Computer icon.
2. Double-click the Control Panel icon.
3. Double-click the Services icon.
4. To start the server select IBM Tivoli Directory V5.2 and click Start.
5. To stop the server select IBM Tivoli Directory V5.2 and click Stop.
9.8 Console layout
The IBM Tivoli Directory Server Web Administration Tool console consists of five areas:
•Banner area
The banner area located at the top of the panel contains the application name, IBM Tivoli Directory Server Web Administration Tool, and the IBM Logo.
•Navigation area
The navigation area, located on the left side of the panel, displays expandable categories for various console or server tasks. The tasks available vary depending on your authority or the capabilities of the server you are logging onto or both.
•Work area
The work area displays the tasks associated with the selected task in the navigation area. For example, if Managing server security is selected in the navigation area, the work area displays the Server Security page and the tabs containing tasks related to setting up server security.
•Server status area
The server status area, located at the top of the work area, indicates the status and the name of the server being administered. It also has two icon links, one to the Start/Stop/Restart procedure and the other to general help information. When you select a task from the navigation area, the name of the selected task, a link to the error log files, and a link to the task help are also displayed.
|
Note: If you are logged on as the console administrator, this area displays
Console administrator and provides an icon link to the table of contents for task helps.
|
•Task status area
The task status area, located beneath the work area, displays the status of the current task.
9.9 Configuration only mode
The IBM Tivoli Directory Server supports LDAP access to the server’s configuration settings. An administrator can use the LDAP protocol to query and update the configuration for the server. This feature enables remote administration. For the remote access to be more robust and reliable, the server does not depend on successful initialization of the database backends. It is possible to start the server in configuration only mode with only the cn=configuration suffix active. As long as the configuration backend is available, the server starts and accepts LDAP requests. Configuration only mode gives an administrator remote access to the server even when errors are encountered during startup.
The following features are supported in configuration only mode:
•Access to the configuration file and log files
•Auditing
•Event notification
•Kerberos
•SASL
•SSL
The following features are not supported in configuration only mode:
•Access to the database
•Changelog
•Password policy
•Replication
•Schema changes
•Transactions
9.9.1 Minimum requirements for configuration-only mode
The following specify the minimum requirements for configuration-only mode:
•The configuration file must be in the correct LDIF format and the server must be able to locate and read the file.
•The server must be able to read and load the schema according to the configuration file.
•The server must be able to load the configuration plug-in.
9.9.2 Starting LDAP in configuration-only mode
The following methods will start the LDAP server in configuration only mode:
|
Note: Any failure during server startup will also cause the server to start in configuration only mode.
|
•Using Web Administration:
Check the Configuration only mode when starting the server through the Web Administration Tool.
•Using the command line:
Specify -a or -A on server startup.
ibmslapd -a
or
ibmdirctl -h <hostname> -D <adminDN> -w <adminpw>-p <portnumber>
start -- -a
9.9.3 Verifying the server is in configuration-only mode
To determine if the server is running in configuration only mode, use one of the following methods.
•Using Web Administration:
If the server has been started in configuration only mode the || icon located between the stop and start icons is highlighted.
•Using the command line:
Issue a search of the root DSE for the attribute ibm-slapdisconfigurationmode. If this attribute is set to true, the server is running in configuration only mode.
ldapsearch -s base -b " " objectclass=* ibm-slapdisconfigurationmode
9.10 Setting up the console
After you have started the application server, you need to set up the console that is going to manage your directory servers. From the IBM Tivoli Directory Server Web Administration login page, log in as the console administrator and perform the following tasks.
9.10.1 Managing the console
At the IBM Tivoli Directory Server Web Administration Tool console the following tasks can be done to manage the console.
Changing the console administrator login
To change superadmin to a different administrator ID, refer to Figure 9-2 and perform the following steps:
1. Expand Console administration in the navigation area
2. Click Change console administrator login.
3. Enter the new administrator ID.
|
Note: Only one administrator ID is allowed. The superadmin ID is replaced by the new ID that you specified.
|
4. Enter the current administrator password. The password, secret, is the same for the new administrator ID, until you change it.

Figure 9-2 Changing console administrator login
Changing the console administration password
To change the administrator password to another password:
1. Expand Console administration in the navigation area
2. Click Change console administrator password.
3. Enter the current password.
4. Enter the new password.
5. Enter the new password again to confirm that there are no typographical errors.
6. Click OK.
Adding, modifying, and removing servers in the console
Use the following procedures to add, edit, or delete servers in the console.
Adding a server to the console
To add a server to the console, refer to Figure 9-3 and perform the following steps:
1. Expand Console administration in the navigation area.
2. Click Manage console servers. A table for listing of server host names and port numbers is displayed.
3. Click Add.
4. Enter the host name address or the IP address of the server. For example:
servername.austin.ibm.com
5. Specify the port numbers or accept the defaults.
6. Specify if the server is SSL enabled.
7. Click OK to apply the changes or click Cancel to exit the panel without making any changes.

Figure 9-3 Adding a server to the console
Modifying a server in the console
To change the port number or SSL enablement of a server, refer to Figure 9-4 and Figure 9-5, and perform the following steps:
1. Expand Console administration in the navigation area.
2. Click Manage console servers. A listing of server host names and port numbers is displayed.
3. Select the radio button next to the server you want to modify.
4. Click Edit.
5. You can change the port numbers.
6. You can change whether the server is SSL enabled with the SSL enabled check box.
7. Click OK to apply the changes or click Cancel to exit the panel without making any changes.

Figure 9-4 Manage console servers

Figure 9-5 Modifying a server in the console
Removing a server from the console
To remove a server from the console, refer to Figure 9-4 on page 205, and perform the following steps:
1. Expand Console administration in the navigation area.
2. Click Manage console servers. A listing of server host names and port numbers is displayed.
3. Select the radio button next to the server you want to remove.
4. Click Delete.
5. Click OK to delete the server or click Cancel to exit the panel without making any changes.
Managing console properties
To change the settings for the console properties, perform the following steps:
1. Expand Console administration in the navigation area.
2. Click Manage console properties.
3. Click Component management to specify the components that are enabled for all servers in the console. By default all the components are enabled.
|
Note: You might not see a management component or some of its tasks, even if it is enabled, if you do not have the correct authority on the server or the server does not have the needed capabilities, or both.
|
4. Click Session properties to set the time-out limit for the console session. The default setting is 60 minutes.
|
Note: A session might be valid for three to five minutes more than what you have set. This is because the invalidations are performed by a background thread in the application server that acts on a timer interval. This timer interval extends the session time out duration.
|
5. Click SSL key database to set up the console so that it can communicate with other LDAP servers using the Secure Sockets Layer (SSL), if necessary. Set the key database path and file name, the key password, the trusted database path and file name, the trusted password in the appropriate fields. The supported file type is jks.
6. When you have finished setting up the console, click Logout to exit.
Component management
Component management allows you to enable or disable management components across all servers in the console. By default all the components are enabled. The components managed from this panel are:
•User properties
•Server administration
•Schema management
•Directory management
•Replication management
•Realms and templates
•Users and groups
Figure 9-6 shows the component management panel. To enable a component, select the check box next to the component. To disable a component, clear the check box next to it.
|
Note: An enabled management component, or some of the tasks associated with the enabled management component, might not be accessible to a user if one of the following conditions is true:
•The LDAP server the user is logging into does not support the capabilities required by the management component.
•The user does not have sufficient access rights on the LDAP server.
|

Figure 9-6 Manage console properties
9.10.2 Creating an administrative group
An administrative group provides administrative capabilities without having to share a single ID and password among the administrators. Members of the administrative group have their own unique IDs and passwords. The administrative group member DNs must not match each other and they must also not match the IBM Tivoli Directory Server administrator’s DN. Conversely, the IBM Tivoli Directory Server administrator DN must not match the DN of any administrative group member. This rule also applies to the Kerberos or Digest-MD5 IDs of the IBM Tivoli Directory Server administrator and the administrative group members. These DNs must not match any of the IBM Tivoli Directory Server’s replication supplier DNs. This also means that IBM Tivoli Directory Server’s replication supplier DNs must not match any of the administrative group member DNs or the IBM Tivoli Directory Server administrator DN.
|
Note: The IBM Tivoli Directory Server’s replication supplier DNs can match each other.
|
The members of the administrative group have all the capabilities of the directory administrator with the following exceptions:
•Only the IBM Tivoli Directory Server administrator has the ability to add or remove members from the administrative group. In addition only the IBM Tivoli Directory Server administrator can modify the DN, password, Kerberos ID, or Digest-MD5 ID of any administrative group member. However, a member of the administrative group can modify his own password, but cannot modify his own DN, Kerberos ID, or Digest-MD5 ID. An administrative group member cannot see the password of any other administrative group member or the IBM Tivoli Directory Server administrator.
•Only the IBM Tivoli Directory Server administrator has the ability to add or remove the cn=Keberos,cn=Configuration and the cn=Digest,cn=Configuration entries in the configuration backend. Administrative group members can modify all the attributes in these entries except for the directory administrator’s Keberos ID and Digest-MD5 ID.
•Only the IBM Tivoli Directory Server administrator has the ability to modify or update any of the audit log settings. Members of the administrative group are able only to view the audit log and the audit log settings.
•Only the IBM Tivoli Directory Server administrator has the ability to clear the audit log.
9.10.3 Enabling and disabling the administrative group
Enabling and disabling the administrative group can be done through the Web administration tool and the command line. You must be the IBM Tivoli Directory Server administrator to perform this operation.
|
Note: In this task and the Manage administrative group tasks that follow, the operation buttons are disabled for members of the administrative group. Members of the administrative group can only view the Administrative group members table on the Manage administrative group panel.
|
Using Web Administration
To enable or disable the administrative group using the Web Administration Tool, perform the following steps:
1. Expand the Server administration category in the navigation area. Click Manage administrative group.
2. To enable or disable the administrative group, click the check box next to Enable administrative group. If the box is checked, the administrative group is enabled.
3. Click OK.
|
Note: If you disable the administrative group, any member who is logged in can continue administrative operations until that member is required to rebind. To stop any additional operations by already bound administrative group members, perform an unbind operation.
|
Using the command line
To perform the same operations using the command line, issue the following command:
ldapmodify -D <adminDN> -w<adminPW> -i<filename>
Where the file used is similar to Example 9-1.
Example 9-1 File used for administrative group modification
dn: cn=Configuration
cn: Configuration
changetype: modify
replace: ibm-slapdAdminGroupEnabled
#specify TRUE to enable or FALSE to disable the administrative group
#TRUE has been preselected for you.
ibm-slapdAdminGroupEnabled: TRUE
objectclass: top
objectclass: ibm-slapdConfigEntry
objectclass: ibm-slapdTop
To update the settings dynamically, issue the following ldapexop command:
ldapexop -D cn=root -w root -op readconfig -scope single
cn=Configuration ibm-slapdAdminGroupEnabled
9.10.4 Adding members to the administrative group
Members can be added to the administrative group through either the Web Administration Tool or the command line. You must be the IBM Tivoli Directory Server administrator to perform this operation.
Using Web Administration
To add a member to the administrative group, perform the following steps:
1. On the Manage administrative group panel, click Add.
2. On the Add administrative group member panel, enter the member’s administrator DN (this must be a valid DN syntax).
3. Enter the member’s password.
4. Enter the member’s password again to confirm it.
5. Optionally, enter the member’s Kerberos ID. The Kerberos ID must be in either ibm-kn or ibm-KerberosName format. The values are case insensitive, for example, [email protected] is equivalent to [email protected].
|
Note: This field is only available for the AIX and Windows NT and Windows 2000 platforms. It is displayed only if the Kerberos supported capabilities OID (1.3.18.0.2.32.30) is found on the server.
|
6. Optionally, enter the member’s Digest-MD5 user name.
7. Click OK.
|
Note: The Digest-MD5 user name is case sensitive. Repeat this procedure for each member you want to add to the administrative group.
|
The member administrator DN, Digest-MD5 username, if specified, and Kerberos ID, if specified, are displayed in the Administrative group members list box.
|
Note: Kerberos support is only available for the AIX and Windows NT, Windows 2000, and Windows 2003 platforms. The Kerberos ID column in the is displayed in the Administrative group members list box only, if the kerberos supported capabilities OID (1.3.18.0.2.32.30) is found on the server.
|
Using the command line
To perform the same operations using the command line, issue the following command:
ldapadd -D <adminDN> -w<adminPW> -i<filename>
Where the file used is similar to Example 9-2.
Example 9-2 File used to add user to administrative group
dn: cn=AdminGroup, cn=Configuration
cn: AdminGroup
objectclass: top
objectclass: container
dn: cn=admin1, cn=AdminGroup, cn=Configuration
cn: admin1
ibm-slapdAdminDN: <memberDN>
ibm-slapdAdminPW: <password>
#ibm-slapdKrbAdminDN and ibm-slapdDigestAdminUser are optional attributes.
ibm-slapdKrbAdminDN: <KerberosID>
ibm-slapdDigestAdminUser: <DigestID>
objectclass: top
objectclass: ibm-slapdConfigEntry
objectclass: ibm-slapdAdminGroupMember
|
Note: If you already have a member created in the administrative group, omit the first entry in Example 9-2.
|
To update the settings dynamically, issue the following ldapexop command:
ldapexop -D cn=root -w root -op readconfig -scope subtree
cn=AdminGroup,cn=Configuration
9.10.5 Modifying an administrative group member
Modifying an administrative group member can be done through either the Web Administration Tool or the command line. You must be the IBM Tivoli Directory Server administrator to perform this operation.
Using Web Administration
To modify an administrative group member’s information, on the Manage administrative group panel:
1. Select the member whose information you want to modify.
2. Click Edit.
3. Enter the member’s administrator DN (this must be a valid DN syntax).
4. Change the member’s password.
5. Enter the member’s password again to confirm it.
6. Enter or change the member’s Kerberos ID. The Kerberos ID must be in either ibm-kn or ibm-KerberosName format. The values are case insensitive, for example, [email protected] is equivalent to [email protected].
|
Note: This field is only available for the AIX and Windows NT and Windows 2000 platforms. It is displayed only, if the Kerberos supported capabilities OID(1.3.18.0.2.32.30) is found on the server.
|
7. Enter or change the member’s Digest-MD5 user name. The Digest-MD5 user name is case sensitive.
8. Click OK.
|
Note: If you are member of the administrative group, you can change your password using the User properties → Change password panel.
|
Repeat this procedure for each member you want to modify in the administrative group.
Using the command line
To perform the same operations using the command line, issue the following command:
ldapmodify -D <adminDN> -w<adminPW> -i<filename>
Where the file used is similar to Example 9-3.
Example 9-3 File used to modify an administrative group member
dn: cn=admin1, cn=AdminGroup, cn=Configuration
cn: admin1
changetype: modify
replace: ibm-slapdAdminDN
ibm-slapdAdminDN: cn=<memberDN>
-
replace: ibm-slapdAdminPW
ibm-slapdAdminPW: <password>
-
replace: ibm-slapdKrbAdminDN
ibm-slapdKrbAdminDN: <KerberosID>
-
replace: ibm-slapdDigestAdminUser
ibm-slapdDigestAdminUser: <DigestID>
To update the settings dynamically, issue the following ldapexop command:
ldapexop -D cn=root -w root -op readconfig -scope subtree
cn=AdminGroup,cn=Configuration
9.10.6 Removing a member from the administrative group
Removing a member from the administrative group can be done through the Web administration tool or the command line. You must be the IBM Tivoli Directory Server administrator to perform this operation.
Using server administration
To remove a member of the administrative group, on the Manage administrative group panel:
1. Select the member you want to remove.
2. Click Delete.
3. You are prompted to confirm the removal.
4. Click OK to delete the member or Cancel to return to the Manage administrative group panel without making any changes.
Repeat this procedure for each member you want to remove from the administrative group.
Using the command line
To perform the same operations using the command line, issue the following command:
ldapdelete -D <adminDN> -w<adminPW> -i<filename>
Where the file used is similar to Example 9-4.
Example 9-4 File used to remove a member of the administrative group
#list additional DNs here, one per line
dn: cn=admin1, cn=AdminGroup, cn=Configuration
To remove multiple members, list the DNs. Each DN must be on a separate line.
To update the settings dynamically, issue the following ldapexop command:
ldapexop -D cn=root -w root -op readconfig -scope subtree cn=AdminGroup,cn=Configuration
9.11 ibmslapd command parameters
The ibmslapd command has two parameters on UNIX systems and an additional two parameters on Windows systems. The following parameters are common to both platforms:
-h <debug_mask>
This causes ibmslapd to generate debug output to stdout. The debug_mask is a bit mask that controls which output is generated with values up to 65535. This parameter is for use by IBM service personnel. See “Server debug mode” on page 214 for more information on the use of this parameter.
-f <path_to_configuration_file>
This specifies the location of the configuration file used when starting the server. This parameter is used if you want to use a customized configuration file. If not specified, ibmslapd defaults to the platform dependent location where the configuration file was installed.
Additional parameters for Windows systems are:
•-i <servicename>
This installs IBM Directory as service on the server.
•-u <servicename>
This removes IBM Directory as service from the server.
Server debug mode
If the error logs do not provide enough information to resolve a problem, you can run the IBM Tivoli Directory Server in a special debug mode that generates very detailed information. The server executable ibmslapd must be run from a command prompt to enable debug output. Be careful not to run in debug mode for long periods of time. This will generate a large amount of data and could easy fill up the max file size of 2 Gb. When this happens, the LDAP will not accept any new connections or log any more data to the file. The way to fix this would be to stop and re-start ibmslapd. When doing this make sure you copy or rename the trace file before you restart ibmslapd. If you do not rename it or copy it, then it will be erased and overwritten with the new trace file.
The syntax is as follows:
ldtrc on
ibmslapd -h bitmask
Where the specified bitmask value determines which categories of debug output are generated, as shown in Table 9-2.
For example, specifying a bitmask value of 65535 turns on full debug output and generates the most complete information. When you are finished, issue the following command at a command prompt:
ldtrc off
It is recommended that you contact IBM Service for assistance with interpreting the debug output and resolving of the problem.
Table 9-2 ibmslapd bitmask values and descriptions
|
Hex
|
Decimal
|
Value
|
Description
|
|
0x0001
|
1
|
LDAP_DEBUG_TRACE
|
Entry and exit from routines
|
|
0x0002
|
2
|
LDAP_DEBUG_PACKETS
|
Packet activity
|
|
0x0004
|
4
|
LDAP_DEBUG_ARGS
|
Data arguments from requests
|
|
0x0008
|
8
|
LDAP_DEBUG_CONNS
|
Connection activity
|
|
0x0010
|
16
|
LDAP_DEBUG_BER
|
Encoding and decoding of data
|
|
0x0020
|
32
|
LDAP_DEBUG_FILTER
|
Search filters
|
|
0x0040
|
64
|
LDAP_DEBUG_MESSAGE
|
Messaging subsystem activities and events
|
|
0x0080
|
128
|
LDAP_DEBUG_ACL
|
Access Control List activities
|
|
0x0100
|
256
|
LDAP_DEBUG_STATS
|
Operational statistics
|
|
0x0200
|
512
|
LDAP_DEBUG_THREAD
|
Threading statistics
|
|
0x0400
|
1024
|
LDAP_DEBUG_REPL
|
Replication statistics
|
|
0x0800
|
2048
|
LDAP_DEBUG_PARSE
|
Parsing activities
|
|
0x1000
|
4096
|
LDAP_DEBUG_PERFORMANCE
|
Relational backend performance
statistics
|
|
0x2000
|
8192
|
LDAP_DEBUG_RDBM
|
Relational backend activities (RDBM)
|
|
0x4000
|
16384
|
LDAP_DEBUG_REFERRAL
|
Referral activities
|
|
0x8000
|
32768
|
LDAP_DEBUG_ERROR
|
Error conditions
|
|
0xffff
|
65535
|
LDAP_DEBUG_ANY
|
All levels of debug
|
9.12 Directory administration daemon
The directory administration daemon (ibmdiradm) enables remote management of the IBM Tivoli Directory Server. It must be installed on the machine where the IBM Tivoli Directory Server is installed and must be running continuously. The directory administration daemon accepts requests by way of LDAP extended operations and supports starting, stopping, restarting, and status monitoring of the IBM Tivoli Directory Server. By default, the IBM Directory administration daemon listens on two ports, port 3538 for non-SSL connections and port 3539 for SSL connections, if SSL communication is enabled.
9.12.1 The ibmdiradm command
To start the administration daemon, use the ibmdiradm command.
Synopsis
ibmdiradm [-h debug_mask] [-f path_to_configuration_file]
[-s ssl_port] [-p nonssl_port] [-i servicename | -u servicename]
Description
Starts the administration daemon.
Options
The options are:
•-h debug_mask
Causes ibmdiradm to generate administration daemon debug output to stdout. The debug_mask is a bit mask that controls which output is generated with values up to 65535. This parameter is for use by IBM service personnel. See “Server debug mode” on page 214 for additional information on debug levels.
•-f path_to_configuration_file
Specifies the location of the configuration file used when starting the administration daemon server. This parameter is used if you want to use a customized configuration file. If not specified, ibmdiradm defaults to the platform-dependent location where the configuration file was installed.
•-s ssl_port
Specifies the SSL port.
•-p nonssl_port
Specifies the non-SSL port.
The following two parameters are for Windows systems only:
•-i servicename
Adds the administration daemon as a Windows service.
•-u servicename
Removes the administration daemon as a Windows service.
Stopping the administration daemon
For UNIX-based systems, run the following commands:
ps -ef |grep ibmdiradm
kill -p pid_obtained_by_previous_commnand
For Windows systems:
1. Through the Control Panel, open the Services window.
2. Click Directory Admin Daemon.
3. Click Action → Stop.
9.12.2 Starting the directory administration daemon
|
Note: By default, the administration daemon is running when you install the IBM Tivoli Directory Server.
|
For UNIX-based and Windows-based systems issue the command:
ibmdiradm
For Windows-based systems the directory administration daemon can be started from the control panel (Control Panel → Services, select IBM Directory Admin Daemon, click Start).
|
Note: If you enable SSL communication, the directory administration daemon must be stopped and restarted for SSL to take effect.
|
9.12.3 Stopping the directory administration daemon
If you have already configured a directory administration DN and password, you can use the ibmdirctl command to stop the administration daemon. This command is not platform specific.
ibmdirictl -D <adminDN> -w <adminPW> admstop
For UNIX-based systems the directory administration daemon can also be stopped by:
ps -ef | grep ibmdiradm
kill -p <pid obtained by previous command>
For Windows-based systems the directory administration daemon can also be stopped through the control panel (Control Panel → Services, select IBM Directory Admin Daemon, click Stop).
9.12.4 Administration daemon error log
The admin daemon error log logs messages pertaining to the ITDS 52 administration daemon. ibmdiradm is a lightweight version of ibmslapd, which would be needed in case you need to control the server remotely. ibmdiradm runs as a daemon on the server and helps remote clients to pass on the start/stop/restart requests to the server. It listens on port 3538 by default for non-SSL communications and over port 3539 by default for the SSL communications. On Windows, the administration daemon is also installed as a service, in addition to the command line version of ibmdiradm. The name of the service is IBM Tivoli Directory Admin Daemon V5.2. The basic use of ibmdiradm is that it is a prerequisite service/daemon for a remote Web Administration GUI to communicate with the server (ibmslapd). If the Web Administration GUI is local to ibmslapd, then there is no necessity of ibmdiradm to be running for the GUI to communicate to the server.
To control the ibmdiradm you would need to use another command-line utility, known as ibmdirctl. The details of ibmdirctl will be provided in the next section (Figure 9.13 on page 227), but for now refer to Figure 9-7 on page 219 to see which utility controls the other.

Figure 9-7 Figure depicting the processes for regulating ibmdiradm & ibmslapd
The next question would be why do we need the administration log at all? Well, the answer is quite simple. There are occasions when you need to control your server remotely. There may be issues associated with the remote handling of server, like the ibmdiradm is not able to start ibmslapd. The administration daemon log is handy in such situations, as we can get to know the probable causes of failure. The problem may be that the server is not configured properly, due to which the server is compelled to start in configuration mode. In such a situation ibmdiradm would flash an error saying that it was not able to start the server. You may check out the administration daemon log for getting the relevant details and consequently fix the problem.
Modifying administration daemon error log settings
There are two ways to update the administration daemon error log settings.
Using the Web Administration
Refer to Figure 9-8 on page 220, and perform the following steps:
1. Expand Logs in the navigation area, click Modify admin daemon log settings.
2. Enter the path and file name for the administration daemon error log. Typically this is the ibmdiradm.log file located in the var/ldap/ directory. Ensure that the file exists on the LDAP server and that the path is valid.
|
Note: var/ldap/ibmdiradm.log is the default administration daemon error log for UNIX systems and installpathvaribmdiradm.log is the default administration daemon error log for Windows systems.
|
3. Click OK to apply your changes or click Cancel to return to the IBM Tivoli Directory Server Web Administration Welcome panel without making any changes.
4. If you click OK, a message is displayed to remind you that you need to restart the server. Click OK to return to the IBM Tivoli Directory Server Web Administration Welcome panel.
5. You must stop the server for changes to take effect. After stopping the server you must also stop and start the administration daemon locally to resynchronize the ports.
For UNIX systems:
ibmdirctl -D <AdminDN> -w <Adminpw> admstop
ibmdiradm
For Windows systems:
– If you are running ibmdiradm as a service:
Through the Control Panel, open the Services window.
i. Click Directory Admin Daemon.
ii. Click Action → Stop.
iii. Click Directory Admin Daemon.
iv. Click Action → Start.
– If you are running ibmdiradm as a separate process, you just need to kill the current process of ibmdiradm and run it again.
Restart the server.

Figure 9-8 Settings for the admin daemon log
Using the command line
Issue the command:
ldapmodify -D <adminDN> -w >adminPW> -i <filename>
Where <filename> contains:
dn: cn=Admin, cn=Configuration
changetype: modify
replace: ibm-slapdErrorLog
ibm-slapdErrorLog: <newpathname>
You must stop the server for changes to take effect. After stopping the server you must also stop and start the administration daemon locally to resynchronize the ports. Start the server. The sequence of the commands to do the same is as follows:
ibmdirctl -D <adminDN> -w <adminPW> -p 389 stop
ibmdirctl -D <adminDN> -w <adminPW> admstop
ibmdiradm
ibmdirctl -D <adminDN> -w <adminPW> start
Viewing the administration daemon error log
Use the following procedures to view the administration daemon error log.
Using Web Administration
Refer to Figure 9-9, and perform the following steps:
1. Expand Logs in the navigation area, then click View admin daemon log.
2. The panel displays the first page of the administration daemon log and the navigation arrows at the bottom of the panel enable you to go to the next page or to the previous page. From the menu, you can select a specific page, for example Page 6 of 16, and click Go to display that page of the administration daemon log.
3. From the Web administration tool you can also:
a. Click Refresh to update the entries in the log.
b. Click Clear log to delete all entries in the administration daemon log.
c. Click Close to return to the IBM Tivoli Directory Server Web Administration Welcome panel.

Figure 9-9 Contents of the admin daemon log
Using the command line
To view the administration daemon error log issue the following command:
more /var/ldap/ibmdiradm.log
Where /var/ldap/ibmdiradm.log is your administration daemon error log.
|
Note: /var/ldap/ibmdiradm.log is the default administration daemon error log for UNIX systems and installpathvaribmdiradm.log is the default administration daemon error log for Windows systems.
|
Dynamically view and clear administration daemon error log
To dynamically view and clear the administration daemon error log, the following commands can be used from the command line. See Example 9-5 and Example 9-6 for sample output from these commands.
ldapexop -D <adminDN> -w <adminPW> -op readlog -log ibmdiradm -lines all
ldapexop -D <adminDN> -w <adminPW> -op clearlog -log ibmdiradm
Example 9-5 ldapexop command viewing the log
E:>ldapexop -D cn=root -w secret -op readlog -log ibmdiradm -lines all
Feb 22 00:21:06 2004 Attempt to bind failed; errno 22 (Invalid argument).
Feb 22 00:21:06 2004 SocketInit failed for port 3538.
Feb 22 00:21:06 2004 Terminating server.
Mar 03 20:39:11 2004 Open of SSL key database file F:Keysserver.kdb failed.
Mar 03 20:39:11 2004 Terminating server.
Mar 04 08:46:56 2004 Open of SSL key database file F:Keysserver.kdb failed.
Mar 04 08:46:56 2004 Terminating server.
Mar 04 09:01:11 2004 Open of SSL key database file F:Keysserver.kdb failed.
Mar 04 09:01:11 2004 Terminating server.
Mar 04 09:05:58 2004 Open of SSL key database file F:Keysserver.kdb failed.
Mar 04 09:05:58 2004 Terminating server.
Mar 04 09:08:10 2004 Open of SSL key database file F:Keysserver.kdb failed.
Mar 04 09:08:10 2004 Terminating server.
Mar 04 09:08:40 2004 Open of SSL key database file F:Keysserver.kdb failed.
Mar 04 09:08:40 2004 Terminating server.
Example 9-6 ldapexop command clearing the log
E:>ldapexop -D cn=root -w secret -op clearlog -log ibmdiradm
ibmdiradm log file cleared.
E:>ldapexop -D cn=root -w secret -op readlog -log ibmdiradm -lines all
Mar 18 08:18:51 2004 Log file cleared.
Administration daemon audit logging
We can audit the operations or transactions that are performed between clients and the directory server via the administration daemon, ibmdiradm. This has again the same uses as we had seen for audit log. We can get a detailed set of timestamped activities occurring on the server. Timestamps obviously play a vital role during problem determination.
|
Note: Members of the administrative group can view the administration daemon audit log and settings but not modify them. Only the root administrator is enabled to access. Change or clear the administration daemon audit log files.
|
Administration daemon audit log and administration audit log
To enable the administration daemon audit log you can use the we administration tool, or the command line.
Using Web Administration
Refer to Figure 9-10 on page 224, and perform the following steps to enable the administration audit log and modify the administration audit log settings:
1. Expand Logs in the navigation area, click Modify admin daemon audit log settings.
2. Select Enable admin daemon audit logging to use the audit log utility with the administration daemon.
|
Note: The default setting is enabled. You only need to select the check box if you have previously disabled the administration daemon audit log.
|
3. Enter the path and file name for the administration daemon audit log. Typically this is the adminAudit.log file located in the /var/ldap/ directory. Ensure that the file exists on the ldap server and that the path is valid.
|
Note: /var/ldap/adminAudit.log is the default administration daemon audit log for UNIX systems and installpathvaradminAudit.log is the default administration daemon audit log for Windows systems.
|
4. Click OK to apply your changes or click Cancel to return to the IBM Tivoli Directory Server Web Administration Welcome panel without making any changes.
5. If you click OK, a message is displayed to remind you that you need to restart the server. Click OK to return to the IBM Tivoli Directory Server Web Administration Welcome panel.
6. You must stop the server for changes to take effect. After stopping the server you must also stop and start the administration daemon locally to resynchronize the ports.
For UNIX systems:
ibmdirctl -D <AdminDN> -w <Adminpw> admstop
ibmdiradm
For Windows systems:
– If you are running ibmdiradm as a service:
Through the Control Panel, open the Services window.
i. Click Directory Admin Daemon.
ii. Click Action → Stop.
iii. Click Directory Admin Daemon.
iv. Click Action → Start.
– If you are running ibmdiradm as a separate process, you just need to kill the current process of ibmdiradm and run it again.
Restart the server.

Figure 9-10 Settings for the admin daemon audit log
Using the command line
Issue the command:
ldapmodify -D <adminDN> -w <adminPW> -i <filename>
Where <filename> contains:
dn: cn=Admin Audit, cn=Configuration
changetype: modify
replace: ibm-audit
ibm-audit: true
-
replace: ibm-auditLog
ibm-auditLog: <newpathname>
You must stop the server for changes to take effect. After stopping the server you must also stop and start the administration daemon locally to resynchronize the ports. Restart the server.
ibmdirctl -D <AdminDN> -w <adminPW> -p 389 stop
ibmdirctl -D <AdminDN> -w <adminPW> admstop
ibmdiradm
ibmdirctl -D <AdminDN> -w <adminPW> start
Disabling the administration daemon audit log
To disable audit logging perform the steps in one of the following methods:
Using Web Administration
To use this:
1. Expand Logs in the navigation area, click Modify admin daemon audit log settings.
2. Deselect Enable admin daemon audit logging.
3. Click OK to apply your changes or click Cancel to return to the IBM Tivoli Directory Server Web Administration Welcome panel without making any changes.
The panel where you would be making these settings is same as the one shown in Figure 9-10 on page 224.
Using the command line
Issue the command:
ldapmodify -D <adminDN> -w <adminPW> -i <filename>
Where <filename> contains:
cn=Admin Audit, cn=Configuration
changetype: modify
replace: ibm-audit
ibm-audit: false
|
Note: If you are using administration daemon audit logging in configuration-only mode, the DN specified is dn: cn=audit, cn=configuration. Any changes made to this DN are overwritten with the dn: cn=audit, cn=localhost values when the server is started in normal mode.
|
Viewing the administration daemon audit log
Use one of the following procedures to view the administration daemon audit log.
Using Web Administration
Refer to Figure 9-11, and perform the following steps:
1. Expand Logs in the navigation area, then click View admin daemon audit log.
2. The panel displays the first page of the administration daemon audit log and the navigation arrows at the bottom of the panel enable you to go to the next page or to the previous page. From the menu, you can select a specific page, for example Page 6 of 16, and click Go to display that page of the administration daemon audit log.
3. From the Web administration tool, you can:
a. Click Refresh to update the entries in the log.
b. Click Clear log to delete all entries in the administration daemon audit log.
c. Click Close to return to the IBM Tivoli Directory Server Web Administration Welcome panel.
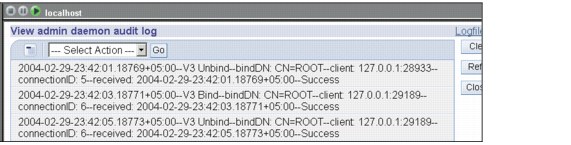
Figure 9-11 Contents of the admin daemon audit log
Using the command line
To view the administration daemon audit log issue the following command:
more /var/ldap/adminAudit.log
Where var/ldap/adminAudit.log is your administration daemon log.
|
Note: /var/ldap/adminAudit.log is the default administration daemon log for UNIX systems and installpathvaradminAudit.log is the default administration daemon log for Windows systems.
|
To dynamically view and clear the administration daemon audit log, the following commands can be used from the command line. See Example 9-7 and Example 9-8 for sample output from these commands.
ldapexop -D <adminDN> -w <adminPW> -op readlog -log adminAudit -lines all
ldapexop -D <adminDN> -w <adminPW> -op clearlog -log adminAudit
Example 9-7 ldapexop command to view the administration audit log
E:>ldapexop -D cn=root -w secret -op readlog -log adminAudit -lines all | head -5
2004-03-03-06:29:54.55220+05:00--V3 Bind--bindDN: CN=ROOT--client: 127.0.0.1:34056--connectionID: 12--received: 2004-03-03-06:29:54.55220+05:00--Success
2004-03-03-06:29:54.55220+05:00--V3 Unbind--bindDN: CN=ROOT--client: 127.0.0.1:34056--connectionID: 12--received: 2004-03-03-06:29:54.55220+05:00--Success
2004-03-03-06:29:59.55225+05:00--V3 Bind--bindDN: CN=ROOT--client: 127.0.0.1:34312--connectionID: 13--received: 2004-03-03-06:29:59.55225+05:00--Success
2004-03-03-15:09:03.076+05:00--Audit logging started.
2004-03-04-03:16:53.43747+05:00--Audit logging started.
2004-03-04-03:31:08.44602+05:00--Audit logging started.
As seen in Example 9-7, the messages logged appear the same as they were for the error log. This log is, however, pertaining to transactions with ibmslapd through ibmdiradm.
Example 9-8 ldapexop command to clear the administration audit log
E:>ldapexop -D cn=root -w secret -op clearlog -log adminAudit
adminAudit log file cleared.
E:>ldapexop -D cn=root -w secret -op readlog -log adminAudit -lines all
Mar 18 08:25:20 2004 Log file cleared.
9.13 The ibmdirctl command
This is the administration daemon control program. The administration daemon (ibmdiradm) must be running.
|
Note: Only the administrator may use this utility.
|
Syntax
The syntax is:
ibmdirctl [-D adminDN] [-h hostname] [-K keyfile] [ -N key_name ]
[-p port] [-v] [-w adminPW | ?] [-Z] [-?]
command -- [ibmslapd options]
Where command is {start|stop|restart|status|admstop}.
Description
The administration daemon control program, ibmdirctl, is used to start, stop, restart or query the status of the IBM Tivoli Directory Server. It can also be used to stop the administration daemon.
To display syntax help for ibmdirctl, type ibmdirctl -?.
Options
The options are:
•-D adminDN
Use adminDN to bind to the LDAP directory. The adminDN is a string-represented DN (see LDAP Distinguished Names).
•-h hostname
Specify an alternate host on which the ldap server and the admin daemon are running.
•-K keyfile
Specifies the file to use for keys.
•-N key_name
Specifies the private key name to use in keyfile.
•-p port
Specify an alternate TCP port where the admin daemon is listening. The default LDAP port is 3538.
•-v
Specifies to run in verbose mode.
•-w adminPW | ?
Use adminPW as the password for authentication. Use the ? to generate a password prompt. Using this prompt prevents your password from being visible through the ps command. Refer to
•-?
Displays the help screen
•command
– start - Starts the server
– stop - Stops the server
– restart - Stops then starts the server
– status - Queries the status the server
– admstop - Stops the IBM Tivoli Directory Server administration daemon
|
Note: The stop command may be issued directly to the LDAP server.
If the admstop command is issued successfully, the IBM Tivoli Directory Server Administration Daemon must be restarted manually.
|
•-- ibmslapd options
The ibmslapd options are any options the ibmslapd process takes at startup time, typically:
– -a | -A - Starts the server in configuration only mode
– -n | -N - Does not start the server, if the server is unable to start with the database backends (no configuration only mode)
|
Note: If ibmslapd options are requested, they must be preceded by the --.
The ibmslapd options are ignored if the stop command is issued.
|
|
Note: The -n and -N options prevent the server from starting if the server is unable to start with the database backends (not in configuration only mode).
|
To start the server in configuration-only mode issue the command:
ibmdirctl -h mymachine -D myDN -w mypassword -p 3538 start -- -a
To stop the server issue the command:
ibmdirctl -h mymachine -D myDN -w mypassword -p 3538 stop
To stop and start the LDAP Server with out showing the password:
C:>ibmdirctl -D cn=root -w ? stop
Enter password ==> <password is not shown when typed>
Stop operation succeeded
C:>ibmdirctl -D cn=root -w ? start
Enter password ==> <password is not shown when typed>
Start operation succeeded
9.14 Manual installation of IBM WAS - Express
If you use the InstallShield GUI to install the Web Administration Tool, you can select the embedded version of IBM WebSphere Application Server - Express for installation. In this case, configuration is also done automatically. If you use native installation methods, you can install and configure the embedded version of IBM WebSphere Application Server - Express manually. If you already have the embedded version of IBM WebSphere Application Server - Express V5.0.2 installed, you must configure manually before you can use the Web Administration Tool.
9.14.1 Manually installing the Web Administration Tool
To manually install the embedded version of WebSphere Application Server - Express, use the following procedure:
1. After you download and unzip (or untar) the IBM Tivoli Directory Server zip or tar file, change directories to the directory where you expanded the file.
2. Type the following command at a command prompt:
On Windows platforms:
install.bat -installRoot embWASE_installpath -hostName localhost
On UNIX platforms:
install.sh -installRoot embWASE_installpath -hostName localhost
Where embWASE_installpath is the directory where you are installing the embedded version of IBM WebSphere Application Server - Express. By convention, this directory is the appsrv subdirectory of the directory where IBM Tivoli Directory Server is installed, but you can use any directory.
After installing the Web Administration Tool, copy the Web Administration Tool to the embedded version of IBM WebSphere Application Server - Express directory by using the following commands:
mkdir embWASE_installpath/installableApps/
cp installpath/idstools/IDSWebApp.war embWASE_installpath/installableApps/
Where:
•embWASE_installpath is the directory where you are installing the embedded version of WebSphere Application Server - Express.
•installpath is the directory where IBM Tivoli Directory Server is installed.
Install the Web Administration Tool into the embedded version of IBM WebSphere Application Server - Express by using the following command:
•On Windows systems:
|
Note: Type the command on one line.
|
"embWASE_installpathinwsadmin.bat" -conntype NONE -c "$AdminApp install {embWASE_installpathinstallableAppsIDSWebApp.war}
{-configroot "embWASE_installpathconfig"
-node DefaultNode -usedefaultbindings -nodeployejb -appname IDSWebApp.war -contextroot "IDSWebApp"}"
•On UNIX systems:
|
Note: Type the command on one line.
|
embWASE_installpath/bin/wsadmin.sh -conntype NONE -c "$AdminApp install {embWASE_installpath/installableApps/IDSWebApp.war}
{-configroot "embWASE_installpath/config"
-node DefaultNode -usedefaultbindings -nodeployejb -appname IDSWebApp.war -contextroot "IDSWebApp"}"
|
Note: If you install the Web Administration Tool and the embedded version of WebSphere Application Server - Express through the InstallShield GUI, these commands are run automatically.
|
9.14.2 Manually uninstalling the Web Administration Tool
To manually uninstall Web Administration Tool from the embedded version of IBM WebSphere Application Server - Express, use the following procedure:
1. Be sure that the application server is started.
2. Type the following at a command prompt to uninstall the Web Administration Tool:
– On Windows platforms:
|
Note: Type the command on one line.
|
embWASE_installpathinwsadmin.bat -conntype NONE -c "$AdminApp uninstall IDSWebApp.war"
– On UNIX platforms:
|
Note: Type the command on one line.
|
embWASE_installpath/bin/wsadmin.sh -conntype NONE -c "$AdminApp uninstall IDSWebApp.war"
Where embWASE_installpath is the path where you installed the embedded version of WebSphere Application Server - Express.
9.14.3 Default ports used by IBM WAS - Express
The embedded version of WebSphere Application Server - Express uses four default port settings:
Http Transport (port 1): 9080
Http Transport (port 2): 9443
Bootstrap/rmi port: 2809
Soap connector port: 8880
If a conflict exists with another application using one or more of these default ports, you can use a text editor to change from the default ports to unused ports.
Http Transport port 1
Find the line containing the port number 9080 in the following files and replace the 9080 with the port number that you want:
$WASHOMEappsrvconfigcellsDefaultNode
odesDefaultNodeserversserver1server.xml
$WASHOMEappsrvconfigcellsDefaultNodevirtualhosts.xml
Where $WASHOME is the directory where the embedded version of WebSphere Application Server - Express is installed.
Http Transport port 2
Find the line containing the port number 9443 in the following files and replace the 9443 with the port number that you want:
$WASHOMEconfigcellsDefaultNode
odesDefaultNodeserversserver1server.xml
$WASHOMEconfigcellsDefaultNodevirtualhosts.xml
Where $WASHOME is the directory where the embedded version of WebSphere Application Server - Express is installed.
Bootstrap/rmi port
Find the line containing the port number 2809 in the following file and replace the 2809 with the port number that you want:
$WASHOMEconfigcellsDefaultNode
odesDefaultNodeserverindex.html
Where WASHOME is the directory where the embedded version of WebSphere Application Server - Express is installed.
Soap connector port
Find the line containing the port number 8880 in the following file and replace the 8880 with the port number that you want:
$WASHOMEconfigcellsDefaultNode
odesDefaultNodeserverindex.html
Where WASHOME is the directory where the embedded version of WebSphere Application Server - Express is installed.
HTTP and HTTPS Ports
The embedded version of WebSphere Application Server - Express, V5.0.2 comes with HTTPS set up by default on port 9443. To use HTTPS, you must change your login URL to the following:
https://<hostname>:9443/IDSWebApp/IDSjsp/Login.jsp
For non-HTTPS connections, continue to use the URL:
http://<hostname>:9080/IDSWebApp/IDSjsp/Login.jsp
Additionally, if you want to change the application server’s SSL certificate, you can create new key and trust store database files for the embedded version of WebSphere Application Server - Express to use. By default, the key and trust store database files are separate and are located in the <WASHOME>/etc directory. These files are named DummyServerKeyFile.jks and DummyServerTrustFile.jks respectively.
After you have created your new Java keystore files, you can change the key and trust store database files that WAS uses by modifying the <WASHOME>/config/cells/DefaultNode/security.xml file to use your new file names, passwords, and file formats. In Example 9-9, refer to the highlighted lines that indicate what gets modified in the security.xml file.
Example 9-9 security.xml file
<repertoire xmi:id="SSLConfig_1" alias="DefaultSSLSettings">
<setting xmi:id="DefaultSSLSettings"
keyFileName="${USER_INSTALL_ROOT}/etc/DummyServerKeyFile.jks"
keyFilePassword="WebAS" keyFileFormat="JKS"
trustFileName="${USER_INSTALL_ROOT}/etc/DummyServerTrustFile.jks"
trustFilePassword="WebAS" trustFileFormat="JKS"
clientAuthentication="false" securityLevel="HIGH"
enableCryptoHardwareSupport="false">
<cryptoHardware xmi:id="CryptoHardwareToken_1" tokenType=""
libraryFile="" password=""/>
<properties xmi:id="Property_4" name="com.ibm.ssl.protocol" value="SSLv3"/>
<properties xmi:id="Property_5" name="com.ibm.ssl.contextProvider"
value="IBMJSSE"/>
</setting>
</repertoire>
9.15 Installing in WebSphere Version 5.0 or later
If you use WebSphere, you must install the Web Administration Tool into WebSphere. Use the following instructions as a guide:
1. Install WebSphere, using the installation information provided with it.
2. Install the Web Administration Tool using either the InstallShield GUI or the installation utility for your operating system. The file containing the Web Administration Tool is named IDSWebApp.war, and it is in the idstools subdirectory of the installation directory that was specified during installation.
3. Install the Web Administration Tool application into WebSphere, using the information provided with WebSphere. For example, if you use the Administrative Console, on the Install New Application window, set the Local path to installdirectory/idstools/IDSWebApp.war, and the Context root to /IDSWebApp. installdirectory is the directory you specified when installing the Web Administration Tool.
4. Start the Web Administration Tool (for example, through the Administrative Console).
5. From a Web browser, type the following address:
http://localhost:9080/IDSWebApp/IDSjsp/Login.jsp
The IBM Tivoli Directory Server Web Administration login page window is displayed.
|
Note: This address works only if you are running the browser on the computer on which the Web Administration Tool is installed. If the Web Administration Tool is installed on a different computer, replace localhost with the hostname or IP address of the computer where the Web Administration Tool is installed.
One problem found was if you are running the browser on the computer on which the Web Administration Tool is installed and you are using an IP address or hostname as part of the URL used to access the Web Administration Tool you might get errors trying to connect. To fix this use localhost:9080 instead of the IP address or hostname and you will not have any problems.
|
..................Content has been hidden....................
You can't read the all page of ebook, please click here login for view all page.